|
|
Needs Expansion |

Contents
- Introduction
- Target Audience
-
System Logs
- Authorization Log
- Daemon Log
- Debug Log
- Kernel Log
- Kernel Ring Buffer
- System Log
-
Application Logs
- Apache HTTP Server Logs
- CUPS Print System Logs
- Rootkit Hunter Log
- Samba SMB Server Logs
- X11 Server Log
-
Non-Human-Readable Logs
- Login Failures Log
- Last Logins Log
- Login Records Log
-
System Logging Daemon (syslogd)
- Configuration of syslogd
- Echoing Messages to syslogd With Logger
- Log Rotation
-
Essential Commands
- Getting Started
- Editing Files
- Viewing Files
- Viewing the Beginning of Files
- Viewing the End of Files
- Watching a Changing File
- Searching Files
-
Resources
- Local System Resources
- WWW Resources
Introduction
One of the things which makes GNU/Linux a great operating system is that virtually anything and everything happening on and to the system may be logged in some manner. This information is invaluable for using the system in an informed manner, and should be one of the first resources you use to trouble-shoot system and application issues. The logs can tell you almost anything you need to know, as long as you have an idea where to look first.
Your Ubuntu system provides vital information using various system log files. These log files are typically plain ASCII text in a standard log file format, and most of them sit in the traditional system log subdirectory /var/log. Many are generated by the system log daemon, syslogd on behalf of the system and certain applications, while some applications generate their own logs by writing directly to files in /var/log.
This guide talks about how to read and use several of these system log files, how to use and configure the system logging daemon, syslogd, and how log rotation works. See the Resources section for additional information.
Target Audience
This guide will be simple enough to use if you have any experience using the console and editing text files using a text editor. See the end of this document for some essential commands that may help you find your way around these files if you’re relatively new to the command line.
System Logs
System logs deal primarily with the functioning of the Ubuntu system, not necessarily with additional applications added by users. Examples include authorization mechanisms, system daemons, system messages, and the all-encompassing system log itself, syslog.
The Authorization Log tracks usage of authorization systems, the mechanisms for authorizing users which prompt for user passwords, such as the Pluggable Authentication Module (PAM) system, the sudo command, remote logins to sshd and so on. The Authorization Log file may be accessed at /var/log/auth.log. This log is useful for learning about user logins and usage of the sudo command.
Use grep to cut down on the volume. For example, to see only information in the Authorization Log pertaining to sshd logins, use this:
grep sshd /var/log/auth.log | less
Daemon Log
A daemon is a program that runs in the background, generally without human intervention, performing some operation important to the proper running of your system. The daemon log at /var/log/daemon.log and contains information about running system and application daemons such as the Gnome Display Manager daemon gdm, the Bluetooth HCI daemon hcid, or the MySQL database daemon mysqld. This can help you trouble-shoot problems with a particular daemon.
Again, use grep to find specific information, plugging in the name of the daemon you’re interested in.
Debug Log
The debug log at /var/log/debug and provides detailed debug messages from the Ubuntu system and applications which log to syslogd at the DEBUG level.
Kernel Log
The kernel log at /var/log/kern.log provides a detailed log of messages from the Ubuntu Linux kernel. These messages may prove useful for trouble-shooting a new or custom-built kernel, for example.
Kernel Ring Buffer
The kernel ring buffer is not really a log file per se, but rather an area in the running kernel you can query for kernel bootup messages via the dmesg utility. To see the messages, use this:
dmesg | less
Or to search for lines that mention the Plug & Play system, for example, use grep like this:
dmesg | grep pnp | less
By default, the system initialization script /etc/init.d/bootmisc.sh sends all bootup messages to the file /var/log/dmesg as well. You can view and search this file the usual way.
System Log
The system log typically contains the greatest deal of information by default about your Ubuntu system. It is located at /var/log/syslog, and may contain information other logs do not. Consult the System Log when you can’t locate the desired log information in another log. It also contains everything that used to be in /var/log/messages.
Application Logs
Many applications also create logs in /var/log. If you list the contents of your /var/log subdirectory, you will see familiar names, such as /var/log/apache2 representing the logs for the Apache 2 web server, or /var/log/samba, which contains the logs for the Samba server. This section of the guide introduces some specific examples of application logs, and information contained within them.
Apache HTTP Server Logs
The default installation for Apache2 on Ubuntu creates a log subdirectory: /var/log/apache2. Within this subdirectory are two log files with two distinct purposes:
-
/var/log/apache2/access.log — records of every page served and every file loaded by the web server.
-
/var/log/apache2/error.log — records of all error conditions reported by the HTTP server
By default, every time Apache accesses a file or page, the access logs record the IP address, time and date, browser identification string, HTTP result code and the text of the actual query, which will generally be a GET for a page view. Look at the Apache documentation for a complete rundown; quite a lot can be gleaned from this file, and indeed many statistical packages exist that perform analyses of these logs.
Also, every time any error occurs, Apache adds a line to the error log. If you run PHP with error and warning messages disabled, this can be your only way to identify bugs.
CUPS Print System Logs
The Common Unix Printing System (CUPS) uses the default log file /var/log/cups/error_log to store informational and error messages. If you need to solve a printing issue in Ubuntu, this log may be a good place to start.
Rootkit Hunter Log
The Rootkit Hunter utility (rkhunter) checks your Ubuntu system for backdoors, sniffers and rootkits, which are all signs of compromise of your system. The log rkhunter uses is located at /var/log/rkhunter.log.
Samba SMB Server Logs
The Server Message Block Protocol (SMB) server, Samba is popularly used for sharing files between your Ubuntu computer and other computers which support the SMB protocol. Samba keeps three distinct types of logs in the subdirectory /var/log/samba:
-
log.nmbd — messages related to Samba’s NETBIOS over IP functionality (the network stuff)
-
log.smbd — messages related to Samba’s SMB/CIFS functionality (the file and print sharing stuff)
-
log.[IP_ADDRESS] — messages related to requests for services from the IP address contained in the log file name, for example, log.192.168.1.1.
X11 Server Log
The default X11 Windowing Server in use with Ubuntu is the Xorg X11 server, and assuming your computer has only one display defined, it stores log messages in the file /var/log/Xorg.0.log. This log is helpful for diagnosing issues with your X11 environment.
Non-Human-Readable Logs
Some log files found in the /var/log subdirectory are designed to be readable by applications, not necessarily by humans. Some examples of such log files which appear in /var/log follow.
Login Failures Log
The login failures log located at /var/log/faillog is actually designed to be parsed and displayed by the faillog command. For example, to print recent login failures, use this:
faillog
Last Logins Log
The last logins log at /var/log/lastlog should not typically be parsed and examined by humans, but rather should be used in conjunction with the lastlog command. For example to see a listing of logins with the lastlog command, displayed one page per screen with the less command, use the following command:
lastlog | less
Login Records Log
The file /var/log/wtmp contains login records, but unlike /var/log/lastlog above, /var/log/wtmp is not used to show a list of recent logins, but is instead used by other utilities such as the who command to present a listed of currently logged in users. This command will show the users currently logged in to your machine:
who
System Logging Daemon (syslogd)
The system logging daemon syslogd, also known as sysklogd, awaits logging messages from numerous sources and routes the messages to the appropriate file or network destination. Messages logged to syslogd usually contain common elements like system hostnames and time-stamps in addition to the specific log information.
Configuration of syslogd
The syslogd daemon’s configuration file is /etc/syslog.conf. Each entry in this file consists of two fields, the selector and the action. The selector field specifies a facility to be logged, such as for example the auth facility which deals with authorization, and a priority level to log such information at, such as info, or warning. The action field consists of a target for the log information, such as a standard log file (i.e. /var/log/syslog), or the hostname of a remote computer to send the log information to.
Echoing Messages to syslogd With Logger
A neat utility exists in the logger tool, which allows one to place messages into the System Log (i.e. /var/log/syslog) arbitrarily. For example, assume your user name is buddha, and you would like to enter a message into the syslog about a particularly delicious pizza you’re eating, you could use a command such as the following at a terminal prompt:
logger This Pizza from Vinnys Gourmet Rocks
and you would end up with a line in the /var/log/syslog file like this:
Jan 12 23:34:45 localhost buddha: This Pizza from Vinnys Gourmet Rocks
You can even specify a tag the messages come from, and redirect the output standard error too.
#
# sample logger error jive
#
logmsg="/usr/bin/logger -s -t MyScript "

# announce what this script is, even to the log
$logmsg "Directory Checker FooScript Jive 1.0"

# test for the existence of Fred's home dir on this machine
if [ -d /home/fred ]; then
   $logmsg "I. Fred's Home Directory Found"
else
   $logmsg "E. Fred's Home Directory was NOT Found. Boo Hoo."
   exit 1
fi
Executing this script as chkdir.sh on the machine butters where Fred does not have a home directory, /home/fred, gives the following results:
bumpy@butters:~$./chkdir.sh
MyScript: Directory Checker FooScript Jive 1.0
MyScript: E. Fred's Home Directory was NOT Found. Boo Hoo.
bumpy@butters:~$tail -n 2 /var/log/syslog
Jan 12 23:23:11 localhost MyScript: Directory Checker FooScript Jive 1.0
Jan 12 23:23:11 localhost MyScript: E. Fred's Home Directory was NOT Found. Boo Hoo.
So, as you can see, we received the messages both via standard error, at the terminal prompt, and they also appear in our syslog.
Log Rotation
When viewing directory listings in /var/log or any of its subdirectories, you may encounter log files with names such as daemon.log.0, daemon.log.1.gz, and so on. What are these log files? They are ‘rotated’ log files. That is, they have automatically been renamed after a predefined time-frame, and a new original log started. After even more time the log files are compressed with the gzip utility as in the case of the example daemon.log.1.gz. The purpose of log rotation is to archive and compress old logs so that they consume less disk space, but are still available for inspection as needed. What handles this functionality? Why, the logrotate command of course! Typically, logrotate is called from the system-wide cron script /etc/cron.daily/logrotate, and further defined by the configuration file /etc/logrotate.conf. Individual configuration files can be added into /etc/logrotate.d (where the apache2 and mysql configurations are stored for example).
This guide will not cover the myriad of ways logrotate may be configured to handle the automatic rotation of any log file on your Ubuntu system. For more detail, check the Resources section of this guide.
 NOTE: You may also rotate system log files via the cron.daily script /etc/cron.daily/sysklogd instead of using logrotate. Actually, the utility savelog may produce unexpected results on log rotation which configuring logrotate seems to have no effect on. In those cases, you should check the cron.daily sysklogd script in /etc/cron.daily/sysklogd and read the savelog manual page to see if savelog is not in fact doing the rotation in a way that is not what you are specifying with logrotate.
Essential Commands
If you’re new to the console and the Linux command line, these commands will get you up and running to the point where you can work with log files at a basic level.
Getting Started
To change to the log directory, where most of these files sit, use the cd command. This saves having to type out a full path name for every subsequent command:
cd /var/log
Editing Files
You can view and edit files in GEdit or Kate, the simple text editors that come with Ubuntu and Kubuntu respectively, but these can be overkill when all you want to do is look at a file or make simple changes. The easiest editor to use from the console is nano, which is less powerful but also less complicated than vim or emacs. The command to edit a particular logfile /var/log/example.log using nano is:
nano example.log
Press Ctrl+X to exit. It will ask if you want to save your changes when you exit, but unless you run it with the sudo command the files won’t be writable. In general, you won’t want to save your changes to log files, of course.
Viewing Files
To simply look at a file, an editor is overkill. Use the less command, which pages through a file one screen at a time:
less example.log
You don’t need sudo to look at a file. Press h for help, or q to quit. The cursor keys and page up/down keys will work as expected, and the slash key («/») will do a case-sensitive search; the n key repeats the last search.
Viewing the Beginning of Files
To see the first ten lines of a file, use the head command:
head example.log
To see some other number of lines from the beginning of the file, add the -n switch, thus:
head -n 20 example.log
Viewing the End of Files
To see the final ten lines of a file, the analogous command is tail:
tail example.log
Again, the -n switch gives you control over how many lines it displays:
tail -n 20 example.log
Watching a Changing File
Also, the -f («follow») switch puts tail into a loop, constantly waiting for new additions to the file it’s displaying. This is useful for monitoring files that are being updated in real time:
tail -f example.log
Press Ctrl+C to quit the loop.
Searching Files
Because log files can be large and unwieldy, it helps to be able to focus. The grep command helps you strip out only the content you care about. To find all the lines in a file containing the word «system», for example, use this:
grep "system" example.log
To find all the lines containing «system» at the beginning of the line, use this:
grep "^system" example.log
Note the caret symbol, a regular expression that matches only the start of a line. This is less useful for standard log files, which always start with a date and time, but it can be handy otherwise. Not all files have a standard format.
Any time the result of a grep is still too long, you can pipe it through less:
grep "system" example.log | less
Resources
Additional information on system and application logs and syslogd is available via the following resources:
Local System Resources
|
man dmesg |
System manual page for the dmesg kernel ring buffer utility |
|
man faillog |
System manual page for the faillog command (and also the faillog configuration file via man 5 faillog) |
|
man grep |
System manual page for the grep pattern searching utility |
|
man head |
System manual page for the head utility |
|
man klogd |
System manual page for the kernel log daemon (klogd) |
|
man last |
System manual for the last command which shows last logged in users |
|
man less |
System manual page for the less paging utility |
|
man logger |
System manual page for the logger command-line interface to syslog utility |
|
man logrotate |
System manual page for the the logrotate utility |
|
man savelog |
System manual page for the savelog log file saving utility |
|
man syslogd |
System manual page for the system log daemon (syslogd) |
|
man syslog.conf |
System manual page for the syslogd configuration file |
|
man tail |
System manual page for the tail utility |
WWW Resources
Checking Your System Logs with awk
Syslog — Watching Your Logs
http://www.ibm.com/developerworks/linux/library/l-roadmap5/-Linux Logging
Sawing Linux Logs With Simple Tools
CategorySystem
Системные администраторы, да и обычные пользователи Linux, часто должны смотреть лог файлы для устранения неполадок. На самом деле, это первое, что должен сделать любой сисадмин при возникновении любой ошибки в системе.
Сама операционная система Linux и работающие приложения генерируют различные типы сообщений, которые регистрируются в различных файлах журналов. В Linux используются специальное программное обеспечение, файлы и директории для хранения лог файлов. Знание в каких файлах находятся логи каких программ поможет вам сэкономить время и быстрее решить проблему. В этой статье мы рассмотрим основные части системы логирования в Linux, файлы логов, а также утилиты, с помощью которых можно посмотреть логи Linux.
Расположение логов по умолчанию
Большинство файлов логов Linux находятся в папке /var/log/ вы можете список файлов логов для вашей системы с помощью команды ls:
ls -l /var/log/
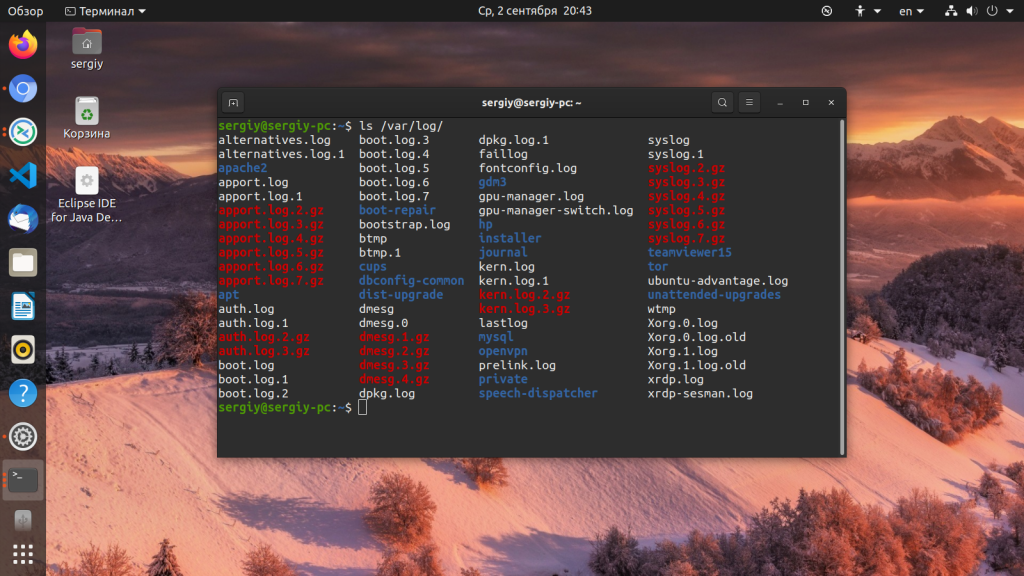
Ниже мы рассмотрим 20 различных файлов логов Linux, размещенных в каталоге /var/log/. Некоторые из этих логов встречаются только в определенных дистрибутивах, например, dpkg.log встречается только в системах, основанных на Debian.
- /var/log/messages — содержит глобальные системные логи Linux, в том числе те, которые регистрируются при запуске системы. В этот лог записываются несколько типов сообщений: это почта, cron, различные сервисы, ядро, аутентификация и другие.
- /var/log/dmesg — содержит сообщения, полученные от ядра. Регистрирует много сообщений еще на этапе загрузки, в них отображается информация об аппаратных устройствах, которые инициализируются в процессе загрузки. Можно сказать это еще один лог системы Linux. Количество сообщений в логе ограничено, и когда файл будет переполнен, с каждым новым сообщением старые будут перезаписаны. Вы также можете посмотреть сообщения из этого лога с помощью команды dmseg.
- /var/log/auth.log — содержит информацию об авторизации пользователей в системе, включая пользовательские логины и механизмы аутентификации, которые были использованы.
- /var/log/boot.log — Содержит информацию, которая регистрируется при загрузке системы.
- /var/log/daemon.log — Включает сообщения от различных фоновых демонов
- /var/log/kern.log — Тоже содержит сообщения от ядра, полезны при устранении ошибок пользовательских модулей, встроенных в ядро.
- /var/log/lastlog — Отображает информацию о последней сессии всех пользователей. Это нетекстовый файл, для его просмотра необходимо использовать команду lastlog.
- /var/log/maillog /var/log/mail.log — журналы сервера электронной почты, запущенного в системе.
- /var/log/user.log — Информация из всех журналов на уровне пользователей.
- /var/log/Xorg.x.log — Лог сообщений Х сервера.
- /var/log/alternatives.log — Информация о работе программы update-alternatives. Это символические ссылки на команды или библиотеки по умолчанию.
- /var/log/btmp — лог файл Linux содержит информацию о неудачных попытках входа. Для просмотра файла удобно использовать команду last -f /var/log/btmp
- /var/log/cups — Все сообщения, связанные с печатью и принтерами.
- /var/log/anaconda.log — все сообщения, зарегистрированные при установке сохраняются в этом файле
- /var/log/yum.log — регистрирует всю информацию об установке пакетов с помощью Yum.
- /var/log/cron — Всякий раз когда демон Cron запускает выполнения программы, он записывает отчет и сообщения самой программы в этом файле.
- /var/log/secure — содержит информацию, относящуюся к аутентификации и авторизации. Например, SSHd регистрирует здесь все, в том числе неудачные попытки входа в систему.
- /var/log/wtmp или /var/log/utmp — системные логи Linux, содержат журнал входов пользователей в систему. С помощью команды wtmp вы можете узнать кто и когда вошел в систему.
- /var/log/faillog — лог системы linux, содержит неудачные попытки входа в систему. Используйте команду faillog, чтобы отобразить содержимое этого файла.
- /var/log/mysqld.log — файлы логов Linux от сервера баз данных MySQL.
- /var/log/httpd/ или /var/log/apache2 — лог файлы linux11 веб-сервера Apache. Логи доступа находятся в файле access_log, а ошибок в error_log
- /var/log/lighttpd/ — логи linux веб-сервера lighttpd
- /var/log/conman/ — файлы логов клиента ConMan,
- /var/log/mail/ — в этом каталоге содержатся дополнительные логи почтового сервера
- /var/log/prelink/ — Программа Prelink связывает библиотеки и исполняемые файлы, чтобы ускорить процесс их загрузки. /var/log/prelink/prelink.log содержит информацию о .so файлах, которые были изменены программой.
- /var/log/audit/— Содержит информацию, созданную демоном аудита auditd.
- /var/log/setroubleshoot/ — SE Linux использует демон setroubleshootd (SE Trouble Shoot Daemon) для уведомления о проблемах с безопасностью. В этом журнале находятся сообщения этой программы.
- /var/log/samba/ — содержит информацию и журналы файлового сервера Samba, который используется для подключения к общим папкам Windows.
- /var/log/sa/ — Содержит .cap файлы, собранные пакетом Sysstat.
- /var/log/sssd/ — Используется системным демоном безопасности, который управляет удаленным доступом к каталогам и механизмами аутентификации.
Чтобы посмотреть логи на Linux удобно использовать несколько утилит командной строки Linux. Это может быть любой текстовый редактор, или специальная утилита. Скорее всего, вам понадобятся права суперпользователя для того чтобы посмотреть логи в Linux. Вот команды, которые чаще всего используются для этих целей:
- less;
- more;
- cat;
- head;
- grep;
- tail;
- zcat;
- zgrep;
- zmore;
- vi;
- nano.
Я не буду останавливаться подробно на каждой из этих команд, поскольку большинство из них уже подробно рассмотрены на нашем сайте. Но приведу несколько примеров. Просмотр логов Linux выполняется очень просто:
Смотрим лог /var/log/dmesg, с возможностью прокрутки:
less /var/log/dmesg
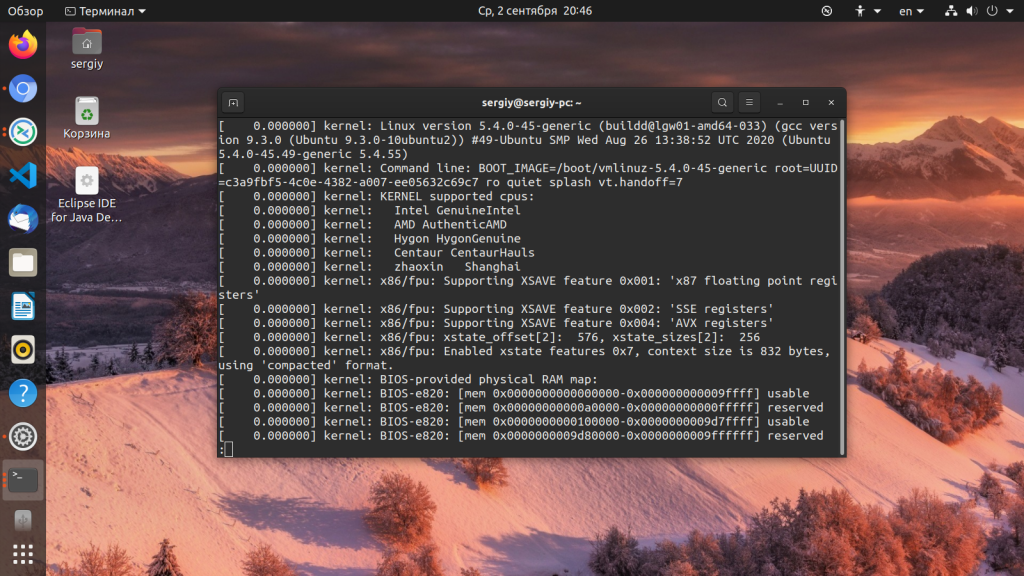
Просмотр логов Linux, в реальном времени:
tail -f /var/log/dmesg
Открываем лог файл dmesg:
cat /var/log/dmesg
Первые строки dmesg:
head /var/log/dmesg
Выводим только ошибки из /var/log/messages:
grep -i error /var/log/dmesg
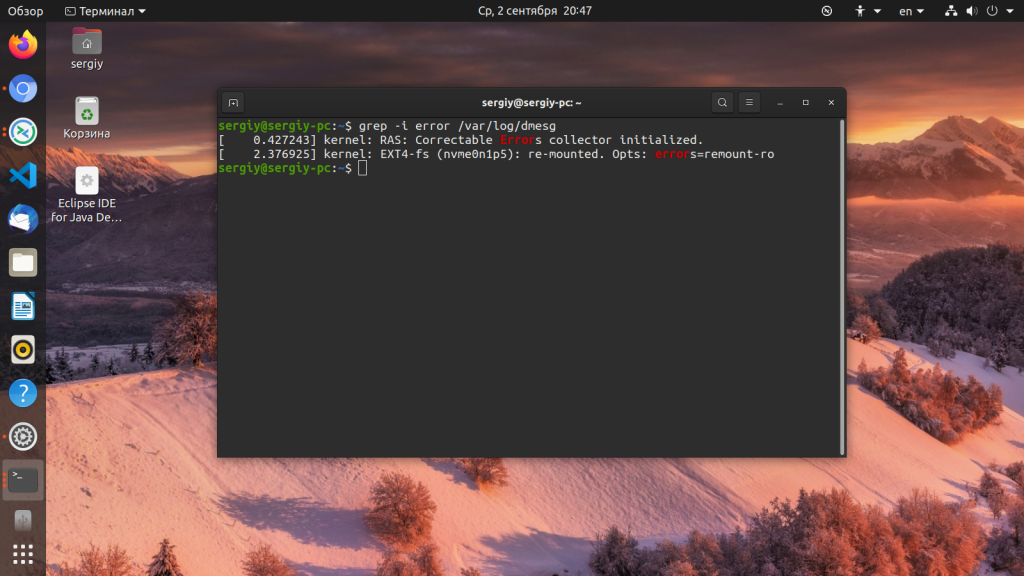
Кроме того, посмотреть логи на linux можно и с помощью графических утилит. Программа Журналы может быть использована для удобного просмотра и отслеживания системных журналов на ноутбуке или персональном компьютере с Linux.
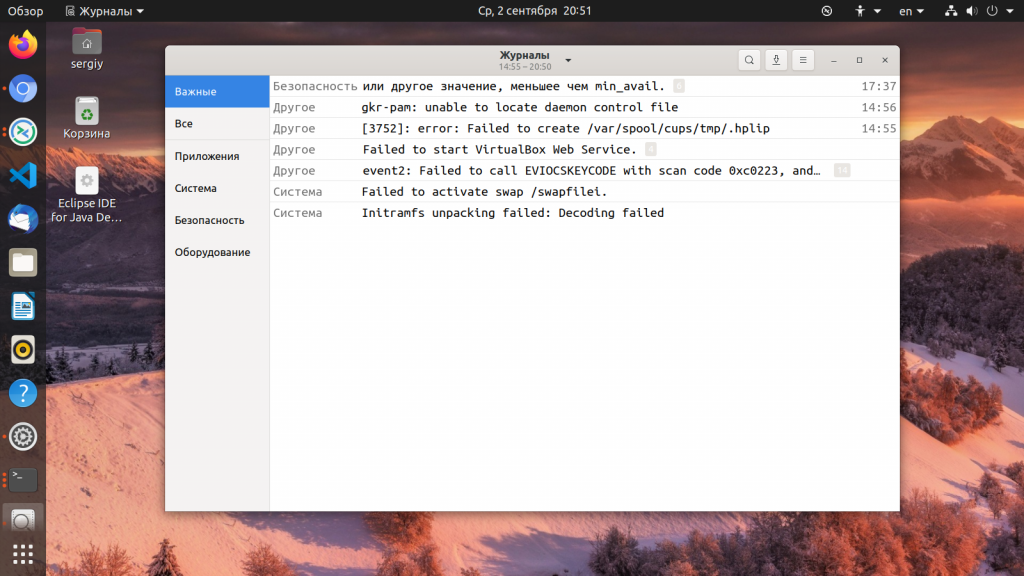
Вы можете установить программу в любой системе с установленным X сервером. Также для просмотра логов может использоваться любой графический тестовый редактор.
Кроме того, у каждого сервиса есть свой лог файл, который можно посмотреть с помощью утилиты journalctl.
Выводы
В каталоге /var/log вы можете найти всю необходимую информацию о работе Linux. Из сегодняшней статьи вы достаточно узнали, чтобы знать где искать, и что искать. Теперь просмотр логов в Linux не вызовет у вас проблем. Если остались вопросы, задавайте в комментариях!

Статья распространяется под лицензией Creative Commons ShareAlike 4.0 при копировании материала ссылка на источник обязательна .
Об авторе

Основатель и администратор сайта losst.ru, увлекаюсь открытым программным обеспечением и операционной системой Linux. В качестве основной ОС сейчас использую Ubuntu. Кроме Linux, интересуюсь всем, что связано с информационными технологиями и современной наукой.
This tutorial explains the basic administration of a Linux server through system
logs. A system log is a file that contains information about the events that
happened on the system during runtime.
In this article, you will learn the following Linux logging basics:
- Where the Linux log files are stored, how are they formatted, and how to read them.
- How to read the most important logs (such as
syslog). - How to configure the Ubuntu
syslogdaemon. - What Linux log rotation is all about and how to use the logrotate utility.
Prerequisites
Before proceeding with the rest of this tutorial, ensure that you have a basic
knowledge of working with the Linux command line. While many of the concepts
discussed in this article are general applicable to all Linux distributions,
we’ll be demonstrating them in Ubuntu only so ensure to set up an Ubuntu 20.04
server that includes a non-root user with sudo access.
🔭 Want to centralize and monitor your Linux logs?
Head over to Logtail and start ingesting your logs in 5 minutes.
Step 1 — Finding Linux system logs
All Ubuntu system logs are stored in the /var/log directory. Change into this
directory in the terminal using the command below:
You can view the contents of this directory by issuing the following command:
You should see a similar output to the following:
Output
alternatives.log  auth.log       btmp            cloud-init-output.log  dmesg    dpkg.log  journal/  landscape/  private/  ubuntu-advantage-license-check.log  ubuntu-advantage-timer.log  unattended-upgrades/
apt/              bootstrap.log  cloud-init.log  dist-upgrade/          dmesg.0  faillog   kern.log  lastlog     syslog    ubuntu-advantage.log                ufw.log                     wtmp
Let’s look at a few of the essential system log files that may be present in the
/var/log directory and what they contain:
/var/log/syslog: stores general information about any global activity in the
system./var/log/auth.log: keeps track of all security-related actions (login,
logout, or root user activity)./var/log/kern.log: stores information about events originating from the
Linux kernel./var/log/boot.log: stores system startup messages./var/log/dmesg: contains messages related to device drivers./var/log/faillog: keeps track of failed logins, which comes in handy when
investigating attempted security breaches.
The /var/log directory is also used to store various application logs. For
example, if your distribution is bundled with Apache or MySQL, or installed
later, their log files will also be found here.
Step 2 — Viewing Linux log file contents
Log files contain a large amount of information that are useful for monitoring
or analyzing activities performed by the system or a specific application.
Therefore, a Linux server administrator must learn the art of reading and
understanding the various messages present in log files to effectively diagnose
or troubleshoot an issue.
Before we can read log files, we ought to know how they are formatted. Let’s
review two basic approaches to log file formatting and storage: plain text and
binary files.
Plaintext log files
These logs are plain text files with a standardized content format. Ubuntu uses
a log template called
RSYSLOG_TraditionalFileFormat
.
This log format consists of four main fields with a space delimiter:
- The timestamp indicates the time when a log entry was created in the
formatMMM dd HH:mm:ss(e.g.Sep 28 19:00:00). Notice that this format
does not include a year. - Hostname is the host or system that originally create the message.
- Application is the application that created the message.
- Message contains the actual details of an event.
Let’s go ahead and review some log files in the plaintext format. Run the
command below to print the contents of the /var/log/syslog file with the
tail utility:
sudo tail /var/log/syslog
This outputs the last 10 lines of the file:
Output
Mar 23 12:38:09 peter dbus-daemon[1757]: [session uid=1000 pid=1757] Activating via systemd: service name='org.freedesktop.Tracker1' unit='tracker-store.service' requested by ':1.1' (uid=1000 pid=1754 comm="/usr/libexec/tracker-miner-fs " label="unconfined")
Mar 23 12:38:09 peter systemd[1743]: Starting Tracker metadata database store and lookup manager...
Mar 23 12:38:09 peter dbus-daemon[1757]: [session uid=1000 pid=1757] Successfully activated service 'org.freedesktop.Tracker1'
Mar 23 12:38:09 peter systemd[1743]: Started Tracker metadata database store and lookup manager.
Mar 23 12:38:40 peter tracker-store[359847]: OK
Mar 23 12:38:40 peter systemd[1743]: tracker-store.service: Succeeded.
Mar 23 12:39:01 peter CRON[359873]: (root) CMD (  [ -x /usr/lib/php/sessionclean ] && if [ ! -d /run/systemd/system ]; then /usr/lib/php/sessionclean; fi)
Mar 23 12:39:23 peter systemd[1]: Starting Clean php session files...
Mar 23 12:39:23 peter systemd[1]: phpsessionclean.service: Succeeded.
Mar 23 12:39:23 peter systemd[1]: Finished Clean php session files.
You’ll notice that that each record in this file is formatted in the manner
described earlier. For example, the last record has its timestamp as Mar 23
12:39:23, hostname as peter, application as systemd[1] and message as
Finished Clean php session files.
If you want to view the entire log file, you can use the cat utility or any
text editor such as nano or vim.
Binary log files
While plaintext is the dominant storage format for log files, you will also
encounter binary log files that cannot be read with a normal text editor. The
/var/log directory contains multiple binary files that are related to the user
authorization:
/var/log/utmp: tracks users that are currently logged into the system./var/log/wtmp: tracks previously logged in users. It contains a past data
fromutmp./var/log/btmp: tracks failed login attempts.
For these binary logs, special command-line tools are used to display the
relevant information in human-readable form. For example, to review the contents
of the /var/log/utmp file, run the who utility with -H option (this option
causes column labels to be printed in the output table):
You’ll see the program’s output appear on the screen:
Output
NAME   LINE         TIME             COMMENT
george pts/0        2021-03-21 15:29 (2001:67c:1220:80c:b1:a84e:69ee:f530)
willie pts/1        2021-03-21 07:20 (adsl-dyn22.78-98-29.t-com.sk)
bonnie pts/2        2021-03-21 10:31 (2001:67c:1220:80c:b1:a84e:69ee:f530)
peter  pts/6        2021-03-21 14:37 (100.64.97.50)
...
The output above describes all the currently logged in users, the time of login
and their host machine’s IP address.
You can also review the contents of the /var/log/wtmp binary file through the
last command as shown below:
You’ll see the program’s output appear on the screen:
Output
peter    :1           Sat Mar 13 08:06   still logged in
reboot   system boot  Sat Mar 13 08:06   still running
peter    :1           Fri Mar 12 07:42 - down  (1+00:22)
reboot   system boot  Fri Mar 12 07:42 - 08:05 (1+00:23)
peter    :1           Sun Mar  7 11:20 - down  (4+20:21)
reboot   system boot  Sun Mar  7 11:20 - 07:41 (4+20:21)
peter    :1           Fri Mar  5 08:02 - crash (2+03:17)
reboot   system boot  Fri Mar  5 08:01 - 07:41 (6+23:39)
peter    :0           Tue Mar  2 08:38 - crash (2+23:23)
reboot   system boot  Tue Mar  2 08:38 - 07:41 (9+23:03)
peter    :1           Thu Feb 25 11:44 - down  (4+20:53)
reboot   system boot  Thu Feb 25 11:44 - 08:37 (4+20:53)

wtmp begins Thu Feb 25 11:43:23 2021
The output shows a table where the first column refers to the user name (the
pseudo-user reboot is recorded each time when the system is rebooted). The third
field refers to the login timestamp, and the last column shows the session
duration.
To review the /var/log/btmp file (containing failed login attempts), execute
the lastb command with sudo privileges:
You’ll see the program’s output appear on the screen:
Output
falcon   tty3                  Thu Feb 12 07:10 - 07:10  (00:00)
ruby     tty1                  Thu Feb 12 07:09 - 07:09  (00:00)
sergio   tty1                  Thu Feb 12 07:09 - 07:09  (00:00)

btmp begins Thu Feb 25 11:43:32 2021
The output shows users that failed to login with the corresponding timestamp.
Step 3 — Examining the syslog deamon configuration
All system logs are created and maintained by a background process called a
daemon. The traditional Linux daemon for logging is syslogd. However, Ubuntu
20.04 uses a daemon called rsyslogd which is a superset of syslogd. It uses
a special configuration file (/etc/rsyslog.conf) that specifies the logging
rules.
Go ahead and print the contents of the /etc/rsyslog.conf file with the cat
command:
This command prints the entire content of this configuration file, but we’re
only going to show a truncated output here:
Output
[label /etc/rsyslog.conf]
. . .

###########################
#### GLOBAL DIRECTIVES ####
###########################

#
# Use traditional timestamp format.
# To enable high precision timestamps, comment out the following line.
#
$ActionFileDefaultTemplate RSYSLOG_TraditionalFileFormat

# Filter duplicated messages
$RepeatedMsgReduction on

#
# Set the default permissions for all log files.
#
$FileOwner syslog
$FileGroup adm
$FileCreateMode 0640
$DirCreateMode 0755
$Umask 0022
$PrivDropToUser syslog
$PrivDropToGroup syslog

#
# Where to place spool and state files
#
$WorkDirectory /var/spool/rsyslog

#
# Include all config files in /etc/rsyslog.d/
#
$IncludeConfig /etc/rsyslog.d/*.conf
This file contains a lot of information, but we’ll focus on two configuration
details. Firstly, a variable called $ActionFileDefaultTemplate defines the
syslog record format as described in Step 2. You can change the value of this
variable if the default log format is unsuitable for you. Secondly, the last
line in the file defines a variable called $IncludeConfig that specifies the
directory for additional configuration files.
In Ubuntu, all additional Rsyslog rules are placed in the
/etc/rsyslog.d/50-default.conf file by default. Go ahead and examine the
contents of this file with the head utility (the -n 15 option specifies that
only the first 15 lines should be printed):
head -n 15 /etc/rsyslog.conf/50-default.conf
You’ll see the program’s output appear on the screen:
Output
#  Default rules for rsyslog.
#
#           For more information see rsyslog.conf(5) and /etc/rsyslog.conf

#
# First some standard log files.  Log by facility.
#
auth,authpriv.*         /var/log/auth.log
*.*;auth,authpriv.none      -/var/log/syslog
#cron.*             /var/log/cron.log
#daemon.*           -/var/log/daemon.log
kern.*              -/var/log/kern.log
#lpr.*              -/var/log/lpr.log
mail.*              -/var/log/mail.log
#user.*             -/var/log/user.log
The output contains rsyslogd configuration rules. Each non-empty line (or line
that does not start with the # character) defines a rule. The rule definition
starts with a selector followed by one or more spaces and an action field:
- The selector specifies the facility with a corresponding priority. For
example, the*selector refers to all facilities or priorities. - The action field of a selector usually references a log file.
Step 4 — Rotating log files in Linux
The size of log file must be controlled because they always grow over time. Each
system has limited resources and logs that are too large can lead to performance
and memory problems, not to mention the loss of storage space. Linux
distributions typically solve this problem through the concept of log rotation
which continuously repeats the following actions:
- Instead of continuously writing to log file as it grows larger, the file name
is changed to one with a version suffix, and creates a brand new file is
created for new log entries. This means a log file has multiple backups which
are optionally compressed. - When the backup files reaches a specified number, the system deletes the
oldest ones.
Let’s view an example of rotating log files in Linux. Execute the ls command
with following options:
ls -l -h -t /var/log/syslog*
The -l option outputs a listing that includes various metadata about a file,
the -h option prints the file size in human-readable form, and the -t option
sorts the listing by modification time (newest first). The /var/log/syslog*
argument specifies that only files in the /var/log directory with the syslog
prefix should be included in the output.
You’ll see the program’s output appear on the screen:
Output
-rw-r----- 1 syslog adm  47K mar 30 09:49 /var/log/syslog
-rw-r----- 1 syslog adm 3,5G mar 30 07:45 /var/log/syslog.1.gz
-rw-r----- 1 syslog adm 1,6M mar 29 10:06 /var/log/syslog.2.gz
-rw-r----- 1 syslog adm  29K mar 28 07:49 /var/log/syslog.3.gz
-rw-r----- 1 syslog adm  54K mar 27 08:08 /var/log/syslog.4.gz
-rw-r----- 1 syslog adm 6,4M mar 26 07:35 /var/log/syslog.5.gz
-rw-r----- 1 syslog adm  31K mar 25 08:01 /var/log/syslog.6.gz
This output describes all the versions of the syslog file. Typically, it is
the biggest log file on the system because, as explained earlier, it records
almost every event that occurs in the system. The older versions are labelled
with a version suffix (e.g. syslog.6.gz is the oldest syslog backup).
Notice that the backup files are all compressed with the standard GNU zip
compression algorithm. (as evidenced by the .gz extension). This helps with
space savings since log files can grow to the size of gigabytes (in our example
the biggest file is 3.5 GB). You’ll also notice that these files cover a time
interval of only six days.
Step 5 — Configuring the logrotate daemon
Log rotation is maintained by a system daemon called logrotate. Similar to the
rsyslogd utility, this daemon uses a special configuration file called
logrotate.conf in the /etc directory.
Go ahead and display the contents of the logrotate config file with cat
utility:
This command prints the entire contents of the configuration file to the screen:
Output
# see "man logrotate" for details
# rotate log files weekly
weekly

# use the adm group by default, since this is the owning group
# of /var/log/syslog.
su root adm

# keep 4 weeks worth of backlogs
rotate 4

# create new (empty) log files after rotating old ones
create

# use date as a suffix of the rotated file
#dateext

# uncomment this if you want your log files compressed
#compress

# packages drop log rotation information into this directory
include /etc/logrotate.d

# system-specific logs may be also be configured here.
The output describes the global configuration for logrotate. In our example,
the log files are rotated weekly, the system keeps four rotation backups, and
compression is turned off. However, this is the most general configuration for
any log. We can also set up a more specific configuration for a particular log
file. In Ubuntu, the configuration for specific logs are placed in the
/etc/logrotate.d directory by default (you’ll notice the presence of this
directory in /etc/logrotate.conf).
Let’s view the contents of the /etc/logrotate.d directory by executing the
ls command:
The output below describes all the utilities that have a specific log rotation
config:
Output
alternatives  bootlog      dpkg               ubuntu-advantage-tools
apache2       btmp         ppp                ufw
apport        certbot      rsyslog            unattended-upgrades
apt           cups-daemon  speech-dispatcher  wtmp
You’ll notice that the rsyslog daemon has its own log rotation configuration
file. Go ahead and display the first 15 lines of the rsyslog file with the
head utility:
head -n 15 /etc/logrotate.d/rsyslog
You’ll see the following output on the screen:
Output
/var/log/syslog
{
    rotate 7
    daily
    missingok
    notifempty
    delaycompress
    compress
    postrotate
        /usr/lib/rsyslog/rsyslog-rotate
    endscript
}

/var/log/mail.info
/var/log/mail.warn
This output shows that the syslog file is rotated daily, and that seven
compressed backups are kept before older ones are deleted.
You can force logrotate to rotate a log file immediately by executing
following the command:
sudo logrotate -fv /etc/logrotate.conf
The -f option forces immediate rotation and the -v option turns on verbose
mode (it will display messages during rotation). The execution of this command
shows the following output (truncated to save space):
Output
reading config file /etc/logrotate.conf
including /etc/logrotate.d
reading config file alternatives
reading config file apache2
reading config file apport
reading config file apt
reading config file bootlog
reading config file btmp
reading config file certbot
reading config file cups-daemon
reading config file dpkg
reading config file ppp
reading config file rsyslog
reading config file speech-dispatcher
reading config file ubuntu-advantage-tools
reading config file ufw
reading config file unattended-upgrades
reading config file wtmp
. . .
The beginning of the output shows that the logrotate daemon reads all its
configuration files first before proceeding. The entire output is very long
because it prints every single detail of the rotation process.
Conclusion
In this tutorial, you’ve learnt the basics of system logs in Linux and how to
read and understand them. We discussed where the logs are typically placed and
the different log formats you will likely encounter. We also covered the
rsyslogd utility, which is responsible for maintaining log files in Ubuntu
before discussing log rotation and how to use the logrotate utility to keep
log files small and manageable. To learn more about all the utilities described
in this article, explore the
Rsyslog server article and the
Logrotate article in
the Logging guides.
Thanks for reading!
Centralize all your logs into one place.
Analyze, correlate and filter logs with SQL.
Create actionable
dashboards.
Share and comment with built-in collaboration.
Got an article suggestion?
Let us know


Next article
How to Use Logrotate to Manage Log Files in Linux
Learn how to use the Logrotate utility in Linux-based systems to set up automatic compression and deletion of older log records
→

This work is licensed under a Creative Commons Attribution-NonCommercial-ShareAlike 4.0 International License.
Как проверить системные ошибки в Linux?
Журналы Linux можно просмотреть с помощью команда cd / var / log, затем, набрав команду ls, чтобы просмотреть журналы, хранящиеся в этом каталоге. Один из наиболее важных журналов для просмотра — это системный журнал, в котором регистрируется все, кроме сообщений, связанных с аутентификацией.
Как запустить chkdsk в Ubuntu?
Как запустить Chkdsk в Ubuntu
- Щелкните правой кнопкой мыши на рабочем столе и выберите в появившемся меню опцию «Открыть в терминале». …
- Введите следующую команду, чтобы отключить диск, который вы хотите проверить:…
- Введите следующую команду, чтобы проверить диск:…
- Выполните команду «fsck» второй раз, если появится любое число, кроме нуля.
Как предотвратить и исправить ошибки зависимости пакетов в Ubuntu
- Пакеты обновлений. …
- Пакеты обновлений. …
- Очистите кэшированные и остаточные пакеты. …
- Сделайте имитацию установки. …
- Исправьте сломанные пакеты. …
- Настроить пакеты, которые не удалось установить из-за перебоев. …
- Используйте PPA-Purge. …
- Используйте диспетчер пакетов Aptitude.
Как исправить ошибку файловой системы в Linux?
Восстановить поврежденную файловую систему
- Если вы не знаете имя устройства, используйте fdisk, df или любой другой инструмент, чтобы найти его.
- Размонтируйте устройство: sudo umount / dev / sdc1.
- Запустите fsck, чтобы восстановить файловую систему: sudo fsck -p / dev / sdc1. …
- После восстановления файловой системы смонтируйте раздел: sudo mount / dev / sdc1.
Что такое файл журнала в Linux?
Файлы журнала набор записей, которые Linux ведет для администраторов, чтобы отслеживать важные события. Они содержат сообщения о сервере, включая ядро, службы и приложения, работающие на нем. Linux предоставляет централизованный репозиторий файлов журнала, который может находиться в каталоге / var / log.
Что такое fsck в Ubuntu?
fsck это используется для проверки и, при необходимости, восстановления одной или нескольких файловых систем Linux. … На самом деле, fsck — это просто интерфейс для различных программ проверки файловой системы (fsck. Fstype), доступных в Linux. Проверка, специфичная для файловой системы, ищется в переменной окружения PATH.
Что лучше chkdsk R или F?
С точки зрения диска, CHKDSK / R сканирует всю поверхность диска, сектор за сектором, чтобы убедиться, что каждый сектор может быть прочитан правильно. В результате CHKDSK / R занимает значительно меньше времени. длиннее, чем / F, поскольку это касается всей поверхности диска, а не только частей, указанных в Оглавлении.
Как исправить ошибку apt?
Чтобы исправить сломанные пакеты в дистрибутивах на основе Debian с помощью Apt:
- Откройте терминал, нажав Ctrl + Alt + T на клавиатуре, и введите: sudo apt –fix-missing update.
- Обновите пакеты в вашей системе: sudo apt update.
- Теперь принудительно установите поврежденные пакеты с помощью флага -f.
Почему не работает sudo apt-get update?
Эта ошибка может произойти, если получение последних репозиториев во время «apt-get update» было прервано, а последующее «apt-get update» было прервано. не может возобновить прерванная выборка. В этом случае удалите содержимое в / var / lib / apt / lists перед повторной попыткой «apt-get update».
Какое обновление sudo apt-get?
Команда sudo apt-get update: используется для загрузки информации о пакете из всех настроенных источников. Источники часто определяются в / etc / apt / sources. list и другие файлы, расположенные в / etc / apt / sources. … Итак, когда вы запускаете команду обновления, она загружает информацию о пакете из Интернета.