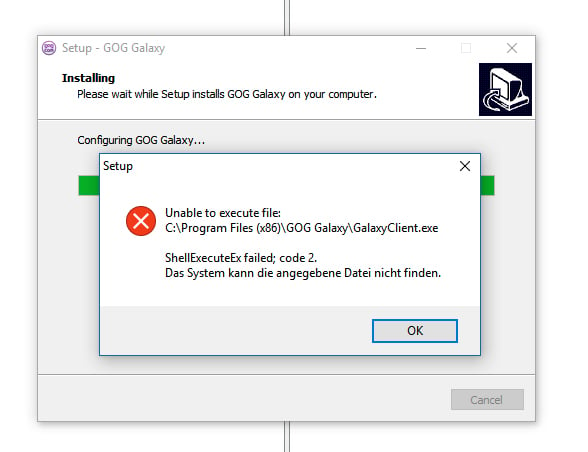
При попытке установить программу на вашем компьютере с Windows, Если вы видите “ShellExecuteEx failed” в сопровождении различных кодов, то этот пост поможет вам.
Сопутствующие коды ошибок могут быть: 2, 5, 67, 255, 1155, 1460, 8235, 2147221003, и т.д. Эта ошибка обычно возникает, если установщик требует прав администратора, файл установки был поврежден или существует конфликт приложений.
ShellExecuteEx — это функция ОС, которая выполняет операцию над указанным файлом. Если операция завершится неудачно, вы получите эту ошибку.
- Запустите исполняемый файл от имени администратора
- Повторно загрузите или переустановите программу
- Запустить Средство Проверки Системных Файлов
- Сброс звуков по умолчанию.
Давайте подробно рассмотрим эти методы.
Попробуйте запустить приложение от имени администратора
Запуск приложений с правами администратора. Даже если приложение не удается запустить, попробуйте переустановить приложение с правами администратора. Просто щелкните правой кнопкой мыши на файле установщика и нажмите кнопку Запуск от имени администратора.

Загрузите установщик еще раз, а затем установите повторно
Иногда, когда вы загружаете любое приложение для установки, вы возможно столкнулись с ситуацией, когда программа установки не будет работать и приложение не будет установлено. Это может произойти из-за поврежденного или файла установщика.
Попробуйте загрузить то же самое с официального сайта приложения или любого доверенного источника. Также можно отключить антивирус на время установки и далее добавить приложение в исключения антивируса ( Внимание!!, вы должны быть уверены, что в этом файле нет вирусов или он из надежного источника)
Здесь вы можете приобрести ключ лицензии Windows 10 Pro 2020. Вы сразу же получаете ваш собственный уникальный ключ активации. После ввода лицензионного ключа вы начинаете использовать лицензионную операционную систему без ограничений, а также получать последующие пакеты обновлений, выпускаемые Microsoft.
Запустите сканирование SFC
Запуск сканирования SFC делается для замены потенциально поврежденных системных файлов. Таким образом, если ошибка возникает из-за поврежденного системного файла, то следующие шаги должны помочь вам исправить ошибку.
SFC scan не только находит проблемный системный файл, но и исправляет его.
Нажмите Клавишу Win + X . Откроется меню быстрого доступа.
Нажмите на Windows PowerShell (администратор) . Если вместо PowerShell отображается Командная строка, выберите пункт Командная строка (администратор) .

Выполните команду: sfc /scannow
Подождите несколько секунд, так как требуется время для завершения сканирования.
Если проблема в этом, то ошибка должна быть решена.

Но если есть действительно большая проблема, то вы можете столкнуться с сообщением, говорящим: «Windows Resource Protection нашел поврежденные файлы, но не смог исправить».
Вам просто нужно перезагрузить машину в безопасном режиме и снова запустить вышеуказанную команду.
Сброс системных звуков по умолчанию
Вы можете подумать, что как сброс системного звука по умолчанию может решить системную ошибку, такую как “ShellExecuteEx”? Но некоторые пользователи сообщили, как этот шаг решил их проблему.
Откройте диалоговое окно Выполнить, нажав клавишу Win + R.
И введите mmsys.cpl нажмите Enter.
Нажмите на вкладку Звуки. Выберите «По умолчанию» в звуковой схеме.
Нажмите на кнопку Применить, а затем на кнопку ОК.

Ошибка «Shellexecuteex Failed» возникает перед пользователями Windows всякий раз, когда те пытаются совершить действие, требующее подключения к Интернету, либо установить какое-то приложение в систему. Пользователи утверждают, что данное сообщение могут сопровождать самые разные коды.
Содержание
- Причины за «Shellexecuteex Failed»
- Методы решения «Shellexecuteex Failed»
- Метод №1 Запуск приложения от имени Администратора (если применимо)
- Метод №2 Сканирование системных файлов
- Метод №3 Сброс настроек системных звуков
- Метод №4 Выполнение чистой загрузки
- Метод №5 Редактирование групповой политики
Причины за «Shellexecuteex Failed»
- У приложения нет прав администратора.
- Повреждение системных файлов Windows.
- Системные звуки, заданный пользователем, заставляют приложение вылетать.
- Конфликт между двумя или несколькими приложениями.
- Чрезвычайно строгие групповые политики системы Windows.
Методы решения «Shellexecuteex Failed»
Метод №1 Запуск приложения от имени Администратора (если применимо)
Самый простой метод в подобной ситуации — это запуск необходимого приложения от имени Администратора. Разумеется, этот метод подойдет далеко не для всех пользователей. Чтобы запустить приложение от имени Администратора, вам нужно сделать следующее:
- нажмите правой кнопкой мыши на исполнительный файл (.exe) нужного вам приложения;
- выберите в контекстном меню пункт «Свойства»;
- перейдите во вкладку «Совместимость»;
- поставьте галочку возле пункта «Запускать эту программу от имени администратора»;
- нажмите кнопки «Применить» и «OK».
Попробуйте запустить приложение и посмотрите, проявится ли ошибка «Shellexecuteex Failed» или нет.
Метод №2 Сканирование системных файлов
Возможно, причиной за появлением данного сообщения стоят поврежденные системные файлы. В таком случае вам необходимо воспользоваться утилитами SFC и DISM. Они просканируют вашу Windows на наличие поврежденных файлов и восстановят их, если это будет возможно.
Попробуйте сделать следующее:
- нажмите Windows+R;
- копируйте в пустую строчку «cmd» и нажмите Ctrl+Shift+Enter;
- впишите команду «sfc /scannow» и нажмите Enter;
- подождите окончания работы утилиты SFC и перезагрузите компьютер;
- снова откройте командную строку;
- выполните следующие команды:
- Dism.exe /online /cleanup-image /scanhealth;
- Dism.exe /online /cleanup-image /restorehealth;
- перезагрузите компьютер.
Если эти утилиты нашли на вашем компьютере повреждения и исправили их (это станет понятно из информации в командной строке), то сообщение «Shellexecuteex Failed» должно исчезнуть.
Метод №3 Сброс настроек системных звуков
Как бы странно это не звучало, но рассматриваемая сегодня ошибка может возникать… из-за системных звуков Windows. Возможно, не так давно вы меняли настройки своих системных звуков. Если это так, то попробуйте сделать следующее:
- нажмите Windows+R;
- пропишите в пустой строчке «mmsys.cpl» и нажмите Enter;
- перейдите во вкладку «Звуки»;
- выберите в ниспадающем меню звуковых схем значение «По умолчанию»;
- нажмите кнопки «Применить» и «OK»;
- перезагрузите компьютер.
Проверьте, исчезла ли ошибка «Shellexecuteex Failed» или нет.
Метод №4 Выполнение чистой загрузки
Конфликт между какими-то программами в системе может вызвать ошибку «Shellexecuteex Failed». Но как понять, что дело действительно заключается в конфликте между программным обеспечением? Ответ — чистая загрузка. Чтобы осуществить чистую загрузку, сделайте следующее:
- нажмите Windows+R;
- копируйте в пустую строчку «msconfig» и нажмите Enter;
- перейдите во вкладку «Службы»;
- поставьте галочку возле опции «Не отображать службы Майкрософт» и нажмите кнопку «Отключить все»;
- теперь перейдите во вкладку «Автозагрузка» и нажмите на строчку «Открыть диспетчер задач»;
- отключите все программы из предоставленного списка;
- перезагрузите компьютер.
Протестируйте теперь свою систему. Если ошибка «Shellexecuteex Failed» исчезла, то какая-то отключенная служба или программа действительно была «виновницей». Вам нужно поочередно включать отключенные программы/службы и тестировать систему, чтобы понять, что конкретно вызывает ошибку.
Метод №5 Редактирование групповой политики
Если ничего из вышеуказанного не сработало, то можно попробовать воспользоваться этим методом. Некоторые пользователи утверждают, что им удалось избавиться от ошибки «Shellexecuteex Failed», отредактировав групповую политику «Контроль учетных записей пользователей: повышение прав только для подписанных и проверенных исполняемых файлов».
Чтобы сделать это на своем компьютере, вам нужно выполнить следующее:
- нажмите Windows+R;
- пропишите «gpedit.msc» и нажмите Ctrl+Shift+Enter;
- пройдите следующим путем: Политика “Локальный компьютер”→Конфигурация компьютера→Конфигурация Windows→Параметры безопасности;
- открыв меню параметров безопасности, нажмите дважды левой кнопкой мыши на «Контроль учетных записей пользователей: повышение прав только для подписанных и проверенных исполняемых файлов»;
- поставьте галочку возле пункта «Отключить»;
- сохраните изменения в настройках групповой политики системы и перезагрузите компьютер.
Мы надеемся, что наш материал был полезен в решении ошибки «Shellexecuteex Failed».
Когда вы пытаетесь установить программу на свой компьютер с Windows, если вы видите сообщение «ShellExecuteEx failed» с разными кодами, тогда этот пост поможет вам. Сопутствующие коды ошибок могут быть 2, 5, 67, 255, 1155, 1460, 8235, 2147221003 и т. Д. Эта ошибка обычно возникает, если для установщика требуются права администратора, файл установки поврежден или существует конфликт приложения. ShellExecuteEx — это функция ОС, которая выполняет операцию с указанным файлом. Если операция завершится неудачно, вы получите эту ошибку.
Исправить ошибку ShellExecuteEx failed
В этой статье мы покажем вам, как бороться с ошибками ShellExecuteEx в Windows 10. У вас есть следующие возможности:
- Запустите EXE-файл от имени администратора
- Перезагрузите или переустановите программу
- Запустить проверку системных файлов
- Сбросить звуки по умолчанию
- Установите или запустите программу в состоянии чистой загрузки.
Давайте рассмотрим эти методы подробнее.
1]Попробуйте запустить приложение от имени администратора.
Запуск приложений с правами администратора позволяет приложениям работать с большей мощностью. Даже если приложение не открывается, попробуйте переустановить приложение с правами администратора. Просто щелкните правой кнопкой мыши файл установщика и выберите Запуск от имени администратора.
Иногда, когда вы загружаете какое-либо приложение для установки, вы можете столкнуться с ситуацией, когда установка не запускается, и приложение не устанавливается. Это может произойти из-за поврежденного или неисправного установочного файла. Попробуйте скачать то же самое с официального сайта приложения или из любого надежного источника.
3]Запустить сканирование SFC
Возможно, вы знаете, что сканирование SFC выполняется для замены потенциально поврежденных системных файлов. Итак, если ошибка возникает из-за поврежденного системного файла, вам должны помочь следующие шаги. Сканирование SFC не только находит проблемный системный файл, но и исправляет его.
- Нажмите Ключ победы + Икс. А Меню быстрого доступа откроется.
- Нажмите на Windows PowerShell (администратор). Если вместо PowerShell отображается командная строка, выберите Командная строка (администратор).
- Выполните команду: sfc / scannow
- Подождите несколько секунд, так как для завершения сканирования требуется время.
Если все пойдет правильно, ошибка должна быть устранена. Но, если есть действительно большая проблема, вы можете столкнуться с сообщением: «Защита ресурсов Windows обнаружила поврежденные файлы, но не смогла исправить‘. Вам просто нужно перезагрузить компьютер в безопасном режиме и снова запустить указанную выше команду.
4]Сброс системных звуков по умолчанию
Вы можете подумать, как сброс системного звука до значения по умолчанию может решить системную ошибку, такую как «ShellExecuteEx»? Но некоторые пользователи сообщили, как этот шаг решил их проблему, и стоит упомянуть, что он может решить и вашу проблему.
Открыть Пробег диалоговое окно, нажав Ключ победы + р.
Тип mmsys.cpl и нажмите Enter.
Нажмите на Звуки Табл. Выбирать Windows по умолчанию в звуковой схеме.
Нажмите Применить, а затем ОК.
Проблема уже должна была исчезнуть.
5]Установите или запустите программу в состоянии чистой загрузки.
Чтобы избежать конфликтов программ, вы можете установить или запустить программу в чистом состоянии загрузки и посмотреть, поможет ли это вам.
Вот некоторые из методов, которые вы можете попробовать устранить. Сообщите нам, помогло ли это.
6 Methods Fix Shellexecuteex Failed Error Windows

Резюме :

Если вы хотите найти решение для ошибки «Shellexecuteex Failed», этот пост — то, что вам нужно. Он покажет вам некоторые возможные причины ошибки «Shellexecuteex Failed». Кроме того, он также познакомит вас с несколькими рабочими методами устранения этой ошибки. Теперь возьмите эти методы из MiniTool .
Что вызывает ошибку «Shellexecuteex Failed» в Windows?
Вот несколько ситуаций, с которыми вы можете столкнуться:
- У приложения нет прав администратора.
- Повреждение системного файла
- Пользовательские системные звуки вызывают сбой приложения
- Конфликт приложений
- Чрезмерная защита Местная политика
Наконечник: Вам может быть интересен этот пост: Как восстановить данные с диска с поврежденной файловой системой .
Если вы хотите найти методы устранения ошибки «Shellexecuteex Failed», продолжайте читать.
Метод 1. Запустите приложение от имени администратора
Если при открытии или установке приложения вы столкнулись с ошибкой «Shellexecuteex Failed», это может вызвать проблемы из-за неожиданного завершения работы приложения или установки исполняемого файла, поскольку у него нет прав администратора.
Следующая часть покажет вам, как запустить приложение от имени администратора.
Шаг 1. Щелкните правой кнопкой мыши приложение, которое вызывает ошибку, и выберите Свойства .
Шаг 2: выберите Совместимость вкладка и проверьте Запустите эту программу от имени администратора под Настройки раздел. Нажмите Применять .
Шаг 3. Запустите приложение еще раз и посмотрите, исправлена ли ошибка «Shellexecuteex Failed».
Метод 2: запустить сканирование DISM и SFC
В некоторых случаях ошибка «Shellexecuteex Failure» возникает из-за того, что установка не может быть завершена из-за какого-либо типа повреждения системного файла.
Следуйте инструкциям ниже, чтобы исправить эту ошибку.
Шаг 1: нажмите Windows + R ключи, чтобы открыть Бежать диалоговое окно. Тип cmd и нажмите Ctrl + Shift + Enter бежать Командная строка как администратор.
Шаг 2: введите sfc / scannow и нажмите Войти для выполнения сканирования SFC.
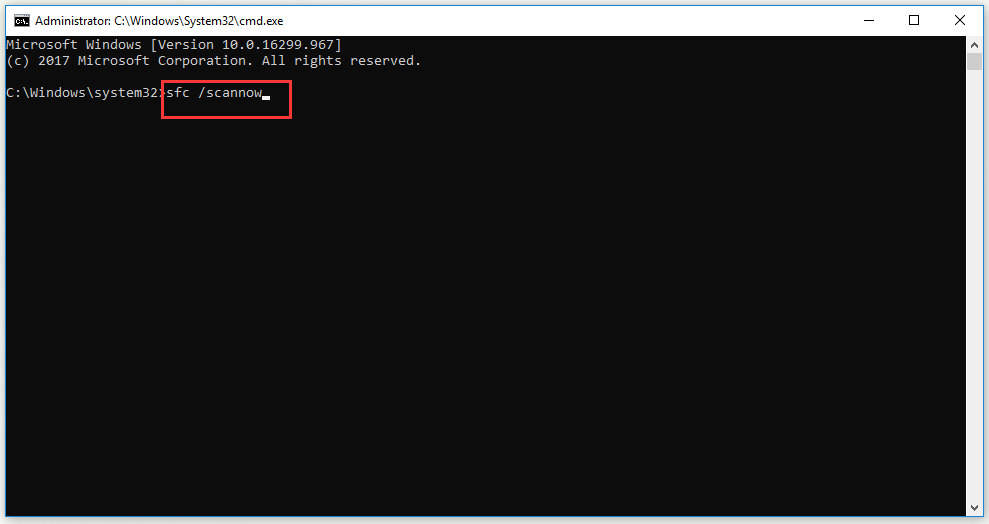
Наконечник: Не мешайте окну, пока этот процесс не будет завершен. Прерывание этой операции может привести к большему количеству логических ошибок, которые будет труднее исправить.
Шаг 3: После завершения сканирования перезагрузите компьютер и дождитесь завершения следующей загрузки. Когда операционная система полностью загрузится, выполните шаг 1, чтобы открыть Командная строка очередной раз.
Шаг 4: Выполните команды: Dism.exe / онлайн / очистка-изображение / scanhealth и Dism.exe / онлайн / очистка-изображение / restorehealth для выполнения сканирования DISM.
Наконечник: Перед началом этого процесса убедитесь, что ваше интернет-соединение стабильно.
Шаг 5. После завершения сканирования DISM перезагрузите компьютер, чтобы проверить, исправлена ли ошибка «Ошибка Shellexecuteex».
Метод 3: восстановить системные звуки по умолчанию
В этом случае вы также решите проблему, сбросив все звуки Windows по умолчанию.
Шаг 1: нажмите Windows + R ключи, чтобы открыть Бежать диалоговое окно. Тип mmsys.cpl и нажмите Хорошо , чтобы открыть экран звука.
Шаг 2: выберите Звуки вкладка, а затем измените Звуковая схема к Windows по умолчанию . Нажмите Применять а затем щелкните Хорошо .
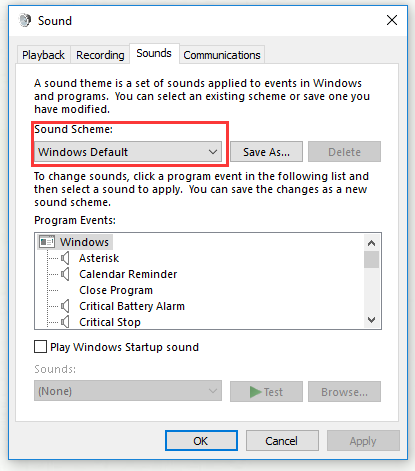
Шаг 3. Перезагрузите компьютер, чтобы увидеть, исчезла ли ошибка «Shellexecuteex Failed».
Метод 4: выполните чистую загрузку
Если ошибки до сих пор не были полностью устранены, возможно, вы столкнулись с ошибкой «Ошибка Shellexecuteex» из-за какого-то стороннего конфликта. Многие потенциальные приложения могут конфликтовать с приложениями, отображающими ошибку, поэтому лучший способ решения проблемы — настроить компьютер на запуск с чистой загрузкой.
Шаг 1: нажмите Windows + R ключи, чтобы открыть Бежать диалоговое окно. Тип mscofig и нажмите Хорошо открыть Конфигурация системы меню.
Шаг 2. Щелкните значок Сервисы вкладка, а затем проверьте Скрыть все службы Microsoft .
Шаг 3: нажмите Отключить все чтобы предотвратить запуск всех сторонних служб при следующем запуске компьютера.
Шаг 4: Выберите Запускать вкладку и щелкните Открыть диспетчер задач .
Шаг 5. Систематически выберите каждую службу запуска и нажмите Отключить . Этот шаг гарантирует, что никакие службы запуска не будут вызваны при следующем запуске системы.
Шаг 6. Перезагрузите компьютер, чтобы проверить, сохраняется ли ошибка. Если ошибка больше не возникает, завершите установку, затем перепроектируйте описанные выше шаги и повторно включите ранее отключенные службы.
Метод 5. Настройте политику «Повышать только исполняемые файлы»
В случаях, когда проблема вызвана неправильно подписанным исполняемым файлом, чтобы избежать этой конкретной проблемы, вы можете настроить один Групповая политика названный Повышайте только исполняемые файлы, которые подписаны и проверены .
Шаг 1: нажмите Windows + R ключи, чтобы открыть Бежать диалоговое окно. Тип gpedit.msc и нажмите Ctrl + Shift + Enter открыть Редактор локальной групповой политики с правами администратора.
Шаг 2: перейдите к Конфигурация компьютера > Настройки Windows > Параметры безопасности> Локальные политики> Параметры безопасности . Двойной щелчок Контроль учетных записей пользователей: повышайте уровень только исполняемых файлов, которые подписаны и проверены. .
Шаг 3: выберите Настройка локальной безопасности вкладка, а затем убедитесь, что для политики установлено значение Отключено . Нажмите Применять а затем щелкните Хорошо .
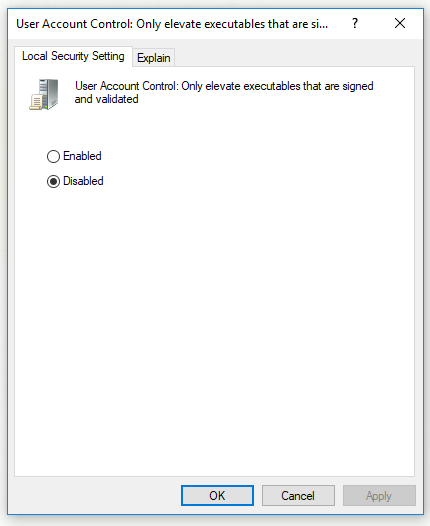
Шаг 4. Перезагрузите компьютер, чтобы проверить, устранена ли проблема.
Метод 6. Выполните чистую установку
Если ни один из вышеперечисленных методов не может решить эту проблему, вы, вероятно, имеете дело с основной проблемой коррупции, которую нельзя исправить обычными средствами. Вы можете решить эту проблему, только сбросив каждый компонент Windows.
Самый быстрый способ — выполнить чистую установку. Этот процесс приведет к потере любых личных данных.
Самый эффективный способ продлить срок — установить исправление на место. Во время этого процесса вы можете сохранить все личные вещи.
 Два решения для обновления Windows 10 без потери программ
В этой статье рассказывается, когда переустанавливать операционную систему, и показаны два метода обновления Windows 10 без потери программ и файлов.
Читать больше
Нижняя граница
В заключение, этот пост показал вам некоторые возможные причины ошибки «Shellexecuteex Failed». Между тем, он также показывает вам несколько полезных методов решения этой проблемы. Если вы столкнулись с этой проблемой, вы можете попробовать эти методы.
Download PC Repair Tool to quickly find & fix Windows errors automatically
When you try to install a program on your Windows computer if you see a “ShellExecuteEx failed” accompanied by different codes, then this post will help you. The accompanying error codes could be 2, 5, 67, 255, 1155, 1460, 8235, 2147221003, etc. . This error usually occurs, if the installer requires administrator privileges, the setup file has become corrupted, or there is application conflict. ShellExecuteEx is an OS function that performs an operation on a specified file. If the operation fails, you get this error.
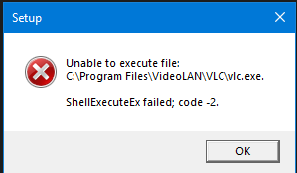
In this article, we will show you how to deal with ShellExecuteEx failed errors in Windows 11/10. You have the following options:
- Run the Exe file as administrator
- Re-download or reinstall the program
- Run System File Checker
- Reset Sounds to default
- Install or run the program in Clean Boot State.
Let us take a look at these methods in detail.
1] Try running the application as an administrator
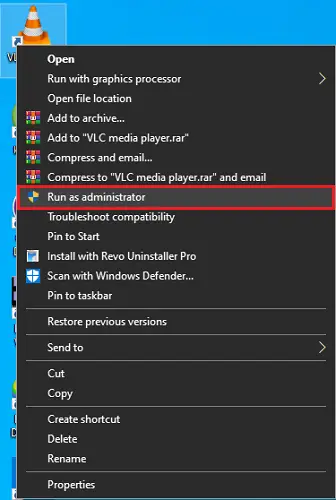
Running applications with admin rights make applications run with more power. Even if the application fails to open up, try re-installing the application with admin rights. Just right click on the installer file and click on Run as administrator.
2] Download the installer again and then install
Sometimes when you download any application to install, you may have faced a situation where the setup won’t run and the app won’t install. This may happen due to a corrupt or defective installer file. Try downloading the same from the application’s official website or any trusted source.
3] Run SFC scan
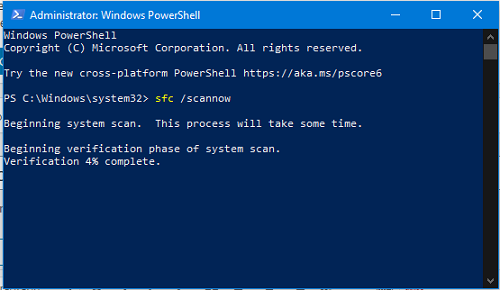
You may know that running an SFC scan is done for replacing potentially corrupted system files. So, if the error is occurring due to a corrupted system file then the following steps should help you. SFC scan not only finds a problematic system file but also fixes it.
- Press Win Key + X. A Quick Access Menu will open up.
- Click on Windows PowerShell (Admin). If it shows Command Prompt instead of PowerShell then select Command Prompt (Admin).
- Run the command: sfc /scannow
- Wait for some moments as it takes time to complete the scan.
If everything goes right, the error should get resolved. But, if there is a really big problem then you may encounter a message saying: ‘Windows Resource Protection found corrupt files but was unable to fix’. You just need to restart your machine in Safe Mode and run the above command again.
4] Reset System Sounds to default
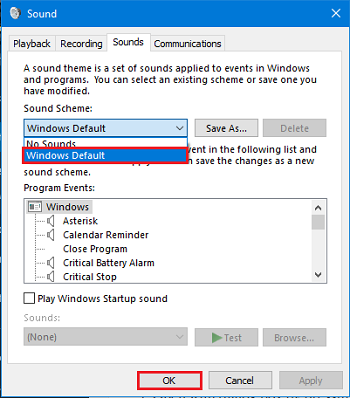
You may think that how resetting system sound to default can solve a system error like “ShellExecuteEx”? But some of the users have reported how this step solved their problem and it is worth mentioning, it may solve your problem too.
Open Run dialog box by pressing Win Key + R.
Type mmsys.cpl and press Enter.
Click on Sounds Tab. Select Windows Default in Sound Scheme.
Click on Apply and then on OK.
The problem should have gone by now.
5] Install or run the program in Clean Boot State
To avoid program conflicts, you may install or run the program in Clean Boot State and see if that helps you.
These are some of the methods you can try to resolve the error. Let us know if this helped.
Shubham is a PHP Developer, who is skilled in PHP, DOM, Angular, JavaScript, and C#. He loves talking about Microsoft technologies.
Обновлено 2023 января: перестаньте получать сообщения об ошибках и замедлите работу вашей системы с помощью нашего инструмента оптимизации. Получить сейчас в эту ссылку
- Скачайте и установите инструмент для ремонта здесь.
- Пусть он просканирует ваш компьютер.
- Затем инструмент почини свой компьютер.
Ошибка ShellExecuteEx; code1155 — это системный код ошибки, который обычно возникает, когда вы не можете открыть файл. Это связано с тем, что ваш компьютер атакован вредоносными программами или вирусами, или потому что ваша антивирусная программа находится в конфликте с ShellExecuteEx.
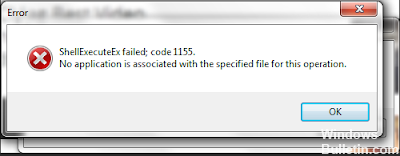
ShellExecuteEx — важная функция системной процедуры. ShellEx не удалось; code1155 означает только то, что ваша система находится в зоне высокого риска. Чтобы избежать дальнейших проблем и повреждений, вы должны сделать все возможное, чтобы удалить существующие вирусы как можно быстрее.
Запуск приложения от имени администратора
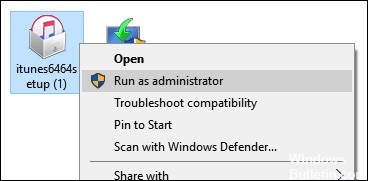
Если вы столкнулись с ошибкой Shellexecuteex Failed при открытии или установке приложения, это может вызвать проблемы из-за неожиданного завершения работы приложения или установки исполняемого файла, который не имеет доступа администратора.
В следующем разделе объясняется, как запустить приложение от имени администратора.
Шаг 1: щелкните правой кнопкой мыши приложение, которое вызывает ошибку, и выберите Свойства.
Шаг 2. Выберите вкладку «Совместимость» и включите эту программу в качестве администратора в разделе «Параметры времени выполнения». Нажмите на Применить.
Шаг 3: перезапустите приложение и убедитесь, что ошибка Shellexecuteex Failed исправлена.
Обновление за январь 2023 года:
Теперь вы можете предотвратить проблемы с ПК с помощью этого инструмента, например, защитить вас от потери файлов и вредоносных программ. Кроме того, это отличный способ оптимизировать ваш компьютер для достижения максимальной производительности. Программа с легкостью исправляет типичные ошибки, которые могут возникнуть в системах Windows — нет необходимости часами искать и устранять неполадки, если у вас под рукой есть идеальное решение:
- Шаг 1: Скачать PC Repair & Optimizer Tool (Windows 10, 8, 7, XP, Vista — Microsoft Gold Certified).
- Шаг 2: Нажмите «Начать сканирование”, Чтобы найти проблемы реестра Windows, которые могут вызывать проблемы с ПК.
- Шаг 3: Нажмите «Починить все», Чтобы исправить все проблемы.

Отключить UAC
Отключите UAC и попробуйте переустановить или запустить программу.
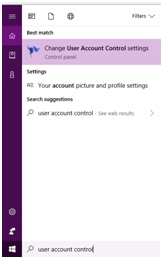
Скачайте и переустановите программу установки
Если вы получаете сообщение об ошибке «shellexecuteex failed code 2» при установке приложения или игры, которые вы только что загрузили, мы рекомендуем вам снова загрузить программу установки. В установочном файле может быть ошибка, вызывающая сообщение об ошибке «shellexecuteex failed code 2». В таком сценарии пользователям придется удалить и переустановить приложение или его следы. Также убедитесь, что вы запускаете программу установки в режиме администратора.
Сброс системных звуков по умолчанию
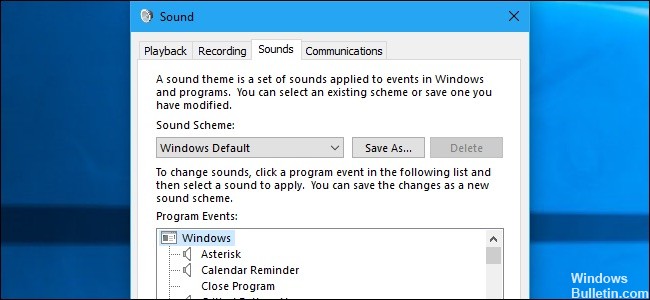
Как сообщили несколько разных пользователей, эта конкретная проблема также может быть вызвана определенными системными звуками, определенными определенными субъектами, которые не обрабатываются надлежащим образом модулем, который они пытаются использовать. Если этот сценарий применим, приложение будет сбой со звуками при попытке их воспроизведения,
В этом случае вы можете решить проблему, сбросив все Звуки Windows к значению по умолчанию. После перезагрузки системы большинство заинтересованных пользователей сообщили, что проблема была решена.
Вот краткое руководство по сбросу системных звуков к значениям по умолчанию:
- Нажмите Windows + R, чтобы открыть диалоговое окно «Выполнить». В поле «Выполнить» введите «mmsys.cpl» в текстовое поле и нажмите Enter, чтобы открыть экран «Звук».
- Находясь в окне «Звук», выберите вкладку «Звуки» в горизонтальном меню. Затем измените звуковую схему на Windows Standard.
- Как только активная звуковая схема была успешно изменена, перезагрузите компьютер и убедитесь, что проблема будет решена при следующем запуске.
Запустите компьютер в безопасном режиме и проверьте, сохраняется ли проблема.

- Нажмите кнопку Windows + C, затем нажмите «Настройки».
- Нажмите Power, удерживая клавишу Shift на клавиатуре, а затем нажмите Restart.
- Нажмите на Устранение неполадок.
- Нажмите на Дополнительные параметры.
- Нажмите «Параметры запуска».
- Нажмите «Перезагрузить».
- Нажмите клавишу 5 на клавиатуре, чтобы активировать безопасный режим с сетью.
https://www.nvidia.com/en-us/geforce/forums/geforce-experience/14/192666/shellexecuteex-failed-code-1155/
Совет экспертов: Этот инструмент восстановления сканирует репозитории и заменяет поврежденные или отсутствующие файлы, если ни один из этих методов не сработал. Это хорошо работает в большинстве случаев, когда проблема связана с повреждением системы. Этот инструмент также оптимизирует вашу систему, чтобы максимизировать производительность. Его можно скачать по Щелчок Здесь

CCNA, веб-разработчик, ПК для устранения неполадок
Я компьютерный энтузиаст и практикующий ИТ-специалист. У меня за плечами многолетний опыт работы в области компьютерного программирования, устранения неисправностей и ремонта оборудования. Я специализируюсь на веб-разработке и дизайне баз данных. У меня также есть сертификат CCNA для проектирования сетей и устранения неполадок.
Сообщение Просмотров: 218
Several Windows users have been reaching us with questions after encountering the “Shellexecuteex Failed” error message whenever they try to perform an action that involves connecting to the Internet or when installing an application. Affected users are reported various codes that are displayed along with the error message. As it turns out, the issue is not exclusive to a certain WIndows version as we managed to find occurrences of it on Windows 7, Windows 8.1 and Windows 10.
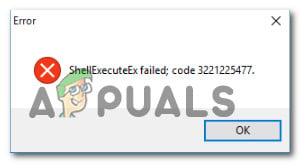
What’s causing the “Shellexecuteex Failed” error on Windows?
We investigated this particular issue by looking at various user reports and at the repair strategies that are commonly used in this particular scenario. Based on our analysis, there are several different culprits that are often identified for causing the issue. Here are several scenarios that you might be encountering:
- The application doesn’t have admin privileges – As it turns out, this problem is quite common in instances where there’s an unexpected app shut down due to insufficient permissions. If this scenario is applicable, you should be able to resolve the issue in most cases by ensuring that the app opens with administrative access.
- System File Corruption – Another potential culprit is system file corruption that affects a dependency used by the application that’s showing the error. Several users that were also encountering this problem have reported that the issue was resolved after they repaired every logical error and corrupted item with the two built-in utilities (DISM and SFC). In most severe cases, the only viable fix that will work in this scenario is to reset every Windows component by performing a clean install or repair install.
- Custom System sounds are crashing the app – It’s also possible that you’re encountering this issue due to some custom Windows theme sounds that are not being handled properties by the application trying to use them. In this case, you should be able to resolve the issue by reverting back to the default Windows sounds.
- Application conflict – Under certain circumstances, it’s also possible that a different application conflicts with the process of the app that you’re trying to launch, which ends up triggering the error. Since there’s no definitive of the apps that conflict, the best way of discovering the culprit is to start your computer in clean boot mode and see if the symptoms stop.
- Overprotective Local policy – If one particular Local policy is enabled (Only elevate executables that are signed and validated) every executable that is not properly signed and validated will be prevented from running with this particular error. In this case, you fix the problem by accessing the Group Policy editor and disabling the policy causing the problem.
Method 1: Running the application as Administrator (if applicable)
If you’re encountering the “Shellexecuteex Failed” error while trying to open or install an application, it’s very likely that the issue occurs due to an unexpected application shutdown (or installation executable) because it doesn’t have admin access.
This type of issue is typically restricted to open source apps and apps with small teams of developers – we haven’t identified any occurrences with triple-A teams.
If you think this scenario might be applicable to your current situation, you will be able to resolve the issue simply by forcing the application to start with admin access. Here’s a quick guide on how to run the application as administrator:
- Right-click on the application that is is triggering the error and choose Properties from the newly appeared menu.
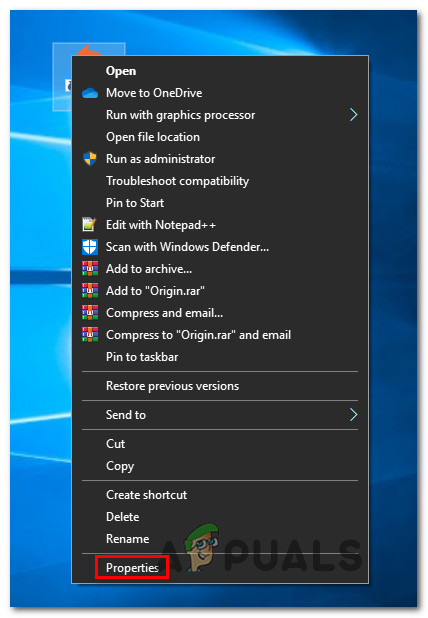
Accessing the Properties screen of the application encountering the issue - Once you’re inside the Properties screen, select the Compatibility tab and go to the Settings section. Next, check the box associated with Run this program as administrator, then click on Apply to set this as the new default behavior.
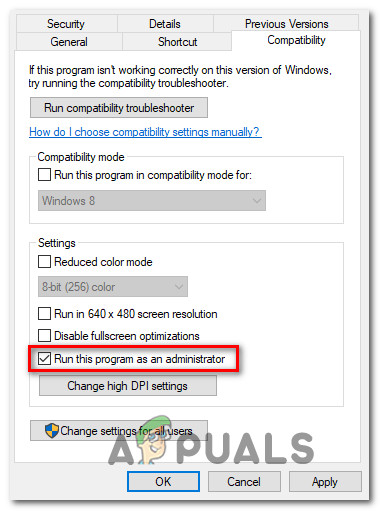
Ensuring that the app starts with admin privileges - Start the application again and see if the issue is now resolved.
If the same “Shellexecuteex Failed” error is still occurring, move down to the next method below.
Method 2: Running DISM and SFC scans
As it turns out, in some cases, the “Shellexecuteex Failed” error is occurring due to some kind of system file corruption that is preventing the installation from completing. If this scenario is applicable, the only viable fix is to try to resolve the corruption that’s causing the issue while limiting the damage.
And the best way of doing this is to rely on built-in utilities like DISM (Deployment Image Servicing and Management) and SFC (System File Checker). both are equipped to deal with corrupted system files, but they operate differently.
While SFC relies on a locally stored cache to replace the corrupted items with healthy copies, DISM uses WU (Windows Update) to download the healthy files needed for the replacement. But since the utilities are geared towards fixing different components (SFC is more efficient with logical errors), the best approach is to deploy both scans to improve your chances of success.
Here’s what you need to do:
- Press Windows key + R to open up a Run dialog box. Next, inside the Run text box, type ‘cmd’ and press Ctrl + Shift + Enter to open up a Command Prompt with admin access. When you’re prompted by the UAC (User Account Control), click Yes to open the elevated Command Prompt.
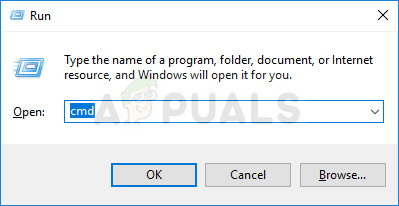
Running Command Prompt - Inside the elevated Command prompt, type the following command and press Enter to initiate an SFC scan:
sfc /scannow
Note: Do not interfere with the window until the process is complete. Interrupting the operation will likely create even more logical errors that will be harder to fix.
- Once the scan is complete, restart your computer and wait for the next startup to complete. Once your OS is fully loaded, follow step 1 again to open another elevated Command Prompt. Once back into the CMD window, type the following commands and press Enter after each one to initiate a DISM scan:
Dism.exe /online /cleanup-image /scanhealth
Dism.exe /online /cleanup-image /restorehealth
Note: Make sure your internet connection is stable before you initiate this process. The first command will start the scan while the second will start the scanning process.
- Once the DISM scan is complete, restart your computer and see if the issue is resolved at the next system startup.
If the “Shellexecuteex Failed” error is still appearing when you repeat the same action, move down to the next method below.
Method 3: Reverting the System Sounds to the Default
As several different users have reported, this particular issue can also be caused by some System Sounds defined by some themes that are not being handled properly by the module that is trying to use them. If this scenario is applicable, the app using the sounds will crash whenever it tries to play them,
In this case, you will be able to resolve the issue by resetting all Windows sounds to the default. After doing so and restarting the machine, most affected users have reported that the issue was resolved.
Here’s a quick guide on reverting the system sounds back to the default values:
- Press Windows key + R to open up a Run dialog box. Inside the run box, type “mmsys.cpl” inside the text box and press Enter to open the Sound screen.
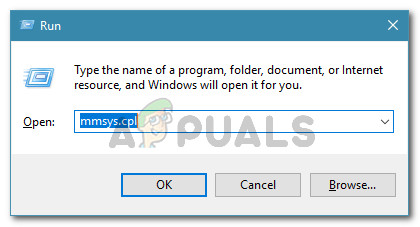
Running dialog: mmsys.cpl - Once you’re inside the Sound window, select the Sounds tab from the horizontal menu. Next, change the Sound Scheme to Windows Default.
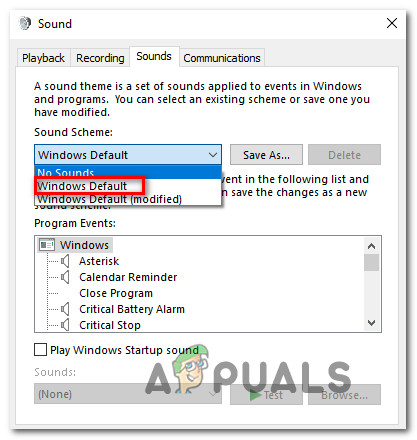
Changing the Sound Scheme to Windows Default Note: If your current Sound Scheme is set to Windows Default (modified) chance it to Windows Default since you might have some invalid sounds.
- Once the active Sound Scheme has been successfully changed, restart your computer and see if the issue is resolved at the next system startup.
Repeat the action that was previously triggering the “Shellexecuteex Failed” error and in case the issue is still appearing, move down to the next method below.
Method 4: Performing a clean boot
If you’ve come this far with no palpable results, you may be encountering the issue due to some kind of 3rd party conflict that is triggering the “Shellexecuteex Failed” error. Since there are a lot of potential applications that might conflict with the application that’s displaying the error, the best way of taking care of the issue is to configure your computer to start in clean boot.
Follow the instructions below to achieve a clean boot state and identify the application that is causing the conflict. Here’s what you need to do:
- Press Windows key + R to open up a Run dialog box. Next, type “mscofig” and press Enter to open up the System Configuration menu. When you see the UAC (User Account Control) menu, click Yes to grant administrative privileges.
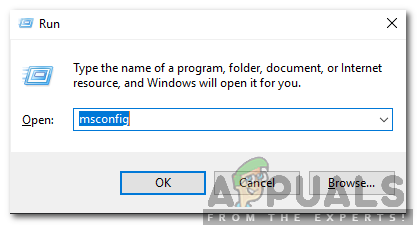
Typing in msconfig and pressing enter - Once you’re inside the System Configuration window, click on the Services tab from the top of the menu, then check the box associated with “Hide all Microsoft Services”. After you’ve done this, all Windows services will be removed from that list, so you don’t run the risk of disabling a Windows component.
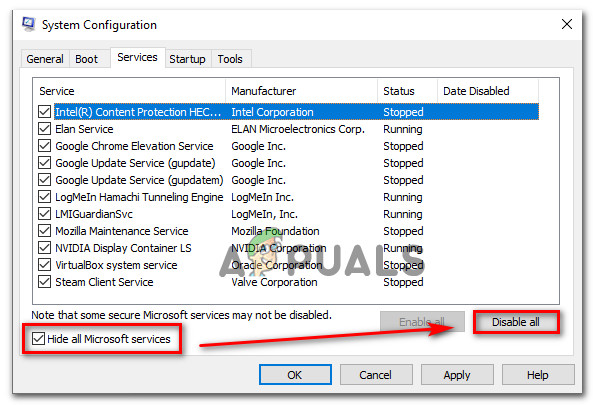
Disabling all non-Microsoft startup items - After you manage to exclude all essential services from the list, click on the Disable all button to effectively prevent any 3rd party service from being started at the next machine startup.
- Next, select the Startup tab from the horizontal menu and click on Open Task Manager.
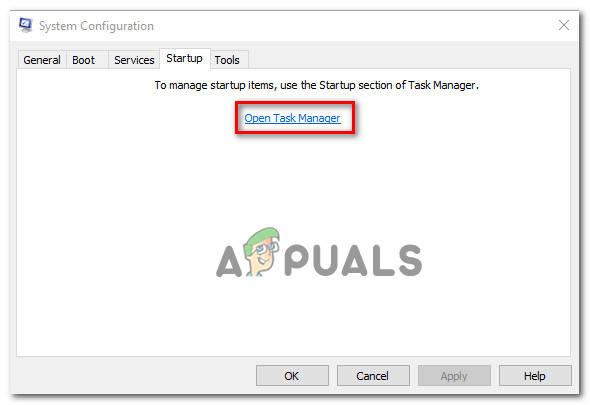
Opening the Startup items window via Task Manager - After you’re inside the Startup tab of Task Manager, systematically select each startup service and then click on the Disable button in the bottom section of the screen. This procedure will ensure that no startup service gets called at the next system startup.
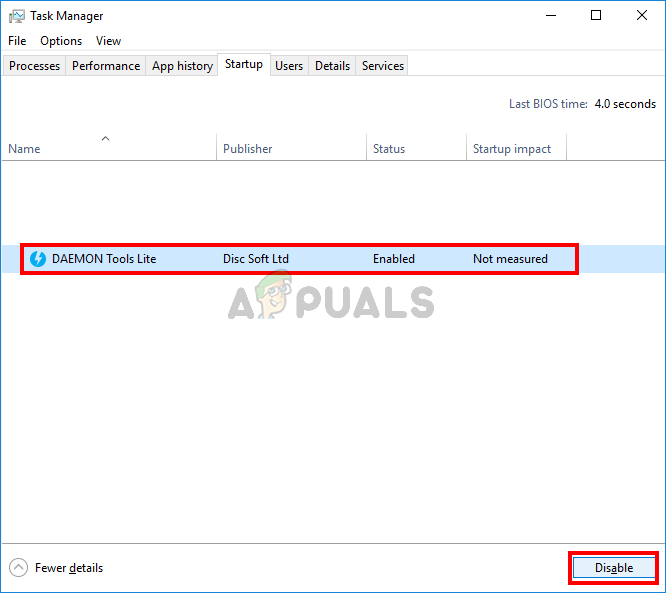
Disabling Apps from Startup - Now that you’ve got to this step, you have effectively disabled every service or process that might interfere with the application showing the “Shellexecuteex Failed” error. Take advantage of the clean boot state you’ve just configured by restarting your computer.
- At the next system startup, see if the error is still occurring once you try to launch the application. If the error is not occurring anymore, complete the installation, then reverse engineer the steps above and re-enable the services that you previously disabled.
If this method didn’t allow you to resolve the “Shellexecuteex Failed” error, move down to the next method below.
Method 5: Adjusting the “Only elevate executables” Policy
As it turns out, this particular issue can also be avoided by adjusting one Group policy named Only elevate executables that are signed and validated. But keep in mind that this method will only be effective in situations where the issue is being caused by an executable that isn’t signed properly.
Several affected users have reported that the issue stopped occurring and the installation was successful after the Only elevate executables that are signed and validated was effectively disabled.
Note: Certain Windows versions don’t include the Group Editor. In this case, this method won’t be applicable, so move directly to the final method below.
Here’s a quick guide on disabling the policy that is triggering the “Shellexecuteex Failed” error:
- Press Windows key + R to open up a Run dialog box. Next, type “gpedit.msc” inside the text box and press Ctrl + Shift + Enter to open up the Local Group Policy Editor with admin privileges. When you see the UAC (User Account Control) prompt, click on Yes to grant admin access.
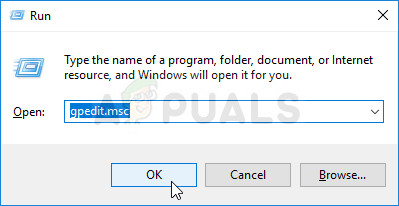
Running the Local Policy Group Editor - Once you’re inside the Local Group Policy Editor, move to the left-hand panel and select Computer Configuration > Windows Settings > Security Settings.
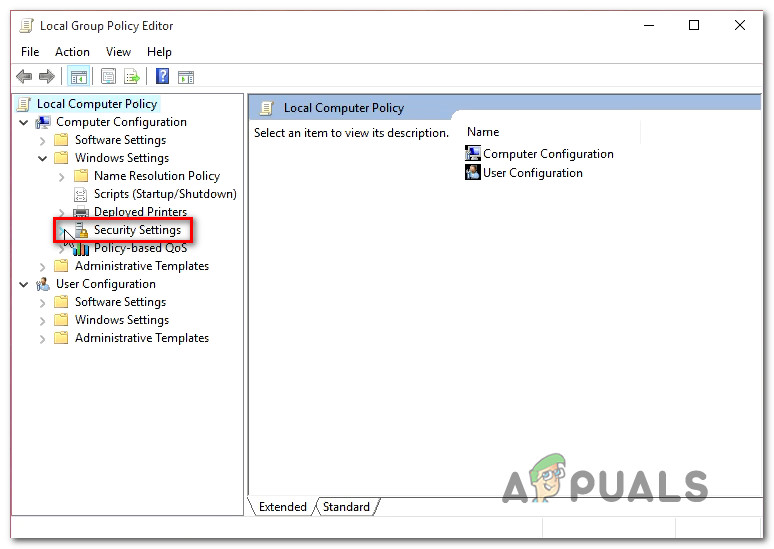
Accessing the Security Settings menu from the Local Group Policy Editor - With the Security Options menu selected, move over to the right-hand side and double-click on the User Account Control: Only elevate executables that are signed and validated policy.
- Once you’re inside the policy menu, select the Local Security Setting tab and then ensure that the policy is set to Disabled.
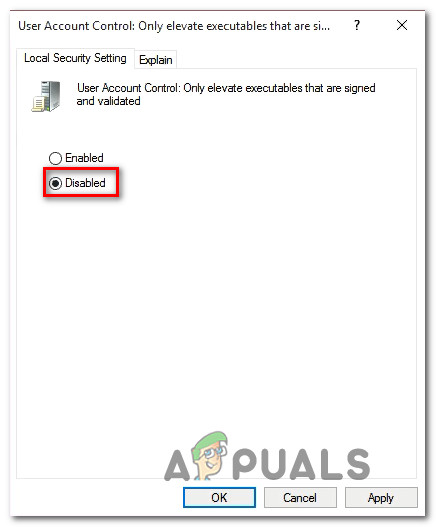
Disabling the Policy - Click Apply to save the changes, then restart your computer and see if the issue is resolved at the next system startup.
If the “Shellexecuteex Failed” error is still occurring move down to the next method below.
Method 6: Performing a clean install
If none of the methods above have allowed you to resolve the issue, chances are you’re dealing with an underlying corruption issue that cannot be resolved conventionally. If this scenario is applicable in your current situation, you can only resolve the issue by resetting every Windows component.
The quickest way of doing this is by performing a clean install (here), but keep in mind that this procedure will make you lose any personal data including installed applications, games, media, user preferences and more.
A most efficient approach that takes a little longer is to go for a repair install (in place install). This procedure will allow you to keep all your personal effects including games, applications, user preferences and any type of media. If you decide to perform a repair install, follow the instructions (here).
If you want to find a solution to the “Shellexecuteex Failed” error, this post is what you need. It will show you some possible causes of the “Shellexecuteex Failed” error. In addition, it will also introduce you to several workable methods for this error. Now get these methods from MiniTool.
What Causes the “Shellexecuteex Failed” error on Windows?
Here are a few situations you might encounter:
- The application doesn’t have admin privileges
- System File Corruption
- Custom System sounds are crashing the app
- Application conflict
- Overprotective Local policy
If you want to find the methods for the “Shellexecuteex Failed” error, keep reading.
Method 1: Run the Application as Administrator
If you meet a «Shellexecuteex Failed» error when you open or install an application, it is likely to cause problems due to an unexpected application shutdown or installation of an executable because it does not have administrator access.
The following part will show you how to run an application as an administrator.
Step 1: Right-click on the application that is triggering the error, and select Properties.
Step 2: Select the Compatibility tab and check Run this program as administrator under the Settings section. Click Apply.
Step 3: Run the application again and see if the “Shellexecuteex Failed” error is fixed.
Method 2: Run DISM and SFC Scans
In some cases, the «Shellexecuteex Failure» error occurs because the installation could not be completed due to some type of system file corruption.
Follow the steps below to fix this error.
Step 1: Press Windows + R keys to open the Run dialog box. Type cmd and press Ctrl + Shift + Enter to run Command Prompt as an administrator.
Step 2: Type sfc /scannow and press Enter to perform an SFC scan.

Tip: Do not interfere with the window until this process is complete. Interrupting this operation may result in more logical errors that are more difficult to fix.
Step 3: After the scan is complete, restart the computer and wait for the next boot to complete. When the operating system is fully loaded, follow Step 1 to open Command Prompt again.
Step 4: Execute the commands: Dism.exe /online /cleanup-image /scanhealth and Dism.exe /online /cleanup-image /restorehealth to perform a DISM scan.
Tip: Before starting this process, make sure your Internet connection is stable.
Step 5: After the DISM scan is complete, restart the computer to see if the “Shellexecuteex Failed” error is fixed.
Method 3: Revert the System Sounds to the Default
In this case, you also fix the issue by resetting all Windows sounds to the default.
Step 1: Press Windows + R keys to open the Run dialog box. Type mmsys.cpl and click OK to open the Sound screen.
Step 2: Select the Sounds tab and then change the Sound Scheme to Windows Default. Click Apply and then click OK.
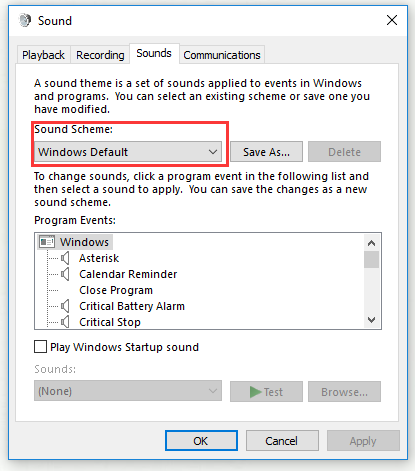
Step 3: Restart your computer to see if the “Shellexecuteex Failed” error disappears.
Method 4: Perform a Clean Boot
If the errors haven’t been fully resolved so far, you may be experiencing a «Shellexecuteex failure» error due to some kind of third-party conflict. Many potential applications could conflict with the ones that the application that is displaying the error, so your best approach to the problem is to configure your computer to start with a clean boot.
Step 1: Press Windows + R keys to open the Run dialog box. Type mscofig and click OK to open the System Configuration menu.
Step 2: Click the Services tab and then check Hide all Microsoft Services.
Step 3: Click Disable all to prevent all third party services from being started the next time your computer starts.
Step 4: Select the Startup tab and click Open Task Manager.
Step 5: Select each startup service systematically and then click Disable. This step ensures that no startup services are invoked the next time the system starts.
Step 6: Restart the computer to see if the error is still existing. If the error no longer occurs, complete the installation, then reverse engineer the steps above and re-enable the previously disabled services.
Method 5: Adjust the “Only elevate executables” Policy
In cases where the problem is caused by an improperly signed executable, in order to avoid this particular problem, you can adjust one Group policy named Only elevate executables that are signed and validated.
Step 1: Press Windows + R keys to open the Run dialog box. Type gpedit.msc and press Ctrl + Shift + Enter to open Local Group Policy Editor with admin privileges.
Step 2: Navigate to Computer Configuration > Windows Settings > Security Settings > Local Policies > Security Options. Double-click User Account Control: Only elevate executables that are signed and validated.
Step 3: Select the Local Security Setting tab and then ensure the policy is set to Disabled. Click Apply and then click OK.

Step 4: Restart the computer to see if the issue is fixed.
Method 6: Perform a Clean Install
If none of the above methods can solve this problem, you’re probably dealing with an underlying corruption problem that cannot be fixed by conventional means. You can only solve this problem by resetting each Windows component.
The quickest way is to perform a clean install. This process will cause you to lose any personal data.
The most effective way to take longer is to install the fix — in place install. During this process, you can retain all personal effects.
Bottom Line
In conclusion, this post has shown you some possible reasons for the “Shellexecuteex Failed” error. Meanwhile, it also shows you some useful methods to fix this problem. If you encounter this issue, you can try these methods.
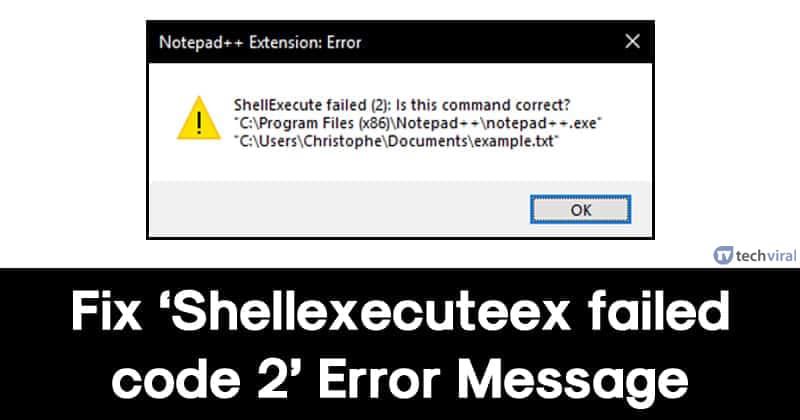
В последнее время много Windows 10 пользователей сообщили, что они получают «код ошибки shellexecuteex 2» при установке файлов .exe. С Windows имеет хорошую репутацию в ущерб пользовательскому опыту, подобные ошибки теперь считаются «нормальными». Для Windows пользователи, переустановка Windows операционная система – обычное дело, и цикл установки и форматирования операционной системы, кажется, никогда не заканчивается.
После получения нескольких сообщений от наших посетителей относительно сообщения об ошибке «shellexecuteex failed code 2» мы исследовали и обнаружили, что ошибка возникает из-за некоторых ошибок. Ошибка исправлена в последней сборке Windows ОС, но проблема в том, что пользователи, использующие пиратскую версию Windows ОС не получит обновление.
Итак, для этих пользователей мы собираемся обсудить несколько лучших методов, которые могут в кратчайшие сроки исправить «ошибочный код shellexecuteex 2». Поскольку основная причина сообщения об ошибке еще не найдена, пользователям необходимо следовать всем методам, чтобы исправить сообщение об ошибке shellexecuteex failed code 2.
1. Просканируйте свой компьютер с помощью мощного инструмента безопасности.
Сканируйте свой компьютер с помощью антивируса
Что ж, это одна из первых вещей, которые вам нужно сделать при работе с ошибками. Стоит отметить, что вирусы, вредоносные программы, шпионское ПО, рекламное ПО и т. Д. Иногда играют с системными файлами, что может вызвать различные ошибки. Итак, прежде чем вы решите использовать другие методы, обязательно просканируйте свой компьютер. Даже если полное сканирование системы не поможет исправить сообщение об ошибке, оно устранит угрозы безопасности. Поэтому обязательно просканируйте свою систему с помощью инструментов безопасности, чтобы исправить сообщение об ошибке «shellexecuteex failed code 2».
2. Попробуйте запустить в режиме администратора.
Попробуйте запустить в режиме администратора
Что ж, если вы получаете сообщение об ошибке при установке программ, вы можете попробовать запустить установщик с правами администратора. Если с разрешениями что-то не так, то запуск установщика в режиме администратора, вероятно, устранит сообщение об ошибке «shellexecuteex failed code 2». Устанавливать приложения в режиме администратора очень просто; пользователям необходимо щелкнуть установщик правой кнопкой мыши и выбрать параметр «Запуск от имени администратора». Некоторые приложения также требуют прав администратора для установки, поэтому, если это вызывает ошибку, она будет исправлена.
3. Повторно загрузите установщик и установите его.
Повторно загрузите установщик и установите
Если вы получаете сообщение об ошибке «shellexecuteex failed code 2» при установке любого приложения или игры, которые вы только что загрузили, мы рекомендуем вам повторно загрузить установщик. В установочном файле может быть какая-то ошибка, которая вызывает сообщение об ошибке «shellexecuteex failed code 2». Таким образом, в таком сценарии пользователям необходимо удалить приложение или его следы и установить его снова. Кроме того, не забудьте запустить установщик в «режиме администратора».
4. Верните системные звуки к значениям по умолчанию.
Что ж, некоторые пользователи сообщили, что возвращение системных звуков к значениям по умолчанию устранило сообщение об ошибке. Проблема обычно возникает, когда модуль, который вы пытаетесь установить или использовать, не может правильно обрабатывать системные звуки. Итак, если это была проблема, вам нужно вернуть системные звуки по умолчанию, чтобы исправить сообщение об ошибке.
Шаг 1. Прежде всего, нажмите Windows Клавиша + R , чтобы открыть диалоговое окно RUN.
Открыть диалоговое окно RUN
Шаг 2. В диалоговом окне ЗАПУСК введите mmsys.cpl и нажмите Enter.
Введите mmsys.cpl и нажмите Enter.
Шаг 3. Далее вам нужно выбрать ‘Звуки’ вкладка, а затем выберите ‘Windows дефолт’ под Звуковой схемой.
Перейдите на вкладку “Звук” и выберите “Windows по умолчанию ‘в разделе Звуковая схема
Вот и все! Вы сделали. Теперь просто перезагрузите компьютер, чтобы исправить сообщение об ошибке shellexecuteex failed от Windows 10.
5. Запустите команду SFC.
Что ж, сообщение об ошибке «shellexecuteex failed code 2» также возникает из-за поврежденных системных файлов. Итак, если вы получаете сообщение об ошибке из-за поврежденных системных файлов, вам необходимо использовать команду SFC. Команда SFC на Windows скорее всего, исправит все поврежденные, отсутствующие или измененные системные файлы. Вот как использовать команду SFC, чтобы исправить сообщение об ошибке shellexecuteex failed code 2.
Шаг 1. Прежде всего, введите CMD в меню поиска и щелкните правой кнопкой мыши командную строку. В контекстном меню выберите «Командная строка (администратор)».
Использование команды SFC
Шаг 2. Теперь в окне командной строки введите команду sfc / scannnow и нажмите клавишу ВВОД.
Использование команды SFC
Шаг 3. Теперь подождите несколько секунд, пока сканирование не завершится. Если вы получите сообщение об ошибке ‘Windows Защита ресурсов обнаружила поврежденные файлы, но не смогла их исправить », затем выполните ту же команду в безопасном режиме.
Вот и все; вы сделали! Вот как вы можете использовать команду SFC, чтобы исправить «ошибочный код 2 shellexecuteex» из Windows 10.
6. Ремонт системы
Что ж, если команде SFC не удалось исправить сообщение об ошибке shellexecuteex failed code 2, вам необходимо восстановить вашу систему. Однако вам необходимо иметь рабочий Windows загрузочный DVD или USB для восстановления системы. В Windows Утилита восстановления системы исправит различные проблемы, связанные с файлами System 32, точками восстановления, реестром и т. Д.
Использование восстановления системы
Просто вставьте Windows установочный DVD или USB-накопитель и перезагрузите компьютер. Во время запуска вам будет предложено нажать любую клавишу для загрузки с DVD или USB. Нажмите любую клавишу и на следующей странице выберите «Восстановить». Теперь просто следуйте инструкциям на экране, чтобы восстановить вашу систему.
Итак, это лучшие методы для исправления сообщения об ошибке shellexecuteex failed code 2 из Windows компьютер. Если вы знаете какой-либо другой способ исправить ошибку, сообщите нам об этом в поле для комментариев ниже ».
Contents
- What Does the “ShellExecuteEx Failed; Code Error 8235. A Referral Was Returned from the Server” Error Mean?
- How to Resolve the ShellExecuteEx Failed Error
- Use Administrator Permissions
- Grant the Program Admin Privileges
- Adjust UAC Settings
- Log In to the Hidden Administrator Account and Install the Program
- The steps below will show you how to do that:
- Make the File’s Signature a Trusted One
- Uninstall Problematic Windows Updates
- Make Changes to the System Registry
- Now, follow these steps to apply the changes:
- Restore Your System
- The following steps will guide you:
- Conclusion
![[FIXED] “ShellExecuteEx Failed; code 8235” in Windows 10](https://www.auslogics.com/en/articles/wp-content/uploads/2020/12/fix-shellexecuteex-failed-code-8235.jpg)
The “ShellExecuteEx Failed; code 8235” error usually comes with the “A referral was returned from the server” message. You may encounter this error when you try to install a program or open an application.
What Does the “ShellExecuteEx Failed; Code Error 8235. A Referral Was Returned from the Server” Error Mean?
This error message is an indication that some security policies are preventing you from performing a certain action. The policies might be some default restrictions or some adjustments made via an update, for example. The problem may also reside with the program or setup that you’re working with.
In this article, you’ll learn how to fix the ShellExecuteEx Failed error.
How to Resolve the ShellExecuteEx Failed Error
To get rid of the problem, you’ll have to make sure the file or program you’re working with isn’t denied access because it doesn’t have the required privileges. In this article, you’ll find out how to relax certain restrictions and remove roadblocks that shouldn’t be there.
Follow the solutions below one after the other and in the order that we have arranged them.
Use Administrator Permissions
If you’re experiencing the error whenever you want to install a program, right-click on the installer and select Run as Administrator. Click on the Yes option once the User Account Control dialog window pops up.
The installer might require permission to write files to some protected system directories. Make sure you’re logged into an administrator account before you perform this operation. Also, it’s important that you verify the legitimacy of the installer you’re about to run, as granting a malicious program admin access can wreak havoc that your PC might not recover from.
Grant the Program Admin Privileges
If the error keeps showing up whenever you try to launch a program, then grant it admin privileges. Windows might be blocking the application from accessing certain system files that it needs to run properly.
You can either right-click on the program and select Run as Administrator any time you want to open it or make changes to its properties. These steps will show you how to prompt Windows to run the program as an administrator whenever you launch it:
- Launch a File Explorer window and navigate to the installation folder of the program.
- Locate its executable file, right-click on it, and then click on Properties.
- If you have a desktop shortcut to the exe file, right-click it and click on Properties.
- If there is no desktop shortcut to the file and you don’t know how to locate it, follow these steps:
- Open the Start menu and search for the program.
- Once it appears in the results list, right-click it, hover your mouse pointer over More, and then select Open File Location.
- You’ll be taken to a folder where you’ll see the program’s Start menu shortcut.
- Right-click on the shortcut and select Open File Location.
- The program’s installation folder will now appear.
- You can now right-click on its executable file and select Properties.
- After the Properties window opens, go to the Compatibility tab.
- Click on the “Change settings for all users” button.
- On the next dialog window, check the box for “Run this program as an administrator”, and then click on the OK button.
- You can now run the program and check whether the error message appears again.
Adjust UAC Settings
The error message could be popping up because your current UAC policy is too stringent. The highest security policy prompts Windows to scrutinize and block operations that you might consider basic.
While it’s important that you maintain a reasonable level of security for your system, you can relax some tough measures to prevent issues like this from needlessly occurring. The following steps will show you how to lower your UAC policy:
- Right-click the Start button and select Run or press the Windows and R keys together to launch the Run dialog box.
- After Run opens, type “Control Panel” (don’t add the quotes) into the text field, and then click on the OK button.
- Once the Control Panel window opens, click on User Accounts.
- Click on User Accounts again on the next page.
- Next, click on “Change User Account Control settings”.
- Now, on User Account Control’s Settings window, drag the slider down a step or two from Always Notify towards Never Notify. The box to the right will describe the security level for you.
- Click on the OK button, and then go back to check whether the problem persists.
Log In to the Hidden Administrator Account and Install the Program
If you’re experiencing the issue with a single executable file, then you can resolve it by signing in to the hidden admin account, which has higher privileges. You’ll have to activate the account via the Command Prompt utility. We recommend that you open Command Prompt from the Windows Recovery Environment.
The steps below will show you how to do that:
- Press and hold your power button to force your PC to shut down.
- Turn on the computer and force it to shut down again after the logo of your system’s manufacturer shows up.
- Repeat Step 2 twice and you’ll see the “Please wait” message.
- On the Automatic Repair screen, click on the Advanced Options button.
- On the Choose an Option screen, click on Troubleshoot.
- Now, click on Advanced Options under Troubleshoot, and then click on Command Prompt.
- Once the Command Prompt loads, type in the following and hit Enter:
Net user administrator /active:yes
- Restart your PC, log in to the admin account, and then try performing the operation.
Make the File’s Signature a Trusted One
You can let Windows know that the executable file that you want to run or install is legitimate by adding its signature as a trusted signature. While this process is a bit complicated, some users have confirmed that it worked for them. So, carefully follow these steps to apply the fix:
- Launch a File Explorer window and navigate to the installation folder of the program.
- Locate its executable file, right-click on it, and then click on Properties.
- If you have a desktop shortcut to the exe file, right-click it and click on Properties.
- If there is no such shortcut and you don’t know how to locate the file, follow these steps:
- Open the Start menu and search for the program.
- Once it shows up in the results list, right-click it, hover your mouse pointer over More, and then select Open File Location.
- You’ll be taken to a folder where you’ll see the program’s Start menu shortcut.
- Right-click on the shortcut and select Open File Location.
- The program’s installation folder will now appear.
- You can now right-click on its executable file and select Properties.
- After the Properties window opens, go to the Digital Signatures tab.
- Click on the signature under Signature List, then click on Details.
- Under Signer Information, click on View Certificate.
- On the next page, click on Install Certificate, and then click on Next.
- Once you get to the Certificate Import wizard, select “Place all certificates in the following store”, and then click on the Browse button. Write down the name of this certificate, as you’ll need it in the next step.
- Now, choose the Trusted Root Certification Authorities option, and then click OK.
- Click Next.
- Click Finish.
- You can now run the program and check whether the error persists.
You can take things further so that Windows won’t flag the program in the future. Follow these steps:
- Open the Run dialog box by right-clicking the Start button and selecting Run from the Power User menu.
- Once Run opens, type “mmc” (no quotes) into the text field, and then click on OK.
- Click on Yes in the User Account Control dialog that pops up.
- After the Microsoft Management Console opens, click on File in the top-left corner of the window.
- Select “Add/remove snap-ins” once the context menu drops down.
- Once the “Add or remove snap-ins” window opens, navigate to the left pane and click on Certificates under Available Snap-Ins.
- Click on the Add button, and then click on OK.
- Now, on the main MMC interface, right-click on Certificates and click on Find Certificates.
- Enter the name of the certificate you wrote down earlier and click on the Find Now button.
- When you see the certificate, right-click it, and then select Properties.
- Switch to the General tab and select “Enable only the following purposes”.
- Uncheck every other box save the one for “Code Signing”.
- That should do it! You can now check whether the error persists.
Uninstall Problematic Windows Updates
If you started seeing the problem after updating your system, try uninstalling the update. Microsoft updates may even cause conflicts that prompt the company to undo them. While issues like these are hardly widespread, they happen in unique situations.
If you don’t know how to uninstall an update, follow these steps:
- Right-click on the Start button and select Settings.
- After the Settings application opens, click on Update & Security.
- Once the Update & Security interface opens, switch to the Windows Update page and click on View Update History.
- Take note of the KB number of the last update you installed before the problem started showing up.
- Now, go to the top of the window and click on Uninstall Updates.
- You’ll be taken to the Control Panel’s Programs and Features window. Locate the KB, click on it, and then click on Uninstall.
- Follow the subsequent instructions until the process is complete.
- Restart your system and check whether the error shows up again.
Make Changes to the System Registry
You can use this workaround to instruct Windows to allow certain executable files that aren’t signed and validated.
However, before you start, make sure you back up the system registry so that you can recover it if anything goes wrong. So, follow these steps:
- Press the Windows and R keyboard buttons together to open the Run dialog window.
- After Run opens, type “regedit” (no quotes), and then hit the Enter key.
- Click on Yes in the User Account Control dialog window.
- Once the Registry Editor opens, click on File, then select Export from the menu.
- Select the folder where you’d like to save the file, enter the name of the file, select All under Export Range, and then click on Save.
- Whenever you want to recover your registry to undo the changes you made, open the Registry Editor, click on File, and then select Import. Navigate to the folder where you saved the backup file and double-click it.
Now, follow these steps to apply the changes:
- Go to the left pane of the Registry Editor and expand the HKEY_LOCAL_MACHINE folder.
- Expand SOFTWARE.
- Under SOFTWARE, navigate to Microsoft and expand it.
- Next, expand Windows, and then look for the CurrentVersion folder and open it.
- Head to Policies, and then single-click on System.
- Head to the right side of the window and double-click on ValidateAdminSignatures.
- Now, set Value data to 0.
- Restart your system and check whether the problem is resolved.
You can also apply the same setting using the Group Policy Editor if you use Windows 10 Pro or Enterprise. Follow these steps:
- Press the Windows and R keyboard buttons together to open the Run dialog window.
- After Run opens, type “gpedit.msc” (no quotes), and then hit the Enter key.
- After the Group Policy Editor opens, go to the left pane and expand Windows Settings under Computer Configuration.
- After that, head to Security Settings and expand it.
- Expand Local Policies.
- Go to Security Options and click on it.
- Navigate to the middle pane, scroll down to “User Account Control: Only elevate executables that are signed and validated” and double-click it.
- On the next dialog window, select Disabled, and then click OK.
- The problem should now be resolved.
Restore Your System
If you were able to run the program in the past without seeing the error, then it’s possible that some changes made to your system might be the cause of the issue. These changes could be installing or uninstalling drivers and third-party programs. To resolve the issue, take your system back to an earlier date when everything worked fine.
The following steps will guide you:
- Right-click on the Start button or press the Windows and E keyboard buttons together to open the File Explorer window.
- After File Explorer opens, go to the left pane, right-click on This PC, and then click on Properties.
- After the System window opens, go to the left pane and click on System Protection.
Note: In new Windows 10 builds, you’ll be taken to the Settings application’s About page. Go to the right pane and click on System Protection.
- Click on System Restore once you see the System Protection tab of the System Properties dialog.
- Click on Next once the first page of the wizard opens.
- Now, select a restore point and click on Next.
- Click Finish and allow the tool to do the job.
- Run the program or installer and check whether the “A referral was returned from the server” error shows up again.
Conclusion
If you have any questions about the “ShellExecuteEx Failed; error code 8235” problem or can’t resolve the issue, leave a comment below.
You can always keep your system running smoothly by installing Auslogics BoostSpeed, which will eliminate bad registry keys and harmful junk files.
Do you like this post? 🙂
Please rate and share it and subscribe to our newsletter!
5 votes,
average: 5.00 out of
5
Loading…