Вы можете столкнуться с ошибкой 14 или 1-4 на роботе Roomba, если корзина устройства не закрывается должным образом или контакты корзины неисправны.
Как исправить ошибку Roomba 14
Проблема возникает, когда пользователь пытается использовать робот Roomba, но обнаруживает ошибку 14 (переустановите корзину, затем нажмите «Очистить»).
Вы можете столкнуться с ошибкой 14 или 1-4 на роботе Roomba (роботе-уборщике), если его пылесборник или разъемы загрязнены, и тщательная очистка устройства может решить проблему.
- Переверните пылесборник (где расположен вентилятор устройства) робота Roomba и открутите винты (обычно 4-6 винтов) на дне мусорного ведра.
Отвинтите пылесборник робота-пылесоса Roomba
- Теперь разберите бункер и очистите вентилятор от пыли / мусора. Вы можете использовать сильный воздушный поток или хорошо встряхнуть деталь, но не используйте в ней ничего острого или липкого. Если необходимо, вы можете попробовать удалить пыль с помощью ватной палочки. Также не забудьте очистить пространство над вентилятором.
- Затем не забудьте очистить вентиляционное отверстие в задней части бункера и не забудьте очистить вакуумное отверстие.
Очистите вентилятор корзины Roomba
- Теперь проверьте, свободно ли вращается вентилятор в бункере и не застревает ли он.
- Затем соберите блок и проверьте, устранена ли ошибка 14.
Если нет, то можно очистить контакты мотора и бункера. Вы можете использовать ластик для карандашей (или бритву), чтобы очистить контакты, но попробуйте сделать это на свой страх и риск.
Временные обходные пути
Если проблема не исчезнет, вы можете исправить ошибку 14 на своем роботе Roomba, попробовав следующие временные обходные пути, о которых сообщили пользователи, чтобы решить проблему за них:
- Извлеките и снова вставьте аккумулятор робота Roomba.
Извлеките и снова вставьте аккумулятор робота Roomba
- Убедитесь, что контакты не торчат из робота. Вы можете надеть нижнюю часть банки или полосу из металлической / оловянной фольги на сломанный кусок, чтобы обеспечить контакт с контейнером и корпусом.
Поместите лист оловянной фольги, чтобы создать контакт между контейнером и корпусом Roomba.
- Убедитесь, что контейнер для пыли правильно и плотно закрывается (вы можете нажать на стенки контейнера после снятия ручки). Вы также можете протереть стенки мусорного ведра наждачной бумагой, чтобы правильно установить его.
Если проблема не устраняется, проверьте, устраняет ли ошибка робота Roomba замена неисправной части (например, контактов корзины с eBay и т. Д.) Или всего мусорного контейнера.
Roomba прост в использовании, но он также подвержен ошибкам. Робот предназначен для работы только в оптимальных условиях, и если что-то выходит из строя, он выдает сообщение об ошибке. Ошибка 14 или 1-4 на Roomba, в частности, является распространенной, когда корзина устройства не закрывается должным образом.
Бункер может не закрываться из-за аппаратных дефектов, связанных с контактами бункера. Когда это происходит, появляется ошибка 14 или 1-4, что означает, что Roomba не обнаруживает установленную корзину. Без обнаружения корзины Roomba не начнет процесс очистки. Поэтому в этой статье мы рассмотрим все возможные решения этой проблемы. Итак, без лишних слов, давайте перейдем к делу.

Как исправить ошибку 14 или 1-4 на Roomba?
Вы сможете исправить эту ошибку, просто полностью очистив робота. Поскольку эта ошибка связана с мусорным баком устройства, вы должны убедиться, что он правильно подключен к вашему устройству.
Очистите робот-пылесос Roomba:
- Переверните пылесборник.
- Открутите винты, которые находятся внизу бункера. Обычно это от 4 до 6 винтов.
- Полностью разберите бункер и начните процесс очистки. Для начала, вы можете использовать фен с очень высокой скоростью, чтобы обеспечить сильный поток воздуха. Это удалит пыль и мусор, прилипшие к вентилятору.
- Используйте ватную палочку, чтобы тщательно прочистить вентилятор на конце.
- Кроме того, прочистите вентиляционное отверстие в задней части бункера и вакуумное отверстие.
После того, как вся эта очистка будет завершена, переместите вентилятор в мусорное ведро, используя любые необходимые средства, прежде чем все собирать. Если вентилятор двигается или вращается свободно без каких-либо проблем, все в порядке. Снова соберите устройство и попробуйте снова его включить.
Если ошибка 14 по-прежнему возникает, попробуйте следующее решение.
Читайте также
Исправлено: код ошибки Roomba 17 (Roomba не может завершить уборку)
Другие обходные пути:
Во-первых, попробуйте вынуть, а затем снова вставить аккумулятор робота Roomba. Это удалит все сохраненные изменения в роботе. Если какой-либо дефект программного обеспечения вызывает проблему, это должно устранить это.
Во-вторых, убедитесь, что пылесборник правильно и плотно закрыт и ничего нигде не торчит. При необходимости вы можете использовать такой материал, как алюминий, чтобы все поставить на место.
Итак, это все решения, которые вы можете попробовать исправить ошибку 14 или 1-4 на Roomba. яЕсли у вас есть какие-либо вопросы или вопросы по этой статье, оставьте комментарий ниже, и мы свяжемся с вами. Также не забудьте ознакомиться с другими нашими статьями на Советы и хитрости iPhone,Советы и хитрости для Android, Советы и хитрости для ПКи многое другое для получения дополнительной полезной информации.
RobotPoweredHome is reader-supported. When you buy through links on my blog, I may earn an affiliate commission. As an Amazon Associate, I earn from qualifying purchases.
My friend bought a Roomba on my recommendation because he didn’t find enough time on his busy schedule to clean his house.
He thought the robot was convenient as he could set a schedule and watch as the Roomba went around cleaning his home.
I told him that if he ever ran into issues with his Roomba, he could call me for help because I have a lot of experience working with Roombas.
He took the advice to heart because he called me up a few months after he got his Roomba and told me it was acting strange, and he needed me to check on it.
So I immediately went over and saw that the Roomba had indeed stopped working properly and was showing an Error 14.
To find out more about what happened to his Roomba, what exactly Error 14 was and how to get it fixed, I went to iRobot’s support pages and poured through pages and pages of manuals.
With the help of iRobot’s extensive documentation and a few people over at Roomba user forums, I solved the issue for my friend.
The guide that you will be reading shortly was made with the help of that research and a bit of trial and error from my side so that you can take a shot at fixing Error 14 yourself.
Error 14 on your Roomba means that the dust collector bin needs to be reinstalled. If the bin was installed correctly, clean the Roomba of dust and grime, or try restarting or resetting the robot.
I’ve also gone into great detail on how you can reset and restart your Roomba, as well as how you can reset the battery on the Roomba and recover lost charge cycles.
What does Error 14 mean on my Roomba?

Error 14 on a Roomba generally means that there was an issue with the Roomba being unable to detect if a bin had been installed.
The Roomba either has failed to detect a properly installed Roomba, or you may not have installed the bin correctly.
This error code can show up as Error 1-4 in some Roomba models as well.
Why am I getting Error 14 on my Roomba?

Error 14 shows up when the Roomba fails to detect a properly installed dust bin, which can happen due to various reasons.
The error can show up you had installed the dust collector bin on the Roomba incorrectly.
It can also happen if the Roomba doesn’t correctly detect the bin, even if you installed it correctly.
The error can appear if you haven’t cleaned out the Roomba in a long while since dust and grime from the floor can accumulate on the Roomba and stop the Roomba from sensing if the bin was correctly installed.
Reinstall the Bin

The most straightforward troubleshooting step would be to do what iRobot usually recommends for this error.
They suggest you remove and reinstall the dust collector bin, this time making sure it is correctly installed.
Press the bin release button and take the bin out.
This is also what you do when you face the Roomba Bin Error.
Carefully place it back in and make sure it fits properly.
Check if the bin has damage, and replace the bin with a new authentic part, which you can get from store.irobot.com.
After installing the bin, press the Clean button on the Roomba and see if Error 14 comes back.
Clean the Roomba

Cleaning the Roomba can help with detection issues and can solve Error 14.
To clean the Roomba:
- Turn the Roomba off and flip it over.
- Unscrew the bottom of the Roomba near the bin unit and take off the plastic panel.
- Clean the internals of the Roomba with a can of compressed air. You can also use Q-tips to get to difficult-to-reach areas.
- Reassemble the panel and screw everything back in.
Make the Roomba run its scheduled routine and see if Error 14 persists.
Reinstall the Battery

Reinstalling the battery of your Roomba kind of acts like a soft reset and can help fix temporary issues with your Roomba.
It’s pretty easy to do and won’t take you more than five minutes.
To reinstall your battery:
- Flip the Roomba onto its back.
- Loosen all screws, including the one at the spinning brush.
- Remove the bottom cover.
- Lift the two tabs on the battery to remove it.
- Wait for at least 10-15 seconds and put the battery back in.
- Reassemble everything back by retracing your steps.
After you close everything up, flip the Roomba over to its correct side and let it run through its cleaning routine.
Check if it runs into Error 14 again.
Reset the Battery
Roombas have a neat battery reset function that not only can fix temporary issues with your Roomba but can recover some of the battery’s lost charge cycles.
To reset the battery on your 500 or 600 series Roombas:
- Press the Clean button.
- Press and hold the Spot and Dock buttons for at least 15 seconds and release them when it beeps.
- Leave your Roomba on the charging dock for about 10 hours or until the Clean button turns green.
To do this with a 700 series Roomba:
- Connect the Roomba to the charging dock or the charging cable.
- Press and hold the Clean button for at least 10 seconds and release them when the display says “r5t” to hear a beep.
- Leave the Roomba to charge for about 15 hours.
Let the Roomba run through its schedule and see if Error 14 comes back.
Restart the Roomba

Rebooting can also help with Error 14 if it was a temporary bug in the software.
Different models of Roomba have different ways to go about restarting, so make sure you are following the steps for your model.
To restart an s Series Roomba:
- Press and hold the Clean button for at least 20 seconds and release it when the white LED ring around the bin’s lid starts spinning clockwise.
- Wait for a few minutes for the Roomba to turn back on.
- When the white light turns off, the restart has been completed.
To restart an i Series Roomba
- Press and hold the Clean button for at least 20 seconds and release it when the white light around the button starts spinning clockwise.
- Wait for a few minutes for the Roomba to turn back on.
- When the white light turns off, the restart has been completed.
To restart a 700, 800, or 900 Series Roomba:
- Press and hold the Clean button for about 10 seconds and release it when you hear a beep.
- The Roomba will then reboot.
After your Roomba reboots, let it run through its schedule and see if the error comes back.
Reset the Roomba

If cleaning or restarting your Roomba didn’t work, try performing a factory reset on the Roomba.
First, make sure that you have connected the Roomba with the iRobot Home app on your phone.
To hard reset your Roomba:
- Go to the Settings > Factory Reset in the iRobot Home app.
- Confirm the prompt.
- The Roomba will start its factory reset procedure after you accept the prompt, so let it finish the reset.
When the reset completes, and the Roomba can start working again, try running a cleaning cycle and see if Error 14 persists.
Contact Support
If you are still having trouble with Error 14 and none of these troubleshooting steps have worked for you, feel free to contact iRobot support.
They can give you more troubleshooting tips that are more personalized for your Roomba.
They can also make a more informed call on whether you need to turn the robot in for service.
Final Thoughts
After disassembling the robot and reinstalling the bin, make sure it still can charge.
People online reported running into the creatively titled Charging error 1 on their Roomba after changing or reinstalling a battery.
If you ever run into this issue, make sure the battery has been reinstalled correctly.
For other charging issues that your Roomba can run into, try cleaning the battery charging contacts with rubbing alcohol to remove dust and grime that might have accumulated there.
Frequently Asked Questions
Why is my Roomba going backward?
The reason why your Roomba goes backward can sometimes be attributed to a blocked or jammed front wheel.
When the wheel is jammed in the forward direction, the Roomba thinks it cannot go forward because of some obstacle and will try to move backwards to clear that obstacle.
What does it mean when Roomba flashes clean?
When the Clean button on your Roomba flashes when it is on its home base, it means that it is updating its software.
How long should I let my Roomba run?
iRobot recommends you run the Roomba for its entire cleaning cycle according to the schedule you’ve set, and this can take upwards of 20-40 minutes because it depends on the size of your home.
Does Roomba memorize your house?
Roombas use their advanced sensors on the front of the robot to learn the layout of your home and makes a map of it.
The Roomba then uses this map to clean your home according to a schedule that you set.

Fully charged? Check. Plugged Home Base? Check. Set a cleaning schedule? Check.
Your Roomba is ready to go out into the world.
Until… “Uh-oh.” *beep*
Your Roomba’s display shows “Error 14.”
Don’t panic.
Instead…
Read on to find out:
- Why your Roomba displays “Error 14”.
- 5 easy steps to solve “Error 14” in seconds.
- How often you should clean each part of your Roomba.
- Why you should check the condition of your Roomba’s dustbin.
- And much, much more…
Contents
- What does it mean when Roomba displays error 14?
- Roomba error 14: 5 causes & ways to fix it
- #1: The sensors, filters, and bin are dirty
- #2: The firmware is corrupted
- #3: The dustbin isn’t placed firmly
- #4: The dustbin is damaged
- #5: The battery is dying
- Bonus: More tips!
What does it mean when Roomba displays error 14?
When your Roomba displays “Error 14”, it means it’s not detecting an installed bin. This is due to the sensors, bin, and filters getting too dirty to work. Also, your Roomba’s software may be corrupted. Your dustbin isn’t firmly placed and has damages. Or the battery is low.
#1: The sensors, filters, and bin are dirty
Don’t neglect your Roomba. After all, it does all the dirty work for you. Getting on the ground. Getting rid of all that dust, dirt, and grime.
It dives into the hard-to-reach areas of your home. As a result, it gets filthy.
The Roomba is made up of sensitive parts. It has sensors, filters, and a bin.
Your Roomba has 3 types of sensors, which are:
- Cliff sensors.
- Full bin sensors.
- Floor tracking sensors.
Cliff sensors detect changes in the floor’s level. Like staircases, steps, or ledges. It helps the Roomba swerve or stop.
Full bin sensors alert you when the bin needs cleaning. And floor tracking sensors get the room’s data. Like the location of walls and furniture.
For Error 14, the full bin sensors are significant. These can sense an installed bin. Once these get dirty, they don’t function well. And so the Roomba can’t detect the bin.
Another part to check is the filter. The filter sifts the dust into smaller particles. Which then goes into the bin.
Some dust, wool, or bigger objects may accumulate there. Then, they end up on other parts of the device.
The bin catches everything passing through the filter. This may be the dirtiest part of your Roomba.
“So, how often should I clean the sensors, filters, and bin?”
For the floor tracking sensors and cliff sensors, once a month. The full bin sensors need it every 2 weeks.
Have the Roomba running daily? Clean the filter once a week. If you have hairy pets, twice a week. Also, replace the filter every 2 months.
Empty the bin after cleaning. It wouldn’t hurt to wipe it too.
“What’s the safest way to clean these parts?”
Before starting, you can see what the sensors look like:
Step 1: Have a microfiber cloth in hand. Make sure it’s clean.
Step 2: Flip over the Roomba. Locate the sensors. Each model may differ. Some sensors are found under the device. You may check your Roomba’s manual.
Step 3: Gently wipe the sensors with the cloth.
Step 4: Now, you have to disassemble the bin unit. So that you can reach the filter and the bin. Before that, clean the fan too. Use a Q-tip for this. This is to reach the smaller corners. Expect this part to be covered in dust too.
Step 5: To clean its filter, look for the release button. It’s on top of your Roomba. Slide the bin out. Then, empty the bin. Press the yellow lever to open it.
Step 6: The filter is usually colored blue. Push the tabs on each side. Then, pull the filter out.
Step 7: Tap the filter inside your garbage can. Repeat until all the dust is gone. Once done, slide it back.
You can also scrape the dust off using a paper towel. Or use a hand vacuum. Never clean your filter with water. Once done, slide it back.
You can clean the bin with water. Rinse it with only warm water. Make sure no debris gets stuck on the sides.
Once everything is put back, check if error 14 persists.
Learn more: How often do you need to empty your Roomba?
#2: The firmware is corrupted
Software bugs are a device’s biggest enemy.
Your Roomba operates on software too. The latter can malfunction sometimes. Especially when you’ve used it for so long. But not necessarily.
Most likely, it may need a break. Or a deload. And start all over again with a clean slate.
If the software is laggy, the other parts won’t do their jobs. Then, the error appears.
To resolve this, there are 3 ways:
- Resetting the device.
- Restarting the device.
- Reinstalling the battery.
“How do I restart my Roomba?”
This depends on which model you own.
For the I Series and S Series Roomba, press the Clean button. Hold it for 20 seconds. You’ll see the white light around the button spin clockwise. When this happens, release the button. Wait for the Roomba’s white light to turn off. This only takes a few minutes.
For the 700, 800, and 900 Series Roomba, press the Clean button. Hold it for 10 seconds. Release when it beeps. Then, your Roomba will reboot.
Still didn’t work? Move to the next step.
“How do I reset my Roomba?”
A factory reset may help. Like how you study for weeks. And finally, finish taking the big exam. You’d want to clear your mind ASAP.
That’s how your Roomba feels.
A reset deletes all custom settings, maps, and schedules. Make sure to note all your data before doing this. Also, check that your Roomba is connected to the iRobot Home app.
To reset, open the iRobot Home app. Go to Settings. Choose Factory Reset. Confirm the prompt that will appear. Wait for it to finish resettings.
If this fails, open the app again. Disable the Edge Clean Mode. This mode tells your Roomba to focus on the outer edges of a room. You can find this in Cleaning Preferences.
“How do I reinstall the battery?”
No improvements? Let’s do something with the battery.
To reinstall the battery:
- Completely turn off the Roomba.
- Turn the Roomba over on its back. Get a screwdriver. Loosen the screws. Don’t forget the one at the spinning brush.
- Remove the bottom cover. Lift the two tabs of the battery. Then, remove it.
- Wait for at least 15 seconds. Insert the battery.
- Close the cover, and put back the screws.
- Turn the device back on. This should resolve the error.
#3: The dustbin isn’t placed firmly
The sensors are cleaned. And the software got a refresh. But Error 14 continues to flash. Mocking you in a way.
Get it together! There’s still another solution.
Your Roomba may not detect the bin. All because it isn’t secured firmly. It should be installed correctly. So that the sensors can pick it up.
“What’s the right way to install the bin?
To install the bin:
- Press the release button.
- Take the dustbin out.
- Put the dustbin back. Make sure it closes properly.
- Press down on the bin’s sides. Do this after removing the handle.
Another tip is to rub the sides of the bin with sandpaper. This ensures proper placement.
There shouldn’t be anything sticking out. Use aluminum if there are loose corners.
Once reinstalled, press the Clean button. See if it cleared the error.
#4: The dustbin is damaged
What if the problem lies within the dustbin itself?
Now that you’ve been navigating through every part of your Roomba…
You may have noticed. Cracks, scratches, dents – all over your dustbin.
A busted dustbin disrupts your Roomba’s processes. The sensors may not detect due to being deformed.
“How often should I change my Roomba’s dustbin?”
There isn’t any specific lifespan for its bin.
But if there are any significant defects. Like the changes in its shape. Or even broken pieces. Then, you should probably get a new one.
Follow the steps in removing the dustbin. Buy a dustbin from a trusted store.
You can get a replacement bin. This is explicitly sold under the Roomba brand.
Note: Minor damages like surface-level scratches don’t affect your Roomba’s performance.
#5: The battery is dying

Admit it. Skipping your morning coffee makes life a gazillion times more difficult.
You lose your focus. You feel like falling asleep. And you get grouchy – really grouchy. Over the tiniest things.
Like how caffeine turns into your energy source. Your Roomba relies on its battery to function.
A weak battery may cause some processes to crash.
“How do I know that I need to charge my Roomba?”
See a flashing red light on your Roomba? That means its battery is running out.
A solid red light stands for a completely drained battery.
Note: Your Roomba’s Home Base should always be plugged in. That way, it is always ready for charging.
Two ways to charge your Roomba are:
- Using the Home Base.
- Using only a power supply.
After cleaning, your Roomba returns to the Home Base. It also goes there when its battery is low.
You can also charge your Roomba by plugging it into a wall socket.
Warning: Don’t wait for days before charging your Roomba. This can damage the battery.
An amber red pulse light means it’s charging. A solid green light means it’s full.
There’s also a 16-hour refresh charge. This is when the Roomba has been away from the Home Base for a long time.
The Roomba starts this by itself. It refreshes the battery. And also extends the battery life.
The battery can work for up to two hours.
“Can I change my Roomba’s battery?”
A Roomba’s battery can be replaced. It doesn’t take much technical know-how to take it out.
Remember: A Roomba’s lifespan is 2 to 6 years. But a battery’s life depends on how much TLC it gets.
You should consider getting a new battery if yours:
- Doesn’t charge.
- Quickly drains in less than two hours.
- Is almost at the device’s maximum age of 6 years.
Buy it from a trusted manufacturer. Be sure it’s the same battery you had previously.
Reading tip: Roomba Not Charging: 9 Ways To Fix It In 30 Seconds
Bonus: More tips!
Whether you’re a Roomba newbie. Or a seasoned user. It wouldn’t hurt to know these. So you can make the most out of your Roomba!
“Should I charge my Roomba after every cleaning?”
It may take an hour or less for your Roomba to clean.
Once the flashing red light appears, charge it. Don’t wait for the battery to drain. This can damage it.
“Is my Roomba waterproof? Can it clean spills?”
Your Roomba shouldn’t get wet. It can only pick up dust and dirt. And other solid materials.
The same goes for the Roomba brushes. They can only be a little damp when cleaned using alcohol wipes.
Your Roomba should only clean on dry floors and surfaces.
One more thing: Never let your Roomba clean dog poop. Or any waste, for that matter. It can only clean pet hair.
“Can I still use my Roomba without Wi-Fi?”
Without Wi-Fi, you have to press the Clean button. Every time you want it to clean.
You need Wi-Fi to make use of scheduled cleaning times.
“Does my Roomba have a warranty?”
Your Roomba has a one-year warranty. You can file a warranty claim here. Especially if you experience issues within a year.
Once they receive your claim, they check the issue, making sure it’s covered by the warranty.
If approved, they’ll either:
- Fix the Roomba.
- Give you a new product of the same model.
- Give you a new product with an upgraded function.
They will decide which option to do for you.
The repaired Roomba is under a 90-day warranty. The new products are covered by the same warranty you had. For the remaining period.
They won’t accept the claim if the Roomba:
- Has broken seals.
- Has changed or replaced parts.
- Has a short-circuited or tampered battery.
- Is damaged due to power or Wi-Fi issues.
- Is broken due to mishandling, accidents, or improper packaging.
Never use any cleaning solutions. And never change your Roomba’s parts. Unless these parts are from the official store.
You might also want to check out: 6 Steps To Fix “Roomba Error 2” In Seconds (How-To)
В этом видео я расскажу про проблему с ёмкостью батареи Roborock и покажу процесс разборки батареи и замены аккумуляторов 18650. В видео я также расскажу про термодатчики в батарее и «Ошибка 14: Проблемы с зарядкой. Температура батареи слишком высокая или слишком низкая. Дождитесь нормализации температуры батареи.»
Ссылка на видеоинструкцию по решению «Ошибка 13: Проблемы с зарядкой, убедитесь в надежном контакте между пылесосом и док-станцией»
Ссылка на видео, где рассказано, как научить Roborock заезжать на ковер с высоким ворсом
Также внимательные зрители получат ссылку, где размещена принципиальная схема батареи Roborock, которую я списал с моей оригинальной батареи.
In this video, I will show how Isolved the problem with the capacity of the Roborock battery and I will show the process of disassembling the battery and replacing the 18650 batteries. Also, attentive viewers will receive a link to the circuit diagram of the Roborock battery, which I drown from my original battery. In the video, I will also talk about temperature sensors in the battery and “Error 14: Charging problems. Battery temperature is too high or too low. Wait for the battery temperature to normalize. ”
Link to the video tutorial on the repair “Error 13: Charging problems, make sure that there is reliable contact between the vacuum cleaner and the dock”
Link to the video, which show how to teach Roborock to clamb on a carpet with a high pile
Метки: 18650, aliexpress, battery, battery repair, capacity, circuit diagram, easyDIY, error, improvement, laptop, lifehack, repack, repacking, repair, replacement, schematic, upgrade, vacuum cleaner, xiaomi, акб, аккумулятор, алиэкспресс, батарея, емкость, замена, как проверить, как разобрать, купить, лайфхак, ноутбук, отключается, ошибка, ошибки, ошибку, перепаковка, принципиальная схема, разборка, ремонт, ремонт аккумулятора, ремонт батареи, репак, робот, робот пылесос, самостоятельно, своими руками, схема
« Обзор и тест робота-пылесоса Samsung VR7260 Ecovacs Deebot OZMO 950: ОБЗОР и ТЕСТ🔥🔥🔥 УГРОЗА ROBOROCK? »
Коды ошибок роботов-пылесосов и способы их устранения
Опубликовано
20.09.2018
Обновлено: 26.09.2018
51 комментарий
112 437 просмотров

Владелец и главный редактор сайта, эксперт по выбору роботов-пылесосов.
Содержание:
- Коды ошибок роботов-пылесосов iRobot
- Звуковые коды
- Световые коды (при зарядке аккумулятора)
- Голосовые сообщения
- Коды ошибок роботов-пылесосов iClebo
- Ошибки роботов Panda
- Ошибки роботов-пылесосов Kitfort
- Коды ошибок роботов-пылесосов Samsung
- Основные ошибки роботов iLife

Независимо от марки, при работе могут возникать различные ошибки роботов-пылесосов. С этим моментом рано или поздно может столкнуться любой владелец автоматизированного устройства, поэтому расстраиваться не стоит. В случае возникновения поломки, её код обычно отображается на дисплее, либо отображается в виде звуковых сигналов. Большинство ошибок вы сможете устранить сами, для этого достаточно знать обозначения их кодов. Сегодня мы рассмотрим, что делать в ситуации, когда робот-пылесос выдаёт ошибку, а также какие особенности устранения неполадок для моделей разных производителей.
Звуковые коды
| Число звуковых импульсов | Вероятные причины | Методы устранения |
| 1 | Робот-пылесос застрял, какое-либо боковое колесо провалилось/свесилось | Передвиньте ваш робот и проверьте, чтобы колёса касались пола. После этого, запустите Айробот вновь |
| 2 | Основные щётки не крутятся | Требуется извлечь и очистить щётки от волос, шерсти и прочего мусора |
| 5 | Заблокировано/не вращается боковое колесо | Необходимо почистить колесо от волос, шерсти, ниток, грязи. Вращение ведущего колеса должно производиться без затруднений |
| 6 | Засорены датчики падения, либо аппарат застрял над выступом | Протрите датчики сухой салфеткой без ворса и повторно запустите в другом месте |
| 7 | Устройство заблокировано | Поднимите робот-пылесос и проверьте состояние боковых колёс, они должны крутиться без затруднений |
| 8 | Произошла блокировка переднего поворотного ролика или робота-пылесоса | Нужно снять и почистить поворотный ролик от грязи и заново запустить прибор в другом месте |
| 9 | Робот заблокирован (заклинило бампер, либо загрязнены его датчики) | Требуется провести осмотр и очистку бампера |
| 11 | Пылесос длительное время не регистрирует препятствия и останавливается на каком-либо участке | Вероятно, прибор расположен в помещении со слишком большой площадью. Рекомендуется установить ограничитель передвижения. Также попробуйте нажать на бампер несколько раз для проверки его работоспособности |
| 12 | Загрязнён либо неисправен сенсор падения | Проверьте и почистите датчики |
О том, как почистить робот-пылесос мы рассказывали в отдельной статье. Возможно вам пригодится предоставленная информация. Также мы подробно рассказали о том, как устранить неисправности робота-пылесоса.
Световые коды (при зарядке аккумулятора)
| Число миганий красного сигнала | Возможные причины | Методы устранения |
| 1 | Аккумуляторная батарея не присоединена | Следует убедиться, что защитная пластинка извлечения из робота-пылесоса. Откройте нижнюю крышку робота, достаньте и установите АКБ обратно |
| 2,3 | Аккумулятор не присоединён | Попробуйте начать зарядку устройства заново. Если неполадка вновь даёт о себе знать, обратитесь в сервисный центр |
| 5 | Ошибка в процессе подзарядки | Нужно перезагрузить аппарат, нажав и удерживая одновременно порядка десяти секунд клавиши «SPOT» и «DOCK». Если проблема не разрешилась, обратитесь в сервисный центр |
| 6 | АКБ перегрелась | Дайте возможность батарее остыть, после чего возобновите подзарядку |
| 7 | Аккумулятор робота значительно перегрелся | Дайте батарее остыть до уровня комнатной температуры, затем возобновите подзарядку. Если неполадка осталась, то следует обратить в сервисную службу |
Голосовые сообщения
| Число звуковых импульсов | Возможные причины | Методы устранения |
| Ошибка 1 (левый/ правый) | Робот-пылесос застрял, либо свесился/провалилось боковое колесо (левое/правое) | Необходимо переместить робот-пылесос и убедиться, что колёса касаются пола. Затем нужно включить робот заново |
| Ошибка 2 | Не крутятся основные щётки | Требуется извлечь и тщательно очистить щётки от намотанных волос, шерсти, ниток и прочего мусора |
| Ошибка 5 | Заблокировано/не крутится ведущее колесо | Поскольку ведущее колесо должно вращаться без затруднений, его нужно почистить от грязи |
| Ошибка 6 | Загрязнились датчики падения, либо устройство застряло над выступом | Датчики падения необходимо протереть сухой салфеткой без ворса и запустить пылесос в другом месте заново |
| Ошибка 7 | Устройство заблокировано | Поднимите iRobot и проверьте состояние ведущих колёс |
| Ошибка 9 | Робот заблокирован (заклинило бампер, либо засорены его сенсоры) | Требуется осмотреть и очистить бампер |
| Ошибка 10 | Застрял ролик либо бампер не видит препятствий | Вероятно, робот-пылесос находится в помещении со слишком большой площадью. Необходимо установить виртуальную стену для ограничения зоны уборки. Если же пространство не слишком большое, попробуйте нажать на бампер несколько раз для проверки его работоспособности |
Коды ошибок роботов-пылесосов iClebo
| Сообщение на дисплее | Причина | Вариант решения |
| C1 | Колесо поднято | Необходимо переместить пылесос на ровную поверхность |
| C2 | Неисправность датчика пола | |
| C3 | Неисправность пылесборника | Следует убедиться, что пылесборник установлен в устройстве и надёжно зафиксирован |
| C4 | Перегрузка колеса | Работе колеса препятствует накопившийся мусор, волосы, шерсть, его нужно почистить |
| C5 | Перегрузка щётки | Нормальной работе щётки препятствует застрявший сор, требуется их очистка |
| C6 | Перегрузка всасывающего модуля | Нужно очистить пылесборник, при необходимости заменить фильтр |
| C7 / CA в новых материнских платах | Внутренняя ошибка системы / проблема в модуле навигации (камере) | Произведите выключение робота-пылесоса Айклебо путём переключения клавиши питания в положение Off, а после включите устройство заново нажатием кнопки On. Если проблема не решится, обратитесь в сервисную службу |
| C8 | Неисправность одометра переднего колёсика, колесо не касается пола | Требуется извлечь передний ролик и обратить внимание на местоположение магнитного диска на его оси: он должен находиться выемкой наружу. Если он установлен обратной стороной, то следует его достать и установить корректно. Также произведите очистку колеса, либо замену при его значительном повреждении. Для замены одометра нужно обратиться в сервисную службу |
Ошибки роботов Panda
Коды неисправностей датчика:
| Код | Возможные причины | Решение |
| E000 | Неисправности отсутствуют | — |
| E001 | Проблемы с левым датчиком высоты | Необходимо почистить датчики робота Панда сухой тряпочкой |
| E002 | Проблемы с верхним левым датчиком высоты | |
| E004 | Проблемы с верхним правым датчиком высоты | |
| E008 | Проблемы с правым датчиком высоты | |
| E00F | Поломка всех датчиков высоты | |
| E010 | Поломка левого инфракрасного датчика | Нужно почистить стеклянные вставки на защитном бампере |
| E020 | Поломка правого инфракрасного датчика | |
| E040 | Поломка переднего левого инфракрасного датчика | |
| E080 | Поломка переднего правого инфракрасного датчика | |
| E0F0 | Поломка всех инфракрасных датчиков | |
| E100 | Проблемы с левым датчиком столкновений | Обследуйте защитный бампер робота-пылесоса |
| E200 | Проблемы с правым датчиком столкновений | |
| E400 | У левого колеса отсутствует контакт с поверхностью | Требуется установить робот на ровную поверхность |
| E800 | У правого колеса отсутствует контакт с поверхностью |
Коды неисправностей двигателя робота-пылесоса:
| Код | Возможные причины | Решение |
| L000 | Неисправности отсутствуют | — |
| L001 | Перегрузка правого колеса | Необходимо проверить, не заблокировалось ли колесо |
| L002 | Перегрузка левого колеса | |
| L004 | Перегрузка правой щёточки | Необходимо проверить, не заблокировалась ли щёточка |
| L008 | Перегрузка левой щёточки | |
| L010 | Перегрузка системы охлаждения | Необходимо проверить, не заблокировался ли вентилятор |
Ошибки роботов-пылесосов Kitfort
| Код | Описание неисправности | Рекомендация |
| E01 | Поломка левого колеса | Требуется проверить, способно ли колесо вращаться свободно, при необходимости очистить деталь |
| E02 | Поломка правого колеса | |
| E03 | Не применяется | — |
| E04 | Устройство поднято с пола, либо одно из колёс свесилось/провалилось | Нужно установить робот-пылесос Китфорт на ровный пол |
| E05 | Поломка нижних сенсоров | Следует протереть окошки сенсоров сухой тряпочкой |
| E06 | Поломка сенсоров в защитном бампере | Протрите боковую поверхность защитного бампера |
| E07 | Неисправность левой боковой щёточки | Необходимо снять щёточку и очистить от скопившегося мусора |
| E08 | Неисправность правой боковой щёточки | |
| E09 | Робот-пылесос застрял | Установите устройство на ровную поверхность |
| E10 | Зарядка выключенного робота | Необходимо включить робот нажатием на выключатель сбоку |
| Е12 | Не применяется | — |
| Мигает значок пылесборника | Контейнер для сбора мусора заполнен | Следует очистить контейнер от мусора и отверстие всасывающего модуля |
Коды ошибок роботов-пылесосов Samsung
| Код | Возможные причины | Решение |
| C00 | Робот застрял | Необходимо отключить устройство нажатием клавиши в нижней его части, перенести в другую зону и затем заново включить |
| C01 | В щёточке застрял посторонний объект | Необходимо отключить устройство нажатием клавиши в нижней его части, извлечь пылесборник, устранить посторонние объекты из щёточки и затем включить робот |
| C02 | В левом колесе оказался посторонний объект | Следует выключить пылесос нажатием клавиши в нижней его части, извлечь посторонний объект из колеса и включить аппарат заново |
| C03 | В правом колесе оказался посторонний объект | |
| C05 | Поломка датчика защитного бампера | Следует выключить робот-пылесос нажатием клавиши в нижней его части, устранить препятствие перед изделием, либо перенести его в другую часть помещения, затем включить |
| C06 | В окошко датчика проник посторонний материал | Выключите прибор клавишей, расположенной в нижней его стороне, протрите окошки переднего и заднего датчика мягкой сухой материей, заново включите. |
| C07 | В окошке датчика обрыва оказался посторонний материал | |
| C08 | Не установлен пылесборник | Следует установить пылесборник в пылесос |
| C09 | В боковой щёточке оказался посторонний объект в режиме «Вдоль стен» | Нужно отключить прибор нажатием кнопки в нижней его части, извлечь лишние объекты из боковой щёточки, включить робот-пылесос |
| Nobatt | Отсоединён провод/неисправность аккумулятора | Выключите аппарат кнопкой, расположенной в нижней его стороне, после снова его запустите. Если проблема не решилась, обратитесь в сервисную службу Samsung |
Основные ошибки роботов iLife
Из инструкции мы также взяли таблицу, в которой предоставлены наиболее распространенные ошибки роботов-пылесосов Айлайф и способы их самостоятельного устранения:
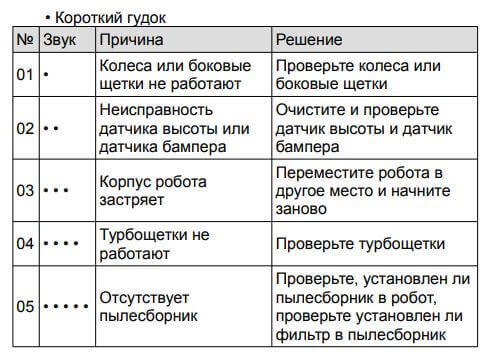
iLife ошибки
На этом мы и заканчиваем статью. Если вы не нашли ошибку к своему роботу-пылесосу, укажите ее в комментариях. Мы постараемся помочь определить причину ее возникновения и способы устранения. Также, ваш опыт в устранении ошибок может помочь читателям нашего сайта, поэтому можете описать собственную ситуацию под статьей!
There are a number of places where Roomba issues could come from. Moving parts include the wheels, roller brushes, side brush, batteries, dustbin, and more.
Roombas are incredibly useful household appliances. They clean your floors automatically without having to lift a finger. However, they also require maintenance, and the Roomba may get stuck in places. If they run into trouble, they’ll tell you what’s going wrong through beeps and indicator lights.
If you’re wondering why your Roomba keeps beeping, check the errors below that could be leading to all the beeping.
This is an easy troubleshooting guide for your Roomba robot vacuum cleaner. You’ll learn everything about the error codes, how they affect your robot, and various solutions to fixing the Roomba error codes.
Let’s first take a look at errors in operating the Roomba and its different parts.
Operational Errors and Solutions
Roomba Error 1: Ground is Uneven
Error code 1 is usually a result of the Roomba not being on a flat surface and is on uneven grounds.
Whenever the Roomba’s left wheel is higher than the other, suspended in the air above the ground, you will get error message 1.
Fixing the error is simple. Pick up the Roomba and place it on a flat surface. Then press the Clean button to start the Roomba back up.
Roomba Error 2: Brushes Not Working
Roomba’s dual multi-surface rubber brushes will adjust its height automatically as it cleans different surfaces. That allows for the brushes to always be in contact with the surface.
But if the brush isn’t able to come in contact with the surface, you’ll get Error 2. That means something object or debris is stopping the brush from spinning and cleaning.
It could be that the Roomba keeps saying Clean brushes. Check the brushes for pet hair or other debris that stops the brushes from spinning and working correctly.
If you see debris and hair, remove the brushes and clean them more easily.
Roomba Error 5: Wheels Not Working
Each Roomba has two wheels on the bottom. If the wheels stop working, the Roomba won’t be able to move around and clean.
If the right wheel ever stops working, then Error 5 will show. Your Roomba could also keep saying to Clean Brushes.
Fixing Roomba error 5 is simple. The reason the wheel stopped spinning could be because of pet hair or some other debris particles that are affecting the way it works. Clean the Roomba wheels and free any dirt, debris, hair, etc.
Roomba Error 6: Cliff Sensor Error
Cliff sensors help the Roomba avoid obstacles while moving around your home, especially with drop-offs like staircases. But sometimes, the sensor can become faulty and cause the Roomba to get stuck.
Reasons the cliff sensor is not working correctly could be due to sensors being dirty or something blocking the sensor views. Even a dark surface could confuse some of the older Roomba models.
To solve Error 6, use a dry and soft cloth to wipe the cliff sensors to clear its view. Place the Roomba in a new area and allow it to start cleaning. A dry cloth is important as a wet one could still lead to potential issue by spreading water.
Learn more about Issues when Roomba Gets Wet and If Roombas Work in the Dark.
Roomba Error 7: Wheel Blockage
Error 7 is an error that’s also notifying issues with the side wheels from spinning. The wheel jam could be due to a blockage from debris clogging it.
Fix error 7 by checking the drive wheel assembly to ensure there is no hair or other debris clogging it up. You can also use compressed air to try and unclog debris that’s further inside the Roomba body.
Roomba Error 8: Broken Motor and Filter
When you get Error 8 from the Roomba, that means there’s an issue with the motor and filter.
A broken motor will lead to the Roomba not being able to suck in the dust, debris, and dirt. A broken filter would result in dust particles and other things not being filtered into its dustbin.
To try and solve the Error 8, check the filter first. Try removing and checking the filter first. Clean the Roomba filter of dirt. If it was an issue with the filter, then the Roomba should start working again.
If it’s an issue with the motor, contact iRobot support for assistance.
Roomba Error 9: Bumper is Dirty or Jammed
Error 9 is usually due to the Roomba bumpers being dirty or jammed in a tight space.
If the Roomba got caught under a piece of furniture or the bumper is caught on something, you’ll get an error. You can fix it by freeing the Roomba from wherever it’s stuck.
If the Roomba isn’t stuck anywhere, Error 9 means the bumper sensors are dirty or there’s dirt that’s caught between the bumpers and the Roomba unit. To get the dirt out, press the bumper a few times to loosen the dirt from the space.
Roomba Error 10: Wheels are Stuck
Roomba Error 10 shows up when the wheels are stuck and the Roomba can’t move around.
This is usually because of debris getting stuck in the wheels. To fix this problem, flip the Roomba over, and remove all the debris from the wheels. This includes hairs, dust, and anything else that may be caught in the wheels.
Roomba Error 11: Motor Needs to be Fixed
Error 11 shows up when the motor stops working. The motor is what creates the suction power that sucks up the dirt and debris off the floor.
Motors will usually need to be replaced in this case, so it’s best to contact iRobot customer support for a new Roomba motor. Hopefully you are still within the warranty period.
Roomba Error 14: Can’t Detect Dustbin
Error message 14 will show when the Roomba is unable to detect the dustbin. If you recently emptied the Roomba dustbin, it could be the bin wasn’t replaced correctly.
Double-check that the bin was properly put back. It’s also a good idea to check the filter was replaced correctly if you had cleaned it too.
Roomba Error 15: Communication Issues
Roomba Error 15 lets you know that there are internal communication errors due to internal circuitry issues. It can happen from time to time.
You can usually fix the communication issue by rebooting the Roomba or restarting a new cleaning session by pressing the Clean button.
Roomba Error 16: Unbalanced Bumper
Error 16 is when the Roomba’s bumper is tilted to one side and not touching the floor.
The Roomba will tilt when it gets bumped or hit while moving. The bumper sensor will sense the imbalance. When the Roomba tilts, the brush won’t pick up as much dirt.
To fix it, place the Roomba on a level surface and press the Clean button to start the Roomba. If the Roomba isn’t running, try a Roomba reboot.
Roomba Error 17: Navigation System Problem
Error 17 is when the Roomba navigation system has a problem. The navigation system uses floor tracking sensor technology to help guide the Roomba through your home.
When there’s an issue with the sensor, the Roomba will stop cleaning and give you the error.
To fix the issue, clean the tracking sensors with a soft cloth to make sure there are no issues with the Roomba reading the floor. Make sure there’s sufficient light and the floors are not too dark.
Roomba Error 18: Roomba Docking Problems
Error 18 occurs when the Roomba doesn’t dock with the docking station after cleaning. There could be a few different issues for this, but easy solutions to try.
- Ensure the Home Base is still plugged in, so the Roomba can communicate with the dock to know how to return to recharge.
- Make sure there are no obstacles around the charging station that’s preventing the Roomba from docking.
- Clean the charging ports on the Home Base and the Roomba. This is one of the more common charging issues.
Learn more about Roomba and the Home Base location.
Roomba Error 26: Lack of Airflow
Error 26 shows when the Roomba has a lack of airflow that’s usually caused by issues with the motor or filter. This is usually on the Roomba i Series models.
To remedy the error, you’ll need to remove and check the Cleaning Head Module for dirt and debris. Then rotate the Roomba motor for 3 full rotations clockwise and counterclockwise to release any debris.
Next step is to clean the filter of any dust and debris to allow for proper airflow.
Reinstall the filter and Cleaning Head Module. You should be good to go now.
Roomba Error 31: Internal Communication Error
Roomba Error 31 usually appears on the Roomba s9 model due to an internal communication error.
Unfortunately, there aren’t any real solutions to this. Factory resets and reboots of the Roomba can fix the error temporarily, but Error 31 will most likely show up again.
It’s best to contact iRobot customer support and give them your Roomba’s serial number. They will be able to look up the error logs on your specific Roomba. Most likely they will send you a replacement Roomba.
You will also need to provide iRobot with proof of purchase, so don’t lose your receipt to show you purchased the Roomba.
Learn more about How to Find Roomba Serial Number.
Roomba Error 34: Internal Communication Error
Roomba Error 34 will show “Please see the app for help” because there’s an internal communication error that it’s experiencing.
Roomba Error 34 will show on the Roomba i and s Series.
The Roomba will most likely have stopped its cleaning. It’s easy to fix error 34, follow these steps:
- Press CLEAN to restart the cleaning job.
- If that doesn’t work and the error 34 message persists, you will need to reset the Roomba to get it connected again.
Roomba Error 99: Navigation and Mapping Error
The Roomba Error 99 will show when the robot vacuum is having trouble orienting and navigating itself around the home based on landmarks, like furniture or walls.
This error is most prevalent on the Roomba i3 and i3 models, but can be seen on other i series models like the Roomba i4.
Roomba wasn’t able to complete the mapping or cleaning job, so the job was cancelled (shows ‘cncl’ in the mission report).
To fix the issues and avoid issues in the future, try the following:
- Clean the deep sensor on the bottom of the Roomba with a cotton swab or clean cloth. If the sensor is dirty, the navigation system is unable to correctly perform for mapping and cleaning.
- Be sure not to pick up and move the Roomba when it’s in the middle of a job.
- If you happen to move the robot in the middle of a mission, either put it back in the same place it was paused or put it back on the dock station.
- Excessive clutter and obstacles on the floor could lead to error 99. Clear the cluttered areas or use Dual Mode Virtual Wall Barriers to block off problem areas.
- Move the dock to a new location that’s more open or in a centralized location for easier access.
11 Beeps With No Voice Message
When you hear 11 beeps from the Roomba, it’s letting you know that it’s having trouble with detecting obstacles and is stuck somewhere.
To fix this, put the Roomba in an open area and tap its bumper to make sure it’s still working. It could’ve just been confused and unable to recognize the obstacles where it was.
If you find the Roomba doing a Circle Dance, going in circles, it could be that one of the wheels has debris affecting its spinning. Clean the wheel to get it working correctly again.
4 Beeps / Roomba Says “Please Charge the Roomba.”
This means that the Roomba is low on battery power and doesn’t have enough energy to return back to its charging station.
To recharge, simply pick up the Roomba and take it back to the dock to recharge.
Roomba Says “Please Inspect and Clean Roomba’s Cliff Sensors”
Roomba will send the “Please inspect and clean Roomba’s cliff sensors” message if there’s an issue with the cliff sensors.
The issue is usually some dirt or debris on the sensor that causes issues when it tries to detect stairs and drop-offs.
To fix the error, simply clean the sensors off.
Roomba Says “Please Inspect and Clean Roomba’s Wheels”
When Roomba gives this common error, it’s letting you know to check the Roomba wheels and clear it of any clogged pet hair and dirt.
Cleaning the wheels will fix this error.
Roomba Says “Please Remove and Clean Roomba’s Brushes”
You will hear the “Please remove and clean Roomba’s brushes” message when the spinning brush rollers is not operaturing correctly. It could be due to some hair and debris that’s on the yellow brush caps and/or metal brush cap shaft.
To solve the issue, you need to clean the brushes, brush cage and brush casing. With the Roomba flipped upside down, lift the yellow tabs on each side of the brush roller to unlock the brush compartment.
Remove any pet hair and debris that you see. Then reinstall the brush rollers and you’re done.
Roomba Returns to Home Base Too Early
If there are internal communication issues, the Roomba may think that it’s on low battery power even though the battery is full.
This type of error is easy to fix though. Rebooting the Roomba should fix the issue. If it doesn’t, contact iRobot’s customer care department.
Charging Errors and Solutions
There are many reasons why your Roomba might stop charging. Let’s take a look at the different charging error codes that Roomba will give you, what they mean, and how to fix the errors.
Charging Error 1: Battery Disconnected
Charging Error 1 is due to the Roomba not detecting that the lithium-ion battery is connected. Your Roomba will not be able to charge because the battery cable is disconnected.
Open up your battery cover and make sure that the cable is connected securely. Make sure no wires are disconnected.
Charging Error 2: Battery Unable to Charge
You will see this Charging Error 2 when the Roomba battery isn’t charging. If the battery looks good and no wires are disconnected, then it could be a battery issue.
Fixing a battery issue can be either easy or complicated. The easy solution is to try a different battery. You can find Roomba replacement batteries online.
The more complicated solution will involve getting an expert and/or contacting iRobot support to fix it. It could be an issue with the wiring or electronics boards that need to be fixed.


Last update on 2022-12-26 / Affiliate links / Images from Amazon Product Advertising API
Charging Error 3: Charging Issue
It’s unclear what this exact error is except that there’s a charging issue. If you can confirm that it’s not a battery, wiring, or charging ports issue, then it’s best to contact iRobot customer care.
Charging Error 5: Charging Contacts
Charging Error 5 is usually caused by charging contact issues. Wipe down the charging points on the Roomba and the Home Base. Then try to see if the Roomba will start charging again.
Charging Error 6: Battery is Too Warm
This error is letting you know that the Roomba won’t charge because the battery is too warm.
When storing the Roomba Home Base, it’s important to keep the dock and Roomba away from radiators and heating vents when charging.
Batteries will heat up itself as it charges normally, so you don’t want to keep it near any heating sources. It’s fine to charge at room temperature.
Charging Error 7: Battery Too Cold
Charging Error 7 is highlighting that the battery is too cold and not charging properly or at all.
Be sure to keep the Home Base away from cold air sources like air conditioning vents. Charge it at room temperature.
Charging Error 8: Communication Error
This charging error message is when the Roomba is unable to communicate with the lithium-ion battery. That results in the battery not charging correctly.
One reason there’s no communication is not using authentic iRobot replacement batteries. Third-party batteries could potentially lead to issues.

Last update on 2022-12-18 / Affiliate links / Images from Amazon Product Advertising API
Charging Error 9: General Battery Error
Charging Error 9 will show up to notify you that there’s a battery and charging issue that’s more serious. It’s best at this point to contact iRobot customer care to get the next steps.
Rooma Errors Final Thoughts
All in all, these errors aren’t common, but they do happen occasionally. They’re mostly minor problems that can easily be solved. Make sure to check out our error code guide for troubleshooting tips.
Check out these other articles for more Roomba troubleshooting:
- How to Make Roomba Quieter
- Cleaning a Roomba Filter
- How to Get Roomba Over Bumps
- How to Move the Roomba Home Base
- How to Make a Roomba Garage
- Is There a Roomba Child Lock?
Содержание
- Устранение ошибок в Roomba — Как исправить коды ошибок
- Что означают ошибки Irobot Roomba
- 1 звуковой сигнал/ошибка 1 (серии Roomba 500 и 600)
- 1 звуковой сигнал или ошибка «Нет голоса» (Roomba серии 700 и 800)
- 2 звуковых сигнала / ошибка 2
- 5 звуковых сигналов / ошибка 5
- 6 звуковых сигналов / ошибка 6
- 7 звуковых сигналов / ошибка 7
- 9 звуковых сигналов / ошибка 9
- 10 звуковых сигналов / ошибка 10
- 4-тактный звук разряженной батареи Irobot Roomba
- «Пожалуйста, осмотрите и очистите датчики Cliff Roomba»
- «Пожалуйста, осмотрите и почистите колеса Roomba»
- «Пожалуйста, удалите и очистите щетки Roomba»
- Roomba возвращается в док слишком рано с полной батареей
- Ошибки зарядки: Мигания Irobot Roomba
- 1 Миганий или Ошибка зарядки два
- 2 Миганий или Ошибка зарядки два
- 3 Миганий или Ошибка зарядки три
- 5 Миганий или Ошибка зарядки пять
- 6 Миганий или ошибка зарядки шесть
- 7 Миганий или Ошибка зарядки Семь
- 8 миганий или ошибка зарядки восемь
- 9 Миганий или Ошибка зарядки Девять
Ваш робот пылесос Roomba только что подал звуковой сигнал и выдал страшный код ошибки? Не волнуйтесь! Некоторые ошибки легко исправить. Ознакомьтесь с этим подробным руководством для получения информации по устранению ошибок на вашем Irobot Roomba.
Разные модели ведут себя по-разному, когда дело доходит до отображения кодов ошибок: некоторые просто издают звуковые сигналы, другие сообщают об ошибке словами. Но, к счастью, сами коды ошибок в большинстве случаев идентичны для разных моделей.
Следующие коды ошибок относятся к Roomba Series 500, 600, 700 и 800 :
Что означают ошибки Irobot Roomba
1 звуковой сигнал/ошибка 1 (серии Roomba 500 и 600)
Roomba говорит: «Ошибка 1: переместите Roomba в новое место, затем нажмите CLEAN для запуска». Обычно это происходит из-за зависания Roomba или зависания бокового колеса.
Как исправить: Переверните Roomba и осмотрите боковые колеса, очистите все застрявшие волосы или мусор и надавите на колеса, чтобы убедиться, что они могут свободно втягиваться и выдвигаться. Наконец, переместите вашу Roomba и нажмите clean, чтобы проверить, была ли ошибка исправлена.

1 звуковой сигнал или ошибка «Нет голоса» (Roomba серии 700 и 800)
Убедитесь, что мусорное ведро правильно установлено в Roomba.
2 звуковых сигнала / ошибка 2
Roomba говорит: «Ошибка 2: Откройте и чистите щетки Roomba». Если вы получаете эту ошибку, наиболее вероятным виновником является прилипание волос на щетках. Возможно, вы недостаточно часто чистите щетки вашего Roomba, а волосы мешают щеткам правильно вращаться.
Как исправить: Извлеките волосы
Совет: чистить кисти на старых моделях довольно утомительно. Более новые модели Roomba, такие как 860 и 960 , заменили щетки старого образца на ролики без щетины, что значительно упростило обслуживание Roomba.
5 звуковых сигналов / ошибка 5
Roomba «Ошибка 5: вращайте боковые колеса Roomba для очистки». Эта ошибка указывает на то, что одно из колес застряло, что может быть связано с препятствием для одного из колес.
Как исправить: очистите колеса от волос и мусора и убедитесь, что колеса могут свободно вращаться.
6 звуковых сигналов / ошибка 6
Roomba: «Ошибка 6: переместите Roomba в новое место, затем нажмите CLEAN для перезапуска». Это происходит в одной из следующих ситуаций: (1) датчики могут быть грязными или (2) Roomba застряла, на краю или на темной поверхности (которая похожа на обрыва для Roomba).
Как исправить: очистите датчики тканью, затем просто переместите Roomba в новое место и нажмите CLEAN, чтобы перезапустить его.
7 звуковых сигналов / ошибка 7
Одно из боковых колес застряло.
Как исправить: Проверьте их на наличие препятствий, очистите их и подтолкните колеса вверх и вниз, чтобы убрать любой мусор. Вручную поверните колеса, чтобы убедиться в их свободном движении.
9 звуковых сигналов / ошибка 9
Roomba: «Ошибка 9: коснитесь бамперов Roomba для очистки». Это происходит, когда загрязнены датчики на бамперах или загрязнена зона между устройством Roomba и бамперами.
Как исправить: сначала коснитесь бампера несколько раз, чтобы убрать любой мусор и убедиться, что он может вернуться на место. Если это не устраняет ошибку, вам может потребоваться очистить область между бамперами и устройством Roomba. Очистите мусор, а также очистите датчики бампера.
10 звуковых сигналов / ошибка 10
«Ошибка 10: вращайте боковые колеса Roomba для очистки». Это означает, что боковые колеса Roomba (два больших колеса) не могут вращаться или что Roomba застрял на чем-то.
Как исправить: Если Roomba где-то застрял, просто переместите его в новое место и нажмите CLEAN. В противном случае убедитесь, что на боковых колесах нет препятствий, мешающих их вращению. Толкайте колеса внутрь и наружу, чтобы ослабить мусор, и поверните колеса рукой, чтобы убедиться, что им ничего не мешает.
Эта ошибка также может возникнуть, если у вас в доме большая открытая площадка с очень небольшим количеством предметов. Чтобы исправить это, используйте виртуальные стены, чтобы разделить большую область на несколько меньших областей.
11 звуковых сигналов / ошибка 11
«Ошибка 11» по сути та же ошибка, что и ошибка 10.
4-тактный звук разряженной батареи Irobot Roomba
«Пожалуйста, зарядите Roomba».
Как исправить: полностью зарядить Roomba. Кроме того, выполняйте следующие действия, чтобы продлить срок службы батареи вашего Roomba:
- Заряжайте Roomba как можно быстрее после каждого использования. Старайтесь не оставлять Roomba разряженным после уборки.
- Используйте Roomba регулярно. Аккумуляторы предназначены для частой разрядки и перезарядки, поэтому бе бойтесь использовать робота часто.
- Держите док-станцию подключенной, а Roomba пристыкованного, когда он не используется.
- Наконец, если вы не будете использовать Roomba более нескольких недель, выньте аккумулятор и храните его в сухом и прохладном месте.
«Пожалуйста, осмотрите и очистите датчики Cliff Roomba»
Как и в случае ошибки 6, датчики, возможно, необходимо протереть. Протрите датчики обрыва влажной тканью, чтобы очистить их. См. Ошибку 6 выше для деталей.
«Пожалуйста, осмотрите и почистите колеса Roomba»
Вероятно, застряло одно из боковых колес. Убедитесь, что нет препятствий, мешающих вращению боковых колес. Толкайте колеса внутрь и наружу, чтобы извлечь мусор, и поверните колеса рукой, чтобы убедиться, что они свободно вращаются. Смотрите Ошибка 10 для деталей.
«Пожалуйста, удалите и очистите щетки Roomba»
Вращающиеся щетки не могут поворачиваться. Обычно это происходит из-за того, что волосы застревают в щетках. Извлеките вращающиеся щетки или валики под Roomba, очистите его, затем установите щетки на место. В будущем делайте это регулярно до появления ошибки, чтобы обеспечить долгий срок службы вашего Roomba. Если вы находите это утомительным, новые модели щеток Roomba изготовлены чтобы в них не оставались волосы.

Roomba возвращается в док слишком рано с полной батареей
Убедитесь, что батарея не разряжена. Индикатор батареи на устройстве Roomba будет светиться зеленым, если он полностью заряжен. Если это так, перезагрузите Roomba:
Roomba 500 и 600: нажмите и удерживайте кнопки SPOT и DOCK примерно 10 секунд.
Roomba 700 и 800: нажмите и удерживайте кнопку CLEAN в течение примерно 10 секунд, на устройстве отобразится «RST».
После этого вам необходимо перепрограммировать время, дату.
Ошибки зарядки: Мигания Irobot Roomba
1 Миганий или Ошибка зарядки два
Аккумулятор не подключен. Убедитесь, что батарея установлена правильно . Если ваш Roomba совершенно новый, это означает, что вы не вытащили пластиковые вкладки, блокирующие батареи.
2 Миганий или Ошибка зарядки два
Ток к батарее слишком высок. Эта ошибка требует обслуживания со стороны производителя, но в последний момент вы можете попытаться переместить Roomba в более прохладное место, чтобы дать ему остыть.
3 Миганий или Ошибка зарядки три
Эта ошибка зарядки обычно требует обслуживания производителя. Однако это также может означать, что контакты батареи не имеют хорошего контакта. Извлеките батареи и попробуйте согнуть большие контакты и попробуйте зарядить снова.
5 Миганий или Ошибка зарядки пять
Сначала проверьте аккумулятор и зарядные контакты. Удалите винты в нижней части Roomba, чтобы открыть крышку батарейного отсека. И протрите их чистой сухой тканью. Также сделайте то же самое для зарядных контактов на домашней базе.
Переместите домашнюю базу в более прохладное место, чтобы зарядка Roomba не вызывала его перегрева. Кроме того, домашняя база должна быть размещена на твердой ровной поверхности, чтобы контакты были правильно выровнены.
6 Миганий или ошибка зарядки шесть
Аккумулятор перегрелся. Эта ошибка возникает, когда температура батареи достигает 75 ° C. Переместите домашнюю базу в более прохладное место.
7 Миганий или Ошибка зарядки Семь
Аккумулятор не может охладиться. Эта ошибка возникает, когда батарея не остывает в течение 4 часов после зарядки или после использования. Дайте Roomba остыть в течение как минимум одного часа, затем зарядите его в более прохладном месте. Если проблема не устранена, возможно, потребуется заменить батарею.
8 миганий или ошибка зарядки восемь
Roomba не видит литий-ионную батареею. Возможно, аккумулятор неисправен или нуждается в замене.
9 Миганий или Ошибка зарядки Девять
Как и в случае ошибки зарядки 8, литий-ионная батарея может нуждаться в замене.
Cleaners Talk is reader-supported. This post contains affiliate links, we may earn a commission at no additional costs to you. As an Amazon Associate we earn from qualifying purchases.
As amazing as Roombas are, they are machines and will inevitably come across an issue. No matter the issue, iRobot has come up with a helpful system of error codes to troubleshoot any problem.
In this post, we share with you the complete Roomba error code troubleshooting guide. No matter the problem, you should be able to find a solution in this comprehensive article.
You can use the quick navigation tab to go to a specific Roomba error code.
IMPORTANT: A Roomba runtime error is different from a Roomba charging error. If your Roomba is experiencing an error while charging, please go to the charging error troubleshooting guide right here.
Roomba Error Code Troubleshooting
A Roomba without Wi-Fi capabilities will stop and tell you something is wrong with a two-tone “uh-oh” sound followed by a narrated voice. Error messages can be repeated by pressing the bumper or the CLEAN button.
A Wi-Fi connected Roomba will display the error in the iRobot HOME App through push notifications. Tap the troubleshooting icon for additional information. Roomba will play a two-tone “uh-oh” sound, followed by a narrated voice. Select models will display a blinking troubleshooting indicator.
The troubleshooting guide below applies to all Roomba models. Newer Roomba models will have more error code possibilities than older versions because they employ better technology.
Please use the information below to troubleshoot a Roomba error code:
Error 1: Roomba is stuck (left wheel)
Error 1 means the Roomba’s left wheel is hanging down or the Roomba is stuck.
If this is the case, lift your robot off the floor, place it in the center of the room, and restart the clean cycle. If this error occurred on a flat surface, check the wheels for obstructions.
Push the wheels up and down several times and shake out any debris that may be trapped in the wheel well.
Gently turn both wheels by hand, making sure they turn freely, and each wheel displays the same amount of resistance. Ensure the Roomba’s wheels are firmly on the floor, then start the Roomba in a new location.
Error 2: Main brushes cannot turn
Error 2 means that the Roomba’s main brushes or extractors cannot turn.
Remove the main brush roller and remove hair and debris that may have accumulated and become tangled. Ensure hair and debris is removed from the square and hex pegs of the extractors as well.
Remove the extractor caps. Ensure any hair or debris that has collected on or underneath the caps, as well as around the metal axles, has been removed. Last but not least, ensure the vacuum path is clear.
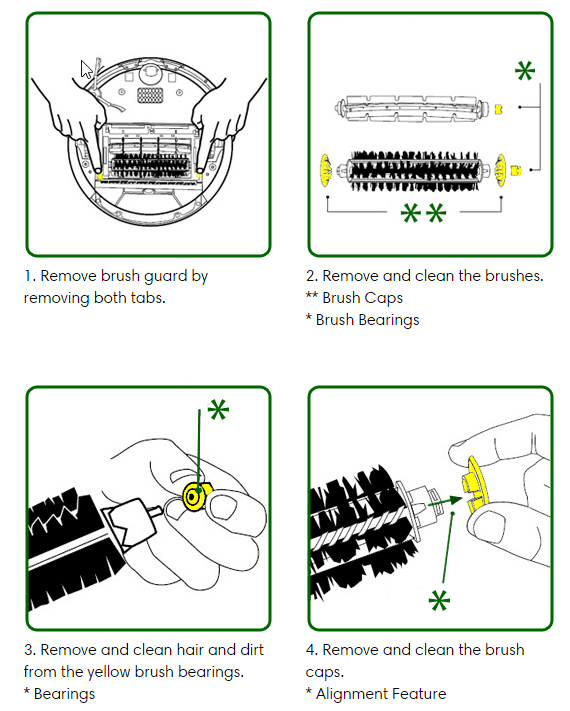
You can also learn the right way on how to clean Roomba brushes right here.
Error 3: Roomba is stuck (right wheel)
Error 3 means the Roomba’s right wheel is hanging down or the Roomba is stuck.
If this is the case, lift your robot off the floor, place it in the center of the room, and restart the clean cycle. If this error occurred on a flat surface, check the wheels for obstructions.
Push the wheels up and down several times and shake out any debris that may be trapped in the wheel well.
Gently turn both wheels by hand, making sure they turn freely, and each wheel displays the same amount of resistance. Ensure the Roomba’s wheels are firmly on the floor, then start the Roomba in a new location.
Error 4: Roomba’s left wheel cannot turn
Error 4 means the Roomba’s left wheel cannot turn. Check the left wheel for obstructions.
Push the wheels up and down several times and shake out any debris that may be trapped in the wheel well.
Gently turn both wheels by hand, making sure they turn freely, and each wheel displays the same amount of resistance. Ensure the Roomba’s wheels are firmly on the floor, then start the Roomba in a new location.
If the wheels cannot be turned by hand or if error persists on flat surfaces when there is no obstacle present, you may need a replacement left wheel module.
Error 5: Roomba’s right wheel cannot turn
Error 5 means the Roomba’s right wheel cannot turn. Check the right wheel for obstructions.
Push the wheels up and down several times and shake out any debris that may be trapped in the wheel well.
Gently turn both wheels by hand, making sure they turn freely, and each wheel displays the same amount of resistance. Ensure the Roomba’s wheels are firmly on the floor, then start the Roomba in a new location.
If the wheels cannot be turned by hand or if error persists on flat surfaces when there is no obstacle present, you may need a replacement right wheel module.
Error 6: Constant cliff detected
Error 6 means the Roomba constantly detects a cliff.
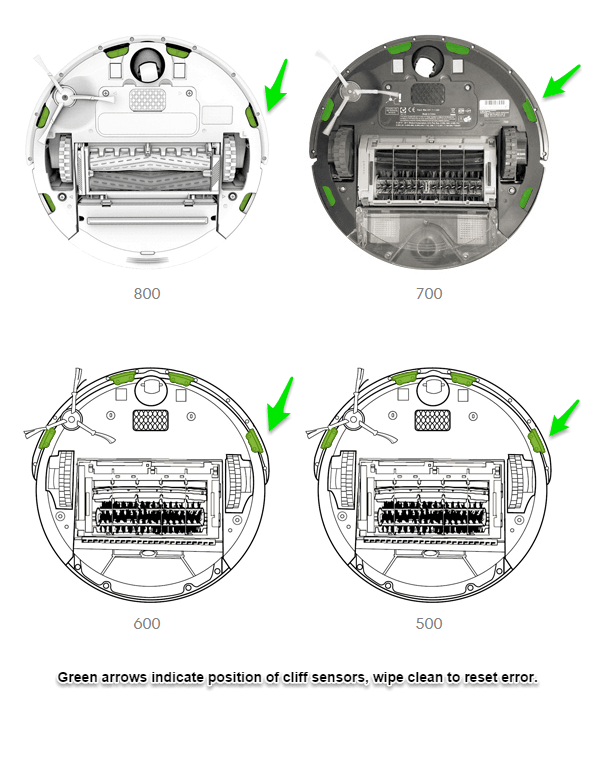
This means that the cliff sensors are dirty, Roomba is stuck, hanging over a cliff, or is on a dark surface. Wipe Roomba’s cliff sensors with a dry cloth, then start Roomba in a new location.
Error 7: Side wheels cannot turn
Error 7 means both of the Roomba’s side wheels are stuck and cannot turn.
Check the wheels for obstructions.
Push the wheels up and down and shake out any loose debris that may be trapped in the wheel well.
Gently turn both wheels by hand and make sure they turn freely and that each wheel displays the same amount of resistance. If a wheel cannot be turned by hand, place your Roomba on the floor and manually push the Roomba backwards and forwards, about >1 ft ( 0.3 m >).
If compressed air is available, gently blow air into the wheel well.
If the issue still persists, consider rebooting your Roomba.
Error 8: Vacuum has poor suction
Error 8 means the Roomba’s vacuum motor is having problems spinning or the filter is clogged. Most likely, the filter is very dirty causing weak suction on your Roomba.
Perform bin and filter care procedures.
Open the bin door and empty it into the trash. Push down and remove to clean the filter. Tap the filter gently against a trash can. Then, return the filter into the bin and place the bin back in the robot.
The bin should be emptied after each use, while the filter should be replaced every two months.
You can also learn more about how to clean a Roomba filter based on the model.
Error 9: Bumper is stuck
Error 9 means the Roomba’s bumper is stuck and is not moving freely.
Gently tap the bumper several times to dislodge any debris that may be trapped underneath, and then press the button to restart. It is also possible that during cleaning the bumper became dislodged from the robot. If so, please go to the dislodged bumper to properly align the bumper into the robot.
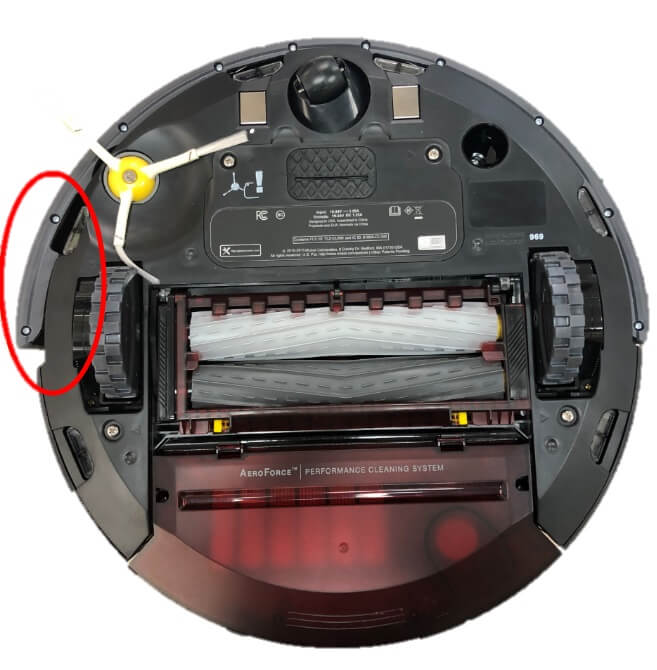
Dislodged bumper.
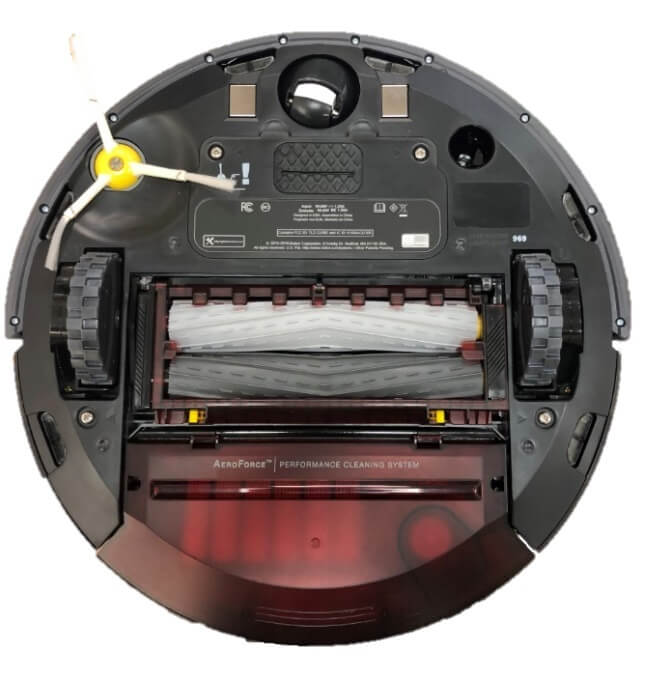
Correct bumper orientation.
A stuck bumper is the main cause why your Roomba may be running around in circles.
Error 10: Side wheels cannot turn
Error 10 means the Roomba’s side wheels are stuck or its bumper is not registering obstacles.
If the Roomba is circling in place, clean the Roomba’s side wheels of hair and debris. Push them in and out and confirm that they both turn. If not circling in place, Roomba may be in an extremely large room. Use a Virtual Wall to create a smaller cleaning area.
Push the wheels up and down several times and shake out any debris that may be trapped in the wheel well.
Gently turn both wheels by hand, making sure they turn freely, and each wheel displays the same amount of resistance. Ensure the Roomba’s wheels are firmly on the floor, then start the Roomba in a new location.
Error 11: Insufficient air flow
Error 11 means the Roomba is experiencing insufficient airflow.
This is often caused by an internal error or the vacuum in the bin is not functioning properly. If you have a Roomba 800 or 900 Series, you may need a replacement AeroForce™ bin. You may also contact iRobot Customer Care for more information.
Remove the cleaning head module by following the instructions right here.
Next, inspect the fan/scroll/vacuum assembly for debris. Be sure to inspect both the entrance and exhaust. Remove any debris using compressed air, then replace the bin filter.
You may also need a replacement cleaning head system.
Error 12: Stuck over an edge
Error 12 means the Roomba is stuck over an edge, is on a threshold, or is on a dark surface.
Move the Roomba to a new location then press the button to restart. If this does not resolve the issue, the floor tracking sensor may be dirty. Wipe them with a clean, dry cloth or a melamine foam, like a Magic Eraser.
Error 13: Both wheels on uneven surface
Error 13 means the Roomba is on an obstacle or an uneven surface and a side wheel is stuck.
If this is the case, lift your robot off the floor, place it in the center of the room and restart the clean cycle. If this error occurred on a flat surface, check the wheels for obstructions.
Push the wheels up and down several times and shake out any debris that may be trapped in the wheel well.
Gently turn both wheels by hand, making sure they turn freely, and each wheel displays the same amount of resistance. Ensure the Roomba’s wheels are firmly on the floor, then start the Roomba in a new location.
Inspect the front caster wheel on the robot to ensure it is free of any debris.
Error 14: Roomba does not detect bin
Error 14 means the Roomba is not detecting an installed bin or the bin has a bad connection to the robot.
If this is the case, confirm the filter and the bin are installed properly.
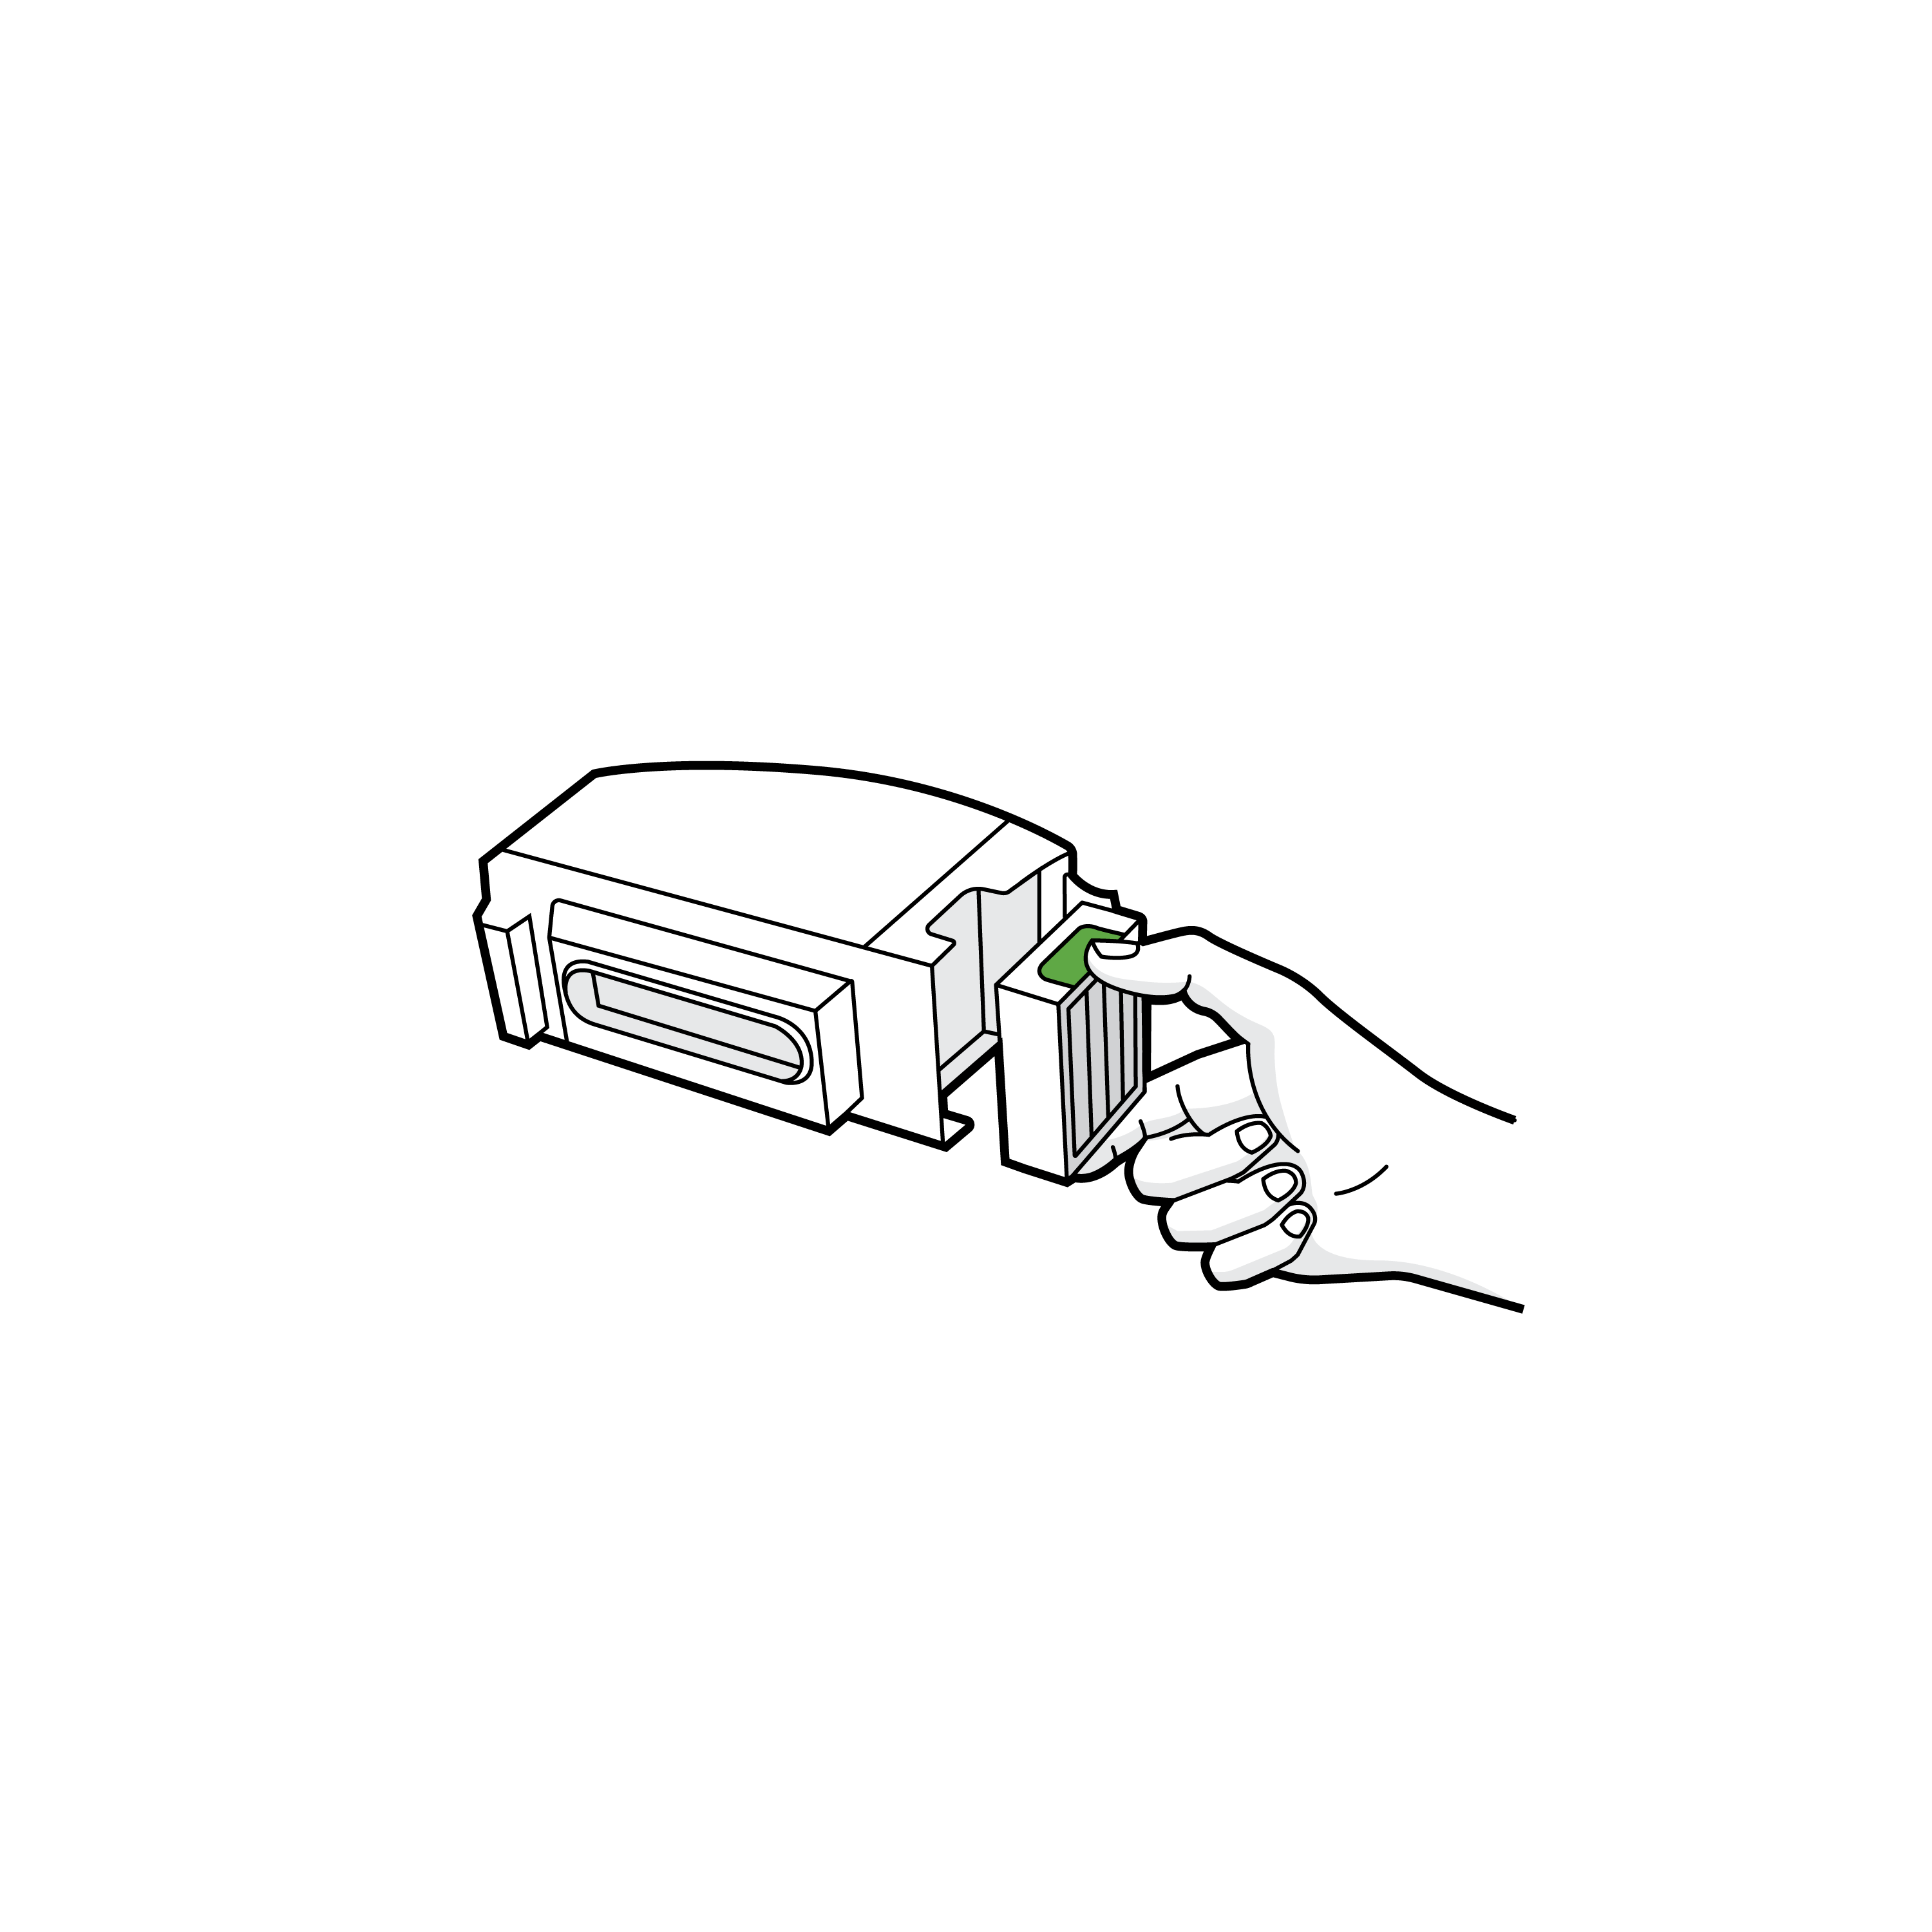
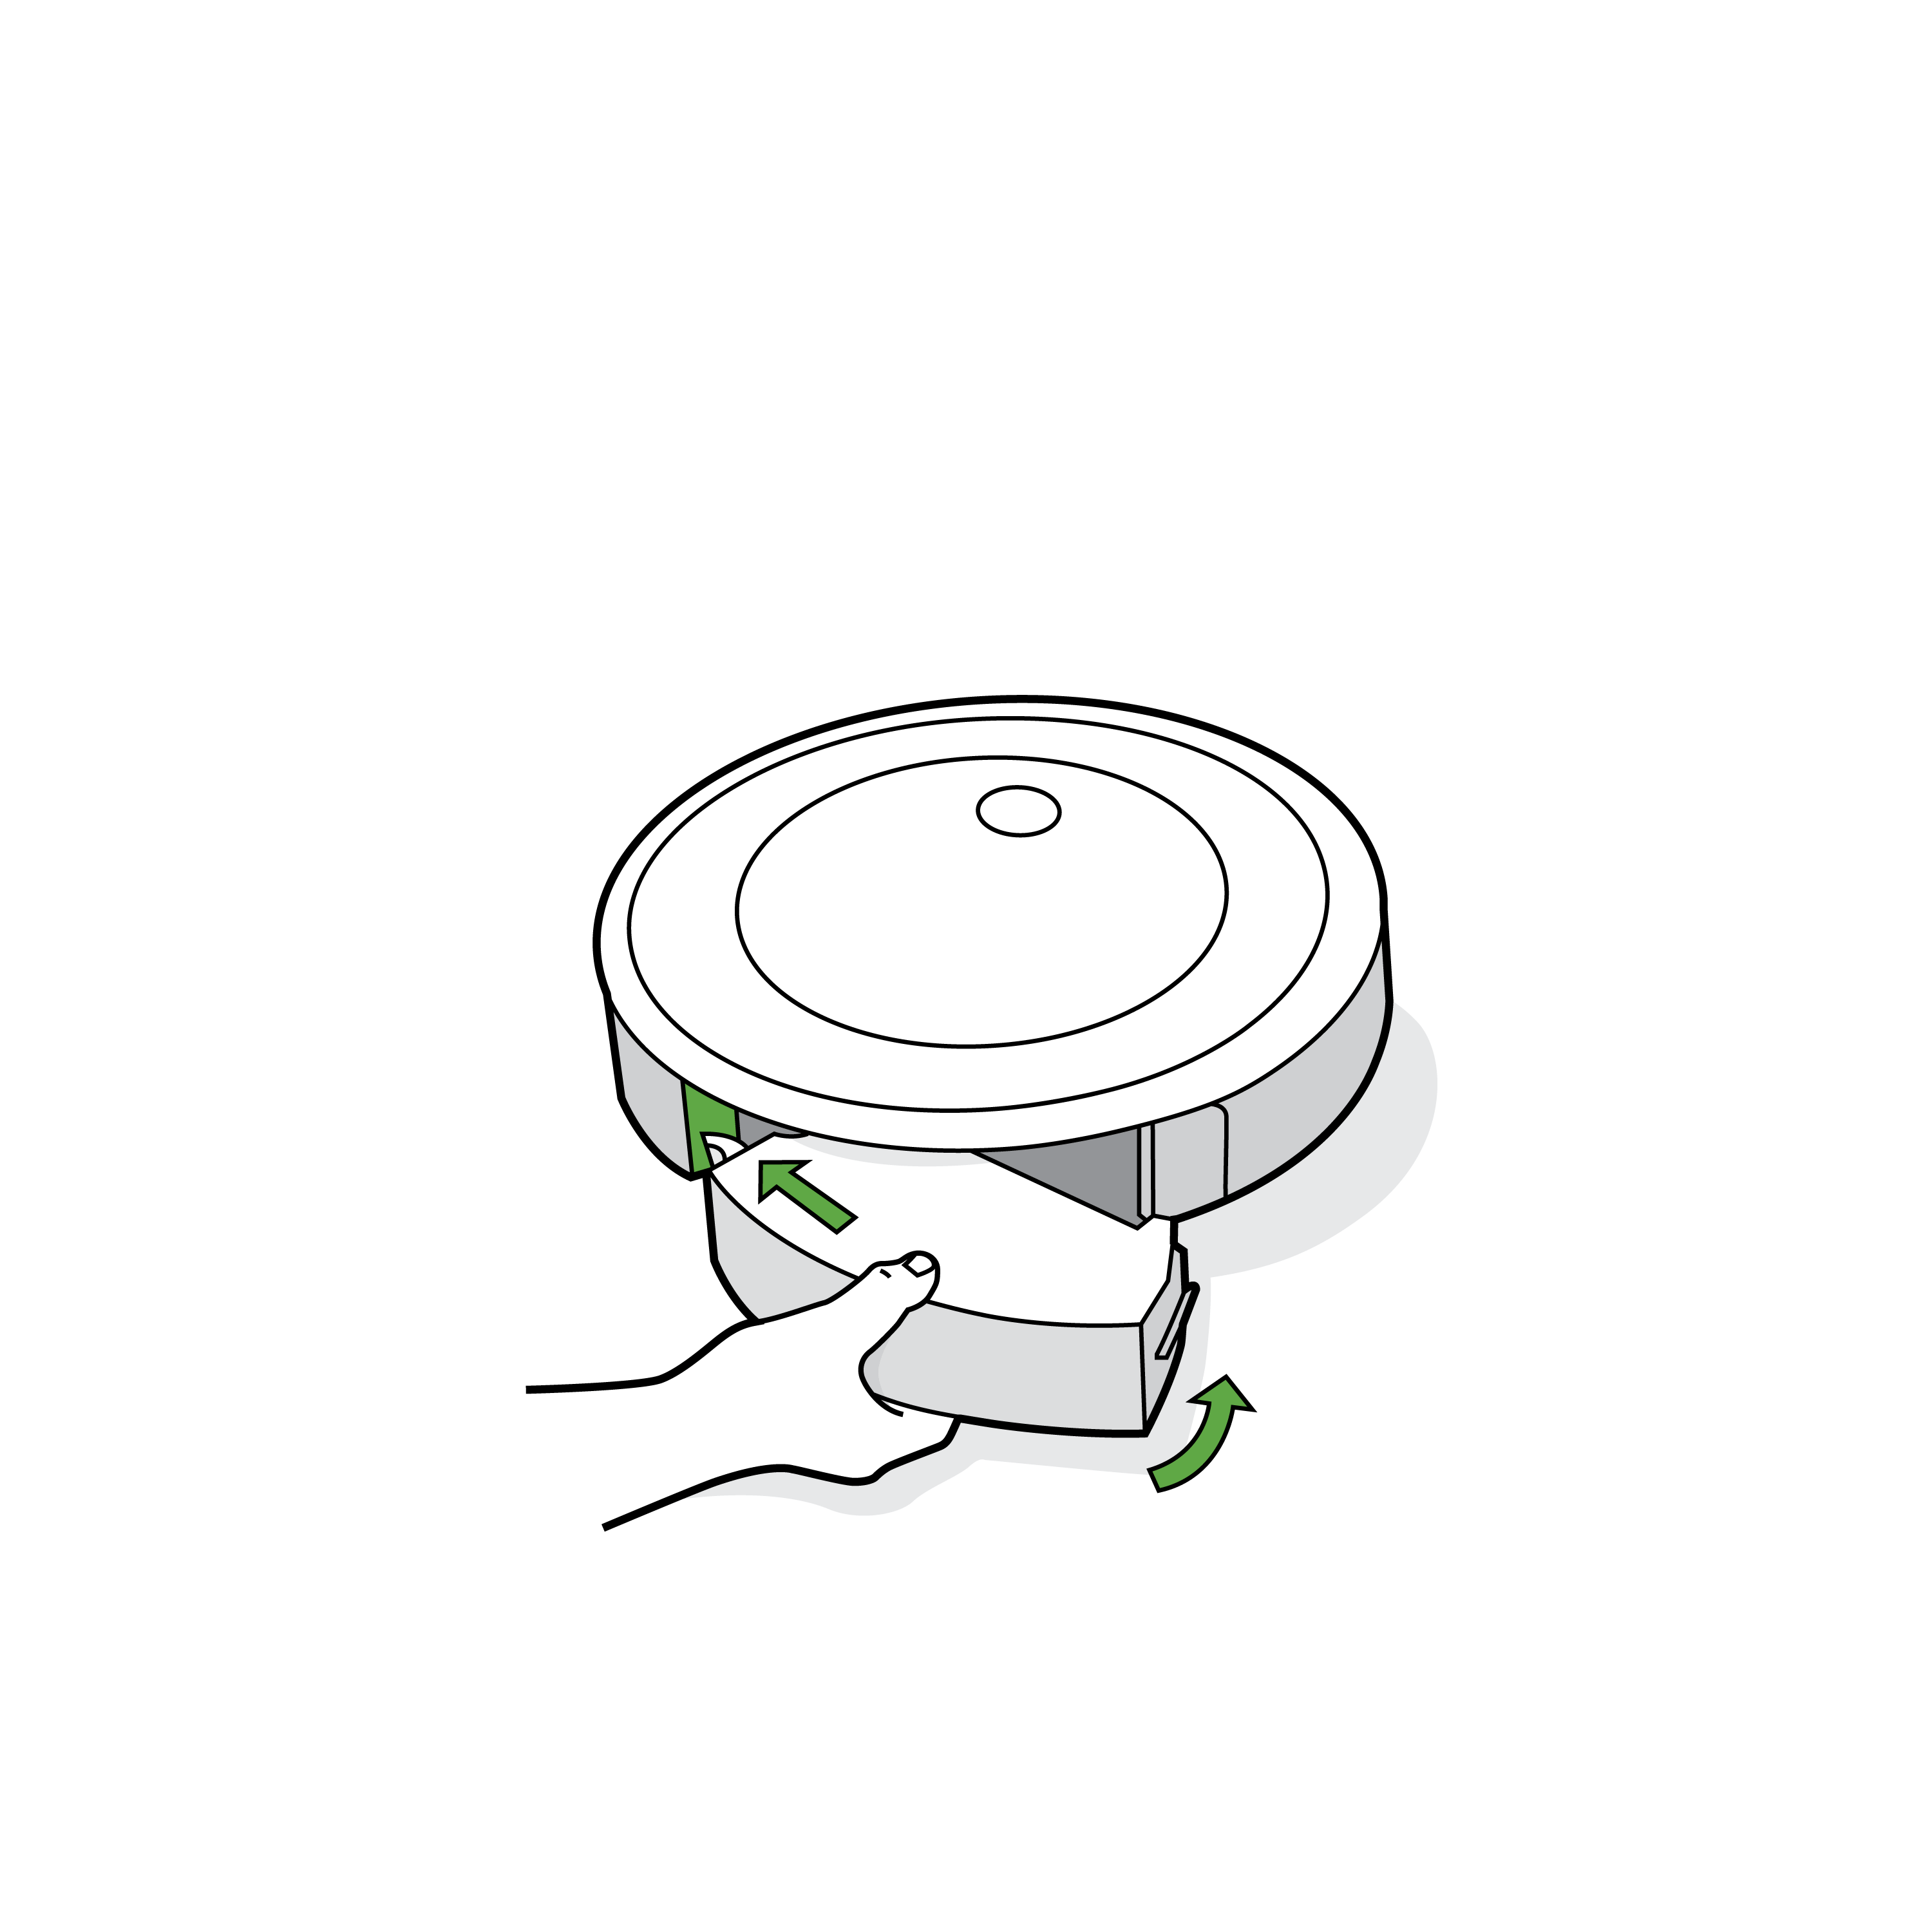
Remove and reinstall the bin to ensure a good connection. Please check the metal bin contacts and wipe them on both the robot and the bin with a clean, dry cloth.
Error 15: Internal board error
Error 15 means the Roomba is experiencing internal board error.
This error happens only to Roomba models with smart maps and can happen periodically. A few things can trigger it. Often, Error 15 means your robot experienced an internal error and was able to take care of itself. It’s just letting you know about that afterwards.
For example, if the battery is removed and then reinserted into your robot, upon power up, your robot will signal Error 15 (this is expected behavior, and there is nothing wrong with your robot).
However, if Error 15 is happening on every cleaning job, and is interfering with your ability to use the Roomba, you can try the following troubleshooting steps:
- First, revert your Smart Map to a previous version by going into your History and viewing your Clean Map reports. At this point, simply find a map you like from a previous cleaning job and select the overflow menu in the top right corner. Select «Update Smart Maps» to complete this process.
- If the error persists, try remapping your home by deleting all of your Smart Maps and starting a new one. You can do so by viewing the maps you’d like to delete, tapping the three (3) horizontal dots icon, and then choosing «Delete map».
- At this point, you can try rebooting your robot. To do so, press and hold its button for 9 seconds, and then release it. The light ring will then swirl clockwise in white. This swirling pattern, which can last for up to a minute and a half, means that your robot is booting up. The reboot procedure is complete when the light ring shuts off.
- If none of these steps work and Error 15 persists, you can perform a full factory reset. You can learn how to perform the correct factory reset right here.
Error 16: Roomba is tilted or the bumper is dislodged
Error 16 means the Roomba is not able to start cleaning because it is tilted or the bumper is possibly dislodged from the robot. If the bumper is dislodged, push the bottom of the bumper in this area in, and up towards the top of the robot. You will hear a click when it snaps back into place.
Dislodged bumper.
Correct bumper orientation.
After, the bottom of the bumper is in place, press the top of the bumper in the dislodged area in and down towards the bottom of the robot. You will hear a click when it snaps back into place.
Tap on the bumper to ensure it moves freely.
If the bumper is not dislodged from the robot, move the Roomba to a flat surface then press the Clean button to restart. Avoid moving the robot when pressing the button.
If the Roomba says this message on a flat surface, reboot the robot.
Error 17: Navigation problem
Error 17 means the Roomba has entered an unknown area and got lost while cleaning and unable to return to Home Base. It can also mean the Roomba cannot complete and has cancelled its cleaning job.
Here’s how to troubleshoot error 17:
- Ensure there were no changes to the environment during the cleaning cycle like a closed door or moved furniture.
- The space is too large to be completed in a single cleaning run.
- The carpet to be cleaned is too thick.
- It is possible for a Roomba to drive over transitions, such as doorway thresholds, that it cannot drive over again when trying to leave the area.
- Ensure the house has adequate light (daylight or dim lighting should be sufficient) for Roomba to navigate. Extremely dark rooms can obscure the localization camera and cause problems with navigation and coverage.
- Excessive clutter can contribute to this error. Clear any cluttered areas.
- Ensure the camera is clear of any dust or debris. Wipe the clear window using a microfiber or soft cotton cloth that has been lightly dampened with water or a screen cleaning solution.
- There may be debris on the Floor Tracking Sensor. Turn the Roomba over and use a clean, dry microfiber or soft cotton cloth to wipe any debris that has accumulated in the round Floor Tracking Sensor opening on the right side of the bottom surface. Do not spray cleaning solution directly into the sensor opening.
- There is an issue with the robot (e.g., a loose caster wheel) which requires maintenance.
Error 18: Docking problem
Error 18 means the cleaning is complete, but the Roomba was unable to dock onto the Home Base. Put simply, Roomba cannot return to the Home Base or starting position.
Please check the Home Base and charging contacts, then do the following:
- Ensure the Home Base did not get unplugged, moved, or rotated during the cleaning cycle.
- The charging contacts on both the Home Base and robot should be clear of residue or debris. Use a clean lightly dampened melamine foam such as a Magic Eraser to remove any residue or debris that may have built up. The power indicator on the Home Base will illuminate when your Roomba is charging.
- Use a clean dry cloth to clean the front facing camera, and the Visual Docking Target on the Clean Base or Home Base.
- Ensure there is no clutter around or near the Home Base.
- The position of the Home Base is on a hard, level surface against a wall. Your Roomba should have a clear path to the Home Base and the Home Base should be at least 4 ft (1.2 m) from any stairs.
- Ensure there are no obstructions (e.g., stickers, tape, or paint) on the bumper or on the Home Base.
- Please check if Your Roomba can detect the Home Base.
- If your Roomba is not starting on a Home Base, ensure there are no obstacles in front of the starting position. This will prevent Your Roomba from being able to return to the original starting position when the cleaning cycle is complete.
Error 19: Undocking problem
Error 19 means your Roomba is experiencing an issue undocking from the Home Base. Clear any obstacles that may be in front or around the Home Base, then press the button.
If the message persists, please perform a reboot on the Roomba and the Home Base, then start your Roomba from the Home Base. Environmental interference may prevent your Roomba from navigating as expected.
If the issue persists, try to start Roomba off the Home Base. Doing so may cause Roomba to provide a different Error Message. Use the to troubleshoot the Error Roomba presents.
Error 20: Internal communication error
Error 20 means your Roomba is experiencing an internal communication error. Press the button to restart the cleaning mission. If the message persists, perform a reboot.
Error 21: Lost communication with mobility board
Error 21 means your Roomba is experiencing an internal communication error. More specifically, Roomba has lost communication with its mobility board.
Press the button to restart the cleaning mission. If the message persists, perform a reboot.
For this error, it is best to contact iRobot Customer Care.
Error 22: Roomba is stuck
Error 22 means your Roomba is stuck. It will produce the message “Move to a new area then press the button”.
If your Roomba gives this error when it is stuck under an obstacle, move your Roomba to a new location and press the button to restart. Check the side wheels for obstructions.
Push the wheels up and down several times and shake out any debris that may be trapped in the wheel well.
Gently turn both wheels by hand, making sure they turn freely, and each wheel displays the same amount of resistance. Ensure the Roomba’s wheels are firmly on the floor, then start the Roomba in a new location.
Error 23: Battery authentication failure
Error 23 means Roomba is not communicating with the battery.
Please confirm that you are using an authentic iRobot battery. If you need a new replacement battery, you can browse an authentic battery based on the model right here on Amazon.
Error 24: Wheels are spinning but Roomba is not moving
Error 24 means your Roomba is on an obstacle or an uneven surface and the wheels are spinning, but the robot is not moving. If this is the case, lift Your Roomba off the floor, place it in the center of the room and restart the clean cycle.
If this error occurred on a flat surface, check the wheels for obstructions.
Push the wheels up and down several times and shake out any debris that may be trapped in the wheel well.
Gently turn both wheels by hand, making sure they turn freely, and each wheel displays the same amount of resistance. Ensure the Roomba’s wheels are firmly on the floor, then start the Roomba in a new location.
Error 25: Internal communication error
Error 25 means your Roomba is experiencing an internal communication error. Press the button to restart the cleaning mission. If the message persists, perform a Roomba reboot.
If the message persists after rebooting the Roomba, please contact iRobot Customer Care.
Error 26: Vacuum stall, filter clog possible
Error 26 means the Roomba’s vacuum is experiencing insufficient airflow.
Begin by removing the Cleaning Head Module. Next, inspect the fan/scroll/vacuum assembly for debris. Be sure to inspect both the entrance and exhaust.
Remove any debris using compressed air, then replace the Bin Filter.
Error 27: Vacuum motor over-temperature
Error 27 means the Roomba vacuum is not functioning due to over-temperature, often caused by a clogged filter or bad impeller of the vacuum motor. You may also need a replacement cleaning head system.
Begin by removing the Cleaning Head Module. Next, inspect the fan/scroll/vacuum assembly for debris. Be sure to inspect both the entrance and exhaust.
Remove any debris using compressed air, then replace the Bin Filter.
Error 29: Error while upgrading software
Error 29 means that your Roomba experienced an error while upgrading its software. This is caused by the Roomba starting a cleaning run while a software update was being performed.
Place your Roomba on the Home Base for the software update to process fully.
If the robot has been on the Home Base for an extended period of time and the white light ring starts to swirl around the button, this also will let you know an update is in progress.
White clockwise swirl: Starting up or updating software (please wait).
Error 30: Vacuum failed to start
Error 30 means your Roomba’s vacuum motor is having problems spinning or the filter is clogged. Perform bin and filter care procedures.
Open the bin door and empty it into the trash. Push down and remove to clean the filter. Tap the filter gently against a trash can. Then, return the filter into the bin and place the bin back in the robot.
The bin should be emptied after each use, while the filter should be replaced every two months.
Error 32: Smart Map on robot does not match map saved on App
Error 32 means that the Smart Map your robot created does not match with the map in the iRobot HOME App.
Please review the iRobot HOME app Smart Map section to ensure no changes have been made to the map and then try again. If the message persists, perform a robot reboot by pressing and holding the button for nine (9) seconds. Then ask the robot to clean everywhere/clean all.
If the message persists after rebooting the robot, please contact iRobot Customer Care.
Error 33: Path may be blocked
Error 33 means your Roomba cannot complete cleaning and has cancelled its cleaning job because its path may be blocked. Please do the following:
- Ensure there were no changes to the environment during the cleaning cycle (i.e. closed door, moved furniture).
- It is possible for your Roomba to drive over transitions, such as doorway thresholds, that it cannot drive over again to leave the area.
- Ensure the house has enough light (daylight or dim lighting is sufficient) for your Roomba to navigate. Extremely dark rooms could obscure the localization camera and cause problems with navigation and coverage.
- Excessive clutter could contribute to this error. Clear cluttered areas.
- Ensure the camera is clear of any dust or debris. Wipe the clear window on the top surface using a microfiber cloth that has been lightly dampened with water or a screen cleaning solution.
Error 34: Internal communication error
Error 34 means your Roomba is experiencing an internal communication error. Press the button to restart the cleaning mission. If the message persists, perform a robot reboot.
If the message persists after rebooting the robot, please contact iRobot Customer Care.
Error 36: Bin full sensor not cleared
Error 36 means that the Bin Full sensor for your Roomba Is not cleared when the robot evacuated debris into the Clean Base. You may also see a red light ring sweeping towards the rear of the robot.
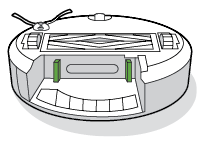
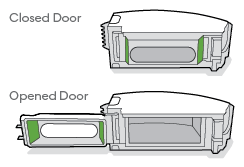
Ensure the bin full sensors on the robot cleaning head and bin have been cleaned off. To do so, remove the filter from the bin, rinse the bin and bin door with water, and let them air dry. Wipe the Bin Full sensors on the robot with a clean, lightly dampened melamine foam such as a Magic Eraser.
Error 38: Power communication issue
Error 38 means your Roomba is experiencing an internal communication error. Press the button to restart the cleaning mission. If the message persists, perform a robot reboot.
If the message persists after rebooting the robot, please contact iRobot Customer Care.
Error 39: Power communication issue
Error 39 means your Roomba is experiencing an internal communication error. Press the button to restart the cleaning mission. If the message persists, perform a robot reboot.
If the message persists after rebooting the robot, please contact iRobot Customer Care.
Error 41: Mission timed out before completion
Error 41 means your Roomba timed out during a cleaning mission.
This error could occur due to the following reasons:
- The cleaning job took too long for your Roomba to complete and the robot did not pause or perform a recharge and resume cycle. This could happen if the robot ran over four (4) hours without either occurring. Please place Roomba back onto the Home Base to let the robot charge, and then attempt another cleaning job.
- Roomba reached the limit for the room size area it is able to cover during a cleaning job. The robot can cover a certain area on one level of the home. If this happens, place the robot and Home Base into the area of the home where the robot is unable to reach and start a new cleaning mission. Doing so you can also create and eventually save a new map for that area. Anytime it is desired for the robot to clean this area of the home, the robot will need to be moved and fully charged.
- The robot did not perform any wall following within 15 minutes of beginning the cleaning job. Ensure the robot is navigating around the home as intended and not stuck in an area such as under a table with multiple chairs.
- The robot did not perform edge cleaning within the duration of the cleaning job with edge cleaning activated in the iRobot HOME App. Ensure the robot is navigating around the home as intended and not trapped in a tight space such as under a table with multiple chairs.
Error 42: Failed to re-localize when direct cleaning
Error 42 means that your Roomba failed to re-localize during a direct cleaning job using Smart Maps and the map may also appear to not look correct in the app.
This error could occur due to the following reasons:
- Changes to the environment during the cleaning cycle (i.e. closed door, moved furniture).
- It is possible for the Roomba to drive over transitions, such as doorway thresholds, that it cannot drive over again to leave the area.
- Not enough adequate lighting (daylight or dim lighting is sufficient) for Roomba to navigate. Extremely dark rooms could obscure the localization camera and cause problems with navigation.
- Excessive clutter could contribute to this error. Clear cluttered areas.
- Camera covered with dust or debris. If so, wipe the clear window on the top surface using a microfiber or cloth that has been lightly dampened with water or a screen cleaning solution.
- Roomba was picked up and moved to another location while cleaning.
Please ensure there were no changes or edits to your Smart Map. Place your Roomba back onto the Home Base and attempt another direct cleaning job.
Error 43: Roomba started in Home Base Keep Out Zone
Error 43 means your Roomba started a job in a Keep-out Zone.
The robot places a small keep-out zone around the Home Base by default. Move your Roomba to a new location, then press the CLEAN button to restart the mission.
Error 46: Robot ended mission with low battery not on dock
Error 46 means that your Roomba’s battery is low and needs to charge. Place your Roomba on the Home Base until fully charged. You can use the iRobot HOME app to view charging status.
Error 47: Invalid robot calibration
Error 47 means your Roomba is experiencing an internal error.
A robot reboot should resolve this issue. If the error persists, please contact iRobot Customer Care.
Error 48: Invalid robot calibration (Roomba’s path)
Error 48 means your Roomba’s path is not properly calibrated.
If your Roomba says «couldn’t get to the room you asked it to clean. Please clear the path and try again.» Please make sure there are no obstacles that are preventing Roomba from navigating from room to room within the cleaning area.
Ensure that the Imprint™ Smart Map looks like your cleaning area and that all desired cleaning areas are connected within the Smart Map.
Error 66: Memory limit reached
Error 66 means your Roomba has run out of memory during a cleaning mission.
You may see the robot return to its Home Base and reboot itself.
The Light Ring will swirl white and the robot will beep. If this occurs, ensure that your robot is provisioned to the iRobot HOME App before starting a cleaning job. Please go to Setting up your Wi-Fi Connected Robot with the iRobot HOME App to connect to the app.
Once your robot is connected to the app, as your robot maps out space in your home it is continually adding information to its memory. If the space the robot is mapping out is too large for the robot’s memory, the robot will eventually run out of memory, head back to the home base and then report this error message.
The robot will then automatically reboot while on the home base to clear the memory.
If your robot continues with this error after rebooting, perform the following steps:
- Create a new Smart Map with smaller sections of the house and use directed room cleaning only once the map is saved.
- If multiple maps are saved in the app, delete any unused maps as this will free up memory.
If the robot does not perform an automatic reboot after docking onto the Home Base, please reboot the robot manually. If the message persists, please contact iRobot Customer Care.
Error 68: Camera failed during cleaning job
Error 68 means an error occurred with the Roomba’s camera during cleaning.
If your Roomba reports an error 68, this means the robot is not receiving data from the camera which will cause the robot to not navigate your home properly.
Should this error occur, place the robot back onto the home base and perform a robot reboot; this should clear the error and you will be able to perform another cleaning job.
If the message persists, please contact iRobot Customer Care.
Error 74: Area limit cleaned reached
Error 74 means your Roomba has stopped during a cleaning mission because it has reached the limit for the maximum area it can cover during a cleaning job.
This can happen because the Roomba can cover a certain area on one level of the home.
Also, the area covered is dependent upon a few factors including flooring type and furniture.
If you receive this error, place the Roomba and the Home Base in the area of the home where the robot was unable to reach. Start a new cleaning mission.
If error 74 continues after relocating your Roomba, perform a reboot to clear the error. If the message persists after the reboot, contact iRobot Customer Care.
If you own a Roomba with Imprint™ Smart Mapping capabilities, you have options for creating and saving a new map for that area, and for replacing a Smart Map with a recent Clean Map. Anytime it is desired for the robot to clean this area of the home, the robot will need to be moved and fully charged.
Error 75: Stuck around obstacles
Error 75 means your Roomba timed out during a cleaning mission because it is stuck around obstacles.
This can happen because the Roomba did not perform any wall following within 15 minutes of beginning the cleaning job. Ensure the robot is navigating around the home as intended and not stuck in an area such as under a table with multiple chairs. Perform robot reboot if issue persists after relocating your robot.
Error 88: Roomba cannot safely move backwards
Error 88 means your Roomba has determined it can no longer safely back up (reverse).
The error occurs on a Roomba that is not equipped with rear cliff sensors when it is unable to back up any further due to a perceived safety issue. There is a limited distance that the robot can safely back up to ensure it does not fall backward down a cliff.
The error can also occur if the Roomba gets stuck on a threshold, hung up near a chair, or gets into a situation where the bumper is hit when it does see an actual cliff.
Spinning in place depletes the amount of distance that the robot can back up.
To solve this error, move the Roomba to a new nearby location and press the button to resume the mission.
Error 89: Mission runtime too long
Error 89 means the Roomba was not able to complete the cleaning mission within a reasonable period of time and returned to the dock. Most Roombas will run a cleaning mission, with charge and resume occurring as needed, for up to 12 hours to clean.
If the cleaning time during a mission exceeds the Roomba’s limitations, it will return to its dock.
To solve this issue, check for obstacles that could be interfering with the Roomba’s ability to efficiently clean the space; remove and retry. Use cleaning zones to divide the space into smaller sections and run multiple cleaning missions. If the message persists, please contact iRobot Customer Care.
Error 1003: Internal communication error
Error 1003 means Roomba is experiencing an internal communication error. Press the button to restart the cleaning mission. If the problem persists, perform a robot reboot.
If the message persists after rebooting the robot, please contact iRobot Customer Care.
To solve this issue, check for obstacles that could be interfering with the Roomba’s ability to efficiently clean the space; remove and retry. Use cleaning zones to divide the space into smaller sections and run multiple cleaning missions. If the message persists, please contact iRobot Customer Care.
Final Words
And there you have it, the complete Roomba error code troubleshooting guide.
We are grateful for the manufacturer of Roomba, iRobot, to have created such a simple system for Roomba owners to troubleshoot issues using its error codes. Remember, if you are unable to resolve an issue, don’t hesitate to contact iRobot Customer Care.
Other helpful Roomba articles:
- How to connect Roomba to Wi-Fi
- Roomba not connecting to Wi-Fi troubleshooting