Вы испытываете синий экран или случайные сбои с кодом ошибки What Failed: «IntcOED.sys» на компьютере с Windows 11 или Windows 10? Некоторые пользователи сталкивались с синим экраном, сопровождаемым кодом ошибки What Failed: «IntcOED.sys». Это ошибка синего экрана, которая возникает, когда Windows устанавливает коллективное обновление или при установке оставшихся драйверов. Это также известно как фатальная ошибка, поскольку ОС перестает работать.
Если вы один из затронутых пользователей, вы попали на правильную страницу. Здесь мы упомянули решения, которые помогли затронутым пользователям избавиться от ошибки. Вы пробуете эти исправления и устраняете ошибку без особых проблем.
Что такое IntcOED.sys?
IntcOED.sys — это ошибка в Windows, которая приводит к появлению синего экрана. Большинство пользователей сообщили, что основной причиной этой проблемы является несоответствие технологии Intel SST или Smart Sound. Однако другие причины также могут привести к появлению кода ошибки IntcOED.sys.
Когда возникает ошибка IntcOED.sys Failed?
Несоответствие, связанное с драйвером
Одной из наиболее распространенных причин ошибки сбоя IntcOED.sys являются проблемы, возникающие из-за проблем, связанных с драйверами. В этом случае средство устранения неполадок Windows Audio может помочь, используя автоматические исправления. Вам необходимо запустить средство устранения неполадок Windows Audio и следовать приведенным инструкциям. Убедитесь, что вы выбрали рекомендуемое решение.
Конфликт с драйвером OED
Другой причиной возникновения ошибки IntcOED.sys сбоя является конфликт между различными системными процессами. В этом случае вы увидите проблемы с драйвером OED на базовом устройстве Surface Book Perf. Единственное решение — заставить систему удалить существующий драйвер OED. Используйте версию, совместимую с системными процессами.
Поврежденный драйвер Smart Sound Technology
Знаете ли вы, что поврежденные файлы драйверов могут вызвать проблемы с аудиосистемой? Лучшее решение — откат существующего драйвера OED Sound Technology. После этого нужно позволить системе выбрать эквивалент, совместимый с системой.
Существуют различные решения, которые могут помочь вам исправить ошибку сбоя IntcOED.sys. В сопроводительном сообщении может быть указано, что драйвер выгружен без отмены незавершенных операций. Мы предоставили последние исправления, которые на сегодняшний день работают на 100%.
- Удалите или переустановите технологию Intel Smart Sound Technology (SST)
- Запустите средство устранения неполадок с воспроизведением звука
- Обновите драйверы с помощью Intel Driver & Support Assistant
- Обновите БИОС.
- Удалите последние обновления функций.
- Запустите сканирование SFC и DISM.
- Восстановить компьютер к заводским настройкам.
Вам потребуется разрешение администратора или учетная запись, чтобы решить эту проблему.
1]Удалите или переустановите технологию Intel Smart Sound Technology (SST)
Один из самых простых способов исправить ошибку IntcOED.sys в Windows — это удалить SST или технологию Intel Smart Sound. После этого вы можете переустановить его, если хотите. Однако пользователи сообщают, что переустановка SST может не решить проблему. Для достижения наилучших результатов не устанавливайте SST, и таким образом вы избавитесь от синих экранов.
Ознакомьтесь с шагами, которые необходимо предпринять для удаления SST.
- Одновременно нажмите клавиши Windows и R, чтобы открыть диалоговое окно «Выполнить».
- Введите devmgmt.msc и нажмите Enter. Откроется диспетчер устройств, который предлагает доступ администратора.
- Здесь вам нужно обратить внимание на звуковые, видео и игровые контроллеры в списке категорий устройств.
- Разверните категорию и найдите Smart Sound Technology OED.
- Щелкните правой кнопкой мыши Smart Sound Technology OED. В контекстном меню выберите пункт «Удалить устройство».
- Вы получите всплывающее сообщение с вопросом, уверены ли вы, что хотите удалить устройство, нажмите «Да».
- Теперь вам нужно дождаться, пока не произойдет удаление.
- Перезагрузите компьютер.
После этого проверьте, возникает ли по-прежнему ошибка сбоя IntcOED.sys.
2]Запустите средство устранения неполадок с воспроизведением звука
Часто причиной ошибки IntcOED.sys failed является неправильно портированный звуковой драйвер из Windows. В этом случае сама Microsoft предложила исправление, которое вы можете применить. Вот шаги, которые необходимо выполнить, чтобы запустить средство устранения неполадок со звуком:
- Нажмите на значок Windows (крайний левый нижний угол экрана). Отсюда вам нужно открыть Настройки.
- Нажмите на систему
- Выберите «Устранение неполадок» на левой панели из списка параметров, а затем «Другие средства устранения неполадок» в настройках справа.
- Выберите «Воспроизведение аудио». Нажмите «Запустить средство устранения неполадок» в раскрывающемся списке.
- Было бы полезно, если бы вы подождали, пока Windows просканирует систему на наличие проблем, связанных со звуком.
- Если все в порядке, придется искать другие решения.
- Тем не менее, вы получите всплывающее сообщение с инструкциями, если возникнет проблема.
- Нажмите «Да, открыть улучшения звука».
После этого перезагрузите систему и проверьте, устранена ли проблема.
Читать: исправить ошибку «Синий экран смерти» hardlock.sys
3]Обновите драйверы с помощью программного обеспечения Intel Assistant.
Иногда проблемы с драйвером, поставляемым с обновлением Microsoft, могут вызывать ошибку сбоя IntcOED.sys. В этом случае вы можете посетить страницу драйверов Intel и использовать программное обеспечение Intel Driver & Support Assistant для обновления драйверов.
- Для начала вам нужно нажать кнопку «Загрузить сейчас», чтобы загрузить программное обеспечение.
- Следуйте инструкциям на экране, чтобы установить программное обеспечение.
- После установки программного обеспечения откройте его и запустите Support Assistant.
- Он автоматически обнаружит программное обеспечение для обновления и установки. Следуйте инструкциям на экране.
Это предложение, вероятно, поможет вам.
В командной строке введите следующую команду:
SFC/сканировать
Теперь нажмите Enter, и он просканирует систему на наличие поврежденных системных файлов.
После завершения сканирования перезагрузите компьютер и посмотрите, появится ли снова та же ошибка или нет.
Если SFC не удается получить исправление ошибки, вы можете попробовать выполнить сканирование с помощью DISM (инструмент обслуживания образов развертывания и управления ими), который может оказаться полезным. Это как средство проверки системных файлов. Однако он использует обновление Windows для замены поврежденного файла, так что это на шаг впереди SFC. Вы можете выполнить следующие шаги, чтобы выполнить сканирование DISM:
Во-первых, откройте командную строку с правами администратора.
Теперь введите следующие команды в CMD и нажмите Enter:
DISM/Online/Cleanup-Image/CheckHealth DISM/Online/Cleanup-Image/RestoreHealth
Когда обе команды будут выполнены успешно, перезагрузите компьютер и посмотрите, устранена ли ошибка.
Если запуск сканирования SFC или DISM не помогает исправить ошибку, вы можете попробовать следующее потенциальное исправление, чтобы избавиться от нее.
Читать . Как исправить ошибку «синий экран» Tcpip.sys?
6]Удалить последнее обновление функций
Возможно, что недавно установленное обновление компонента конфликтует с зависимостью IntcOED.sys, и в результате у вас возникнет ошибка сбоя IntcOED.sys. В этом случае удаление последнего обновления функции может помочь исправить ошибку. Чтобы удалить последние обновления компонентов, выполните следующие действия:
- Во-первых, нажмите Win + R и откройте диалоговое окно «Выполнить».
- Теперь введите «appwiz.cpl», чтобы открыть «Программы и функции».
- Затем нажмите «Просмотр установленных обновлений» в левой вертикальной панели.
- Когда вы окажетесь в установленных обновлениях, найдите последнее обновление на вкладке Microsoft Windows.
- После этого выберите последнее обновление (Обновление для Windows) и нажмите кнопку «Удалить».
- Затем нажмите «Да» для удаления обновления.
- Как только он будет удален, перезагрузите компьютер и обратите внимание, устранена ли ошибка под рукой или нет.
Если ошибка по-прежнему появляется снова, вы можете попробовать еще несколько исправлений. Итак, переходим к следующему потенциальному решению.
См.: Исправление ошибки UcmUcsi.sys «синий экран».
7]Восстановить Windows до заводских настроек
Если вышеуказанные меры не работают, вы можете сбросить настройки ПК до заводских без потери данных. Он автоматически очищает всю недавнюю активность и начинает заново с нуля. Чтобы сбросить настройки Windows, выполните следующие действия:
- Прежде всего, откройте приложение «Настройки» с помощью горячей клавиши Windows + I.
- Затем перейдите на вкладку «Система» и прокрутите вниз до параметра «Восстановление» на правой боковой панели.
- На странице «Восстановление» коснитесь параметра «Сбросить компьютер».
- Затем выберите сохранить свои файлы и приложения и продолжите процесс сброса.
- После этого система перезапустится. При следующем запуске проверьте, устранена ли ошибка или нет.
Читать: исправить ошибку BSOD с ошибкой volsnap.sys
Ошибка сбоя IntcOED.sys в Windows может быть особенно неприятной, если вы продолжаете получать синий экран. Вот почему так важно определить основную причину и найти наилучшее решение. К счастью, есть несколько решений, которые можно использовать для устранения ошибки. Однако, если насыщение по-прежнему не устранено, необходимо обратиться к специалисту.
Читать: исправить ошибку BSOD EXFAT FILE SYSTEM (volmgr.sys)
Что вызывает ошибку сбоя IntcOED.sys в Windows 11?
Мы исследовали и проанализировали возможные причины ошибки сбоя IntcOED.sys на основе различных отчетов. Вот возможные причины, из-за которых может возникнуть ошибка:
- Эта ошибка, скорее всего, вызвана какой-либо проблемой нестабильности драйвера. В этом случае ошибку можно исправить, запустив средство устранения неполадок со звуком.
- Устаревшее обновление функций может быть причиной ошибки, которая может содержать ошибки. Следовательно, удаление последнего обновления функции также может решить проблему.
- Вероятной причиной этого может быть поврежденный звуковой драйвер, который является результатом повреждения файлов драйвера. Таким образом, простое решение этой проблемы — удалить драйвер Smart Sound Technology OED.
- Устаревший BIOS также может быть причиной этой ошибки. Следовательно, вы можете попробовать обновить BIOS до последней версии, которая может устранить ошибку для вас.
- Это также может быть вызвано поврежденными системными файлами. Итак, если сценарий применим, вы можете попробовать запустить сканирование SFC и DISM, чтобы исправить это.
Могут быть какие-то другие основные причины этой ошибки. В любом случае вы можете попробовать исправления, которые мы упомянули в этой статье, чтобы исправить ошибку.
Что такое технология Intel Smart Sound?
Технология Smart Sound или SST от Intel — это превосходный интегрированный звуковой цифровой сигнальный процессор или DSP. Он предназначен для управления речью, голосовыми и звуковыми взаимодействиями. С помощью Intel SST компьютеры с процессорами Intel Atom и Intel Core эффективно и быстро взаимодействуют с голосовыми командами. Вы можете рассчитывать на высококачественный звук без ущерба для времени автономной работы и производительности системы.
Some Windows 11 users are reporting that after Windows 11 installed a cumulative update or after installing a pending driver, they constantly get Blue Screen crashes with the ‘What Failed: IntcOED.sys‘ error code.
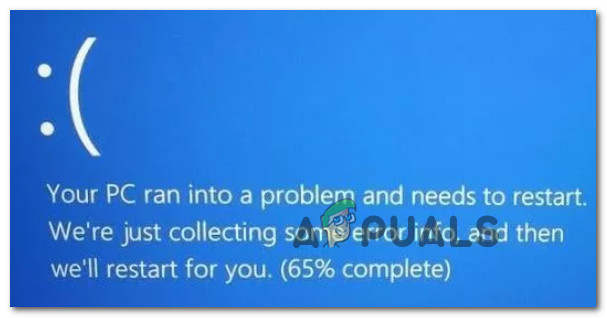
After investigating this particular issue, it turns out that this error can actually be rooted in multiple potential causes. Here’s a list of scenarios that might end up causing the ‘What Failed: IntcOED.sys‘ error on Windows 11:
- Driver-related inconsistency – Oftentimes, the root cause that’s causing this crash is already fixed by the automated fixes available through the Windows Audio troubleshooter. So, the best way to start troubleshooting this problem is to run the Audio troubleshooter and follow its recommended fix.
- Corrupted Smart Sound Technology driver – Having issues with audio or audio recording can be a huge pain, and it’s often caused by corrupted driver files. In this case, the best way to deal with the issue is to uninstall the current Smart Sound Technology OED driver and let your OS automatically migrate to a generic equivalent.
- An available hotfix is not installed – If you’re experiencing this issue after installing a feature update and you have pending Windows updates, you should know that Microsoft has released a hotfix to resolve the problem. You can check for and install the hotfix through Windows Update. Additionally, you can simply uninstall the feature update that was just installed in order to allow Windows to install the non-buggy version.
- System File corruption – If you’re seeing the “System File Inconsistency” error, it’s likely due to a problem with your system files. You can fix this by running SFC and DISM scans to repair any corrupted OS data. In more serious cases, you might need to do a system restore or even go for a repair install or reinstall the OS.
- Outdated BIOS / UEFI driver – If your BIOS or UEFI firmware is outdated, it could be the reason behind this particular problem. Updating to the latest version should take care of the issue.
- Conflict with OED driver – If you’re seeing problems with the OED driver on your Surface Book Perf base device, it’s likely due to a conflict between system processes. You can resolve the issue by forcing your system to roll back the current OED driver.
Now that we went over every scenario that might be responsible for the ‘What Failed: IntcOED.sys‘ error, let’s go over a series of fixes that other affected Windows 11 users have successfully used to get to the bottom of this issue.
Run the Sound Troubleshooter
If you’re experiencing this issue on your Windows 11 installation, the first thing you should do is see if Microsoft has already pushed out an automated fix for the problem. As it turns out, they are aware of the issue and have released a couple of fixes already.
As it turns out, this problem is often related to a legacy sound driver that was improperly ported from Windows 11.
To take advantage of the automated fixes that Windows provides, you’ll need to run the Audio troubleshooter and apply the recommended fix. This particular fix has been confirmed by many users as being effective – especially those that upgraded from Windows 10 to Windows 11, as opposed to clean-installing the latest operating system.
Here’s how you can run the Audio Troubleshooter and apply the recommended fix:
1. Start by opening the Settings app from your Start menu. You can do this by pressing the Windows key + I on your keyboard.
2. Once the Settings app is open, click System from the vertical menu on the left, then click on the “Troubleshoot” option from the right-hand section.
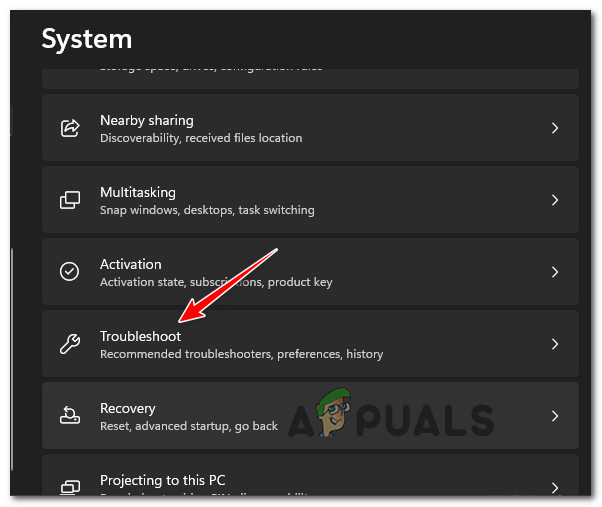
4. In the Troubleshoot window, scroll down and click on the “Playing Audio” option.
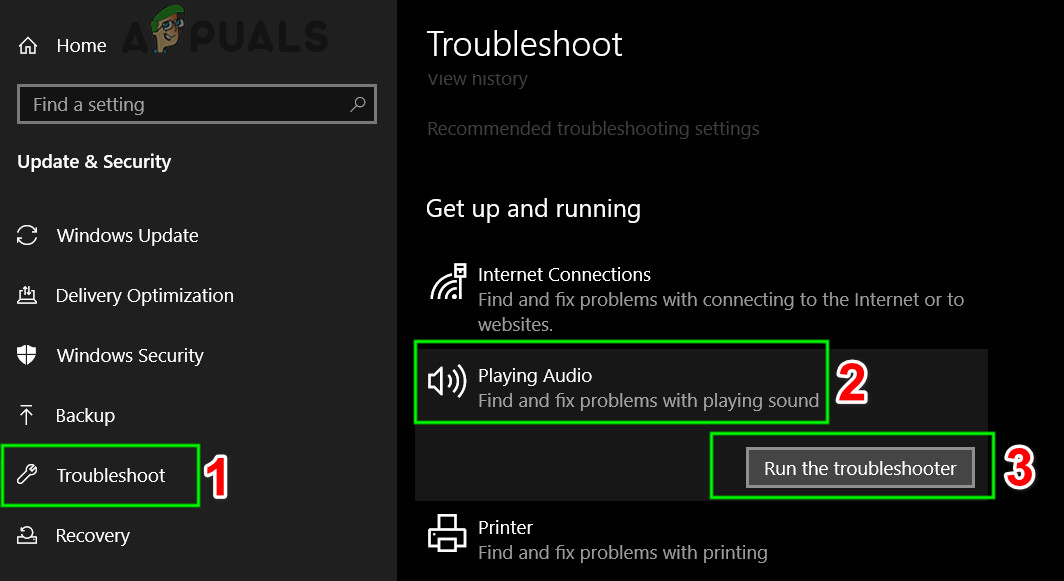
5. Click on the “Run the troubleshooter” button and wait for Windows to scan your computer for audio problems.
6. If any problems are found, follow the on-screen instructions to fix them.
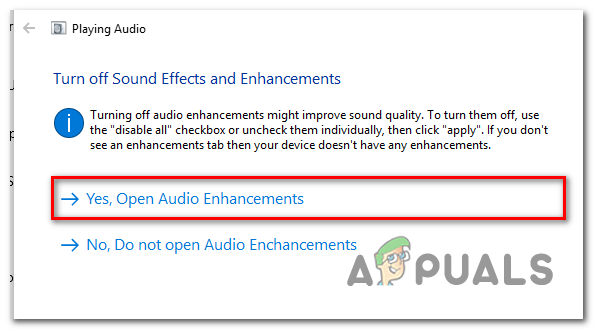
7. Restart your computer and see if the issue is resolved.
If you’re still getting the ‘What Failed: IntcOED.sys‘ at random intervals, move down to the next method below.
Uninstall the Intel Smart Sound Technology driver
If the method above didn’t work and the ‘What Failed: IntcOED.sys‘ error is related Smart Sound Technology OED service, one of the most effective things you can do is to uninstall the driver that’s currently governing it. This might seem counter-intuitive, but it will force your operating system to migrate to a generic equivalent, which should resolve the issue entirely and prevent your system from crashing in the system.
Note: The only time you’ll run into problems is if you’re actively using the Intel dedicated Sound Technology driver for advanced audio editing tasks, in which case you’ll need to find an alternative solution. But for everyone else, this should take care of the problem.
If you lose audio or recording capabilities on your Windows computer, don’t worry – this is only a temporary interruption while your computer migrates from the dedicated driver to the generic equivalent. You can fix this issue by following the instructions below to migrate over to a generic equivalent using Device Manager:
- Press Windows key + R to open up a Run dialog box.
- Type ‘devmgmt.msc’ inside the text box and press Ctrl + Shift + Enter to open up Device Manager with admin access.
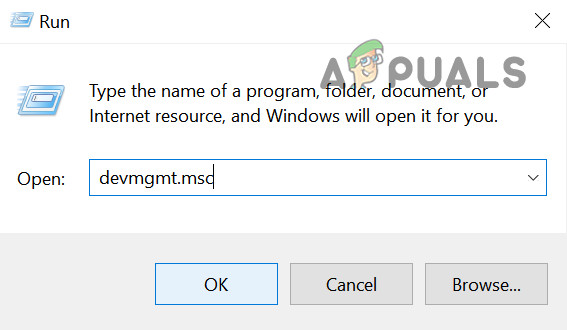
Open Device Manager - Scroll down through the different device categories and expand the drop-down menu associated with Sound, video, and game controllers.
- Find the Smart Sound Technology OED service and right-click on it.
- From the next context menu that just appeared, choose Uninstall device.
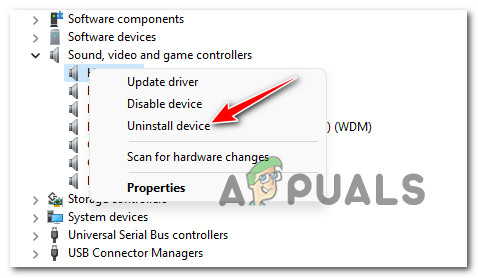
Uninstall the Smart Sound Technology driver - At the confirmation prompt, click Yes and wait for the uninstallation to finish.
- Restart your computer and see if the random crashes associated with the ‘What Failed: IntcOED.sys‘ error stop occurring.
If the problem is still persisting, try the next method below.
Uninstall the recent feature update
As it turns out, you might start receiving the ‘What Failed: IntcOED.sys’ error in situations where your system recently installed a Windows 11 feature update that ends up conflicting with the IntcOED.sys dependency.
Several users that dealt with this issue themselves have reported that they managed to fix this problem by uninstalling the latest feature update and restarting their computer.
Note: Since Microsoft already released a hotfix for this issue, the next time WU will install this feature update, you will no longer experience this problem.
Follow the instructions below to manually uninstall the Windows feature update that was recently installed:
Note: As an extra step we also included some instructions that will allow you to hide the update and prevent it from installing in the future.
- To open the Programs and Features screen, first press the Windows key + R to open a Run dialog box. Then, inside the text box, type ‘appwiz.cpl’ and press Enter.
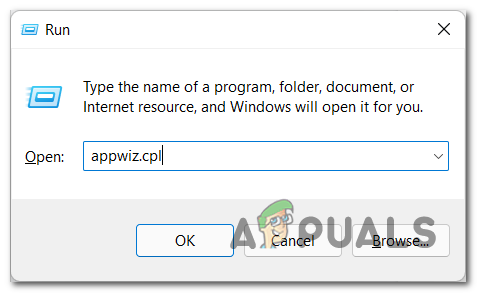
Open up the Programs and Features menu - After you’re inside the Programs and Features menu, use the vertical menu on the left to click on View installed updates.
- Once you’re in the Installed Update screen, find the update that was installed the last and right-click on it.
- From the context menu, choose Uninstall.
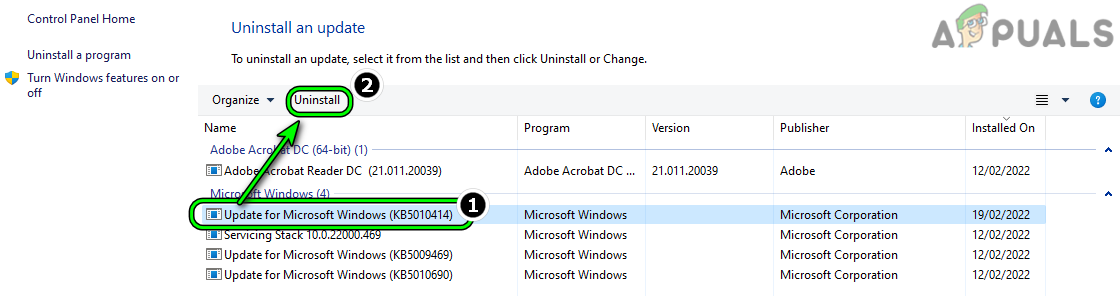
Uninstall the latest Windows 11 feature update - At the confirmation prompt, click Yes to begin uninstalling the update. Wait until the process is complete.
- Now that the update is uninstalled, don’t restart your computer just yet. Instead, visit the official download page of the Microsoft Show or Hide troubleshooter.
Note: The download should start automatically. - After the download is finished, open up the .diagcab file and click on Advanced at the first prompt. Then, check the box next to Apply Repairs Automatically before clicking on Next.
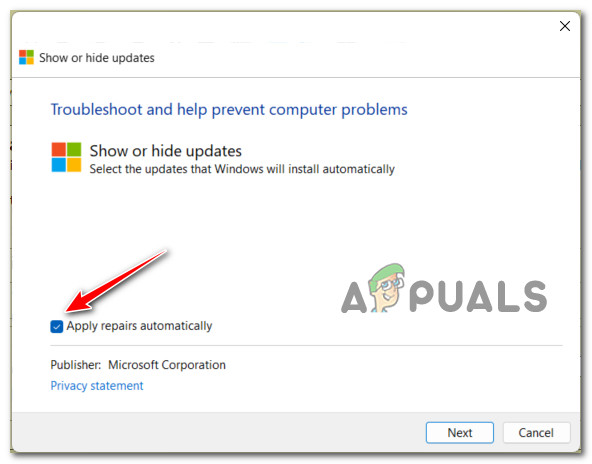
Apply the repairs automatically - The utility will scan your system to figure out which pending updates are not installed. Once the next screen appears, click Hide Updates from the list of options.
- On the following screen, check the box next to the update that you’re targeting and click Next to hide it – this will stop Windows Update from installing the update again in future attempts.
- Reboot your PC one final time and see if you can use your computer without constantly getting the ‘What Failed: IntcOED.sys’ error.
If the problem is still not fixed, move down to the next method below.
Install every security update
Soon after the ‘What Failed: IntcOED.sys’ error started occurring on Windows 11 due to the problematic Windows 11 feature update, Microsoft released a fix that supposedly addressed the issue.
If you are affected too and none of the methods above have helped, you can follow the instructions below to install the hotfix and resolve the constant crashes pointing towards the IntcOED.sys process.
Note: Microsoft releases these hotfixes in segments, so it‘s possible that you haven‘t yet received the hotfix while others have. If no new update is available yet, check back regularly or move down to the next potential fix below.
If you have pending updates that are currently waiting to get installed on your PC, follow the instructions below to get them installed and apply the hotfix:
- To open the Windows Update tab on Windows 11, first press the Windows key + R to open a Run dialog box. Then, type ‘ms-settings:windowsupdate‘ in the text box and press Enter.
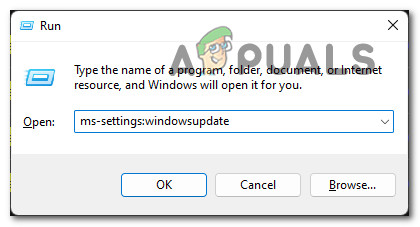
Accessing the Windows Update screen - Within the Windows Update screen, locate the right–hand section and click on Check for Updates to see if the hotfix is available.
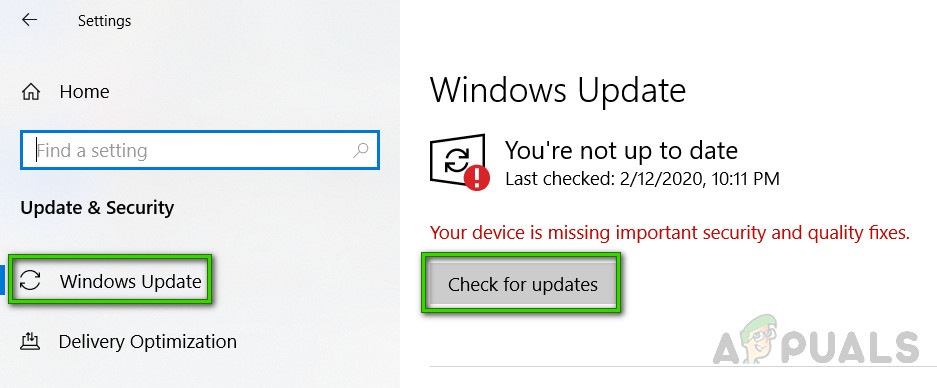
Check for Updates - If a new update appears, click Install Now and wait until the hotfix has been installed on your device.
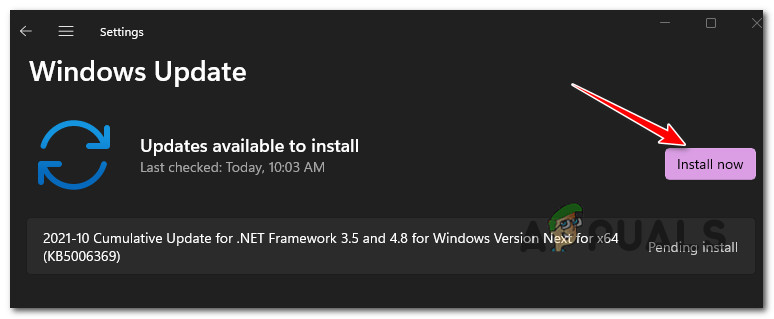
Install the pending hotfix - Once installation is complete, reboot your computer and repeat the action that was previously causing the IntcOED.sys process to see if the problem is now resolved.
If the issue is still not fixed yet, move down to the next potential fix below.
Deploy SFC and DISM Scans
If the issue with the ‘What Failed: IntcOED.sys‘ error persists, you may need to troubleshoot a potential system file corruption.
The best way to do this is to use two built–in utilities, SFC and DISM. These utilities can fix common corruption instances that may be causing the error.
To start, run a System File Checker scan. This does not require a stable internet connection.
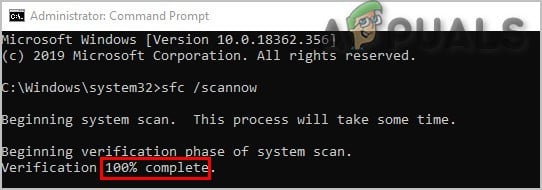
Note that SFC is a local tool that uses a cached copy of healthy system files to replace corrupted ones. It is important not to interrupt the scan until it is complete, as this could create additional logical errors.
If you are running this on a traditional hard drive rather than an SSD, it may take a couple of hours to complete. So arm yourself with patience.
Additionally, SFC has a tendency to freeze temporarily – if this happens, do not close the window, and wait for the real–time tracking to return.
Once the SFC scan is complete, reboot your computer and see if the IntcOED.sys error is still, occurring. If you are still seeing the same ‘What Failed: IntcOED.sys’ error, you can run a DISM scan next.
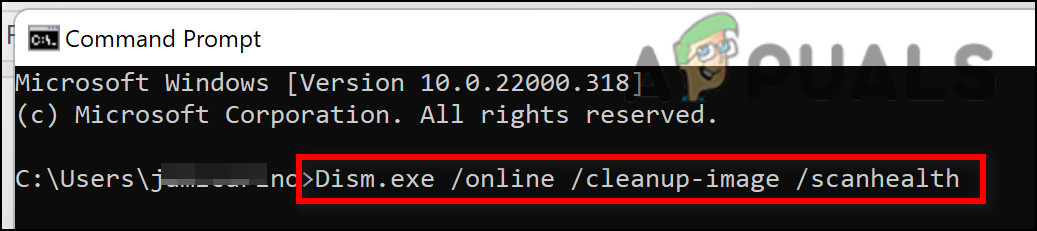
Info: DISM uses a component of Windows Update to replace corrupted files with healthy copies downloaded from the internet. Before starting the scan, make sure your internet connection is stable.
Once you have run both SFC and DISM scans, reboot your computer and repeat the action that was previously causing the same critical system crash. If you are still seeing the same error, try another potential fix below.
Installing the pending BIOS update
If you find yourself encountering the ‘What Failed: IntcOED.sys‘ error, it is likely because you have an outdated BIOS version that is causing your system to be unstable under heavy loads.
Several users who have experienced the same problem have found that updating their BIOS version to the latest one available has fixed the issue.
However, this process will differ depending on your motherboard manufacturer. Most manufacturers have developed their own flashing utilities to make the process easier.
You can find the official documentation for this procedure easily by doing a web search for ”*Your motherboard model* + BIOS Update.”
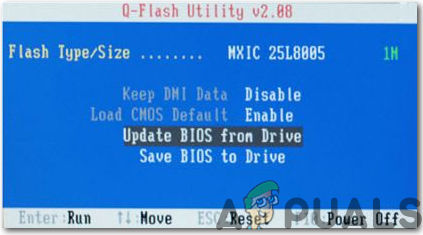
Keep in mind that if you do not follow the steps correctly or skip any, you run the risk of bricking your motherboard. Unless you have experience with updating BIOS firmware, we recommend that you take your PC to a certified technician.
If this method does not work or is not applicable, and you have already updated your BIOS version but are still seeing the same ‘What Failed: IntcOED.sys’ error, try the next potential fix below.
Rollback the Audio Controller (Surface Book users)
If you are using a Surface Book Perf base device, chances are you’re seeing this problem due to a problem having to do with a conflict between some system processes and the OED driver.
In case this scenario is applicable to your particular use case, you should be able to resolve the issue by forcing your system to roll back the current OED driver. Several users dealing with the same problem have confirmed that once they’ve done this, the What Failed: IntcOED.sys error stopped occurring and they could utilize their PC normally.
Follow the instructions below to roll back your current OED driver and fix the What Failed: IntcOED.sys error:
- Start by opening Device Manager by pressing Windows key + R.
- From the text prompt that appeared, type ‘devmgmt.msc’ and press Enter to open Device Manager.
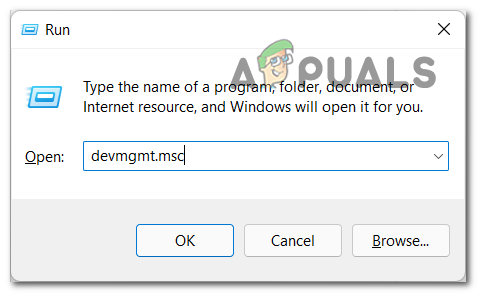
Open Device Manager - Once you’re inside Device Manager, expand the System Devices Group and double-click on the Audio controller driver.
- From the Properties tab of the Audio Controller driver, go to the Driver tab, click on the Roll Back driver.
- At the confirmation prompt, click Yes and allow your system to perform the rollback procedure.
- Reboot your PC and see if the What Failed: IntcOED.sys error is fixed once the next startup is complete.
In case this method was not applicable in your particular scenario or it didn’t fix your problem, move down to the next method below.
Use a System Restore point
If the methods above have not worked to fix the issue, it is likely that there is an underlying file corruption causing the ‘What Failed: IntcOED.sys’ error.
Since the issue cannot be resolved in a conventional manner, you can try using System Restore to restore the entire Windows installation.
Note: System Restore is a utility that can fix critical errors by reverting the machine to a previous point in time when the problem did not occur.
But in order to get this to work, you need to have a restored snapshot from a time before the issue began. Windows should automatically save these snapshots regularly.
Before you go ahead with this method, keep in mind that a system restore will revert all software and firmware to the state it was in when the snapshot was created.
Important: This means that all games, applications, user preferences, and anything else related to your Windows installation will be reversed.
If you decide to use System Restore, here are step–by–step instructions:
- To begin, press Windows key + R to open a Run dialog box.
- In the box, type ‘rstrui’ and press Enter to launch the System Restore wizard.
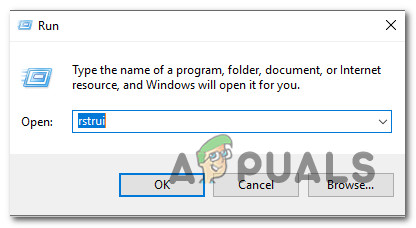
Opening the System Restore utility - On the first screen of System Restore, click Next to continue.
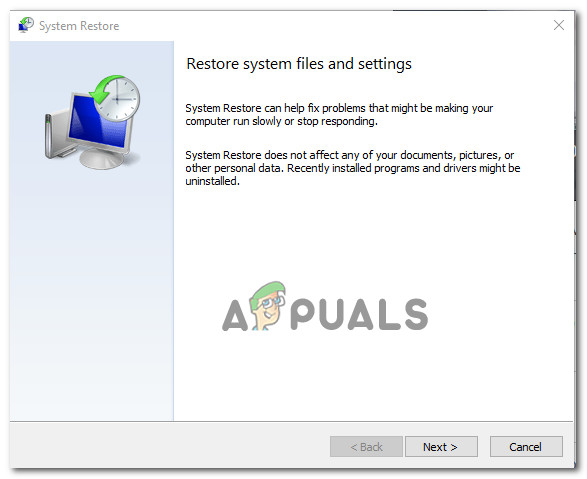
Opening the System restore - On the next screen, check the box next to Show more restore points.
- After doing this, select a restore point that is prior to when the issue began appearing, then click Next.
- To initiate the restoring process, click Finish. This will restart your computer and, upon startup, load the older state that you selected. [caption id=”attachment_96448“ align=”aligncenter“ width=”588“] Starting the System Restore process[/caption]
- After the reboot sequence is complete, check to see if the BSOD 0x000000c2 error is still occurring. If it is, proceed to the next method below.
Repair install WIndows 11
If you’re still encountering the ‘What Failed: IntcOED.sys’ error, it’s clear that you’re dealing with a severe corruption issue.
In this case, the only way of taking care of the problem is to reset all Windows components to ensure that you remove any instance of corrupted system files.
Most users choose the radical solution – a clean install that does the job but also removes any personal data including applications, games, media, and documents.
If you want to go for a less destructive route that will allow you to refresh your Windows components without affecting any of your personal files, you should go for a repair install. This procedure will allow you to keep all your personal data.
Follow this guide for step-by-step instructions on completing a repair install procedure.
Пользователи ранее сообщали об ошибке BSOD IntcOED.sys для Windows 10. Это проблема с синим экраном, когда драйвер выгружается без сообщения об ошибке отмены ожидающих операций. Теперь пользователи размещают на форумах сообщения о той же проблеме, возникающей в Windows 11. В сообщении на форуме одного пользователя говорится следующее:
После обновления Windows 10 до Windows 11 в декабре 2021 года я столкнулся с этой проблемой:
Что не удалось: код остановки «IntcOED.sys»
: драйвер выгружен без отмены ожидающих операций
Некоторые пользователи сообщают, что ошибки BSOD с выгрузкой драйвера возникают при запуске или вскоре после запуска своих компьютеров. Другие пользователи говорят, что эта ошибка синего экрана возникает после того, как их компьютеры выходят из спящего режима. Этим пользователям необходимо исправить повторяющиеся ошибки выгрузки драйвера.
Вам также нужно исправить повторяющуюся ошибку выгрузки драйвера в Windows 11? Если это так, попробуйте применить возможные решения для выгруженного драйвера без отмены ожидающих операций ошибки ниже.
Что такое ошибка синего экрана?
Ошибки типа «синий экран», также известные как стоп-ошибки, — это ошибки с синим фоном и стоп-кодами. Их также называют фатальными системными ошибками, поскольку ОС Windows перестает работать. Windows перезагружается после сбора информации после возникновения ошибок синего экрана.
Ошибки BSOD (синий экран смерти) часто могут быть связаны с драйверами устройств. На веб-странице Microsoft говорится, что по оценкам Big M, 70 процентов ошибок синего экрана относятся к сторонним драйверам устройств. В сообщении об ошибке «Драйвер выгружен» указан драйвер IntcOED.sys для технологии Intel Smart Sound.
Одноразовая проблема BSOD не является особенно большой проблемой. После перезапуска Windows ошибка синего экрана может больше никогда не появиться. Однако пользователям необходимо исправлять ошибки синего экрана, когда они повторяются на своих ПК с Windows.
Как исправить ошибку выгрузки драйвера без отмены ожидающих операций в Windows 11?
1. Обновите Windows 11
- Нажмите кнопку « Пуск » в Windows 11 и выберите приложение «Настройки».
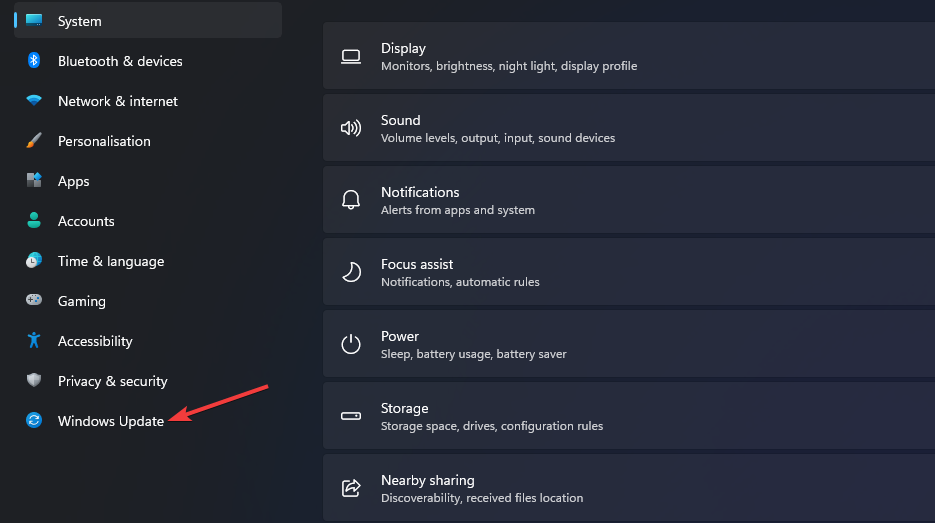
- Нажмите Центр обновления Windows слева от настроек.
- Нажмите кнопку Проверить наличие обновлений , чтобы загрузить и установить обновления.
- Нажмите кнопку «Загрузить и установить«, чтобы просмотреть доступные необязательные обновления.
2. Запустите сканирование системных файлов
- Откройте меню «Пуск» и введите «Командная строка» в поле поиска.
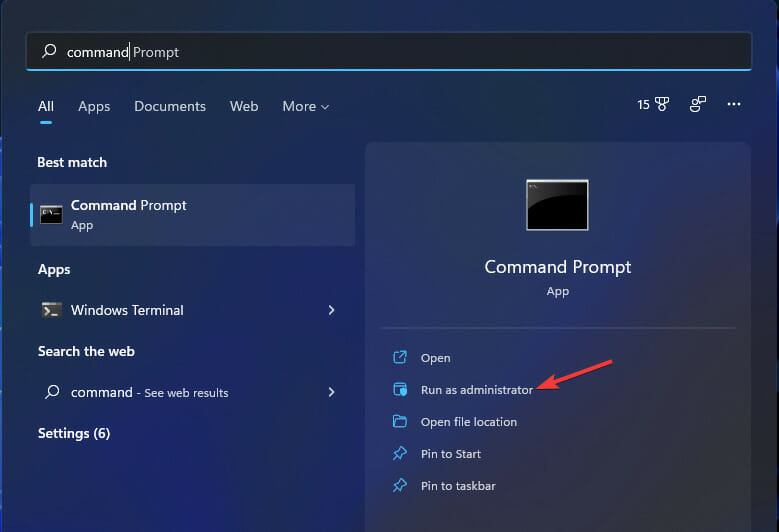
- Чтобы открыть командную строку с правами администратора, выберите параметр « Запуск от имени администратора », показанный непосредственно ниже.
- Введите следующую команду и нажмите Return:
DISM.exe /Online /Cleanup-image /Restorehealth - Затем запустите сканирование SFC, введя эту команду и нажав Enter:
sfc /scannow - Подождите, пока инструмент SFC завершит сканирование и отобразит результат.
3. Запустите восстановление при загрузке
- Откройте приложение «Настройки».
- Выберите « Восстановление » на вкладке « Система ».
- Нажмите кнопку « Перезагрузить сейчас » для параметра « Расширенный запуск », показанного непосредственно ниже.
- Выберите Устранение неполадок в среде восстановления Windows.
- Затем нажмите « Дополнительные параметры » > «Восстановление запуска ».
- Выберите учетную запись, а затем введите пароль для нее.
- Нажмите кнопку «Продолжить«, чтобы начать.
4. Обновите драйверы устройств в Windows 11.
Поскольку ошибка «Драйвер выгружен» часто возникает из-за неисправных или устаревших драйверов, попробуйте обновить драйверы устройств. Чтобы проверить состояние драйверов вашего ПК, запустите сканирование с помощью сторонней утилиты обновления драйверов, например DriverFix. Это программное обеспечение предоставит полный обзор устаревших или неисправных драйверов устройств на вашем ПК.

После сканирования вы можете нажать кнопку DriverFix «Обновить все«. При этом будут загружены новые драйверы для всех перечисленных устройств с устаревшими или неисправными. Если у вас версия Pro, вы можете выбрать автоматическую установку драйверов. Наш обзор DriverFix содержит дополнительную информацию об этом программном обеспечении.
5. Удалите драйвер Smart Sound Technology (SST).
- Одновременно нажмите клавиши Windows+ X, чтобы открыть меню опытного пользователя.
- Выберите Диспетчер устройств , чтобы открыть окно этой системной утилиты.
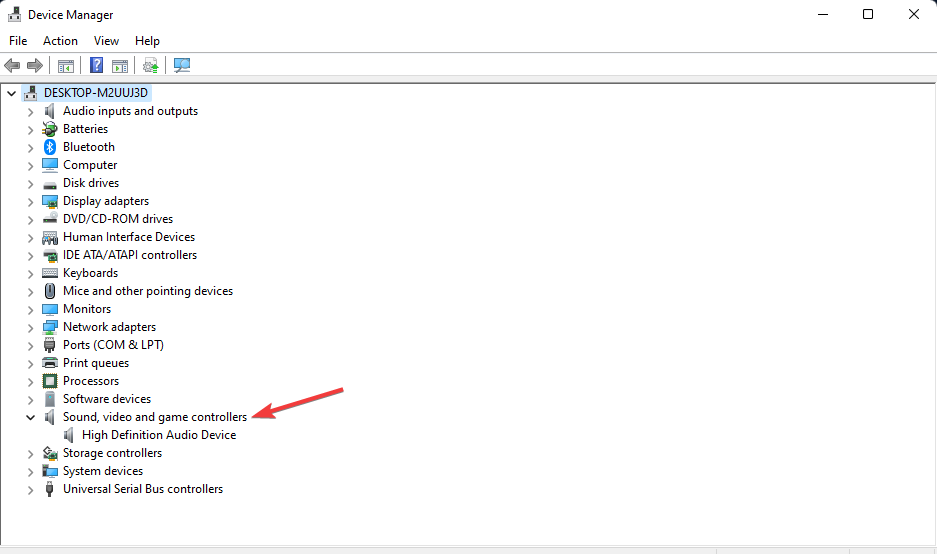
- Затем дважды щелкните категорию « Звуковые, видео и игровые контроллеры ».
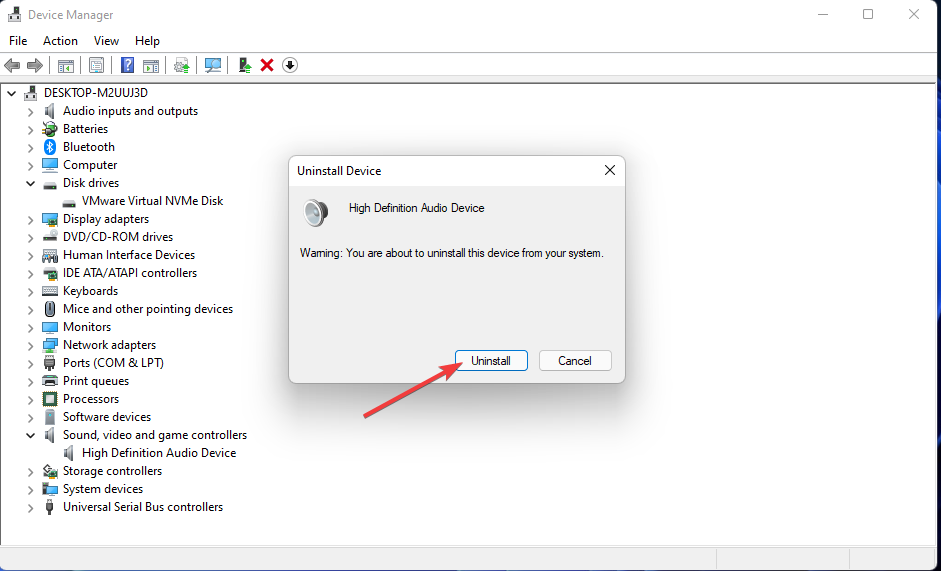
- Щелкните устройство Intel Smart Sound правой кнопкой мыши и выберите пункт контекстного меню «Удалить устройство ».
- Установите флажок «Удалить драйвер для этого устройства«.
- Нажмите кнопку « Удалить » для подтверждения.
6. Отключить Intelppm.sys
- Нажмите комбинацию клавиш Windows+. R
- Откройте редактор реестра, введя эту команду «Выполнить» в поле «Открыть» и нажав « ОК » :
regedit - Затем введите это местоположение ключа реестра в адресную строку:
HKEY_LOCAL_MACHINESYSTEM CurrentControlSetServicesProcessor - Дважды щелкните Start DWORD для ключа процессора.
- Введите 4 в поле «Значение» для начального DWORD и нажмите кнопку « ОК » .
- Затем перейдите в этот раздел реестра:
HKEY_LOCAL_MACHINESYSTEMCurrentControlSet ServicesIntelppm - Дважды щелкните Пуск в разделе реестра Intelppm.
- Сотрите текущее значение в текстовом поле, а затем введите 4, чтобы заменить его. Нажмите OK, чтобы выйти из окна редактирования DWORD.
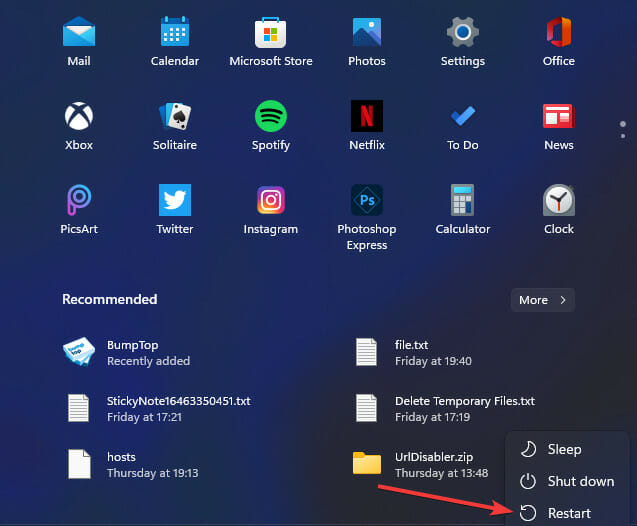
- Откройте меню «Пуск», нажмите « Питание » и выберите « Перезагрузить » .
7. Сбросить Windows 11
- Откройте приложение «Настройки» и нажмите «Восстановление» на вкладке «Система».
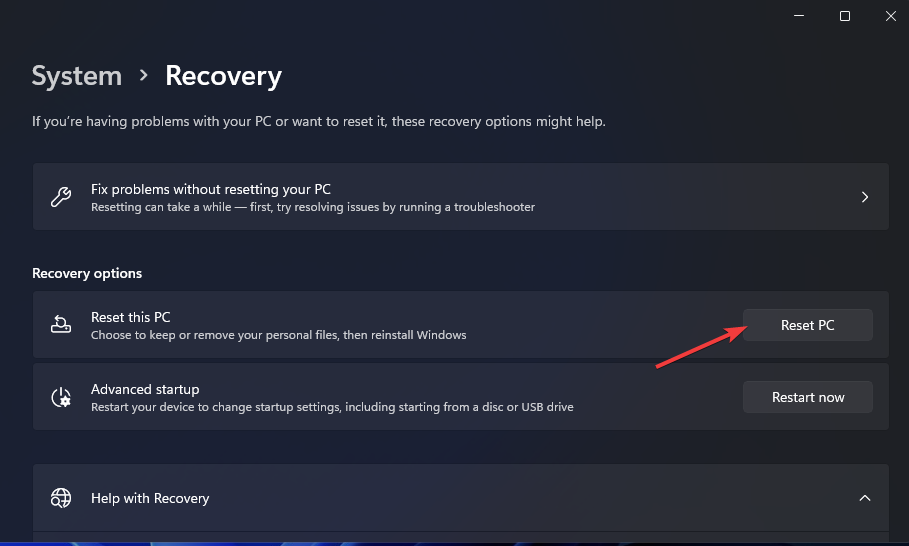
- Нажмите кнопку « Сбросить компьютер » , чтобы открыть окно «Сбросить этот компьютер».
- Выберите «Сохранить мои файлы» в окне «Сбросить этот компьютер».
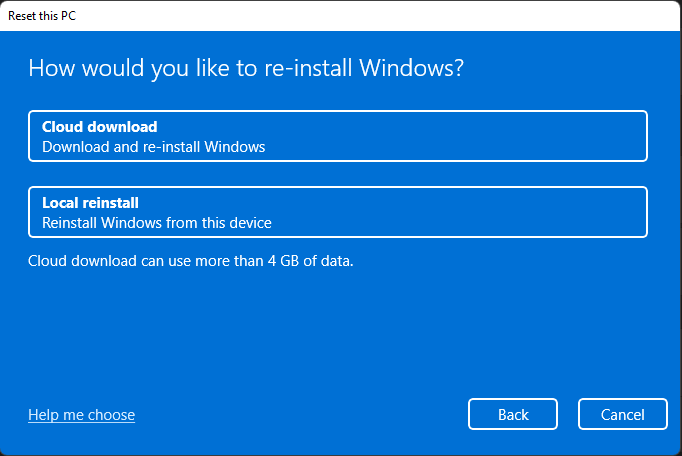
- Нажмите « Облачная загрузка » или « Локальная переустановка ».
- Нажмите кнопку « Далее » и нажмите « Сброс » для подтверждения.
Как я могу войти в безопасный режим, чтобы применить вышеуказанные исправления?
Если вы не можете войти в Windows 11, чтобы применить вышеуказанные исправления из-за ошибки «Драйвер выгружен», вам необходимо загрузиться в безопасном режиме через меню «Дополнительные параметры запуска». Вы также можете применить некоторые из вышеуказанных разрешений из среды восстановления. Вот как загрузиться в безопасном режиме.
- Включите свой рабочий стол или ноутбук.
- Нажмите и удерживайте кнопку питания ПК в течение примерно пяти секунд, когда во время запуска появится логотип, чтобы выключить ПК. Сделайте это три или четыре раза подряд, пока не появится экран автоматического восстановления.
- Выберите «Дополнительные параметры» на экране «Автоматическое восстановление».
- Затем выберите «Устранение неполадок» в меню «Выберите параметр».
- Затем выберите « Дополнительные параметры » и «Параметры запуска» в меню «Дополнительные параметры запуска».
- Нажмите «Перезагрузить» , чтобы сделать это.
- После перезагрузки нажмите клавишу F5, чтобы выбрать « Включить безопасный режим с поддержкой сети» .
- Когда вы загрузились в безопасном режиме, вы можете применить указанные выше потенциальные разрешения.
Ошибка выгрузки драйвера — не самая простая проблема для устранения. Однако пользователи подтвердили, что им удалось исправить эту ошибку в Windows 11 с некоторыми из возможных решений, указанных выше. Так что, возможно, один из них также устранит ошибку выгрузки драйвера на вашем ПК.
Для дальнейших потенциальных решений, возможно, стоит взглянуть на страницу Microsoft «Устранение неполадок синего экрана». Эта веб-страница содержит средство устранения неполадок, которое предоставляет общие исправления BSOD. Наше руководство по устранению ошибок IntcOED также может включать некоторые потенциальные исправления ошибки «Драйвер выгружен».
Вы можете поговорить об ошибке «Драйвер выгружен» в разделе комментариев на этой странице ниже. Не стесняйтесь задавать любые вопросы об этой ошибке BSOD. Пользователи, которые нашли другие способы решения той же проблемы, особенно рады поделиться своими решениями ниже.
Драйвер OSD технологии Intel Smart Sound является одной из наиболее распространенных причин проблем со звуком системы на многих ноутбуках с Windows 10. Его легко узнать, так как он часто вызывает проблемы со звуком и, в конце концов, даже BSOD. Пользователи, которые испытали это, обнаружили, что ошибка идентифицируется как «IntcOED». Что, конечно, указывает на направление драйвера Intel Smart Sound Technology.
Мы предоставили несколько решений, надеясь, что они помогут вам решить данную проблему. Начните с начала и двигайтесь дальше по списку.
Как исправить «IntcOED» критическую системную ошибку в Windows 10
- Запустить средство устранения неполадок звука
- Обновление драйверов
- Запустить SFC
- Попробуй с DISM
- Отключить встроенную графику и Intel Smart Sound
- Обновить BIOS
- Запустите систему в чистой загрузке
- Обновить Windows
- Сброс вашего компьютера до заводских настроек
- Переустановите Windows 10
1. Запустите средство устранения неполадок звука.
Несмотря на то, что возможный зачинщик неясен, это, безусловно, проблема Intel Smart Sound. Ошибка возникает в основном из-за неудачной интеграции драйвера Intel Smart Sound в Windows 10. И, поскольку мы уже знаем, как Windows 10 имеет проблемы с драйверами, особенно с некоторым старым оборудованием.
- Читайте также: нет звука HDMI с Windows 10, 8.1, 8 ноутбуков на телевизор? Вот как это исправить
Первый шаг, который вы можете предпринять, — разрешить Windows 10 устранить проблему с помощью встроенного средства устранения неполадок. Если вам не хватает звука, очевидным шагом является запуск средства устранения неполадок со звуком. Это может занять много времени, учитывая серьезность ошибки. Но это не будет стоить вам ничего, чтобы попробовать.
Вот как запустить Play Audio Troubleshooter в Windows 10:
- Щелкните правой кнопкой мыши на Пуск и откройте Настройки.
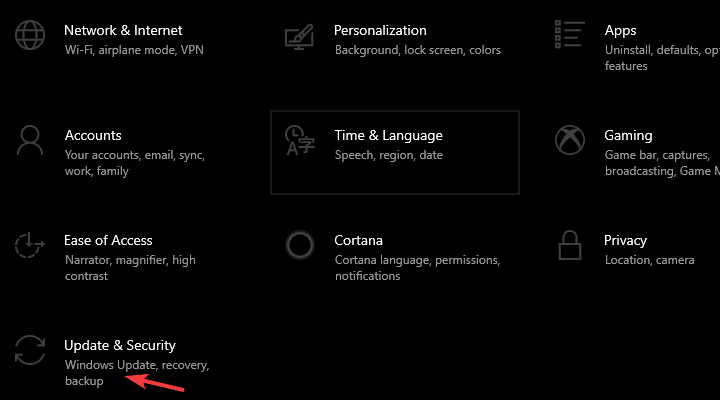
- Выберите « Обновление и безопасность».

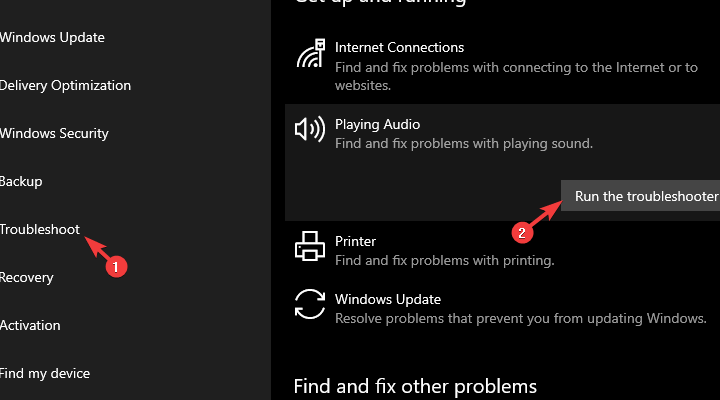
- Выберите Устранение неполадок на левой панели.
- Разверните средство устранения неполадок « Воспроизведение аудио ».
- Нажмите на кнопку « Запустить средство устранения неполадок ».

2: обновить драйверы
В обычных обстоятельствах этот шаг должен устранить ошибку «IntcOED». Водители, как мы уже говорили, являются основной причиной этого более чем нежелательного происшествия. Особенно если вы обновились до Windows 10 поверх Windows 7.
- Читайте также: FIX: Звук не работает в Windows 10, 8.1
Официальная поддержка некоторых устройств прекращена. Но это не значит, что вы не сможете получить полностью функциональный драйвер. Хитрость заключается в том, чтобы избегать драйверов, предоставляемых Центром обновления Windows.
Выполните следующие шаги для установки драйвера Intel Sound из официального источника:
- Щелкните правой кнопкой мыши кнопку «Пуск» и откройте диспетчер устройств.
- Разверните раздел « Звуковые, видео и игровые устройства ».
- Щелкните правой кнопкой мыши устройство Intel Smart Sound и выберите «Удалить устройство» из контекстного меню.

- Установите флажок « Удалить программное обеспечение драйвера для этого устройства».
- Загрузите Inter Driver Update Assistant здесь и установите его.
- Запустите клиент и обновите все драйверы.
- Перезагрузите компьютер и найдите изменения.
3: Запустить SFC
Теперь, если проблема все еще присутствует, даже после того, как вы установили драйвер прямо, возможное повреждение системы может быть под рукой. Когда это происходит, мы предлагаем запустить встроенную утилиту через командную строку. Этот инструмент проверяет потенциальное повреждение системных файлов и исправляет их соответствующим образом.
- Читайте также: Как изменить звуковую схему Windows 10, 8, 8.1
Выполните следующие действия для запуска SFC в Windows 10:
- В строке поиска Windows введите cmd. Щелкните правой кнопкой мыши по командной строке и запустите ее с правами администратора.
- В командной строке введите sfc / scannow и нажмите Enter.

- Если инструмент SFC не нашел ничего подозрительного, не закрывайте командную строку.
4: попробуйте с DISM
Если SFC не может найти системные ошибки, должен помочь инструмент обслуживания образов развертывания и управления ими. Этот инструмент использует все доступные средства для исправления системных ошибок. И это, как и System File Checker, встроенная утилита, которую вы можете запустить через командную строку с повышенными правами. Он использует Windows Update для замены всех файлов, поэтому для исправления системной ошибки требуется еще один шаг.
- ЧИТАЙТЕ ТАКЖЕ: Вот как исправить звук дисплея Intel, не работающий
Вот как запустить DISM в Windows 10:
-
- В командной строке введите следующие команды и нажмите Enter после каждого:
- DISM / Online / Cleanup-Image / CheckHealth

- DISM / Online / Cleanup-Image / RestoreHealth
- DISM / Online / Cleanup-Image / CheckHealth
- Подождите, пока инструмент обнаружит и устранит системные ошибки. Это может занять некоторое время.
- В командной строке введите следующие команды и нажмите Enter после каждого:
5: Отключить встроенную графику и Intel Smart Sound
Теперь эта проблема возникает почти исключительно в конфигурациях с двумя графическими процессорами, где Intel обеспечивает встроенную встроенную систему управления графикой и звуком. Однако столкновение водителей может создать много проблем. По этой причине мы предлагаем придерживаться выделенной графики (ATI или Nvidia) и Realtek HD Audio на данный момент.
- ЧИТАЙТЕ ТАКЖЕ: дискретный графический процессор все еще вызывает частые микрозамерзания в Windows 10
Если вы не уверены, как отключить выделенный графический процессор на своем ноутбуке с двумя графическими процессорами, выполните следующие действия:
- Откройте диспетчер устройств.
- Разверните раздел « Адаптеры дисплея ».
- Отключить встроенную встроенную графику Intel.
- Перезагрузите компьютер и найдите изменения.
6: обновить BIOS
Некоторые пользователи, у которых снова появились проблемы с IntcOED в Windows 10, решили проблему, перепрограммировав BIOS. Теперь, с переходом на более новую ОС, вы всегда должны обновлять свой BIOS. Просто обычный пользователь редко будет иметь дело с перепрошивкой BIOS, особенно если есть (и есть) шанс заглушить ваш компьютер. Мы все еще предлагаем поискать ваше устройство и обновить BIOS. Процедура может отличаться для разных производителей, так как некоторые предлагают обновления в меню настроек BIOS / UEFI, в то время как другие требуют специальных сторонних инструментов для применения обновлений.
- Читайте также: Как: прошить BIOS на Windows 10
С другой стороны, если ошибка, возможно, возникла после перепрошивки BIOS, следует перейти к настройкам BIOS / UEFI и восстановить их значения по умолчанию. Это, казалось бы, решило проблему для нескольких пользователей.
7: Запустите систему в чистой загрузке
Помимо очевидных проблем с драйверами, может существовать стороннее приложение, конфликтующее с Intel Smart Sound. Этот список длинный, и мы не можем с уверенностью сказать, какая именно программа не будет работать в сочетании с вышеупомянутым устройством. Вот почему вы можете попробовать чистую загрузку и искать изменения.
- ЧИТАЙТЕ ТАКЖЕ: Исправлено: ошибка «Отсутствует драйвер носителя» во время чистой установки Windows 10
Вот как запустить Windows 10 в чистой загрузке:
- В строке поиска Windows введите msconfig и откройте Конфигурация системы.
- На вкладке «Службы» установите флажок « Скрыть все службы Microsoft ».
- Нажмите « Отключить все », чтобы отключить все активные сторонние сервисы.

- Теперь выберите вкладку « Автозагрузка » и перейдите в диспетчер задач.
- Запретить запуск всех программ с системой и подтвердить изменения.
- Перезагрузите компьютер.
Обновления Windows и способ их администрирования в Windows 10 получили огромную обратную реакцию со стороны сообщества пользователей. Однако это не значит, что они бесполезны. Некоторые пользователи заметили, что все начальные системные проблемы, возникающие при установке системы, были позже решены с помощью обновлений
- Читайте также: Как удалить загруженные обновления Windows, которые не удалось установить
Это хорошая причина для обновления вашей системы. Даже если они приходят автоматически, вы должны время от времени проверять наличие обновлений вручную. Вот как это сделать:
- На панели поиска Windows введите «Обновить» и нажмите « Проверить наличие обновлений ».

- Нажмите Проверить наличие обновлений в Настройках.
- Дождитесь установки обновлений и перезагрузите компьютер.
9: Сброс вашего компьютера до заводских настроек
Если ошибка все еще появляется, мы можем только предложить более радикальные меры. Прежде чем перейти к чистой переустановке Windows 10, стоит попробовать некоторые варианты восстановления. Мы предлагаем воспользоваться опцией «Сбросить этот компьютер», которая позволяет начинать с нуля, не теряя свои данные. Конечно, вы можете очистить все и начать с чистого листа, но мы сохраняем это для полной переустановки.
- ЧИТАЙТЕ ТАКЖЕ: Windows 10 Обновление апреля вызывает скрытые диски восстановления
Выполните следующие действия, чтобы восстановить заводские настройки системы:
- В строке поиска введите Reset и откройте Reset this PC.
- Под опцией « Сбросить этот компьютер » нажмите « Начать».

- Выберите, чтобы сохранить ваши файлы и приложения и продолжить процесс сброса.
10: переустановите Windows 10
Наконец, если ни один из предыдущих шагов не сработал, чистая переустановка является последним средством. Конечно, в этом случае мы предлагаем отформатировать ваш диск и начать с нуля. Кроме того, восстановите настройки BIOS по умолчанию. Перед началом процедуры обязательно создайте резервную копию всех ваших данных на внешнем носителе.
- Читайте также: могу ли я очистить переустановить Windows 10 после обновления?
Следуйте инструкциям из этой статьи, чтобы установить Windows 10 clean. После этого обязательно перейдите на официальный сайт OEM и установите исключительно официальные драйверы. Кроме того, как мы упоминали в шаге 2, используйте помощник по обновлению драйверов Intel, чтобы получить последние версии драйверов Intel для Windows 10.
С учетом сказанного мы можем завершить эту статью. Если у вас есть какие-то дополнительные решения или что-то спросить, не стесняйтесь размещать их в разделе комментариев ниже.
by Matthew Adams
Matthew is a freelancer who has produced a variety of articles on various topics related to technology. His main focus is the Windows OS and all the things… read more
Published on March 19, 2022
- The Driver unloaded without canceling pending operations Windows 11 error often arises because of corrupted, incompatible, outdated driver files.
- You might be able to fix the stop code Driver unloaded without canceling pending operations Windows 11 error by generally updating your PC’s device drivers.
- Some users have said they’ve fixed the Driver unloaded intcoed.sys Windows 11 error by uninstalling the Smart Sound Technology driver.
- Users have also confirmed that disabling certain device drivers by editing the registry can resolve the Driver unloaded error.
XINSTALL BY CLICKING THE DOWNLOAD FILE
This software will keep your drivers up and running, thus keeping you safe from common computer errors and hardware failure. Check all your drivers now in 3 easy steps:
- Download DriverFix (verified download file).
- Click Start Scan to find all problematic drivers.
- Click Update Drivers to get new versions and avoid system malfunctionings.
- DriverFix has been downloaded by 0 readers this month.
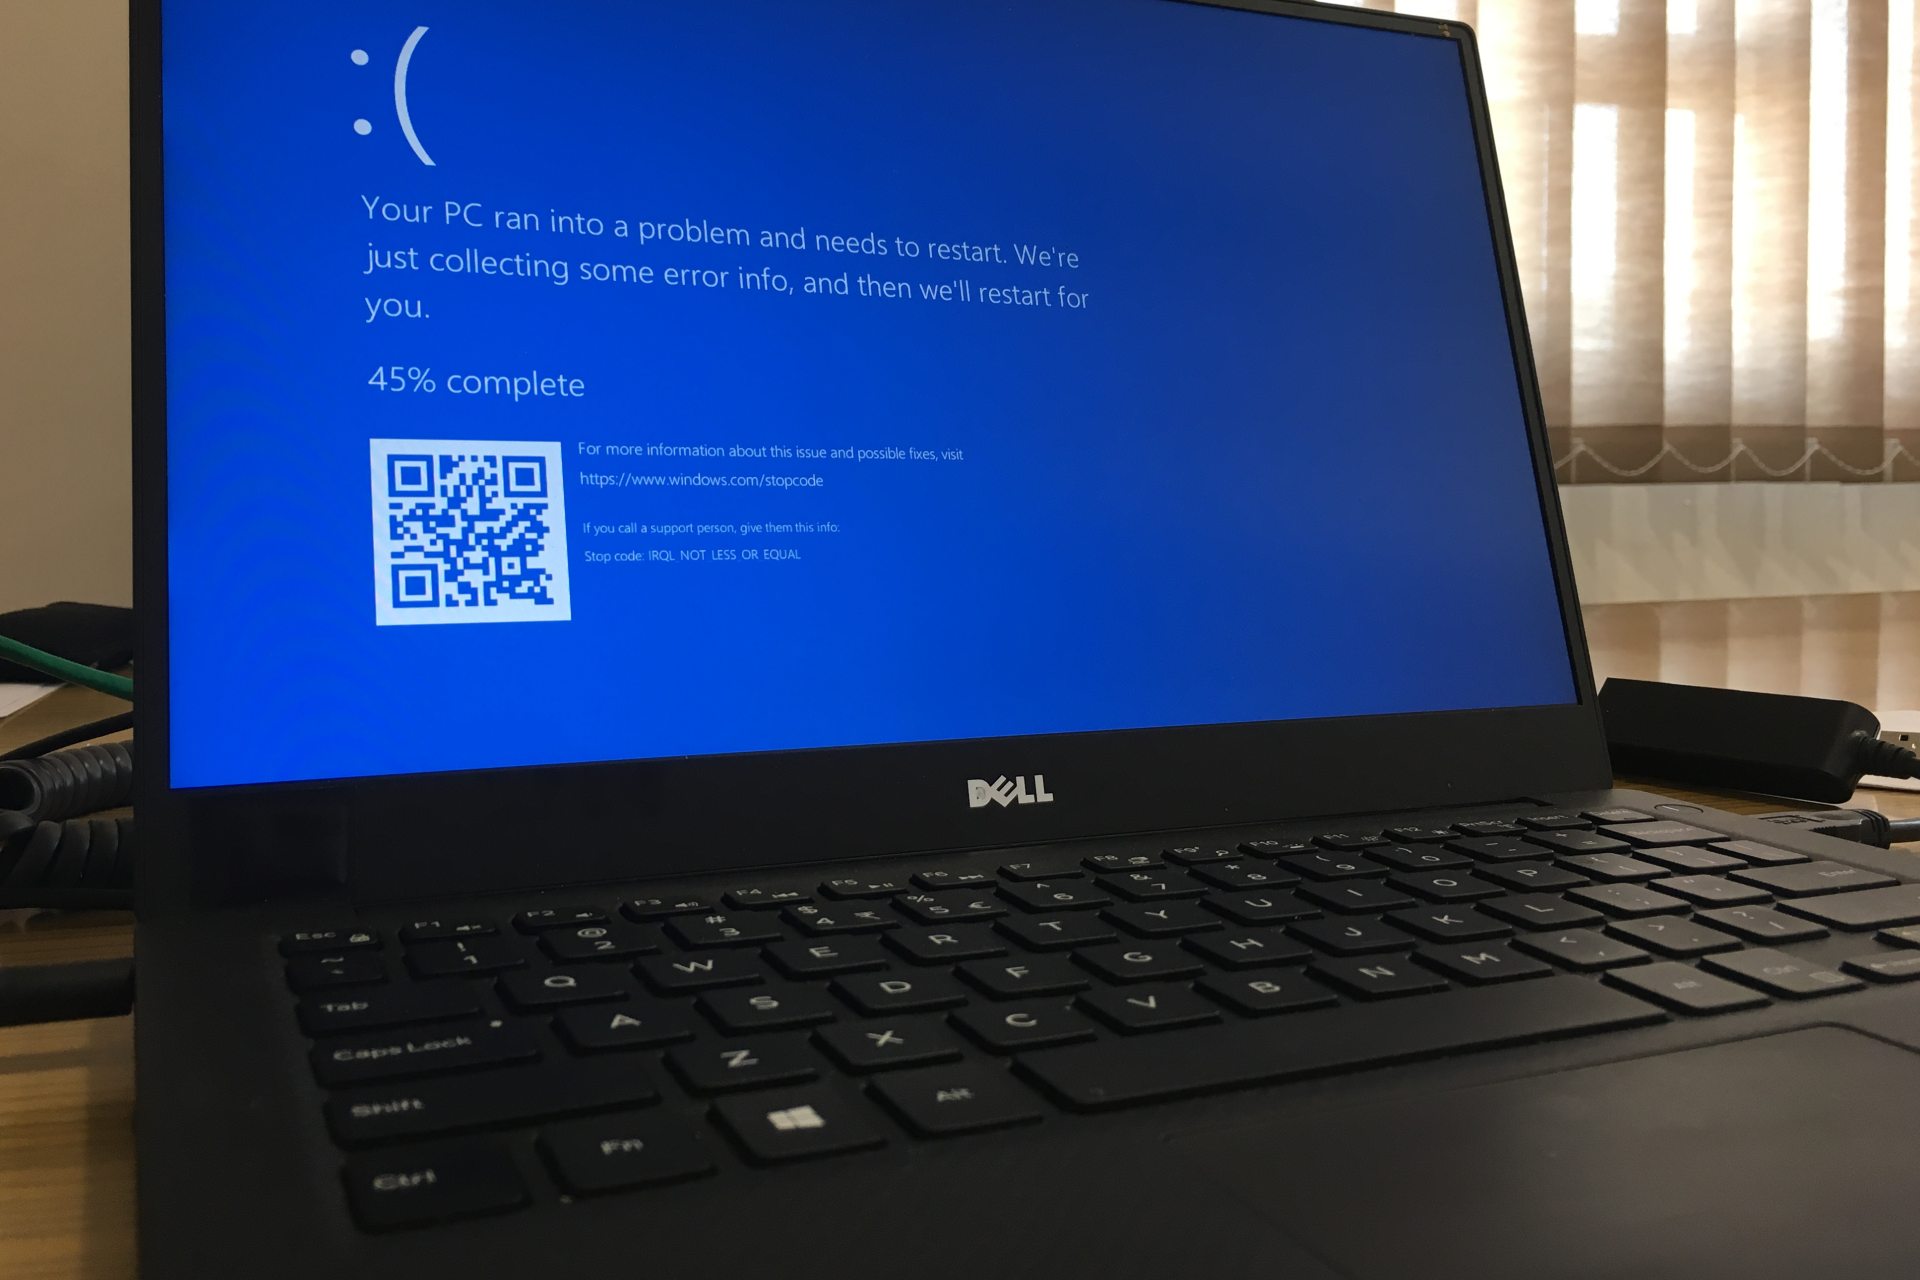
Users previously reported an IntcOED.sys BSOD error for Windows 10. That’s a blue screen issue with a Driver unloaded without canceling pending operations error message. Now users have posted on forums about that same issue arising in Windows 11. One user’s forum post said this:
After having Windows 10 update to Windows 11 in December 2021, I am facing this issue:
What Failed: ‘IntcOED.sys’
Stop Code: Driver Unloaded without canceling pending operations
Some users have reported that Driver unloaded BSOD errors arise when they start, or shortly after starting, their PCs. Other users have said this blue screen error occurs after their computers come out of sleep mode. Those users have needed to fix recurring Driver unloaded errors.
Do you need to fix a recurring Driver unloaded error in Windows 11 as well? If so, try applying the potential resolutions for the Driver unloaded without canceling pending operations error below.
What is a blue screen error?
Blue screen errors, also known as stop errors, are those with blue backgrounds and stop codes. They are also referred to as fatal system errors because the Windows OS stops operating. Windows restarts after collecting info after blue screen errors arise.
BSOD (Blue Screen of Death) errors can often pertain to device drivers. A Microsoft webpage says the big M estimates that 70 percent of blue screen errors pertain to third-party device drivers. The Driver unloaded error message specifies the IntcOED.sys driver for Intel Smart Sound Technology.
A one-off BSOD issue isn’t an especially big deal. After restarting Windows, the blue screen error might never occur again. However, users need to fix blue screen errors when they recur on their Windows PCs.
How can I fix the driver unloaded without canceling pending operations error in Windows 11?
1. Update Windows 11
- Press Windows 11’s Start button, and select the Settings app.
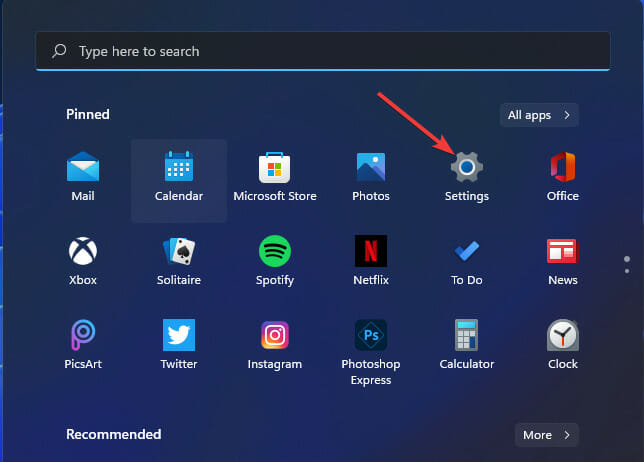
- Click Windows Update on the left of Settings.
- Press the Check for updates button to download and install updates.

- Click the Download & install button for any available optional updates.
2. Run a System File Scan
- Open the Start menu and type Command Prompt in its search box.
- To open Command Prompt with admin permissions, click the Run as administrator option shown directly below.
- Input the following command and press Return:
DISM.exe /Online /Cleanup-image /Restorehealth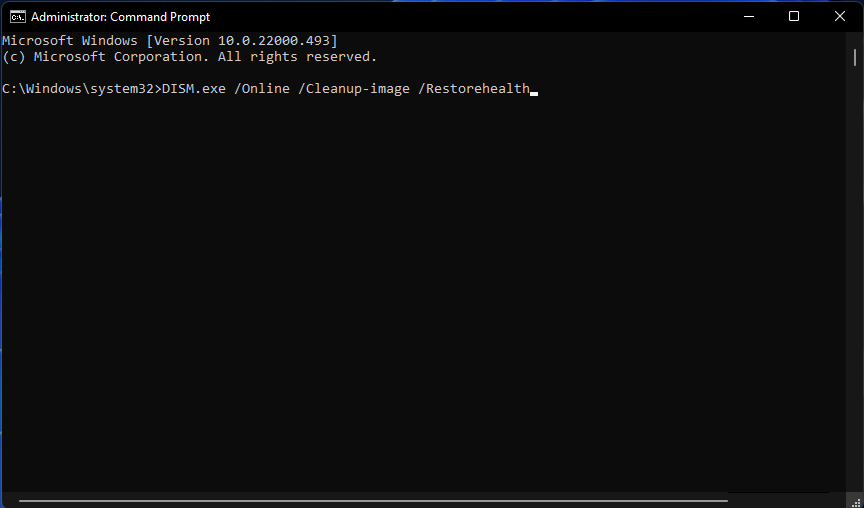
- Then start the SFC scan by inputting this command and pressing Enter:
sfc /scannow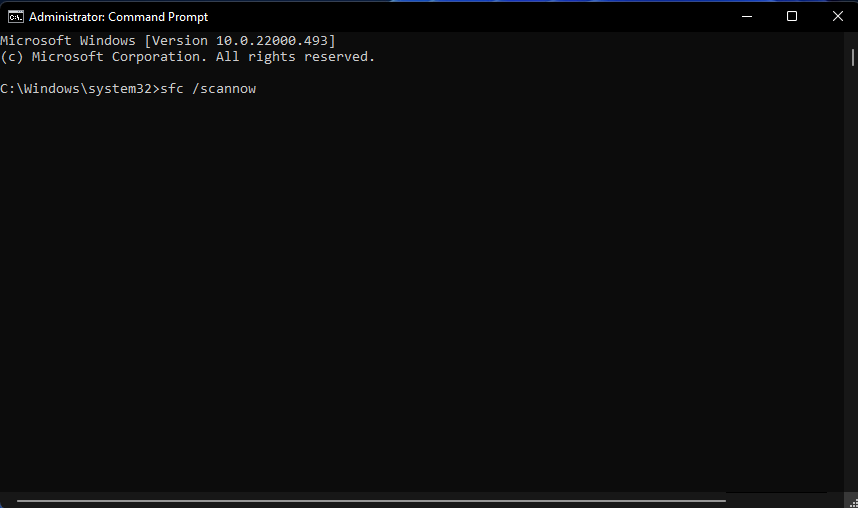
- Wait for the SFC tool to complete its scanning and display outcome.
3. Run Startup Repair
- Bring up the Settings app.
- Select Recovery on the System tab.
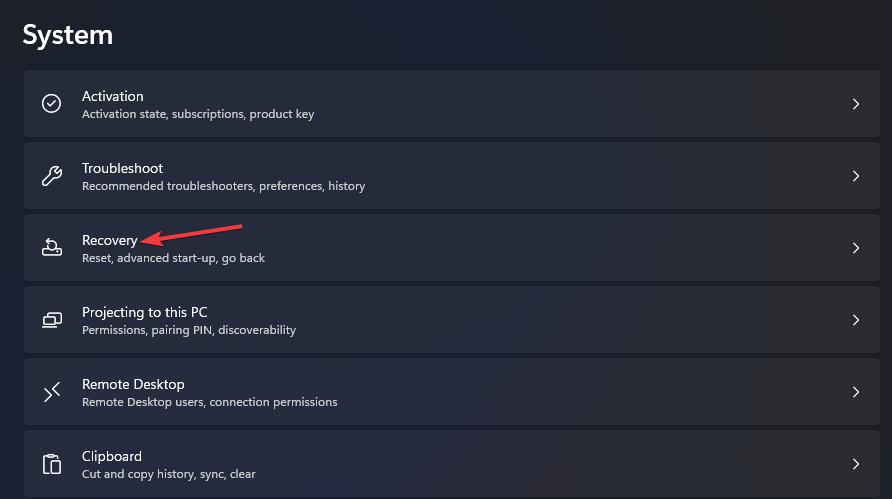
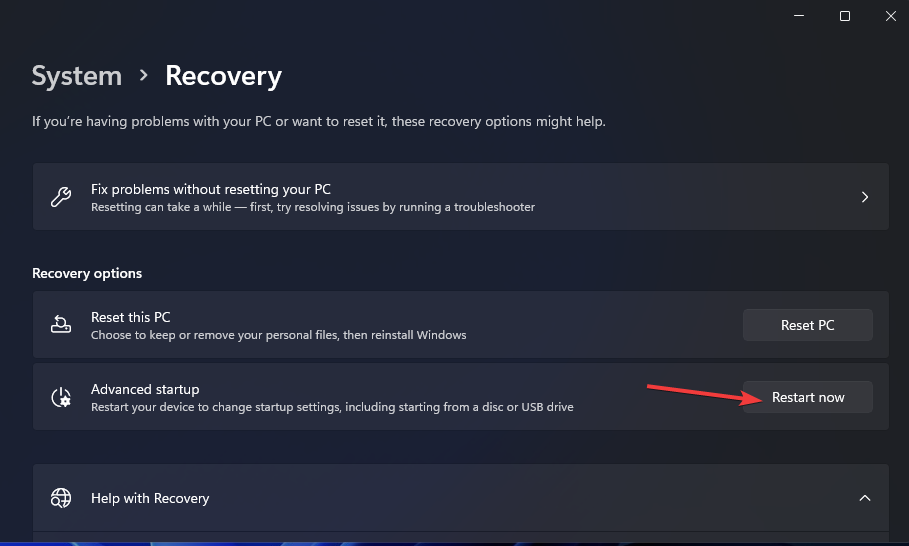
- Click Restart now button for the Advanced startup option shown directly below.
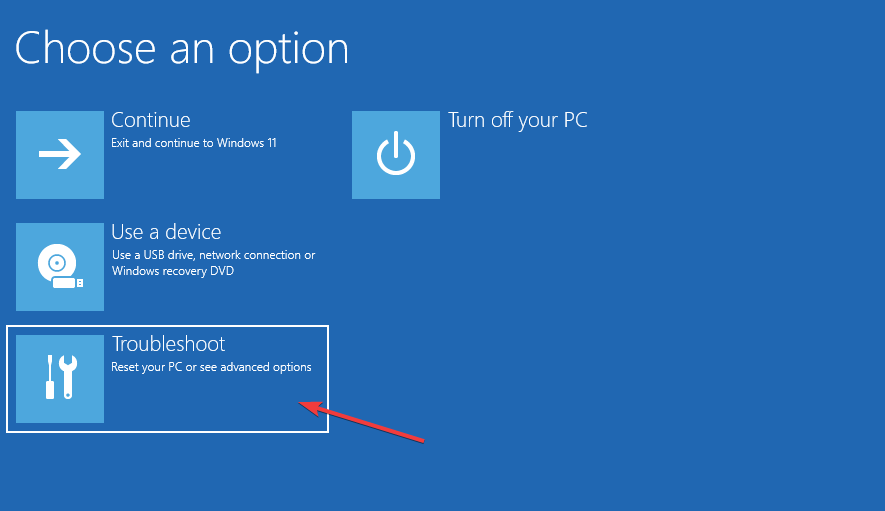
- Select Troubleshoot in the Windows Recovery Environment.
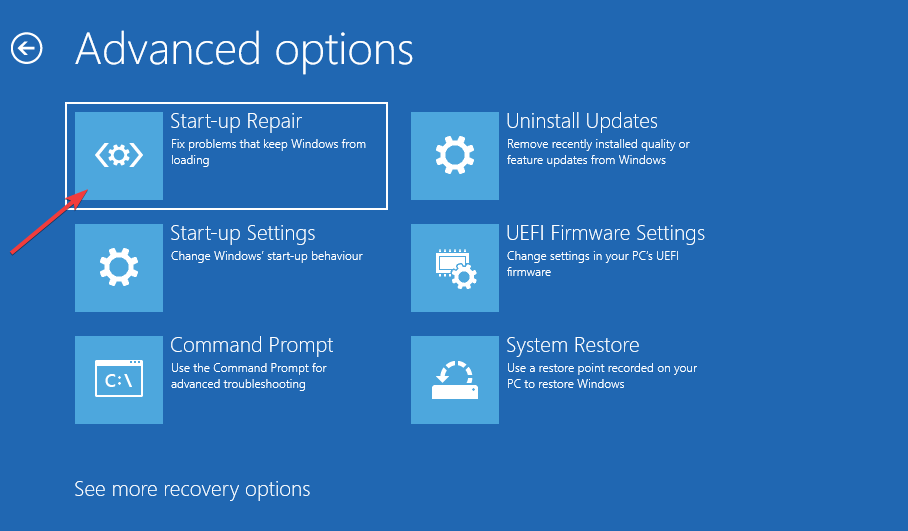
- Then click Advanced options > Startup Repair
- Choose an account, and then input the password for it.
- Press the Continue button to start.
- USB Device Descriptor Failure on Windows: How to Fix & Cause
- How to Reinstall Bluetooth Driver on Windows 11
- Password Expiration in Windows 11: How to Enable/Disable It
- How to Permanently Disable BitLocker on Windows 11
4. Update device drivers in Windows 11
Some PC issues are hard to tackle, especially when it comes to corrupted repositories or missing Windows files. If you are having troubles fixing an error, your system may be partially broken.
We recommend installing Restoro, a tool that will scan your machine and identify what the fault is.
Click here to download and start repairing.
As the Driver unloaded error is often due to faulty or outdated drivers, try updating device drivers. To check the status of your PC’s drivers, run a scan with a third-party driver updater utility, such as DriverFix. That software will provide a full overview of outdated or faulty device drivers on your PC.
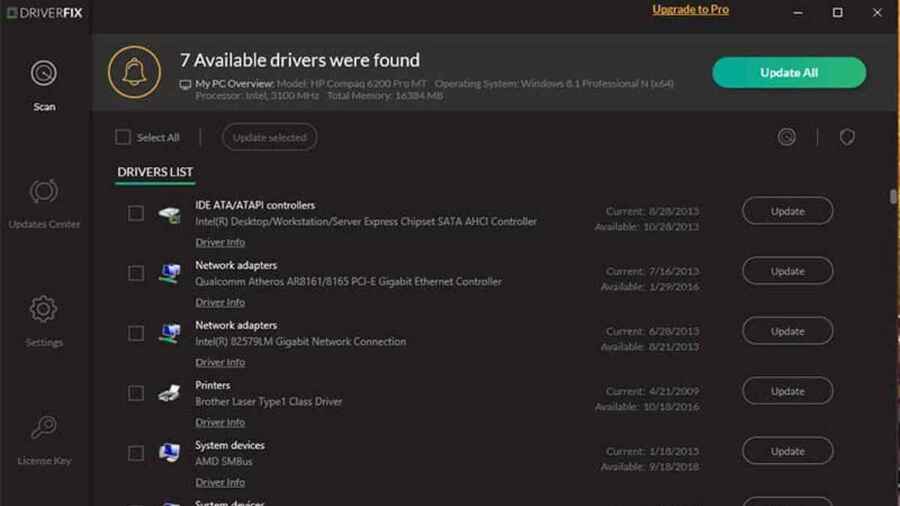
After scanning, you can click DriverFix’s Update All button. Doing so will download new drivers for all those listed devices with outdated or faulty ones. If you have the Pro version, you can select to automatically install drivers. Our DriverFix Review provides further details about that software.
There are also other ways you can generally update device drivers in Windows 11. Check out our How to easily update drivers on Windows 11 guide for full guidelines.
5. Uninstall the Smart Sound Technology (SST) driver
- Press the Windows + X keys simultaneously, which will open the Power User menu.
- Select Device Manager to open the window for that system utility.
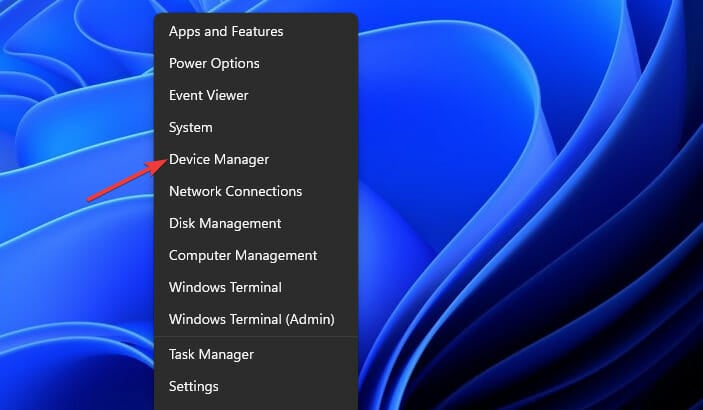
- Then double-click the Sound, video and game controllers category.
- Click Intel Smart Sound device with your right mouse button and select its Uninstall device context menu option.
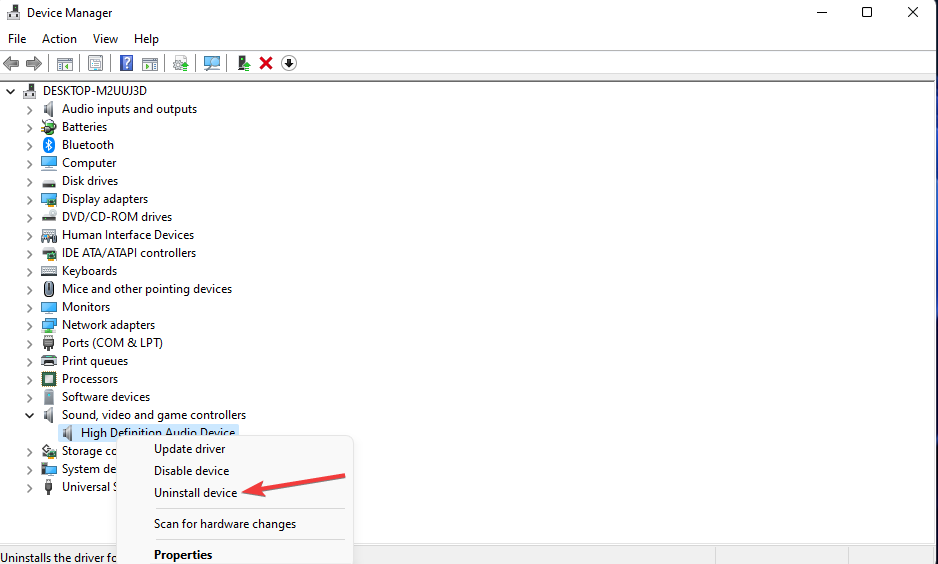
- Select the checkbox for the Delete the driver for this device option.
- Click the Uninstall button to confirm.

NOTE
If you see any devices with exclamation marks by them in Device Manager, reinstall the drivers for them. To do so, you’ll need to uninstall drivers as outlined above. Then download the latest driver packages for the devices from their manufacturers’ websites to reinstall them.
6. Disable Intelppm.sys
- Press the Windows + R key combo.
- Open Registry Editor by inputting this Run command in the Open box and clicking OK:
regedit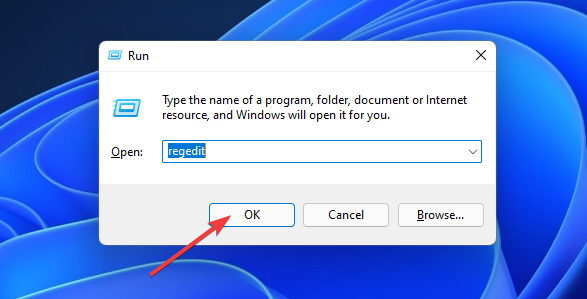
- Then input this registry key location in the address bar:
HKEY_LOCAL_MACHINESYSTEM CurrentControlSetServicesProcessor - Double-click the Start DWORD for the Processor key.
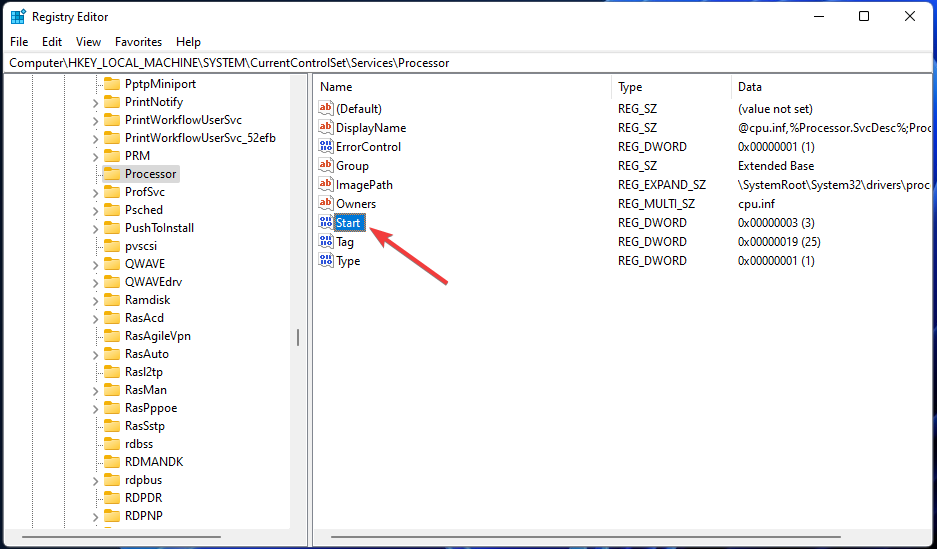
- Enter 4 within the Value box for the Start DWORD, and click the OK button.
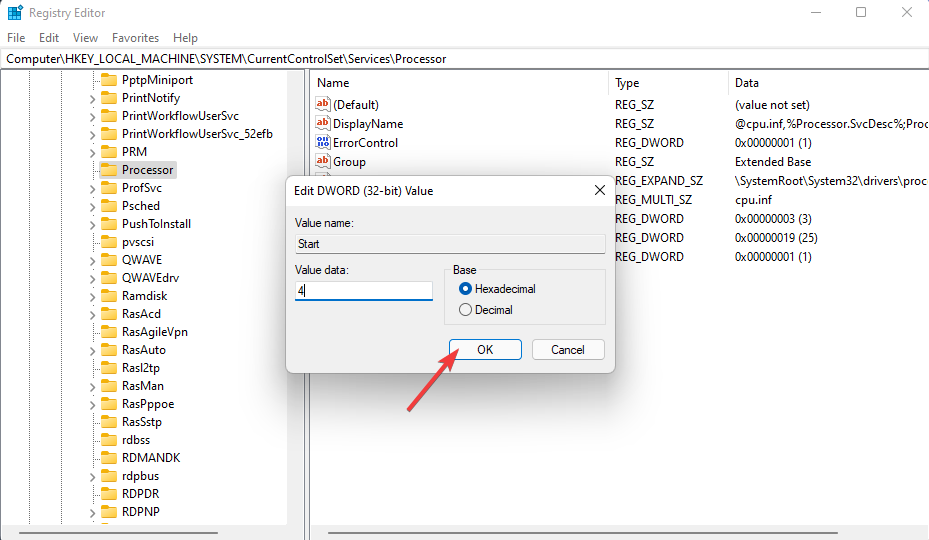
- Next, navigate to this registry location:
HKEY_LOCAL_MACHINESYSTEMCurrentControlSet ServicesIntelppm - Double-click Start in the Intelppm registry key.
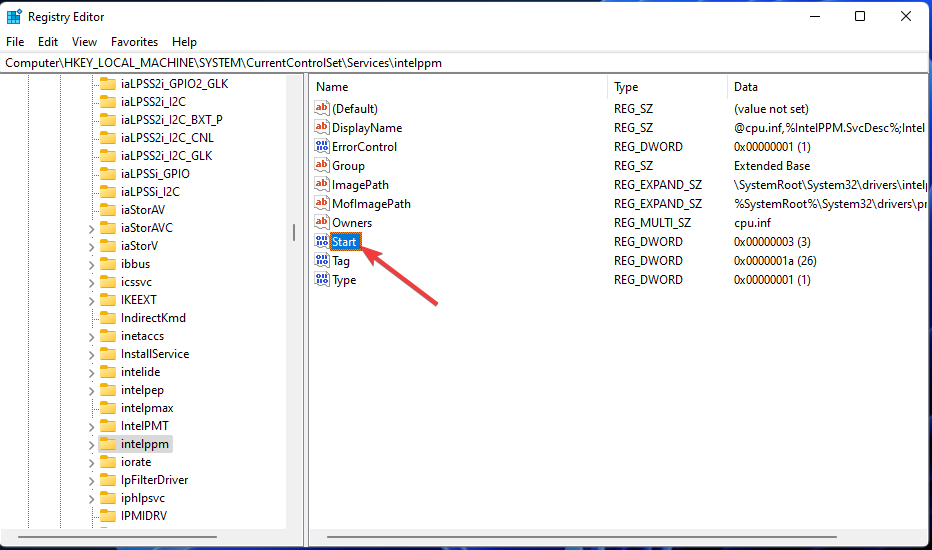
- Erase the current value in the text box, and then input 4 to replace it. Click OK to exit the Edit DWORD window.
- Bring up the Start menu, click Power, and select Restart.
7. Reset Windows 11
- Open the Settings app, and click Recovery in the System tab.
- Press the Reset PC button to open a Reset this PC window.
- Select Keep my files in the Reset this PC window.

- Click the Cloud download or Local Reinstall option.
- Press the Next button, and click Reset to confirm.
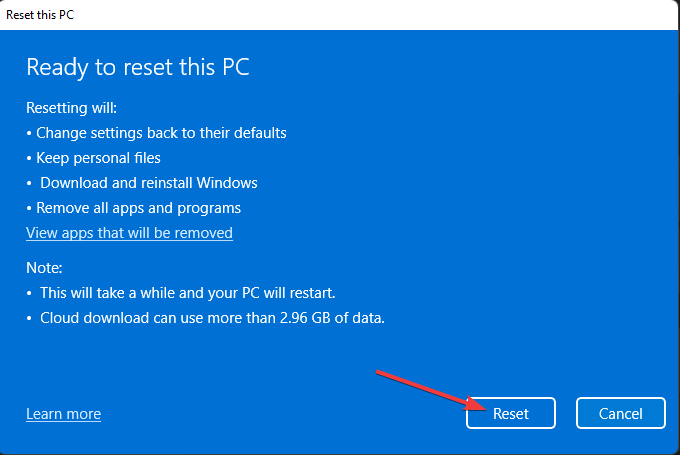
NOTE
Note that you’ll need to reinstall software packages that didn’t come pre-installed with Windows 11 after resetting the platform. Therefore, it’s recommended that you try some of the alternative resolutions before resetting Windows 11.
How can I enter Safe Mode to apply the above fixes?
If you can’t get into Windows 11 to apply the above fixes because of the Driver unloaded error, you’ll need to boot into Safe Mode via the Advanced Startup Options menu. You can also apply some of the above resolutions from the recovery environment. This is how to boot into Safe Mode.
- Turn on your desktop or laptop.
- Press and hold the PC’s power key for about five seconds when a logo appears during the startup to shut down the PC. Do that three or four consecutive times until an Automatic Repair screen appears.
- Select Advanced options on the Automatic Repair screen.
- Then select Troubleshoot on the Choose an option menu.
- Next, select Advanced options and Startup Settings within the Advanced Startup Options menu.
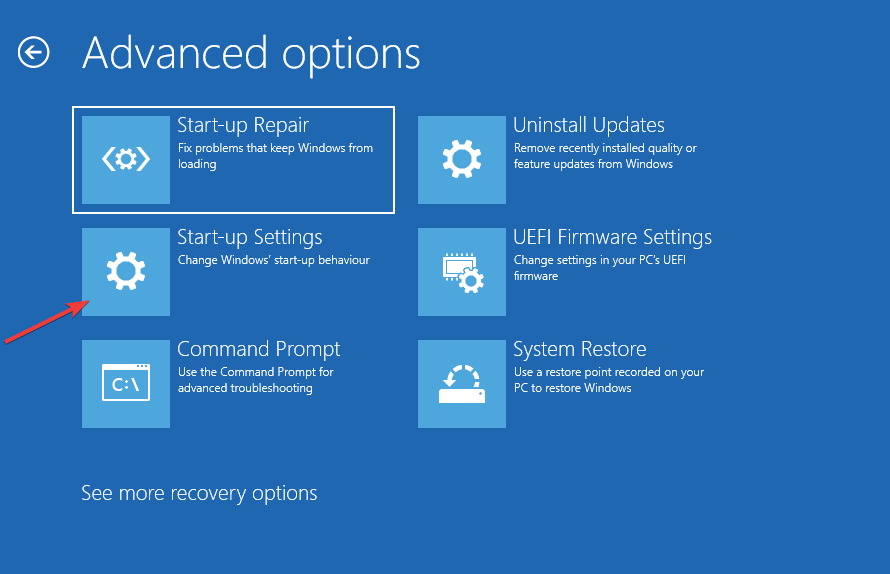
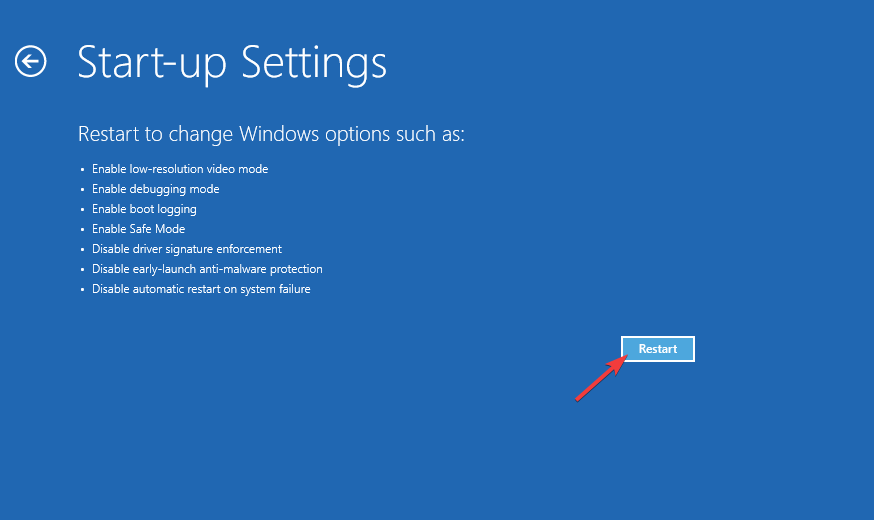
- Click Restart to do that.
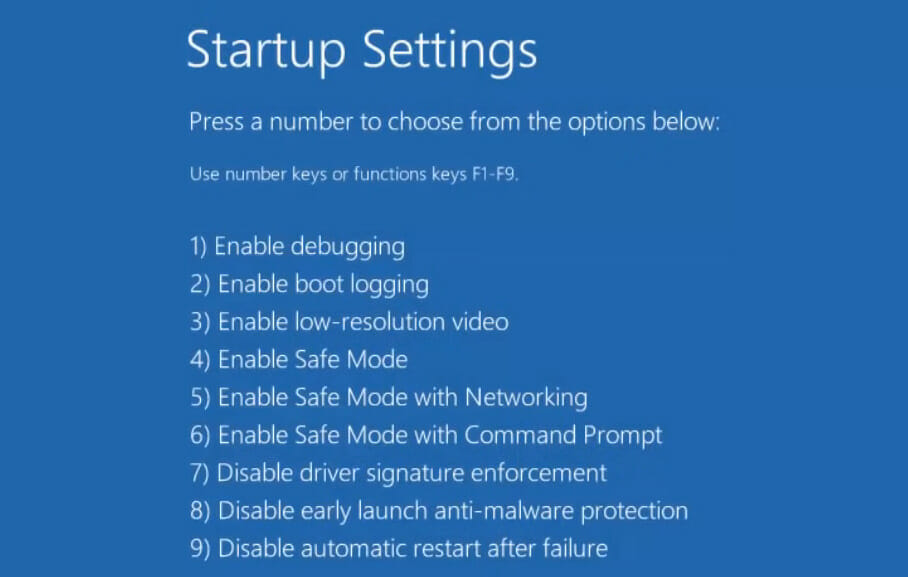
- After restarting, press the F5 key to select Enable Safe Mode with Networking.
- When you’ve booted into Safe Mode, you can apply the potential resolutions above as outlined.
The Driver unloaded error isn’t the most straightforward issue to fix. However, users have confirmed they’ve been able to fix that error in Windows 11 with some of the potential resolutions above. So, maybe one of them will resolve the Driver unloaded error on your PC as well.
For further potential resolutions, Microsoft’s Troubleshoot blue screen error page might be worth a look. That webpage includes a troubleshooter that provides general BSOD fixes. Our How to fix IntcOED errors guide might also include some potential fixes for the Driver unloaded error.
You can chat about the Driver unloaded error in this page’s comments section below. Feel free to enter any pertinent questions about that BSOD error there. Users who’ve found other ways to fix the same issue are especially welcome to share their resolutions below.
Still having issues? Fix them with this tool:
SPONSORED
If the advices above haven’t solved your issue, your PC may experience deeper Windows problems. We recommend downloading this PC Repair tool (rated Great on TrustPilot.com) to easily address them. After installation, simply click the Start Scan button and then press on Repair All.

Newsletter
by Matthew Adams
Matthew is a freelancer who has produced a variety of articles on various topics related to technology. His main focus is the Windows OS and all the things… read more
Published on March 19, 2022
- The Driver unloaded without canceling pending operations Windows 11 error often arises because of corrupted, incompatible, outdated driver files.
- You might be able to fix the stop code Driver unloaded without canceling pending operations Windows 11 error by generally updating your PC’s device drivers.
- Some users have said they’ve fixed the Driver unloaded intcoed.sys Windows 11 error by uninstalling the Smart Sound Technology driver.
- Users have also confirmed that disabling certain device drivers by editing the registry can resolve the Driver unloaded error.
XINSTALL BY CLICKING THE DOWNLOAD FILE
This software will keep your drivers up and running, thus keeping you safe from common computer errors and hardware failure. Check all your drivers now in 3 easy steps:
- Download DriverFix (verified download file).
- Click Start Scan to find all problematic drivers.
- Click Update Drivers to get new versions and avoid system malfunctionings.
- DriverFix has been downloaded by 0 readers this month.
Users previously reported an IntcOED.sys BSOD error for Windows 10. That’s a blue screen issue with a Driver unloaded without canceling pending operations error message. Now users have posted on forums about that same issue arising in Windows 11. One user’s forum post said this:
After having Windows 10 update to Windows 11 in December 2021, I am facing this issue:
What Failed: ‘IntcOED.sys’
Stop Code: Driver Unloaded without canceling pending operations
Some users have reported that Driver unloaded BSOD errors arise when they start, or shortly after starting, their PCs. Other users have said this blue screen error occurs after their computers come out of sleep mode. Those users have needed to fix recurring Driver unloaded errors.
Do you need to fix a recurring Driver unloaded error in Windows 11 as well? If so, try applying the potential resolutions for the Driver unloaded without canceling pending operations error below.
What is a blue screen error?
Blue screen errors, also known as stop errors, are those with blue backgrounds and stop codes. They are also referred to as fatal system errors because the Windows OS stops operating. Windows restarts after collecting info after blue screen errors arise.
BSOD (Blue Screen of Death) errors can often pertain to device drivers. A Microsoft webpage says the big M estimates that 70 percent of blue screen errors pertain to third-party device drivers. The Driver unloaded error message specifies the IntcOED.sys driver for Intel Smart Sound Technology.
A one-off BSOD issue isn’t an especially big deal. After restarting Windows, the blue screen error might never occur again. However, users need to fix blue screen errors when they recur on their Windows PCs.
How can I fix the driver unloaded without canceling pending operations error in Windows 11?
1. Update Windows 11
- Press Windows 11’s Start button, and select the Settings app.
- Click Windows Update on the left of Settings.
- Press the Check for updates button to download and install updates.
- Click the Download & install button for any available optional updates.
2. Run a System File Scan
- Open the Start menu and type Command Prompt in its search box.
- To open Command Prompt with admin permissions, click the Run as administrator option shown directly below.
- Input the following command and press Return:
DISM.exe /Online /Cleanup-image /Restorehealth - Then start the SFC scan by inputting this command and pressing Enter:
sfc /scannow - Wait for the SFC tool to complete its scanning and display outcome.
3. Run Startup Repair
- Bring up the Settings app.
- Select Recovery on the System tab.
- Click Restart now button for the Advanced startup option shown directly below.
- Select Troubleshoot in the Windows Recovery Environment.
- Then click Advanced options > Startup Repair
- Choose an account, and then input the password for it.
- Press the Continue button to start.
- USB Device Descriptor Failure on Windows: How to Fix & Cause
- How to Reinstall Bluetooth Driver on Windows 11
- Password Expiration in Windows 11: How to Enable/Disable It
- How to Permanently Disable BitLocker on Windows 11
4. Update device drivers in Windows 11
Some PC issues are hard to tackle, especially when it comes to corrupted repositories or missing Windows files. If you are having troubles fixing an error, your system may be partially broken.
We recommend installing Restoro, a tool that will scan your machine and identify what the fault is.
Click here to download and start repairing.
As the Driver unloaded error is often due to faulty or outdated drivers, try updating device drivers. To check the status of your PC’s drivers, run a scan with a third-party driver updater utility, such as DriverFix. That software will provide a full overview of outdated or faulty device drivers on your PC.
After scanning, you can click DriverFix’s Update All button. Doing so will download new drivers for all those listed devices with outdated or faulty ones. If you have the Pro version, you can select to automatically install drivers. Our DriverFix Review provides further details about that software.
There are also other ways you can generally update device drivers in Windows 11. Check out our How to easily update drivers on Windows 11 guide for full guidelines.
5. Uninstall the Smart Sound Technology (SST) driver
- Press the Windows + X keys simultaneously, which will open the Power User menu.
- Select Device Manager to open the window for that system utility.
- Then double-click the Sound, video and game controllers category.
- Click Intel Smart Sound device with your right mouse button and select its Uninstall device context menu option.
- Select the checkbox for the Delete the driver for this device option.
- Click the Uninstall button to confirm.
NOTE
If you see any devices with exclamation marks by them in Device Manager, reinstall the drivers for them. To do so, you’ll need to uninstall drivers as outlined above. Then download the latest driver packages for the devices from their manufacturers’ websites to reinstall them.
6. Disable Intelppm.sys
- Press the Windows + R key combo.
- Open Registry Editor by inputting this Run command in the Open box and clicking OK:
regedit - Then input this registry key location in the address bar:
HKEY_LOCAL_MACHINESYSTEM CurrentControlSetServicesProcessor - Double-click the Start DWORD for the Processor key.
- Enter 4 within the Value box for the Start DWORD, and click the OK button.
- Next, navigate to this registry location:
HKEY_LOCAL_MACHINESYSTEMCurrentControlSet ServicesIntelppm - Double-click Start in the Intelppm registry key.
- Erase the current value in the text box, and then input 4 to replace it. Click OK to exit the Edit DWORD window.
- Bring up the Start menu, click Power, and select Restart.
7. Reset Windows 11
- Open the Settings app, and click Recovery in the System tab.
- Press the Reset PC button to open a Reset this PC window.
- Select Keep my files in the Reset this PC window.
- Click the Cloud download or Local Reinstall option.
- Press the Next button, and click Reset to confirm.
NOTE
Note that you’ll need to reinstall software packages that didn’t come pre-installed with Windows 11 after resetting the platform. Therefore, it’s recommended that you try some of the alternative resolutions before resetting Windows 11.
How can I enter Safe Mode to apply the above fixes?
If you can’t get into Windows 11 to apply the above fixes because of the Driver unloaded error, you’ll need to boot into Safe Mode via the Advanced Startup Options menu. You can also apply some of the above resolutions from the recovery environment. This is how to boot into Safe Mode.
- Turn on your desktop or laptop.
- Press and hold the PC’s power key for about five seconds when a logo appears during the startup to shut down the PC. Do that three or four consecutive times until an Automatic Repair screen appears.
- Select Advanced options on the Automatic Repair screen.
- Then select Troubleshoot on the Choose an option menu.
- Next, select Advanced options and Startup Settings within the Advanced Startup Options menu.
- Click Restart to do that.
- After restarting, press the F5 key to select Enable Safe Mode with Networking.
- When you’ve booted into Safe Mode, you can apply the potential resolutions above as outlined.
The Driver unloaded error isn’t the most straightforward issue to fix. However, users have confirmed they’ve been able to fix that error in Windows 11 with some of the potential resolutions above. So, maybe one of them will resolve the Driver unloaded error on your PC as well.
For further potential resolutions, Microsoft’s Troubleshoot blue screen error page might be worth a look. That webpage includes a troubleshooter that provides general BSOD fixes. Our How to fix IntcOED errors guide might also include some potential fixes for the Driver unloaded error.
You can chat about the Driver unloaded error in this page’s comments section below. Feel free to enter any pertinent questions about that BSOD error there. Users who’ve found other ways to fix the same issue are especially welcome to share their resolutions below.
Still having issues? Fix them with this tool:
SPONSORED
If the advices above haven’t solved your issue, your PC may experience deeper Windows problems. We recommend downloading this PC Repair tool (rated Great on TrustPilot.com) to easily address them. After installation, simply click the Start Scan button and then press on Repair All.
Newsletter
by Aleksandar Ognjanovic
Aleksandar’s main passion is technology. With a solid writing background, he is determined to bring the bleeding edge to the common user. With a keen eye, he always… read more
Updated on December 8, 2021
XINSTALL BY CLICKING THE DOWNLOAD FILE
This software will keep your drivers up and running, thus keeping you safe from common computer errors and hardware failure. Check all your drivers now in 3 easy steps:
- Download DriverFix (verified download file).
- Click Start Scan to find all problematic drivers.
- Click Update Drivers to get new versions and avoid system malfunctionings.
- DriverFix has been downloaded by 0 readers this month.
Intel Smart Sound Technology OSD driver is one of the most prominent reasons for system sound issues on so many Windows 10 laptops. It’s easily recognizable since it often causes sound issues and, eventually, even BSODs. Users who experienced these have found that the error is identified as “IntcOED”. Which, of course, points in the Intel Smart Sound Technology driver’s direction.
We provided a few solutions, hoping they’ll help you address the issue at hand. Start from the beginning and move onwards through the list.
How to fix “IntcOED” critical system error in Windows 10
- Run Sound Troubleshooter
- Update drivers
- Run SFC
- Try with DISM
- Disable onboard graphics and Intel Smart Sound
- Update BIOS
- Start the system in a clean boot
- Update Windows
- Reset your PC to factory settings
- Reinstall Windows 10
1. Run Sound Troubleshooter
Even though the possible instigator is uncertain, this is most certainly the Intel Smart Sound issue. The error appears mostly due to the failed integration of the Intel Smart Sound driver in Windows 10. And, since we already know how Windows 10 has issues with drivers, especially with some older hardware.
The first step you can take is to allow Windows 10 to fix the problem through the built-in troubleshooting tool. If you’re missing the sound, the obvious step is to run the Audio Troubleshooter. This might be a long stretch, taking into consideration how serious is the error at hand. But, it won’t cost you anything to give it a try.
Here’s how to run Play Audio Troubleshooter in Windows 10:
- Right-click on the Start and open Settings.
- Choose Update & Security.
- Select Troubleshoot from the left pane.
- Expand the “Playing Audio” Troubleshooter.
- Click on the “Run the troubleshooter” button.
2. Update drivers
In regular circumstances, this step should resolve the “IntcOED” error. Drivers are, as we already said, are the main reason for this more than unwelcome occurrence. Especially if you’ve upgraded to Windows 10 over Windows 7.
The official support for some devices is discontinued. But, this doesn’t mean that you won’t be able to get a fully functional driver. The trick is in avoiding Windows Update-provided drivers.
Follow these steps to install Intel Sound driver from the official source:
- Right-click on the Start button and open Device Manager.
- Expand the “Sound, video and game controllers” section.
- Right-click on Intel Smart Sound device and choose Uninstall device from the contextual menu.
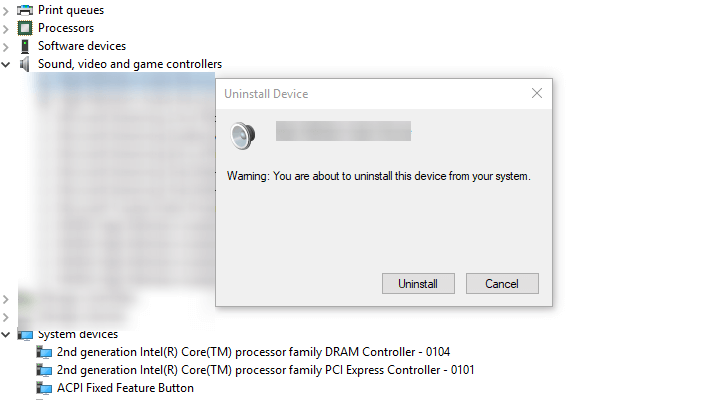
- Check the “Delete the driver software for this device” box.
- Download Inter Driver Update Assistant, here, and install it.
- Run the client and update all drivers.
- Restart your PC and look for changes.
Alternatively, you can use dedicated software. It will remove the risk of permanent damage caused by faulty driver installs.
A dedicated driver updater will scan find the perfect match for your specific hardware and install it to your PC.
The tool can also detect if you have any damaged or missing drivers and fix them as well. You can set it up to keep your drivers in check on a regular basis.
⇒ Get DriverFix
3. Run SFC
Now, if the problem is still present even after you’ve set the driver straight, a possible system corruption might be at hand. When this happens, we suggest running the built-in utility via Command Prompt. This tool checks for potential corruption of system files and fixes them accordingly.
Follow these steps to run SFC in Windows 10:
- In the Windows Search bar, type cmd. Right-click click on Command Prompt and run it as admin.
- In the command-line, type sfc/scannow and press Enter.
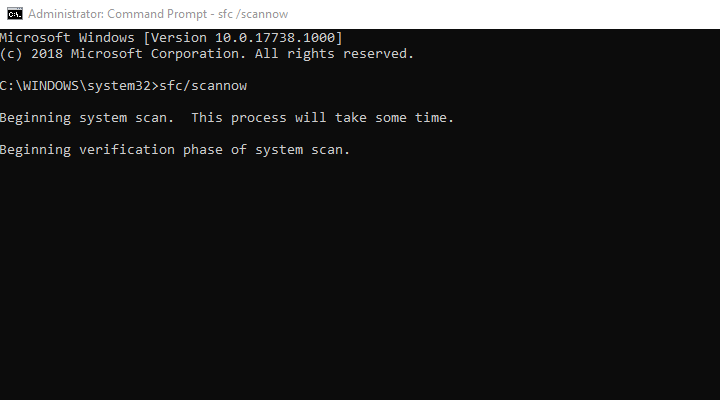
- If the SFC tool hasn’t found anything suspicious, don’t close the command-line.
4. Try with DISM
If SFC fails to find system errors, the Deployment Image Servicing and Management tool should help. This tool uses all available means to fix system errors. And its, like System File Checker, the built-in utility you can run through the elevated command line. It uses Windows Update to replace all files, so it takes fixing system errors one step further.
Here’s how to run DISM in Windows 10:
- In the command line, type the following commands and press Enter after each:
- DISM /Online /Cleanup-Image /CheckHealth

- DISM/Online/Cleanup-Image/RestoreHealth
- DISM /Online /Cleanup-Image /CheckHealth
- Wait until the tool locates and resolves system errors. It might take some time.
5. Disable onboard graphics and Intel Smart Sound
Now, this problem appears almost exclusively on dual-GPU configurations where Intel is providing the onboard integrated graphics and sound control. However, the collision of drivers might create lots of issues.
Some PC issues are hard to tackle, especially when it comes to corrupted repositories or missing Windows files. If you are having troubles fixing an error, your system may be partially broken.
We recommend installing Restoro, a tool that will scan your machine and identify what the fault is.
Click here to download and start repairing.
For that reason, we suggest sticking to dedicated graphics (ATI or Nvidia) and Realtek HD Audio for the time being.
If you’re not sure how to disable the dedicated GPU on your dual-GPU laptop or PC, follow the steps we provided below:
- Open Device Manager.
- Expand the Display adapters section.
- Disable integrated onboard Intel graphics.
- Restart your PC and look for changes.
6. Update BIOS
Some users who have reappearing issues with IntcOED on Windows 10, resolved the issue by flashing the BIOS. Now, with the transition to a newer OS, you should always update your BIOS.
Just, a common user will rarely deal with the BIOS flashing, especially if there’s (and there is) a chance to brick your computer. We still suggest looking up your device and updating BIOS.
The procedure might differ for different manufacturers, as some offer updates in the BIOS/UEFI settings menu while others require special third-party tools to apply updates.
On the other hand, if the error possibly started after flashing BIOS, you should navigate to BIOS/UEFI settings and restore them to default values. This seemingly addressed the problem for more than a few users.
7. Start the system in a clean boot
Besides the obvious driver issues, there might be a third-party application that conflicts with Intel Smart Sound. This list is long, and we can’t say with certainty what exact program won’t work when combined with the aforementioned device. That’s why you can try a Clean Boot, and look for changes.
Here’s how to start Windows 10 in a Clean Boot:
- In the Windows Search bar, type msconfig and open System Configuration.
- Under the Services tab, check the “Hide all Microsoft services” box.
- Click “Disable all” to disable all active third-party services.
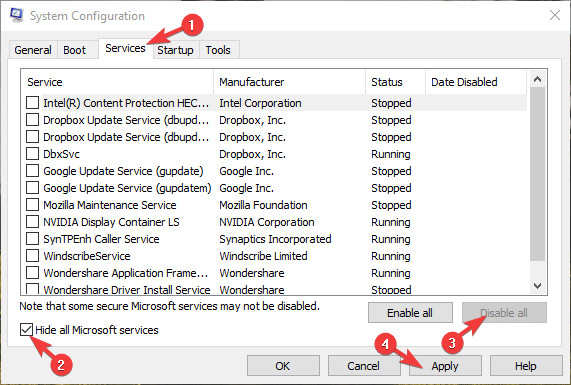
- Now, select the Startup tab and go to Task Manager.
- Prevent all programs from starting with the system and confirm changes.
- Restart your PC.
8. Update Windows
Windows Updates and the way they’re administered in Windows 10 received a huge backlash from the user community.
However, this doesn’t mean that they’re not useful. Some users noticed that all initial system issues which appeared upon system installation were resolved with updates later on.
That’s a good reason to update your system. Even though they come in automatically, you should check for updates manually from time to time. Here’s how to do it:
- In the Windows Search bar, type Update and click “Check for updates“.

- Click Check for updates in Settings.
- Wait until updates are installed and restart your PC.
9. Reset your PC to factory settings
If the error still appears, we can only suggest more radical measures. Before you move to a clean reinstallation of Windows 10, it’s worth trying some of the recovery options.
We suggest going for the “Reset this PC” option which allows you to start from scratch without losing your data. You can, of course, clear everything and start from a blank slate, but we keep that for the complete reinstallation.
Follow these steps to reset your system to factory values:
- In the Search bar, type Reset and open Reset this PC.
- Under the ‘Reset this PC‘ option, click Get started.
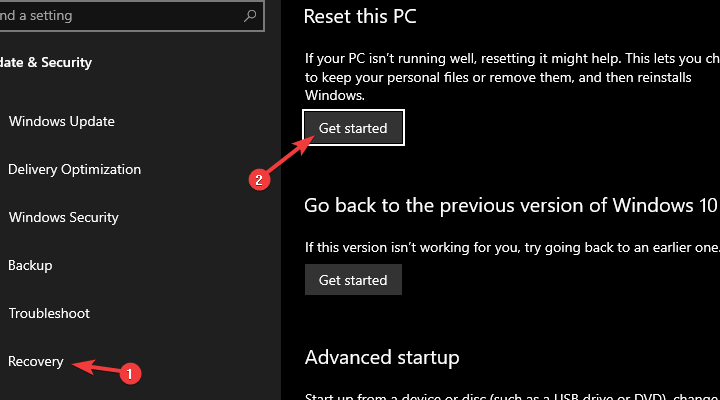
- Choose to keep your files and apps and continue with the resetting process.
10. Reinstall Windows 10
Finally, if none of the previous steps worked out, clean reinstallation is the last resort. Of course, in this scenario, we suggest formatting your drive and starting from scratch.
In addition, restore your BIOS settings to default values. Before you start the procedure, make sure to back up all your data on external media.
Follow the steps from this article to install Windows 10 clean. After that, make sure to navigate to the official OEM site and install exclusively official drivers. In addition, as we’ve mentioned in step 2, use Intel Driver Update Assistant to get the latest Intel drivers for Windows 10.
With that said, we can conclude this article. In case you have some additional solutions to offer or something to ask, feel free to post those in the comments section below.
Newsletter
Драйвер OSD для технологии Intel Smart Sound Technology является одной из наиболее важных причин проблем со звуком системы на многих ноутбуках с Windows 10. Его легко узнать, так как он часто вызывает проблемы со звуком и, в конце концов, даже BSOD. Пользователи, которые испытали это, обнаружили, что ошибка идентифицируется как «IntcOED». Что, конечно, указывает на направление драйвера Intel Smart Sound Technology.
Мы предоставили несколько решений, надеясь, что они помогут вам решить проблему. Начните с начала и двигайтесь дальше по списку.
- Запустить устранение неполадок звука
- Обновление драйверов
- Запустить SFC
- Попробуй с DISM
- Отключить встроенную графику и Intel Smart Sound
- Обновить BIOS
- Запустите систему в чистой загрузке
- Обновление Windows
- Сброс вашего компьютера до заводских настроек
- Переустановите Windows 10
1: Запустите средство устранения неполадок звука
Хотя возможный зачинщик сомнителен, это, безусловно, проблема Intel Smart Sound. Ошибка возникает в основном из-за неудачной интеграции драйвера Intel Smart Sound в Windows 10. И, так как мы уже знаем, как Windows 10 имеет проблемы с драйверами, особенно с некоторым старым оборудованием.
Первый шаг, который вы можете сделать, — это разрешить Windows 10 устранить проблему с помощью встроенного средства устранения неполадок. Если вам не хватает звука, очевидным шагом является запуск средства устранения неполадок со звуком. Это может занять много времени, учитывая серьезность ошибки. Но это не будет стоить вам ничего, чтобы попробовать.
Вот как запустить Play Audio Troubleshooter в Windows 10:
- Щелкните правой кнопкой мыши на Пуск и откройте Настройки .
- Выберите « Обновление и безопасность» .
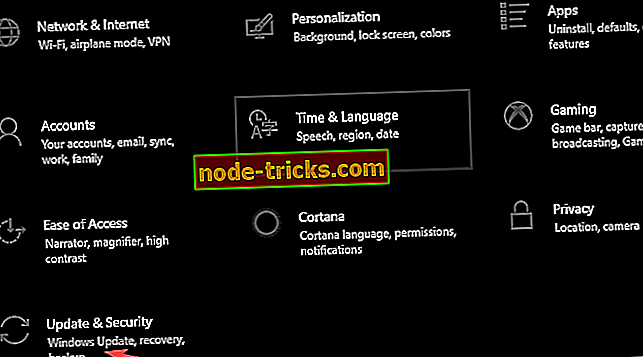
- Выберите Устранение неполадок в левой панели.
- Разверните средство устранения неполадок « Воспроизведение звука ».
- Нажмите на кнопку « Запустить средство устранения неполадок ».
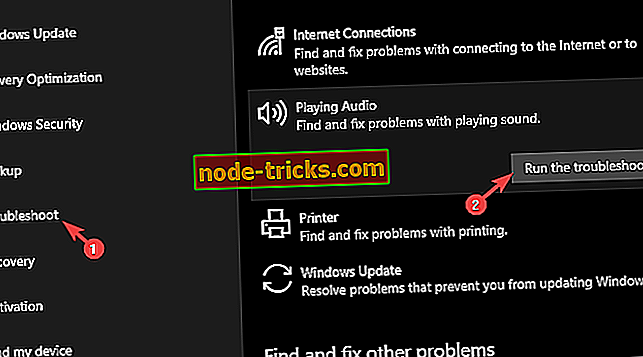
2: обновить драйверы
В обычных обстоятельствах этот шаг должен устранить ошибку «IntcOED». Водители, как мы уже говорили, являются основной причиной этого более чем нежелательного происшествия. Особенно, если вы обновились до Windows 10 поверх Windows 7.
Официальная поддержка некоторых устройств прекращена. Но это не значит, что вы не сможете получить полностью функциональный драйвер. Хитрость заключается в том, чтобы избегать драйверов, предоставляемых Центром обновления Windows.
Для установки драйвера Intel Sound из официального источника выполните следующие действия:
- Щелкните правой кнопкой мыши кнопку «Пуск» и откройте диспетчер устройств .
- Разверните раздел « Звуковые, видео и игровые устройства ».
- Щелкните правой кнопкой мыши устройство Intel Smart Sound и выберите «Удалить устройство» из контекстного меню.
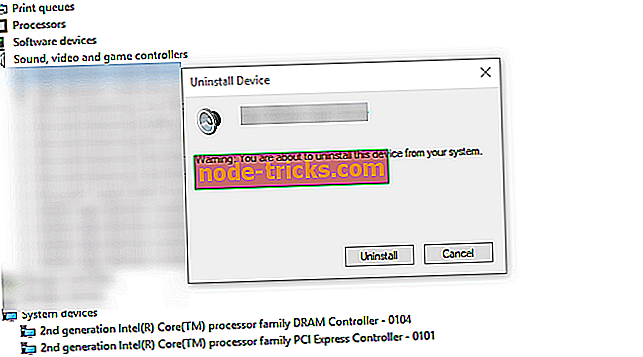
- Установите флажок « Удалить программное обеспечение драйвера для этого устройства» .
- Загрузите Inter Driver Update Assistant здесь и установите его.
- Запустите клиент и обновите все драйверы.
- Перезагрузите компьютер и ищите изменения.
3: Запустить SFC
Теперь, если проблема все еще присутствует, даже после того, как вы установили драйвер прямо, возможное повреждение системы может быть под рукой. Когда это происходит, мы предлагаем запустить встроенную утилиту через командную строку. Этот инструмент проверяет возможные повреждения системных файлов и исправляет их соответствующим образом.
Выполните следующие действия для запуска SFC в Windows 10:
- В строке поиска Windows введите cmd. Щелкните правой кнопкой мыши по командной строке и запустите ее с правами администратора.
- В командной строке введите sfc / scannow и нажмите Enter.
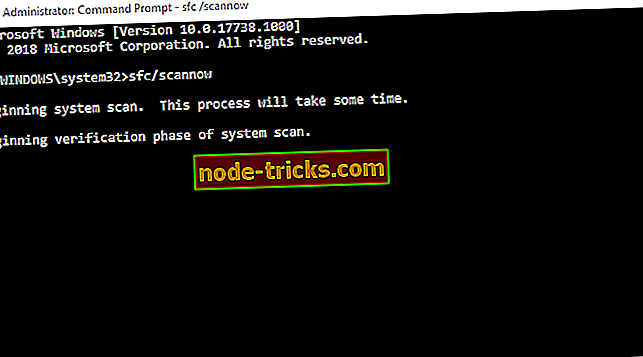
- Если инструмент SFC не нашел ничего подозрительного, не закрывайте командную строку.
4: попробуйте с DISM
Если SFC не удается найти системные ошибки, должен помочь инструмент обслуживания образов развертывания и управления ими. Этот инструмент использует все доступные средства для исправления системных ошибок. И это, как и System File Checker, встроенная утилита, которую вы можете запустить через командную строку с повышенными правами. Он использует Центр обновления Windows для замены всех файлов, поэтому для исправления системной ошибки требуется еще один шаг.
Вот как запустить DISM в Windows 10:
-
- В командной строке введите следующие команды и нажмите Enter после каждого:
- DISM / Online / Cleanup-Image / CheckHealth
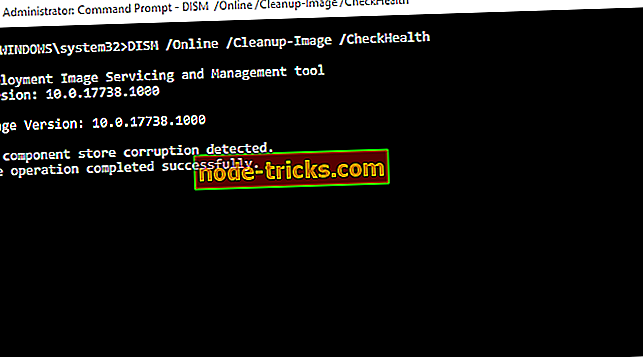
- DISM / Online / Cleanup-Image / RestoreHealth
- DISM / Online / Cleanup-Image / CheckHealth
- Подождите, пока инструмент обнаружит и устранит системные ошибки. Это может занять некоторое время.
- В командной строке введите следующие команды и нажмите Enter после каждого:
5: Отключить встроенную графику и Intel Smart Sound
Теперь эта проблема возникает почти исключительно в конфигурациях с двумя графическими процессорами, где Intel обеспечивает встроенную встроенную систему управления графикой и звуком. Однако столкновение водителей может создать много проблем. По этой причине мы предлагаем придерживаться выделенной графики (ATI или Nvidia) и Realtek HD Audio на данный момент.
Если вы не уверены, как отключить выделенный графический процессор на своем ноутбуке с двумя графическими процессорами, выполните следующие действия:
- Откройте диспетчер устройств .
- Разверните раздел « Адаптеры дисплея ».
- Отключить встроенную встроенную графику Intel.
- Перезагрузите компьютер и ищите изменения.
6: обновить BIOS
Некоторые пользователи, у которых возникли проблемы с IntcOED в Windows 10, решили проблему, перепрограммировав BIOS. Теперь, с переходом на более новую ОС, вы всегда должны обновлять свой BIOS. Просто обычный пользователь редко будет иметь дело с перепрошивкой BIOS, особенно если есть (и есть) шанс заглушить ваш компьютер. Мы по-прежнему предлагаем поискать ваше устройство и обновить BIOS. Процедура может отличаться для разных производителей, так как некоторые предлагают обновления в меню настроек BIOS / UEFI, в то время как другие требуют специальных сторонних инструментов для применения обновлений.
С другой стороны, если ошибка, возможно, возникла после перепрошивки BIOS, следует перейти к настройкам BIOS / UEFI и восстановить их значения по умолчанию. Это, казалось бы, решило проблему для нескольких пользователей.
7: Запустите систему в чистой загрузке
Помимо очевидных проблем с драйверами, может существовать стороннее приложение, конфликтующее с Intel Smart Sound. Этот список длинный, и мы не можем с уверенностью сказать, какая именно программа не будет работать в сочетании с вышеупомянутым устройством. Вот почему вы можете попробовать чистую загрузку и искать изменения.
Вот как запустить Windows 10 в чистой загрузке:
- В строке поиска Windows введите msconfig и откройте Конфигурация системы .
- На вкладке «Службы» установите флажок « Скрыть все службы Microsoft ».
- Нажмите « Отключить все », чтобы отключить все активные сторонние сервисы.
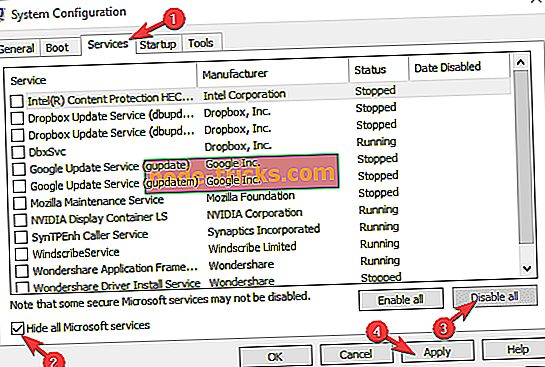
- Теперь выберите вкладку « Автозагрузка » и перейдите в диспетчер задач .
- Запретить запуск всех программ с системой и подтвердить изменения.
- Перезагрузите компьютер.
8: обновить Windows
Обновления Windows и способы их администрирования в Windows 10 получили огромную негативную реакцию со стороны сообщества пользователей. Однако это не значит, что они бесполезны. Некоторые пользователи заметили, что все начальные системные проблемы, возникающие при установке системы, были решены с помощью обновлений позже.
Это хорошая причина для обновления вашей системы. Несмотря на то, что они приходят автоматически, вы должны время от времени проверять наличие обновлений вручную. Вот как это сделать:
- На панели поиска Windows введите «Обновить» и нажмите « Проверить наличие обновлений ».

- Нажмите Проверить наличие обновлений в Настройках .
- Дождитесь установки обновлений и перезагрузите компьютер.
9: Сброс вашего компьютера до заводских настроек
Если ошибка все еще появляется, мы можем только предложить более радикальные меры. Прежде чем перейти к чистой переустановке Windows 10, стоит попробовать некоторые варианты восстановления. Мы предлагаем воспользоваться опцией «Сбросить этот компьютер», которая позволяет начинать с нуля, не теряя свои данные. Конечно, вы можете очистить все и начать с чистого листа, но мы сохраняем это для полной переустановки.
Выполните следующие действия, чтобы восстановить заводские настройки системы:
- В строке поиска введите Reset и откройте Reset this PC.
- Под опцией « Сбросить этот компьютер » нажмите « Начать» .
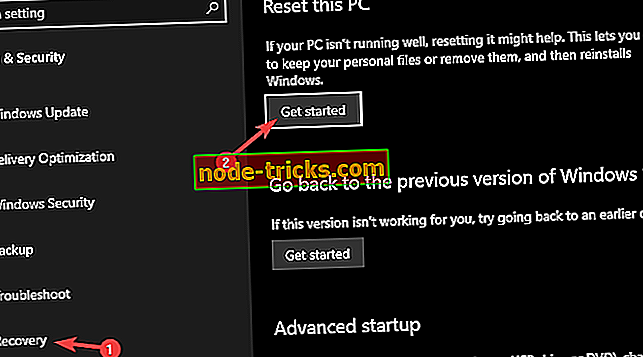
- Выберите, чтобы сохранить ваши файлы и приложения и продолжить процесс сброса.
10: переустановите Windows 10
Наконец, если ни один из предыдущих шагов не сработал, чистая переустановка является последним средством. Конечно, в этом случае мы предлагаем отформатировать ваш диск и начать с нуля. Кроме того, восстановите настройки BIOS по умолчанию. Перед началом процедуры обязательно создайте резервную копию всех ваших данных на внешнем носителе.
Следуйте инструкциям из этой статьи, чтобы установить Windows 10 clean. После этого обязательно перейдите на официальный сайт OEM и установите исключительно официальные драйверы. Кроме того, как мы упоминали в шаге 2, используйте помощник по обновлению драйверов Intel, чтобы получить последние версии драйверов Intel для Windows 10.
С учетом сказанного мы можем завершить эту статью. Если у вас есть какие-то дополнительные решения или что-то спросить, не стесняйтесь размещать их в разделе комментариев ниже.
It is frustrating when you struggle with the What Failed: IntcOED.sys error. You may be strange about this name, but actually, it always comes up with the blue screen, the name more familiar among users. If you are facing the blue screen with the IntcOED.sys failed error, please read this article on MiniTool Website.
What Failed: IntcOED.sys error
You may be curious about such a complicated code — What Failed: IntcOED.sys – which often accompanies the blue screen. So, what does that means?
When you see the IntcOED.sys failed error occur, there are other accentuated words telling that your PC ran into a problem and needs to restart on the blue screen.
It means your Windows encounters a critical error that stops the operating system from running. These critical errors can be the result of faulty hardware, faulty or low-level hardware drivers, or faulty or low-level apps that run within the Windows kernel.
Therefore, it is critical to dig out the potential reasons for the IntcOED.sys failed error.
Why IntcOED.sys Failed Error Happens?
1. Outdated BIOS driver.
Most of you may perform the Windows update regularly while leaving the BIOS driver outdated. From time to time, your PC’s manufacturer may offer updates to the BIOS with certain improvements.
Therefore, updating BIOS may troubleshoot your problem.
2. System file corruption.
Corrupted system files may be the reason for the IntcOED.sys failed error. You can fix it by using SFC and DISM scans.
3. Conflict with OED driver.
There may be a conflict between different system processes. Your OED driver may have been too outdated to adapt to your system or drivers, or the Windows update causes the incompatibility issue.
You’d better switch to the version compatible with the system processes.
4. Driver-related inconsistency.
IntcOED.sys is a component of Intel drivers, so the most common cause of What Failed: IntcOED.sys is the system and driver mismatch, corruption, or other similar issues.
Usually, users start experiencing the IntcOED.sys crashes after they update Windows. Therefore, to see the error settled down, you need to resolve the incompatibility issue.
Next, you will learn how to fix what failed: the IntcOED.sys error.
How to Fix What Failed: IntcOED.sys Error?
Fix 1: Run the Audio Troubleshooter
What Failed: IntcOED.sys is often related to a legacy sound driver. Fortunately, Microsoft has already pushed out an automated fix for the problem.
Step 1: Open the System section in the Update & Security part.
Step 2: Go to the Troubleshoot from the left pane. Scroll down and click Additional troubleshooters.
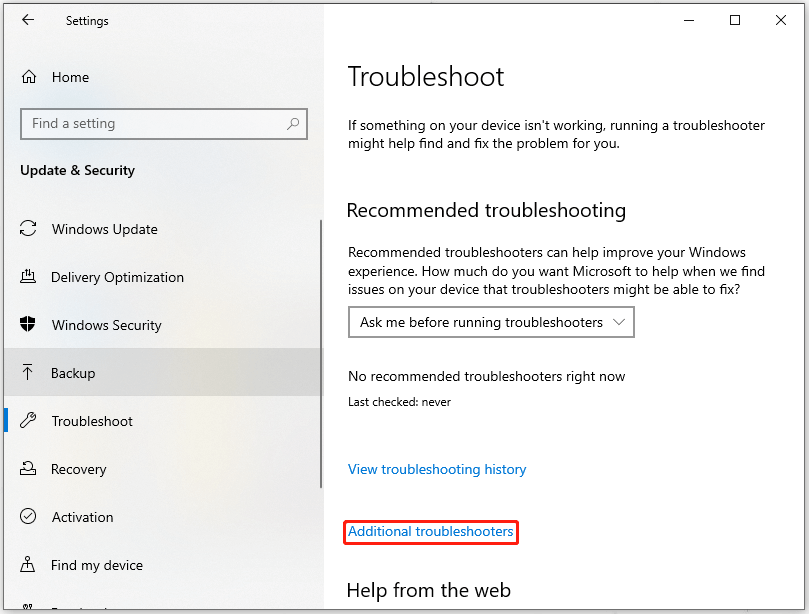
Step 3: Please choose Playing Audio and click on Run the Troubleshooter from the drop-down.
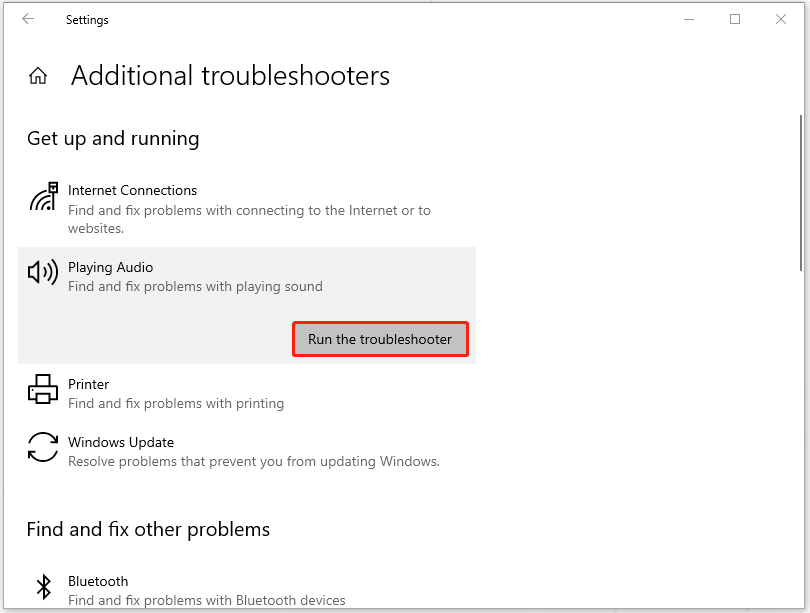
Step 4: Simply wait for a moment, it will show you the fix. Please follow its instruction to finish the fix.
Then restart your computer and see if the issue is resolved.
Fix 2: Uninstall the Intel Smart Sound Technology Driver
If the scan results in the last fix show nothing wrong here, you can try to uninstall the Intel smart sound technology driver.
Step 1: Press the Windows key and R key at the same time to open the Run dialogue.
Step 2: Type devmgmt.msc and press Enter to open the Device Manager window.
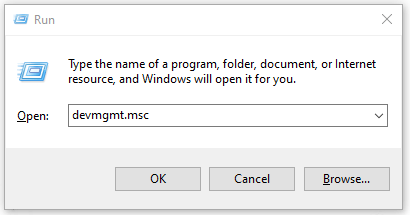
Step 3: Locate Sound, video, and game controllers in the list of device categories and click it.
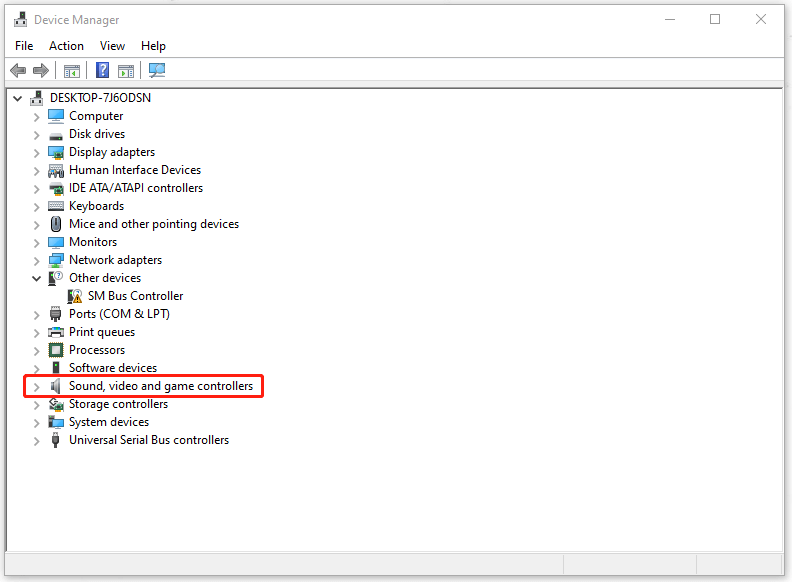
Step 4: Right-click on Smart Sound Technology OED and select Uninstall Device option from the context menu.
Step 5: Click Yes when a message pops up asking if you are sure you want to uninstall the device.
Once the uninstallation is done, please reboot your PC.
Fix 3: Uninstall the Recent Update
As mentioned before, users start experiencing the IntcOED.sys crashes after they update Windows. The update may cause an incompatibility issue between drivers and systems.
Therefore, you can uninstall the update and restart your PC to fix the blue screen with the IntcOED.sys failed error.
Step 1: Open the Run dialogue by pressing the Windows key and R key.
Step 2: Type appwiz.cpl to enter the Programs and Features window.
Step 3: Click on the View installed updates option from the left vertical options.
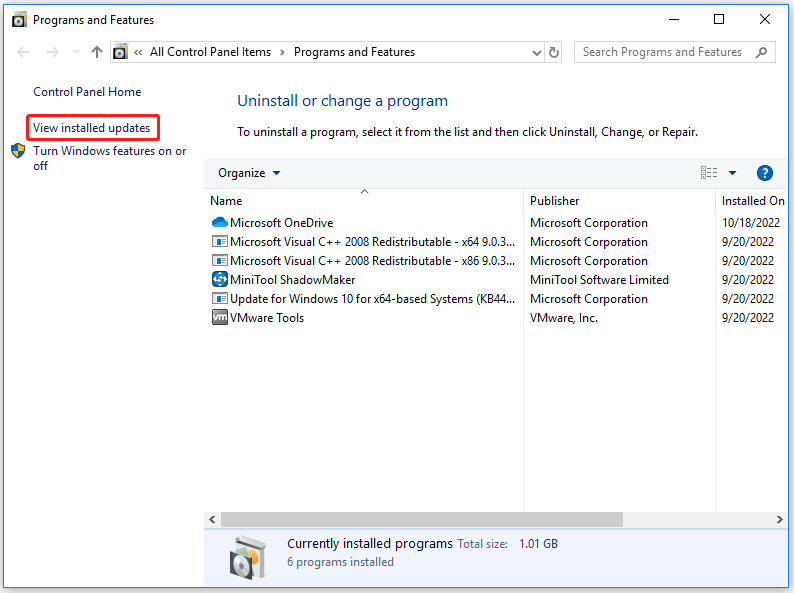
Step 4: Find the latest update and right-click on it. Select Uninstall from the drop-down menu.
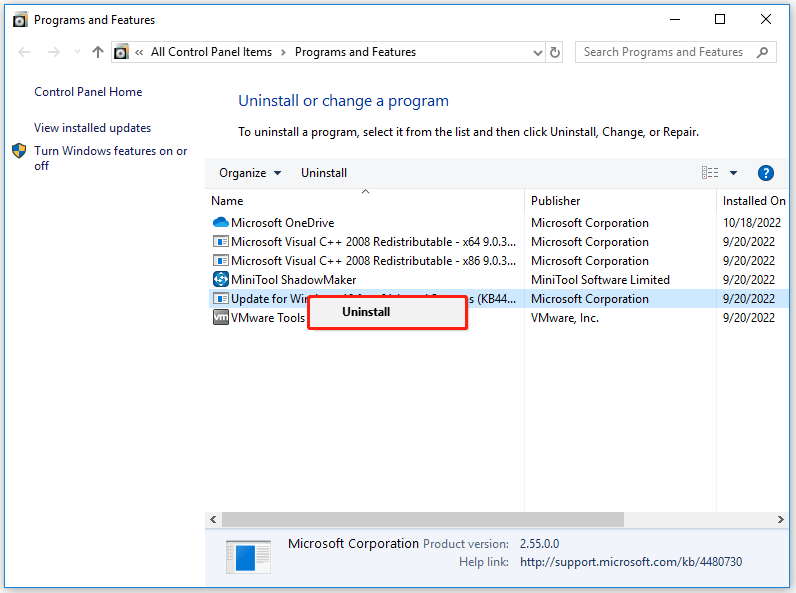
Step 5: At the confirmation prompt, click Yes to begin uninstalling the update. Wait until the process is complete.
Step 6: Once you finish the uninstallation, restart your PC. Check if the problem persists.
Fix 4: Update Your Drivers
One of the potential causes of the What Failed IntcOED.sys stop error is that your OED driver has been outdated and incompatible.
You can download the latest version of the OED driver on the official Intel website. Before that, you need to check if you are using the correct driver for your particular device type.
Fix 5: Run SFC and DISM Scans
System File Checker (SFC) and Deployment Image Servicing and Management (DISM) are both useful tools built-in Windows systems for helping users scan system files and images for corruption or any other changes.
Therefore, according to the analysis of why IntcOED.sys failed error happens, we have inferred that the corrupted system files could be the one to blame. In this way, SFC and DISM scans can come into play.
System File Checker (SFC)
Step 1: Type cmd in the Search box and right-click the Command Prompt option.
Step 2: Click Run as administrator in the drop-down menu.
Step 3: Type sfc /scnnow and press Enter on the keyboard when the Command Prompt window shows up.
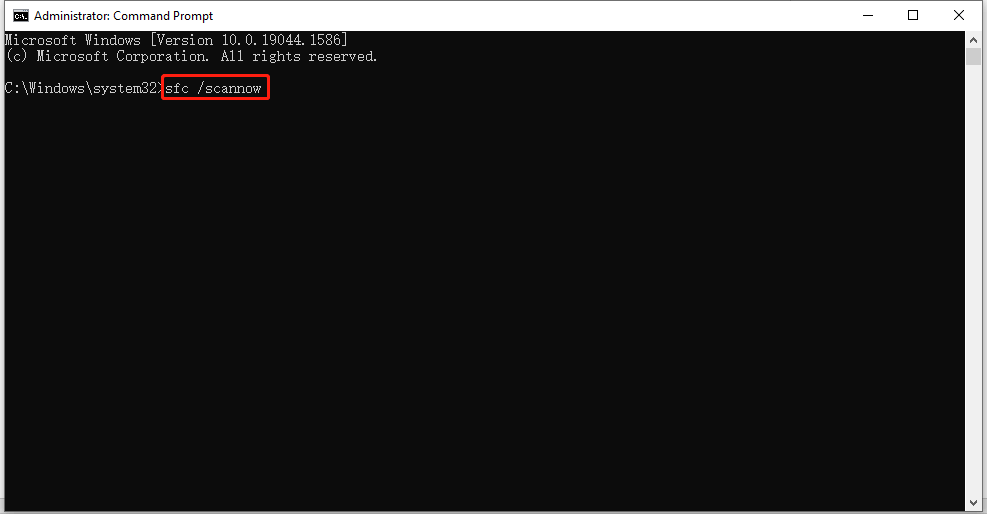
Then you need to wait for a moment. After the verification is up to 100%, it will show you the scan results.
Step 4: Restart your PC and see if the same error appears again or not.
DISM Scan
Step 1: Run Command Prompt as an administrator.
Step 2: You can type the following three demands one by one and press Enter after each of them.
Dism /Online /Cleanup-Image /ScanHealth
Dism /Online /Cleanup-Image /CheckHealth
Dism /Online /Cleanup-Image /RestoreHealth
Wait for the scan finished.
After that, restart the PC and see if the error is fixed.
Fix 6: Update BIOS
BIOS updates have the capability of correcting problems occurring with your computer hardware that cannot be fixed with drivers or an operating system update.
It can help keep the system software current and compatible with other computer modules.
Therefore, it is worthwhile to resolve the What Failed: IntcOED.sys error by updating bios.
Step 1: Press Windows + R keys to open the Run box and type msinfo32 to enter the System Information window.
Step 2: Find your System Model and record it to search for the BIOS update file.
Step 3: Find the latest BIOS update from the manufacturer’s website.
Note: You can directly type your computer manufacturer name, your computer model or motherboard name, and BIOS into the Google search box to find the BIOS download page on the manufacturer’s website.
Step 4: Download and unzip the BIOS file.
Step 5: Copy the BIOS file to a USB flash drive and restart your computer to boot into the BIOS screen.
Step 6: Click the Backup or Save option to back up current BIOS settings in the Main tab.
Step 7: Launch the BIOS/UEFI firmware update or flashing tool and select the new BIOS update file you copied to the USB flash drive to start the BIOS update process.
Then your computer will automatically restart with the new BIOS firmware version.
Check if the issue persists. If the method turns out to be useless, please try the next.
Fix 7: Use a System Restore Point
System Restore is a utility that can fix critical errors by reverting the machine to a previous point in time when the problem did not occur.
We can try the system restore to avoid the What Failed: IntcOED.sys error.
Note: This method requires you to set a system restore point before the issue happens. Therefore, it is not suitable for everyone.
Step 1: Press Windows + R to open a Run dialog box.
Step 2: Type rstrui and press Enter to launch the System Restore wizard.
Step 3: Click Next on the pop-up window and select the one you have created before. Click Next.
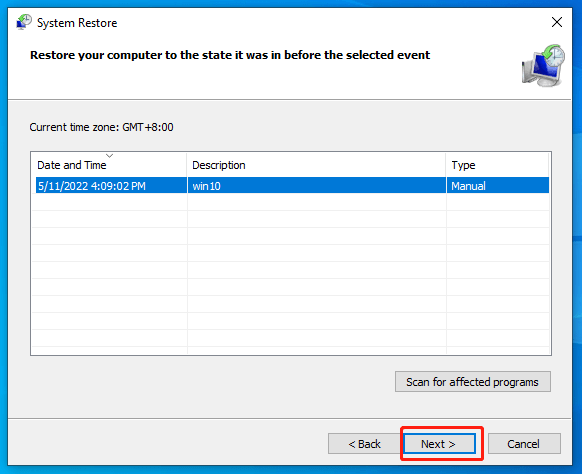
Step 4: To initiate the restoring process, click Finish.
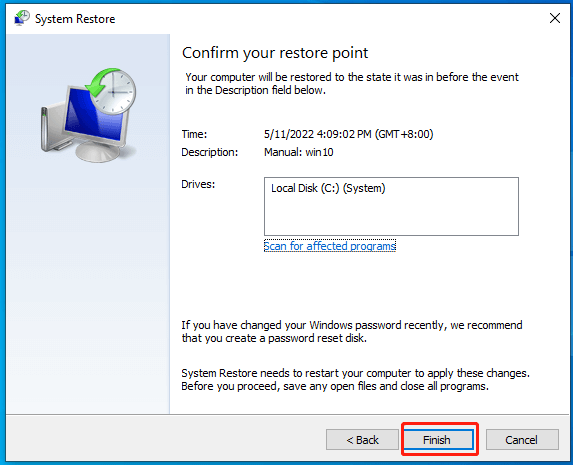
Then your computer will reboot and back to the previous state. You can check to see if the error is still occurring.
Fix 8: Restore Windows to Factory Settings
If the above methods all have been proved of no use, now you can choose to reset your computer to factory settings.
Step 1: Open the Update & Security tab in the Settings part.
Step 2: Scroll down to the Recovery option on the right-side panel.
Step 3: Tap on the Get started option.
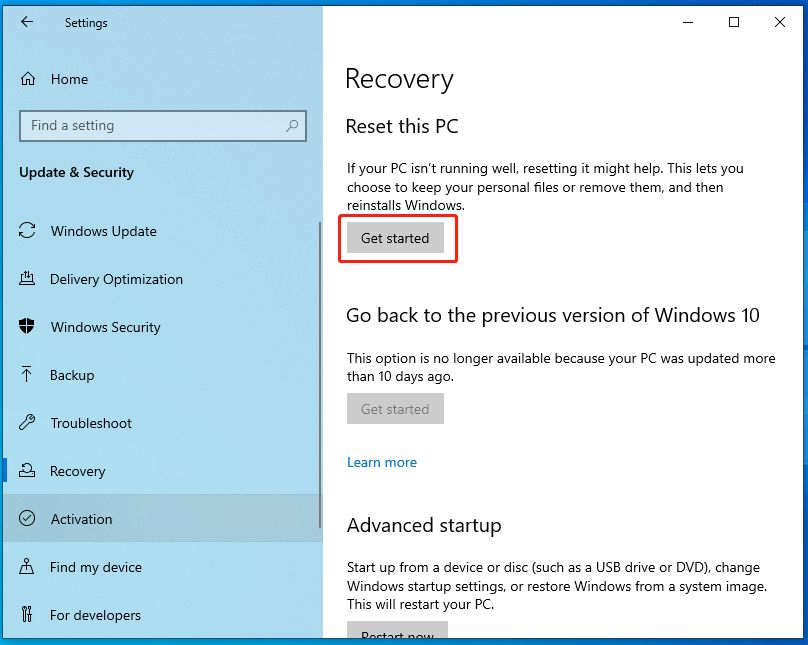
Step 4: Choose to keep your files and apps and continue with the resetting process.
Then you can check whether the fault is still there or not.
We have mentioned that the What Failed: IntcOED.sys error always comes up with the blue screen. It may make your PC hard to boot, and system crash, which requires resetting your systems to restart Windows.
But if you have backed up the system in advance, you can directly restore your system with this backup image and no data loss.
The MiniTool ShadowMaker is a backup expert that is committed to providing more features for users during the backup process.
You can download it first and you will get the Trial version.
Free Download
Step 1: Click Keep Trial to enter the program and click Backup.
Step 2: Click the Source section, in the pop-up window you can choose backup content.
Here, MiniTool ShadowMaker provides you with more options, including system, disk, partition, folder, and file. By default, the system is set as the backup source already, so you don’t need to change it.
Step 3: Click Destination and choose where you want to back up to. Here, you have four options (Administrator account folder, Libraries, Computer, and Shared).
Here, it is recommended to use an external drive as your backup destination.
Step 4: Click the Back up Now or Back up Later button. Click the Back up Now option to start the process immediately or choose the Back up Later option to delay the backup. You can start the delayed backup task on the Manage page.
Besides, MiniTool ShadowMaker is equipped with other features to make your backup more convenient. To ensure your data integrity, it is recommended to back up at a scheduled time.
Therefore, MiniTool ShadowMaker develops the Schedule Setting part to automatically back up. The only thing you need to do is to ensure your scheduled setting.
You can configure your backup schedule as once a day, a week, a month, or on an event.
You can also design your backup scheme, including full, incremental, and differential backup.
They have different backup models to facilitate your backup habit.
Bottom Line:
Although the What Failed: IntcOED.sys error makes people annoyed and overwhelmed, fortunately, it is reversible. Among the above measures, you can try them one by one according to your situation. However, backup always can be your lifeline when you are endangered in data loss.
If you have encountered any issues when using MiniTool ShadowMaker, you can leave a message in the following comment zone and we will reply as soon as possible. If you need any help when using MiniTool software, you may contact us via [email protected].