 Импорт виртуальных машин Hyper-V можно выполнять разными способами – как через графические инструменты типа Hyper-V Manager, так и с помощью PowerShell. Мастер импорта в оснастке Hyper-V Manager, взаимодействуя с администратором в интерактивном диалоге, позволяет разрешить ряд проблем, которые могут возникнуть в ходе импорта. Если же для импорта используется PowerShell, то здесь нюансы несовместимости исходной и целевой сред виртуализации могут выливаться в ошибки, останавливающие процедуру импорта. Так при попытке импорта виртуальной машины, подготовленной сторонней организацией мы можем столкнуться с ситуацией, когда PowerShell командлет Import-VM завершает свою работу с ошибкой вида:
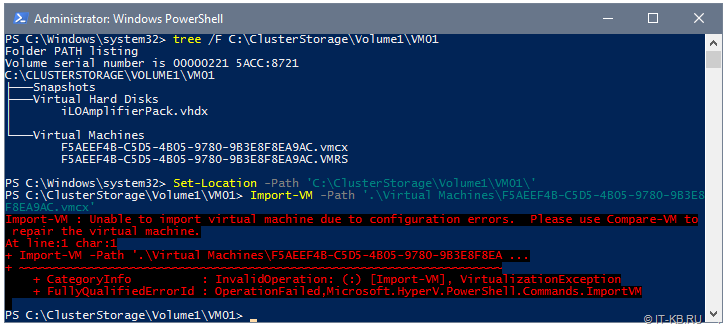
Import-VM : Unable to import virtual machine due to configuration errors. Please use Compare-VM to repair the virtual machine
Попробуем рассмотреть пример такого импорта с возникновением описанной ошибки и рассмотрим метод её исправления.
Распаковываем файлы экспортированной ранее виртуальной машины в то месторасположение, где она будет выполняться (в нашем примере это каталог C:ClusterStorageVolume1VM01). В консоли PowerShell переходим в этот каталог и выполняем команду импорта, указав файл конфигурации ВМ *.vmcx):
Set-Location -Path 'C:ClusterStorageVolume1VM01'
Import-VM -Path '.Virtual MachinesF5AEEF4B-C5D5-4B05-9780-9B3E8F8EA9AC.vmcx'
В результате мы можем получить выше обозначенную ошибку:
Если прочитать онлайн справку по командлету Compare-VM, на который нас отсылает текст ошибки, то там мы сможем найти пример решения подобной проблемы.
Выполним команду проверки совместимости файла конфигурации ВМ с настройками и возможностями текущего хоста виртуализации, и поместим результат проверки в некую переменную, например $report.
$report = Compare-VM -Path '.Virtual MachinesF5AEEF4B-C5D5-4B05-9780-9B3E8F8EA9AC.vmcx'
$report
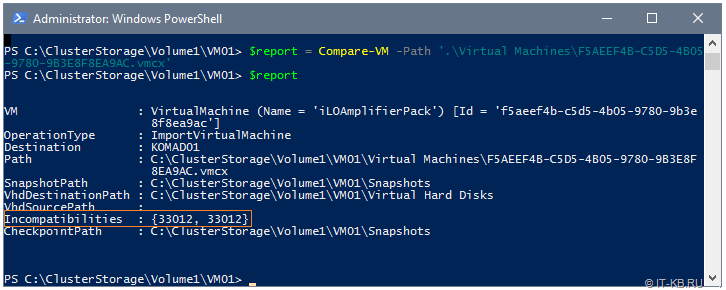
Как видим, в свойстве «Incompatibilities» есть набор объектов, каждый из которых представляет какую-либо проблему совместимости. В нашем случае найдено две таких проблемы. Посмотрим подробней:
$report.Incompatibilities | Format-List
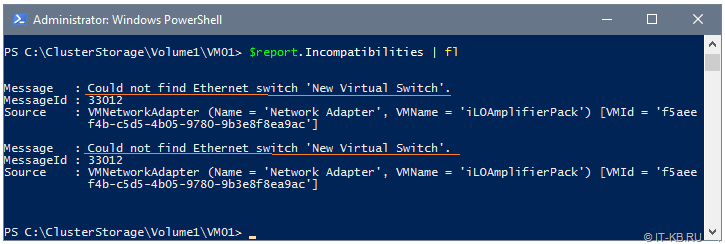
Как видим, ВМ не может быть импортирована на хост, так как на хосте нет
виртуального сетевого коммутатора Hyper-V с именем «New Virtual Switch«, которое фигурирует в конфигурации ВМ.
Можем более углублённо посмотреть текущую конфигурацию проблемных компонент через набор данных в свойстве «Source»:
$report.Incompatibilities.Source | Select Name,MacAddress,Connected | Format-Table
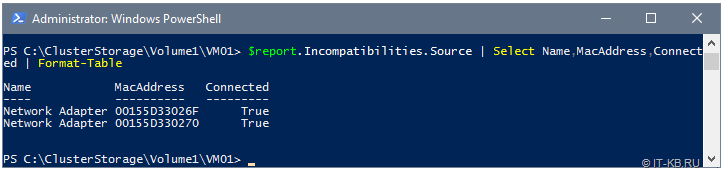
Простым решением этой конкретной проблемы является отключение сетевых адаптеров в конфигурации импортируемой ВМ от несуществующего виртуального коммутатора (после импорта нужные виртуальные коммутаторы Hyper-V можно будет снова назначить на виртуальных сетевых адаптерах ВМ).
У нас две несовместимости и мы обрабатываем каждую их них по порядковому индексу начиная с 0, оперируя при этом объектами конфигурации ВМ точно также, как для любой локальной ВМ на хосте.
$report.Incompatibilities[0].Source | Disconnect-VMNetworkAdapter
$report.Incompatibilities[1].Source | Disconnect-VMNetworkAdapter
Убедимся, что параметры конфигурации проблемных компонент изменились и хранятся в переменной $report:
$report.Incompatibilities.Source | Select Name,MacAddress,Connected | Format-Table
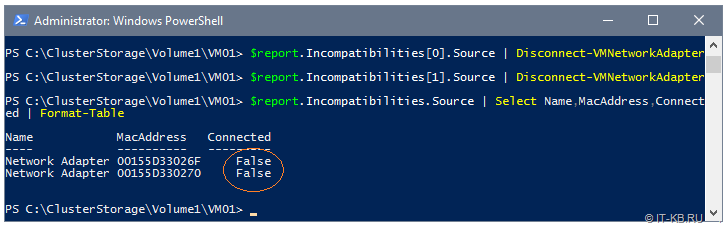
Теперь пробуем снова выполнить импорт ВМ, вызывая командлет импорта в специальном режиме с обработкой откорректированных данных о совместимости из переменной $report (при этом путь к конфигурации vmcx уже не указываем, так как он уже есть в данных $report):
Import-VM -CompatibilityReport $report
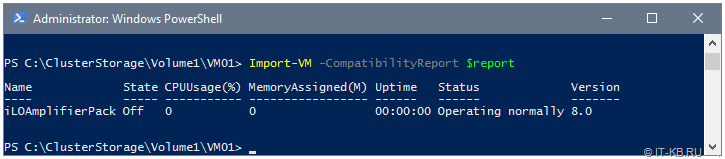
Как видим, теперь импорт виртуальной машины завершился успешно.
Download PC Repair Tool to quickly find & fix Windows errors automatically
While importing a virtual machine, if you get Hyper-V did not find virtual machines to import from location error, here are some working solutions to fix the issue. Although it is an unusual error that doesn’t appear frequently, you can get it on a computer with multiple user accounts.
The entire error message says something like this:
Hyper-V did not find virtual machines to import from location ‘virtual-machine-path’
The folder ‘virtual-machine-folder-path’ could not be found. You might not have permission to access it.

There are two reasons why you are getting this problem, and they are:
- When you select the virtual machine folder while importing it on another or the same computer, you must keep the folder intact until the setup is complete. At times, it might take some time for Hyper-V Manager to complete the importing process. In the meantime, if you rename, move or delete the folder from the predefined location, you will get the error mentioned above.
- If there is some folder or file permission issue on your computer, you can get the same problem. Hyper-V Manager needs to access the exported virtual machine folder during the entire process. If this virtual machine software cannot access your folder due to inadequate permission, you will confront the same issue.
To fix Hyper-V did not find virtual machines to import from location error, follow these steps:
- Check if the folder is intact
- Check the folder permission
- Export the virtual machine again
To learn more about these steps, continue reading.
1] Check if the folder is intact
As mentioned earlier, you need to keep the exported virtual machine folder intact when Hyper-V Manager is importing the virtual machine. You cannot move it to another location, delete the folder, or rename it. Therefore, ensure that the selected folder has all the required files and it is there in the predefined location.
2] Check the folder permission
If your user account doesn’t have the correct permission to access the exported virtual machine folder, Hyper-V Manager shows this error message. To verify and regain permission of a folder, you can follow this detailed tutorial. After that, you can go through the same steps to import virtual machines in Hyper-V.
3] Export the virtual machine again
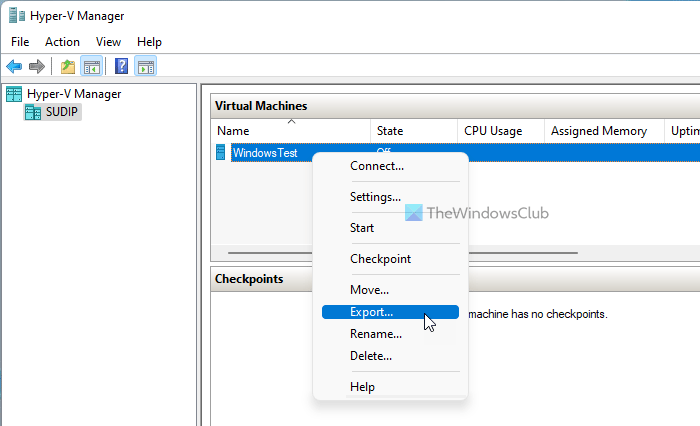
If the exported files are corrupted, there is a chance of getting the same error message while importing a virtual machine. In such situations, it is better to re-export the virtual machine. For that, you can follow these steps:
- Open the Hyper-V Manager on your computer.
- Right-click on the virtual machine.
- Select the Export option.
- Click the Browse button and select a path to save the files.
- Click the Export button.
Now, you can import the virtual machine without any error.
Where are Hyper V virtual machines stored?
By default, Hyper-V stores the virtual disk in C:UsersPublicDocumentsHyper-VVirtual Hard Disks folder. However, it saves the data file in the C:ProgramDataMicrosoftWindowsHyper-V folder. Nonetheless, if you export a virtual machine, you can save the files anywhere you want.
How do I import a virtual machine into Hyper V?
To import a virtual machine in Hyper-V, you must have all the export files on your computer. Then, you can open Hyper-V Manager and click the Import Virtual Machine option visible on the right side. After that, you need to choose the exported folder, select the virtual machine you want to import, create a unique ID, select the location to save the configuration files, etc. Once done, you can re-access your virtual machine on the new setup.
That’s all! Hope this tutorial helped you fix the Hyper-V did not find virtual machines to import from location error on Windows 11/10.
Read: Hyper-V encountered an error while loading the virtual machine configuration.

Anand Khanse is the Admin of TheWindowsClub.com, a 10-year Microsoft MVP (2006-16) & a Windows Insider MVP (2016-2022). Please read the entire post & the comments first, create a System Restore Point before making any changes to your system & be careful about any 3rd-party offers while installing freeware.
Download PC Repair Tool to quickly find & fix Windows errors automatically
While importing a virtual machine, if you get Hyper-V did not find virtual machines to import from location error, here are some working solutions to fix the issue. Although it is an unusual error that doesn’t appear frequently, you can get it on a computer with multiple user accounts.
The entire error message says something like this:
Hyper-V did not find virtual machines to import from location ‘virtual-machine-path’
The folder ‘virtual-machine-folder-path’ could not be found. You might not have permission to access it.
There are two reasons why you are getting this problem, and they are:
- When you select the virtual machine folder while importing it on another or the same computer, you must keep the folder intact until the setup is complete. At times, it might take some time for Hyper-V Manager to complete the importing process. In the meantime, if you rename, move or delete the folder from the predefined location, you will get the error mentioned above.
- If there is some folder or file permission issue on your computer, you can get the same problem. Hyper-V Manager needs to access the exported virtual machine folder during the entire process. If this virtual machine software cannot access your folder due to inadequate permission, you will confront the same issue.
To fix Hyper-V did not find virtual machines to import from location error, follow these steps:
- Check if the folder is intact
- Check the folder permission
- Export the virtual machine again
To learn more about these steps, continue reading.
1] Check if the folder is intact
As mentioned earlier, you need to keep the exported virtual machine folder intact when Hyper-V Manager is importing the virtual machine. You cannot move it to another location, delete the folder, or rename it. Therefore, ensure that the selected folder has all the required files and it is there in the predefined location.
2] Check the folder permission
If your user account doesn’t have the correct permission to access the exported virtual machine folder, Hyper-V Manager shows this error message. To verify and regain permission of a folder, you can follow this detailed tutorial. After that, you can go through the same steps to import virtual machines in Hyper-V.
3] Export the virtual machine again
If the exported files are corrupted, there is a chance of getting the same error message while importing a virtual machine. In such situations, it is better to re-export the virtual machine. For that, you can follow these steps:
- Open the Hyper-V Manager on your computer.
- Right-click on the virtual machine.
- Select the Export option.
- Click the Browse button and select a path to save the files.
- Click the Export button.
Now, you can import the virtual machine without any error.
Where are Hyper V virtual machines stored?
By default, Hyper-V stores the virtual disk in C:UsersPublicDocumentsHyper-VVirtual Hard Disks folder. However, it saves the data file in the C:ProgramDataMicrosoftWindowsHyper-V folder. Nonetheless, if you export a virtual machine, you can save the files anywhere you want.
How do I import a virtual machine into Hyper V?
To import a virtual machine in Hyper-V, you must have all the export files on your computer. Then, you can open Hyper-V Manager and click the Import Virtual Machine option visible on the right side. After that, you need to choose the exported folder, select the virtual machine you want to import, create a unique ID, select the location to save the configuration files, etc. Once done, you can re-access your virtual machine on the new setup.
That’s all! Hope this tutorial helped you fix the Hyper-V did not find virtual machines to import from location error on Windows 11/10.
Read: Hyper-V encountered an error while loading the virtual machine configuration.
Anand Khanse is the Admin of TheWindowsClub.com, a 10-year Microsoft MVP (2006-16) & a Windows Insider MVP (2016-2022). Please read the entire post & the comments first, create a System Restore Point before making any changes to your system & be careful about any 3rd-party offers while installing freeware.
При импорте виртуальной машины в Hyper-V, если вы получаете Hyper-V, возникла ошибка при загрузке ошибки конфигурации виртуальной машины, вот как вы можете исправить это, используя эти советы и рекомендации. Эта ошибка в основном возникает, когда вы импортируете ту же виртуальную машину, которая уже есть на вашем компьютере.
Во всем сообщении об ошибке написано примерно следующее:
Hyper-V обнаружил ошибку при загрузке конфигурации виртуальной машины из [a-location]
Не удалось создать виртуальную машину.
Операция завершилась неудачно, поскольку виртуальная машина с таким идентификатором уже существует. Выберите новый идентификатор и попробуйте снова.
Hyper-V позволяет экспортировать и импортировать виртуальные машины на ваш компьютер. Импортировать виртуальную машину на Hyper-V не так уж и сложно. Однако проблема начинается, когда вы пытаетесь импортировать ту же виртуальную машину на свой компьютер, когда у вас уже есть исходная. Другими словами, эта ошибка возникает, когда вы выбираете Зарегистрируйте виртуальную машину на месте или Восстановить виртуальную машину вариант при импорте виртуальной машины.
Каждый раз, когда вы создаете виртуальную машину, Hyper-V генерирует уникальный идентификатор для представления виртуальной машины, называемый идентификатор. Когда вы экспортируете виртуальную машину, она несет этот идентификатор. Точно так же, когда вы импортируете виртуальную машину, идентификатор также устанавливается на ваш компьютер. Если ваш компьютер обнаруживает тот же идентификатор при импорте, он отображает сообщение об ошибке, подобное этому.
Чтобы исправить ошибку Hyper-V при загрузке ошибки конфигурации виртуальной машины, выполните следующие действия:
- Удалить старую виртуальную машину
- Создайте новый уникальный идентификатор
Чтобы узнать больше об этих шагах, продолжайте читать.
1]Удалить старую виртуальную машину
Если вы удалите исходную виртуальную машину, уникальный идентификатор будет удален и с вашего компьютера. Другими словами, он создаст место для установки старого идентификатора на ваш компьютер. Чтобы удалить виртуальную машину Hyper-V, выполните следующие действия:
- Откройте диспетчер Hyper-V на своем компьютере.
- Щелкните виртуальную машину правой кнопкой мыши.
- Выберите Удалить вариант из контекстного меню.
- Нажать на Удалить в окне подтверждения.
Он удалил все файлы выбранной вами виртуальной машины за считанные секунды. После этого вы сможете безошибочно импортировать виртуальную машину.
2]Создайте новый уникальный идентификатор
Иногда вы можете не захотеть удалять виртуальную машину, чтобы импортировать другую. В такой ситуации вы можете создать новый уникальный идентификатор или идентификатор. Это можно сделать при импорте виртуальной машины.
Чтобы создать новый уникальный идентификатор для виртуальной машины, выполните следующие действия:
- Откройте диспетчер Hyper-V на своем компьютере.
- Щелкните значок Импортировать виртуальную машину вариант.
- Выберите папку виртуальной машины, щелкнув значок Просматривать кнопка.
- Выбирать Скопируйте виртуальную машину (создайте новый уникальный идентификатор) вариант в Выберите тип импорта таб.
- Щелкните значок Следующий кнопку и запустите вашу виртуальную машину.
Выбирая эту опцию, вы создаете новый уникальный идентификатор для своей виртуальной машины. На импортированной виртуальной машине будут сохранены все старые настройки, кроме идентификатора.
Как импортировать виртуальную машину в Hyper-V?
Чтобы импортировать виртуальную машину в Hyper-V, вам необходимо использовать Импортировать виртуальную машину вариант. После этого вы можете выбрать экспортированную папку вашей виртуальной машины, выбрать Скопируйте виртуальную машину вариант и начать установку. Чтобы узнать больше об импорте виртуальной машины в Hyper-V, вы можете прочитать это подробное руководство.
[I wrote an article on this topic. It is not published yet. Please add the link here. added the underline to highlight the anchor text.]
Где хранятся виртуальные машины Hyper V?
По умолчанию Windows хранит все файлы Hyper-V в папке C: ProgramData Microsoft Windows Hyper-V. Однако вы можете найти все виртуальные диски в C: Users Public Documents Hyper-V. Независимо от того, используете ли вы Windows 10 или Windows 11, расположение одинаково.
Это все! Надеюсь, эта статья помогла вам решить проблему импорта Hyper-V.
Читайте: Как установить Windows 11 с помощью Hyper-V в Windows 10.
.
- Remove From My Forums
-
Question
-
Hi,
we are trying to import virtual machines in Hyper-V2012 R2 but it fails with an error Hyper-V did not find virtual machines to import from the location, the folder c:somethingsomething could not be found. You might not have permission to access it.
Folder structure -Root folder with the name of machine-> 2 folders (virtual hard disks and virtual machines) -> In virtual hard disks folder there is .vhd file and in Virtual machines folder there is the XML file and also folder with the same
name as XML file in which it has BIN and VSV file.These machines were created on a host (hyper-v 2012 R2) which is destroyed because of some irreparable issues. So those machines are basically not exported from anywhere.
Is it because of these machines were not exported from anywhere at first place(because «.exp» file is not available), if yes is there any way to import these machines? (there are a lot of machines, so ruling our creating empty virtual machines
option)Thanks in Advance.
Всем привет сегодня разберем, как решается ошибка 0x8009030E или 0x8009030D при миграции виртуальной машины Hyper-V в Windows Server 2012 R2. Напомню миграция — это перемещение виртуальной машины на другой хост виртуализации, и вот во время этого процесса возникает этот неприятный момент.
Сбой операции миграции виртуальной машины в исходном расположении миграции
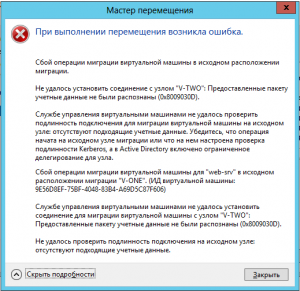
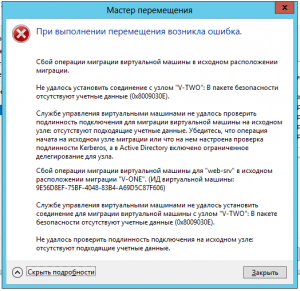
И та и другая ошибка связаны с тем что нужно входить на каждый сервер для выполнения определенной задачи (через локальный сеанс консоли, сеанс удаленного рабочего стола или удаленный сеанс Windows PowerShell) с сервера с которого осуществляется миграция либо настроить ограниченное делегирование для хостов.
Поскольку каждый раз входить с сервера на сервер неудобно, я опишу как настроить ограниченное делегирование.
Решения:
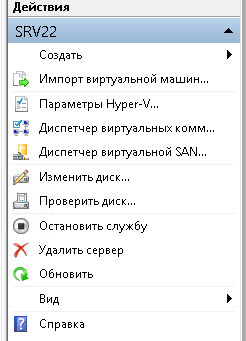
На вкладке Динамическая миграция, должна стоять галка Включить входящие и исходящие миграции.
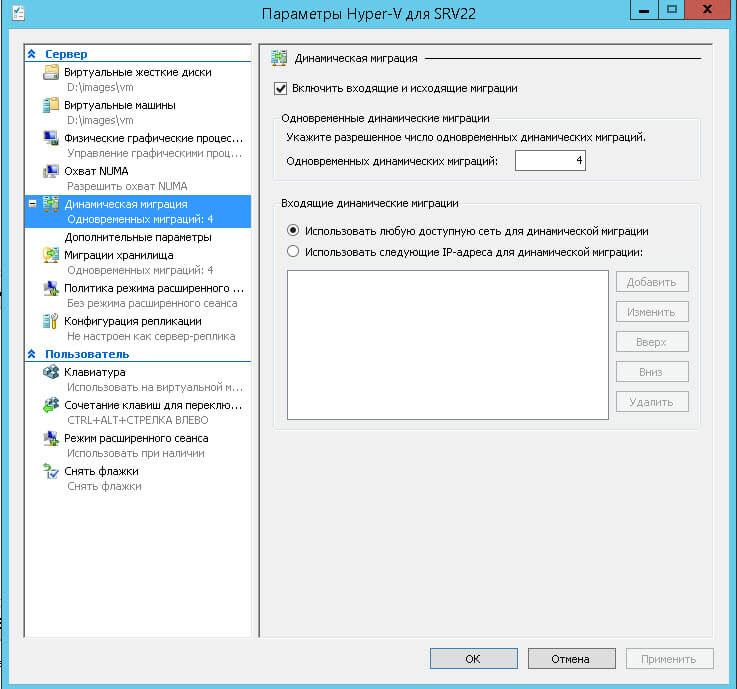
Вторая причина у вас не включен Kerberos. Если у вас по CredSSp, не удается мигрировать выставляем тогда Kerberos, для большей безопасности, его мы еще поднастроим.

Так же если вы пытаетесь делать миграцию работающей виртуальной машины, может возникнуть ошибка VMM:
virtual machine … is using processor-specific features not supported on host…
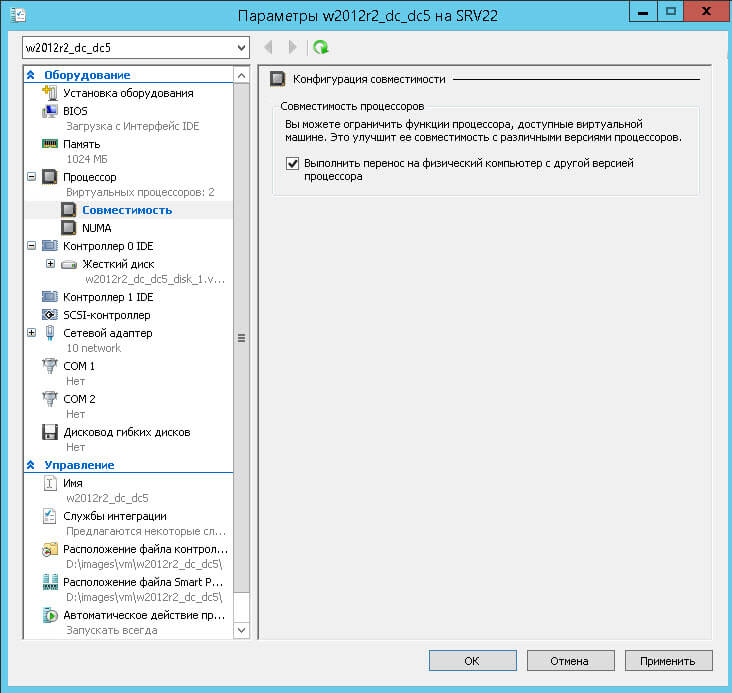
Для решения, удостоверьтесь, что у вас стоит галка в свойствах виртуалки, на вкладке Процессор (Выполнить перенос на физический компьютер с другой версией процессора). Данная галка нужна если у вас разные процессоры, так как не везде все сервера одинаковые.
Если вы выполняете миграцию с рабочей станции, через оснастку Диспетчер Heper-V вы опять словите данную ошибку 0x8009030E или 0x8009030D, так как данную операцию нужно производить с хоста Hyper-V, где лежит тачка подключенного по RDP, но не спешите расстраиваться, мы же не зря настраивали kerberos, делаем ниже инструкции и радуемся жизни
Для того чтобы kerberos отработал и вы не получили ни 0x8009030E, ни 0x8009030D при миграции виртуальной машины Hyper-V в Windows Server 2012 R2, делаем следующее. Открываем оснастку Active Directory — Пользователи и компьютеры, ищем там ваши компьютеры Hyper-V и переходим в их свойства. Переходим на вкладку Делегирование, выставляем там Доверять компьютеру делегирование указанных служб > Использовать только Kerberos и добавляем туда две службы первая — cifs (для миграции хранилищ), вторая — Microsoft Virtual System Migration Service
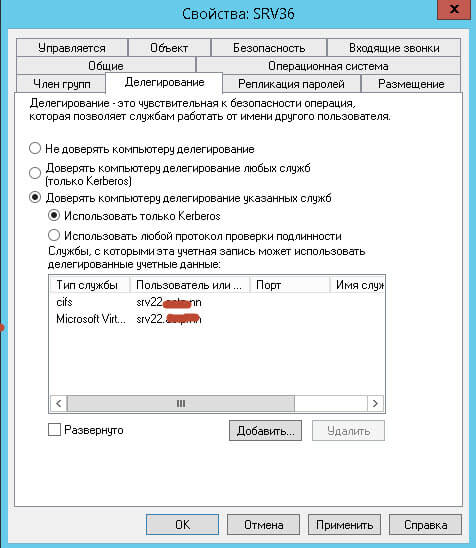
Все можно теперь мигрировать спокойно.
Если у вас SCVMM
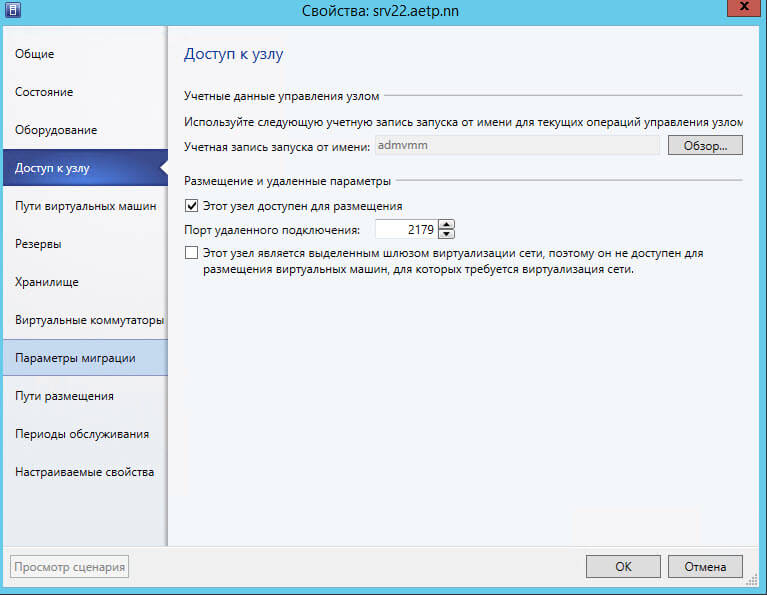
Если у вас есть scvmm, то проверьте, что в свойствах хоста
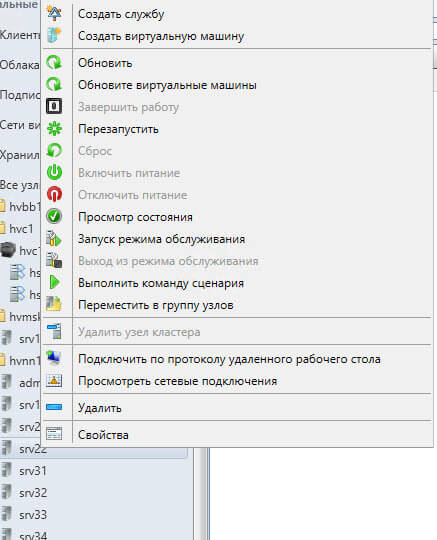
Перейдите на вкладку Доступ к узлу и проверьте, что в Учетная запись запуска от имени не пуста, если там ничег онет, то через обор добавьте.
Мигрируем через Powershell
Move-VM <VMName> <Hyper-V-Servername> -IncludeStorage -DestinationStoragePath D:Hyper-V<VMNameFolder>
- VMName — Имя виртуальной машины
- Hyper-V-ServerName — Имя сервера, куда вы мигрируете
- VMNameFolder — Имя папки, в которую размещается VM
Думаю было не сложно и вы победили свою ошибку 0x8009030E.
источник: http://pyatilistnik.org/0x8009030e-hyper-v/
Join @AdmNtsRu on Telegram