When building and maintaining a website, you’re bound to encounter some unexpected HTTP errors here and there. Problems like these are tough to avoid, and some are trickier to resolve than others.

If you’re experiencing a «413 Request Entity Too Large» error, the good news is that this issue is quick and simple to address — you just need to do a bit of server reconfiguration. And no, you don’t need to be a technical expert. Let’s learn how.
![Free Resource: Website Optimization Checklist [Download Now]](https://no-cache.hubspot.com/cta/default/53/00d9cc96-eff7-4cea-8ff3-583374c3dcd5.png)
A 413 HTTP error code occurs when the size of a client’s request exceeds the server’s file size limit. This typically happens when a client attempts to upload a large file to a web server, and the server responds with a 413 error to alert the client.
Web servers place size limits on uploads to prevent users from overwhelming the server and exceeding storage permissions. This limit usually isn’t an issue, and common website files should stay well under it. However, especially large file uploads may occasionally exceed the limit, resulting in a message like this:
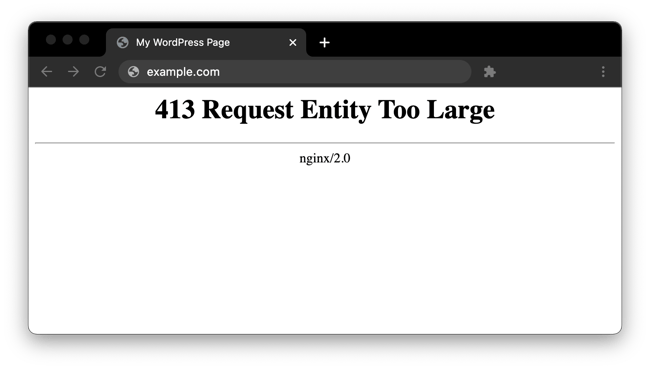
While you can reduce the size of your upload to get around the error, it’s also possible to change your file size limit with some server-side modification.
How to Fix a “413 Request Entity Too Large” Error
Your default upload size limit will depend on how your server is set up. In this guide, we’ll show you how to fix a 413 error by increasing your size limit with a WordPress setup, as well as with an Apache or Nginx server configuration.
All methods require some edits to your server files, so we recommend creating a backup before attempting the steps below.
WordPress
Themes and plugins are common causes of the 413 error with the WordPress content management system. Fortunately, there are several ways to increase your WordPress upload size limit enough to let these larger files through. As long as you do not exceed the limits of your hosting plan, you can try any of the following:
Modify PHP.ini
The easiest method to increase your upload limit is by modifying your server’s PHP.ini file. Here, you can change your limit through the cPanel interface without any coding. To do this:
1. In your cPanel menu, select MultiPHP INI Editor under Software.

2. In the window that appears, choose your domain from the dropdown menu.
3. Change the values of the following parameters to your preference:
- max_execution_time (maximum time to upload, in seconds)
- upload_max_filesize (maximum upload size, in megabytes)
- post_max_size (maximum post size, in megabytes)
4. When finished, click Apply.
Modify .htaccess
If your WordPress site is hosted on an Apache server, it’s also possible to increase your server’s limit via .htaccess, a file that contains many directives for the server. See the solution below.
Modify functions.php
You can also try increasing your size limit via the functions.php file of your current WordPress theme.
If you want to make this change permanent, we recommend trying the above approaches first. With this approach, you’ll need to update functions.php whenever you update or change your current theme.
1. In your cPanel menu, select File Manager under Files.
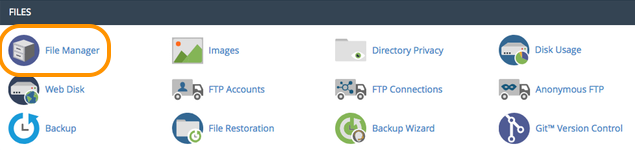
2. Navigate to the folder of your current theme inside your root WordPress directory (public_html by default). Open this theme file.
3. Select functions.php and click the Edit icon.
4. Copy the code below and paste it at the end of the file
@ini_set( ‘upload_max_size’ , ’64M’ );
@ini_set( ‘post_max_size’, ’64M’);
@ini_set( ‘max_execution_time’, ‘300’ );
5. Click Save.
This code sets the maximum allowed size of your WordPress uploads and posts to 64 megabytes. You can change this number to something larger or smaller if you need, as long as you do not exceed your hosting plan’s storage limit.
It also sets the maximum period your uploads can take to 300 seconds. Feel free to change this as well.
Nginx Server
Nginx server settings can be modified inside the file nginx.conf. Open this file and check for the directive client_max_body_size. Then, change the value (in megabytes) to your maximum file size preference.
If you do not see this directive in nginx.conf, you can add it to the end of a server, location, or http block like so:
server {
          ...
          client_max_body_size 64M;
}
This allows for a 64-megabyte upload. Set this number to your preference, save the file, then reload Nginx for the change to take effect.
Apache Server
Change the size limit on an Apache server by updating your .htaccess file like so:
1. In your cPanel menu, select File Manager under Files.
2. In your root WordPress directory (public_html by default), locate .htaccess. Depending on your settings, the .htaccess file may be hidden.
3. Select .htaccess and click the Edit icon.
4. Copy and paste the code below at the bottom of your .htaccess file:
php_value upload_max_filesize 64M
php_value post_max_size 64M
php_value max_execution_time 300
php_value max_input_time 300
5. Click Save and reload Apache.
Doing this sets the maximum allowed size of your WordPress uploads and posts to 64 megabytes and sets the maximum file upload time to 300 seconds. You can change both of these values to your preference.
Still getting a 413?
After trying one or more of the solutions above, you still may encounter a 413 error when uploading large files, even if these files are below your new size limit.
In this case, the issue may stem from your CDN’s servers or some other restriction set by your hosting provider. First, reach out to your hosting support, detailing the problem and the steps you’ve taken so far to resolve it. It may be that you’ve exceeded your plan’s file size limit without realizing. Or, your configurations may have inadvertently caused another error.
If you use a CDN to improve your site’s performance, this may also be the cause of your issue — the CDN servers you’re using may impose file size limits that are too small. Since you probably can’t modify these servers’ files directly, you consult the documentation for your CDN provider or contact product support to resolve the error.
If all else fails, consider uploading alternative files, reducing the size of your current file, or upgrading your storage plan. If you find yourself needing to upload a massive amount of data, more likely than not there’s a workaround.
Fixing a 413 Error
While HTTP errors can be frustrating, many are quickly solvable including a 413. By finding and tackling this issue now, you’ll have one less thing to worry about while building out your website. If your site allows users to upload their own content, changing your upload size limit solves this problem too — just make sure you’re not exceeding the limits set by your hosting plan.
As for the best option, we recommend WordPress users modify their server’s PHP.ini file first if possible, since this can easily be done through your hosting panel. Otherwise, choose the option that matches your server software.
This post was originally published in January 2021 and has been updated for comprehensiveness.

WordPress errors come in all shapes and sizes. In most cases they’re easy to decipher; such is the accessibility of WordPress’ error reporting. Even so, when the “413 Request Entity Too Large” error pops up, it can leave you scratching your head.
Without realizing it, you already have everything you need to understand and diagnose the error within its name. The good news is you won’t need more than a standard Secure File Transfer Protocol (SFTP) client and administrator access to your server.
In this post, we’ll take a look at how to solve the “413 Request Entity Too Large” error. We’ll also give you a quick list of steps to take before you begin to solve the error, to make the process super straightforward.
Check out our video guide to fixing the “413 Request Entity Too Large” Error
What the “413 Request Entity Too Large” Error Is (And Why It Exists)
We noted that there’s a clue in the error name as to what the solution and problem are. Before you go sleuthing yourself, though, we’ll spoil the surprise: it’s in the adjective “large.”
In a nutshell, the “413 Request Entity Too Large” error is a size issue. It happens when a client makes a request that’s too large for the end server to process. Depending on the nature of the error, the server could close the connection altogether to prevent further requests being made.
Let’s break the error down into its parts:
- “413”: This is one of the 4xx error codes, which mean there’s a problem between the server and browser.
- “Request Entity”: The “entity” in this case is the information payload being requested by the client from the server.
- “Too Large”: This is straightforward: the entity is bigger than the server is willing or able to serve.
In fact, this error has changed its name from what it originally was to be more specific and offer more clarity. It’s now known as the “413 Payload Too Large” error, although in practice, you’ll see the older name a lot more.
As for why the error occurs, the simple explanation is that the server is set up to deny explicit uploads that are too large. Think of times when you upload a file where there’s a maximum file size limit:

In most cases, there will be some validation in place to stop the error… if you’re seeing the “413 Request Entity Too Large” error, those validation efforts may not be as watertight as you think.
What You’ll Need to Resolve the “413 Request Entity Too Large” Error
Fixing this error is all about raising the maximum file size for the server in question. Once that’s out of the way, you shouldn’t see the error anymore.
As such, to fix the “413 Request Entity Too Large” error, you’ll need the following:
- Administrator access to your server.
- A suitable SFTP client (we’ve covered many of these in the past).
- The know-how to use SFTP — there’s a good guide to the basics on WordPress.org, and you won’t need more than that.
- A text editor, though there’s no need for anything too complex.
- A clean and current backup in case the worst happens.
As an aside, we mention SFTP throughout this article as opposed to FTP. In short, the former is more secure than the latter (hence the name). That said, while there are other differences you should investigate, the functionality remains the same for the vast majority of uses.
Also, it’s worth noting that the MyKinsta dashboard has plenty of functionality on hand to help you get onto your server. For example, each site displays SFTP connection information that’s easy to understand:
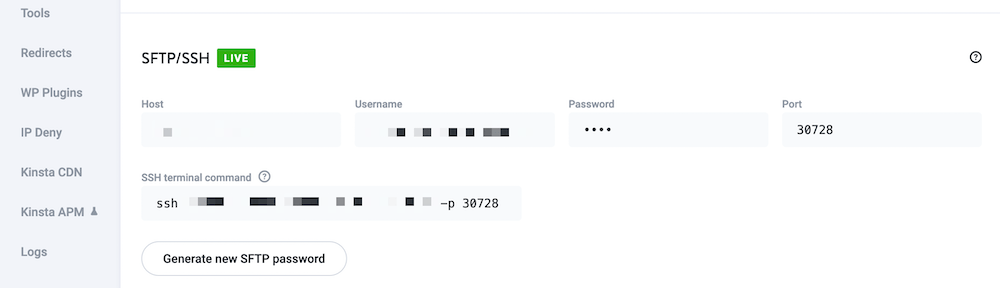
This can help you get into your site without fuss. In some cases, you may be able to import the credentials straight to your chosen SFTP client.
3 “Pre-Steps” You Can Take Before Rectifying the “413 Request Entity Too Large” Error
Before you crack open your toolbox, there are some steps you can take to help resolve the “413 Request Entity Too Large” error. Here are two — and each one may give you a welcome workaround to the error.
1. Try to Upload a Large File to Your Server Through SFTP
Because the issue is related to the file sizes hitting your server, it’s a good idea to circumvent the frontend interface and upload a large file to the server yourself. The best way to do this is through SFTP.
This is because protocols such as SFTP are almost as “close to the bone” as you can get with regards to the way you access your server. Also, you can simultaneously rule out any issues with the frontend that may be causing the error.
To do this, log into your site through SFTP and find the wp-content folder. In here will be the uploads folder.
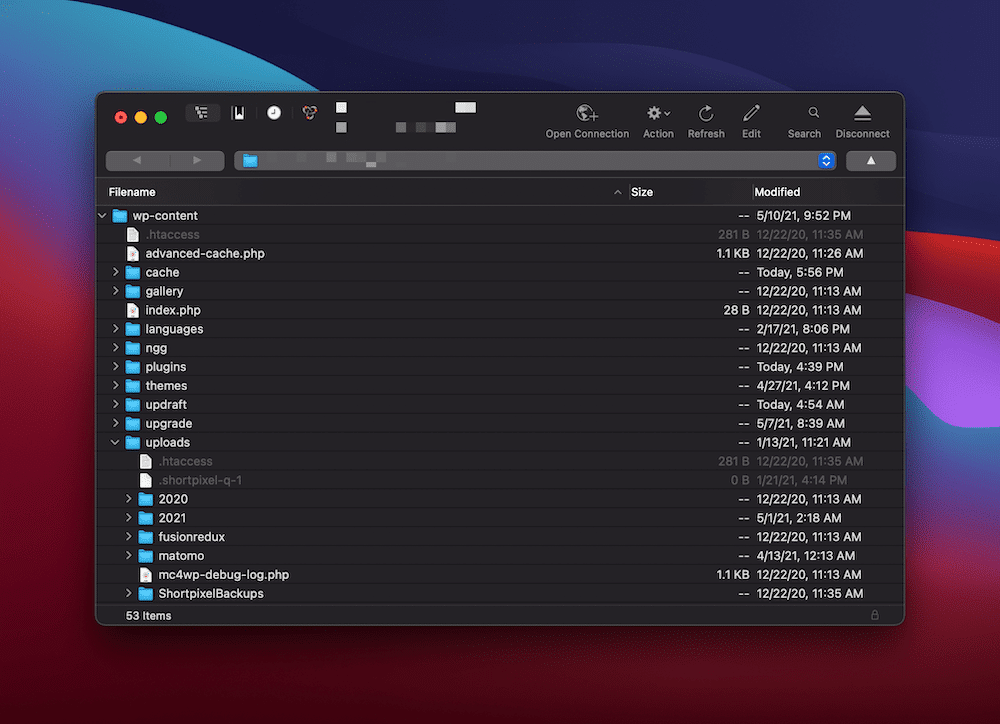
Next, upload your file to this folder on the server and see what the outcome is. If the upload is successful, we suggest sending an email to the site’s developer, as they may want to investigate the issue further on the frontend.
2. Check for Server Permissions Errors
Of course, permissions errors will stop any server request from running. As such, you should check whether the user has sufficient permissions to upload files of any size. Once this is sorted, the error should disappear.
The first step is to determine whether this is an issue with a single user (in which case they may be restricted for a reason). If the “413 Request Entity Too Large” error is happening for multiple users, you can be more sure of something that needs your input.
We’d suggest two “pre-fixes” here:
- Double-check your WordPress file permissions, just in case there’s an issue.
- Remove and re-create your SFTP user (a general investigation is a great idea).
While they may not solve the error in the first instance, you’ll at least know that your file and user structure is as it should be.
How to Solve the “413 Request Entity Too Large Error” for Your WordPress Website (3 Ways)
Once you’ve gone through the pre-steps, you’re ready to tackle the error head-on.
The following three methods are listed from easiest to toughest, with the understanding that that the path of least resistance is the best one to take.
1. Edit Your WordPress functions.php File
First off, you can work with your functions.php file to help bump up the file upload size for your site. To do this, first log into your site through SFTP using the credentials found within your hosting control panel.
When you’re in, you’ll want to look for the file itself. The functions.php file should be in the root of your server. In many cases, this root is called www or public_html, or it could be the abbreviated name of your site.
Once you’ve found it, you can open it in your text editor of choice. If you don’t see the file, you can create it using your text editor.
Once you have a file open, enter the following:
@ini_set( '_max_size' , '64M' );
@ini_set( 'post_max_size', '64M');
@ini_set( 'max_execution_time', '300' );
In short, this increases the maximum file size of posts and uploads while boosting the time the server will spend trying to process the request. The numbers here could be anything you wish, but they should be large enough to make the error disappear. In practice, 64 MB is enough for all but the most heavy-duty of tasks.
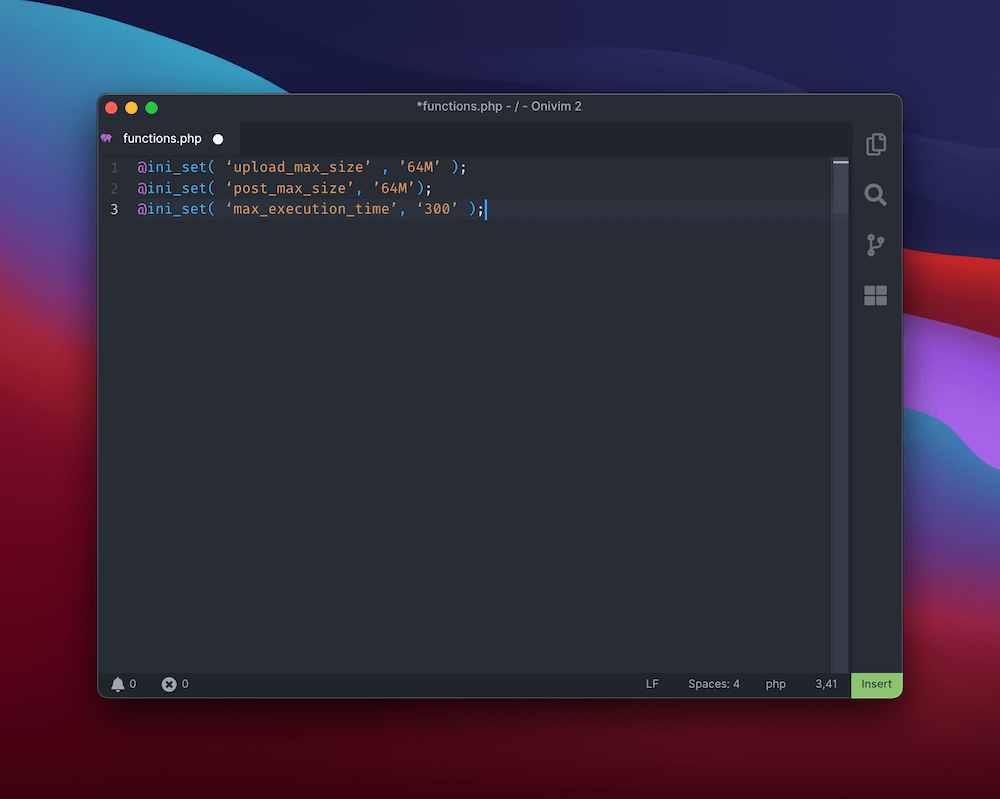
When you’re ready, save your file and upload it to the server again. Then, check whether the “413 Request Entity Too Large” error still exists. If it does, head onto the next method.
2. Modify Your WordPress .htaccess File
Much like your functions.php file, your .htaccess file sits on your server. The difference here is that .htaccess is a configuration file for Apache servers. If you’re a Kinsta customer, you’ll know we run Nginx servers, so you won’t see this file in your setup.
Still, for those with an Apache server, this is the approach you’ll need. Much like with the guidance for functions.php, first log into your server through SFTP, then look in your root folder as before.
The .htaccess file should be within this directory, but if it’s missing, we suggest you get in touch with your host to determine where it is, and whether your server runs on Nginx instead.
Once you’ve found it, open it up again. You’ll see some tags, and the most important here is # END WordPress. You’ll want to paste the following after this line:
php_value upload_max_filesize 64M
php_value post_max_size 64M
php_value max_execution_time 300
php_value max_input_time 300
In short, this does almost the same thing as the code you’d add to the functions.php file, but it’s akin to giving the server direct instructions.
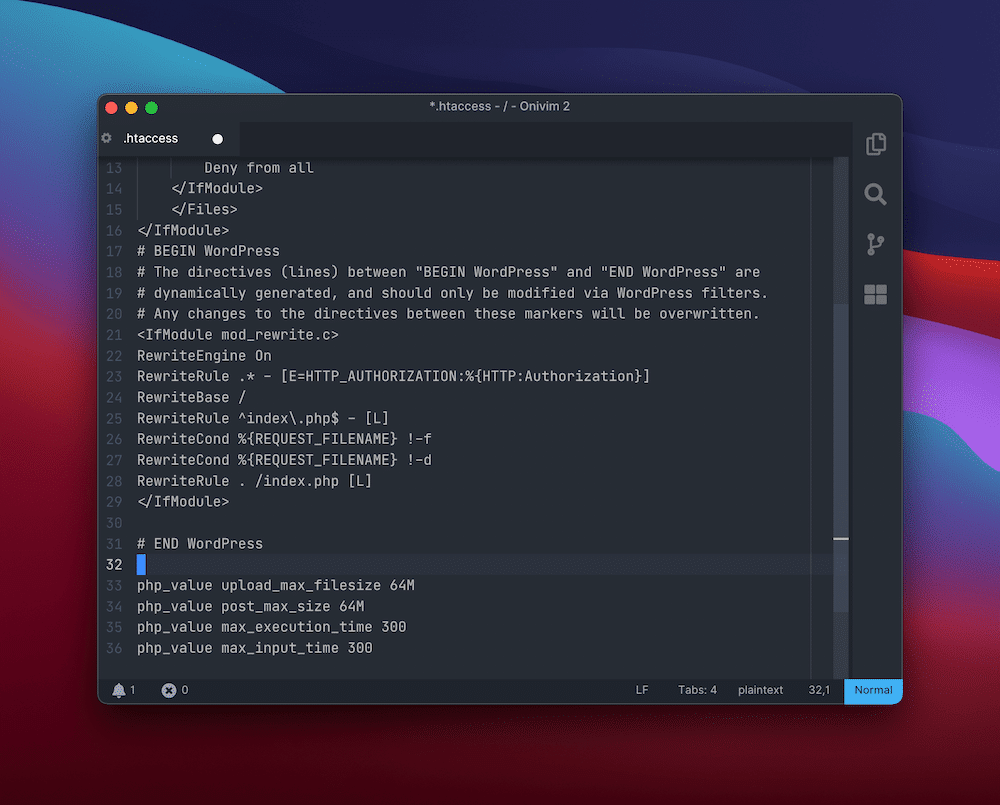
When you’ve finished, save your changes, upload the file, and check your site again. If you’re still having trouble, we’d again suggest contacting your host, as they will need to verify some aspects of your setup that lie beyond the scope of this article.
3. Change Your Nginx Server Configuration
Our final method is specific to Nginx servers — those used at Kinsta. The purpose is the same as when working with the .htaccess file, in that you’re talking to the server, rather than going through WordPress.
We mentioned that for Apache servers you’ll use .htaccess. For Nginx servers, though, you’ll want to find the nginx.conf file. Rather than walk you through every step in the chain, we’ve gone over the full details in our post on changing the WordPress maximum upload size.
Remember that you’ll need to also alter the php.ini file based on the changes you make to nginx.conf. We’ve covered that in the aforementioned blog post too, so take a look there for the exact steps.
Summary
Despite WordPress being a rock-solid platform, you’ll see a lot of different WordPress errors over time. The “413 Request Entity Too Large” error is related to your server, though — not WordPress. As such, there’s a different approach to solving this error than other platform-specific issues.
If you have SFTP skills, there’s no reason you can’t fix this error quickly. It relates to the upload size specified in your server configuration files, so digging into your .htaccess or nginx.config files will be necessary. It’s a breeze to crack open your text editor and make the changes to these files, and if you’re a Kinsta customer, we’re on hand to support you through the process.
Get all your applications, databases and WordPress sites online and under one roof. Our feature-packed, high-performance cloud platform includes:
- Easy setup and management in the MyKinsta dashboard
- 24/7 expert support
- The best Google Cloud Platform hardware and network, powered by Kubernetes for maximum scalability
- An enterprise-level Cloudflare integration for speed and security
- Global audience reach with up to 35 data centers and 275+ PoPs worldwide
Test it yourself with $20 off your first month of Application Hosting or Database Hosting. Explore our plans or talk to sales to find your best fit.
WordPress errors come in all shapes and sizes. In most cases they’re easy to decipher; such is the accessibility of WordPress’ error reporting. Even so, when the “413 Request Entity Too Large” error pops up, it can leave you scratching your head.
Without realizing it, you already have everything you need to understand and diagnose the error within its name. The good news is you won’t need more than a standard Secure File Transfer Protocol (SFTP) client and administrator access to your server.
In this post, we’ll take a look at how to solve the “413 Request Entity Too Large” error. We’ll also give you a quick list of steps to take before you begin to solve the error, to make the process super straightforward.
Check out our video guide to fixing the “413 Request Entity Too Large” Error
What the “413 Request Entity Too Large” Error Is (And Why It Exists)
We noted that there’s a clue in the error name as to what the solution and problem are. Before you go sleuthing yourself, though, we’ll spoil the surprise: it’s in the adjective “large.”
In a nutshell, the “413 Request Entity Too Large” error is a size issue. It happens when a client makes a request that’s too large for the end server to process. Depending on the nature of the error, the server could close the connection altogether to prevent further requests being made.
Let’s break the error down into its parts:
- “413”: This is one of the 4xx error codes, which mean there’s a problem between the server and browser.
- “Request Entity”: The “entity” in this case is the information payload being requested by the client from the server.
- “Too Large”: This is straightforward: the entity is bigger than the server is willing or able to serve.
In fact, this error has changed its name from what it originally was to be more specific and offer more clarity. It’s now known as the “413 Payload Too Large” error, although in practice, you’ll see the older name a lot more.
As for why the error occurs, the simple explanation is that the server is set up to deny explicit uploads that are too large. Think of times when you upload a file where there’s a maximum file size limit:
In most cases, there will be some validation in place to stop the error… if you’re seeing the “413 Request Entity Too Large” error, those validation efforts may not be as watertight as you think.
What You’ll Need to Resolve the “413 Request Entity Too Large” Error
Fixing this error is all about raising the maximum file size for the server in question. Once that’s out of the way, you shouldn’t see the error anymore.
As such, to fix the “413 Request Entity Too Large” error, you’ll need the following:
- Administrator access to your server.
- A suitable SFTP client (we’ve covered many of these in the past).
- The know-how to use SFTP — there’s a good guide to the basics on WordPress.org, and you won’t need more than that.
- A text editor, though there’s no need for anything too complex.
- A clean and current backup in case the worst happens.
As an aside, we mention SFTP throughout this article as opposed to FTP. In short, the former is more secure than the latter (hence the name). That said, while there are other differences you should investigate, the functionality remains the same for the vast majority of uses.
Also, it’s worth noting that the MyKinsta dashboard has plenty of functionality on hand to help you get onto your server. For example, each site displays SFTP connection information that’s easy to understand:
This can help you get into your site without fuss. In some cases, you may be able to import the credentials straight to your chosen SFTP client.
3 “Pre-Steps” You Can Take Before Rectifying the “413 Request Entity Too Large” Error
Before you crack open your toolbox, there are some steps you can take to help resolve the “413 Request Entity Too Large” error. Here are two — and each one may give you a welcome workaround to the error.
1. Try to Upload a Large File to Your Server Through SFTP
Because the issue is related to the file sizes hitting your server, it’s a good idea to circumvent the frontend interface and upload a large file to the server yourself. The best way to do this is through SFTP.
This is because protocols such as SFTP are almost as “close to the bone” as you can get with regards to the way you access your server. Also, you can simultaneously rule out any issues with the frontend that may be causing the error.
To do this, log into your site through SFTP and find the wp-content folder. In here will be the uploads folder.
Next, upload your file to this folder on the server and see what the outcome is. If the upload is successful, we suggest sending an email to the site’s developer, as they may want to investigate the issue further on the frontend.
2. Check for Server Permissions Errors
Of course, permissions errors will stop any server request from running. As such, you should check whether the user has sufficient permissions to upload files of any size. Once this is sorted, the error should disappear.
The first step is to determine whether this is an issue with a single user (in which case they may be restricted for a reason). If the “413 Request Entity Too Large” error is happening for multiple users, you can be more sure of something that needs your input.
We’d suggest two “pre-fixes” here:
- Double-check your WordPress file permissions, just in case there’s an issue.
- Remove and re-create your SFTP user (a general investigation is a great idea).
While they may not solve the error in the first instance, you’ll at least know that your file and user structure is as it should be.
How to Solve the “413 Request Entity Too Large Error” for Your WordPress Website (3 Ways)
Once you’ve gone through the pre-steps, you’re ready to tackle the error head-on.
The following three methods are listed from easiest to toughest, with the understanding that that the path of least resistance is the best one to take.
1. Edit Your WordPress functions.php File
First off, you can work with your functions.php file to help bump up the file upload size for your site. To do this, first log into your site through SFTP using the credentials found within your hosting control panel.
When you’re in, you’ll want to look for the file itself. The functions.php file should be in the root of your server. In many cases, this root is called www or public_html, or it could be the abbreviated name of your site.
Once you’ve found it, you can open it in your text editor of choice. If you don’t see the file, you can create it using your text editor.
Once you have a file open, enter the following:
@ini_set( '_max_size' , '64M' );
@ini_set( 'post_max_size', '64M');
@ini_set( 'max_execution_time', '300' );
In short, this increases the maximum file size of posts and uploads while boosting the time the server will spend trying to process the request. The numbers here could be anything you wish, but they should be large enough to make the error disappear. In practice, 64 MB is enough for all but the most heavy-duty of tasks.
When you’re ready, save your file and upload it to the server again. Then, check whether the “413 Request Entity Too Large” error still exists. If it does, head onto the next method.
2. Modify Your WordPress .htaccess File
Much like your functions.php file, your .htaccess file sits on your server. The difference here is that .htaccess is a configuration file for Apache servers. If you’re a Kinsta customer, you’ll know we run Nginx servers, so you won’t see this file in your setup.
Still, for those with an Apache server, this is the approach you’ll need. Much like with the guidance for functions.php, first log into your server through SFTP, then look in your root folder as before.
The .htaccess file should be within this directory, but if it’s missing, we suggest you get in touch with your host to determine where it is, and whether your server runs on Nginx instead.
Once you’ve found it, open it up again. You’ll see some tags, and the most important here is # END WordPress. You’ll want to paste the following after this line:
php_value upload_max_filesize 64M
php_value post_max_size 64M
php_value max_execution_time 300
php_value max_input_time 300
In short, this does almost the same thing as the code you’d add to the functions.php file, but it’s akin to giving the server direct instructions.
When you’ve finished, save your changes, upload the file, and check your site again. If you’re still having trouble, we’d again suggest contacting your host, as they will need to verify some aspects of your setup that lie beyond the scope of this article.
3. Change Your Nginx Server Configuration
Our final method is specific to Nginx servers — those used at Kinsta. The purpose is the same as when working with the .htaccess file, in that you’re talking to the server, rather than going through WordPress.
We mentioned that for Apache servers you’ll use .htaccess. For Nginx servers, though, you’ll want to find the nginx.conf file. Rather than walk you through every step in the chain, we’ve gone over the full details in our post on changing the WordPress maximum upload size.
Remember that you’ll need to also alter the php.ini file based on the changes you make to nginx.conf. We’ve covered that in the aforementioned blog post too, so take a look there for the exact steps.
Summary
Despite WordPress being a rock-solid platform, you’ll see a lot of different WordPress errors over time. The “413 Request Entity Too Large” error is related to your server, though — not WordPress. As such, there’s a different approach to solving this error than other platform-specific issues.
If you have SFTP skills, there’s no reason you can’t fix this error quickly. It relates to the upload size specified in your server configuration files, so digging into your .htaccess or nginx.config files will be necessary. It’s a breeze to crack open your text editor and make the changes to these files, and if you’re a Kinsta customer, we’re on hand to support you through the process.
Get all your applications, databases and WordPress sites online and under one roof. Our feature-packed, high-performance cloud platform includes:
- Easy setup and management in the MyKinsta dashboard
- 24/7 expert support
- The best Google Cloud Platform hardware and network, powered by Kubernetes for maximum scalability
- An enterprise-level Cloudflare integration for speed and security
- Global audience reach with up to 35 data centers and 275+ PoPs worldwide
Test it yourself with $20 off your first month of Application Hosting or Database Hosting. Explore our plans or talk to sales to find your best fit.
В редких случаях, но бывает, что во время загрузки больших файлов на веб-сайт возникает ошибка, которую возвращает веб-сервер Nginx — 413 Request Entity Too Large. Ошибка появляется, при попытке загрузить на сервер слишком большой файл чем это разрешено на сервере. Дальше рассмотрим описание ошибки 413 Request Entity Too Large а также методы её исправления на стороне веб-сервера Nginx.
Что означает ошибка 413
Ошибка 413 или Request Entity Too Large расшифровывается как «объект запроса слишком велик» или простыми словами объем передаваемых данных слишком большой. Ошибка возвращается в случае, если сервер не может обработать запрос по причине слишком большого размера тела запроса (или большого файла). Снимок экрана с ошибкой изображен ниже:
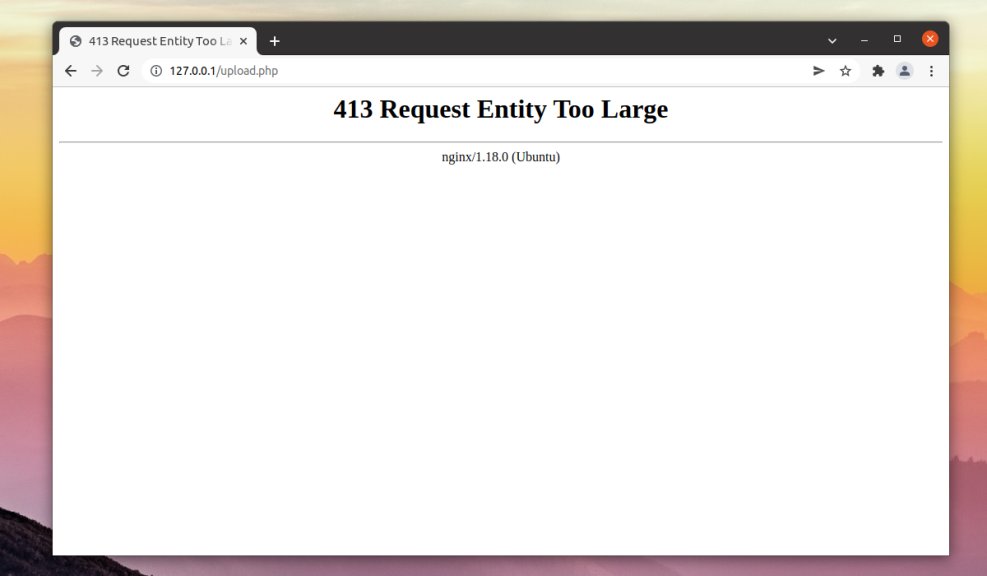
По умолчанию в Nginx установлен лимит на размер тела запроса который равен 1 МБ. Если запрос превышает установленное значение, вы увидите ошибку 413 Request Entity Too Large.
Как исправить
Для исправления ошибки 413 следует увеличить допустимый лимит. Увеличить размер тела запроса и соответственно, загружаемых файлов, можно путем использования client_max_body_size. Опциюя доступна для использования в директивах http, server или location в конфигурационном файле /etc/nginx/nginx.conf или в конфигурационном файле веб-сайта.
Откройте конфигурационный файл nginx.conf при помощи любого текстового редактора:
$ sudo nano /etc/nginx/nginx.conf
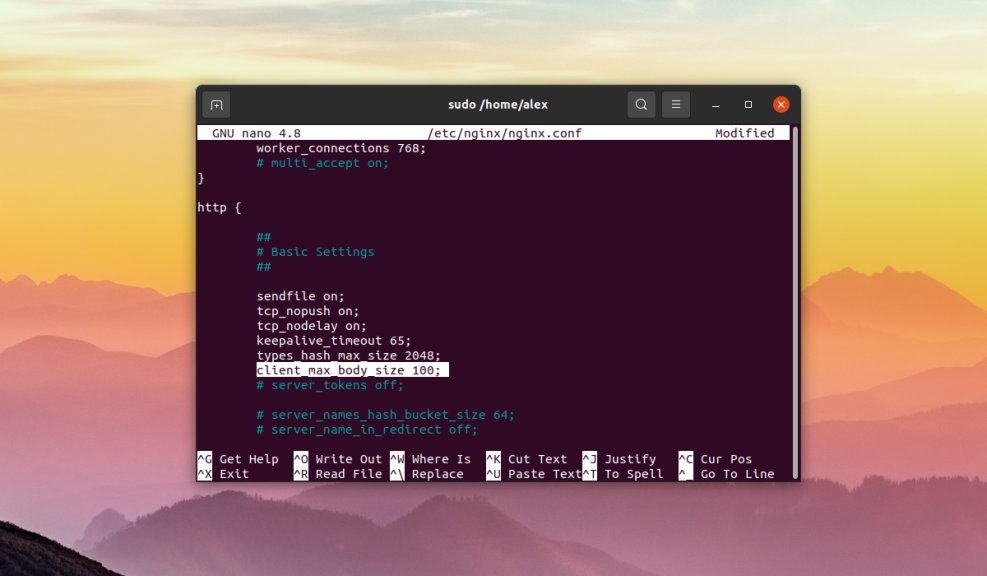
Вписываем строчку в секцию http:
$ client_max_body_size 100M
100 — максимальный размер файла в мегабайтах который можно загрузить на веб-сайт, в данном случае — 100 мегабайт. Если в распоряжении имеется несколько веб-сайтов и необходимо ограничить загрузку на все сайты сразу, то строку client_max_body_size необходимо вписываем в раздел блока http. Если ограничение на загрузку необходимо выставить только для конкретного сайта, то строку client_max_body_size необходимо добавить в блок server конфигурационного файла сайта, который по умолчанию находиться в /etc/nginx/sites-available/имя_файла_с_конфигурацией:
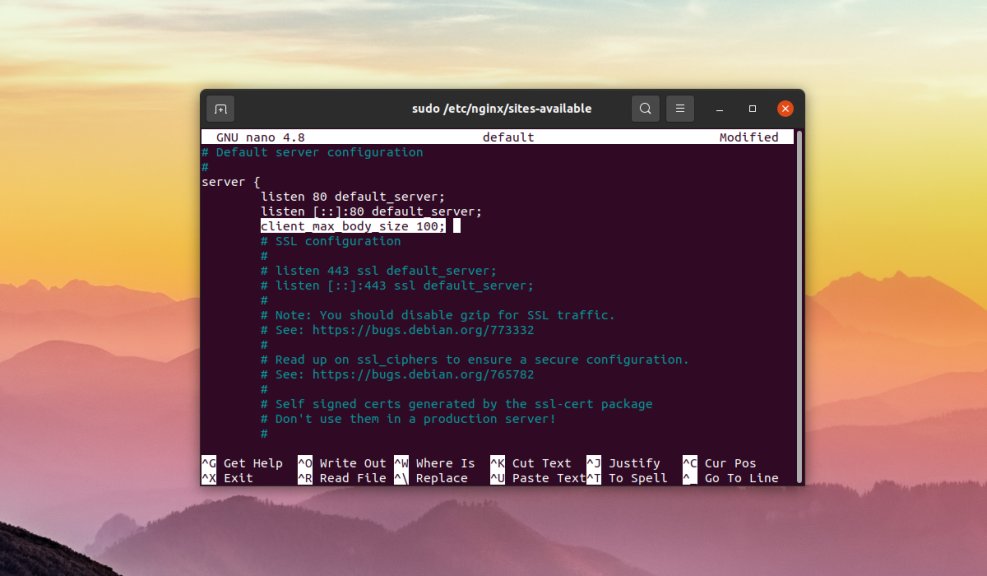
Когда ограничение на загрузку необходимо выставить только для конкретного раздела на сайте, строку client_max_body_size необходимо вписать в директиву location конфигурационного файла сайта, который по умолчанию находиться в /etc/nginx/sites-available/имя_файла_с_конфигурацией:
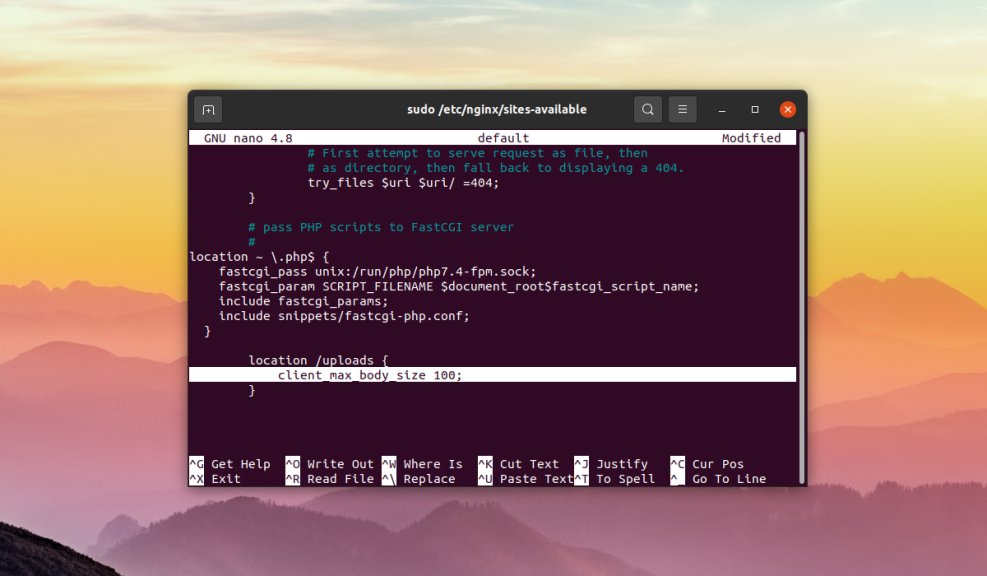
Как только были внесены изменения в конфигурационные файлы, сохраните их, закройте текстовый редактор и проверьте синтаксис конфигурационных файлов на наличие ошибок при помощи команды:
$ sudo nginx -t
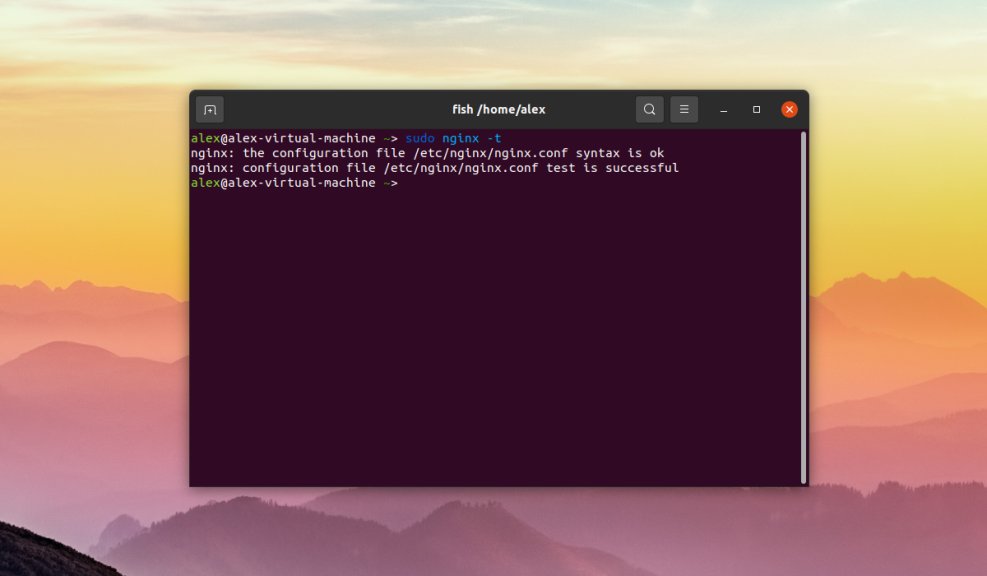
Вы можете увидеть следующие строки:
nginx: the configuration file /etc/nginx/nginx.conf syntax is ok
nginx: configuration file /etc/nginx/nginx.conf test is successful
Это означает что ошибок нет. В противном случае будет выведено описание ошибки, имя файла в котором найдена ошибка и номер строки. После внесения любых изменений в конфигурационные файлы Nginx их необходимо перезапустить при помощи команды:
$ sudo systemctl reload nginx
В этой статье рассмотрена ошибка в Nginx, известная 413 Request Entity Too Large, возникающая при загрузке больших файлов на веб-сайт. Помимо описания самой ошибки также было описаны шаги по устранению ошибки путем редактирования конфигурационных файлов Nginx.
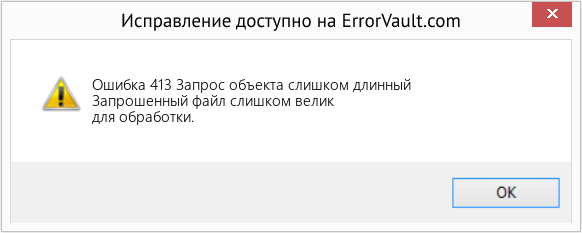
В этой статье представлен номер ошибки Ошибка 413, широко известный как Запрос объекта слишком длинный, описанный как Запрошенный файл слишком велик для обработки.
О кодах состояния
Когда вы получаете коды веб-ошибок, у вас могут быть проблемы либо с клиентом, либо с сервером. Проблема может быть связана с браузером или настройками, которые блокируют ваше соединение, или это могут быть любые другие проблемы, связанные с сервером, к которому вы пытаетесь получить доступ.
Чтобы объяснить проблему подробнее, вот несколько полезных сведений о кодах веб-ошибок, их симптомах, причинах и методах устранения.
Определения (Бета)
Здесь мы приводим некоторые определения слов, содержащихся в вашей ошибке, в попытке помочь вам понять вашу проблему. Эта работа продолжается, поэтому иногда мы можем неправильно определить слово, так что не стесняйтесь пропустить этот раздел!
- Сущность . В информатике сущность — это объект, который имеет идентичность и может быть однозначно определен, содержит сохраняемую информацию или может быть обработан.
- Файл — блок произвольной информации или ресурс для хранения информации, доступный по строковому имени или пути.
- Процесс — этот тег относится к процессам операционной системы.
- Запрос — запрос — это сообщение, отправленное источником другому объекту.
- Длинное — длинное целое число — это целое число, обычно в два раза больше стандартного целого.
Симптомы Ошибка 413 — Запрос объекта слишком длинный
Коды веб-ошибок также известны как коды состояния http. Существует пять различных классов кодов состояния http, и они всегда начинаются со следующих цифр, в зависимости от того, с какой ошибкой столкнулся пользователь. Это также симптомы ошибки, с которой столкнулся пользователь. Для дальнейшего объяснения ниже приведены коды состояния.
4xx: Ошибка клиента
Эта ошибка отправляется обратно пользователю, если это ошибка на стороне клиента. Пользователь получает уведомления о плохом запросе, о том, что содержимое не найдено, о несанкционированном доступе к содержимому или что-то в этом роде.
400 — Плохой запрос
401 — Неавторизованный доступ
402 — Требуется оплата
403 — Запрещено
404 — Не найдено
405 — Метод не разрешен
406 — Не принято
407 — Требуется прокси-аутентификация
408 — Таймаут запроса
409 — Конфликт
410 — Пропал
411 — Требуется длина
412 — Предварительное условие не выполнено
413 — Request Entity Too Large
414 — Request-URI Too Long
415 — Неподдерживаемый тип носителя
416 — Диапазон запроса не удовлетворен
417 — Ожидание не выполнено
(Только для примера)
Причины Запрос объекта слишком длинный — Ошибка 413
Коды 4XX возникают по вине пользователя или настроек со стороны пользователя. Запрос не был понят сервером из-за неправильного ввода адресной строки, неправильного синтаксиса, нестабильного соединения или ошибочной ОС.
Методы устранения
Для определенных кодов веб-ошибок существуют конкретные шаги по устранению неполадок. Однако существуют и обобщенные методы устранения, которые пользователи могут применять при возникновении подобных ошибок.
Если метод ремонта вам подошел, пожалуйста, нажмите кнопку upvote слева от ответа, это позволит другим пользователям узнать, какой метод ремонта на данный момент работает лучше всего.
Обратите внимание: ни ErrorVault.com, ни его авторы не несут ответственности за результаты действий, предпринятых при использовании любого из методов ремонта, перечисленных на этой странице — вы выполняете эти шаги на свой страх и риск.
Метод 1 — Очистить кеш браузера
При доступе к сайту данные сохраняются в кеше браузера. Иногда вы пытаетесь исправить веб-ошибку, но в вашем браузере появляется такое же сообщение. В таких случаях вам необходимо очистить кеш браузера, чтобы избавиться от надоедливого сообщения. Вот способы сделать это в разных браузерах:
- В Google Chrome
- Откройте Chrome и нажмите три точки в правом верхнем углу браузера.
- Нажмите Дополнительные инструменты , а затем нажмите Очистить данные просмотра .
- Вы можете удалить все или только определенный период просмотра.
- Установите флажки рядом с файлами cookie и другими данными сайта и кэшированными изображениями и файлами .
- Наконец, нажмите Очистить данные .
- На краю
- Нажмите … это крайняя правая кнопка под кнопкой закрытия.
- Прокрутите вниз и нажмите «Настройки».
- Найдите пункт «Очистить данные просмотра» и нажмите кнопку «Выбрать, что очистить».
- Это даст вам возможность выбрать, какой тип данных вы хотите очистить, просто поставьте галочку на тех элементах, которые хотите включить, затем нажмите «Очистить».
- В Mozilla
- Перейдите в меню «История» и выберите «Очистить недавнюю историю».
- Вы можете нажать кнопку Alt, если строка меню скрыта.
- Вы увидите раскрывающееся меню, в котором вы можете выбрать период или диапазон, который хотите удалить, и щелкните свой выбор.
- Вы можете нажать «Подробности», чтобы выбрать, что нужно очистить, будь то весь кеш или другие элементы.
- После выбора нажмите «Очистить сейчас» и перезагрузите браузер, чтобы изменения вступили в силу.
Метод 5 — Удалить расширения
- Иногда дополнительные расширения могут выдавать коды веб-ошибок.
- Удалите недавно установленные расширения, зайдя в настройки браузера и нажав «Дополнительные инструменты».
- Вы увидите расширения, которые не были установлены в вашем браузере, выберите последнее дополнение, которое, как вы подозреваете, вызвало возникшую у вас проблему.
Метод 2 — Проверить журналы
- Если вы хотите проверить файлы журналов, вы можете сделать это, сначала убедившись, что вы вошли на компьютер веб-сервера как администратор.
- Нажмите «Пуск», затем «Настройка», затем нажмите «Панель управления».
- Откройте Инструменты администратора и дважды щелкните Диспетчер служб Интернета.
- Выберите веб-сайт из списка различных обслуживаемых сайтов.
- Щелкните веб-сайт правой кнопкой мыши и затем наведите указатель мыши на «Свойства».
- Выберите вкладку «Веб-сайт» и нажмите «Свойства». На нем вы увидите вкладку Общие свойства. Внизу окна вы можете увидеть расположение сгенерированных файлов журнала.
- Открывайте файлы журналов с помощью WordPad, любого средства просмотра текстовых файлов или Microsoft Word.
- Здесь вы сможете проанализировать, где возникли ошибки при доступе к серверу.
Метод 3 — Проверить запрошенный URL
- Бывают случаи, когда вы вручную вводите URL-адрес сайта, который хотите изучить. Если после этого вы получаете ошибки, проверьте URL-адрес, который вы только что ввели в адресной строке, если вы действительно получаете доступ к правильному адресу. Если нет, исправьте элементы, которые вы ввели неправильно.
Метод 4 — Удалить последние обновления
Для Windows 7
- Найдите обновления Windows в строке поиска.
- Нажмите «Ввод», когда он появится в результатах поиска.
- Проверьте последние обновления и нажмите Удалить обновления в те дни, когда возникла ошибка.
Для Windows 8 и Windows 10
- Нажмите одновременно кнопку окна и букву X, чтобы открыть настройки.
- Когда вы перейдете к настройкам Windows, нажмите «Обновление и безопасность».
- Нажмите «Просмотреть историю установленных обновлений», а затем «Удалить обновления».
Метод 6 — Проверить конфигурацию сервера
- Устранением неполадок обычно занимается администратор сайта. Если это вы, то вам необходимо иметь представление о конфигурации веб-сервера.
- Вы можете проверить, на каком веб-сервере работает ваш сайт, с помощью средств проверки URL или домена. Вам просто нужно ввести адрес сайта и проанализировать результаты, которые вы получите.
- Вы также можете проверить неработающие ссылки, щелкнув веб-страницу правой кнопкой мыши и выбрав «Проверить». Это должно дать вам код сайта справа. Вы можете проверить каждый якорный текст и убедиться, что связанные с ними ссылки все еще активны.
Метод 7 — Другие техники
- Вы также можете проверить наличие нежелательных символов в кодах и сценариях с помощью отладки кодов приложений и сценариев. Если вы не знаете, как это сделать, вы можете проверить этот ресурс для этого.
- Вы также можете попробовать Обновить веб-сайт. Иногда вы получаете старую ошибку, которая никуда не делась, и простое обновление, нажав F5, может сработать.
Другие языки:
How to fix Error 413 (Request Entity Too Long) — The requested file was too large to process.
Wie beheben Fehler 413 (Anfrage Entität zu lang) — Die angeforderte Datei war zu groß für die Verarbeitung.
Come fissare Errore 413 (Richiesta Entità Troppo Long) — Il file richiesto era troppo grande per essere elaborato.
Hoe maak je Fout 413 (Verzoek Entiteit Te lang) — Het gevraagde bestand was te groot om te verwerken.
Comment réparer Erreur 413 (Entité de la demande trop longue) — Le fichier demandé était trop volumineux pour être traité.
어떻게 고치는 지 오류 413 (요청 항목이 너무 깁니다.) — 요청한 파일이 너무 커서 처리할 수 없습니다.
Como corrigir o Erro 413 (Solicitar Entidade Muito Longa) — O arquivo solicitado era muito grande para ser processado.
Hur man åtgärdar Fel 413 (Begäran Entitet för lång) — Den begärda filen var för stor för att behandlas.
Jak naprawić Błąd 413 (Żądanie Jednostki Zbyt długie) — Żądany plik był za duży do przetworzenia.
Cómo arreglar Error 413 (Solicitar entidad demasiado larga) — El archivo solicitado era demasiado grande para procesarlo.
 Об авторе: Фил Харт является участником сообщества Microsoft с 2010 года. С текущим количеством баллов более 100 000 он внес более 3000 ответов на форумах Microsoft Support и создал почти 200 новых справочных статей в Technet Wiki.
Следуйте за нами: 


Последнее обновление:
22/08/22 10:01 : Пользователь Mac OS X проголосовал за то, что метод восстановления 1 работает для него.
Этот инструмент восстановления может устранить такие распространенные проблемы компьютера, как синие экраны, сбои и замораживание, отсутствующие DLL-файлы, а также устранить повреждения от вредоносных программ/вирусов и многое другое путем замены поврежденных и отсутствующих системных файлов.
ШАГ 1:
Нажмите здесь, чтобы скачать и установите средство восстановления Windows.
ШАГ 2:
Нажмите на Start Scan и позвольте ему проанализировать ваше устройство.
ШАГ 3:
Нажмите на Repair All, чтобы устранить все обнаруженные проблемы.
СКАЧАТЬ СЕЙЧАС
Совместимость

Требования
1 Ghz CPU, 512 MB RAM, 40 GB HDD
Эта загрузка предлагает неограниченное бесплатное сканирование ПК с Windows. Полное восстановление системы начинается от $19,95.
ID статьи: ACX01632RU
Применяется к: Windows 10, Windows 8.1, Windows 7, Windows Vista, Windows XP, Windows 2000
Ошибки в алфавитном порядке: A B C D E F G H I J K L M N O P Q R S T U V W X Y Z
Логотипы Microsoft и Windows® являются зарегистрированными торговыми марками Microsoft. Отказ от ответственности: ErrorVault.com не связан с Microsoft и не заявляет о такой связи. Эта страница может содержать определения из https://stackoverflow.com/tags по лицензии CC-BY-SA. Информация на этой странице представлена исключительно в информационных целях. © Copyright 2018
Is your website showing a 413 request entity too large error? We are here to help you.
The 413 error simply means that the browser request was too large for the webserver to process.
Again, the fix for 413 request entity too large error involves modifying the size of the request body that the server accepts.
At Bobcares, we manage web servers for our customers as part of our Server Management Services.
Today, we’ll see how our Expert Engineers fix 413 errors in popular webservers like Apache, Nginx, and IIS.
Common scenarios of 413 request entity too large error
Let’s first have a quick look at the common scenarios that show the 413 error.
In general, most users experience the error while trying to upload files to the server.
For instance, in WordPress, it can happen during a theme or a plugin file upload using the WordPress dashboard. Or when a visitor tries to upload a large file, the error shows up as:

Similarly, the same error can appear while trying to restore a large WordPress backup too.
In a recent Helpdesk request, the customer reported the error as:
The upload page on my website shows the request entity is too large error. A reload will always fix it. Any clue how to prevent that issue?
What exactly causes a 413 error?
Now that we know the various scenarios of the error, we’ll see the reason for the error.
The 413 request entity too large error happens when the browser requests a very large file that the webserver cannot process. In other words, it means that the client’s HTTP request is too large for the server to handle.
For security reasons, every web server limits the size of the client request. This helps to avoid any resource abuse on the server.
For example, when any visitor tries to request a big file, it can even slow down the entire server. In many attacks, overloading the server with huge sized requests is a common method. When the request body is larger than the server allowed limit, it ends up in the 413 error.

How we fix 413 request entity too large error
The fix for 413 request entity too large error is to increase the maximum request size that a web server can process. This again varies depending on the type of web server that the website uses.
Having a decade of experience in managing various servers, let’s see how our Dedicated Engineers fix this error in different web servers.
In IIS web server
To resolve the 413 error in IIS, we increase the value of the “uploadReadAheadSize” parameter. This value determines the number of bytes that IIS will read to run the respective IIS module.
The steps for modifying applicationHost.config on an IIS7 web server are:
- In IIS7, select the website.
- Then go to the “Configuration Editor“, in the drop-down menu, select “system.webServer“
- Select “serverRuntime“.
- Find “uploadReadAheadSize” and increase its value.
- Finally, click Apply.
Solution for 413 request entity too large error in Apache
Similarly, when the website runs on an Apache webserver, we edit the value of LimitRequestBody in the configuration.
Based on the setting, we modify it in either the httpd.conf file or in a local .htaccess file inside the website.
To restrict the Apache requests beyond 50MB, we set the value as:
LimitRequestBody 52428800Then we do a config test, followed by a server reload.
service apache2 reload
Now the new value will be effective and the upload works fine.
Setting a value of 0 will allow any client request. But for security reasons, we never recommend it.
For Nginx webserver
Similarly, one of our customers came with a similar request on his Nginx server.
I have done a silly thing on my WordPress site and I need to reinstall my backup. However, I am getting an error message when I try to restore the site. The server responded with a “413 Request Entity Too Large”, please make sure that the server is not blocking our requests.
Here, we modified the value of the client_body_max_size directive in the Nginx configuration.
We opened the file at /usr/local/nginx/conf/nginx.conf and then modify the value as
# set client body size to 50M #
client_max_body_size 50M;
Then we restarted the Nginx server. This fixed the 413 Request Entity Too Large error.
Cross-checking PHP limits
In some cases, even if the webserver allows the client request size, often PHP limits on the website can throw up errors. Therefore, our Dedicated Engineers always cross verify the server limits for
- upload_max_filesize
- post_max_size
- max_execution_time
And, we modify the values either using .htaccess file or php.ini file depending on the website settings.
[Looking for a fix for a 413 error on your website. We are here to help you.]
Conclusion
To sum up, the 413 Request Entity Too Large error occurs when the client browser request is too large for the webserver to handle. Today, we saw how our Support Engineers modify the value of HTTP request size limit in IIS, Apache, and Nginx.
PREVENT YOUR SERVER FROM CRASHING!
Never again lose customers to poor server speed! Let us help you.
Our server experts will monitor & maintain your server 24/7 so that it remains lightning fast and secure.
GET STARTED
var google_conversion_label = «owonCMyG5nEQ0aD71QM»;
При работе с Chrome или Edge вы можете столкнуться с ошибкой HTTP 413. Вы можете получить сообщение об ошибке, объект запроса слишком велик или ваш клиент выдал вместе с ним слишком большой запрос. Что это за ошибка и как ее исправить? Читайте дальше, чтобы узнать больше об этой ошибке.
Появляется код ошибки HTTP 413 вместе с сообщением об ошибке: Ваш клиент выдал слишком большой запрос. Как говорится в сообщении об ошибке, этот код ошибки появляется, когда размер запроса клиента превышает размер файла сервера. При попытке загрузить большой файл на веб-сервер может появиться эта ошибка, чтобы предупредить клиента об ограничении размера.
Почему появляется ошибка HTTP 413?
Ниже приведены возможные причины этой ошибки.
- Ограниченное пространство для хранения на веб-серверах:
Веб-серверы поставляются с ограничениями на объем памяти. Большие файлы, если они загружены на сервер, могут превысить разрешения на хранение сервера, а также перегрузить сервер. Размер загружаемого файла по умолчанию составляет 49 КБ (49152 байта). Следовательно, эта ошибка возникает, чтобы клиенты не загружали файлы большого размера на сервер. Приложение получает указанную выше ошибку, когда пользователь пытается загрузить файл размером более 49 КБ.
- Тело запроса не загружено предварительно:
Ошибка HTTP 413 возникает для сайтов SSL, когда тело запроса не загружается предварительно во время процесса установления связи SSL.
Чтобы предотвратить эту ошибку, вы можете уменьшить размер загружаемого файла, и эта ошибка будет исправлена. Но иногда вам также может потребоваться внести некоторые изменения на стороне сервера, чтобы изменить ограничение размера файла.
Как исправить ошибку HTTP 413?
Ниже приведены некоторые решения, которые вы можете использовать для исправления ошибки HTTP 413.
- Использование атрибута uploadReadAheadSize для увеличения размера файла на стороне сервера
- Использование параметра maxRequestEntityAllowed для увеличения размера файла на стороне сервера
- Использование атрибута MaxReceivedMessageSize для увеличения размера файла на стороне сервера
- Изменение файла PHP.ini для увеличения размера загрузки PHP
Давайте посмотрим, как применить эти решения.
1]Использование атрибута uploadReadAheadSize для увеличения размера файла на стороне сервера
Одно из первых решений, которое вы можете попробовать, — это увеличить ограничение размера загрузки на веб-серверах. Для этого используйте параметр uploadReadAheadSize в файлах applicationHost.config и web.config, чтобы управлять ограничением размера файла.
загрузитьReadAheadSize является необязательным атрибутом модуля. Он указывает количество байтов, которые веб-сервер будет считывать в буфер и передавать в расширение или модуль ISAPI. Это происходит один раз для каждого запроса клиента. Расширение или модуль ISAPI получает любые дополнительные данные непосредственно от клиента. Значение должно находиться в диапазоне от 0 до 2 147 483 647. Значение по умолчанию для этого параметра — 49 152.
Ниже приведены шаги для изменения значения параметра uploadReadAheadSize:
- Откройте диспетчер IIS.
- Выберите сайт.
- Дважды щелкните Редактор конфигурации.
- Выберите веб-сервер, а затем serverRuntime.
- Изменить uploadReadAheadSize
- Нажмите
2]Использование параметра maxRequestEntityAllowed для увеличения размера файла на стороне сервера
Еще один способ увеличить лимит размера файла на стороне сервера — изменить параметр maxRequestEntityAllowed. Этот параметр указывает максимально допустимое количество байтов в теле запроса.
Обратите внимание, что этот параметр был назван Аспмаксрекуестентититиаллоуедв версиях до IIS 7.0.
Вы можете изменить параметр maxRequestEntityAllowed с помощью appcmd. Для этого выполните следующие шаги.
appcmd set config/section:asp/maxRequestEntityAllowed:int
Переменная int представляет собой максимально допустимое количество байтов во всем теле запроса ASP. Значение по умолчанию — 200 000 байт.
3]Использование атрибута MaxReceivedMessageSize для увеличения размера файла на стороне сервера
Если вышеупомянутые решения не работают, вы можете попробовать изменить параметр MaxReceivedMessageSize, чтобы устранить ошибку HTTP 413.
Иногда вы можете получить следующую ошибку в дополнение к ошибке HTTP 413.
Превышена квота на максимальный размер входящих сообщений (65536). Чтобы увеличить квоту, используйте свойство MaxReceivedMessageSize соответствующего элемента привязки.
Как упоминалось в сообщении об ошибке, эта проблема возникает, когда размер файла запроса больше, чем MaxReceivedMessageSize для WCF.
Эту ошибку можно устранить, увеличив значение MaxReceivedMessageSize для веб-службы. Однако при внесении этих изменений может потребоваться изменить два разных параметра MaxReceivedMessageSize. Они заключаются в следующем.
- MaxReceivedMessageSize в System.ServiceModel.Configuration.BasicHttpBindingElement
- MaxReceivedMessageSize в System.ServiceModel.Channels.HttpTransportBindingElement
В таком случае, можешь попробовать следующие настройки:
- Конфигурация для увеличения MaxReceivedMessageSize в ServiceModel.Configuration.BasicHttpBindingElement
- Конфигурация для увеличения MaxReceivedMessageSize в ServiceModel.Channels.HttpTransportBindingElement
4]Изменение файла PHP.ini для увеличения размера загрузки PHP
Иногда вам может потребоваться устранить ошибку HTTP 413, изменив ограничение размера загрузки файла PHP. Ограничение размера загрузки по умолчанию на серверах составляет 2 МБ. Файл конфигурации PHP (php.ini) можно изменить для увеличения или даже уменьшения размера загружаемого файла. Вы можете найти этот файл конфигурации в разных местах в разных дистрибутивах Linux. Ниже указано расположение этого файла.
- Расположение в Cent, RHEL и Fedora: # vim /etc/php.ini
- Расположение в Debian и Ubuntu: #vim /etc/php/7.0/apache2/php.ini
В PHP можно увеличить размер загружаемого файла, изменив параметры upload_max_filesize (10M) и post_max_size (10M) в файле php.ini. Кроме того, вы можете контролировать максимально допустимое количество файлов, которые могут быть загружены в одном запросе, изменив параметр max_file_uploads. По умолчанию это ограничение равно 25.
Таким образом, измените значения следующих параметров:
- max_execution_time (максимальное время загрузки в секундах)
- upload_max_filesize (максимальный размер загружаемого файла в мегабайтах)
- post_max_size (максимальный размер сообщения в мегабайтах)
Вышеупомянутые решения могут помочь вам эффективно справиться с ошибкой HTTP 413. Дайте нам знать ваши отзывы об этих решениях.
Как исправить ошибку 413 в Chrome или Edge?
Теперь это ошибка на уровне сервера, и вы, как конечный пользователь, ничего не можете сделать, кроме как выполнить следующие предложения:
- Проверьте распространенные проблемы с браузером в Chrome: вы можете решить распространенные проблемы в Chrome, очистив данные браузера и очистив сокет.
- Сброс Chrome до заводских настроек. Иногда возврат к заводским настройкам решает многие проблемы. Попробуйте также это решение для устранения ошибки HTTP 413.
- Проверьте сетевой адаптер: сброс настроек сетевого адаптера также помогает устранить ошибку.
Если эти 3 решения не работают, обратитесь к администратору сервера или веб-сайта и сообщите ему или ей об этой ошибке.
Как вы справляетесь со слишком большой полезной нагрузкой 413?
Ошибка 413 Payload too big аналогична ошибке HTTP 413. Обе эти ошибки означают, что размер загружаемых файлов превышает разрешенный размер на серверах.
Jan 06, 2023
Richard B.
3min Read

Ever tried uploading a file to WordPress only to see the 413 Request Entity Too Large error pop up? Annoying, right? Well don’t worry, we have a solution! In this article, we will teach you how to fix the 413 Request Entity Too Large error in WordPress.
| Error code | 413 Request Entity Too Large |
| Error type | Client-side |
| Error variations | 413 Payload Too Large HTTP Status Code 413 |
| Error causes | Request too large PHP limits too low The page was not displayed because the request entity is too large. |

What Does 413 Request Entity Too Large Error Mean?
The 413 Request Entity Too Large error means that the client’s request is too large to be processed by the server. The 413 error commonly occurs when uploading a file larger than the set server limit.
Hosting providers tend to have specific configurations on their server for uploading media to WordPress, and in most cases, these default settings provide sufficient resources for your posts and uploads.
However, in certain cases, you might need to upload a file that exceeds the size limit, and you will unfortunately face the 413 error.
How to Fix 413 Request Entity Too Large Error in WordPress
Luckily, there are a few ways to fix this issue. We will teach you three different methods of how to deal with the error 413 on WordPress.
Important! Two of the methods deal with important WordPress files, so we strongly suggest you back up your files before starting any configuration.
1. Modifying the functions.php file
You can find the functions.php file in your WordPress themes folder. This file is often used to define ‘classes’ and ‘actions’ on your WordPress site. It can add features and functionality like enabling post thumbnails, post formats, and navigation menus.
To modify functions.php access your Hostinger Control Panel. Then, go to the File Manager under the Files section.
In the Hostinger File Manager, you will see three folders under the public_html folder. Click on the wp-content folder that will give you a list of files on the right side. Double click on themes folder to find the functions.php file. Make sure you choose the file of the theme you are currently using.
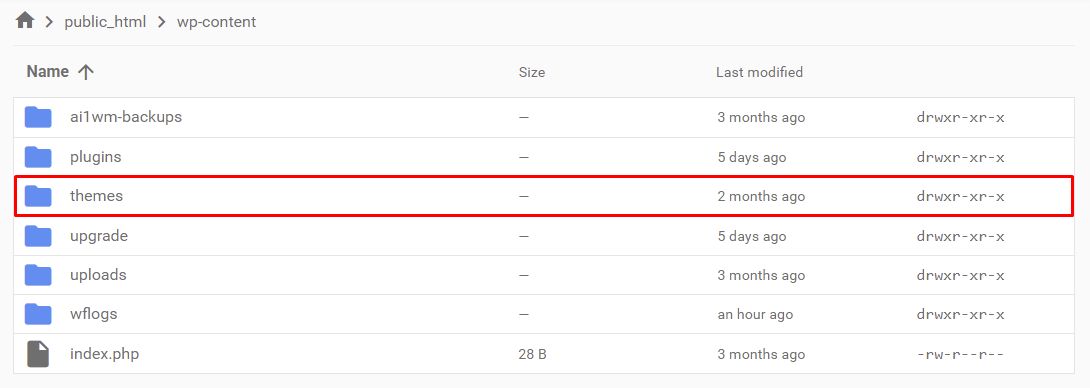
Double click the functions.php file and add the following code snippet. It will increase It will increase upload_max_size, post_max_size and max_execution_time values.
@ini_set( 'upload_max_size' , '256M' );
@ini_set( 'post_max_size', '256M');
@ini_set( 'max_execution_time', '300' );
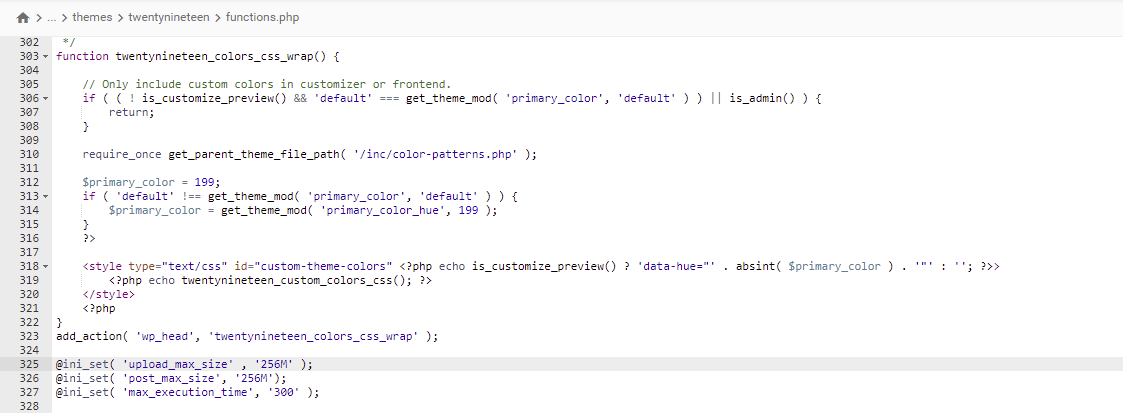
After you are finished, save the changes and try head back to WordPress admin area to test if you still get HTTP 413 error.
2. Modifying .htaccess file
The second method involves editing the .htaccess file, so be cautious not to make any unnecessary changes.
The .htaccess file is a configuration item which is read by the server. It can override server configuration settings for things like authorization, caching, or even optimization.
To reach the .htaccess file, you need to go to your public_html folder in your Hostinger control panel. On the right side, you will see the .htaccess file. Double click on it.
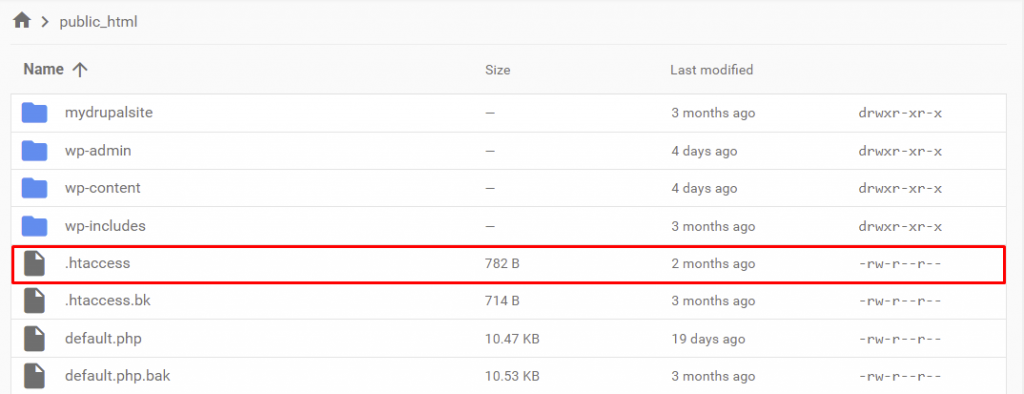
You will get a popup window where you can add in the code. Read through the lines, when you find # END WordPress at the end of the file, paste in the following code under it:
php_value upload_max_filesize 256M
php_value post_max_size 256M
php_value max_execution_time 600
php_value max_input_time 600
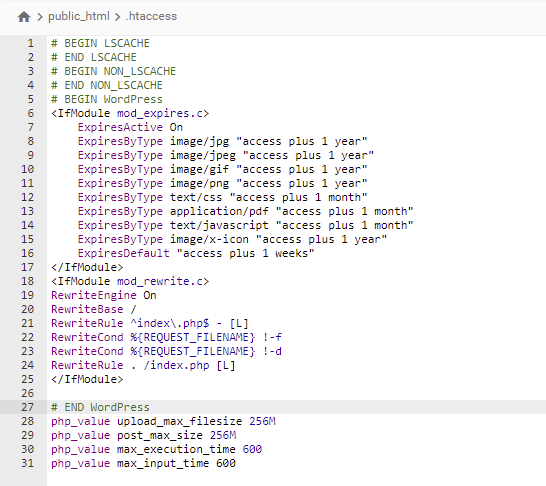
Make sure you save the modification and close the window. Go back to WordPress admin area and try upload a new.
3. Modifying Nginx Configuration
If you use a Hostinger VPS, you’ll get control over most of your server environment. We only reach basic server software (Apache or Nginx) in its default state. That means if you want to tweak more, you are free to revise it.
When the web server is set to restrict large file sizes, it can cause the 413 error request entity too large. Nginx has client_max_body_size to allow the maximum size of the client request body. If the request exceeds the value, an error message emerges. That means we need to reconfigure Nginx to allow the size we want for uploading files.
Reconfiguring nginx.conf will require a text editor. We recommend Vi text editor as it will handle the job perfectly.
Access your VPS via ssh and type the following command on your terminal to start editing with Vi:
vi /etc/nginx/nginx.conf
After that, you can add the following lines in nginx.conf as shown in the example below. It sets the maximum body size of a client request that the server allows. So, make sure you put the right number as your maximum size.
# set client body size to 8M #
client_max_body_size 8M;
Save and close the file. Then, you can reload the Nginx web server with this following command:
# nginx -s reload
Now you can go ahead and check if the error 413 is gone.
Conclusion
If you want to upload a file larger than allowed by your server, you will face the 413 Request Entity Too Large error in WordPress. In this tutorial, we overviewed 3 different methods to fix 413 error.

Richard is a WordPress software developer and an expert of content management systems. When he is not playing around with code, Richard enjoys good cinema and craft beer.