Этот документ относится к принтерам HP LaserJet Pro M203d, M203dn, M203dw и LaserJet Ultra M206dn.
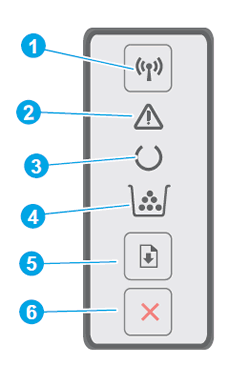
В следующих разделах описываются состояния ошибок, которые обозначаются мигающими индикаторами на панели управления принтера, а также предоставляются решения для каждой проблемы. Определите последовательность мигающих индикаторов на панели управления принтера, затем выполните действие по устранению той или иной проблемы.
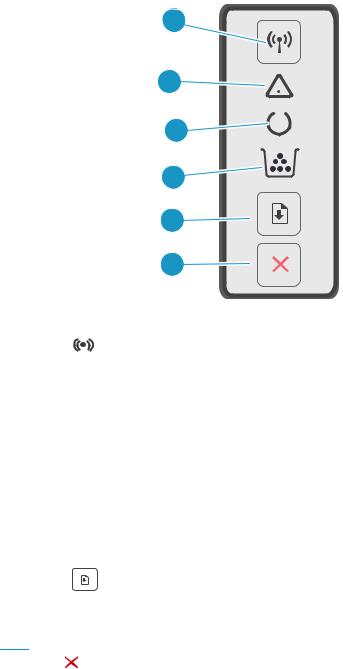
-
Индикатор и кнопка беспроводного подключения (только модели M203dw)
-
Индикатор предупреждения
-
Индикатор «Готовность»
-
Индикатор расходных материалов
-
Кнопка возобновления печати
-
Кнопка «Отмена»
Рис. : Кнопки, значки и индикаторы панели управления
Мигает индикатор беспроводной связи (только на моделях M203dw)
Индикатор беспроводной связи  мигает, если подключение настроено или если принтер не может найти беспроводной сигнал или не может подключиться к сети.
Шаг 1. Дождитесь, пока принтер установит подключение
Индикатор беспроводной связи мигает, когда принтер пытается подключиться к беспроводному маршрутизатору или точке доступа. Подождите несколько минут, затем снова проверьте световые индикаторы.
-
Если индикатор беспроводной связи горит не мигая, принтер подключен, можно прекратить процедуру устранения неполадок.
-
Если индикатор беспроводной связи все еще мигает, перейдите к следующему шагу.
Шаг 2. Проверка проблем, связанных с беспроводной сетью
Следующие факторы могут быть причиной потери беспроводного соединения принтера:
-
Сетевое подключение более неактивно, либо низкий уровень сигнала в сети.
-
Принтер переключается в спящий режим (или режим ожидания).
-
Принтер находится слишком далеко или слишком близко от беспроводного маршрутизатора. Рекомендованное расстояние между принтером и маршрутизатором – от 1,0 до 1,5 метров.
-
Брандмауэр препятствует обращению принтера к компьютеру и беспроводной сети.
-
Расположенное поблизости устройство, излучающее высокочастотные сигналы (например, микроволновая печь или беспроводной телефон), может создавать помехи беспроводному соединению.
-
Виртуальная частная сеть (VPN) препятствует обращению принтера к компьютеру и беспроводной сети.
После выполнения пунктов списка проверяйте индикатор беспроводной связи.
-
Если индикатор беспроводной связи горит не мигая, принтер подключен, можно прекратить процедуру устранения неполадок.
-
Если индикатор беспроводной связи все еще мигает, перейдите к следующему шагу.
Шаг 3. Подключите принтер к сети
Индикатор «Внимание» мигает
Индикатор «Внимание»  мигает, когда принтер находится в состоянии ошибки.
Рис. : Индикатор «Внимание» мигает

Мигает индикатор «Внимание», и на экране компьютера отображается сообщение «Передняя дверца открыта»
Это условие возникает, когда верхняя крышка открыта или не закрыта надлежащим образом. Чтобы устранить ошибку, откройте верхнюю крышку, затем полностью закройте ее.
Рис. : Закрытие верхней крышки

Мигает индикатор «Внимание», и на экране компьютера отображается сообщение «Закончилась бумага»
Это условие возникает, если входной лоток пуст. Для устранения этой ошибки загрузите бумагу во входной лоток. Дополнительные сведения о загрузке бумаги см. в разделе Загрузка бумаги и конвертов.
Индикатор «Внимание» мигает, и на экране компьютера отображается сообщение о замятии бумаги
Это условие возникает, когда бумага застряла внутри принтера. На экране компьютера появляется одно из следующих сообщений:
-
Замятие бумаги в термофиксаторе
-
Замятие бумаги в лотке
-
Замятие бумаги в выходном лотке
-
Замятие бумаги в модуле двусторонней печати
Найдите и извлеките любую замятую бумагу из принтера или перезагрузите принтер, если в принтере нет замятой бумаги. Дополнительные сведения об устранении проблем с замятой бумагой см. в разделе Отображается сообщение об ошибке «Замятие бумаги».
Мигает индикатор «Внимание», и на экране компьютера отображается сообщение «Неавторизованный тонер» или «Неавторизованный барабан»
Это условие возникает, когда картридж с тонером, барабан переноса изображений или оба эти компонента являются неавторизованными. Для устранения этой неполадки замените соответствующие расходные материалы.
Шаг 1. Замените картридж с тонером
Замените картридж с тонером на новый.
Выполните попытку печати. Если проблема не устранена, выполните следующее действие.
Шаг 2. Замените барабан переноса изображений
Замените барабан переноса изображений на новый.
Выполните попытку печати. Если проблема не устранена, выполните следующее действие.
Шаг 3. Отдайте принтер в сервисное обслуживание
Если вы выполнили все приведенные выше действия, но проблема сохранилась, перейдите к разделу Сервисное обслуживание принтера в конце этого документа.
Индикатор «Внимание» мигает, и на экране компьютера отображается сообщение «Несоответствие размера бумаги»
Это состояние возникает в том случае, если бумага, загруженная во входной лоток, не подходит для задания печати. Для устранения этой ошибки загрузите во входной лоток бумагу правильного размера или измените параметры печати.
Индикатор «Внимание» мигает после отправки задания двусторонней печати
Это условие возникает, если принтер обрабатывает задание двусторонней печати, осуществляемой вручную, и не может завершить задание печати до загрузки входного лотка. Для устранения этой ошибки загрузите во входной лоток бумагу правильного размера или измените параметры печати.
Чтобы завершить задание печати, извлеките стопку напечатанных листов из приемного лотка, затем загрузите стопку печатной стороной верх и верхним краем к принтеру.
Горит индикатор «Тонер»
Индикатор «Тонер»  постоянно горит, если истекает срок службы картриджа с тонером, барабана переноса изображений или обоих этих компонентов.
Рис. : Индикатор «Тонер» горит

Примечание.
После того, как истечет срок службы картриджа с тонером, заканчивается гарантия HP Premium Protection на этот картридж.
Это условие возникает, когда уровень картриджа с тонером, барабана переноса изображений или обоих этих компонентов очень низкий. Если качество печати является неприемлемым, замените картридж с тонером или барабан переноса изображений.
Шаг 1. Замените картридж с очень низким уровнем тонера
Замените картридж с тонером на новый.
Шаг 2. Замените барабан переноса изображений с очень низким уровнем службы
Замените барабан переноса изображений на новый.
Выполните попытку печати. Если проблема не устранена, выполните следующее действие.
Шаг 3. Отдайте принтер в сервисное обслуживание
Если вы выполнили все приведенные выше действия, но проблема сохранилась, перейдите к разделу Сервисное обслуживание принтера в конце этого документа.
Мигают индикаторы «Внимание» и «Тонер»
Индикатор «Внимание» и индикатор «Тонер» мигают, если принтер находится в состоянии ошибки.
Рис. : Мигают индикаторы «Внимание» и «Тонер»

Индикаторы «Внимание» и «Тонер» мигают, и на экране компьютера отображается сообщение «Отсутствует тонер» или «Отсутствует барабан»
Это условие возникает, когда картридж с тонером или барабан переноса изображений отсутствует или установлен неправильно. Для устранения этой проблемы правильно установите картридж с тонером или барабан переноса изображений.
Шаг 1. Осмотрите область картриджа с тонером
Откройте верхнюю крышку, затем проверьте картридж с тонером и барабан переноса изображений.
-
Если картридж с тонером, барабан переноса изображений или оба эти компонента отсутствуют, установите отсутствующие расходные материалы.
-
Если картридж с тонером и барабан переноса изображений установлены в принтере, возможно, они установлены неправильно. Извлеките картридж с тонером и барабан переноса изображений, затем снова установите их.
Дополнительные сведения об извлечении и повторной установки картриджа с тонером см. в разделе Замена картриджа с тонером.
Шаг 2. Отдайте принтер в сервисное обслуживание
Если вы выполнили все приведенные выше действия, но проблема сохранилась, перейдите к разделу Сервисное обслуживание принтера в конце этого документа.
Индикаторы «Внимание» и «Тонер» мигают, и на экране компьютера отображается сообщение «Установлен защищенный тонер HP» или «Установлен защищенный барабан HP»
Это состояние возникает, если картридж с тонером, барабан переноса изображений или оба эти компонента были защищены на другом принтере, то есть могут теперь быть установлены только на исходном принтере. Для устранения этой неполадки замените соответствующие расходные материалы.
Шаг 1. Замените картридж с тонером
Замените картридж с тонером на новый.
Выполните попытку печати. Если проблема не устранена, выполните следующее действие.
Шаг 2. Замените барабан переноса изображений
Замените барабан переноса изображений на новый.
Выполните попытку печати. Если проблема не устранена, выполните следующее действие.
Шаг 3. Отдайте принтер в сервисное обслуживание
Если вы выполнили все приведенные выше действия, но проблема сохранилась, перейдите к разделу Сервисное обслуживание принтера в конце этого документа.
Индикаторы «Внимание» и «Тонер» мигают, и на экране компьютера отображается сообщение «Несовместимый тонер» или «Несовместимый барабан»
Это условие возникает, когда картридж с тонером, барабан переноса изображений или оба эти компонента не совместимы с принтером. Для устранения этой неполадки замените соответствующие расходные материалы.
Шаг 1. Замените картридж с тонером
Замените картридж с тонером на новый.
Выполните попытку печати. Если проблема не устранена, выполните следующее действие.
Шаг 2. Замените барабан переноса изображений
Замените барабан переноса изображений на новый.
Выполните попытку печати. Если проблема не устранена, выполните следующее действие.
Шаг 3. Отдайте принтер в сервисное обслуживание
Если вы выполнили все приведенные выше действия, но проблема сохранилась, перейдите к разделу Сервисное обслуживание принтера в конце этого документа.
Индикаторы «Внимание» и «Тонер» мигают, и на экране компьютера отображается сообщение «Неавторизованный тонер» или «Неавторизованный барабан»
Это условие возникает, когда картридж с тонером, барабан переноса изображений или оба эти компонента являются неавторизованными. Для устранения этой неполадки замените соответствующие расходные материалы.
Шаг 1. Замените картридж с тонером
Замените картридж с тонером на новый.
Выполните попытку печати. Если проблема не устранена, выполните следующее действие.
Шаг 2. Замените барабан переноса изображений
Замените барабан переноса изображений на новый.
Выполните попытку печати. Если проблема не устранена, выполните следующее действие.
Шаг 3. Отдайте принтер в сервисное обслуживание
Если вы выполнили все приведенные выше действия, но проблема сохранилась, перейдите к разделу Сервисное обслуживание принтера в конце этого документа.
Индикаторы «Внимание» и «Тонер» мигают, и на экране компьютера отображается сообщение «Ошибка картриджа»
Это состояние возникает, если возникает проблема на датчике картриджа с тонером.
Замените картридж с тонером на новый.
Индикаторы «Внимание» и «Готовность» горят
Это условие возникает, если принтер находится в состоянии критической ошибки.
Рис. : Индикаторы «Внимание» и «Готовность» горят

Шаг 1. Перезапустите принтер
Перезапустите принтер, чтобы устранить ошибку принтера.
-
Включите принтер, если он еще не включен.
-
Прежде чем продолжить, дождитесь полной остановки каретки.
-
Если принтер включен, отсоедините кабель питания от разъема на задней панели принтера.
-
Отсоедините кабель питания от электрической розетки.
-
Подождите не менее 60 секунд.
-
Вставьте вилку кабеля питания в розетку.
Примечание.
Компания HP рекомендует напрямую подключать вилку кабеля питания принтера к настенной розетке.
-
Подсоедините кабель питания к разъему на задней панели принтера.
-
Включите принтер, если он не включается автоматически.
Для прогрева принтера может потребоваться некоторое время. В это время могут мигать индикаторы принтера, а каретка может перемещаться.
-
Перед выполнением следующего шага дождитесь завершения процедуры прогрева принтера и убедитесь в том, что принтер полностью остановился и не издает звуков.
Выполните попытку печати. Если проблема не устранена, выполните следующее действие.
Шаг 2. Подключите вилку кабеля питания принтера напрямую в электрическую розетку
Подключите вилку кабеля питания принтера в электрическую розетку и убедитесь, что источник питания исправен.
-
Отсоедините кабель питания от сетевых фильтров, удлинительных кабелей или фильтров бросков напряжения.
-
Вставьте вилку кабеля питания в розетку.
-
Включите принтер.
Выполните попытку печати. Если проблема не устранена, выполните следующее действие.
Шаг 3. Отдайте принтер в сервисное обслуживание
Если вы выполнили все приведенные выше действия, но проблема сохранилась, перейдите к разделу Сервисное обслуживание принтера в конце этого документа.
Все индикаторы отключены, принтер не отвечает
Такое случается, когда принтер выключен, или есть проблема блока питания.
Шаг 1. Включите принтер
Нажмите кнопку питания для включения принтера.
Если принтер не включается, перейдите к следующему шагу.
Шаг 2. Убедитесь, что принтер подключен
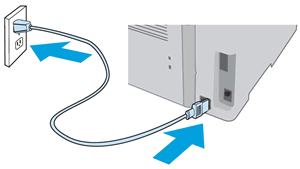
Убедитесь, что кабель питания подключен в разъем на задней панели принтера и к электрической розетке.
-
Убедитесь, что шнур питания надежно подсоединен к разъему питания на принтере, затем убедитесь, что шнур питания подсоединен к электрической розетке.
Рис. : Подсоединение шнура питания
-
Включите принтер.
Если принтер не включается, перейдите к следующему шагу.
Шаг 3. Подключите вилку кабеля питания принтера напрямую в электрическую розетку
При использовании сетевого фильтра, удлинительного кабеля или фильтра бросков напряжения подключите вилку кабеля питания принтера напрямую в электрическую розетку, чтобы проверить правильность работы источника питания.
-
Отсоедините кабель питания от сетевых фильтров, удлинительных кабелей или фильтров бросков напряжения.
-
Вставьте вилку кабеля питания в розетку.
-
Включите принтер.
Если принтер не включается, перейдите к следующему шагу.
Шаг 4. Убедитесь в том, что настенная розетка работает
Убедитесь, что розетка, к которой подключен принтер, работает.
-
Отсоедините кабель питания от электрической розетки.
-
Подключите к розетке другое устройство и проверьте, исправна ли розетка.
-
Если розетка электросети не работает, подключите принтер в другую исправную розетку.
-
Если розетка электросети работает, но принтер не включается, переходите к следующему шагу.
Шаг 5. Проверьте питание, используя совместимый кабель от другого принтера
Если у вас имеется кабель от другого устройства, совместимый с данным принтером, воспользуйтесь им и повторите действия по проверке питания.
-
Если принтер не включается при использовании другого шнура питания, переходите к следующему шагу по сервисному обслуживанию принтера.
-
Если принтер включается при использовании другого кабеля, это означает, что причина проблемы связана с первым кабелем. Обратитесь в HP для замены кабеля питания.
Нажмите ссылку Обращение в службу поддержки на этой странице, чтобы ознакомиться с дополнительными вариантами поддержки.
Шаг 6. Отдайте принтер в сервисное обслуживание
Если вы выполнили все приведенные выше действия, но проблема сохранилась, перейдите к разделу Сервисное обслуживание принтера в конце этого документа.
Отдайте принтер в сервисное обслуживание
Выполните сервисное обслуживание или замените устройство HP, если все предыдущие действия были выполнены.
Оплата за ремонт может взиматься для устройств с истекшим сроком гарантии.

Table 6-2
Control-panel light patterns (continued)
Light status
State of the printer
Action
The printer has experienced a bad code
signature.
Press Resume
to accept the signature, or press Cancel
to stop the upgrade.
The printer has canceled a bad code
signature upgrade.
Press Resume
to continue.
The printer has experienced an engine
cable error.
Press Resume
to continue.
If the error persists, contact HP customer support.
The printer has experienced a control-
panel cable error.
Press Resume
to continue.
If the error persists, contact HP customer support.
The Attention light is
blinking and the Toner
light is on.
The toner cartridge is very low.
Replace the toner cartridge.
The imaging drum is very low.
Replace the imaging drum.
Multiple supplies are low.
Replace the supplies.
The Toner light is on.
The toner cartridge has reached its
estimated end of life. Once a toner
cartridge has reached its estimated end of
life, the HP Premium Protection Warranty
on that toner cartridge has ended.
Consider having a replacement available to install when print
quality is no longer acceptable. The toner cartridge does not
need to be replaced now unless the print quality is no longer
acceptable.
The imaging drum has reached its
estimated end of life. Once an imaging
drum has reached its estimated end of life,
the HP Premium Protection Warranty on
that imaging drum has ended.
Consider having a replacement available to install when print
quality is no longer acceptable. The imaging drum does not need
to be replaced now unless the print quality is no longer
acceptable.
Multiple supplies have reached their
estimated end of life. Once a supply has
reached its estimated end of life, the HP
Premium Protection Warranty on that
supply has ended.
Consider having replacement supplies available to install when
print quality is no longer acceptable. The supplies do not need
to be replaced now unless the print quality is no longer
acceptable.
The Attention and Toner
lights are blinking.
The toner cartridge or imaging drum is
missing or incorrectly installed.
Install or reinstall the toner cartridge and imaging drum.
74
Chapter 6 Solve problems
ENWW
 Loading…
LaserJet Pro M203
User Guide
M203dn
M203dw
 www.hp.com/support/ljM203

HP LaserJet Pro M203
User Guide
Copyright and License
© Copyright 2016 HP Development Company,
L.P.
Reproduction, adaptation, or translation without prior written permission is prohibited, except as allowed under the copyright laws.
The information contained herein is subject to change without notice.
TheonlywarrantiesforHP productsand services are set forth in the express warranty statements accompanying such products and services.
Nothing herein should be construed as constituting an additional warranty. HP shall not be liable for technical or editorial errors or omissions contained herein.
Edition 1, 11/2016
Trademark Credits
Adobe®, Adobe Photoshop®, Acrobat®, and PostScript® are trademarks of Adobe Systems Incorporated.
Apple and the Apple logo are trademarks of Apple Inc., registered in the U.S. and other countries.
OS X is a trademark of Apple Inc., registered in the U.S. and other countries.
AirPrint is a trademark of Apple Inc., registered in the U.S. and other countries.
iPad is a trademark of Apple Inc., registered in the U.S. and other countries.
iPod is a trademark of Apple Inc., registered in the U.S. and other countries.
iPhone is a trademark of Apple Inc., registered in the U.S. and other countries.
Microsoft®, Windows®, Windows® XP, and Windows Vista® are U.S. registered trademarks of Microsoft Corporation.
UNIX® is a registered trademark of The Open Group.

Table of contents
|
1 Printer overview …………………………………………………………………………………………………………………………. |
1 |
|
Printer views ………………………………………………………………………………………………………………………………………. |
2 |
|
Printer front view ……………………………………………………………………………………………………………….. |
2 |
|
Printer back view ………………………………………………………………………………………………………………… |
3 |
|
Control panel view ………………………………………………………………………………………………………………. |
4 |
|
Printer specifications …………………………………………………………………………………………………………………………… |
5 |
|
Technical specifications ………………………………………………………………………………………………………. |
5 |
|
Supported operating systems ……………………………………………………………………………………………… |
5 |
|
Mobile printing solutions …………………………………………………………………………………………………….. |
7 |
|
Printer dimensions ……………………………………………………………………………………………………………… |
7 |
|
Power consumption, electrical specifications, and acoustic emissions …………………………………….. |
8 |
|
Operating environmental range …………………………………………………………………………………………… |
8 |
|
Printer hardware setup and software installation ………………………………………………………………………………….. |
9 |
|
2 Paper trays ………………………………………………………………………………………………………………………………. |
11 |
|
Load the Priority input tray ………………………………………………………………………………………………………………… |
12 |
|
Introduction ……………………………………………………………………………………………………………………… |
12 |
|
Priority input tray paper orientation …………………………………………………………………………………… |
14 |
|
Load the Main input tray …………………………………………………………………………………………………………………….. |
15 |
|
Introduction ……………………………………………………………………………………………………………………… |
15 |
|
Main input tray paper orientation ……………………………………………………………………………………….. |
18 |
|
Load and print envelopes …………………………………………………………………………………………………………………… |
19 |
|
Introduction ……………………………………………………………………………………………………………………… |
19 |
|
Print envelopes ………………………………………………………………………………………………………………… |
19 |
|
Envelope orientation …………………………………………………………………………………………………………. |
20 |
|
Load and print labels …………………………………………………………………………………………………………………………. |
21 |
|
Introduction ……………………………………………………………………………………………………………………… |
21 |
|
Manually feed labels …………………………………………………………………………………………………………. |
21 |
|
Label orientation ………………………………………………………………………………………………………………. |
22 |
|
3 Supplies, accessories, and parts ……………………………………………………………………………………………………. |
23 |
|
Order supplies, accessories, and parts ………………………………………………………………………………………………… |
24 |
|
Ordering …………………………………………………………………………………………………………………………… |
24 |
|
Supplies and accessories …………………………………………………………………………………………………… |
24 |
|
Configure the HP toner-cartridge-protection supply settings ………………………………………………………………… |
25 |
|
Introduction ……………………………………………………………………………………………………………………… |
25 |
|
Enable or disable the Cartridge Policy feature ……………………………………………………………………… |
25 |
|
Use the HP Embedded Web Server (EWS) to enable the Cartridge Policy feature …….. |
25 |
|
Use the HP Embedded Web Server (EWS) to disable the Cartridge Policy feature ……. |
26 |
|
Troubleshoot Cartridge Policy control panel error messages ………………………………… |
26 |
|
Enable or disable the Cartridge Protection feature ………………………………………………………………. |
27 |
|
Use the HP Embedded Web Server (EWS) to enable the Cartridge Protection |
|
|
feature ……………………………………………………………………………………………………………. |
27 |
|
Use the HP Embedded Web Server (EWS) to disable the Cartridge Protection |
|
|
feature ……………………………………………………………………………………………………………. |
27 |
|
Troubleshoot Cartridge Protection control panel error messages …………………………. |
28 |
|
Replace the toner cartridge ………………………………………………………………………………………………………………… |
29 |
|
Introduction ……………………………………………………………………………………………………………………… |
29 |
|
Toner-cartridge information ………………………………………………………………………………………………. |
29 |
|
Remove and replace the toner cartridge ……………………………………………………………………………… |
30 |
|
Replace the imaging drum …………………………………………………………………………………………………………………. |
33 |
|
Introduction ……………………………………………………………………………………………………………………… |
33 |
|
Imaging drum information …………………………………………………………………………………………………. |
33 |
|
Remove and replace the imaging drum ……………………………………………………………………………….. |
34 |
|
4 Print ……………………………………………………………………………………………………………………………………….. |
37 |
|
Print tasks (Windows) ………………………………………………………………………………………………………………………… |
38 |
|
How to print (Windows) ……………………………………………………………………………………………………… |
38 |
|
Automatically print on both sides (Windows) ………………………………………………………………………. |
39 |
|
Manually print on both sides (Windows) ……………………………………………………………………………… |
40 |
|
Print multiple pages per sheet (Windows) …………………………………………………………………………… |
40 |
|
Select the paper type (Windows) ………………………………………………………………………………………… |
40 |
|
Additional print tasks ………………………………………………………………………………………………………… |
42 |
|
Print tasks (OS X) ………………………………………………………………………………………………………………………………. |
43 |
|
How to print (OS X) ……………………………………………………………………………………………………………. |
43 |
|
Automatically print on both sides (OS X) ……………………………………………………………………………… |
43 |
|
Manually print on both sides (OS X) …………………………………………………………………………………….. |
43 |
|
Print multiple pages per sheet (OS X) ………………………………………………………………………………….. |
44 |
|
Select the paper type (OS X) ………………………………………………………………………………………………. |
44 |
|
Additional print tasks ………………………………………………………………………………………………………… |
45 |
|
Mobile printing ………………………………………………………………………………………………………………………………….. |
46 |
|
Introduction ……………………………………………………………………………………………………………………… |
46 |
|
Wi-Fi Direct (wireless models only) …………………………………………………………………………………….. |
46 |
|
Enable or disable Wi-Fi Direct …………………………………………………………………………….. |
47 |
|
Change the printer Wi-Fi Direct name …………………………………………………………………. |
48 |
|
HP ePrint via email ……………………………………………………………………………………………………………. |
49 |
|
HP ePrint software ……………………………………………………………………………………………………………. |
49 |
|
AirPrint …………………………………………………………………………………………………………………………….. |
50 |
|
Android embedded printing ……………………………………………………………………………………………….. |
50 |
|
5 Manage the printer …………………………………………………………………………………………………………………….. |
51 |
|
Change the printer connection type (Windows) …………………………………………………………………………………….. |
52 |
|
Advanced configuration with HP Embedded Web Server (EWS) and HP Device Toolbox (Windows) ……………. |
53 |
|
Advanced configuration with HP Utility for OS X …………………………………………………………………………………… |
57 |
|
Open HP Utility …………………………………………………………………………………………………………………. |
57 |
|
HP Utility features …………………………………………………………………………………………………………….. |
57 |
|
Configure IP network settings …………………………………………………………………………………………………………….. |
59 |
|
Introduction ……………………………………………………………………………………………………………………… |
59 |
|
Printer sharing disclaimer ………………………………………………………………………………………………….. |
59 |
|
View or change network settings ……………………………………………………………………………………….. |
59 |
|
Rename the printer on a network ……………………………………………………………………………………….. |
59 |
|
Manually configure IPv4 TCP/IP parameters ………………………………………………………………………… |
60 |
|
Link speed and duplex settings ………………………………………………………………………………………….. |
61 |
|
Printer security features ……………………………………………………………………………………………………………………. |
62 |
|
Introduction ……………………………………………………………………………………………………………………… |
62 |
|
Assign or change the system password using the HP Embedded Web Server ………………………….. |
62 |
|
Lock the formatter ……………………………………………………………………………………………………………. |
63 |
|
Configure the Quiet Print Mode settings ………………………………………………………………………………………………. |
64 |
|
Introduction ……………………………………………………………………………………………………………………… |
64 |
|
Configure the Quiet Print Mode settings from HP Embedded Web Server (EWS) ……………………… |
64 |
|
Energy-conservation settings …………………………………………………………………………………………………………….. |
65 |
|
Introduction ……………………………………………………………………………………………………………………… |
65 |
|
Print with EconoMode ……………………………………………………………………………………………………….. |
65 |
|
Set the Sleep/Auto Off After Inactivity setting ……………………………………………………………………… |
65 |
|
Set the Shut Down After Inactivity delay and configure the printer to use 1 watt or less of |
|
|
power ………………………………………………………………………………………………………………………………. |
66 |
|
Set the Delay Shut Down setting ………………………………………………………………………………………… |
67 |
|
Update the firmware …………………………………………………………………………………………………………………………. |
69 |
|
Update the firmware using the Firmware Update Utility ……………………………………………………….. |
69 |
|
6 Solve problems …………………………………………………………………………………………………………………………. |
71 |
|
Customer support ……………………………………………………………………………………………………………………………… |
72 |
|
Interpret control-panel light patterns …………………………………………………………………………………………………. |
73 |
|
Restore the factory-set defaults ………………………………………………………………………………………………………… |
76 |
|
A “Cartridge is low” or “Cartridge is very low” message displays on the printer control panel …………………… |
77 |
|
Change the “Very Low” settings …………………………………………………………………………………………. |
77 |
|
Order supplies ………………………………………………………………………………………………………………….. |
78 |
|
Printer does not pick up paper or misfeeds ………………………………………………………………………………………….. |
79 |
|
Introduction ……………………………………………………………………………………………………………………… |
79 |
|
The printer does not pick up paper ……………………………………………………………………………………… |
79 |
|
The printer picks up multiple sheets of paper ………………………………………………………………………. |
80 |
|
Clear paper jams ……………………………………………………………………………………………………………………………….. |
82 |
|
Introduction ……………………………………………………………………………………………………………………… |
82 |
|
Jam locations …………………………………………………………………………………………………………………… |
82 |
|
Experiencing frequent or recurring paper jams? …………………………………………………………………… |
83 |
|
Clear jams in the Main input tray ………………………………………………………………………………………… |
85 |
|
Clear jams in the toner-cartridge area ………………………………………………………………………………… |
89 |
|
Clear jams in the output bin ……………………………………………………………………………………………….. |
93 |
|
Clear jams in the duplexer …………………………………………………………………………………………………. |
95 |
|
Improve print quality …………………………………………………………………………………………………………………………. |
98 |
|
Introduction ……………………………………………………………………………………………………………………… |
98 |
|
Print from a different software program …………………………………………………………………………….. |
98 |
|
Check the paper-type setting for the print job ……………………………………………………………………… |
98 |
|
Check the paper type setting (Windows) …………………………………………………………….. |
98 |
|
Check the paper type setting (OS X) ……………………………………………………………………. |
99 |
|
Check toner-cartridge status ……………………………………………………………………………………………… |
99 |
|
Clean the printer ……………………………………………………………………………………………………………….. |
99 |
|
Print a cleaning page ………………………………………………………………………………………… |
99 |
|
Visually inspect the toner cartridge and imaging drum ……………………………………………………….. |
100 |
|
Check paper and the printing environment ………………………………………………………………………… |
100 |
|
Step one: Use paper that meets HP specifications ……………………………………………… |
100 |
|
Step two: Check the environment …………………………………………………………………….. |
100 |
|
Step three: Set the individual tray alignment …………………………………………………….. |
101 |
|
Try a different print driver ……………………………………………………………………………………………….. |
102 |
|
Check the EconoMode settings …………………………………………………………………………………………. |
103 |
|
Adjust Print Density ………………………………………………………………………………………………………… |
103 |
|
Solve wired network problems …………………………………………………………………………………………………………. |
105 |
|
Introduction ……………………………………………………………………………………………………………………. |
105 |
|
Poor physical connection …………………………………………………………………………………………………. |
105 |
|
The computer is using the incorrect IP address for the printer …………………………………………….. |
105 |
|
The computer is unable to communicate with the printer …………………………………………………… |
105 |
|
The printer is using incorrect link speed and duplex settings for the network ……………………….. |
106 |
|
New software programs might be causing compatibility problems ……………………………………… |
106 |
|
The computer or workstation might be set up incorrectly …………………………………………………… |
106 |
|
The printer is disabled, or other network settings are incorrect …………………………………………… |
106 |
|
Solve wireless network problems ……………………………………………………………………………………………………… |
107 |
|
Introduction ……………………………………………………………………………………………………………………. |
107 |
|
Wireless connectivity checklist …………………………………………………………………………………………. |
107 |
|
The printer does not print after the wireless configuration completes …………………………………. |
108 |
|
The printer does not print, and the computer has a third-party firewall installed ………………….. |
108 |
|
The wireless connection does not work after moving the wireless router or printer ………………. |
108 |
|
Cannot connect more computers to the wireless printer …………………………………………………….. |
108 |
|
The wireless printer loses communication when connected to a VPN …………………………………… |
109 |
|
The network does not appear in the wireless networks list …………………………………………………. |
109 |
|
The wireless network is not functioning ……………………………………………………………………………. |
109 |
|
Perform a wireless network diagnostic test ………………………………………………………………………. |
109 |
|
Reduce interference on a wireless network ……………………………………………………………………….. |
110 |
|
Index ……………………………………………………………………………………………………………………………………….. |
111 |

1 Printer overview
●Printer views
●Printer specifications
●Printer hardware setup and software installation
For more information:
The following information is correct at the time of publication. For current information, see www.hp.com/ support/ljM203.
HP’s all-inclusive help for the printer includes the following information:
●Install and configure
●Learn and use
●Solve problems
●Download software and firmware updates
●Join support forums
●Find warranty and regulatory information
Printer views
●Printer front view
●Printer back view
●Control panel view
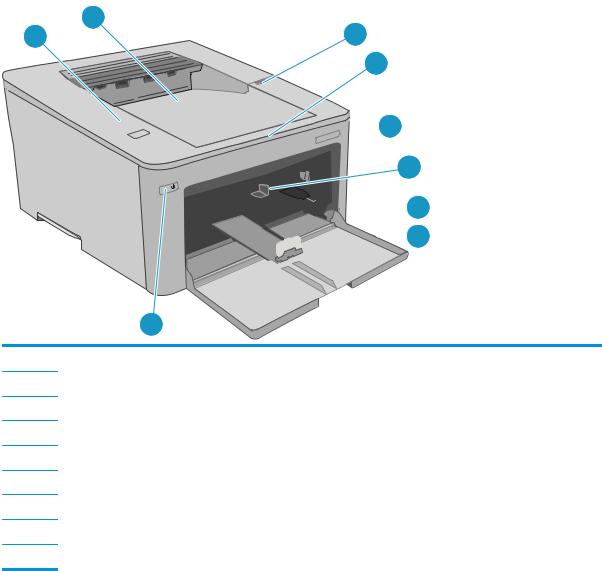
Printer front view
9
2


 3
3
4

 5
5 
 6
6
7
1Toner cartridge door
2Output bin extension
3Model name
4Priority input tray
5Main input tray
6Main input tray door
7Power button
8Control panel
9Output bin
|
2 Chapter 1 Printer overview |
ENWW |
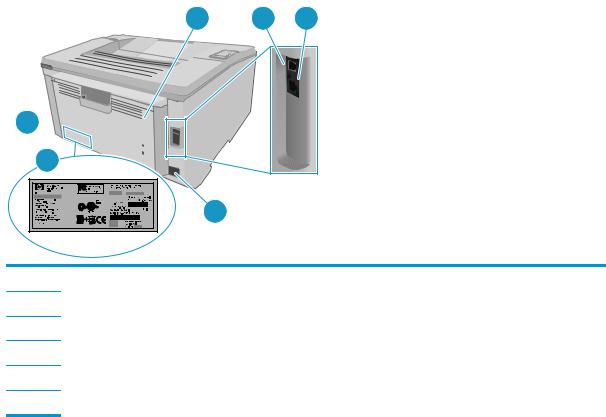
Printer back view
1 2 3
6

5
4
1Rear door (access for clearing jams)
2USB interface port
3Ethernet port
4Power connection
5Serial number and product number label
6Slot for cable-type security lock
Control panel view
1
|
2 |
||||||
|
3 |
||||||
|
4 |
||||||
|
5 |
||||||
|
6 |
||||||
|
1 |
Wireless |
button and LED |
Press this button to turn the wireless feature on or off, or to configure a WiFi Direct |
|||
|
connection. |
||||||
|
(wireless models only) |
||||||
|
Press and hold this button to configure a WPS connection. |
||||||
|
If the wireless LED light is on, there is a stable wireless connection. If it is blinking, there |
||||||
|
is either a WPS or WiFi Direct configuration process in progress. If it is blinking rapidly, |
||||||
|
there is an issue with the wireless connection. |
||||||
|
2 |
Attention LED |
The Attention light blinks when the printer requires user attention. If the Attention light |
||||
|
is on, the printer is in an error state. |
||||||
|
3 |
Ready LED |
The Readylight is on when the printer is readytoprint. It blinks whentheprinter is receiving |
||||
|
print data. |
||||||
|
4 |
Supplies LED |
The Supplies light is on when the toner cartridge is very low. It blinks when there is a toner |
||||
|
cartridge or imaging drum error. |
||||||
|
5 |
Resume |
button |
Press this button to begin a print job. |
|||
If the printer is in an error state, press the Resume button to clear the error and resume printing.
In manual duplex mode, press the Resume button to print the second side of the page.
|
6 |
Cancel |
button |
Press this button to cancel a print job. |
|
4 Chapter 1 Printer overview |
ENWW |

Printer specifications
 IMPORTANT: The following specifications are correct at the time of publication, but they aresubject to change.
For current information, see www.hp.com/support/ljM203.
●Technical specifications
●Supported operating systems
●Mobile printing solutions
●Printer dimensions
●Power consumption, electrical specifications, and acoustic emissions
●Operating environmental range
Technical specifications
See www.hp.com/support/ljM203 for current information.
Supported operating systems
The following information applies to the printer-specific Windows PCL 6 and HP print drivers for OS X and to the in-box software installation CD.
Windows: The HP Software Installer CD installs the “HP PCL.6”, the “HP PCL 6”, or the “HP PCL-6” print driver, depending on the Windows operating system, along with optional software when using the full software installer. Download the «HP PCL.6», the «HP PCL 6», and the «HP PCL-6» print driver from the support website for this printer: www.hp.com/support/ljM203
Mac computers and OS X: Mac computers are supported with this printer. Download HP Easy Start either from 123.hp.com or from the support website, and then use HP Easy Start to install the HP print driver. HP Easy Start is not included in the in-box CD.
1.Go to 123.hp.com.
2.Follow the steps provided to download the printer software.
Linux: For information and print drivers for Linux, go to hplipopensource.com/hplip-web/index.html
UNIX: For information and print drivers for UNIX®, go to www.hp.com/go/unixmodelscripts
|
Operating system |
Driver installed |
Notes |
|
Windows® XP SP3 or later, 32-bit |
The HP PCL.6 printer-specific print driver is |
|
installed for this operating system as part |
|
|
of the basic software installation. The basic |
|
|
installer installs the driver only. |
The full software installation is not supported for this operating system.
Use UPD drivers for 64-bit operating systems.
|
Windows Vista®, 32-bit |
The HP PCL.6 printer-specific print driver is |
|
installed for this operating system as part |
|
|
of the basic software installation. The basic |
|
|
installer installs the driver only. |
The full software installation is not supported for this operating system.
Use UPD drivers for 64-bit operating systems.
|
ENWW |
Printer specifications 5 |

|
Operating system |
Driver installed |
Notes |
|
Windows Server 2003 SP2 or later, 32-bit |
The HP PCL.6 printer-specific print driver is |
|
installed for this operating system as part |
|
|
of the basic software installation. |
The full software installation is not supported for this operating system.
|
Windows Server 2003 R2, 32-bit |
The HP PCL.6 printer-specific print driver is |
|
installed for this operating system as part |
|
|
of the basic software installation. |
The full software installation is not supported for this operating system.
|
Windows 7, 32-bit and 64-bit |
The HP PCL 6 printer-specific print driver is |
|
installed for this operating system as part |
|
|
of the full software installation. |
The HP PCL 6 driver is configured to use the automatic two-sided printing (duplexing) feature as the default when installed in certain countries/regions.
|
Windows 8, 32-bit and 64-bit |
The HP PCL 6 printer-specific print driver is |
|
installed for this operating system as part |
|
|
of the full software installation. |
The HP PCL-6 driver is configured to use the automatic two-sided printing (duplexing) feature as the default when installed in certain countries/regions.
|
Windows 8.1, 32-bit and 64-bit |
The HP PCL-6 printer-specific print driver is |
|
installed for this operating system as part |
|
|
of the full software installation. |
The HP PCL-6 driver is configured to use the automatic two-sided printing (duplexing) feature as the default when installed in certain countries/regions.
|
Windows 10, 32-bit and 64-bit |
The HP PCL-6 printer-specific print driver is |
|
installed for this operating system as part |
|
|
of the full software installation. |
The HP PCL-6 driver is configured to use the automatic two-sided printing (duplexing) feature as the default when installed in certain countries/regions.
|
Windows Server 2008, 32-bit |
The HP PCL.6 printer-specific print driver is |
|
installed for this operating system as part |
|
|
of the basic software installation. |
The full software installation is not supported for this operating system.
|
Windows Server 2008, 64-bit |
The HP PCL 6 printer-specific print driver is |
|
installed for this operating system as part |
|
|
of the basic software installation. |
The full software installation is not supported for this operating system.
|
Windows Server 2008 R2, 64-bit |
The HP PCL 6 printer-specific print driver is |
|
installed for this operating system as part |
|
|
of the basic software installation. |
The full software installation is not supported for this operating system.
|
OS X 10.9 Mavericks, OS X 10.10 Yosemite, |
The OS X print driver and print utility are |
|
and OS X 10.11 El Capitan |
available for download from hp.com and |
|
might also be available via Apple Software |
|
|
Update. The HP installer software for OS X |
|
|
is not included in the in-box CD. |
For OS X, download the installer from HP Easy Start.
1.Go to 123.hp.com.
2.Follow thestepsprovidedtodownload the printer software.
The OS X driver is configured to use the automatic two-sided printing (duplexing) feature as the default when installed in certain countries/regions.
 NOTE: For a current list of supported operating systems, go to www.hp.com/support/ljM203 for HP’s allinclusive help for the printer.


 NOTE: For details on client and server operating systems and for HP UPD PCL6 and UPD PS driver support for this printer, go to www.hp.com/go/upd and click the Specifications tab.
|
6 Chapter 1 Printer overview |
ENWW |
Mobile printing solutions
HP offers multiple mobile and ePrint solutions to enable easy printing to an HP printer from a laptop, tablet, smartphone, or other mobile device. To see the full list and to determine the best choice, go to www.hp.com/ go/LaserJetMobilePrinting.
 NOTE: Update the printer firmware to ensure all mobile printing and ePrint capabilities are supported.
●Wi-Fi Direct (wireless models only)
●HP ePrint via email (Requires HP Web Services to be enabled and the printer to be registered with HP Connected)
●HP ePrint app (Available for Android, iOS, and Blackberry)
●HP All-in-One Remote app for iOS and Android devices
●HP ePrint software
●Google Cloud Print
●AirPrint
●Android Printing
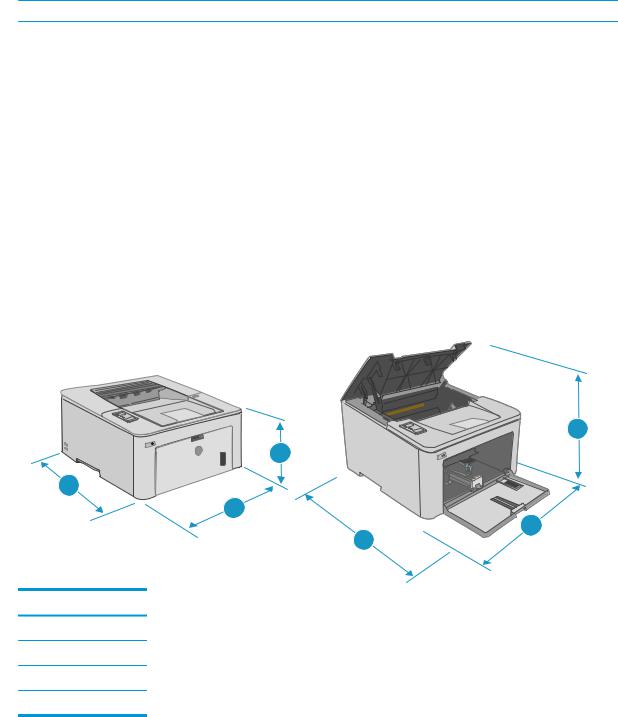
Printer dimensions
Figure 1-1 Dimensions for the printer
|
1 |
||
|
1 |
||
|
3 |
2 |
|
|
2 |
||
|
3 |
||
|
Printer fully closed |
Printer fully open |
|
|
1. Height |
223.9 mm (8.8 in) |
359.5 mm (14.1 in) |
|
2. Width |
370.5 mm (14.5 in) |
370.5 mm (14.5 in) |
|
3. Depth |
407.4 mm (16 in) |
504.1 mm (19.8 in) |
|
Weight (with cartridges) |
6.9 kg (15.2 lb) |
|
ENWW |
Printer specifications 7 |

Power consumption, electrical specifications, and acoustic emissions
See www.hp.com/support/ljM203 for current information.
 CAUTION: Power requirements are based on the country/region where the printer is sold. Do not convert operating voltages. This will damage the printer and void the printer warranty.
Operating environmental range
Table 1-1 Operating environmental range
|
Environment |
Recommended |
Allowed |
|
Temperature |
17° to 25°C (62.6° to 77°F) |
15° to 30°C (59° to 86°F) |
|
Relative humidity |
30% to 70% relative humidity (RH) |
10% to 80% (RH) |
|
Altitude |
Not applicable |
0 to 3048 m (0 to 10,000 ft) |
|
8 Chapter 1 Printer overview |
ENWW |
Printer hardware setup and software installation
For basic setup instructions, see the Setup Poster and Getting Started Guide that came with the printer. For additional instructions, go to HP support on the Web.
Go to www.hp.com/support/ljM203 for HP’s all-inclusive help for the printer. Find the following support:
●Install and configure
●Learn and use
●Solve problems
●Download software and firmware updates
●Join support forums
●Find warranty and regulatory information
|
ENWW |
Printer hardware setup and software installation |
9 |
|
10 Chapter 1 Printer overview |
ENWW |

2 Paper trays
●Load the Priority input tray
●Load the Main input tray
●Load and print envelopes
●Load and print labels
For more information:
The following information is correct at the time of publication. For current information, see www.hp.com/ support/ljM203.
HP’s all-inclusive help for the printer includes the following information:
●Install and configure
●Learn and use
●Solve problems
●Download software and firmware updates
●Join support forums
●Find warranty and regulatory information
Load the Priority input tray
Introduction
The following information describes how to load paper in the Priority input tray. This tray holds up to 10 sheets of 75 g/m2 (20 lb) paper.
 NOTE: To avoid paper jams:
●Never add or remove paper from the Priority input tray during printing.
●Before loading the tray, remove all of the paper from the input tray and straighten the stack.
●When loading the tray, do not fan the paper.
●Use paper that is not wrinkled, folded, or damaged.
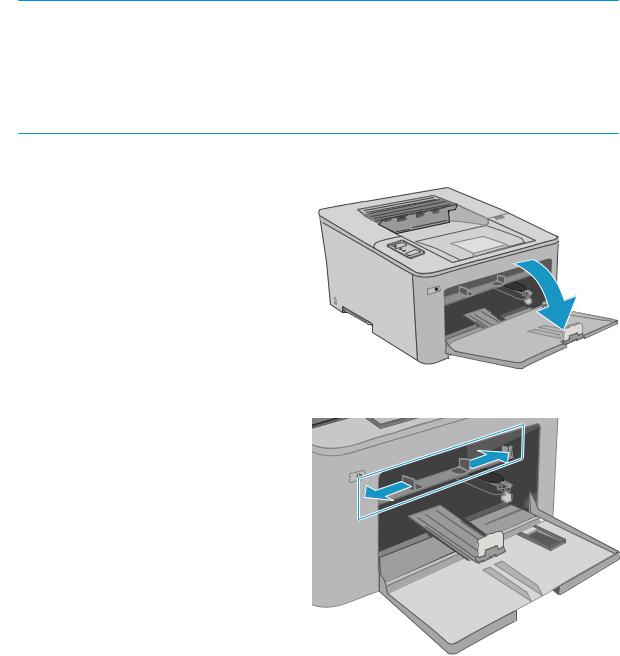
1.Open the Main input tray door by grasping the handle and pulling down.
2. Spread the paper-width guides to the correct size.
|
12 Chapter 2 Paper trays |
ENWW |
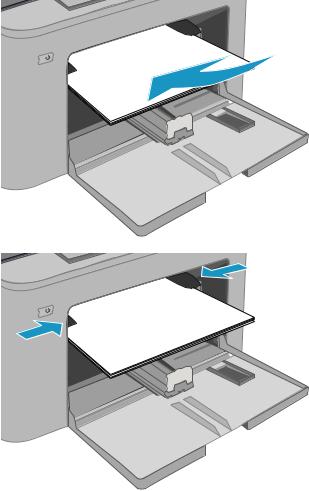
3.Place the top edge of the paper at the opening of the Priority input tray. For information about how to orient the paper, see Priority input tray paper orientation on page 14.
4.Adjust the paper guides so that they lightly touch the paper stack, but do not bend the paper.
NOTE: Do not adjust the paper guides tightly against the paper stack.
NOTE: To prevent jams, adjust the paper guides to the correct size and do not overfill the tray.
|
ENWW |
Load the Priority input tray 13 |
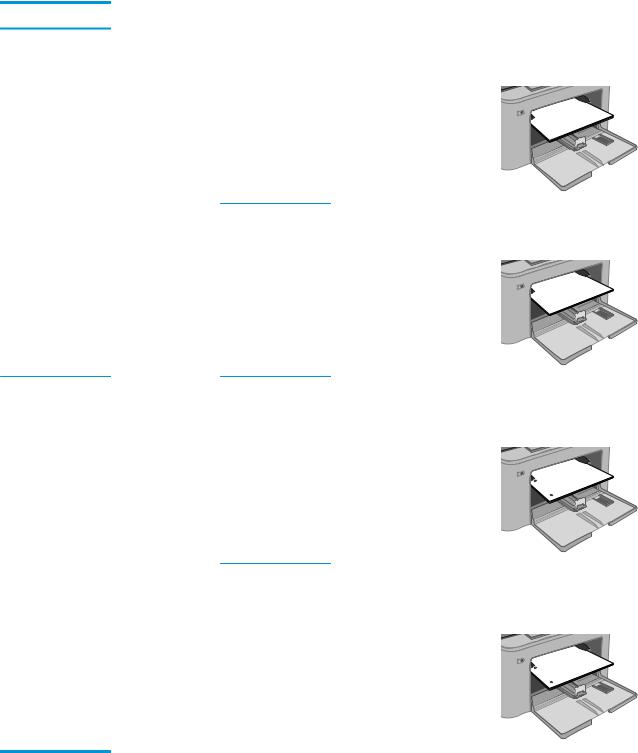
Priority input tray paper orientation
|
Paper type |
Image orientation |
Duplex mode |
Paper size |
How to load paper |
|
Letterhead or |
Portrait |
1-sided printing |
Letter, Legal, Executive, Statement, |
|
Preprinted |
Oficio (8.5 x 13), 4 x 6, 5 x 8, A4, A5, |
||
|
A6, RA5, B5 (JIS), B6 (JIS),10 x15cm, |
|||
|
Oficio (216 x 340), |
|||
|
16K 195 x 270 mm, |
|||
|
16K 184 x 260 mm, |
|||
|
16K 197 x 273 mm, |
|||
|
Japanese Postcard (Postcard (JIS)), |
|||
|
Double Japan Postcard Rotated (Do |
|||
|
uble Postcard (JIS)) |
Face-up
Top edge leading into the product
123
|
2-sided printing |
Letter, Legal, Oficio (8.5 x 13), A4 |
Face-up |
Top edge leading into the product
123
|
Prepunched |
Portrait |
1-sided printing |
Letter, Legal, Executive, Statement, |
|
Oficio (8.5 x 13), 4 x 6, 5 x 8, A4, A5, |
|||
|
A6, RA5, B5 (JIS), B6 (JIS),10 x15cm, |
|||
|
Oficio (216 x 340), |
|||
|
16K 195 x 270 mm, |
|||
|
16K 184 x 260 mm, |
|||
|
16K 197 x 273 mm, |
|||
|
Japanese Postcard (Postcard (JIS)), |
|||
|
Double Japan Postcard Rotated (Do |
|||
|
uble Postcard (JIS)) |
Face-up
Holes toward the left side of the product
123
|
2-sided printing |
Letter, Legal, Oficio (8.5 x 13), A4 |
Face-up |
Holes toward the left side of the product
123
|
14 Chapter 2 Paper trays |
ENWW |
Load the Main input tray
Introduction
The following information describes how to load paper in the Main input tray. This tray holds up to 250 sheets of 75 g/m2 (20 lb) paper.
 NOTE: To avoid paper jams:
●Never add or remove paper from the Main input tray during printing.
●Before loading the tray, remove all of the paper from the input tray and straighten the stack.
●When loading the tray, do not fan the paper.
●Use paper that is not wrinkled, folded, or damaged.
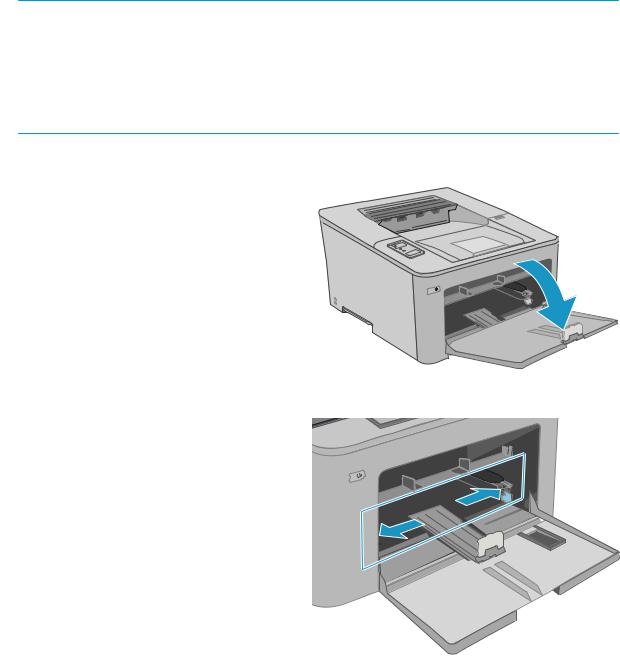
1.Open the Main input tray door by grasping the handle and pulling down.
2. Adjust the paper-width guides by squeezing the adjustment latch on the right guide and sliding the guides to the size of the paper being used.
|
ENWW |
Load the Main input tray 15 |
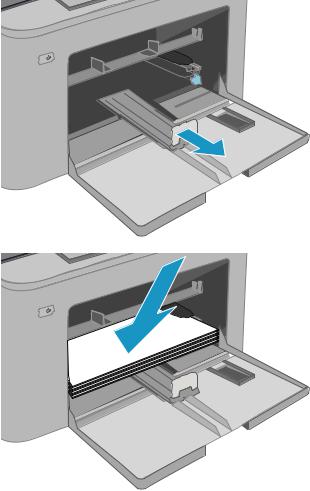
3.Adjust the paper-length guide by sliding guide to the size of the paper being used.
4.Load the paper into the tray. For information about how to orient the paper, see Main input tray paper orientation on page 18.
|
16 Chapter 2 Paper trays |
ENWW |
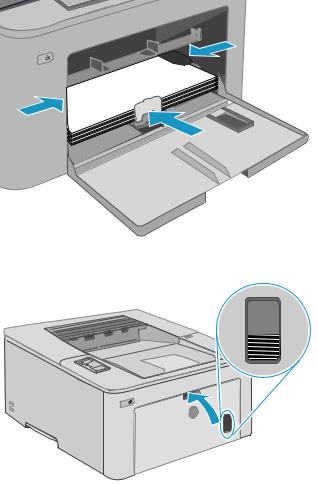
5.Adjust the guides so that they lightly touch the paper stack, but do not bend it.
NOTE: Do not adjust the paper guides tightly against the paper stack.
NOTE: To prevent jams, adjust the paper guides to the correct size and do not overfill the tray.
6.If the paper is Letter-size or smaller, close the Main input tray door. Use the paper-stack window to verify that is correctly loaded.
|
ENWW |
Load the Main input tray 17 |
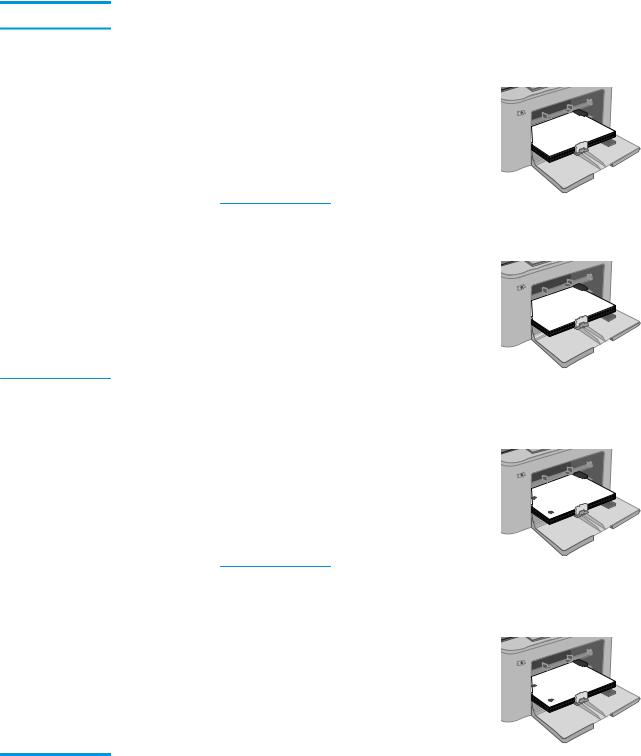
Main input tray paper orientation
|
Paper type |
Image orientation |
Duplex mode |
Paper size |
How to load paper |
|
Letterhead or |
Portrait |
1-sided printing |
Letter, Legal, Executive, Statement, |
|
preprinted |
Oficio (8.5 x 13), 4 x 6, 5 x 8, A4, A5, |
||
|
A6, RA5, B5 (JIS), B6 (JIS),10 x15cm, |
|||
|
Oficio (216 x 340), |
|||
|
16K 195 x 270 mm, |
|||
|
16K 184 x 260 mm, |
|||
|
16K 197 x 273 mm, |
|||
|
Japanese Postcard (Postcard (JIS)), |
|||
|
Double Japan Postcard Rotated (Do |
|||
|
uble Postcard (JIS)) |
Face-up
Top edge leading into the product
123

|
2-sided printing |
Letter, Legal, Oficio (8.5 x 13), A4 |
Face-up |
Top edge leading into the product
123

|
Prepunched |
Portrait |
1-sided printing |
Letter, Legal, Executive, Statement, |
|
Oficio (8.5 x 13), 4 x 6, 5 x 8, A4, A5, |
|||
|
A6, RA5, B5 (JIS), B6 (JIS),10 x15cm, |
|||
|
Oficio (216 x 340), |
|||
|
16K 195 x 270 mm, |
|||
|
16K 184 x 260 mm, |
|||
|
16K 197 x 273 mm, |
|||
|
Japanese Postcard (Postcard (JIS)), |
|||
|
Double Japan Postcard Rotated (Do |
|||
|
uble Postcard (JIS)) |
Face-up
Holes toward the left side of the product
123

|
2-sided printing |
Letter, Legal, Oficio (8.5 x 13), A4 |
Face-up |
Holes toward the left side of the product
123

|
18 Chapter 2 Paper trays |
ENWW |

Load and print envelopes
Introduction
The following information describes how to print and load envelopes. The Priority input tray holds up to 10 envelopes. The Main input tray holds up to 10 envelopes.
To print envelopes using the manual feed option, follow these steps to select the correct settings in the print driver, and then load the envelopes into the tray after sending the print job to the printer.
Print envelopes
1.From the software program, select the Print option.
2.Select the printer from the list of printers, and then click or tap the Properties or Preferences button to open the print driver.
 NOTE: The name of the button varies for different software programs.


 NOTE: To access these features from a Windows 8 or 8.1 Start screen, select Devices, select Print, and then select the printer.
3.Click or tap the Paper/Quality tab.
4.In the Paper size drop-down list, select the correct size for the envelopes.
5.In the Paper type drop-down list, select Envelope.
6.In the Paper source drop-down list, select Manual feed.
7.Click the OK button to close the Document Properties dialog box.
8.In the Print dialog box, click the OK button to print the job.
|
ENWW |
Load and print envelopes 19 |
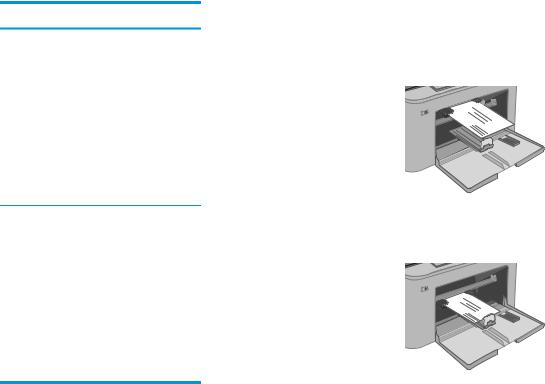
Envelope orientation
|
Tray |
Envelope size |
How to load envelopes |
|
Priority input tray |
Envelope #10, Envelope Monarch, |
Face up |
|
Envelope B5, Envelope C5, Envelope DL |
Short, postage end leading into the printer |
|
|
Main input tray |
Envelope #10, Envelope Monarch, |
Face up |
|
Envelope B5, Envelope C5, Envelope DL |
Short, postage end leading into the printer |
|
|
20 Chapter 2 Paper trays |
ENWW |

Load and print labels
Introduction
The following information describes how to print and load labels.
To print labels using the manual feed option, follow these steps to select the correct settings in the print driver, and then load the labels into the tray after sending the print job to the printer. When using manual feed, the printer waits to print the job until it detects that the tray has been opened.
Manually feed labels
1.From the software program, select the Print option.
2.Select the printer from the list of printers, and then click or tap the Properties or Preferences button to open the print driver.
 NOTE: The name of the button varies for different software programs.


 NOTE: To access these features from a Windows 8 or 8.1 Start screen, select Devices, select Print, and then select the printer.
3.Click the Paper/Quality tab.
4.In the Paper size drop-down list, select the correct size for the sheets of labels.
5.In the Paper type drop-down list, select Labels.
6.In the Paper source drop-down list, select Manual feed.
7.Click the OK button to close the Document Properties dialog box.
8.In the Print dialog box, click the OK button to print the job.
|
ENWW |
Load and print labels 21 |
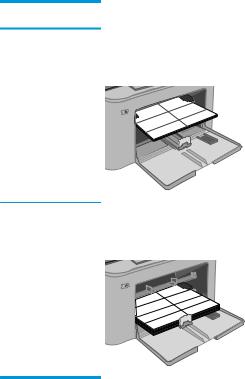
Label orientation
|
Tray |
How to load labels |
|
Priority input tray |
Face-up |
|
Top edge leading into the printer |
|
Main input tray |
Face-up |
|
Top edge leading into the printer |
|
22 Chapter 2 Paper trays |
ENWW |

3 Supplies, accessories, and parts
●Order supplies, accessories, and parts
●Configure the HP toner-cartridge-protection supply settings
●Replace the toner cartridge
●Replace the imaging drum
For more information:
The following information is correct at the time of publication. For current information, see www.hp.com/ support/ljM203.
HP’s all-inclusive help for the printer includes the following information:
●Install and configure
●Learn and use
●Solve problems
●Download software and firmware updates
●Join support forums
●Find warranty and regulatory information

Order supplies, accessories, and parts
Ordering
|
Order supplies and paper |
www.hp.com/go/suresupply |
|
Order genuine HP parts or accessories |
www.hp.com/buy/parts |
|
Order through service or support providers |
Contact an HP-authorized service or support provider. |
Order using the HP Embedded Web Server (EWS)
To access, in a supported Web browser on the computer, enter the printer IP address or host name in the address/URL field. The EWS contains a link to the HP SureSupply Web site, which provides options for purchasing Original HP supplies.
Supplies and accessories
|
Item |
Description |
Cartridge number |
Part number |
|
Supplies |
|||
|
HP 30A Black LaserJet Toner Cartridge |
Standard-capacity replacement black toner |
30A |
CF230A |
|
cartridge |
|||
|
HP 30X Black LaserJet Toner Cartridge |
High-capacity replacement black toner |
30X |
CF230X |
|
cartridge |
|||
|
HP 32A Original LaserJet Imaging Drum |
Imaging drum |
32A |
CF232A |
|
24 Chapter 3 Supplies, accessories, and parts |
ENWW |

Configure the HP toner-cartridge-protection supply settings
●Introduction
●Enable or disable the Cartridge Policy feature
●Enable or disable the Cartridge Protection feature
Introduction
Use HP Cartridge Policy and Cartridge Protection to control which cartridges are installed in the printer and protect the cartridges that are installed from theft.
●Cartridge Policy: This feature protects the printer from counterfeit toner cartridges by allowing only genuine HP cartridges to be used with the printer. Using genuine HP cartridges ensures the best possible print quality. When someone installs a cartridge that is not a genuine HP cartridge, the printer control panel displays a message that the cartridge is unauthorized and it provides information explaining how to proceed.
●Cartridge Protection: This feature permanently associates toner cartridges with a specific printer, or fleet of printers, so they cannot be used in other printers. Protecting cartridges protects your investment. When this feature is enabled, if someone attempts to transfer a protected cartridge from the original printer into an unauthorized printer, that printer will not print with the protected cartridge. The printer control panel displays a message that the cartridge is protected, and it provides information explaining how to proceed.
 CAUTION: After enabling cartridge protection for the printer, all subsequent toner cartridges installed in the printer are automatically and permanently protected. To avoid protecting a new cartridge, disable the feature before installing the new cartridge.
Turning the feature off does not turn off protection for cartridges that are currently installed.
Both features are off by default. Follow these procedures to enable or disable them.
Enable or disable the Cartridge Policy feature
Use the HP Embedded Web Server (EWS) to enable the Cartridge Policy feature
1.Open the HP EWS.
a.Print a configuration page to determine the IP address or host name.
i.Press and hold the Resume  button until the Ready
 light begins blinking.
ii.Release the Resume button.
b.Open a web browser, and in the address line, type the IP address or host name exactly as it displays on the printer control panel. Press the Enter key on the computer keyboard. The EWS opens.
 NOTE: If the displays a message indicating that accessing the website might not be safe, select the option to continue to the website. Accessing this website will not harm the computer.
2.Click the System tab.
|
ENWW |
Configure the HP toner-cartridge-protection supply settings 25 |

3.From the left navigation pane, select Supply Settings.
4.From the Cartridge Policy drop-down list, select Authorized HP.
5.Click the Apply button.
Use the HP Embedded Web Server (EWS) to disable the Cartridge Policy feature
1.Open the HP EWS.
a.Print a configuration page to determine the IP address or host name.
i.Press and hold the Resume  button until the Ready
 light begins blinking.
ii.Release the Resume  button.
b.Open a web browser, and in the address line, type the IP address or host name exactly as it displays on the printer control panel. Press the Enter key on the computer keyboard. The EWS opens.
 NOTE: If the displays a message indicating that accessing the website might not be safe, select the option to continue to the website. Accessing this website will not harm the computer.
2.Click the System tab.
3.From the left navigation pane, select Supply Settings.
4.From the Cartridge Policy drop-down menu, select Off.
5.Click the Apply button.
Troubleshoot Cartridge Policy control panel error messages
|
Error message |
Description |
Recommended action |
|
10.30.0X Unauthorized <Color> Cartridge |
The administrator has configured this |
|
printer to use only genuine HP supplies that |
|
|
are still under warranty. The cartridge must |
|
|
be replaced to continue printing. |
Replace the cartridge with a genuine HP toner cartridge.
If you believe you purchased a genuine HP supply, visit www.hp.com/go/ anticounterfeit to determine if the toner cartridge is a genuine HP cartridge, and learn what to do if it is not a genuine HP cartridge.
|
26 Chapter 3 Supplies, accessories, and parts |
ENWW |

Enable or disable the Cartridge Protection feature
Use the HP Embedded Web Server (EWS) to enable the Cartridge Protection feature
1.Open the HP EWS.
a.Print a configuration page to determine the IP address or host name.
i.Press and hold the Resume  button until the Ready
 light begins blinking.
ii.Release the Resume button.
b.Open a web browser, and in the address line, type the IP address or host name exactly as it displays on the printer control panel. Press the Enter key on the computer keyboard. The EWS opens.
 NOTE: If the displays a message indicating that accessing the website might not be safe, select the option to continue to the website. Accessing this website will not harm the computer.
2.Click the System tab.
3.From the left navigation pane, select Supply Settings.
4.From the Cartridge Protection drop-down list, select Protect Cartridges.
5.Click the Apply button.
 CAUTION: After enabling cartridge protection for the printer, all subsequent toner cartridges installed in the printer are automatically and permanently protected. To avoid protecting a new cartridge, disable the Cartridge Protection feature before installing the new cartridge.
Turning the feature off does not turn off protection for cartridges that are currently installed.
Use the HP Embedded Web Server (EWS) to disable the Cartridge Protection feature
1.Open the HP EWS.
a.Print a configuration page to determine the IP address or host name.
i.Press and hold the Resume  button until the Ready
 light begins blinking.
ii.Release the Resume button.
b.Open a web browser, and in the address line, type the IP address or host name exactly as it displays on the printer control panel. Press the Enter key on the computer keyboard. The EWS opens.
 NOTE: If the displays a message indicating that accessing the website might not be safe, select the option to continue to the website. Accessing this website will not harm the computer.
2.Click the System tab.
3.From the left navigation pane, select Supply Settings.
|
ENWW |
Configure the HP toner-cartridge-protection supply settings 27 |

Почему принтер HP LaserJet Pro M203dw не печатает и горит красная лампочка, а документы висят в очереди?. Это нам и предстоит выяснить и найти решение.
Первым делом надо проверить что ваш компьютер обнаружил принтер, посмотреть это можно в диспетчере устройств или же в панели управления в разделе «Устройства и Принтеры». Если вы совсем недавно нормально печатали, а сейчас, нет, то причина, скорее всего, в другом.
Причины
Из-за чего принтер HP LaserJet Pro M203dw не печатает, мигает красный диод, хотя краска есть?
- В основном проблема в том что Windows ставит документы в очередь на печать и ничего не происходит. Часто такое бывает когда не было долгой переустановки операционной системы или она скажем «замусорена» или же это обычный глюк программного обеспечения, который решается обычной перезагрузкой.
- Заклинило бумагу, в лотке нет бумаги — тут всё ясно не будем задерживаться на этом пункте.
- Актуально для струйного принтера — если вы перевозили или переносили принтер, проверьте переведена ли система подачи чернил из транспортного положения.
- Если закончилась краска, то может вылезти бледный или пустой лист, но при этом процесс печати будет происходить.
Варианты решения проблемы
- Лучший вариант — установка данного патча для операционных систем семейства Windows.
- Более долгое и сложное — переустановить операционную систему, но это весьма не быстро, да и хлопотно.
Какие ещё проблемы могут возникнуть
Большинство проблем можно решить установкой патча под Windows.
Принтер печатает не все цвета
Первым делом проверьте уровень краски, а причины могут быть следующие:
- Сначала надо проверить есть ли краска необходимых вам цветов.
- Один из минусов струйного принтера в том что краска могла пересохнуть если на нём не печатали около двух недель.
- Передавлен чернильный шлейф определённого цвета, это легко понять, разобрав принтер.
- Возможно, в систему подачи чернил попал воздух.
Не печатает офисные документы и картинки
Это ещё одна распространённая проблема, происходящая в основном с:
- 1С бухгалтерией
- Word / Excel / PowerPoint
- djvu / .pdf файлами
- Jpg, Png картинками
Выдает чистые листы и не печатает
- Очистите очередь печати и снова сделайте отправку на печать.
- Если не помогло, попробуйте обновить драйвера вашего принтера.
Не печатает сетевой принтер
Узнайте IP адрес сетевого принтера через свойства чтобы проверить его доступность, далее нажмите Win+R и введите cmd, это действие вызовет консоль, напишите в ней ping «здесь IP вашего принтера» без кавычек. Если он пингуется, значит всё в порядке. Если нет — проверьте целостность Ethernet кабеля, идущего к принтеру от компьютера / маршрутизатора или принт-сервера, попробуйте заменить его.
Если это не помогает, вероятно причина описана выше. В данном случае лучше всего будет обратиться к системному администратору.
Модератор: vetal
-
-
HP Laserjet Pro MFP M426fdn — «замятие в области картр-й»
Sartaniy в форуме Принтеры, МФУ, факсы, копиры формата A4
- 6
- 7814
Sartaniy

Пн июн 24, 2019 7:12 am
-
HP Laserjet Pro MFP M426fdn — «замятие в области картр-й»
-
-
hp color laserjet pro mfp m176n — надпись «Инициализация»
Sergey23 в форуме Принтеры, МФУ, факсы, копиры формата A4
- 12
- 12501
Andreyak777
Чт сен 17, 2015 8:16 pm
-
hp color laserjet pro mfp m176n — надпись «Инициализация»
-
-
Не могу найти прогу HP Color LaserJet CP1210 Series Toolbox.
котбаюн в форуме Принтеры, МФУ, факсы, копиры формата A4
- 9
- 4033
котбаюн
Сб май 30, 2020 2:13 pm
-
Не могу найти прогу HP Color LaserJet CP1210 Series Toolbox.
-
-
Принтар Hp LaserJet 1020 при печать выходят чистые листы
KiraBel в форуме Принтеры, МФУ, копиры формата A3
- 14
- 13331
xCooLx
Пт июн 22, 2012 9:10 am
-
Принтар Hp LaserJet 1020 при печать выходят чистые листы
-
-
HP LaserJet 4200, 4250, 4300 and 4350 Series printers
Verter в форуме Файлообменник
- 0
- 2101
Verter
Ср апр 24, 2013 8:35 am
-
HP LaserJet 4200, 4250, 4300 and 4350 Series printers
Вернуться в Принтеры, МФУ, факсы, копиры формата A4
Кто сейчас на форуме
Сейчас этот форум просматривают: нет зарегистрированных пользователей и гости: 31