Code
Description
EEPROM verification
H27
erroneous
Throttle motors:
Conveying air reference
H60
position not found
Supplementary air
H61
reference position not
found
Electrode rinsing air
H62
reference position not
found
Conveying air throttle
H64
does not move
Supplementary air throttle
H65
does not move
Electrode rinsing air
H66
throttle does not move
Conveying air position
H68
lost
Supplementary air
H69
position lost
Electrode rinsing air
H70
position lost
H71
Fluidizing air position lost
Communication mainboard-gun:
Communication error
H90
Mainboard
Communication error
H91
mainboard-gun
Communication error
H92
Mainboard
OptiFlex 2 F
Rev. 00 09/16
Criteria
EEPROM error
Throttle motor or needle
jammed, limit switch defective,
error in motor throttle
Throttle motor or needle
jammed, limit switch defective,
error in motor throttle
Throttle motor or needle
jammed, limit switch defective,
error in motor throttle
Short circuit in limit switch, motor
throttle defective
Short circuit in limit switch, motor
throttle defective
Short circuit in limit switch, motor
throttle defective
Lost steps, limit switch defective,
throttle motor defective
Lost steps, limit switch defective,
throttle motor defective
Lost steps, limit switch defective,
throttle motor defective
Lost steps, limit switch defective,
throttle motor defective
Mainboard defective
Gun not connected
Gun, gun cable or Mainboard
defective
Mainboard defective
Help codes list
The last appeared four errors are stored in a list by the software. If an
error appears, which is already in the list, he will not be listed again.
Appearance of errors
It is possible that an error is only displayed for a short time, but after the
acknowledgement it will disappear. In this case, it’s recommended to
switch off the control unit and switch it on again (reset by restarting).
Remedy
Contact a Gema service
center
Contact a Gema service
center
Contact a Gema service
center
Contact a Gema service
center
Contact a Gema service
center
Contact a Gema service
center
Contact a Gema service
center
Contact a Gema service
center
Contact a Gema service
center
Contact a Gema service
center
Contact a Gema service
center
Contact a Gema service
center
connect
Replace or contact Gema
Service
Contact a Gema service
center
Fault clearance 47
- Manuals
- Brands
- Gema Manuals
- Paint Sprayer
- OptiFlex 2 F
- Quick reference manual
-
Contents
-
Table of Contents
-
Bookmarks
Quick Links
EN
Rev. 00
1007 142
Quick reference guide
Manual equipment
OptiFlex 2 F
Translation of the original operating instructions
Related Manuals for Gema OptiFlex 2 F
Summary of Contents for Gema OptiFlex 2 F
-
Page 1
Rev. 00 1007 142 Quick reference guide Manual equipment OptiFlex 2 F Translation of the original operating instructions… -
Page 2
To the best of our knowledge and belief, the information contained in this publication was correct and valid on the date of publication. Gema Switzerland GmbH makes no representations or warranties with respect to the contents or use of this publication, and reserves the right to revise this publication and make changes to its content without prior notice. -
Page 3: Table Of Contents
Presentation of the contents ………………. 6 Safety General information ………………..7 Basic safety instructions ………………7 Product specific security regulations …………..8 OptiFlex 2 F Structure …………………… 13 Scope of delivery ………………..14 Technical Data …………………. 14 Assembly / Connection Connection instructions ………………
-
Page 4
Fault clearance Faults ……………………61 Spare parts list Ordering spare parts ………………… 63 OptiFlex 2 F – Spare parts list …………….64 OptiFlex 2 F – Spare parts ………………. 65 Pneumatic group ………………..66 PowerClean module set** ………………67 OptiStar CG13 Gun control unit…………….68 Front plate and power pack ……………… -
Page 5: About These Instructions
General information This operating manual contains all important information which you require for the working with the OptiFlex 2 F. It will safely guide you through the start-up process and give you references and tips for the optimal use when working with your powder coating system.
-
Page 6: Presentation Of The Contents
Figure references in the text Figure references are used as cross references in the descriptive text. Example: «The high voltage (H) created in the gun cascade is guided through the center electrode.» 6 About these instructions OptiFlex 2 F…
-
Page 7: Safety
If this product is to be used for other purposes or other substances outside of our guidelines then Gema Switzerland GmbH should be consulted.
-
Page 8: Product Specific Security Regulations
If this product is to be used for other purposes or other substances outside of our guidelines then Gema Switzerland GmbH should be consulted.
-
Page 9
The use of other parts can lead to risk of injury. Only original Gema spare parts should be used! Repairs must only be carried out by specialists or by authorized Gema service centers. Unauthorized conversions and modifications can lead to injuries and damage to the equipment and invalidate the Gema Switzerland GmbH guarantee. -
Page 10
As a general rule for all powder spraying installations, persons with The stay for persons pacemakers should never enter high voltage areas or areas with with cardiac pacemakers electromagnetic fields. Persons with pacemakers should not enter areas is forbidden with powder spraying installations! 10 Safety OptiFlex 2 F… -
Page 11
The operating personnel must wear electrically conductive, steel-toe footwear (e.g. leather soles). The operating personnel should hold the gun with bare hands. If gloves are worn, these must also conduct electricity. Safety 11 OptiFlex 2 F… -
Page 12
Rev. 00 09/16 12 Safety OptiFlex 2 F… -
Page 13: Optiflex 2 F
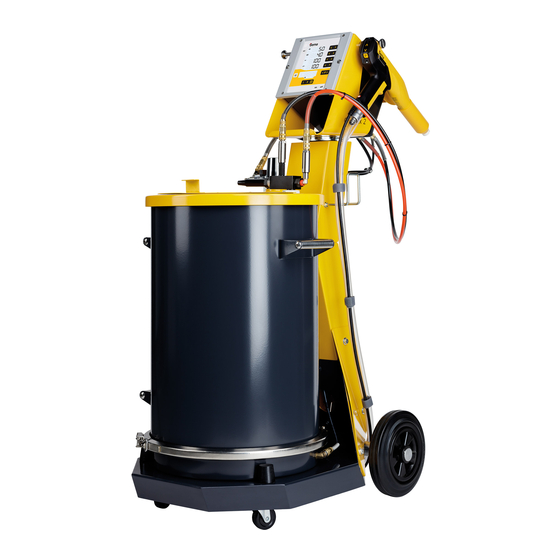
OptiStar CG13 Gun control unit 11 Gun holder OptiSelect GM03 manual gun 12 Hose holder OptiFlow injector 13 PowerClean module** Frame 14 Shelf Fluidized powder hopper 15 Rubber wheel AirMover 16 Swivel wheel 10 Filter unit OptiFlex 2 F 13 OptiFlex 2 F…
-
Page 14: Scope Of Delivery
– Operating manual – Short description Technical Data Connectable guns ATTENTION The OptiFlex 2 F Manual coating equipment may only be used with the specified gun types! OptiFlex 2 F connectable OptiSelect GM03 Electrical data OptiFlex 2 F Nominal input voltage…
-
Page 15
General conditions for the OptiFlow Injector Powder type Epoxy/polyester Length of powder hose (m) Powder hose Ø (mm) Type of powder hose POE with guide strips Input pressure (bar) Powder output zeroing Correction value C0 adjustment OptiFlex 2 F 15 OptiFlex 2 F… -
Page 16
The total air consumption for the device is determined based on the 3 configured air values (without AirMover air value). – These values apply for an internal control pressure of 5.5 bar! 16 OptiFlex 2 F OptiFlex 2 F… -
Page 17: Assembly / Connection
Rev. 00 09/16 Assembly / Connection Connection instructions fig. 2: Connecting guide – overview PowerClean™ module Electrode rinsing air hose (Option) OptiSelect GM03 manual 10 Compressed air hose Assembly / Connection 17 OptiFlex 2 F…
-
Page 18
3: Connections Connection Description Compressed air connection 1.1 Main air IN 2.1 Power IN Mains cable connection 2.2 Aux Vibration motor connection for OptiFlex 2 B 2.3 Gun Gun cable connection 18 Assembly / Connection OptiFlex 2 F… -
Page 19: Set Head Piece
Rev. 00 09/16 Connection Description 2.4 Power Clean Connection to rinsing module Conveying air connection Supplementary air connection Electrode rinsing air connection Fluid air connection Grounding connection Set head piece Assembly / Connection 19 OptiFlex 2 F…
-
Page 20
Rev. 00 09/16 20 Assembly / Connection OptiFlex 2 F… -
Page 21: Start-Up
Fig. 4 The remainder of the start-up procedure for the Gun is explicitly described in the operating instructions for the OptiStar CG08/CG13 powder gun control unit (chapter «Initial start-up» and «Start-up»)! Start-up 21 OptiFlex 2 F…
-
Page 22: Setting The Device Type
ATTENTION A wrong parameterization leads to various malfunctions! ► For more on this, please also see the operating instructions for the OptiStar CG13 gun control unit! 22 Start-up OptiFlex 2 F…
-
Page 23: Operation
► The manual equipment may only be operated in conjunction with a sufficiently powerful suction unit (such as Gema Classic Open booth). Place powder hopper on the mobile trolley…
-
Page 24
Select desired program (01-20) Program 20 active Change coating parameters as required Programs 01-20 are preset at the factory but can be modified at any time, after which they are automatically stored. 24 Operation OptiFlex 2 F… -
Page 25
(deflector plate, flat jet nozzle) ≈ 0,1 Nm³/h ≈ 0,5 Nm³/h too much electrode rinsing air If in this display level is no operation for 3 seconds, the first display level is switched over independently. Operation 25 OptiFlex 2 F… -
Page 26
Point the gun into the booth (not at the object to be coated), press the gun trigger and visually check the powder output Check whether everything is functioning correctly Coating Adjust the coating parameters as necessary Activate the rinsing function periodically 26 Operation OptiFlex 2 F… -
Page 27: Rinsing Mode
The rinsing mode can only be activated from standby mode (main menu display, no powder conveying). On OptiFlex 2 F Manual coating equipment, the injector must be disconnected prior to cleaning procedure, on OptiFlex 2 B, the suction unit must be lifted, and on OptiFlex 2 S, the powder container must be empty.
-
Page 28
Manual equipment with optional PowerClean module (system parameter P01= 1 or P01=2) The rinsing mode can only be activated from standby mode (main menu display, no powder conveying). START = 28 Operation OptiFlex 2 F… -
Page 29
The operator controls the number and length of the Manual PowerClean impulse by pressing the gun trigger a (manual) second time STOP = the cleaning mode is terminated automatically. After completion of the PowerClean procedure, the controller switches back to coating mode. Operation 29 OptiFlex 2 F… -
Page 30: Color Change
All powder particles of the former color must be removed during this process! The following describes an ‘extreme’ color change (light to dark). 10. Remove and clean the nozzle, purge gun using air 30 Operation OptiFlex 2 F…
-
Page 31
17. Clean the suction tube 18. Empty remaining powder into a container 19. Vacuum up the hopper and in particular the bottom 20. Clean container with a cloth 21. Reassemble the powder hopper 22. Fill with new powder Operation 31 OptiFlex 2 F… -
Page 32
Rev. 00 09/16 32 Operation OptiFlex 2 F… -
Page 33: Decommissioning / Storage
If in disuse for several days Separate from power mains Clean guns, injectors and powder hoses (see therefore the corresponding user manuals) Turn off the compressed air main supply Decommissioning / Storage 33 OptiFlex 2 F…
-
Page 34
Rev. 00 09/16 34 Decommissioning / Storage OptiFlex 2 F… -
Page 35: Maintenance / Repairs
Weekly maintenance Clean powder container, injector, rinsing module** and powder gun. Check the control unit grounding connections to the coating booth, the suspension devices of the work pieces, or the conveyor chain Maintenance / Repairs 35 OptiFlex 2 F…
-
Page 36
The gun is designed to require only a minimum amount of maintenance. Clean the gun with dry cloth, see chapter «Maintenance» Check connection points to powder house. Replace the powder hoses, if necessary. 36 Maintenance / Repairs OptiFlex 2 F… -
Page 37: Cleaning
Clean the integrated gun tube with the brush supplied if necessary Blow through the gun with compressed air again Clean the powder hose Reassemble the gun and connect it Maintenance / Repairs 37 OptiFlex 2 F…
-
Page 38
Empty remaining powder into a container Vacuum up the hopper and in particular the bottom Clean container with a cloth 10. Reassemble the powder hopper Do not refill the powder container until just before the next use! 38 Maintenance / Repairs OptiFlex 2 F… -
Page 39: Fault Clearance
Injector or nozzle on the Clean the corresponding part gun trigger is pressed injector, powder hose or powder gun clogged Insert sleeve in the injector is Clean/replace clogged Fluidization not running see below Fault clearance 39 OptiFlex 2 F…
-
Page 40
Fluidizing air is set too low on Set the fluidizing air correctly the control unit Throttle motor defective Contact local Gema representative Airmover pressure incorrectly Adjust Powder flows out of the powder hopper 40 Fault clearance OptiFlex 2 F… -
Page 41: Optistar Cg13
For further information, see the corresponding operating manual, which can be found on the accompanying CD. Design and function Overall view fig. 5: Front plate with control and Back panel with interfaces display elements Enclosure OptiStar CG13 41 OptiFlex 2 F…
-
Page 42
Spraying current (display in µA) Remote operation mode is used as keyboard S12 remote lock, reduced operation is possible Activation of vibration/fluidization Display of predefined operating modes or display of rinsing mode during cleaning 42 OptiStar CG13 OptiFlex 2 F… -
Page 43
8: Input keys and switches Designation Function Input keys for desired values and system T1-T8 parameters T9 (Select) Switch between display levels – Program change – T10-T11 Terminating the rinsing mode (PowerClean) with optional PowerClean module OptiStar CG13 43 OptiFlex 2 F… -
Page 44
(fixed values) – Preset mode for overcoating parts already coated (fixed values) – Switching on the rinsing mode (PowerClean) with optional PowerClean module (Press for at least 5 secs.) T16/T17 Power switch On/Off 44 OptiStar CG13 OptiFlex 2 F… -
Page 45: Fault Clearance
The errors are displayed in the order of their appearance. The T10 and T11 keys cannot be used for other functions, as long as an error code is still shown. Here is a list of all possible help codes for this Gun control unit: Fault clearance 45 OptiFlex 2 F…
-
Page 46
Description Criteria Remedy Pneumatics: – PowerClean valve not connect or replace connected – Valve defective Contact a Gema service PowerClean valve – Connection cable center defective – Mainboard defective Solenoid coil current lower than Contact a Gema service preset limiting value… -
Page 47
Rev. 00 09/16 Code Description Criteria Remedy EEPROM verification Contact a Gema service EEPROM error erroneous center Throttle motors: Throttle motor or needle Contact a Gema service Conveying air reference jammed, limit switch defective, center position not found error in motor throttle… -
Page 48
Rev. 00 09/16 48 Fault clearance OptiFlex 2 F… -
Page 49: Optiselect Gm03
Gun cable Threaded sleeve Powder hose connection Shaft 10 Powder hose quick release connection Cover with remote control and hooks 11 Electrode rinsing air connection Remote control 12 Trigger SuperCorona connection Gun handle OptiSelect GM03 49 OptiFlex 2 F…
-
Page 50: Scope Of Delivery
SuperCorona ring Flat jet nozzle (for specific applications) Round jet nozzles Gun extension 150 and 300 mm Gun cable extensions Application cup 150 and 500 ml Multi-spray adapter 50 OptiSelect GM03 OptiFlex 2 F…
-
Page 51: Technical Data
Max. surface temperature 85 °C (+185 °F) Protection type IP64 Approvals 0102 II 2D PTB 11 ATEX 5006 Dimensions OptiSelect GM03 Weight 520 g Processible powders OptiSelect GM03 Plastic powder Metallic powder Enamel powder OptiSelect GM03 51 OptiFlex 2 F…
-
Page 52
Rev. 00 09/16 52 OptiSelect GM03 OptiFlex 2 F… -
Page 53: Fault Clearance
Replace unit defective Solenoid valve in the control Replace unit defective No conveying air: – Throttle motor defective Contact local Gema – representative Solenoid valve defective Front plate defective Contact local Gema representative Fault clearance 53 OptiFlex 2 F…
-
Page 54
Bend or damage to air lines to Check air lines to injector injector Insert sleeve in the injector Replace or insert it worn or not inserted Fluidization not running see above 54 Fault clearance OptiFlex 2 F… -
Page 55: Optiflow Ig06
CD. Structure Overall view fig. 11 1. Check valve unit 4. Injector housing (supplementary air) 6. Check valve unit 2. Powder hose quick release (conveying air) connection 3. Powder hopper connection OptiFlow IG06 55 OptiFlex 2 F…
-
Page 56: Powder Volume Setting For Optiflow Injector
If a very large powder output is required, it is recommended to select a larger powder hose internal diameter (Ø 12 mm). It should to be noted, that if irregular or pumping conveying occurs, as a rule, the total air is set too low! 56 OptiFlow IG06 OptiFlex 2 F…
-
Page 57: Maintenance / Repairs
► Remove the check valve units (1 and 6) with the correct sized spanner. ► Clean the component parts with compressed air and, if necessary, dissolve sintered deposits with nitro-thinner. ► Do not use acetone, do not scrape! Reinsert the injector and fix it Maintenance / Repairs 57 OptiFlex 2 F…
-
Page 58: Cleaning The Check Valve Units
Parts of the check valve unit may be damaged during the dismantling process. ► Blow off the filter elements from the inside to the outside! ► Do not immerse the filter elements in fluidities or solvents fig. 13 Connection/plug Filter element O-ring 58 Maintenance / Repairs OptiFlex 2 F…
-
Page 59: Replacing The Insert Sleeve
Rev. 00 09/16 Replacing the insert sleeve Maintenance / Repairs 59 OptiFlex 2 F…
-
Page 60
Rev. 00 09/16 60 Maintenance / Repairs OptiFlex 2 F… -
Page 61: Fault Clearance
Insert sleeve worn, Replace or install the not or incorrect insert sleeve. inserted Observe the indexing cam! Clean the nozzle, if Insert sleeve is damaged, replace it worn after a short operating duration Fault clearance 61 OptiFlex 2 F…
-
Page 62
Rev. 00 09/16 62 Fault clearance OptiFlex 2 F… -
Page 63: Spare Parts List
When using the spare parts from other manufacturers the explosion protection is no longer guaranteed. If any damage is caused by this use all guarantee claims become invalid! ► Only original Gema spare parts should be used! Spare parts list 63 OptiFlex 2 F…
-
Page 64: Optiflex 2 F — Spare Parts List
Rev. 00 09/16 OptiFlex 2 F – Spare parts list OptiStar CG13 gun control unit – complete (see corresponding operating 1009 971 manual) GM03 manual powder gun – complete (see corresponding user manual) 1008 070 OptiFlow IG06 injector – complete (see corresponding user manual) 1007 780 Pneumatic connection for conveying air –…
-
Page 65: Optiflex 2 F — Spare Parts
Rev. 00 09/16 OptiFlex 2 F – Spare parts fig. 14 Spare parts list 65 OptiFlex 2 F…
-
Page 66: Pneumatic Group
Rev. 00 09/16 Pneumatic group Pneumatic group – complete 1008 235 Filter cartridge – 20 µm 1008 239# Plug – Ø 8 mm 238 023 # Wearing part fig. 15: Pneumatic group 66 Spare parts list OptiFlex 2 F…
-
Page 67: Powerclean Module Set
103 152* Gasket (not shown) O ring – Ø 16×2 mm, NBR70, anti-static (2x) (not shown) Cable tie (not shown) * Please indicate length # Wearing part fig. 16: PowerClean module set** Spare parts list 67 OptiFlex 2 F…
-
Page 68: Optistar Cg13 Gun Control Unit
OptiStar CG13 Gun control unit – complete 1009 971 Front plate – complete, see corresponding spare parts list Enclosure Backplate – complete, see corresponding spare parts list Cover 1008 301 4 ––––– fig. 17 68 Spare parts list OptiFlex 2 F…
-
Page 69: Front Plate And Power Pack
Front plate gasket 1007 042 Membrane keypad Spacer sleeve – Ø 3.6/7×5 mm Display 1007 044 Washer – Ø 3.2/7×0.5 mm Locknut – M3 Power pack – 24 VDC 1009 849 fig. 18 Spare parts list 69 OptiFlex 2 F…
-
Page 70: Inside Back Plate
Motor throttle – complete 1000 064 Plastic tube – Ø 8/6 mm 103 152* Fluidizing pad – 1/8″ 237 264 Screw – M4x16 mm 1013 925 * Please indicate length fig. 19: 70 Spare parts list OptiFlex 2 F…
-
Page 71: Connecting Material
382 485 Mains cable – USA 382 507 Mains cable – GB 382 515 Mains cable – AUS 382 523 Mains cable – China 1000 993 * Please indicate length fig. 20 Spare parts list 71 OptiFlex 2 F…
-
Page 72: Optiselect Gm03 — Spare Parts List
Hose connection Ø 11-12 mm – complete (incl. pos 15.1) 1001 340 # Hose connection Ø 9-10 mm – complete (incl. pos 15.1) 1002 030 # 15.1 O-ring for pos. 15 1000 822 # Threaded sleeve (see corresponding spare parts list) 72 Spare parts list OptiFlex 2 F…
-
Page 73
Powder hose – Ø 10 mm (not shown) 1001 673*# Powder hose – Ø 11 mm (not shown) 105 139*# * Please indicate length # Wearing part fig. 21: OptiSelect GM03 – spare parts Spare parts list 73 OptiFlex 2 F… -
Page 74: Powerclean™ Module (Option)
O ring – Ø 16×2 mm, anti-static 1007 794# Fluidizing tube bearing 1007 356 Fluidizing tube 1007 355 Retaining bracket 1009 524 Gasket 1010 101 O-ring – Ø 27×2 mm 1009 525 # Wearing part fig. 22 74 Spare parts list OptiFlex 2 F…
-
Page 75: Supercorona
Rev. 00 09/16 SuperCorona SuperCorona PC05 1008 165# # Wearing part Fig. 23 Spare parts list 75 OptiFlex 2 F…
-
Page 76: Accessories
1007 683 1007 935 Complex parts NF22 (deep recess); 1008 140 target spraying NF22 1008 145 NF24 Large surfaces 1008 142 NF24* 1008 147 1008 326 * not suitable for angled nozzles 76 Spare parts list OptiFlex 2 F…
-
Page 77
Ø 16 mm 331 341 NS04 Suitable for Ø 24 mm large surfaces 1008 150 331 333 NS04 1008 152 Ø 32 mm 1008 151 1007 229 331 325 Ø 50 mm 345 822 Spare parts list 77 OptiFlex 2 F… -
Page 78
► The extensions (150 mm/300 mm) may be connected TO ONLY ONE ADDITONAL extension (150 mm/300 mm), if necessary. 78 Spare parts list OptiFlex 2 F… -
Page 79
Ø 16 mm 331 341 Suitable for NS09 large Ø 24 mm 1008 259 surfaces NS09 331 333 1008 258 1008 257 Ø 32 mm 331 325 Ø 50 mm 345 822 Spare parts list 79 OptiFlex 2 F… -
Page 80
* Please indicate length Other accessories 150 ml 500 ml Application cup 1004 552 1002 069 Gun extension cables L=6 m 1002 161 L=14 m 1002 162 Gloves, anti-static (1 pair) 800 254 80 Spare parts list OptiFlex 2 F… -
Page 81: Optiflow Ig06 — Spare Parts List
Powder hose – 74 type, POE, Ø 15/10 mm, with conductive strip 1001 673*# Powder hose – 75 type, POE, Ø 18/12 mm, with conductive strip 1001 674*# * Please indicate length # Wearing part Spare parts list 81 OptiFlex 2 F…
-
Page 82: Optiflow Ig06 — Spare Parts
Rev. 00 09/16 OptiFlow IG06 – spare parts fig. 24 82 Spare parts list OptiFlex 2 F…
-
Page 83
Electrical data ……….14, 51 Start-up …………21 Storage …………33 Fault clearance ……. 39, 45, 53, 61 Figure references in the text ……6 Technical Data ……….. 14, 51 Maintenance ……….35, 57 Index 83 OptiFlex 2 F… -
Page 84
Rev. 00…
- Manuals
- Brands
- Gema Manuals
- Paint Sprayer
- OptiFlex 2 F
- Quick reference manual
-
Contents
-
Table of Contents
-
Bookmarks
Quick Links
EN
Rev. 00
1007 142
Quick reference guide
Manual equipment
OptiFlex 2 F
Translation of the original operating instructions
Related Manuals for Gema OptiFlex 2 F
Summary of Contents for Gema OptiFlex 2 F
-
Page 1
Rev. 00 1007 142 Quick reference guide Manual equipment OptiFlex 2 F Translation of the original operating instructions… -
Page 2
To the best of our knowledge and belief, the information contained in this publication was correct and valid on the date of publication. Gema Switzerland GmbH makes no representations or warranties with respect to the contents or use of this publication, and reserves the right to revise this publication and make changes to its content without prior notice. -
Page 3: Table Of Contents
Presentation of the contents ………………. 6 Safety General information ………………..7 Basic safety instructions ………………7 Product specific security regulations …………..8 OptiFlex 2 F Structure …………………… 13 Scope of delivery ………………..14 Technical Data …………………. 14 Assembly / Connection Connection instructions ………………
-
Page 4
Fault clearance Faults ……………………61 Spare parts list Ordering spare parts ………………… 63 OptiFlex 2 F – Spare parts list …………….64 OptiFlex 2 F – Spare parts ………………. 65 Pneumatic group ………………..66 PowerClean module set** ………………67 OptiStar CG13 Gun control unit…………….68 Front plate and power pack ……………… -
Page 5: About These Instructions
General information This operating manual contains all important information which you require for the working with the OptiFlex 2 F. It will safely guide you through the start-up process and give you references and tips for the optimal use when working with your powder coating system.
-
Page 6: Presentation Of The Contents
Figure references in the text Figure references are used as cross references in the descriptive text. Example: «The high voltage (H) created in the gun cascade is guided through the center electrode.» 6 About these instructions OptiFlex 2 F…
-
Page 7: Safety
If this product is to be used for other purposes or other substances outside of our guidelines then Gema Switzerland GmbH should be consulted.
-
Page 8: Product Specific Security Regulations
If this product is to be used for other purposes or other substances outside of our guidelines then Gema Switzerland GmbH should be consulted.
-
Page 9
The use of other parts can lead to risk of injury. Only original Gema spare parts should be used! Repairs must only be carried out by specialists or by authorized Gema service centers. Unauthorized conversions and modifications can lead to injuries and damage to the equipment and invalidate the Gema Switzerland GmbH guarantee. -
Page 10
As a general rule for all powder spraying installations, persons with The stay for persons pacemakers should never enter high voltage areas or areas with with cardiac pacemakers electromagnetic fields. Persons with pacemakers should not enter areas is forbidden with powder spraying installations! 10 Safety OptiFlex 2 F… -
Page 11
The operating personnel must wear electrically conductive, steel-toe footwear (e.g. leather soles). The operating personnel should hold the gun with bare hands. If gloves are worn, these must also conduct electricity. Safety 11 OptiFlex 2 F… -
Page 12
Rev. 00 09/16 12 Safety OptiFlex 2 F… -
Page 13: Optiflex 2 F
OptiStar CG13 Gun control unit 11 Gun holder OptiSelect GM03 manual gun 12 Hose holder OptiFlow injector 13 PowerClean module** Frame 14 Shelf Fluidized powder hopper 15 Rubber wheel AirMover 16 Swivel wheel 10 Filter unit OptiFlex 2 F 13 OptiFlex 2 F…
-
Page 14: Scope Of Delivery
– Operating manual – Short description Technical Data Connectable guns ATTENTION The OptiFlex 2 F Manual coating equipment may only be used with the specified gun types! OptiFlex 2 F connectable OptiSelect GM03 Electrical data OptiFlex 2 F Nominal input voltage…
-
Page 15
General conditions for the OptiFlow Injector Powder type Epoxy/polyester Length of powder hose (m) Powder hose Ø (mm) Type of powder hose POE with guide strips Input pressure (bar) Powder output zeroing Correction value C0 adjustment OptiFlex 2 F 15 OptiFlex 2 F… -
Page 16
The total air consumption for the device is determined based on the 3 configured air values (without AirMover air value). – These values apply for an internal control pressure of 5.5 bar! 16 OptiFlex 2 F OptiFlex 2 F… -
Page 17: Assembly / Connection
Rev. 00 09/16 Assembly / Connection Connection instructions fig. 2: Connecting guide – overview PowerClean™ module Electrode rinsing air hose (Option) OptiSelect GM03 manual 10 Compressed air hose Assembly / Connection 17 OptiFlex 2 F…
-
Page 18
3: Connections Connection Description Compressed air connection 1.1 Main air IN 2.1 Power IN Mains cable connection 2.2 Aux Vibration motor connection for OptiFlex 2 B 2.3 Gun Gun cable connection 18 Assembly / Connection OptiFlex 2 F… -
Page 19: Set Head Piece
Rev. 00 09/16 Connection Description 2.4 Power Clean Connection to rinsing module Conveying air connection Supplementary air connection Electrode rinsing air connection Fluid air connection Grounding connection Set head piece Assembly / Connection 19 OptiFlex 2 F…
-
Page 20
Rev. 00 09/16 20 Assembly / Connection OptiFlex 2 F… -
Page 21: Start-Up
Fig. 4 The remainder of the start-up procedure for the Gun is explicitly described in the operating instructions for the OptiStar CG08/CG13 powder gun control unit (chapter «Initial start-up» and «Start-up»)! Start-up 21 OptiFlex 2 F…
-
Page 22: Setting The Device Type
ATTENTION A wrong parameterization leads to various malfunctions! ► For more on this, please also see the operating instructions for the OptiStar CG13 gun control unit! 22 Start-up OptiFlex 2 F…
-
Page 23: Operation
► The manual equipment may only be operated in conjunction with a sufficiently powerful suction unit (such as Gema Classic Open booth). Place powder hopper on the mobile trolley…
-
Page 24
Select desired program (01-20) Program 20 active Change coating parameters as required Programs 01-20 are preset at the factory but can be modified at any time, after which they are automatically stored. 24 Operation OptiFlex 2 F… -
Page 25
(deflector plate, flat jet nozzle) ≈ 0,1 Nm³/h ≈ 0,5 Nm³/h too much electrode rinsing air If in this display level is no operation for 3 seconds, the first display level is switched over independently. Operation 25 OptiFlex 2 F… -
Page 26
Point the gun into the booth (not at the object to be coated), press the gun trigger and visually check the powder output Check whether everything is functioning correctly Coating Adjust the coating parameters as necessary Activate the rinsing function periodically 26 Operation OptiFlex 2 F… -
Page 27: Rinsing Mode
The rinsing mode can only be activated from standby mode (main menu display, no powder conveying). On OptiFlex 2 F Manual coating equipment, the injector must be disconnected prior to cleaning procedure, on OptiFlex 2 B, the suction unit must be lifted, and on OptiFlex 2 S, the powder container must be empty.
-
Page 28
Manual equipment with optional PowerClean module (system parameter P01= 1 or P01=2) The rinsing mode can only be activated from standby mode (main menu display, no powder conveying). START = 28 Operation OptiFlex 2 F… -
Page 29
The operator controls the number and length of the Manual PowerClean impulse by pressing the gun trigger a (manual) second time STOP = the cleaning mode is terminated automatically. After completion of the PowerClean procedure, the controller switches back to coating mode. Operation 29 OptiFlex 2 F… -
Page 30: Color Change
All powder particles of the former color must be removed during this process! The following describes an ‘extreme’ color change (light to dark). 10. Remove and clean the nozzle, purge gun using air 30 Operation OptiFlex 2 F…
-
Page 31
17. Clean the suction tube 18. Empty remaining powder into a container 19. Vacuum up the hopper and in particular the bottom 20. Clean container with a cloth 21. Reassemble the powder hopper 22. Fill with new powder Operation 31 OptiFlex 2 F… -
Page 32
Rev. 00 09/16 32 Operation OptiFlex 2 F… -
Page 33: Decommissioning / Storage
If in disuse for several days Separate from power mains Clean guns, injectors and powder hoses (see therefore the corresponding user manuals) Turn off the compressed air main supply Decommissioning / Storage 33 OptiFlex 2 F…
-
Page 34
Rev. 00 09/16 34 Decommissioning / Storage OptiFlex 2 F… -
Page 35: Maintenance / Repairs
Weekly maintenance Clean powder container, injector, rinsing module** and powder gun. Check the control unit grounding connections to the coating booth, the suspension devices of the work pieces, or the conveyor chain Maintenance / Repairs 35 OptiFlex 2 F…
-
Page 36
The gun is designed to require only a minimum amount of maintenance. Clean the gun with dry cloth, see chapter «Maintenance» Check connection points to powder house. Replace the powder hoses, if necessary. 36 Maintenance / Repairs OptiFlex 2 F… -
Page 37: Cleaning
Clean the integrated gun tube with the brush supplied if necessary Blow through the gun with compressed air again Clean the powder hose Reassemble the gun and connect it Maintenance / Repairs 37 OptiFlex 2 F…
-
Page 38
Empty remaining powder into a container Vacuum up the hopper and in particular the bottom Clean container with a cloth 10. Reassemble the powder hopper Do not refill the powder container until just before the next use! 38 Maintenance / Repairs OptiFlex 2 F… -
Page 39: Fault Clearance
Injector or nozzle on the Clean the corresponding part gun trigger is pressed injector, powder hose or powder gun clogged Insert sleeve in the injector is Clean/replace clogged Fluidization not running see below Fault clearance 39 OptiFlex 2 F…
-
Page 40
Fluidizing air is set too low on Set the fluidizing air correctly the control unit Throttle motor defective Contact local Gema representative Airmover pressure incorrectly Adjust Powder flows out of the powder hopper 40 Fault clearance OptiFlex 2 F… -
Page 41: Optistar Cg13
For further information, see the corresponding operating manual, which can be found on the accompanying CD. Design and function Overall view fig. 5: Front plate with control and Back panel with interfaces display elements Enclosure OptiStar CG13 41 OptiFlex 2 F…
-
Page 42
Spraying current (display in µA) Remote operation mode is used as keyboard S12 remote lock, reduced operation is possible Activation of vibration/fluidization Display of predefined operating modes or display of rinsing mode during cleaning 42 OptiStar CG13 OptiFlex 2 F… -
Page 43
8: Input keys and switches Designation Function Input keys for desired values and system T1-T8 parameters T9 (Select) Switch between display levels – Program change – T10-T11 Terminating the rinsing mode (PowerClean) with optional PowerClean module OptiStar CG13 43 OptiFlex 2 F… -
Page 44
(fixed values) – Preset mode for overcoating parts already coated (fixed values) – Switching on the rinsing mode (PowerClean) with optional PowerClean module (Press for at least 5 secs.) T16/T17 Power switch On/Off 44 OptiStar CG13 OptiFlex 2 F… -
Page 45: Fault Clearance
The errors are displayed in the order of their appearance. The T10 and T11 keys cannot be used for other functions, as long as an error code is still shown. Here is a list of all possible help codes for this Gun control unit: Fault clearance 45 OptiFlex 2 F…
-
Page 46
Description Criteria Remedy Pneumatics: – PowerClean valve not connect or replace connected – Valve defective Contact a Gema service PowerClean valve – Connection cable center defective – Mainboard defective Solenoid coil current lower than Contact a Gema service preset limiting value… -
Page 47
Rev. 00 09/16 Code Description Criteria Remedy EEPROM verification Contact a Gema service EEPROM error erroneous center Throttle motors: Throttle motor or needle Contact a Gema service Conveying air reference jammed, limit switch defective, center position not found error in motor throttle… -
Page 48
Rev. 00 09/16 48 Fault clearance OptiFlex 2 F… -
Page 49: Optiselect Gm03
Gun cable Threaded sleeve Powder hose connection Shaft 10 Powder hose quick release connection Cover with remote control and hooks 11 Electrode rinsing air connection Remote control 12 Trigger SuperCorona connection Gun handle OptiSelect GM03 49 OptiFlex 2 F…
-
Page 50: Scope Of Delivery
SuperCorona ring Flat jet nozzle (for specific applications) Round jet nozzles Gun extension 150 and 300 mm Gun cable extensions Application cup 150 and 500 ml Multi-spray adapter 50 OptiSelect GM03 OptiFlex 2 F…
-
Page 51: Technical Data
Max. surface temperature 85 °C (+185 °F) Protection type IP64 Approvals 0102 II 2D PTB 11 ATEX 5006 Dimensions OptiSelect GM03 Weight 520 g Processible powders OptiSelect GM03 Plastic powder Metallic powder Enamel powder OptiSelect GM03 51 OptiFlex 2 F…
-
Page 52
Rev. 00 09/16 52 OptiSelect GM03 OptiFlex 2 F… -
Page 53: Fault Clearance
Replace unit defective Solenoid valve in the control Replace unit defective No conveying air: – Throttle motor defective Contact local Gema – representative Solenoid valve defective Front plate defective Contact local Gema representative Fault clearance 53 OptiFlex 2 F…
-
Page 54
Bend or damage to air lines to Check air lines to injector injector Insert sleeve in the injector Replace or insert it worn or not inserted Fluidization not running see above 54 Fault clearance OptiFlex 2 F… -
Page 55: Optiflow Ig06
CD. Structure Overall view fig. 11 1. Check valve unit 4. Injector housing (supplementary air) 6. Check valve unit 2. Powder hose quick release (conveying air) connection 3. Powder hopper connection OptiFlow IG06 55 OptiFlex 2 F…
-
Page 56: Powder Volume Setting For Optiflow Injector
If a very large powder output is required, it is recommended to select a larger powder hose internal diameter (Ø 12 mm). It should to be noted, that if irregular or pumping conveying occurs, as a rule, the total air is set too low! 56 OptiFlow IG06 OptiFlex 2 F…
-
Page 57: Maintenance / Repairs
► Remove the check valve units (1 and 6) with the correct sized spanner. ► Clean the component parts with compressed air and, if necessary, dissolve sintered deposits with nitro-thinner. ► Do not use acetone, do not scrape! Reinsert the injector and fix it Maintenance / Repairs 57 OptiFlex 2 F…
-
Page 58: Cleaning The Check Valve Units
Parts of the check valve unit may be damaged during the dismantling process. ► Blow off the filter elements from the inside to the outside! ► Do not immerse the filter elements in fluidities or solvents fig. 13 Connection/plug Filter element O-ring 58 Maintenance / Repairs OptiFlex 2 F…
-
Page 59: Replacing The Insert Sleeve
Rev. 00 09/16 Replacing the insert sleeve Maintenance / Repairs 59 OptiFlex 2 F…
-
Page 60
Rev. 00 09/16 60 Maintenance / Repairs OptiFlex 2 F… -
Page 61: Fault Clearance
Insert sleeve worn, Replace or install the not or incorrect insert sleeve. inserted Observe the indexing cam! Clean the nozzle, if Insert sleeve is damaged, replace it worn after a short operating duration Fault clearance 61 OptiFlex 2 F…
-
Page 62
Rev. 00 09/16 62 Fault clearance OptiFlex 2 F… -
Page 63: Spare Parts List
When using the spare parts from other manufacturers the explosion protection is no longer guaranteed. If any damage is caused by this use all guarantee claims become invalid! ► Only original Gema spare parts should be used! Spare parts list 63 OptiFlex 2 F…
-
Page 64: Optiflex 2 F — Spare Parts List
Rev. 00 09/16 OptiFlex 2 F – Spare parts list OptiStar CG13 gun control unit – complete (see corresponding operating 1009 971 manual) GM03 manual powder gun – complete (see corresponding user manual) 1008 070 OptiFlow IG06 injector – complete (see corresponding user manual) 1007 780 Pneumatic connection for conveying air –…
-
Page 65: Optiflex 2 F — Spare Parts
Rev. 00 09/16 OptiFlex 2 F – Spare parts fig. 14 Spare parts list 65 OptiFlex 2 F…
-
Page 66: Pneumatic Group
Rev. 00 09/16 Pneumatic group Pneumatic group – complete 1008 235 Filter cartridge – 20 µm 1008 239# Plug – Ø 8 mm 238 023 # Wearing part fig. 15: Pneumatic group 66 Spare parts list OptiFlex 2 F…
-
Page 67: Powerclean Module Set
103 152* Gasket (not shown) O ring – Ø 16×2 mm, NBR70, anti-static (2x) (not shown) Cable tie (not shown) * Please indicate length # Wearing part fig. 16: PowerClean module set** Spare parts list 67 OptiFlex 2 F…
-
Page 68: Optistar Cg13 Gun Control Unit
OptiStar CG13 Gun control unit – complete 1009 971 Front plate – complete, see corresponding spare parts list Enclosure Backplate – complete, see corresponding spare parts list Cover 1008 301 4 ––––– fig. 17 68 Spare parts list OptiFlex 2 F…
-
Page 69: Front Plate And Power Pack
Front plate gasket 1007 042 Membrane keypad Spacer sleeve – Ø 3.6/7×5 mm Display 1007 044 Washer – Ø 3.2/7×0.5 mm Locknut – M3 Power pack – 24 VDC 1009 849 fig. 18 Spare parts list 69 OptiFlex 2 F…
-
Page 70: Inside Back Plate
Motor throttle – complete 1000 064 Plastic tube – Ø 8/6 mm 103 152* Fluidizing pad – 1/8″ 237 264 Screw – M4x16 mm 1013 925 * Please indicate length fig. 19: 70 Spare parts list OptiFlex 2 F…
-
Page 71: Connecting Material
382 485 Mains cable – USA 382 507 Mains cable – GB 382 515 Mains cable – AUS 382 523 Mains cable – China 1000 993 * Please indicate length fig. 20 Spare parts list 71 OptiFlex 2 F…
-
Page 72: Optiselect Gm03 — Spare Parts List
Hose connection Ø 11-12 mm – complete (incl. pos 15.1) 1001 340 # Hose connection Ø 9-10 mm – complete (incl. pos 15.1) 1002 030 # 15.1 O-ring for pos. 15 1000 822 # Threaded sleeve (see corresponding spare parts list) 72 Spare parts list OptiFlex 2 F…
-
Page 73
Powder hose – Ø 10 mm (not shown) 1001 673*# Powder hose – Ø 11 mm (not shown) 105 139*# * Please indicate length # Wearing part fig. 21: OptiSelect GM03 – spare parts Spare parts list 73 OptiFlex 2 F… -
Page 74: Powerclean™ Module (Option)
O ring – Ø 16×2 mm, anti-static 1007 794# Fluidizing tube bearing 1007 356 Fluidizing tube 1007 355 Retaining bracket 1009 524 Gasket 1010 101 O-ring – Ø 27×2 mm 1009 525 # Wearing part fig. 22 74 Spare parts list OptiFlex 2 F…
-
Page 75: Supercorona
Rev. 00 09/16 SuperCorona SuperCorona PC05 1008 165# # Wearing part Fig. 23 Spare parts list 75 OptiFlex 2 F…
-
Page 76: Accessories
1007 683 1007 935 Complex parts NF22 (deep recess); 1008 140 target spraying NF22 1008 145 NF24 Large surfaces 1008 142 NF24* 1008 147 1008 326 * not suitable for angled nozzles 76 Spare parts list OptiFlex 2 F…
-
Page 77
Ø 16 mm 331 341 NS04 Suitable for Ø 24 mm large surfaces 1008 150 331 333 NS04 1008 152 Ø 32 mm 1008 151 1007 229 331 325 Ø 50 mm 345 822 Spare parts list 77 OptiFlex 2 F… -
Page 78
► The extensions (150 mm/300 mm) may be connected TO ONLY ONE ADDITONAL extension (150 mm/300 mm), if necessary. 78 Spare parts list OptiFlex 2 F… -
Page 79
Ø 16 mm 331 341 Suitable for NS09 large Ø 24 mm 1008 259 surfaces NS09 331 333 1008 258 1008 257 Ø 32 mm 331 325 Ø 50 mm 345 822 Spare parts list 79 OptiFlex 2 F… -
Page 80
* Please indicate length Other accessories 150 ml 500 ml Application cup 1004 552 1002 069 Gun extension cables L=6 m 1002 161 L=14 m 1002 162 Gloves, anti-static (1 pair) 800 254 80 Spare parts list OptiFlex 2 F… -
Page 81: Optiflow Ig06 — Spare Parts List
Powder hose – 74 type, POE, Ø 15/10 mm, with conductive strip 1001 673*# Powder hose – 75 type, POE, Ø 18/12 mm, with conductive strip 1001 674*# * Please indicate length # Wearing part Spare parts list 81 OptiFlex 2 F…
-
Page 82: Optiflow Ig06 — Spare Parts
Rev. 00 09/16 OptiFlow IG06 – spare parts fig. 24 82 Spare parts list OptiFlex 2 F…
-
Page 83
Electrical data ……….14, 51 Start-up …………21 Storage …………33 Fault clearance ……. 39, 45, 53, 61 Figure references in the text ……6 Technical Data ……….. 14, 51 Maintenance ……….35, 57 Index 83 OptiFlex 2 F… -
Page 84
Rev. 00…
Коды ошибок окрасочных аппаратов и способы их устранения.
Большая часть поршневых аппаратов в нашей линейке оборудованы электронной системой контроля давления.
Она состоит из датчика давления и электронной платы и отвечает за более стабильное давление в системе и соответственно за более высокое качество окраски.
Однако, кроме контроля давления плата имеет возможность обезопасить аппарат и сообщить нам о его состоянии. Для этого в ней запрограммированы коды ошибок, которые останавливают работу аппарата.
Ошибки не требующие детальных проверок окрасочного аппарата:
✔Е-07 — Высокое давление очистки,
✔Е-09 — Высокие обороты электродвигателя,
✔Е-08 — Низкое напряжение сети.
Е-07 «Высокое давление очистки».
Для перевода аппарата в режим очистки, необходимо немного повернуть потенциометр по часовой стрелке, ровно настолько, чтобы электродвигатель начал работу.
Электродвигатель будет работать на высоких оборотах без остановки, данный режим служит для того, чтобы быстро и эффективно осуществить промывку аппарата. Оборудование промывается при нажатом курке или при снятом распылителе, т.е. подразумевает свободный проток жидкости по шлангу, без давления. При отпускании курка в системе создается давление, которое определяется датчиком и на дисплее возникает ошибка E-07. Отключение аппарата предохраняет двигатель от поломки в результате перегрузки от работы на высоких оборотах при давлении.
Для того чтобы скинуть данную ошибку нам необходимо выкрутить регулятор давления в ноль, сбросить давление, открыв дренаж, выключить и включить аппарат.
Е-09 «Высокие обороты электродвигателя».
Эта ошибка возникает, на высоких оборотах электродвигателя в режиме распыления, но датчик не определяет давление. Так происходит когда емкость с краской опустела или насос не в состоянии закачать материал. Возникновение ошибки Е-09 в первую очередь предохраняет насос от «сухой» работы, а электродвигатель от перегрузки.
Чтобы избавиться от этой ошибки нам нужно выкрутить регулятор давления в ноль, выключить и включить аппарат, наполнить емкость материалом, запустить аппарат и выгнать воздух из системы через дренаж и продолжить работу.
Е-08 »
Низкое напряжение сети».
В таком случае нужно проверить параметры электросети на объекте и не использовать аппарат до нормализации параметров.
Ошибки требующие более детальных проверок аппарата:
✔Е-03 — Неисправность датчика давления,
✔Е-05 — Неисправность двигателя или платы управления (В данном случае необходимо обратиться в наш сервисный центр для профессиональной диагностики оборудования сервисным инженером).
Е
-03 «Неисправность датчика давления».
Для начала нужно проверить подключен ли датчик к плате, для этого необходимо открутить болты боковой крышки аппарата и осмотреть подключение и осмотреть подключение датчика.
Если после проверки аппарат не запустился – заменить датчик.
Е-05 «Неисправность двигателя или платы управления».
В данном случае необходимо обратиться в наш сервисный центр для профессиональной диагностики оборудования сервисным инженером.
Вы всегда можете нам написать или позвонить.
info@ASPRO-rus.ru
8(800)555-09-74
Возврат к списку