#1

Sergikovskij
-

- Beginner
-

- 3 сообщений
Новичок
- E60
- Belarus
Отправлено 20 Декабрь 2017 — 06:31
Здравствуйте! Подскажите пожалуйста выскочила ошибка-fuel pump fault.possible to continue journey. have the problem checked by the nearestbmw service-в переводе(Неисправность топливного насоса! Malfunction. Possible to continue journey. Have the problem checked by the nearest BMW Service. Сбои в работе. Дальнейшее движение возможно. Как можно скорее обратитесь на СТО BMW.) Дело в том что подключали комп он показал ошибку -катализатор Denox забит серой, ошибка по лямде и ошибка по расходомеру. По топливному насосу ошибок небыло! что бы могло это все значить, ошибка появилась после интенсивной езды по трассе.Или насос не причем может из-за катализатора забитого? BMW E60 2.0L
IMG_2827.JPG 37,88К
0 Количество загрузок:
IMG_2827.JPG 37,88К
0 Количество загрузок:
- Наверх
#2
uno
Отправлено 20 Декабрь 2017 — 11:18
А какой блок диагностировали?
- Наверх
#3
igrok_1
igrok_1
- BMW E60 525d
- Deutschland BW
Отправлено 21 Декабрь 2017 — 12:30
Топливный фильтр когда менялся?
- Наверх
#4
Sergikovskij
Sergikovskij
-
- Beginner
-
- 3 сообщений
Новичок
- E60
- Belarus
Отправлено 21 Декабрь 2017 — 07:22
А какой блок диагностировали?
я так понимаю все блоки
Топливный фильтр когда менялся?
При мне не менялся ни разу. Если бы было дело в насосе, комп показывал бы что-либо?
- Наверх
#5
igrok_1
igrok_1
- BMW E60 525d
- Deutschland BW
Отправлено 21 Декабрь 2017 — 10:13
1.При мне не менялся ни разу.
2.Если бы было дело в насосе, комп показывал бы что-либо?
1.Дак поменяй.
2.Дык он тебе прямым текстом пишит, неисправность топливного насоса. Возможна дальнейшая поездка. (Неисправность топливного насоса! Возможна дальнейшая поездка. Уточните проблему у ближайшей службы BMW.
что ты от него ещё хочешь?
Сообщение отредактировал igrok_1: 21 Декабрь 2017 — 10:22
- Наверх
#6
Sergikovskij
Sergikovskij
-
- Beginner
-
- 3 сообщений
Новичок
- E60
- Belarus
Отправлено 22 Декабрь 2017 — 05:36
1.Дак поменяй.
2.Дык он тебе прямым текстом пишит, неисправность топливного насоса. Возможна дальнейшая поездка. (Неисправность топливного насоса! Возможна дальнейшая поездка. Уточните проблему у ближайшей службы BMW.
что ты от него ещё хочешь?
Да спасибо, на сто посоветовали тоже так сделать, как поменяю отпишусь о проделанной работе!
- Наверх
Страница 1 из 2
-

- Регистрация:
- 12 апр 2015
- Сообщения:
- 34
- Лайки:
- 1
- Баллы:
- 0
- Адрес:
-
Латвия
Всем привет! Столкнулся с проблемой, что после каждой поездки машина не заводится и выдаёт ошибки.
— Cruise control Failure
— Fuel pump failure
— Transmission faultНа холодную проблем нет, но как нагреется, то всё. Приходится играться с ключом по 5-15 минут, иногда и час, пока не засветится индикатор двигателя.
Когда выкидывает ошибки, то слышно как работает топливный насос. Даже если высунуть ключ, то он продолжает работать. Когда ошибок нет насос выключается сразу, после того как высовываешь ключ.
Менял акум, DDE реле и черное реле в багажнике, но не помогло. Терзает смутное сомнение, что перегревается ECU. Может кто сталкивался с такой проблемой? Или знаете кто сможет поставить другой ECU. У нас в Резекне с такой проблемой некуда податься, тем более что сажевик вырезан и прошит, а тогда нужно мою прошивку копировать.
-

- Регистрация:
- 15 июн 2009
- Сообщения:
- 384
- Лайки:
- 9
- Баллы:
- 18
- Адрес:
-
РИГА
-
- Регистрация:
- 15 июн 2009
- Сообщения:
- 384
- Лайки:
- 9
- Баллы:
- 18
- Адрес:
-
РИГА
зайди на bmweast почитай про первую серию
-
- Регистрация:
- 1 апр 2005
- Сообщения:
- 35
- Лайки:
- 0
- Баллы:
- 6
- Адрес:
-
dinaburg
1 диагностика
2 проверь все соединения с блоками -
- Регистрация:
- 12 апр 2015
- Сообщения:
- 34
- Лайки:
- 1
- Баллы:
- 0
- Адрес:
-
Латвия
Спасибо, боюсь у меня другая проблема. Может даже проблема с EKP и её нужно заменить. Попробую сегодня заправиться до верха и посмотрю как она будет себя вести. Может нужно на DDE remap сделать.
С форсунками тоже норма. Есть ли в Риге человек который сможет правильно диагностику провести? А то уже хочется её в кювет спустить и по КАСКО получить деньги.
-

- Регистрация:
- 16 июн 2007
- Сообщения:
- 2,177
- Лайки:
- 212
- Баллы:
- 63
- Род занятий:
- Антидилер
- Адрес:
-
KO26AX
Бред. Всё бред.
Поменяй главное реле. -
- Регистрация:
- 12 апр 2015
- Сообщения:
- 34
- Лайки:
- 1
- Баллы:
- 0
- Адрес:
-
Латвия
Попробую. А где оно находится? Если поможет устранить проблему, с меня ящик пива ) Уж наелся уже я с этой проблемой.
Правда если это оно, то я его уже менял (DDE Relay)
![[IMG]](http://parts.bmwofsouthatlanta.com/images/parts/sons/fullsize/full_20130628_142322_-1151947624.png)
-

Slow
Amateur GynecologistКоманда форума
- Регистрация:
- 14 апр 2007
- Сообщения:
- 8,722
- Лайки:
- 541
- Баллы:
- 113
- Пол:
- Мужской
- Адрес:
-
Riga
DDE сухой? Тонут они иногда из за забитых дренажей. Или тонул какое то время назад. В этом случае трепанация и визуальный осмотр.
-
- Регистрация:
- 12 апр 2015
- Сообщения:
- 34
- Лайки:
- 1
- Баллы:
- 0
- Адрес:
-
Латвия
Та же мысль. К кому можно обратиться по вопросу ремонта, замены DDE ECU?
P.S.
Забыл сказать, после того как показания скинулись, после замены акума. То на холостых показатель расхода на 100 км начал рости, дошло до 29л/100km. Ехал с Риги до Резекне упало до 8 литров, но как опять на холостых, то показания ростут.
-

- Регистрация:
- 17 июл 2009
- Сообщения:
- 8,942
- Лайки:
- 1,142
- Баллы:
- 113
- Пол:
- Мужской
- Адрес:
-
Ventspils
Серьёзно растут? А у меня пока стою мотор сам крутиться по маслу, и расход падает.
-
- Регистрация:
- 12 апр 2015
- Сообщения:
- 34
- Лайки:
- 1
- Баллы:
- 0
- Адрес:
-
Латвия
Да, как появилась эта проблема, так появилось и это чудо. По факту расход на холостых стандартный, но вот датчику на это наплевать.
-
- Регистрация:
- 16 июн 2007
- Сообщения:
- 2,177
- Лайки:
- 212
- Баллы:
- 63
- Род занятий:
- Антидилер
- Адрес:
-
KO26AX
Круиз активный или обычный?
-
- Регистрация:
- 12 апр 2015
- Сообщения:
- 34
- Лайки:
- 1
- Баллы:
- 0
- Адрес:
-
Латвия
-
- Регистрация:
- 2 сен 2013
- Сообщения:
- 59
- Лайки:
- 0
- Баллы:
- 6
- Род занятий:
- https://m.facebook.com/groups/852215221549252?ref=
- Адрес:
-
Liepaja
Какие номера ошибок, даёт диагностика?
-
- Регистрация:
- 12 апр 2015
- Сообщения:
- 34
- Лайки:
- 1
- Баллы:
- 0
- Адрес:
-
Латвия
Сегодня был на диагностике, показало только что ошибка с DDE/DME. У меня естественно DDE. Попробовали поменять DDE, правда вторая часть кода не идентичная. Залили мою прошивку, всё те же ошибки, но ещё добавилось и ABS. Мастер говорит надо всю проводку смотреть.
Катаюсь как идиот, с возможностью один раз выехать за день.
-

- Регистрация:
- 1 окт 2008
- Сообщения:
- 308
- Лайки:
- 7
- Баллы:
- 18
- Адрес:
-
Рига
А номера ошибок, пацаны спрашивают, КАКИЕ ? Они цифрами отображаются. Просишь помощи, а пишешь муть какую-то.
-
- Регистрация:
- 16 июн 2007
- Сообщения:
- 2,177
- Лайки:
- 212
- Баллы:
- 63
- Род занятий:
- Антидилер
- Адрес:
-
KO26AX
В момент когда косяк не пропадает промерь напряжения на РТ-CAN и все питания на входах в DDE.
-

Поделись,кто в Резекне занялса твоей проблемой?
-
- Регистрация:
- 12 апр 2015
- Сообщения:
- 34
- Лайки:
- 1
- Баллы:
- 0
- Адрес:
-
Латвия
Артик, у Сергея в сервисе на Юпатовке. Они в основном тройками занимаются. В Резекне только к ним и можно ездить.
Страница 1 из 2
Поделиться этой страницей
BMW E60 Fuel Pump Replacement And Diagnostic Guide
Changing the fuel pump on a BMW E60 model can be challenging if you have not replaced it a few times in the past or don’t understand the system. In this article, I will be explaining to you how the fuel pump actually works, what possible fault codes you might encounter and how to properly diagnose the system plus show you how to replace it.
But first, here’s a list of the tools you will need.
- Flashlight
- Rubber mallet
- 10MM socket and ratchet
- Lots of rags or catch can in case fuel spills
- Big Flathead screwdriver if you don’t have pump removal tool
BMW E60 case study.
Today a nice looking dark blue 2008 BMW E60 535i showed up on the back of a local tow truck and was dropped off with a crank but no start condition.
Usually, technicians quiver and get upset when this happens because they have to deal with the headache of figuring out what is wrong with the car.
For me, when I see a car in the back of a flatbed I get excited about two reasons. one being that I get to figure out what exactly is wrong with the car and two I get to bring it back to life.
I get that feeling when the mad scientist from the Frankenstein movie gets when he brings him to life on the operating table.
This particular vehicle has about 144,000K miles on the instrument cluster so its no surprise the pump failed and actually lasted this long.
We immediately pushed the car onto my lift after the car was dropped from the flatbed and I quickly scanned the DME to retrieve fault codes and the picture below shows you the fault that was registered.
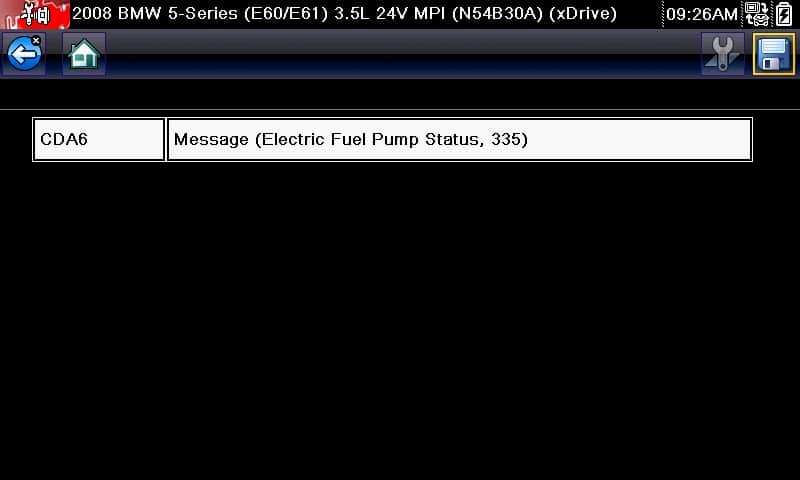
Let’s start the BMW E60 fuel pump replacement process by drawing up a game plan and actually executing it properly.
Most of the time when mechanics get fault codes like this they usually make the mistake of assuming that the pump has in fact failed and start the replacement process.
I’ve seen countless times where a mechanic gets a car then reads the fault memory and it displays oxygen sensor faults and they go ahead and replace the sensor go out on a test drive and the fault code comes back.
Early in my career, I’ve noticed this pattern in other techs and I decided not to be that guy that just changes parts and prays to the car gods that it fixes the problem on the vehicle.
I started studying and reading my butt off and soaked in all the information I can get from my automotive textbook and watched countless youtube videos on technical topics of everything automotive technology.
Now many years later I have fine-tuned my diagnostic procedures and I actually have fun figuring out problems and fixing them.
For this article and case study, the spoiler alert here is that the low-pressure fuel pump has in fact died and I did end up replacing it. but I do still show you how I came to this conclusion.
So as you read along I will show you my exact process of how I came to the conclusion that the low-pressure fuel pump in this car failed and I will show you exactly what failed within the pump.
BMW EKP Fuel Pump Control Unit.
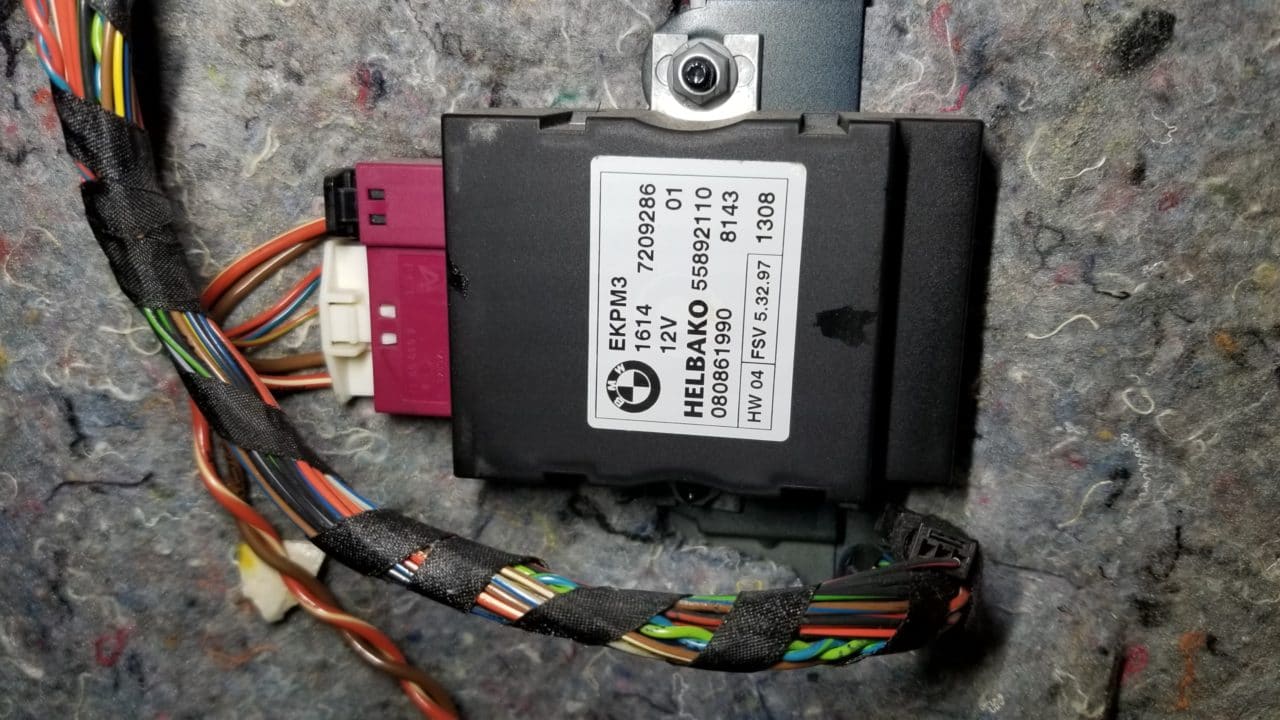
Installation location.
The installation location for the BMW EKP fuel pump control unit for the E60 is located on the passenger side rear trunk space behind the upholstery cover as you can see in the picture below.
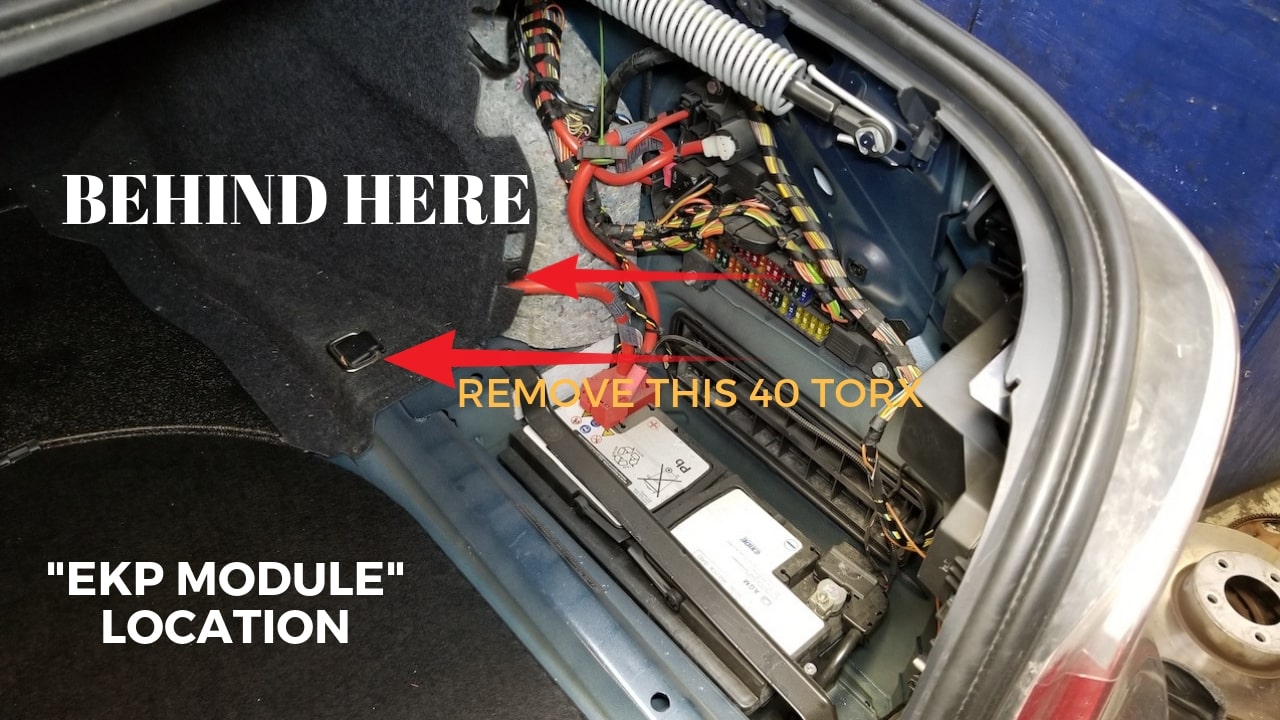
Once you have removed the cover the module will be exposed and will be fastened by two 10mm nuts. you can simply remove the nuts and then remove the unit if you ever need to replace it. remember you have to code the new unit so keep that in the back of your mind. After this step we will move forward to the BMW E60 fuel pump replacement procedure.
For the BMW E63 and E64 models, the control module is located on the base plate underneath the rear seat.
There are 2 versions of the EKP module
- EKP control module with a total of 8 pins (until 03/2004)
- EKP control module with a total of 20 pins (from 03/2004)
How it works.
The actual EKP fuel control module stores the required fuel maps in order for the car to run properly. it is also encoded to match the specific engine and model type.
It uses the fuel mappings as the basis to calculate the correct fuel amount to be used when the DME demands it and the volume it wants. it also calculates how much fuel volume and pressure to send and lubricate the high-pressure pump in the diesel system.
This type of functionality is achieved by a pulse width modulated voltage supply from the control module. what actually supply’s the output voltage of the low pressure in tank fuel pump is the EKP module.
The actual speed and RPM of the low pressure in tank pump is controlled this way and it has become standard technology as BMW moves forward with their vehicles.
So basically the control unit sends a voltage supply to the pump via (pulse width modulated) current. the voltage is then viewed as a specific ripple according to the individual armature windings of the rotating electric motor.
The ripple corresponds with the number of segments in the commutator part in the assembly (= the actual number of armature windings in the electric motor).
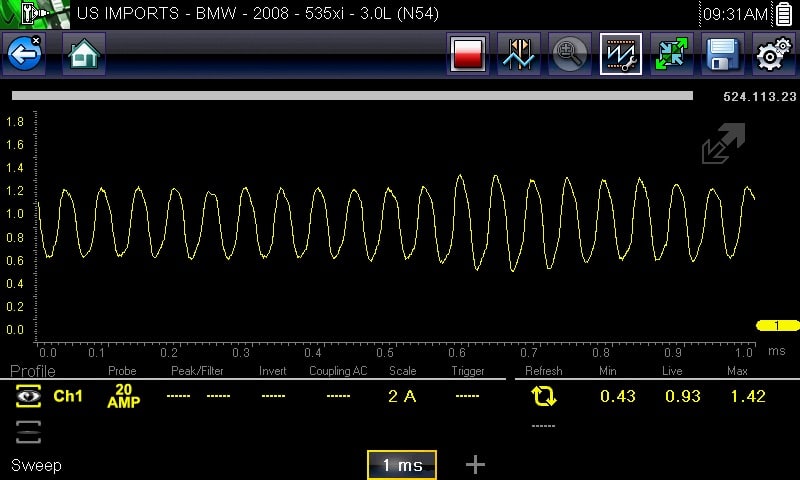
Scope pattern of the fuel pump looks like waves and that is produced by the number of existing commutator segments and the RPM of the unit. check out the picture below to get an idea of what I mean.
Scope pattern of a good fuel pump at idle. (new pump installed).
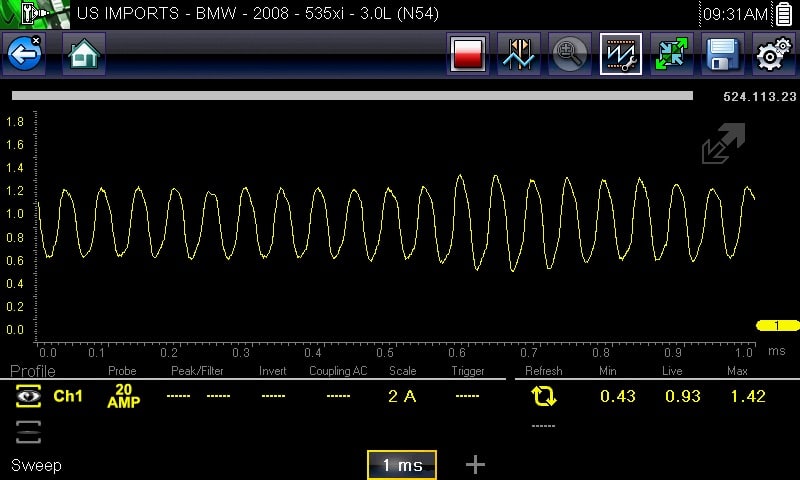
The picture above was taken after I actually changed the low-pressure side fuel pump and its a perfect example of a good looking fuel pump wave pattern of the commutator segments.
For this, I snapped a picture using my snap-on vantage two channel scope and uploaded it from the machine to my computer. I love technology.
Properly diagnosing a bad BMW E60 fuel pump.
Now for the meat and potatoes of this article. I’ve explained what’s involved in the fuel pump system as far as the electronics and the technical aspect of the system but now as you read below I will show you the steps I took to find the problem with this vehicle’s no start condition.
Some of the symptoms of the pump actually failing I have listed in my other article called BMW E46 fuel pump replacement done right(professionally) so you can check that out for a reference.
But for this particular case study and vehicle, the condition here is a “crank” but “no start” problem so I treat it differently. the E46 I worked on was running but had lean conditions. not enough fuel for the demand.
First thing is first we have to verify the problem but that was easy because I knew it did not start to begin with so next step in the direction I wanted to take with this car was to check the actual fuse located in the trunk.
The fuse for the low-pressure fuel pump is number (72) and good thing I checked there first because I found the fuse blown which indicated an obvious problem. check out the picture below of the fuse I found.
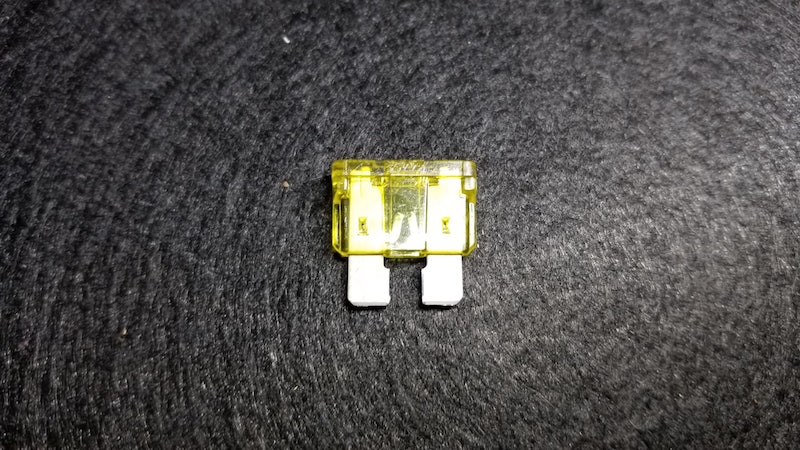
Most of the time when a fuse is blown it is usually due to a short to ground or excessive current within that circuit so I already had an idea where I was going to go with this diagnostic procedure.
After I found this blown fuse I went ahead and replaced that fuse with a good one I sat in the driver seat and cranked away at the ignition switch only to result in the fuse being blown again. confirmation.
Next step I did was to replace the blown fuse again but not start the car. what I did next is hooked up a fuel gauge reader and check if I had any type of pressure whatsoever when I just switch the ignition to accessory mode.
The picture below shows a zero psi reading with a new fuse in the circuit and just placing the ignition switch in the on position.
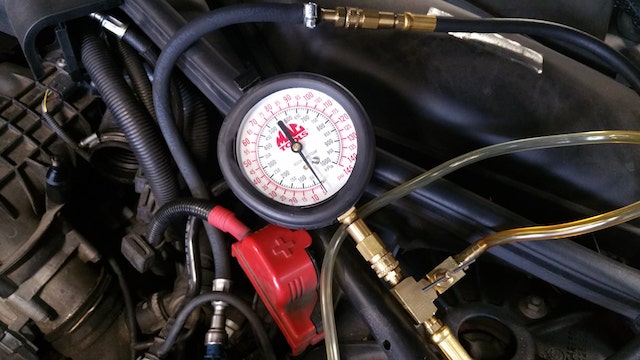
After re-confirming that there is no fuel pressure whatsoever coming from the fuel pump with the ignition switch being turned on I went ahead and tried starting the car again only to have another fuse being blown and no movement from the needle of my fuel pressure gauge.
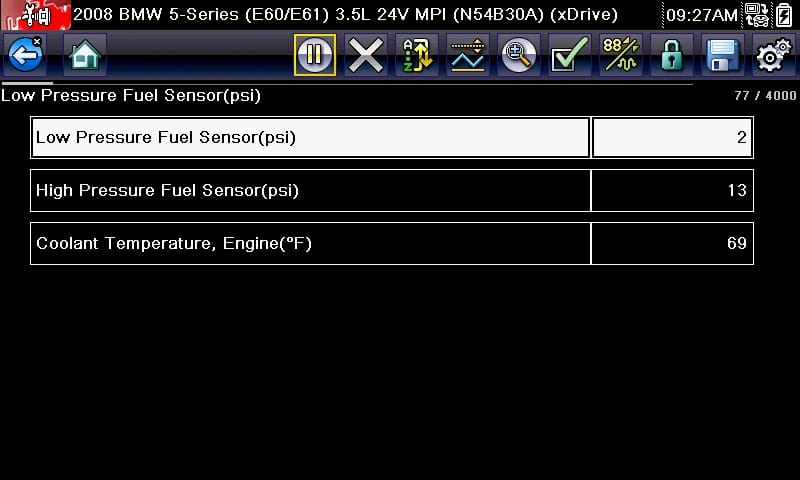
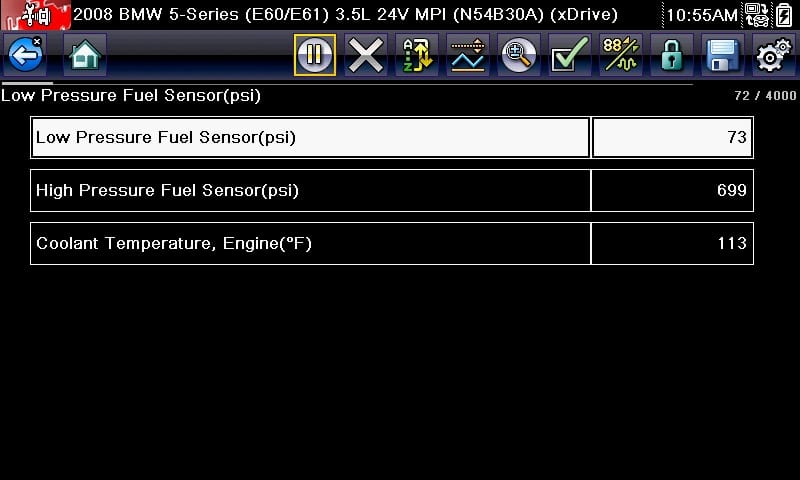
At the same time if you do have access to a proper scan tool like the one I use in my case studies then pull up the data PID for fuel readings like the picture below and take note that no pressure is present upon key on engine off.
Now we are definitely moving in the right direction. After all that now is when I walk to the back of the car and remove the back seat and placed it in a clean location so it won’t get dirty. customers hate to see dirt and grime in their cars.
After removing the back seat you will notice two black covers underneath a carpet like material. Remove both covers. One on the driver side and the other on the passenger side. The passenger side is the pump and the driver side is the sender unit.
First Step For BMW E60 fuel pump replacement procedure.
Remove all eight 10MM nuts and you will see the top of the fuel tank and both units installed in them with the famous BMW lock ring holding them in place.
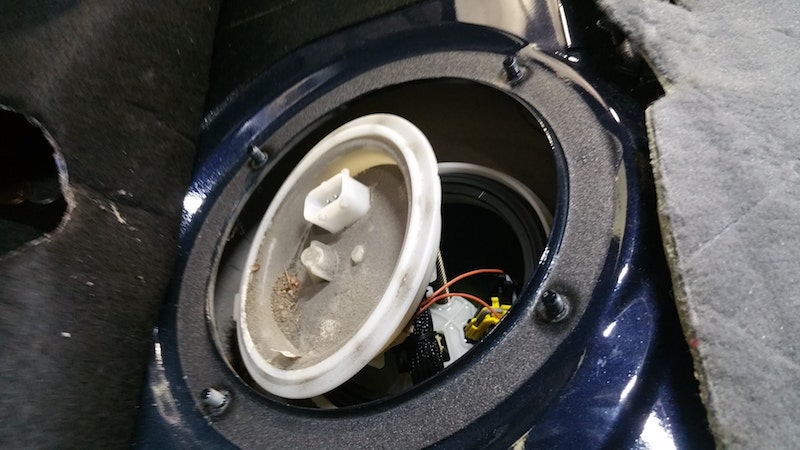
The picture below is the actual fuel pump unit on the passenger side with the black cover removed and exposed.
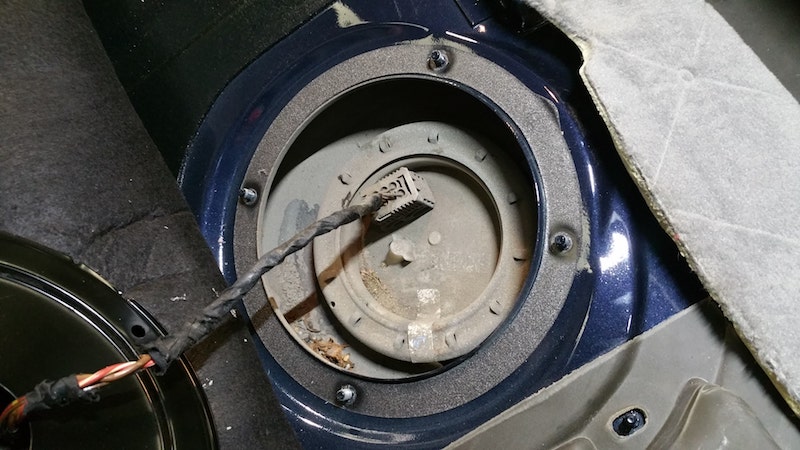
That is the fuel pump and the connector coming from the EKP control unit. notice the big red and brown wires going to it? that will be your power and ground coming from the control module. BMW did great by placing the module near the pump to save the length of wire.
Next step I took was to remove the connector and remove the actual lock ring holding the pump in place in the fuel tank.
Fuel pump side(passenger side)
Sender side(driver side)
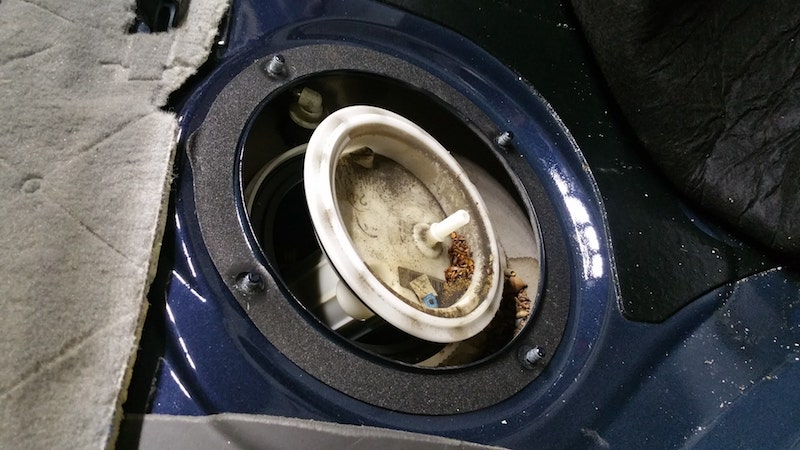
I removed both the sender unit and the fuel pump unit. you have to because as you will see in the upcoming steps the pump has plastic hoses running inside the tank going across to the other side.
Basically, the fuel pump sends the fuel from one side of the tank to the other side via the plastic hoses then the fuel sender on the driver side rear send that fuel towards the front of the engine which is pretty cool.
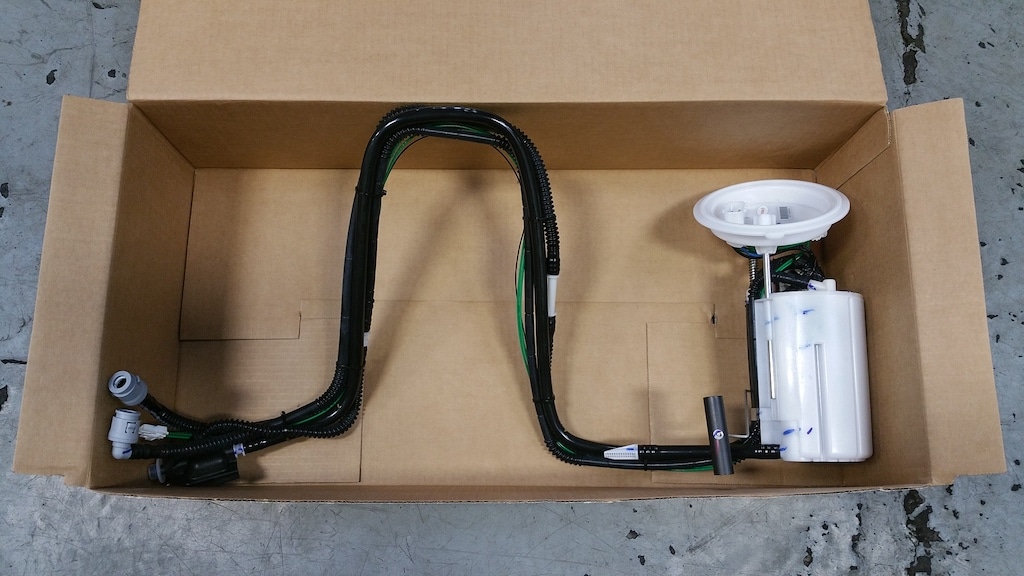
Now after you have removed the lock rings on both sides of the fuel tank what you want to do next is be careful pulling up the sender and fuel pump because they have some hoses attached within the tank.
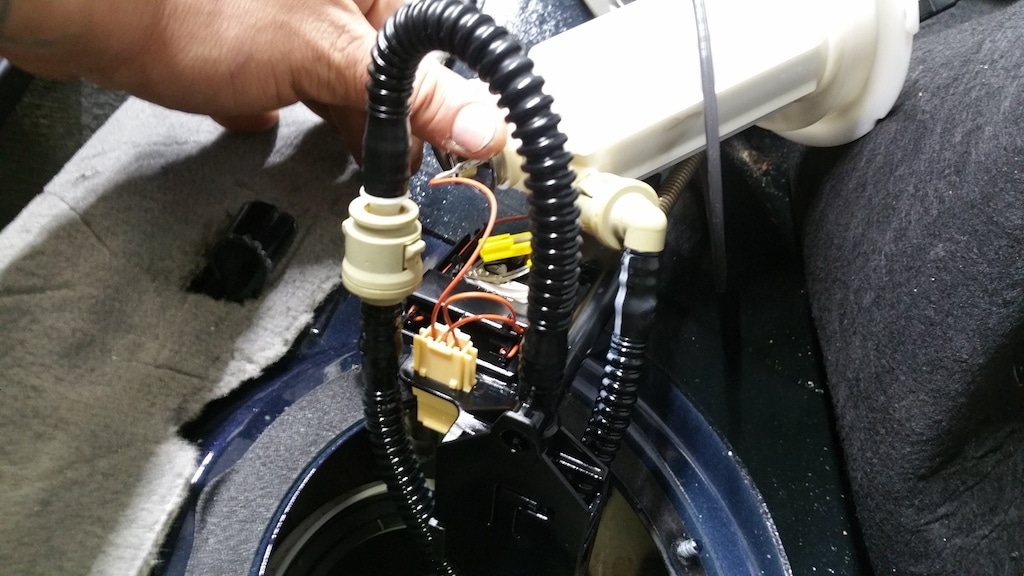
The picture above is the driver side fuel sender unit so what you want to do here is slowly and carefully detach the two hoses and the one harness connector.
Then pull the driver side sender unit out of the tank and place it somewhere safe but be careful that you might leak fuel all over the place. use a pan or a bunch of rags to catch any fuel.
Next, you will have the hoses dangling inside the fuel tank as I show you in the picture below. after that then go over to the passenger side and remove the fuel pump slowly without breaking any of the plastic hoses.
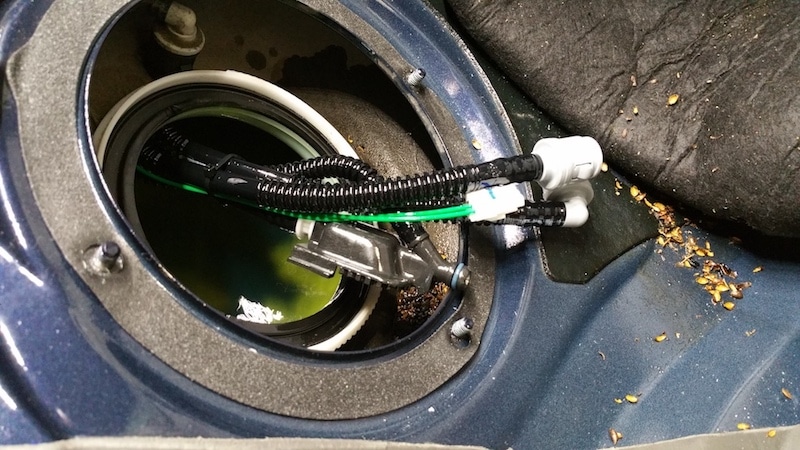
Now that you have successfully removed both the sender unit on the driver side and the actual fuel pump on the passenger side all you have to do is work backward from here in reverse order.
Basically, install the new fuel pump unit and make sure you feed the plastic hoses into the tank and feed it to the other side of the tank so it might mean you have to stick your arm in the tank and guide it to the other side.
Then attach the same sending unit you previously removed on the driver side and put it all back together close up the lids and lock the lockrings back into place.
Verify the problem is fixed.
Now that you have performed the BMW E60 fuel pump replacement procedure you now have to verify that the problem is fixed.
In this case study and this car, I verified a few ways. since I own a snap-on scan tool and snap-on scope I am able to use these tools to test systems and make proper repairs. they do help a ton but they are not necessary.
The first way I verified that the fault was gone after I replaced the low-pressure side fuel pump was to actually install a new fuse and crank the engine.
The picture below is of a fuel pressure reading with the engine running and fault memory cleared.
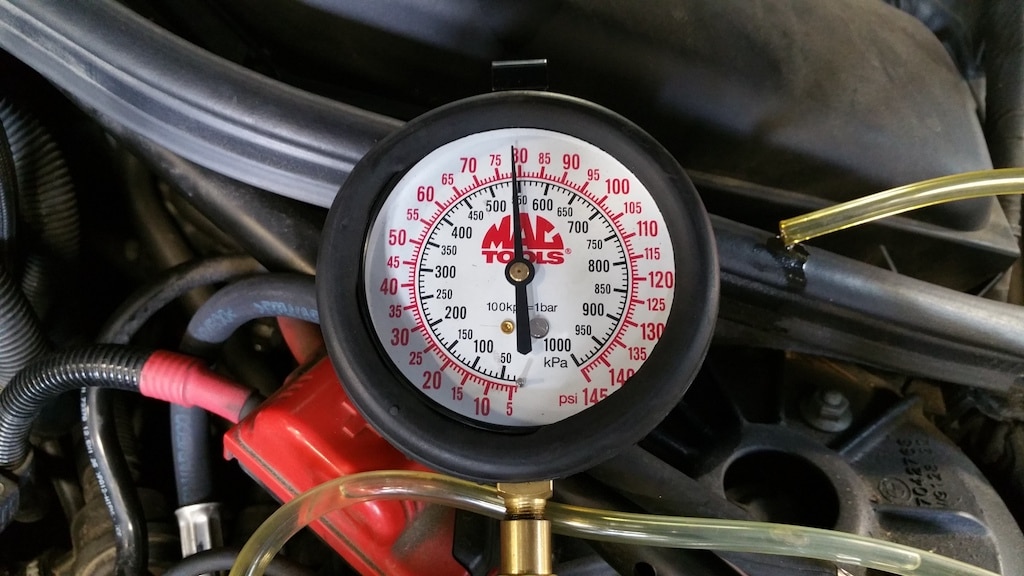
This is the right pressure reading the low-pressure fuel pump should be reading as a normal running pump. now after finding the fuse popped and replacing the fuel pump now the car is able to start and run properly.
Now for my conscious and my OCD, I went one more step further so I would be able to sleep at night and attached my scope to visually see that the new fuel pump was running properly. the pic below is a scope pattern of a good pump.
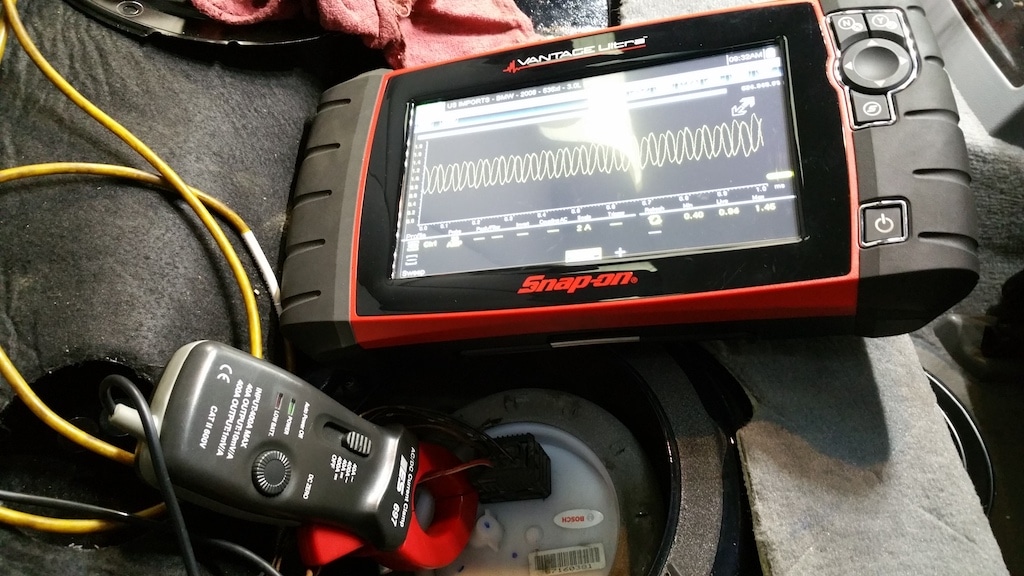
Don’t mind the double wave scope pattern it is actually a single wave pattern but i think it was a camera issue when it captured the image. I did use my android phone.
The picture below is the picture taken from my scope machine and it was a BMP file and converted to JPEG so it looks better but this is a good strong wave pattern here.
And the picture below is a picture taken on my scan tool from the data PID and I uploaded it here for you guys. but this is a proper fuel pressure reading of a good running pump on the low-pressure side.
Here is why the fuel pump failed.
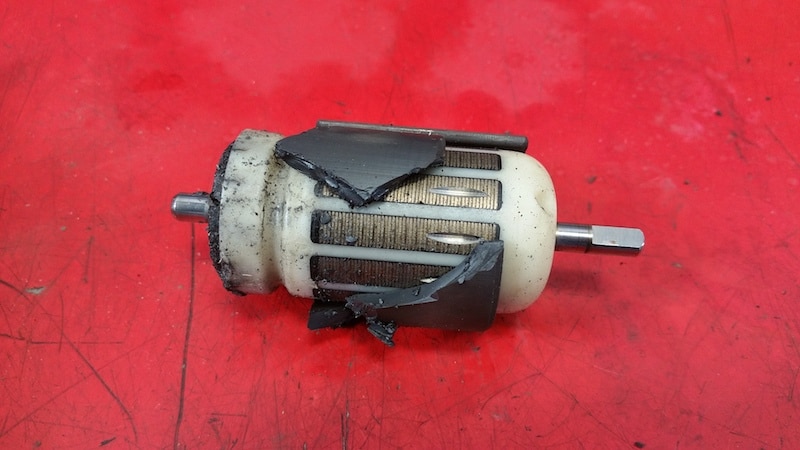
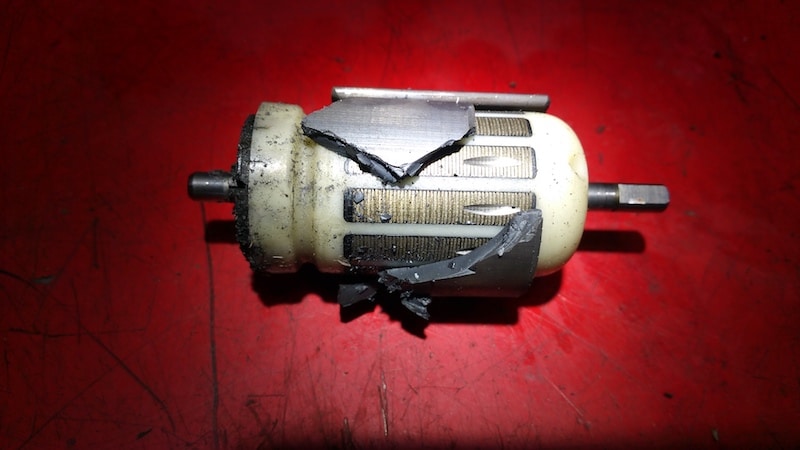
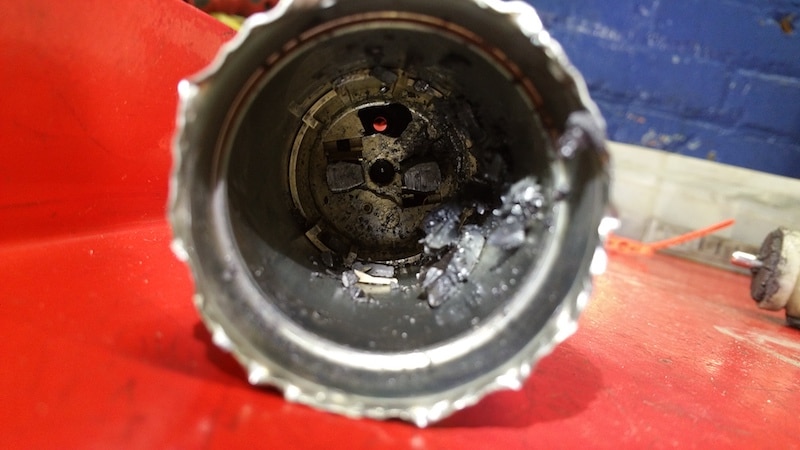
And now to wrap things up here, I show you the reason why the fuel pump failed. in the picture below is the actual pump inside the unit itself.
A fuel pump or in other cases an electric motor can fail for few reasons but in this case, the actual magnet within the fuel pump assembly deteriorated and broke leaving pieces everywhere.
As I usually do I went a step further because from an engineering perspective I want to know why things failed and how they failed so I took it apart to see what happened exactly.
Plus this is just me being the nerd that I am. anyways here are the pictures I took below.
And there you have it. You finished the BMW E60 fuel pump replacement procedure. I explained to you the different parts of the system and how they work, how to diagnose, how to change the fuel pump and I showed you what actually failed.
I really hope this post has helped you in your diagnostic procedures and was able to solve your BMW e60 dead fuel pump problem.
If you enjoy this type of content please share on your social media platforms and forums. any type of exposure to my content will be greatly appreciated. I enjoy teaching and helping others with their problems related to European cars.
If you haven’t yet please subscribe to my newsletter here to stay up to date on a weekly post on subjects like diagnosing, repair, industry news and much much more.
Thank you for reading and happy motoring!
В этом руководстве мы рассмотрим, как устранить неисправность модуля BMW EKPS с помощью диагностического сканера OBD-II. Вы узнаете, что такое модуль EKPS, какие системы он охватывает и как читать/удалять коды из модуля EKPS.
Содержание
- 1
Что такое модуль BMW EKPS? - 2
симптомы - 3
Как прочитать/очистить коды ошибок EKPS- 3.1
видео - 3.2
Что тебе понадобится - 3.3
инструкции
- 3.1
- 4
Общие проблемы - 5
Адаптации - 6
Живые данные- 6.1
Коды неисправностей
- 6.1
- 7
Связанные ресурсы
Что такое модуль BMW EKPS?
Электронный модуль управления топливным насосом (EKPS) управляет питанием вашего топливного насоса BMW. Блок управления EKPS отличается от топливного насоса. Блок EKPS обычно устанавливается в багажнике (на боковой панели) или под задним сиденьем, а топливный насос установлен на верхней части топливного бака.
Система управления двигателем отправляет запрос на топливо, требуемое в данный момент, в модуль управления EKP. Модуль управления EKP преобразует этот запрос в соответствующую частоту вращения двигателя для топливного насоса в топливном баке. Модуль управления EKP затем активирует топливный насос в соответствии с частотой вращения двигателя. Документ TIS 16 02 03036
При замене модуля EKPS требуется, чтобы новый модуль EKPS был запрограммирован (закодирован) на автомобиль. Многие владельцы BMW смогли успешно заменить модуль EKPS на использованный модуль без необходимости программировать его , если использованный модуль EKPS имеет аналогичную модель BMW и двигатель.
симптомы
Список возможных симптомов, которые вы можете заметить в случае сбоя модуля EKPS или одного из его компонентов.
- Предупреждающее сообщение на экране iDrive
- Низкий запас топлива
- Неисправность топливного насоса
- Неисправность двигателя! Уменьшенная сила!
- Двигатель заводится, но не запускается
- Слишком низкое напряжение топливного насоса
- Двигатель запускается, затем качает
- Нерешительность под сильным ускорением
- Пропуск двигателя и распыление
- БМВ не остановится
В некоторых случаях двигатель может запуститься, но встряхнуть, а затем отключить. Ожидание в течение нескольких минут часто позволяет перезапустить двигатель.
Как прочитать/очистить коды ошибок EKPS
Если у вас возникли проблемы, хорошей отправной точкой является чтение кодов неисправностей из модуля EKPS. Если какой-либо код присутствует, его необходимо устранить. Если коды находятся в состоянии STORED/PAST, их можно удалить.
видео
Что тебе понадобится
Диагностический сканер, способный считывать, очищать и выполнять двунаправленные тесты на автомобилях BMW. Вы должны подтвердить , что используемый сканер поддерживает вашу модель BMW и год. Полноценные системные сканеры, которые работают на автомобилях BMW, могут стоить от 150 до 800 долларов США.
Список сканеров, которые считывают и сбрасывают коды неисправностей BMW EKPS.
- Autel MaxiDAS (модель 808 и выше)
- Foxwell для BMW (модель 510 и выше)
- Запустите полный системный сканер (модель X431 и выше)
Другие сканеры OBD2 позволяют считывать и очищать коды неисправностей BMW EKPS. Чтобы узнать о других сканерах OBD2, которые работают на BMW, ознакомьтесь со статьей «Выбор лучшего сканера OBD2 для BMW».
инструкции
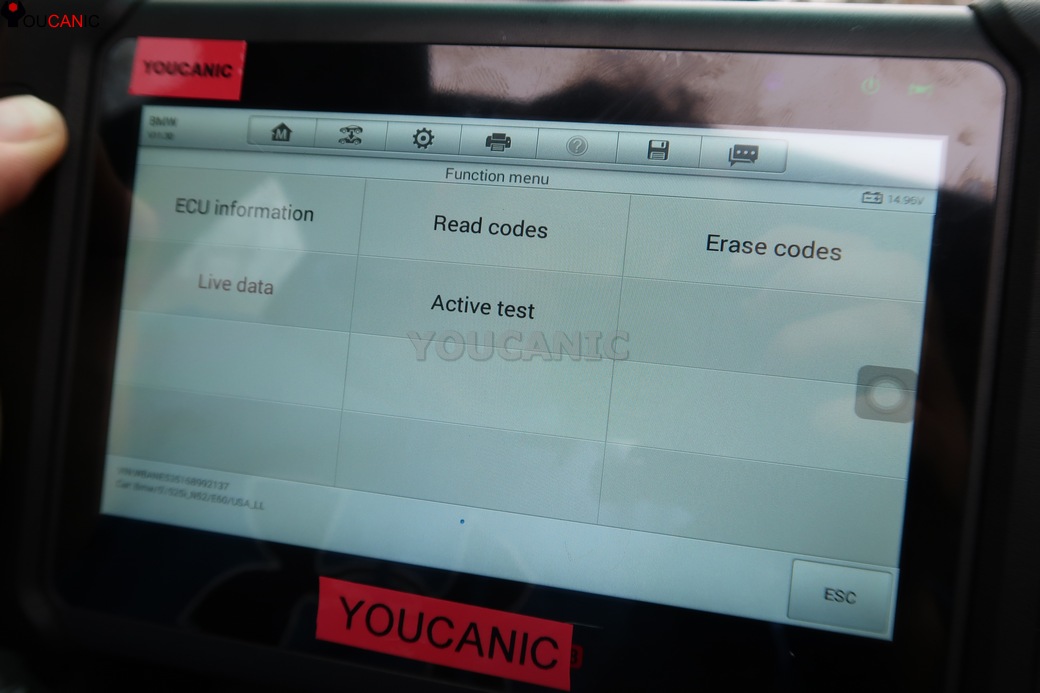
- Подключите сканер OBD-II к диагностическому порту под приборной панелью.
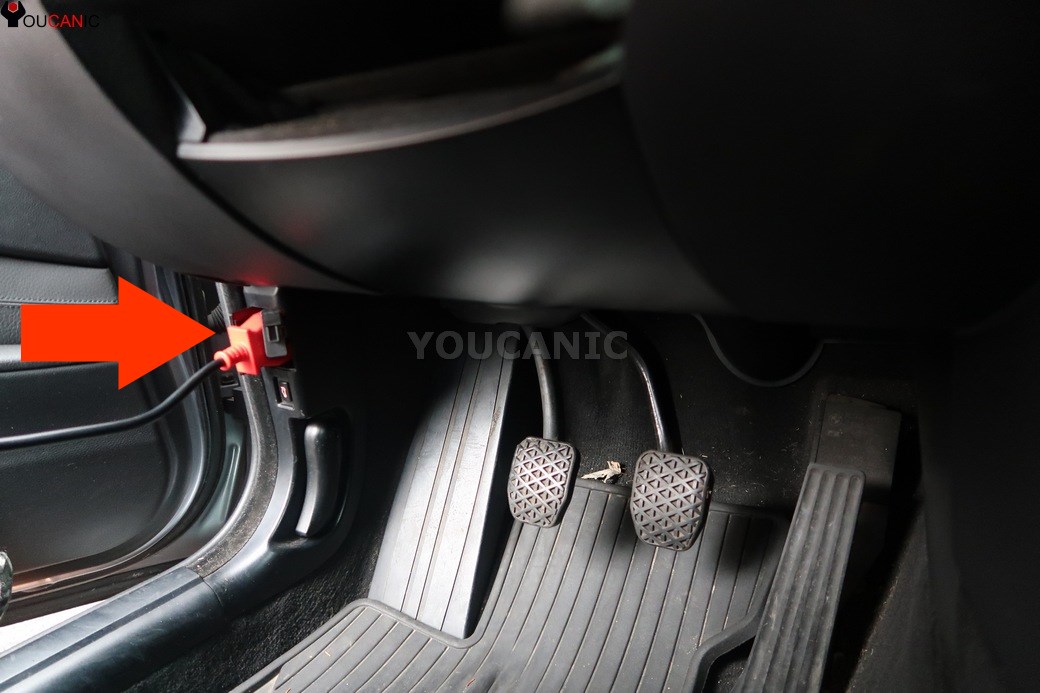
- Включите зажигание, не запускайте двигатель.
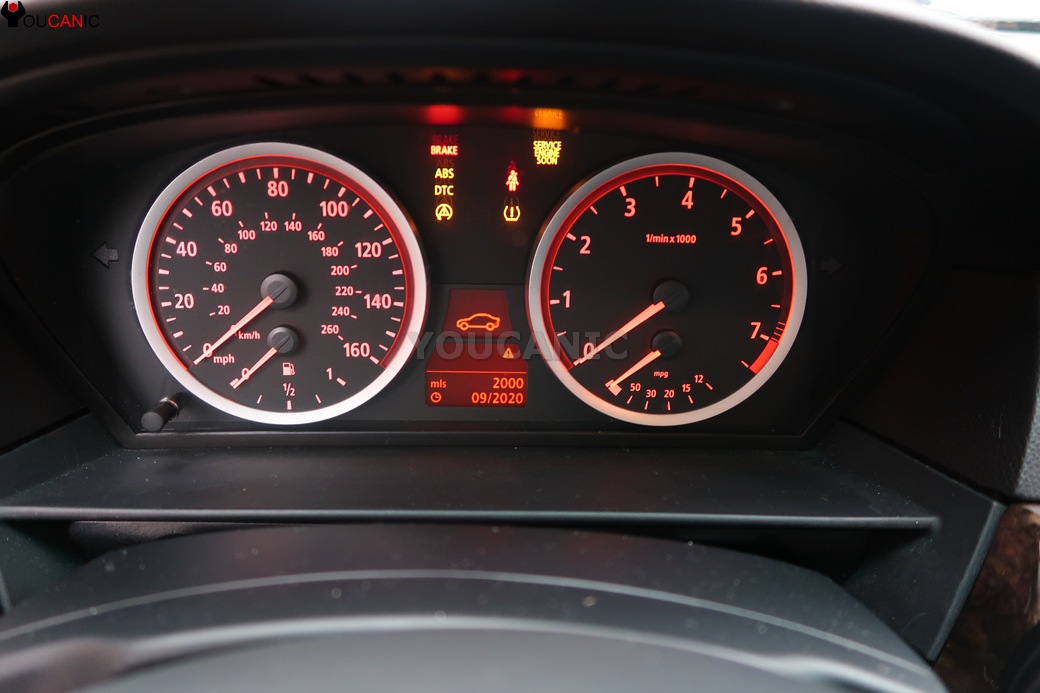
- Включите сканер и выберите шасси BMW. Затем выберите меню «Единицы управления».
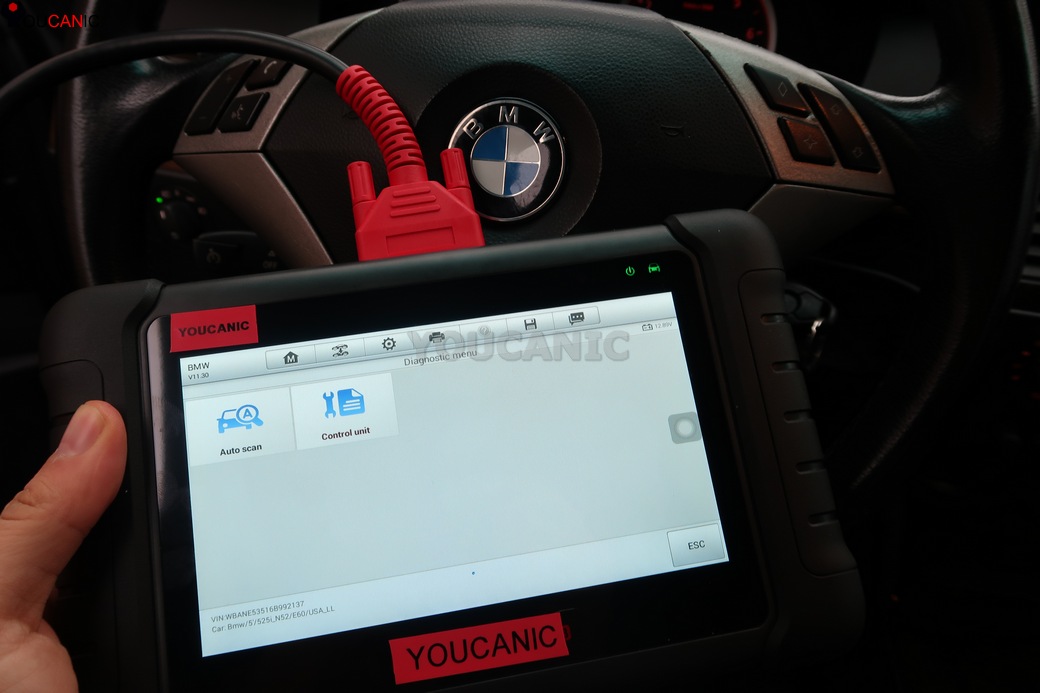
- Выберите Drive, затем EKPS control топливного насоса.
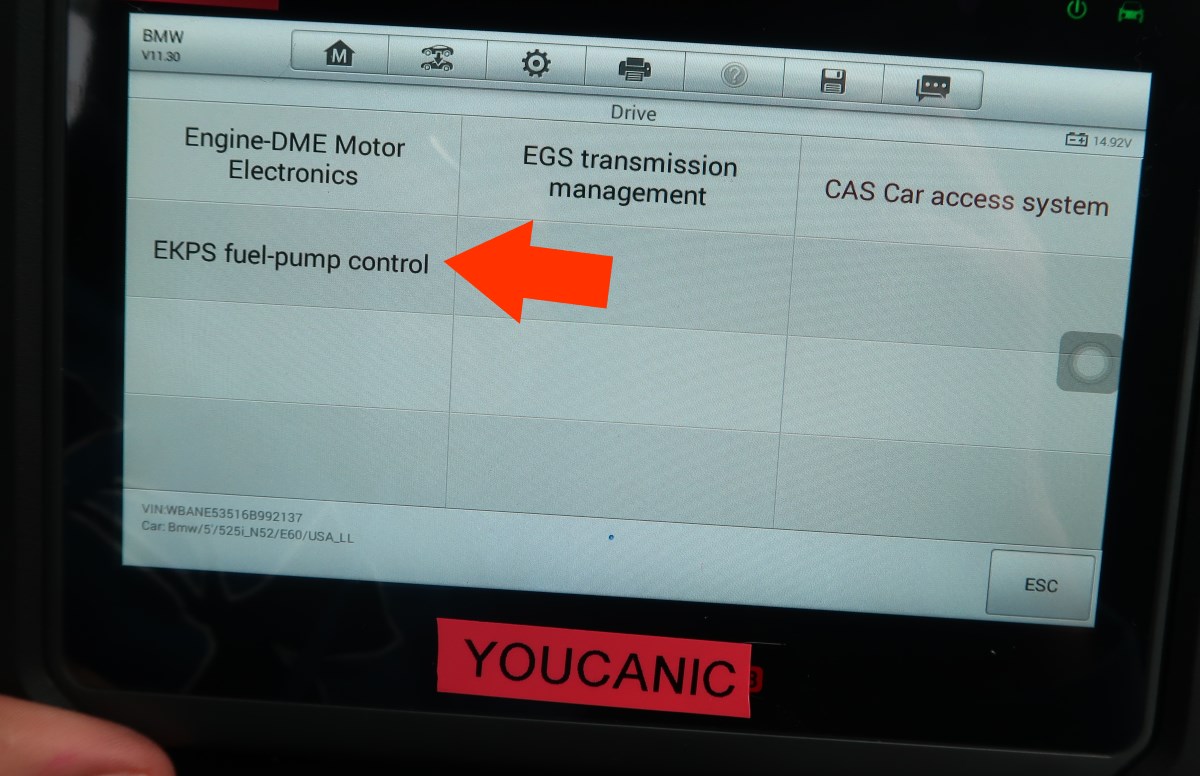
- Как только вы войдете в модуль EKPS, вы сможете сделать следующее.
- Чтение кодов из модуля EKPS
- Очистить коды от модуля EKPS
- Выполните Адаптации, Активации, Тесты
Общие проблемы
Дефектный блок управления EKPS, неисправные топливные насосы или негерметичные форсунки могут демонстрировать аналогичные симптомы. Правильная диагностика может стать проблемой даже для опытных техников BMW.
- Модуль EKPS . Модуль EKPS может выйти из строя, не вызывая проблем с запуском или вызывая проблемы при жестком ускорении. Обновление программного обеспечения может иногда решать определенные проблемы модуля EKPS. Если обновление программного обеспечения не устраняет проблему, может потребоваться замена модуля EKPS.
- Топливные насосы . В автомобилях BMW есть два топливных насоса. Топливный насос низкого давления (LPFP) и топливный насос высокого давления (HPFP). Любой из них может дать сбой, мешая вашему BMW заглянуть или вызвать появление сообщений об ошибках низкого давления. Если у вас возникли проблемы, когда автомобиль будет работать неровно, а обороты двигателя не будут превышать 2000, проблема может быть в топливных насосах.
- Негерметичные форсунки . Одна негерметичная топливная форсунка может вызывать те же симптомы и даже вызывать коды неисправностей в модуле EKPS. Выполните тесты топливных форсунок, чтобы убедиться, что негерметичный инжектор не является виновником.
Адаптации
Это список активаций, которые вы можете выполнить через модуль EKPS.
- Сброс блока управления ЭКПС
- Активировать топливный насос
Совет ! Ваш сканер должен быть способен выполнять двунаправленные тесты, чтобы выполнить эти адаптации и активировать датчики или модули.
Живые данные
В модуле EKPS вы можете отображать данные в реальном времени от различных датчиков, которые взаимодействуют с модулем EKPS.
- Фактическая скорость топливного насоса, об/мин
- Количество заданных значений подачи по шине CAN от двигателя, л/ч
- Указанная скорость подачи, топливный насос, л/ч
- Заданная скорость, блок топливного насоса, об/мин
- Ток на топливном насосе (А)
- Напряжение на топливном насосе, клемма 15, клемма 30 (Вольт)
Коды неисправностей
Существуют сотни кодов неисправностей, которые можно сохранить в модуле BMW EKPS. Ниже приведены некоторые примеры кодов, хранящихся в модуле BMW EKPS.
- 481B01 Слишком низкое управляющее напряжение EKPS
- 6292 EKPS – управляющее напряжение на низкое
- 6291 6293 – Слишком высокий ток управления
- 0029DC – Низкое давление в системе высокого давления
- 0029F3 – Датчик давления топлива, электрический (также может быть вызван неисправным датчиком давления топлива.)
- 002B2C – Топливная система высокого давления, давление топлива
- 0029DC – Топливо под высоким давлением, правдоподобие, холодный старт
- 29F2 – DME топливная система высокого давления, давление топлива.
- 29F1 – DME (управление бензиновым двигателем) Топливо под давлением топлива, достоверность
- 2AAE – Топливный насос, прерывистый
Связанные ресурсы
- Электронный блок управления топливным насосом (EKPS) – Newtis.info
- Электронное управление топливным электронасосом – Newtis.info