Вы можете получить сообщение об ошибке VirtualBox FATAL: INT18: BOOT FAILURE при попытке запустить гостевую машину Windows на хост-компьютере с Windows 11 или Windows 10. Этот пост предлагает наиболее применимые решения, которые вы можете попробовать, чтобы успешно исправить ошибку в вашей системе.
Вы можете столкнуться с этой проблемой по одной или нескольким из следующих причин.
- это признак того, что файл виртуальной машины поврежден.
- Часть загрузочного сектора неактивна.
- Операционная система (ОС) не может загрузиться из-за того, что раздел, содержащий хранилище данных конфигурации загрузки (BCD), неактивен.
- ОС не может загрузиться из-за повреждения BCD.
- ОС не может загрузиться из-за того, что не найден загрузочный сектор.
Затронутые пользователи сообщали, что гостевая операционная система, работающая на виртуальной машине, не запускалась после преобразования физического диска компьютера UEFI с Windows 11/10 в виртуальный жесткий диск (VHD или VHDX) и присоединения файла VHD/VHDX к новой машине VirtualBox. Ошибка иногда может выдать код ошибки 0x0000225.
Читать: VirtualBox не удалось зарегистрироваться и открыть файл образа жесткого диска
Если вы столкнулись с FATAL: INT18: ОШИБКА ЗАГРУЗКИ ошибка при запуске гостевой ОС Windows в VirtualBox на хост-компьютере с Windows 11/10, вы можете применить наши рекомендуемые ниже исправления, чтобы быстро и легко решить проблему в вашей системе.
- Начальный контрольный список
- Включить I/O APIC и EFI в VirtualBox
- Отключить Hyper-V на хост-компьютере
- Восстановить гостевую ОС
Давайте посмотрим на эти перечисленные предложения в деталях.
Читать: виртуальная машина VirtualBox не открывается или не запускается в Windows
1]Начальный контрольный список
Прежде чем приступить к решениям, приведенным ниже, сначала необходимо убедиться, что раздел гостевой ОС активен. Это относится только к виртуальным машинам поколения 1. Виртуальные машины поколения 2 (с использованием UEFI) не используют активный раздел. Чтобы убедиться, что раздел ОС, содержащий хранилище BCD для диска, помечен как активный, выполните следующие действия.
- Откройте командную строку в повышенном режиме.
- Откройте инструмент DISKPART.
- В DISKPART введите команду ниже и нажмите Enter, чтобы вывести список дисков в системе:
список дисков
- В выводе найдите добавленные диски и введите команду ниже, чтобы выбрать новый диск. В этом примере новым диском является Диск 1.
сел диск 1
- Затем введите команду ниже и нажмите Enter, чтобы вывести список всех разделов на диске:
список разделов
- В выводе введите команду ниже и нажмите Enter, чтобы выбрать раздел, который вы хотите проверить. Обычно разделы, управляемые системой, меньше по размеру и составляют около 350 МБ. В этом примере это Раздел 1.
выбрать раздел 1
- Затем, чтобы проверить состояние раздела, введите команду ниже и нажмите Enter:
детальный раздел
- Теперь, если раздел не активен, введите приведенную ниже команду и нажмите Enter, чтобы установить флаг «Активно», а затем еще раз проверьте правильность внесения изменений с помощью приведенной выше команды.
активный
После того, как вы настроили гостевую ОС в качестве активного раздела, проверьте, сможете ли вы без проблем запустить виртуальную машину. Если FATAL: INT18: ОШИБКА ЗАГРУЗКИ ошибка повторяется, или это не относится к вам, поскольку вы уже установили раздел как активный, вы можете перейти к следующему решению.
Читать: DiskPart обнаружил ошибку: Доступ запрещен
2]Включить I/O APIC и EFI в VirtualBox
Обычно вы сталкиваетесь с этой ошибкой при присоединении или открытии файла VHD/VHDX/VMDK, содержащего операционную систему UEFI. В этом случае, чтобы решить проблему, вам нужно просто включить EFI в настройках машины VirtualBox. Для выполнения этой задачи выполните следующие действия:
- Нажмите кнопку X, чтобы закрыть окно виртуальной машины, и выключите машину.
- Затем откройте настройки виртуальной машины.
- Перейдите в Система > Материнская плата.
- в Порядок загрузки раздел, убедитесь, что Жесткий диск выбран и является первым загрузочным устройством.
- в Расширенные функции выберите оба параметра: Enable I/O APIC и Enable EFI (только для специальных ОС).
- Нажмите «ОК».
Чтение: ошибка 0x80370102 Не удалось запустить виртуальную машину, так как не установлена необходимая функция.
3]Отключите Hyper-V на хост-компьютере.
Если в вашей системе включена функция Hyper-V, она может мешать правильному запуску виртуальной машины VirtualBox. Hyper-V блокирует все другие Hyper Visors, такие как VirtualBox, от вызова оборудования VT, поэтому его необходимо отключить. Таким образом, чтобы использовать другое программное обеспечение для виртуализации на хост-компьютере с Windows 11/10, вы должны отключить Hyper-V Hypervisor, Device Guard и Credential Guard.
Чтобы отключить Hyper-V на хост-компьютере, сделайте следующее:
- Нажмите клавишу Windows + R, чтобы вызвать диалоговое окно «Выполнить».
- В диалоговом окне «Выполнить» введите appwiz.cpl и нажмите Enter, чтобы открыть апплет «Программы и компоненты».
- В окне с левой стороны нажмите на ссылку Включение или отключение компонентов Windows.
- Подождите, пока апплет заполнится, затем прокрутите и снимите/снимите отметку со следующих функций:
- Контейнеры
- Гипер-V
- Платформа виртуальной машины
- Платформа гипервизора Windows
- Песочница Windows
- Нажмите «ОК».
- Перезагрузите компьютер после удаления.
- При загрузке откройте командную строку от имени администратора.
- В командной строке CMD введите или скопируйте и вставьте приведенную ниже команду и нажмите Enter:
bcdedit/установить тип запуска гипервизора выключенным
- Выйдите из подсказки CMD после выполнения операции.
- Перезапустить компьютер.
Читайте: как включить или отключить вложенную виртуализацию для виртуальных машин в Hyper-V
4]Восстановите гостевую ОС
Поскольку гостевая ОС не запускается, возможно, мы имеем дело с проблемами загрузки, как указывает ошибка. В этом случае мы можем попытаться исправить проблемы с загрузкой на гостевой машине, запустив гостевую машину с помощью ISO-файла Windows 11/10, а затем приступить к восстановлению гостевой ОС. Для выполнения этой задачи выполните следующие действия:
- Загрузите ISO-образ Windows.
- Откройте настройки машины VirtualBox.
- Перейдите в хранилище.
- Нажмите 1-ю кнопку плюс (+) рядом с контроллером, чтобы добавить оптический привод.
- Нажмите Добавить в Селектор оптических дисков окно.
- Найдите и откройте файл Windows.iso.
- Затем выберите файл Windows.iso.
- Щелкните Выбрать.
- После прикрепления файла Windows.iso в Устройства хранения данныхперейдите в System и перетащите Optical наверх, чтобы загрузить виртуальную машину из прикрепленного Windows.iso.
- Далее убедитесь, что Включить EFI опция не выбрана, иначе вы не сможете загрузиться с ISO-файла.
- Нажмите OK, когда закончите.
- Далее запустите виртуальную машину.
- Нажмите «Далее» > «Восстановить компьютер».
- Выберите «Устранение неполадок» > «Восстановление запуска».
- Разрешите запуск восстановления при загрузке и в зависимости от результата выполните следующие действия:
- Если восстановление при загрузке завершилось успешно, выключите виртуальную машину, установите жесткий диск в качестве первого загрузочного устройства и попробуйте снова запустить виртуальную машину.
- Если программе восстановления при загрузке не удалось завершить восстановление, перейдите к следующему шагу.
- Щелкните Дополнительные параметры > Устранение неполадок > Командная строка.
- В командной строке введите следующую команду и нажмите Enter после каждой строки:
diskpartselect диск 0list раздел
- Из вывода запишите размер системного раздела.
- Затем введите команду ниже и нажмите Enter, чтобы узнать номер тома системного раздела, используя его размер в качестве эталона.
список томов
- Затем выполните следующие команды, чтобы выбрать системный раздел (используя его номер тома) и назначить букву диска. Я: в него, а затем выйдите из DISKPART. Где заполнитель X — это номер тома вашего системного раздела.
выбрать громкость Xназначить букву=Zexit
- Наконец, выполните приведенную ниже команду в командной строке CMD, чтобы восстановить загрузочные файлы:
bcdboot C:windows /s Z: /f ВСЕ
- Выйдите из командной строки CMD после выполнения команды.
- Закройте все окна и выключите виртуальную машину.
- Установите жесткий диск в качестве первого загрузочного устройства и запустите виртуальную машину.
Читайте: Как загрузить или восстановить компьютер с Windows с помощью установочного носителя
Надеюсь, этот пост поможет вам!
Сообщение по теме: FATAL: загрузочный носитель не найден! Ошибка остановки системы в VirtualBox
Как исправить фатальную остановку системы без загрузочного носителя в VirtualBox?
Чтобы решить эту проблему в вашей системе, выполните следующие действия:
- Щелкните правой кнопкой мыши виртуальную машину, которая не находится в состоянии загрузки, и выберите настройки.
- Когда меню настроек открыто, перейдите в «Хранилище»> «Контроллер: IDE»> «Выбрать загрузочный образ».
- Нажмите «ОК».
- Запустите виртуальную машину, и вы сможете нормально загрузиться с смонтированного iso.
Как исправить отсутствие загрузочных устройств?
Чтобы исправить ошибку «Загрузочное устройство не найдено» в Windows 11/10, выполните следующие действия:
- Перезагрузите компьютер и нажмите Esc, чтобы войти в интерфейс BIOS.
- Нажимайте клавишу со стрелкой вправо на клавиатуре, пока не откроется вкладка «Загрузка».
- Переместите «Жесткий диск» в начало списка загрузки, нажав «+» или «-».
- Нажмите F10, чтобы сохранить изменения и перезагрузить компьютер.
Читать: исправить ошибку «Операционная система не была загружена» в Hyper-V
Как запустить Windows 11 на VirtualBox?
Запустите Oracle Virtualbox со своего рабочего стола или из меню «Пуск». Нажмите синюю новую кнопку. Назовите вашу виртуальную машину «Windows 11». Затем вы можете выбрать Microsoft Windows в разделе «Тип», а затем выбрать Windows 11 в разделе «Версия». Шаги для запуска/установки Windows 11 в VirtualBox следующие:
- Загрузите ISO-файл Windows 11.
- Установите Oracle VM Virtual Box, если вы еще этого не сделали.
- Инициализируйте новую виртуальную машину и выберите ISO-файл Windows 11.
- Выделите системные ресурсы и установите ISO.
Читайте: Как создать общую папку VirtualBox в Windows.
If you receive the VirtualBox error «FATAL: INT18: BOOT FAILURE» when starting a guest machine with Windows 10/11 OS, continue reading below to fix the problem.
Problem in details. After converting the physical disk of a Windows 10//11 UEFI computer to a Virtual Hard disk (VHD or VHDX) and attaching the VHD/VHDX file to a new VirtualBox machine, the VM couldn’t start with fatal error: INT18: BOOT FAILURE or the guest Windows 10 OS couldn’t start with error code: 0x0000225.
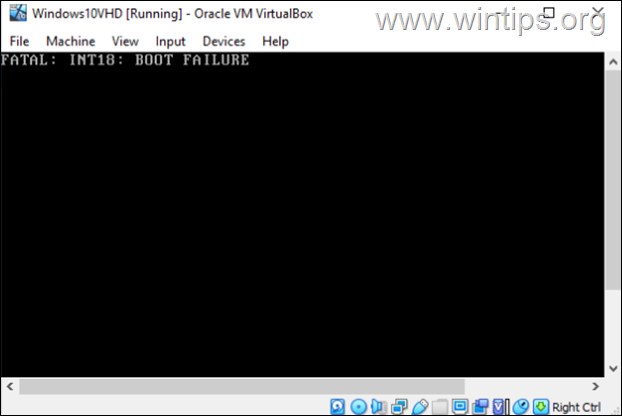
This tutorial contains detailed instructions to troubleshoot the «INT18: BOOT FAILURE” error in VirtualBox.
How to FIX: INT18 BOOT FAILURE & Windows 10 Error Code 0x0000225 in VirtualBox.
Method 1. Enable I/O APIC & UEFI in VirtualBox.
The fatal error «INT18 BOOT FAILURE» in VirtualBox, commonly appears when you attaching a VHD/VHDX/VMDK file which contains an UEFI operating system. To fix this problem just proceed and enable UEFI on the VirtualBox machine’s settings. To do that:
1. Press the X button to close the VM machine window and Power Off the machine.
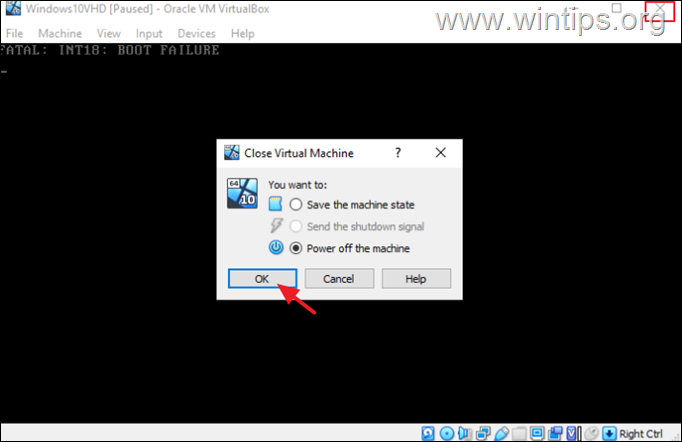
2. Open the VM Settings and go to System > Motherboard.
3. Here ensure that the Hard Disk is checked and is the first boot device, and at Extended features check the following two (2) options and click OK:
-
Enable I/O APIC
-
Enable EFI (special OSes only)
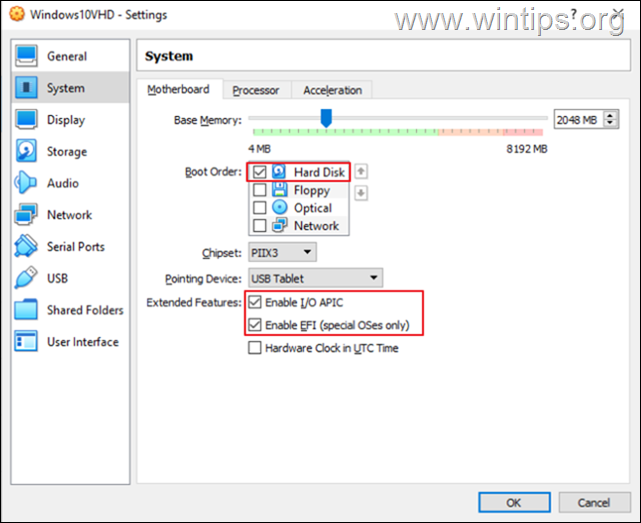
4. Try to start the Virtual Machine now. Hopefully it will start without error now.
Method 2. Disable Hyper-V on Host machine.
1. Navigate to Control Panel > Programs and Features > Turn Windows features on or off
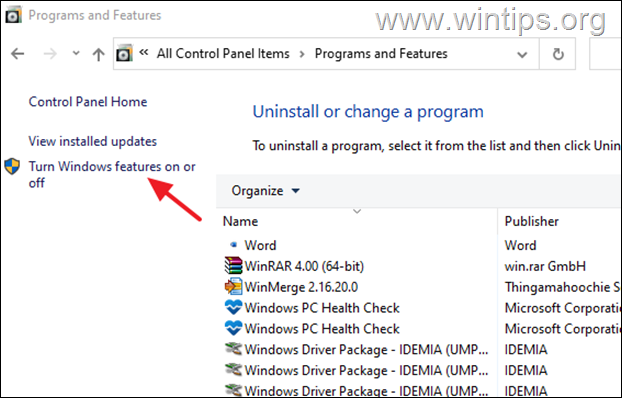
2. Uncheck the following features and click OK to apply the change:
- Containers *
- Hyper-V *
- Virtual Machine Platform
- Windows Hypervisor Platform
- Windows Sandbox
* Note: The ‘Containers’ and the ‘Hyper-V’ features exists only in Windows 10 PRO.
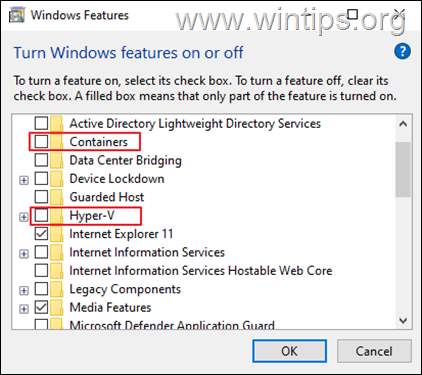
3. Restart the computer after uninstall.
4. Open Command Prompt as Administrator.
5. Type the following command and press Enter:
- bcdedit /set hypervisorlaunchtype off
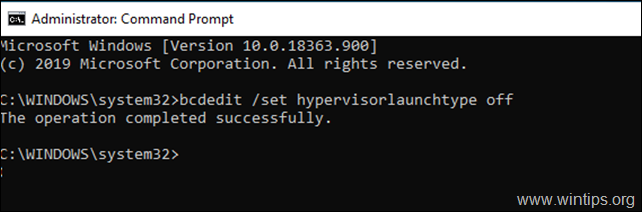
6. Reboot your PC again.
7. After reboot, start the VirtualBox VM machine and see if the problem is fixed.
Method 3. Fix Boot Problems.
The final method to solve VirtualBox error «FATAL: INT18: BOOT FAILURE» is to fix the boot problems on the Guest machine, by starting the guest machine from a bootable Windows 10 ISO file.*
* Note: If you don’t own a Windows 10 ISO file, you can download one directly from Microsoft, by using the Media Creation Tool.
1. Open the Settings of the VirtualBox machine and go to Storage.
2. Click the 1st plus (+) button next to Controller to add optical drive.
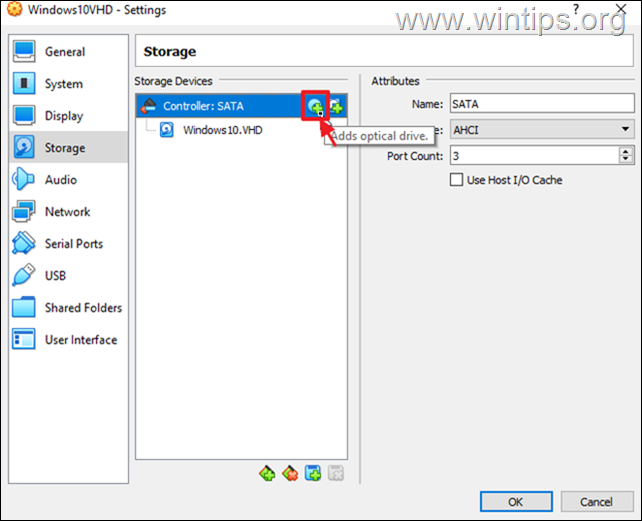
3. Click Add and find and open the Windows.iso file.
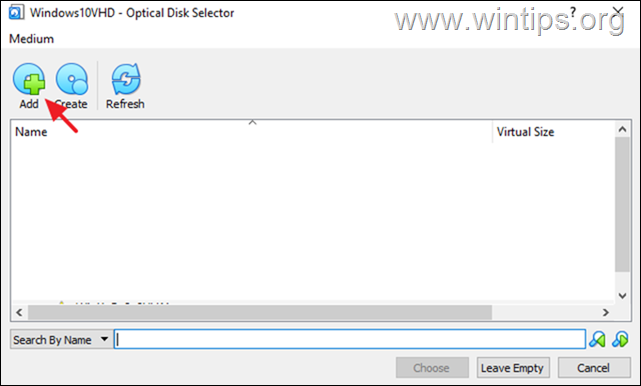
4. Then select the Windows.iso file and click Choose.
![image_thumb[5]](https://www.wintips.org/wp-content/uploads/2022/06/image_thumb5_thumb.png "image_thumb[5]")
5. After attaching the Windows.iso file in Storage devices…
![image_thumb[6]](https://www.wintips.org/wp-content/uploads/2022/06/image_thumb6_thumb.png "image_thumb[6]")
6. … go to System and drag Optical to the top in order to boot the VM from the attached Windows.iso.
Also, make sure that the «Enable EFI» option is unchecked, otherwise you will not be able to boot from the ISO file. When done, click OK.

7. Start the Virtual Machine and click Next > Repair Your computer.
8. Then select Troubleshoot > Startup Repair.

9. Allow the Startup Repair to run and depending on the result do the following actions:
a. If the Startup Repair can fix the problem, shutdown the virtual machine, set the hard disk as first boot device and try to start again the virtual machine.
b. If the Startup Repair cannot fix the problem, continue to next step.
10. Click Advanced Options and go to Troubleshoot > Command Prompt.

11. In Command prompt give the following commands in order (press enter after each command)
- diskpart
- select disk 0
- list partition
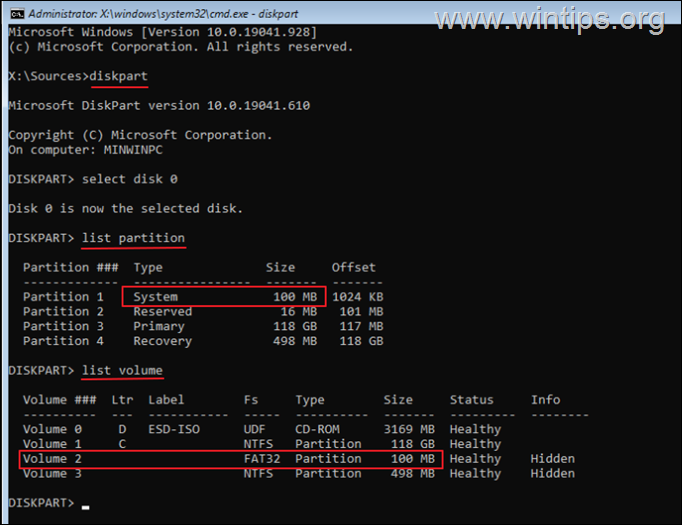
13. Now notice the size of the System partition (e.g. 100MB in this example).
12. Then type the following command and find out the volume number of the System partition by using its size as a reference. *
- list volume
* e.g. As you can see in the screenshot below, in this example, the System partition (100MB) is the volume 2.
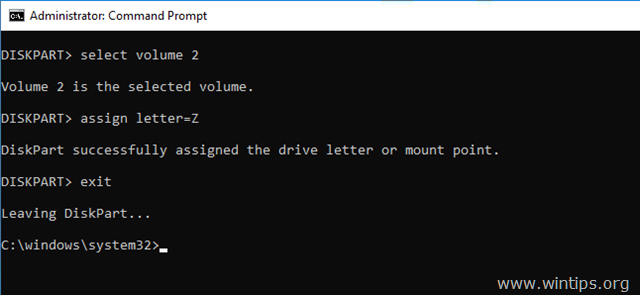
13. Now give the following commands to select the system partition (using its volume number), and to assign the drive letter Z: to it. Then exit DISKPART:
- select volume 2 *
- assign letter=Z
- exit
* Note: Change the Volume number «2» according your case.
14. Finally, in command prompt give this command to repair the boot files:
- bcdboot C:windows /s Z: /f ALL
![image_thumb[9]](https://www.wintips.org/wp-content/uploads/2022/06/image_thumb9_thumb.png "image_thumb[9]")
15. Close all windows, shutdown the virtual machine, set the hard disk as first boot device and start the virtual machine.
That’s it! Which method worked for you?
Let me know if this guide has helped you by leaving your comment about your experience. Please like and share this guide to help others.
If this article was useful for you, please consider supporting us by making a donation. Even $1 can a make a huge difference for us in our effort to continue to help others while keeping this site free:

If you want to stay constantly protected from malware threats, existing and future ones, we recommend that you install Malwarebytes Anti-Malware PRO by clicking below (we
do earn a commision from sales generated from this link, but at no additional cost to you. We have experience with this software and we recommend it because it is helpful and useful):
Full household PC Protection — Protect up to 3 PCs with NEW Malwarebytes Anti-Malware Premium!
- Reply with quote
Fatal: INT18: boot failure
Hi Guys,
After using VB all year without problem, I just got this error on starting the VM which is an old DOS system.
«Fatal: INT18: boot failure»
I’m on Windows 10. I used the VM a week ago and it was fine and now this. I have made no changes to VB or the VM.
Any thoughts please?
Thanks
Paul
PS — I have tried to attached the vhd in disk management but when I do, I can’t see it disk management or in any folders anywhere. I used to be able to do this. I know it’s there as when I tried to attach it again it says I can’t do that as it’s already attached.
- buster953
- Posts: 14
- Joined: 27. Jan 2015, 02:55
- Reply with quote
Re: Fatal: INT18: boot failure
 by mpack » 13. Oct 2015, 12:11
Well, somebody has made changes, because that’s a corrupt disk. You should restore it from your last backup.
- mpack
- Site Moderator
- Posts: 37870
- Joined: 4. Sep 2008, 17:09
- Primary OS: MS Windows 10
- VBox Version: PUEL
- Guest OSses: Mostly XP
- Reply with quote
Re: Fatal: INT18: boot failure
by buster953 » 13. Oct 2015, 23:26
Thanks, I assume you mean the VM file is corrupt?
I am the only one that using this machine and no one has changed the VM file. I have run a virus removal tool but I wouldn’t have thought that would have corrupted the VM.
Anymore thoughts?
- buster953
- Posts: 14
- Joined: 27. Jan 2015, 02:55
- Reply with quote
Re: Fatal: INT18: boot failure
by loukingjr » 13. Oct 2015, 23:40
Not that I speak for mpack but however the VM was corrupted, it needs to be restored from a backup.
OSX, Linux and Windows Hosts & Guests
There are three groups of people. Those that can count and those that can’t.
- loukingjr
- Volunteer
- Posts: 8833
- Joined: 30. Apr 2009, 09:45
- Primary OS: Mac OS X other
- VBox Version: PUEL
- Guest OSses: just about all that run
- Reply with quote
Re: Fatal: INT18: boot failure
by mpack » 13. Oct 2015, 23:57
buster953 wrote:Thanks, I assume you mean the VM file is corrupt?
Actually no, I mean what I said: the (virtual) disk is corrupted. The VM is fine, or it wouldn’t have even tried to start.
I have no way to know what your virus removal tool did, so I won’t speculate on that.
- mpack
- Site Moderator
- Posts: 37870
- Joined: 4. Sep 2008, 17:09
- Primary OS: MS Windows 10
- VBox Version: PUEL
- Guest OSses: Mostly XP
- Reply with quote
Re: Fatal: INT18: boot failure
by mpack » 14. Oct 2015, 00:57
Mount the disk as the second drive in another VM, if the disk is still readable then you can copy off files. This plan has problems if snapshots have been used. Do I gather that the «restore from a backup» plan has problems too?
- mpack
- Site Moderator
- Posts: 37870
- Joined: 4. Sep 2008, 17:09
- Primary OS: MS Windows 10
- VBox Version: PUEL
- Guest OSses: Mostly XP
- Reply with quote
Re: Fatal: INT18: boot failure
by buster953 » 14. Oct 2015, 01:39
My backup is automatic every day so both files will be corrupted and confirmed.
I do have the very original disk and I will have to do another VHD this weekend of that but there is some data on the corrupted VHD which I would really like to get hold of.
I’m sorry I’m not that good at this VHD stuff. I went to disk management, attached VHD, selected the corrupted VHD file and attached it. I can’t «see» it though even though it says it’s there.
I don’t understand your idea of the second drive though. Can you please explain how to do that?
Thanks for your time and help BTW.
- buster953
- Posts: 14
- Joined: 27. Jan 2015, 02:55
- Reply with quote
Re: Fatal: INT18: boot failure
by smithlar » 14. Oct 2015, 15:16
buster953 wrote:My backup is automatic every day so both files will be corrupted and confirmed.
If the host is backing up the VM automatically, ensure that
the VM is completely shut down before doing the backup (not suspended).
This ensures that data is not being written to the VHD’s, VDI’s, snapshots, logs, etc
while the backup is in progress. Active data writes while backing up will
create corrupted backups.
Backup the entire VM directory and its subdirectories. That gets
everything: config files, virtual disks, snapshots, logs, etc.
- smithlar
- Posts: 79
- Joined: 9. May 2008, 15:54
- Location: Texas, USA
- Primary OS: openSUSE
- VBox Version: PUEL
- Guest OSses: WinXP32 WinXP64 Win7-32 Win7-64 openSUSE64 OS2 Win10
- Reply with quote
Re: Fatal: INT18: boot failure
by mpack » 14. Oct 2015, 15:26
buster953 wrote:My backup is automatic every day so both files will be corrupted and confirmed.
Surely you have a rolling set of backups, such that there’s some period of grace — say a week — before the oldest backup is overwritten? Otherwise I don’t really see the purpose of automatic self corrupting backups. If space is a problem then a manually started backup would be better.
buster953 wrote:I went to disk management, attached VHD, selected the corrupted VHD file and attached it. I can’t «see» it though even though it says it’s there.
That probably means that the data on the drive is not recoverable. The «second drive» idea was just another way of accessing the contents of the disk, which is moot if you’ve already verified by other means that the drive’s partitions have been lost.
- mpack
- Site Moderator
- Posts: 37870
- Joined: 4. Sep 2008, 17:09
- Primary OS: MS Windows 10
- VBox Version: PUEL
- Guest OSses: Mostly XP
- Reply with quote
Re: Fatal: INT18: boot failure
by buster953 » 14. Oct 2015, 23:51
Thanks for that guys,
yes I do have a rolling backup but I only use this VHD every few months. I will sort that out from now onwards!
yes I do make sure the VHD and VB are shutdown before I shut my computer off but I do recall having to force a shutdown a bit back and I might have been using the VHD at that time, I can’t remember
I haven’t «verified by other means» that the drive’s partitions have been lost, I wouldn’t even know how to do that. I still want to investigate further ideas for accessing the drive if possible.
Thanks
- buster953
- Posts: 14
- Joined: 27. Jan 2015, 02:55
- Reply with quote
Re: Fatal: INT18: boot failure
by mpack » 15. Oct 2015, 02:04
buster953 wrote:I haven’t «verified by other means» that the drive’s partitions have been lost, I wouldn’t even know how to do that.
You already described how you did it. I understand what you did even if you didn’t! You mounted the VHD and examined the drive contents; there weren’t any. Also no backup. End of story.
Feel free to examine the file with a hex editor, that’s the only way I can think of that you might get some data out, but that usually isn’t a practical option. Most likely is that you spend a lot of time to get nothing.
- mpack
- Site Moderator
- Posts: 37870
- Joined: 4. Sep 2008, 17:09
- Primary OS: MS Windows 10
- VBox Version: PUEL
- Guest OSses: Mostly XP
- Reply with quote
Re: Fatal: INT18: boot failure
by buster953 » 15. Oct 2015, 04:52
All sorted thanks.
I recovered the data files I needed from the corrupted VHD by using Kernel for VHD. Has to shell out some money though. Hyper-V also worked when I used it in trail version.
- buster953
- Posts: 14
- Joined: 27. Jan 2015, 02:55
- Reply with quote
Re: Fatal: INT18: boot failure
by Anguel » 21. Jul 2016, 15:26
For me enabling EFI in VM Settings -> System solved the boot issue. However my guest and host are both Win 10.
- Anguel
- Posts: 1
- Joined: 21. Jul 2016, 15:25
Return to VirtualBox on Windows Hosts
Who is online
Users browsing this forum: No registered users and 42 guests
Get the fix to the Fatal: INT18: Boot failure boot error message affecting Windows XP, Windows Vista, Windows 7, Windows 8, Windows 8.1, , and Windows 10.
Contents
- 1 About the “Fatal: INT18: Boot failure” error
- 1.1 Description and Symptoms
- 1.1.1 Symptom 1: Fatal: INT18: Boot failure error screen on startup
- 1.2 Causes of this Error
- 1.2.1 Cause 1: There are no active partitions available
- 1.2.2 Cause 2: Active partition bootsector is not valid
- 1.1 Description and Symptoms
- 2 Fixing “Fatal: INT18: Boot failure” on Windows
- 2.1 Fix #1: Mark partition as active via Easy Recovery Essentials
- 2.2 Fix #2: Use Windows’ built-in Automatic Repair
- 2.3 Fix #3: Mark partition as active using Diskpart
- 2.4 Fix #4: Mark partition as active using Windows Disk Management
- 3 More Information
- 3.1 Linked Entries
- 3.2 Support Links
- 3.3 Applicable Systems
About the “Fatal: INT18: Boot failure” error
The following information on this error has been compiled by NeoSmart Technologies, based on the information gathered and reported by our global network of engineers, developers, and technicians or partner organizations.
Description and Symptoms
The error messages, alerts, warnings, and symptoms below are tied to this error.
Symptom 1: Fatal: INT18: Boot failure error screen on startup
When an operating system is installed on the hard drive, the installer marks the partition that contains the boot files for that OS as active. Every time a computer with that OS is turned on, as part of the boot process the BIOS loads and starts the first sector on the bootable drive. The first sector on that disk (typically called an MBR or Master Boot Record) contains code that checks the partition table for a partition that is marked as active, and loads the first sector of that partition (the boot sector). However, if there are no active partitions available, then the loading process halts, and “Fatal: INT18: Boot Failure” error is displayed.
Here is a screenshot example of a Fatal: INT18: Boot failure error screen on Windows XP, Vista, 7, 8, 8.1, and Windows 10:

FATAL: INT 18: BOOT FAILURE
Causes of this Error
This error has been known to occur as a result of one of the following causes:
Cause 1: There are no active partitions available
If MBR can’t find an active partition on the current disk to boot from, then the system loading process halts. This is usually caused by errors made while configuring the partitions manually.
Cause 2: Active partition bootsector is not valid
If MBR tries to pass execution on to an active partition that does not have a valid, executable bootsector, then this error may also appear. The bootsector can be sometimes damaged by disk write errors, boot sector infecting viruses, or power outages.
Fixing “Fatal: INT18: Boot failure” on Windows
Windows Setup CD/DVD Required!
Some of the solutions below require the use of the Microsoft Windows setup CD or DVD. If your PC did not come with a Windows installation disc or if you no longer have your Windows setup media, you can use Easy Recovery Essentials for Windows instead. EasyRE will automatically find and fix many problems, and can also be used to solve this problem with the directions below.
Fix #1: Mark partition as active via Easy Recovery Essentials
Easy Recovery Essentials’ one-click automated system repair corrects issues caused by incorrect active partition configuration. If EasyRE does not find an active partition, it will correct the problem by identifying the single, correct boot partition and marking it as active. This is done automatically as part of the automated repair process, and requires no manual action or user intervention.
Easy Recovery Essentials is guaranteed to fix the “FATAL: INT 18: BOOT FAILURE” error automatically using its built-in Automated Repair option. EasyRE is currently available for Windows XP, Vista, 7 and 8 and can be downloaded and created on any PC.
- Download Easy Recovery Essentials. Make sure to note your Windows version (XP, Vista, 7 or 8) before you download EasyRE. This guide can help you identify what version of Windows you have installed.
- Burn the image. Follow these instructions on how to burn the bootable ISO image very carefully, as making a bootable CD can be tricky! Alternatively, these instructions explain how to create a bootable EasyRE recovery USB stick/drive.
- Boot up your PC from the Easy Recovery Essentials CD or USB you created.
- Once EasyRE is running, choose the “Automated Repair” option and click Continue.

Choose “Automated Repair” in Easy Recovery Essentials
- After EasyRE scans your computer’s drives, identify and select the drive letter for your Windows installation from the list, and then click on the Automated Repair button to begin.

Choose the drive associated with the Windows installation you’re trying to repair.
- Easy Recovery Essentials will start analyzing the selected drive for problems. EasyRE will test for and attempt to automatically correct errors with the disk, partition, bootsector, filesystem, bootloader, and registry. No intervention is required, as EasyRE’s repair is fully automated:

Easy Recovery Essentials searches for errors and makes corrections to the selected Windows installation.
- Once the process is complete, EasyRE will report its findings. Click on the Restart button to reboot your PC and test the changes.
- The “FATAL: INT 18: BOOT FAILURE” error should now be fixed as your PC begins to load:

Windows, booting up successfully.
You can download Easy Recovery Essentials from here.
Fix #2: Use Windows’ built-in Automatic Repair
The Windows Automatic Repair can be used to mark the disk partition as active to fix this error. Here are the steps to access the Automatic Repair from an install disc:
- Boot from Windows install disc
- Click Next in the setup page after selecting proper language, time and keyboard input
- Click Repair your computer and select Troubleshoot
- Click on Advanced options
- Select Automatic Repair and select your operating system.
Here is an example screenshot of System Recovery Options Menu.

Fix #3: Mark partition as active using Diskpart
The built-in Diskpart Windows utility can also be used to mark a partition as active. Note that the marked partition must contain the Windows bootloader for Windows to load correctly.
Here are the steps to run Diskpart and change the disk’s status:
- Boot from the Windows install disc
- Click on Repair your computer after after selecting proper language, time and keyboard input
- Select the Windows installation drive, which is usually
C:, and click Next - Choose Command Prompt when the System Recovery Options box appears
- Write the following command and press Enter afterwards:
diskpart
- Then, write
list volume
to get the list of all available partitions, and press Enter.
- Then, write
select volume X
to select the volume you want to mark as active, and press Enter
- Then, write
active
to mark the currently selected volume as active, and press Enter
Here is an example screenshot of what the PC’s console output should look like after the volume is properly marked as active with Diskpart:

Diskpart utility results screen
Fix #4: Mark partition as active using Windows Disk Management
If the user has a second copy of Windows installed on another drive, he can boot into it to his first disk’s partition as active. Alternatively, if he has another working PC available, he may connect his hard drive to that PC to mark the drive’s partition as active from there.
Here are the steps to run Windows Disk Management and mark a partition as active:
- Type diskmgmt.msc into the start menu, and press Enter.

- Right click on the partition you want to mark as active, and select Mark partition as Active.

More Information
Linked Entries
- How to set partition as active
Support Links
- Easy Recovery Essentials for Windows – our repair and recovery disk.
It’s an easy-to-use and automated diagnostics disk. It’s available for Windows 8, Windows 7 and Windows Vista. It’s also available for Windows XP and Windows Server.
Read more at Windows Recovery Disks.
- The NeoSmart Support Forums, member-to-member technical support and troubleshooting.
- Get a discounted price on replacement setup and installation discs: Windows XP, Windows Vista, Windows 7, Windows 8, Windows 10.
Applicable Systems
This Windows-related knowledgebase article applies to the following operating systems:
- Windows XP (all editions)
- Windows Vista (all editions)
- Windows 7 (all editions)
- Windows 8 (all editions)
- Windows 8.1 (all editions)
- Windows 10 (all editions)
Propose an edit
You may get the VirtualBox error FATAL: INT18: BOOT FAILURE when you attempt to start a Windows guest machine on your Windows 11 or Windows 10 host computer. This post offers the most applicable solutions you can try to successfully fix the error on your system.
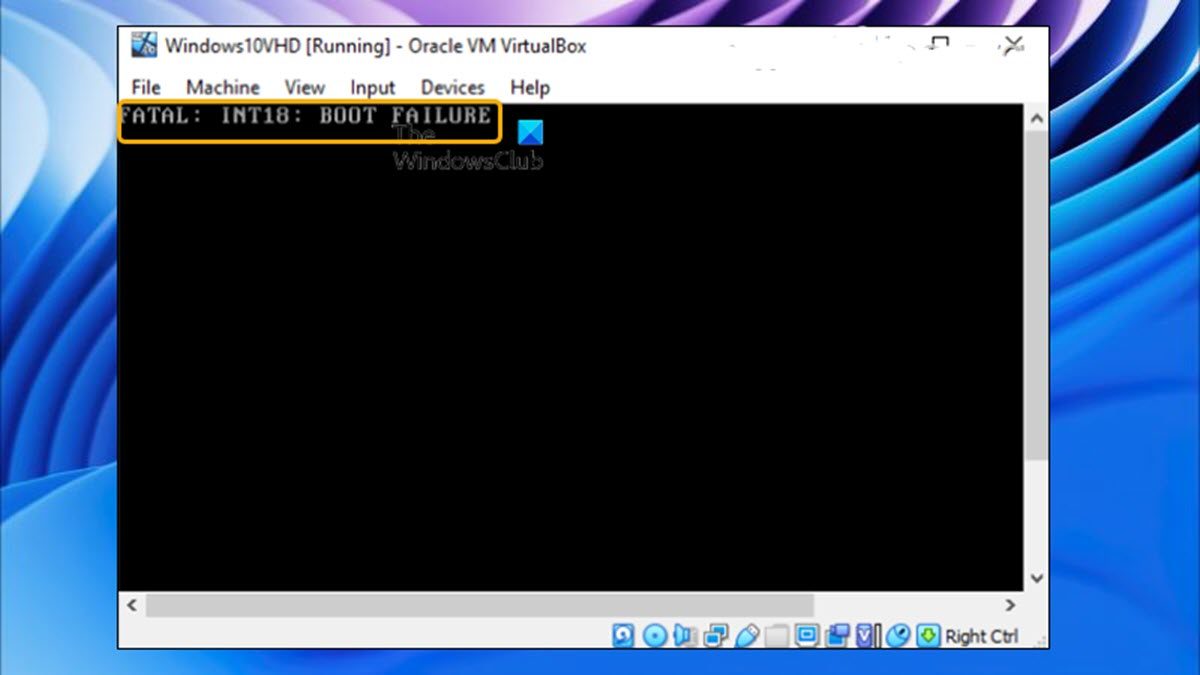
You may encounter this issue due to one or more of the following reasons.
- it’s an indication the VM file is corrupt.
- Part of the boot sector is inactive.
- The operating system (OS) is unable to boot due to the partition holding the Boot Configuration Data (BCD) Store being inactive.
- The OS is unable to boot due to BCD Corruption.
- The OS is unable to boot due to the boot sector not being found.
Affected users reported the guest operating system running on the VM failed to start after converting the physical disk of a Windows 11/10 UEFI computer to a Virtual Hard disk (VHD or VHDX) and attaching the VHD/VHDX file to a new VirtualBox machine. The error sometimes may throw the error code 0x0000225.
Read: VirtualBox failed to register and open Hard Disk image file
If you have encountered the FATAL: INT18: BOOT FAILURE error when you start a Windows Guest OS in VirtualBox on your host Windows 11/10 machine, you can apply our recommended fixes below to quickly and easily resolve the issue on your system.
- Initial checklist
- Enable I/O APIC & EFI in VirtualBox
- Disable Hyper-V on the Host machine
- Repair the Guest OS
Let’s see these listed suggestions in detail.
Read: VirtualBox VM is not opening or starting in Windows
1] Initial checklist
Before you proceed with the solutions proper below, you first need to verify that the Guest OS partition is Active. This applies only to Generation 1 VMs. Generation 2 VMs (using UEFI) does not use an active partition. To verify the OS partition that holds the BCD store for the disk is marked as active, do the following:
- Open command prompt in elevated mode.
- Open the DISKPART tool.
- In DISKPART, type the command below and hit Enter to list the disks on the system:
list disk
- From the output, look for added disks and input the command below to select the new disk. In this example, the new disk is Disk 1.
sel disk 1
- Next, input the command below and hit Enter to list all of the partitions on the disk:
list partition
- From the output, input the command below and hit Enter to select the partition you want to check. Usually, System Managed partitions are smaller and around 350 Mb in size. In this example, the partition is Partition 1.
sel partition 1
- Next, to check the status of the partition, input the command below and hit Enter:
detail partition
- Now, if the partition isn’t active, input the command below and hit Enter to set the Active flag, and then recheck that the change was done properly with the command above.
active
- Exit the DISKPART tool.
After you have set the guest OS as an active partition, see if you can start the VM without issues. If the FATAL: INT18: BOOT FAILURE error reoccurs, or this isn’t the case for you as you already have the partition set as active, you can proceed with the next solution.
Read: DiskPart has encountered an error: Access is denied
2] Enable I/O APIC & EFI in VirtualBox
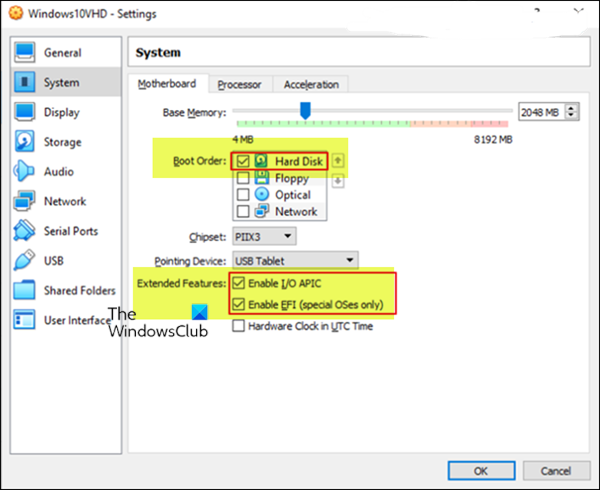
You will encounter this error usually when you are attaching or opening a VHD/VHDX/VMDK file that contains a UEFI operating system. In this case, to resolve the issue, you need to simply enable EFI on the VirtualBox machine’s settings. To perform this task, do the following:
- Press the X button to close the VM machine window and Power Off the machine.
- Next, open the VM Settings.
- Go to System > Motherboard.
- In the Boot Order section, make sure that the Hard Disk is selected and is the first boot device.
- In the Extended Features section, select both the Enable I/O APIC and Enable EFI (special OSes only) options.
- Click OK.
Read: Error 0x80370102 The Virtual machine could not be started because a required feature is not installed
3] Disable Hyper-V on the Host machine
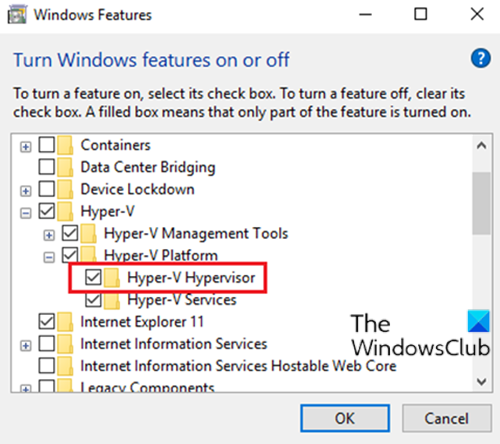
If you have the Hyper-V feature enabled on your system, it could be interfering with the VirtualBox VM starting properly. Hyper-V blocks all other Hyper Visors like VirtualBox from calling VT hardware, therefore it’s required for it to be disabled. So basically, to use other virtualization software on Windows 11/10 host machine, you must disable Hyper-V Hypervisor, Device Guard, and Credential Guard.
To disable Hyper-V on the Host machine, do the following:
- Press the Windows key + R to invoke the Run dialog.
- In the Run dialog box, type
appwiz.cpland hit Enter to open the Programs and Features applet. - In the window, on the left side, click the Turn Windows features on or off link.
- Wait for the applet to populate, then scroll and clear/uncheck the following features:
- Containers
- Hyper-V
- Virtual Machine Platform
- Windows Hypervisor Platform
- Windows Sandbox
- Click OK.
- Restart the computer after uninstalling.
- On boot, open Command Prompt as Administrator.
- In the CMD prompt, type or copy and paste the command below and hit Enter:
bcdedit /set hypervisorlaunchtype off
- Exit CMD prompt once the operation executes.
- Restart computer.
Read: How to enable or disable Nested Virtualization for VMs in Hyper-V
4] Repair the Guest OS
As the guest OS is failing to start, it could be we are dealing with boot problems as the error indicates. In this case, we can attempt to fix boot problems on the Guest machine, by starting the guest machine using Windows 11/10 ISO file and then proceed to run a repair of the guest OS. To perform this task, do the following:
- Download Windows ISO.
- Open the VirtualBox machine Settings.
- Go to Storage.
- Click the 1st plus (+) button next to Controller to add the optical drive.
- Click Add in the Optical Disk Selector window.
- Find and open the Windows.iso file.
- Next, select the Windows.iso file.
- Click Choose.
- After attaching the Windows.iso file in Storage devices, go to System and drag Optical to the top to boot the VM from the attached Windows.iso.
- Next, make sure that the Enable EFI option is not selected, otherwise, you will not be able to boot from the ISO file.
- Click OK when done.
- Next, start the Virtual Machine.
- Click Next > Repair Your computer.
- Select Troubleshoot > Startup Repair.
- Allow the Startup Repair to run and depending on the result do the following actions:
- If Startup Repair completes successfully, shut down the virtual machine, set the hard disk as a first boot device, and try to start again the virtual machine.
- If Startup Repair couldn’t complete the repair, continue to the next step.
- Click Advanced Options > Troubleshoot > Command Prompt.
- In Command prompt, input the following command and hit Enter after each line:
diskpart
select disk 0
list partition
- From the output, make a note of the size of the System partition.
- Next, type the command below and hit Enter to find out the volume number of the System Partition by using its size as a reference.
list volume
- Next, run the following commands to select the system partition (using its volume number), and assign the drive letter Z: to it, and then exit DISKPART. Where X placeholder is the volume number of your system partition.
select volume X
assign letter=Z
exit
- Lastly, run the command below in CMD prompt to repair the boot files:
bcdboot C:windows /s Z: /f ALL
- Exit CMD prompt once the command executes.
- Close all windows and shutdown the virtual machine
- Set the hard disk as the first boot device and start the virtual machine.
Read: How to Boot or Repair Windows computer using the Installation Media
Hopefully, this post helps you!
Related post: FATAL: No bootable medium found! System halted error in VirtualBox
How do I fix the fatal no bootable medium found system halted in VirtualBox?
To resolve this issue on your system, follow these steps:
- Right-click on the virtual machine that isn’t in a bootable state and click on settings.
- Once the settings menu is open, go to Storage > Controller:IDE > Choose the bootable iso.
- Click OK.
- Start your virtual machine and you should be able to boot normally from the mounted iso.
How do I fix no bootable devices found?
To fix the No Boot device found error on Windows 11/10, do the following:
- Restart the computer and tap Esc to enter the BIOS interface.
- Press the right arrow key on your keyboard until the Boot tab is opened.
- Move “Hard Drive” to the top of the boot order list by pressing “+” or “-”.
- Press F10 to save the changes and restart the computer.
Read: Fix No operating system was loaded error in Hyper-V
How do I run Windows 11 on VirtualBox?
Launch Oracle Virtualbox from your desktop or Start Menu. Click the blue new button. Name your virtual machine “Windows 11”. You can then choose Microsoft Windows under Type and then choose Windows 11 under Version. The steps to run/install Windows 11 in VirtualBox are as follows:
- Download the Windows 11 ISO file.
- Install Oracle VM Virtual Box if you haven’t already.
- Initialize a new Virtual Machine and select the Windows 11 ISO file.
- Allocate system resources and install the ISO.
Read: How to create a VirtualBox shared folder in Windows.
“When I start the XP mode I face the message “FATAL:INT18 BOOT FAILURE” on the screen. Help me please”. This problem is also common when trying to install software on a Virtual Box.
It’s too annoying when one cannot successfully boot a computer due to an update or a simple error made while installing hardware/software. When you see the error “FATAL: INT18 BOOT FAILURE” on your screen, it’s an indication the VM file is corrupt or part of the boot sector is inactive. There are many ways of fixing this error immediately it pops up.
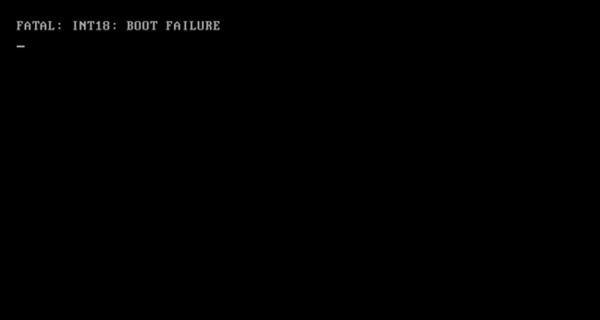
To solve this issue, you need to read all the below included parts. Besides, this article introduces a few common methods to fix the Windows startup issue.
Part 1: FATAL: INT18 BOOT FAILURE Symptoms
To easily solve any computer error, you must have an idea of what the error message implies. By just starting your computer and watching the booting process come to a halt, you should know the cause and the solutions. When BIOS on the first boot drive loads MBR(Master Boot Record) that contains codes, the MBR starts checking for partition marked active. If no active partition is found, the boot process stops thus causing the “Fatal: INT18: Boot Failure” error message.
Part 2: Reasons For The Error
Reason 1: Inactive partition
For MBR to reach the concurrent disk to boot, the first partition has to be active. Once the MBR is loaded, it begins to search for the active partition in the boot sector. The absence of an active partition in the boot sector is one of the reasons for this error.
Reason 2: Corrupt Virtual Machine(VM)
As you configure the VM setting manually to work with the existing OS programs, there is a likelihood of editing wrong codes. When you boot your computer, the OS programs fail to read the installed Virtual Machines. The result is a halted booting process.
Reason 3: Invalid active partition boot sector
An invalid boot sector bars MBR from passing execution to the active partition. When you boot a computer whose boot sector is unfortunately damaged by virus or disk write errors making it invalid, the whole process will stop and this error messages will appear.
Part 3: How to Fix Fatal Int18 boot Failure
As the key part of this guide, we are going to comprehensively guide you through on how to fix the FATAL: INT 18: BOOT FAILURE error. Having read the reasons for this error in part 2, it would be wise to analyze your exact scenario and apply the most suitable solution from the ones highlighted below.
Solution 1: Mark the partition as active using MSCONFIG
This method is a bit selective and can only be applied to primary partitions on the same hard drive. Another condition is must install Windows on the other partition to set it as active.
Here are the steps to follow:
Step 1: On the start menu, type msconfig and press Enter
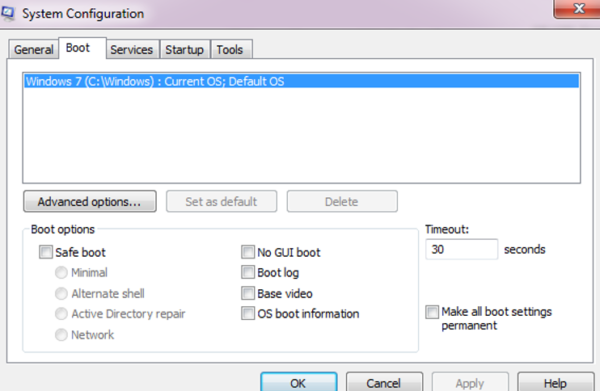
Step 2: Now click Boot and tap on the Set default then press OK
Solution 2: Set the partition as active from Diskpart Command Line
This method is mostly used in Windows 2003, 2008, and Windows 10 to set a partition as active in order to make the computer bootable.
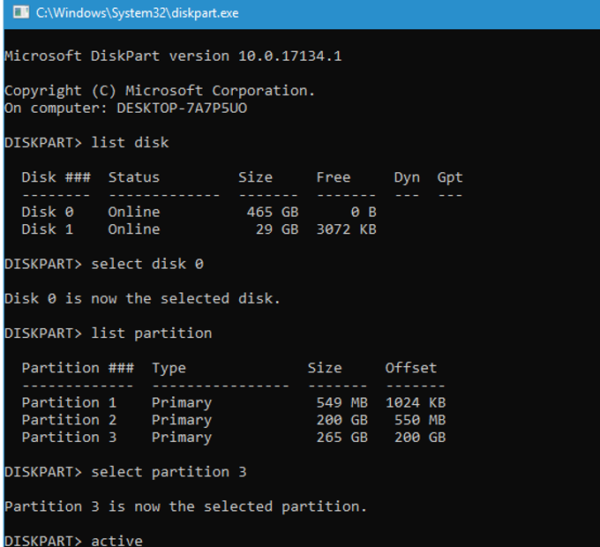
Here is how to set the partition as active from Diskpart:
Step 1: Press Win+R and after the Run box is open, type diskpart then press Enter
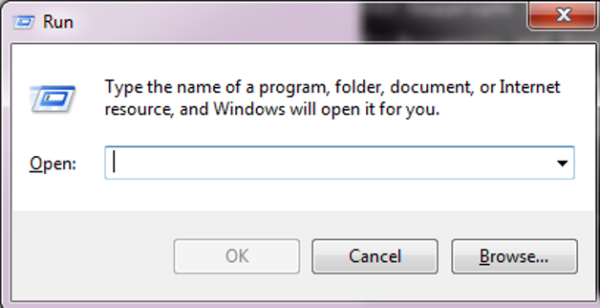
Step 2: Write list volume to receive all the partitions available then press Enter
Step 3: Write select volume to enable you to choose the volume you want to set as active and press Enter
Step 4: Lastly, write active. This is to activate the selected volume. Now press Enter
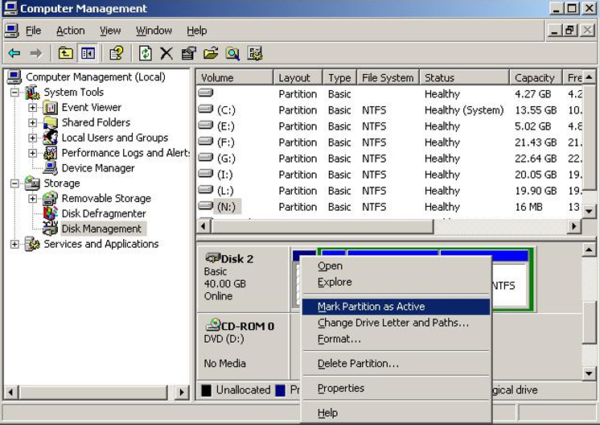
Solution 3: Use Windows Disk Management to mark the partition as active
To use Windows Disk Management, you need to have a copy of the Windows installed into your computer. If it’s available and installed into one drive, use it to boot into the first disk and mark partition as active. You can also use a fully functioning computer to connect it to the hard drive of the faulty pc and then mark the partition as active.
Here is how to use the Windows Disk Management method:
Step 1: Into the start menu, type diskmgmt.msc and press Enter
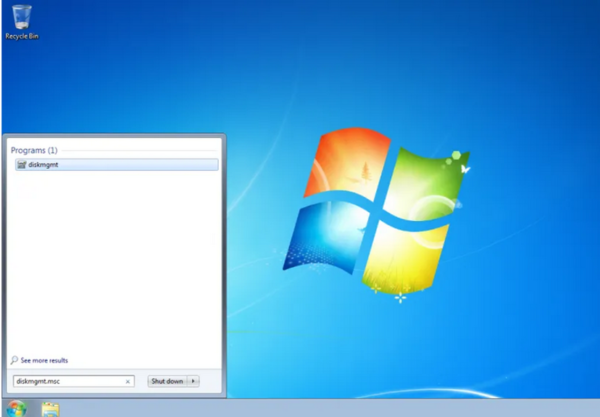
Step 2: On the popup Disk Management command options, choose the partition disk to mark as active and then right-click to mark the Mark partition as Active.
Solution 4: Use Windows’ built-in Automatic Repair
PCs have an inbuilt automatic Startup Repair option that can be used to mark a partition as active. Follow these steps to solve your problem.
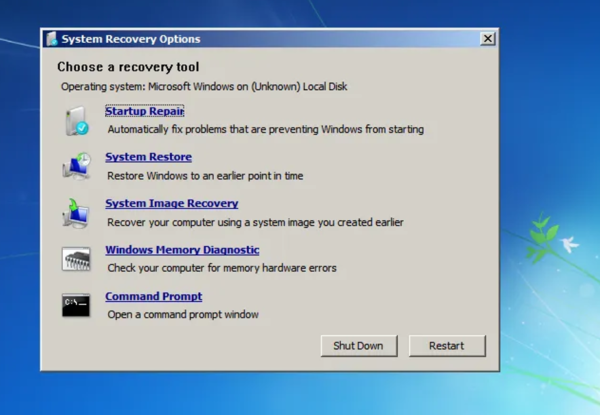
Step 1: Boot your computer from Windows install disc
Step 2: Select your preferred language, keyboard input and time then click Next
Step 3: Now tap Repair your computer and choose Troubleshoot
Step 4: Tap on the Advanced options and choose Automatic Repair
Conclusion
So many computer errors appear during the booting process. “fatal int18 boot failure” is one of them. If you are not a computer expert and this error appears on your screen, follow this suggested solution to fix the problem. The best way to solve a startup problem is by first identifying the root cause. Try to understand the behavior of your PC and seek advice if the issue seems complex.
Mic Johnson
Michael is a security enthusiast who has been in the pen testing space for over a decade. In his spare time he likes to stay abreast of new happenings in this ever-changing industry through reading and writing cyber security related articles.
Давненько я не писал статьи связанные с виртуальной машиной, хотелось бы это исправить. Данная статья будет интересна всем, кто когда либо работал с программой Virtualbox т.к обсуждается очень интересная тема, по переносу установленной на компьютере операционной системы windows 7 на виртуальную машину, со всеми установленными программами и файлами.
Давайте же начнем. Сразу скажу что на моем компьютере установлены две операционные системы, это Windows 7 с которой мы будем работать и window 10 на которой установлена программа virtualbox, в неё мы и будем переносить наш виртуальный образ.

Для создания виртуального образа диска нам потребуется небольшая утилита под названием Disk2vhd, скачать ее можно по ссылке https://technet.microsoft.com/ru-ru/sysinternals/ee656415. После запускаем, снимаем галочку напротив пункта use vhdx, в окне volume to include выбираем диск на котором установлена операционная система, потом нажимаем на кнопку обзора.

В открывшемся проводнике выбираем локальный диск, куда будет сохранен наш виртуальный образ. Желательно чтобы на диске было хотя бы 100 Гб свободного пространства, ну можно и меньше в зависимости от того какого размера ваш локальный диск. И так мы определились куда будем сохранять создаваемый образ, остается вписать имя и нажать сохранить.

Как видим путь прописан, жмем create.

Ждем пока создастся наш виртуальный образ примерно мину 30.

После окончания мы увидим сообщении об успешном завершении, теперь можно закрыть программу.

Переходим в ту папку, куда планировали сохранить образ, дабы убедится что он создан.

Теперь я перехожу в другую систему, которая так же находится на моем компьютере. Можно конечно перейти и на другой компьютер, только потребуется переносной жесткий диск, для переноса созданного образа. Если на вашем компьютере еще не установлен virtualbox, то переходим по ссылке https://www.virtualbox.org/wiki/Downloads и скачиваем данный программный продукт.

Открываем программу и нажимаем создать.

В открывшемся окне пишем имя системы, выбираем версию, в моём случае она 64-х битная. Далее указываем объем оперативной памяти, которую будет использовать наша виртуальная машина. И в разделе жесткий диск выбираем использовать существующий виртуальный жесткий диск, где нажимаем на кнопочку обзора.

Находим созданный виртуальный образ в проводнике и нажимаем открыть.

И создать.

Теперь можно попробовать запустить, выбираем созданный пункт и запускаем.

Появилась ошибка fatal: int18: boot failure, которая говорит о том, что загрузчик отвечающий за запуск системы не обнаружен.

Для устранения данной проблемы переходим в настройки.

Выбираем пункт система, где в окошке порядок загрузки, ставим оптический диск на первое место.

Далее идем во вкладку носители, где нам потребуется iso образ windows 7, для восстановления загрузчика. В окне носители информации, нажимаем на вкладку пусто и жмем на иконку диска в окне атрибуты, нажимаем на пункт выбрать образ оптического диск.

Находим в компьютере данный образ и нажимаем открыть.

Как видим все на месте, Ok.

Запускаем на нашу машину.

Загрузились с образа и в начальном окне жмем сочетание клавиш shift+f10, для вызова командной строки, с которой нам надо чуток поработать.

Итак нам понадобится ввести некоторые команды.
для начало вводим команду diskpart
далее list vol для вывода всех разделов жесткого диска.
Видим, что у нас оказывается отсутствует скрытый раздел System Reserved (Зарезервировано системой), который непосредственно отвечает за успешную загрузку системы. Так давайте же создадим его.
Вводим команду select vol 1, тем самый выбираем основной том на котором находится наша система.
shrink desired=100 — сжимаем том диска до 100 mb
create par prim — создаем раздел
format fs=ntfs — форматируем в файловую систему NTFS
activ — помечаем как активный
assign letter V — назначаем букву диска V
exit — завершаем работу diskpart

Вводим команду bcdboot c:windows, тем самым создаем файлы загрузки на скрытом разделе. И можно заново запустить виртуальную машину.

Если при запуске появляется так называемый синий экран смерти, с ошибкой 0x0000007B, то читаем статью дальше.

Для его устранения опять же заходим в настройки -> носители -> нажимаем правой кнопкой мыши на контроллер SATA и удаляем его.

Теперь жмем на иконку с зеленым плюсиком и добавляем IDE контроллер.

К нему цепляем наш виртуальный образ.


OK.

Запускаем и радуемся

Оставляйте своё мнение о данной статье, ну и конечно же задавайте свои вопросы, если у вас что-то вдруг пошло не так.
Спасибо за внимание!
Статьи рекомендуемые к прочтению:
-
Ошибка в программе VirtualBox. Аппаратное ускорение (VT-x AMD-V) недоступно в вашей системе. Что делать?
(107333)
-
Как перенести установленную в компьютере Windows 7 на виртуальную машину VirtualBox
(30504)
-
Как подключить общую папку в VirtualBox
(24269)
-
Виртуальная машина Hyper-V
(20709)
-
Загружаем виртуальную машину с флешки программой Virtual Machine USB Boot
(16202)
-
Увеличить размер диска VirtualBox
(41211)
-
Ошибка VirtualBox — This operating system user the Physical Address Extension feature to support systems with more than 4GB of RAM.
(15051)
Содержание
- About the “Fatal: INT18: Boot failure” error
- Description and Symptoms
- Symptom 1: Fatal: INT18: Boot failure error screen on startup
- Causes of this Error
- Cause 1: There are no active partitions available
- Cause 2: Active partition bootsector is not valid
- Fixing “Fatal: INT18: Boot failure” on Windows
- Fix #1: Mark partition as active via Easy Recovery Essentials
- Fix #2: Use Windows’ built-in Automatic Repair
- Fix #3: Mark partition as active using Diskpart
- Fix #4: Mark partition as active using Windows Disk Management
- More Information
- Linked Entries
- Support Links
- Applicable Systems
Давненько я не писал статьи связанные с виртуальной машиной, хотелось бы это исправить. Данная статья будет интересна всем, кто когда либо работал с программой Virtualbox т.к обсуждается очень интересная тема, по переносу установленной на компьютере операционной системы windows 7 на виртуальную машину, со всеми установленными программами и файлами.
Давайте же начнем. Сразу скажу что на моем компьютере установлены две операционные системы, это Windows 7 с которой мы будем работать и window 10 на которой установлена программа virtualbox, в неё мы и будем переносить наш виртуальный образ.
Для создания виртуального образа диска нам потребуется небольшая утилита под названием Disk2vhd , скачать ее можно по ссылке https://technet.microsoft.com/ru-ru/sysinternals/ee656415 . После запускаем, снимаем галочку напротив пункта use vhdx , в окне volume to include выбираем диск на котором установлена операционная система, потом нажимаем на кнопку обзора.
В открывшемся проводнике выбираем локальный диск, куда будет сохранен наш виртуальный образ. Желательно чтобы на диске было хотя бы 100 Гб свободного пространства, ну можно и меньше в зависимости от того какого размера ваш локальный диск. И так мы определились куда будем сохранять создаваемый образ, остается вписать имя и нажать сохранить.
Как видим путь прописан, жмем create .
Ждем пока создастся наш виртуальный образ примерно мину 30.
После окончания мы увидим сообщении об успешном завершении, теперь можно закрыть программу.
Переходим в ту папку, куда планировали сохранить образ, дабы убедится что он создан.
Теперь я перехожу в другую систему, которая так же находится на моем компьютере. Можно конечно перейти и на другой компьютер, только потребуется переносной жесткий диск, для переноса созданного образа. Если на вашем компьютере еще не установлен virtualbox, то переходим по ссылке https://www.virtualbox.org/wiki/Downloads и скачиваем данный программный продукт.
Открываем программу и нажимаем создать .
В открывшемся окне пишем имя системы, выбираем версию, в моём случае она 64-х битная. Далее указываем объем оперативной памяти, которую будет использовать наша виртуальная машина. И в разделе жесткий диск выбираем использовать существующий виртуальный жесткий диск , где нажимаем на кнопочку обзора.
Находим созданный виртуальный образ в проводнике и нажимаем открыть.
Теперь можно попробовать запустить, выбираем созданный пункт и запускаем.
Появилась ошибка fatal: int18: boot failure , которая говорит о том, что загрузчик отвечающий за запуск системы не обнаружен.
Для устранения данной проблемы переходим в настройки.
Выбираем пункт система , где в окошке порядок загрузки, ставим оптический диск на первое место.
Далее идем во вкладку носители , где нам потребуется iso образ windows 7, для восстановления загрузчика. В окне носители информации, нажимаем на вкладку пусто и жмем на иконку диска в окне атрибуты, нажимаем на пункт выбрать образ оптического диск.
Находим в компьютере данный образ и нажимаем открыть.
Как видим все на месте, Ok.
Запускаем на нашу машину.
Загрузились с образа и в начальном окне жмем сочетание клавиш shift+f10 , для вызова командной строки, с которой нам надо чуток поработать.
Итак нам понадобится ввести некоторые команды.
для начало вводим команду diskpart
далее list vol для вывода всех разделов жесткого диска.
Видим, что у нас оказывается отсутствует с крытый раздел System Reserved (Зарезервировано системой), который непосредственно отвечает за успешную загрузку системы. Так давайте же создадим его.
Вводим команду select vol 1 , тем самый выбираем основной том на котором находится наша система.
shrink desired=100 — сжимаем том диска до 100 mb
create par prim — создаем раздел
format fs=ntfs — форматируем в файловую систему NTFS
activ — помечаем как активный
assign letter V — назначаем букву диска V
exit — завершаем работу diskpart
Вводим команду bcdboot c:windows , тем самым создаем файлы загрузки на скрытом разделе. И можно заново запустить виртуальную машину.
Если при запуске появляется так называемый синий экран смерти, с ошибкой 0x0000007B, то читаем статью дальше.
Для его устранения опять же заходим в настройки -> носители -> нажимаем правой кнопкой мыши на контроллер SATA и удаляем его.
Теперь жмем на иконку с зеленым плюсиком и добавляем IDE контроллер.
К нему цепляем наш виртуальный образ.
Запускаем и радуемся
О ставляйте своё мнение о данной статье, ну и конечно же задавайте свои вопросы, если у вас что-то вдруг пошло не так.
Get the fix to the Fatal: INT18: Boot failure boot error message affecting Windows XP, Windows Vista, Windows 7, Windows 8, Windows 8.1, , and Windows 10.
About the “Fatal: INT18: Boot failure” error
The following information on this error has been compiled by NeoSmart Technologies, based on the information gathered and reported by our global network of engineers, developers, and technicians or partner organizations.
Description and Symptoms
The error messages, alerts, warnings, and symptoms below are tied to this error.
Symptom 1: Fatal: INT18: Boot failure error screen on startup
When an operating system is installed on the hard drive, the installer marks the partition that contains the boot files for that OS as active. Every time a computer with that OS is turned on, as part of the boot process the BIOS loads and starts the first sector on the bootable drive. The first sector on that disk (typically called an MBR or Master Boot Record) contains code that checks the partition table for a partition that is marked as active, and loads the first sector of that partition (the boot sector). However, if there are no active partitions available, then the loading process halts, and “Fatal: INT18: Boot Failure” error is displayed.
Here is a screenshot example of a Fatal: INT18: Boot failure error screen on Windows XP, Vista, 7, 8, 8.1, and Windows 10:

Causes of this Error
This error has been known to occur as a result of one of the following causes:
Cause 1: There are no active partitions available
If MBR can’t find an active partition on the current disk to boot from, then the system loading process halts. This is usually caused by errors made while configuring the partitions manually.
Cause 2: Active partition bootsector is not valid
If MBR tries to pass execution on to an active partition that does not have a valid, executable bootsector, then this error may also appear. The bootsector can be sometimes damaged by disk write errors, boot sector infecting viruses, or power outages.
Fixing “Fatal: INT18: Boot failure” on Windows
Windows Setup CD/DVD Required!
Some of the solutions below require the use of the Microsoft Windows setup CD or DVD. If your PC did not come with a Windows installation disc or if you no longer have your Windows setup media, you can use Easy Recovery Essentials for Windows instead. EasyRE will automatically find and fix many problems, and can also be used to solve this problem with the directions below.
Fix #1: Mark partition as active via Easy Recovery Essentials
Easy Recovery Essentials is guaranteed to fix the “FATAL: INT 18: BOOT FAILURE” error automatically using its built-in Automated Repair option. EasyRE is currently available for Windows XP, Vista, 7 and 8 and can be downloaded and created on any PC.
- Download Easy Recovery Essentials. Make sure to note your Windows version (XP, Vista, 7 or 8) before you download EasyRE. This guide can help you identify what version of Windows you have installed.
- Burn the image. Follow these instructions on how to burn the bootable ISO image very carefully, as making a bootable CD can be tricky! Alternatively, these instructions explain how to create a bootable EasyRE recovery USB stick/drive.
- Boot up your PC from the Easy Recovery Essentials CD or USB you created.
- Once EasyRE is running, choose the “Automated Repair” option and click Continue .

Choose “Automated Repair” in Easy Recovery Essentials

Choose the drive associated with the Windows installation you’re trying to repair.

Easy Recovery Essentials searches for errors and makes corrections to the selected Windows installation.

Windows, booting up successfully.
You can download Easy Recovery Essentials from here.
Fix #2: Use Windows’ built-in Automatic Repair
The Windows Automatic Repair can be used to mark the disk partition as active to fix this error. Here are the steps to access the Automatic Repair from an install disc:
- Boot from Windows install disc
- Click Next in the setup page after selecting proper language, time and keyboard input
- Click Repair your computer and select Troubleshoot
- Click on Advanced options
- Select Automatic Repair and select your operating system.
Here is an example screenshot of System Recovery Options Menu.

Fix #3: Mark partition as active using Diskpart
The built-in Diskpart Windows utility can also be used to mark a partition as active. Note that the marked partition must contain the Windows bootloader for Windows to load correctly.
Here are the steps to run Diskpart and change the disk’s status:
- Boot from the Windows install disc
- Click on Repair your computer after after selecting proper language, time and keyboard input
- Select the Windows installation drive, which is usually C: , and click Next
- Choose Command Prompt when the System Recovery Options box appears
- Write the following command and press Enter afterwards:
- Then, write
to get the list of all available partitions, and press Enter .
Then, write
to select the volume you want to mark as active, and press Enter
Then, write
to mark the currently selected volume as active, and press Enter
Here is an example screenshot of what the PC’s console output should look like after the volume is properly marked as active with Diskpart:

Diskpart utility results screen
Fix #4: Mark partition as active using Windows Disk Management
If the user has a second copy of Windows installed on another drive, he can boot into it to his first disk’s partition as active. Alternatively, if he has another working PC available, he may connect his hard drive to that PC to mark the drive’s partition as active from there.
Here are the steps to run Windows Disk Management and mark a partition as active:
- Type diskmgmt.msc into the start menu, and press Enter .

- Right click on the partition you want to mark as active, and select Mark partition as Active.

More Information
Linked Entries
Support Links
It’s an easy-to-use and automated diagnostics disk. It’s available for Windows 8, Windows 7 and Windows Vista. It’s also available for Windows XP and Windows Server.
Read more at Windows Recovery Disks.
Applicable Systems
This Windows-related knowledgebase article applies to the following operating systems:
- Windows XP (all editions)
- Windows Vista (all editions)
- Windows 7 (all editions)
- Windows 8 (all editions)
- Windows 8.1 (all editions)
- Windows 10 (all editions)
I have just took a back up of my windows PC, in the backup folder I can see a VHD file, I thought to run this with VirtualBox, but I the boot failure message. I suspect there is not boot information in the partition, if this is correct is there anyway to boot this file via VirtualBox.
Sorry, I have very min. knowledge about virtualization.
I have just took a back up of my windows PC, in the backup folder I can see a VHD file, I thought to run this with VirtualBox, but I the boot failure message. I suspect there is not boot information in the partition, if this is correct is there anyway to boot this file via VirtualBox.
Sorry, I have very min. knowledge about virtualization.

asked Oct 27, 2012 at 8:04

3
Enable EFI:
Settings -> System -> Motherboard
OR
vboxmanage modifyvm vmname —firmware efi
answered Mar 31, 2018 at 22:02

KTCOKTCO
6155 silver badges5 bronze badges
3