Есть несколько часто встречающихся ошибок Solidworks Toolbox:
- Failed to get writable document
- Unable to open read-only file
- Failed to save Toolbox library: Access to the path is denied
- Ошибка чтения таблицы данных (Solidworks 2018)
Failed to get writable document
В этом случае необходимо проверить права доступа к каталогу Toolbox (по умолчанию C:Solidworks Data можно посмотреть в настройках Toolbox)
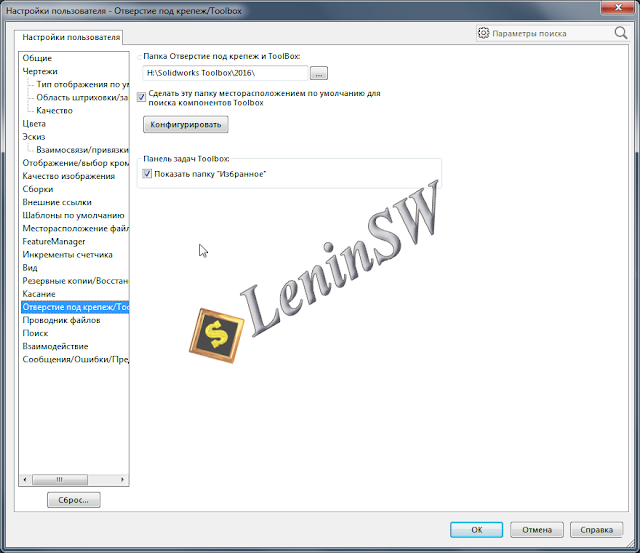 |
| Путь к Solidworks Toolbox |
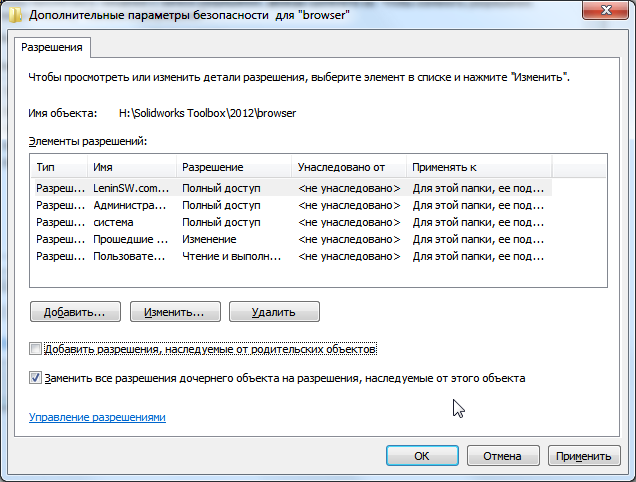
Для этого щелкните правой кнопкой на каталог Toolbox-Свойства — вкладка Безопасность. Проверьте, чтобы у вашей учетной записи были права на запись и был снят атрибут для чтения. Ниже скрины, которые дают полный доступ.

Unable to open read-only file
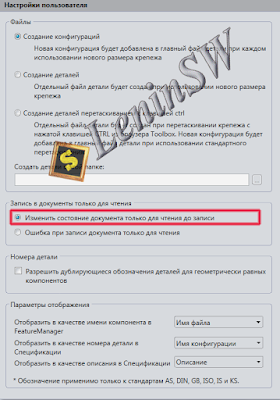
При этой ошибке нужно в настройках конфигуратора Toolbox- «Настройки пользователя» поставить галочку «Изменить состояние документа только для чтения до записи»
Failed to save Toolbox library:
Access to the path is denied
В третьем случае необходимо проверить права на запись у файла «ToolboxFiles.index», который находится в каталоге Toolbox — Browser. Эта ошибка может появиться в версиях SW2012 и выше. Связано это с тем, что начиная с Solidworks 2012 тулбокс не зависит от базы данных SWBrowser.mdb, а сохраняет структуру в файле «ToolboxFiles.index».
Error Solidworks Toolbox:
- Failed to get writable document
- Unable to open read-only file
- Failed to save Toolbox library: Access to the path is denied
- You appear to have experienced problems the last time you loaded the Solidworks Toolbox add-in
Failed to get writable document
In this case, you need to check the access rights to the Toolbox directory (by default C: Solidworks Data can be viewed in the Toolbox settings)
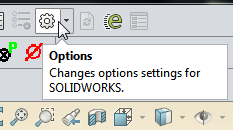 |
| Solidworks Options |
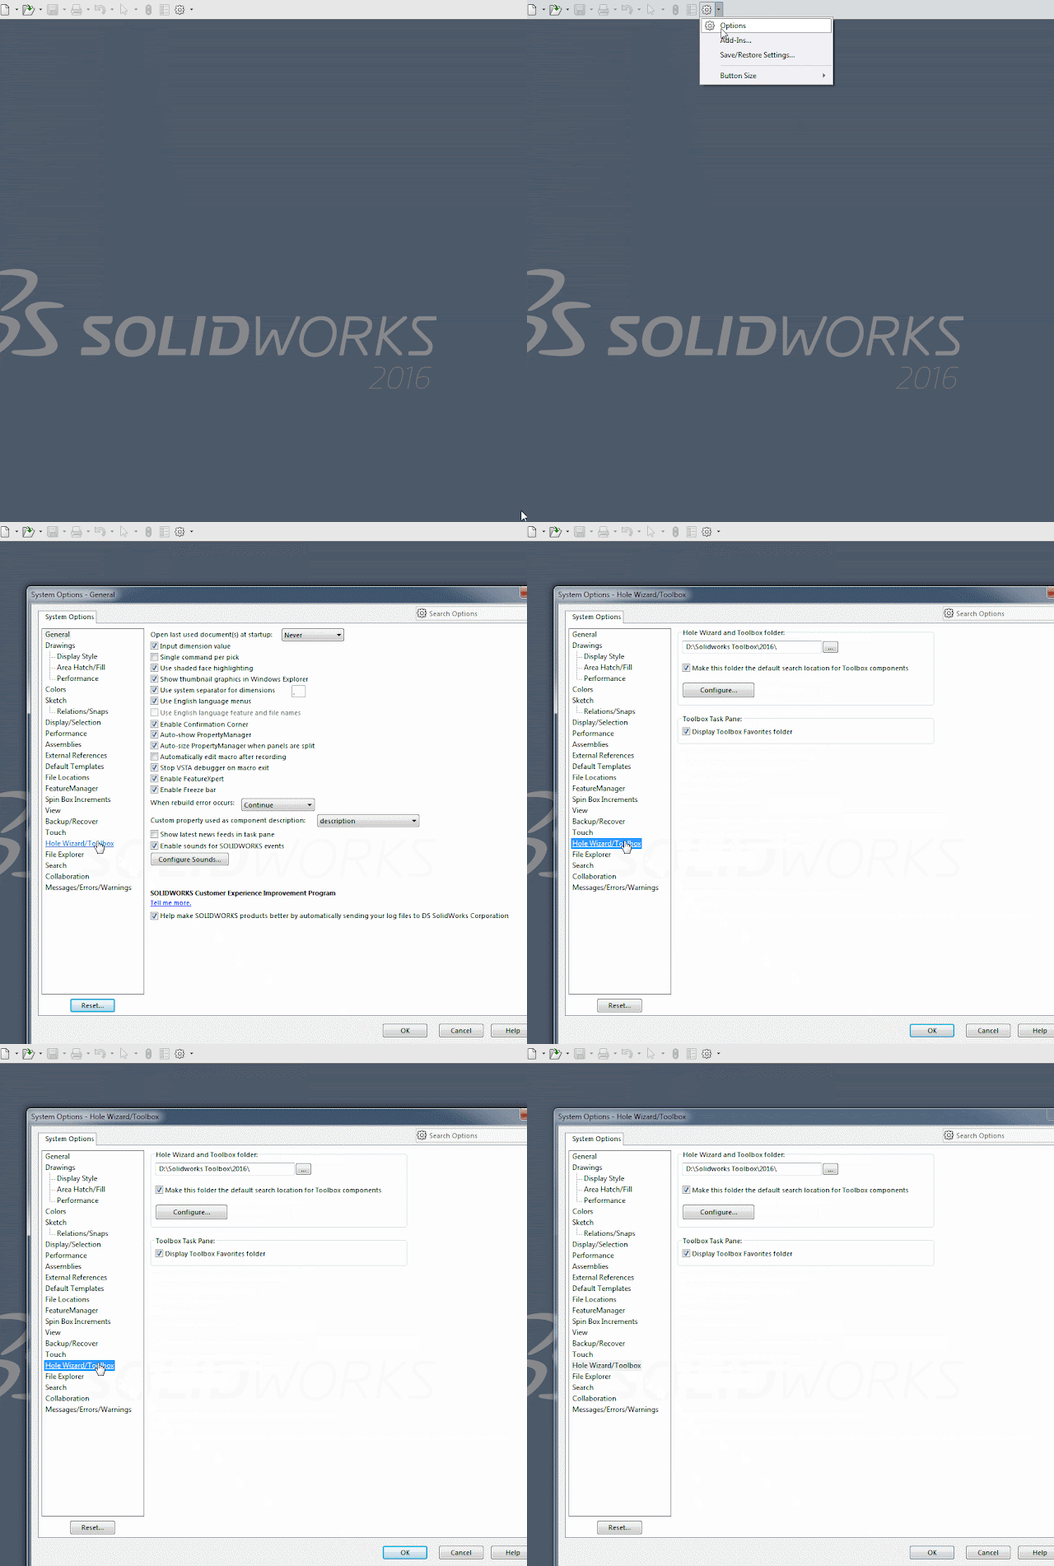 |
| Change Solidworks Toolbox Location |
To do this, right-click on the Toolbox-Properties — Security tab. Check that your account has write permissions.
Unable to open read-only file
With this error, you must tick the «Change the status of the read-only document to the record» in the Toolbox- «User Settings» configurator settings
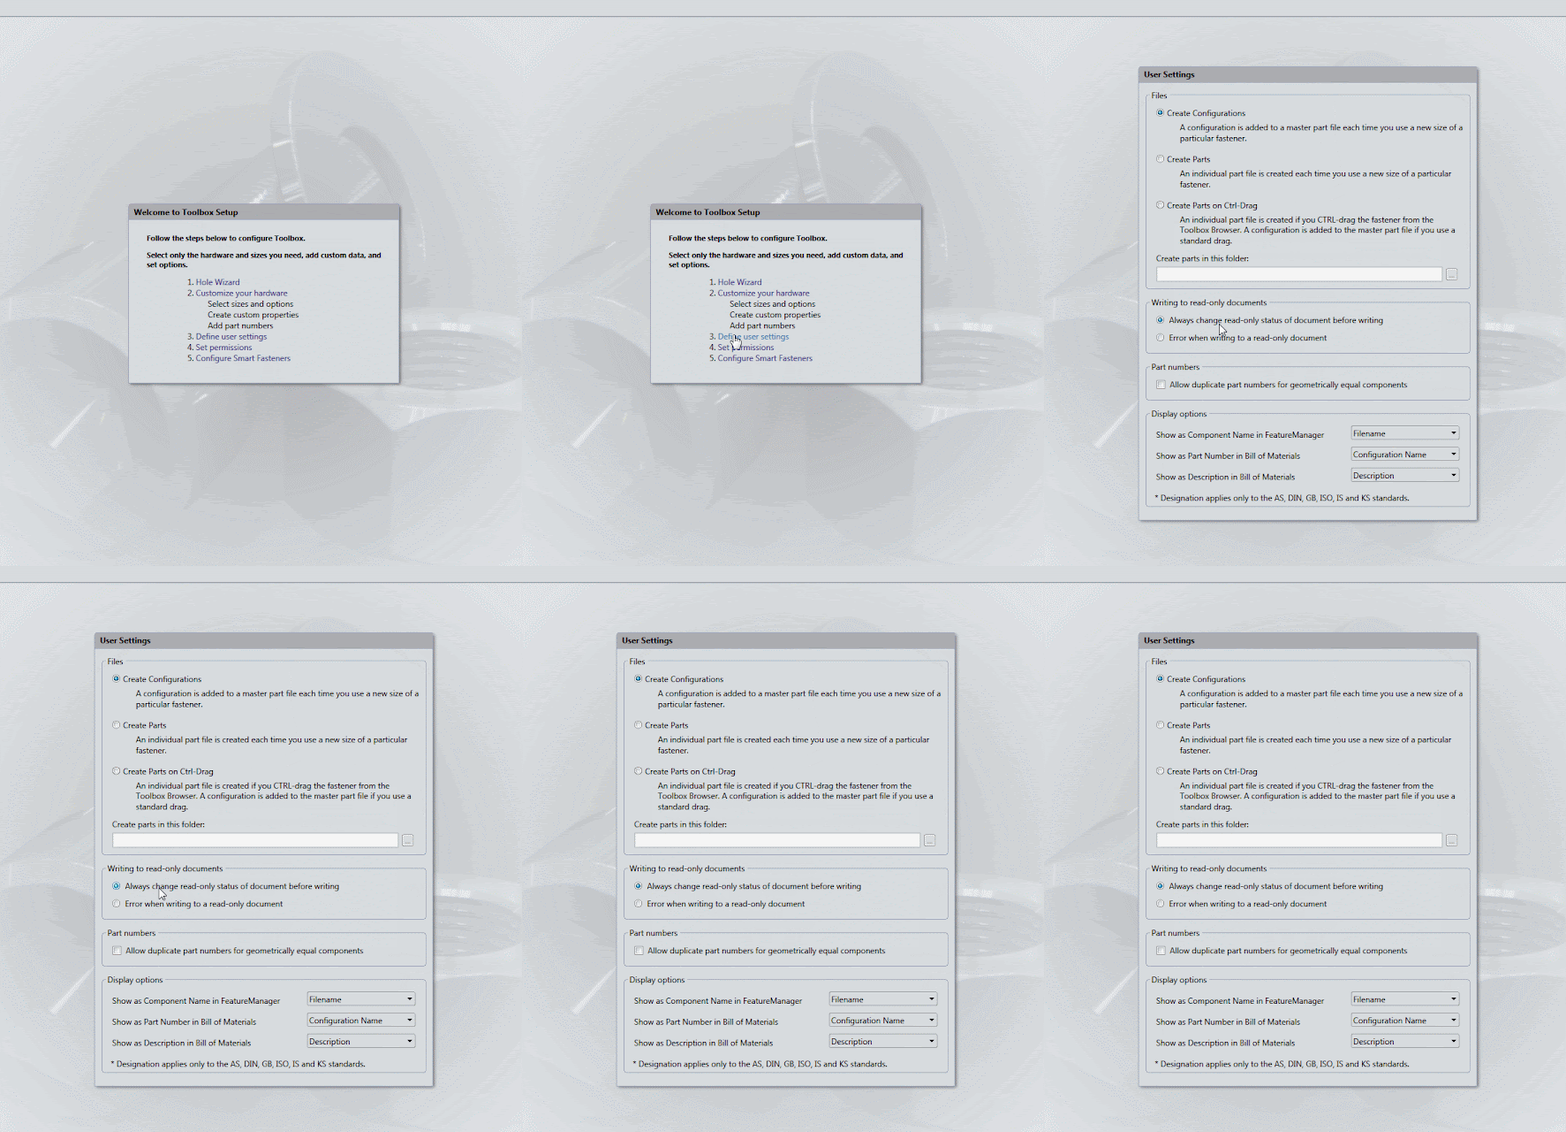 |
| Change the status of the read-only document to the record |
Failed to save Toolbox library:
Access to the path is denied
In the third case, you need to check the write permission of the «ToolboxFiles.index» file, which is located in the Toolbox — Browser directory. This error may appear in SW2012 and higher versions. This is due to the fact that starting from Solidworks 2012 the toolbox does not depend on the SWBrowser.mdb database, but stores the structure in the «ToolboxFiles.index» file.
Error Solidworks Toolbox:
- Failed to get writable document
- Unable to open read-only file
- Failed to save Toolbox library: Access to the path is denied
Failed to get writable document
In this case, you need to check the access rights to the Toolbox directory (by default C: Solidworks Data can be viewed in the Toolbox settings)
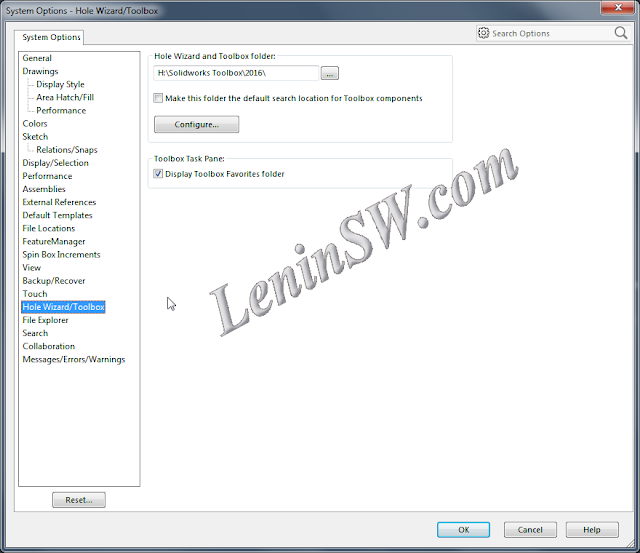
To do this, right-click on the Toolbox-Properties — Security tab. Check that your account has write permissions.
Unable to open read-only file
With this error, you must tick the «Change the status of the read-only document to the record» in the Toolbox- «User Settings» configurator settings
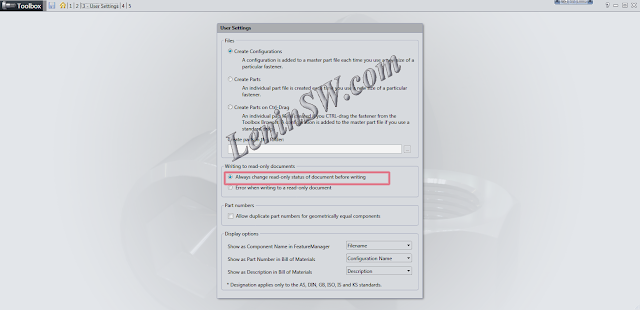
Failed to save Toolbox library:
Access to the path is denied
In the third case, you need to check the write permission of the «ToolboxFiles.index» file, which is located in the Toolbox — Browser directory. This error may appear in SW2012 and higher versions. This is due to the fact that starting from Solidworks 2012 the toolbox does not depend on the SWBrowser.mdb database, but stores the structure in the «ToolboxFiles.index» file.
Содержание
- Популярные вопросы
- MKS GEN v1.4 + A4988 + 17SH4401
- Чем 3D принтер отличается от 3D плоттера?
- Ответы

Популярные вопросы
MKS GEN v1.4 + A4988 + 17SH4401
При попытке пошевелить ШД 17HS4401 с драйверами A4988 и платой MKS GEN V1.4, двигатели сначала делают движение в одну сторону.
Чем 3D принтер отличается от 3D плоттера?
На занятиях по моделированию один школьник спросил — Чем 3D принтер отличается от 3D плоттера и что лучше для нови.
Ответы
Во-первых, у вас шестерня создается не как отдельная деталь, а как конфигурация в файле spur gear_iso.sldprt. Если будете переносить свои проекты на другой компьютер, или переставите винду, то после открытия ваши конфигурации деталей ToolBox слетят на По умолчанию.
Чтобы такого не было, настройте ToolBox на создание деталей в определенной папке.
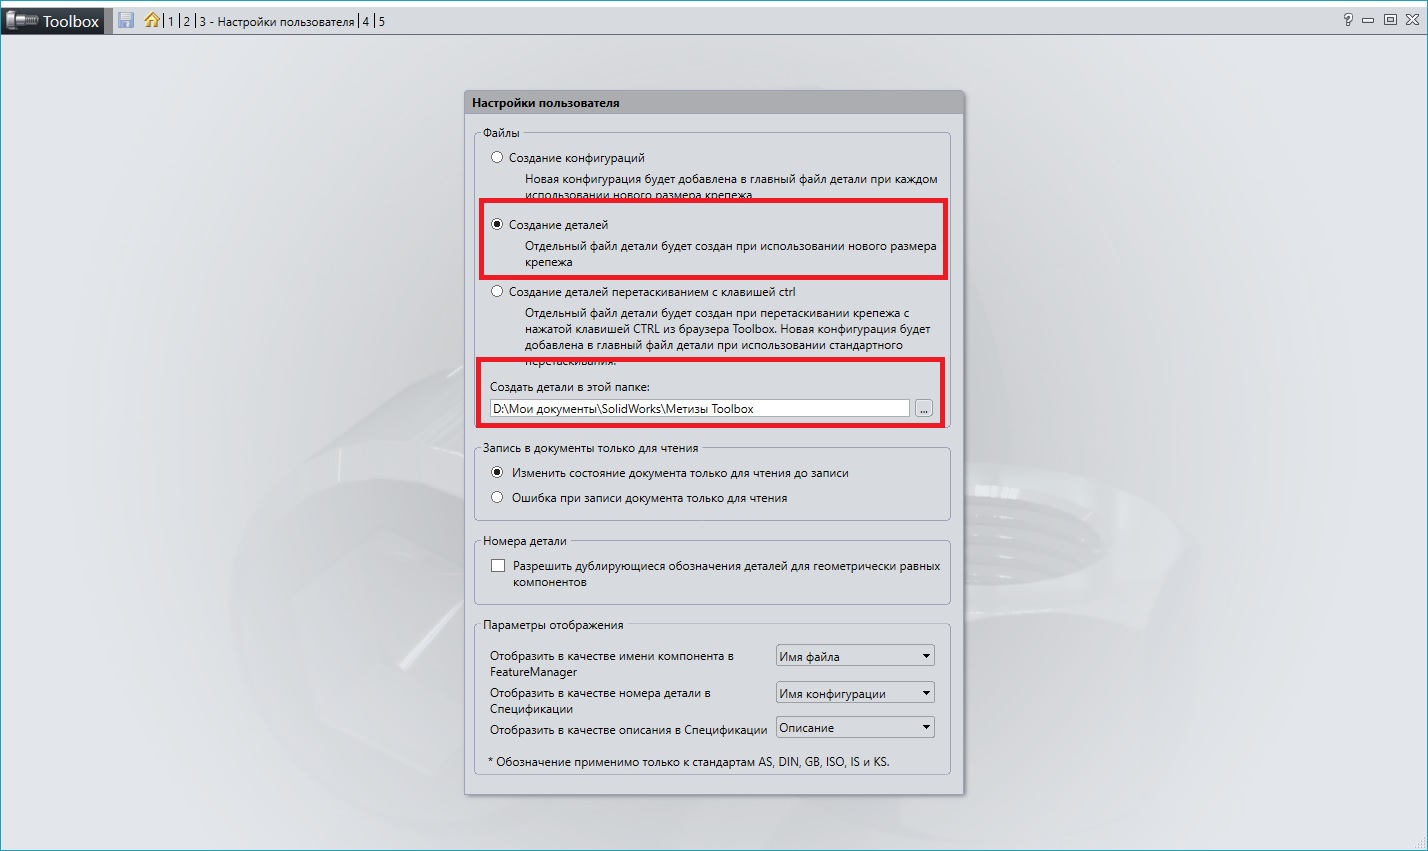
Круто, спасибо большое. Проделал, перезапустился — все детали сохранятся.
Для написания комментариев, пожалуйста, авторизуйтесь.


Says( Failed To Get Writable Document)

If you just installed 2018 make sure toolbox was checked with SW installation manager. If toolbox was already installed, you will often have to manually verify the install directory for toolbox and allow for over-wright.
If this was all done correctly, check your SW options file locations (cog wheel) and verify toolbox is pointed to the correct directory.

Hello Ahmed, how are you?
I had the same problem when I installed the SW in Win 10, is this your problem??
If so, I read that the problem is with the security update KB3072630. before you install SW you have to unistall this KB3072630 then install SW (and crack it if this the case) then install again the update and that’s it.

Today we found a different solution for this issue:
Go to the path which your toolbox is linked to:
Search for the specific toolbox file that you want to insert in SolidWorks and delete it. You will maybe have to close SolidWorks first, so you have access and be able to delete the file.
Ошибка «Could not load SolidWorks DLL: GdtAnalysisSupport.dll» на моей практике, наверное, самая распространенная проблема. Ниже коротенький мануальчик по устранению.
Способ 1. Если установка была выполнена после 15 июля 2015 года, наиболее вероятным объяснением является известный конфликт, вызванный обновлением операционной системы Windows KB3072630. Это обновление вносит изменения в службу «Установщик Windows».
Для автономной установки:
1. В ветке реестра HKEY_LOCAL_MACHINESOFTWAREPoliciesMicrosoftWindowsInstaller создать значение DWORD с именем RemappedElevatedProxiesPolicy и значением 1. Если раздел не существует — нужно создать.
2. Выполнить восстановление установки SOLIDWORKS. Пуск -> Программы и компоненты -> SolidWorks -> Изменить -> Восстановить.
3 . После восстановления установки изменить значение «RemappedElevatedProxiesPolicy» на «».
Установки административного образа:
1. Удалить SOLIDWORKS. Пуск -> Программы и компоненты -> SolidWorks -> Изменить -> Удалить .
2. В ветке реестра HKEY_LOCAL_MACHINESOFTWAREPoliciesMicrosoftWindowsInstaller создать значение DWORD с именем RemappedElevatedProxiesPolicy и значением 1. Если раздел не существует — нужно создать.
3. Установить SOLIDWORKS из административного образа.
4. После установки изменить значение «RemappedElevatedProxiesPolicy» на «».
Способ 2. Если проблема не в обновлении можно
1. Запустить командную строку от имени администратора.
2 часа назад, dGz сказал:
Мне не удалось понять полностью это объяснение. Предполагаю, что Тулбокс стал работать потому что получилось «merge». При этом, вероятно, я неверно понял мысль, что ксенокод, которым собрана сборка, использует метод «writecopy». Но пречитываю текст и по другому понять не могу.
Ксенокод использует «merge» по умолчанию. На файлы сборки (т.е. самого солида) устанавливается метод «full», на компоненты системы «writecopy». Все, на что не указана изоляция имеет изоляцию «merge». Поэтому используя практически любой путь отличающийся от пути по умолчанию в солиде (тулбокс, шаблоны, заметки и т.д.) и не расположенный в системных каталогах винды мы будем практически со 100% вероятностью иметь каталог с изоляцией «merge» — слияние. Т.е. изменения в этой папке будут доступны из сборки и из реальной системы.
Toolbox стал работать потому, что был пересоздал индексный файл тулбокса, а ошибка возникла из-за того, что в базе данных было исполнение 2 с фаской, а в детали фаски не было.
2 часа назад, dGz сказал:
Имеется в виду, прописывать после создания сборки?
Нет, во время создания сборки.
2 часа назад, dGz сказал:
Скопировал из сборки SolidWorks Data и переопределил в SW путь к тулбоксу на локальную папку. Подробно не тестировал, но похоже работает, как вы написали.
Теперь, если придется удалить песочницу сборки (в случае какого-либо сбоя), надо будет лишь восстановить путь к тулбоксу на локальном диске и сборка будет считывать последнюю актуальную версию.
Why ToolBox Doesn’t Work In SolidWorks 2018 With Me

Says( Failed To Get Writable Document)

Oct 17, 2018
If you just installed 2018 make sure toolbox was checked with SW installation manager. If toolbox was already installed, you will often have to manually verify the install directory for toolbox and allow for over-wright.
If this was all done correctly, check your SW options file locations (cog wheel) and verify toolbox is pointed to the correct directory.

Oct 18, 2018
Hello Ahmed, how are you?
I had the same problem when I installed the SW in Win 10, is this your problem??
If so, I read that the problem is with the security update KB3072630. before you install SW you have to unistall this KB3072630 then install SW (and crack it if this the case) then install again the update and that’s it.
Regards
Oct 16, 2019
Today we found a different solution for this issue:
Go to the path which your toolbox is linked to:
.. ToolboxCopiedParts
Search for the specific toolbox file that you want to insert in SolidWorks and delete it. You will maybe have to close SolidWorks first, so you have access and be able to delete the file.
e.g. DIN 7991 M3 x 20 or else.
В меню SOLIDWORKS выберите Инструменты > Надстройки . В диалоговом окне «Надстройки» в разделе «Активные надстройки и запуск» выберите «Утилиты SOLIDWORKS Toolbox», «Библиотека SOLIDWORKS Toolbox» или оба варианта. Вы также можете активировать надстройку SOLIDWORKS Toolbox Library, щелкнув Добавить сейчас на панели задач Toolbox Design Library. Нажмите «ОК».
Ваш набор инструментов обычно можно найти в расположении по умолчанию на вашем диске C:. Вся папка набора инструментов по умолчанию называется «Данные SOLIDWORKS» и находится в следующем расположении: «C:Данные SOLIDWORKS».
Папка Отверстия под крепеж и Toolbox
Открывает инструмент настройки Toolbox, где вы можете установить параметры на странице Smart Fasteners. Дополнительные сведения см. в справке Toolbox. Нажмите «Сброс», чтобы восстановить заводские настройки по умолчанию для всех параметров системы или только для параметров на этой странице.
SOLIDWORKS® Toolbox включает библиотеку стандартных деталей, полностью интегрированную с SOLIDWORKS. Выберите свой стандарт и тип детали, которую вы хотите вставить, затем перетащите компонент в свою сборку.
Добавление кнопок инструментов на панели инструментов
- Открыв документ, нажмите «Инструменты» > «Настроить» или щелкните правой кнопкой мыши границу окна и выберите «Настроить». …
- На вкладке Команды выберите категорию. …
- В разделе «Кнопки» перетащите кнопку инструмента на любую панель инструментов.
В меню SOLIDWORKS выберите Инструменты > Надстройки. В диалоговом окне «Надстройки» в разделе «Активные надстройки и запуск» выберите SOLIDWORKS Toolbox, Браузер SOLIDWORKS Toolbox или оба варианта. Вы также можете активировать надстройку SOLIDWORKS Toolbox Browser, щелкнув Добавить сейчас на панели задач Библиотеки проектирования Toolbox. Нажмите «ОК».
Вы можете сделать это, выбрав «Инструменты», «Параметры», «Отверстие под крепеж/Набор инструментов», затем нажмите кнопку обзора (…) и выберите новое местоположение папки набора инструментов, как показано на рисунке ниже.
SOLIDWORKS Toolbox входит в состав SOLIDWORKS Professional и SOLIDWORKS Premium — премиум-бренда доступного ПО для 3D-САПР.
Чтобы создать деталь из компонента Toolbox:
- На панели задач Библиотеки проектирования в разделе Панель инструментов разверните стандарт, категорию и тип компонента. …
- Щелкните компонент правой кнопкой мыши и выберите «Создать деталь».
- В PropertyManager в разделе «Свойства» укажите значения свойств. …
- Щелкните.
Чтобы вручную обновить Toolbox:
Перейдите в папку установки SOLIDWORKS 2022, обычно «C:Program FilesSOLIDWORKS CorpSOLIDWORKS», а затем в «Утилиты Toolboxdata», щелкните правой кнопкой мыши «UpdateBrowserDatabase.exe» и выберите «Запуск от имени администратора». Чтобы начать обновление, нажмите кнопку «Обновить».
Панель инструментов — это набор нескольких мощных инструментов, встроенных в SolidWorks; это может повысить производительность и сократить время, необходимое для завершения проекта. Toolbox содержит обширную библиотеку стандартных аппаратных компонентов, которые можно легко добавить в проект в любой момент.
Как обновить SOLIDWORKS до версии 2022?
В SOLIDWORKS щелкните > Проверить наличие обновлений. В Windows щелкните Пуск > Менеджер установки SOLIDWORKS > Проверить наличие обновлений.
Цены на SolidWorks: MSRP
| Продукт | Постоянная лицензия | Годовая подписка |
|---|---|---|
| Дизайн | ||
| SolidWorks Премиум | $7,995 | $1,995 |
| SolidWorks Professional | $5,490 | $1,495 |
| Стандарт SolidWorks | $3,995 | $1,295 |
Чтобы добавить деталь в библиотеку Toolbox. на странице «Настройка панели инструментов» в разделе «Настройки панели инструментов», щелкните папку правой кнопкой мыши и выберите «Добавить файл». Поиск ‘Добавление содержимого в библиотеку Toolbox’ в Базе знаний SOLIDWORKS.
Чтобы отредактировать набор инструментов Python, щелкните его правой кнопкой мыши и выберите «Редактировать». Когда вы закончите редактирование, ваш набор инструментов Python будет автоматически обновлен при закрытии редактора. В качестве альтернативы, чтобы вручную обновить набор инструментов Python в любое время, щелкните правой кнопкой мыши набор инструментов и выберите «Обновить».
На чтение 11 мин. Опубликовано 15.12.2019
Read on to find out how to fix these issues in our easy to follow step-by-step guide…
A number of issues with SOLIDWORKS have been caused by Microsoft Installer update KB3072630 from 15th July 2015. If you see any of the errors below, read on for an easy fix.
- The error “The system administrator has set policies to prevent this installation” is displayed when attempting to apply a service pack to SOLIDWORKS with administrative rights.
- After an installation or upgrade of SOLIDWORKS, many SOLIDWORKS add-ins are missing from the add-ins list
- When launching SOLIDWORKS or opening a file, SOLIDWORKS returns “Could not load SOLIDWORKS DLL: GdtAnalysisSupport.dll”
- SOLIDWORKS Treehouse crashes when launching
- SOLIDWORKS crashes when launching, with a SWVBAServer error. This also happens when recording, playing, or editing a SOLIDWORKS Macro
- The error “Could not load SOLIDWORKS DLL: sldshellutils” error is returned when selecting “Pack and Go…” from SOLIDWORKS or SOLIDWORKS Explorer
- “DWG document manager library is invalid or missing” error seen launching SOLIDWORKS or SOLIDWORKS Explorer
- The error “Failed to create ToolboxLibrary object”, followed by “SOLIDWORKS database is missing” when accessing SOLIDWORKS Toolbox add-in?
- Instability when using Equations.
How to fix these errors:
To address any of the issues above, try the following steps:
First of all make sure you have unticked the “Hide extensions for known file types” in the windows folder options
Download this zip archive: SW-Error-Fixes which includes the two registry files required for fixing this issue.
Extract the 2 files and double click on “RunBeforeRepair_disable_KB3072630.reg“. This will make a change to your registry – Windows may warn you that the publisher cannot be verified. Click “Run” to ignore this message.
At the next message click “Yes”
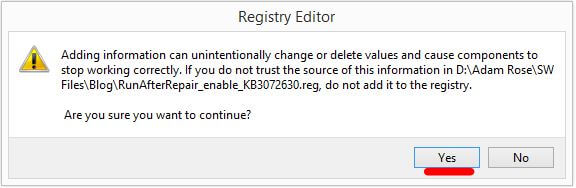
You must now repair SOLIDWORKS. To do this, navigate to the Control Panel > Programs and Features.
Select SOLIDWORKS and choose “Change”.
Choose the option to “Repair the individual installation” when the Installation Manager appears, Click “Next”, then “Repair” on the screen after.
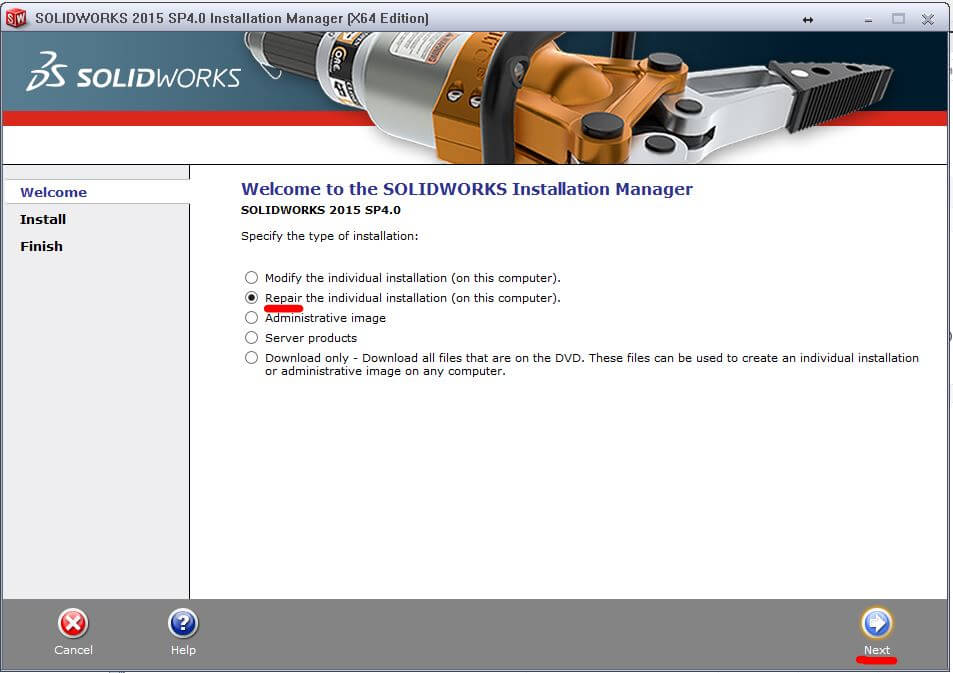
After repairing, and restarting if necessary you will need to renable KB3072630 by running the second .reg file you downloaded.
Locate the “RunAfterRepair_enable_KB3072630.reg” file you unzipped earlier. Run this file, using the same process as “RunBeforeRepair_disable_KB3072630.reg”.
That’s it! The issue should now be resolved. If you experienced any issues during this process please contact us (subscription customers only).
We hope you found that useful!
Have you seen our blog archive where we have posted plenty of helpful articles? We also have a fantastic video library filled with easy-to-follow videos on a number of topics inspired by other SOLIDWORKS users – take a look.
Also, don’t forget to follow us on twitter for daily bite size SOLIDWORKS tips, tricks and videos.
Welcome to this new edition of the SOLIDWORKS Support Monthly News, coauthored by members of the SOLIDWORKS Technical Support teams worldwide.
You already know about MySolidWorks, your place for all things SOLIDWORKS. But what about MySolidWorks Training? It’s the ever growing, free online catalog of learning material that allows you to discover SOLIDWORKS features and functionalities.
MySolidWorks Training is
- Convenient with unlimited 24/7 access to online training
- Easy to follow with videos and example files
- To the point: you can test your knowledge with quizzes after each lesson
The hundreds of recorded online SOLIDWORKS Lessons cover the entire breadth of functionality, from Drawing to Simulation.
There is no better place to improve your SOLIDWORKS skills.

If so, help us improve it. It’s fast and easy.
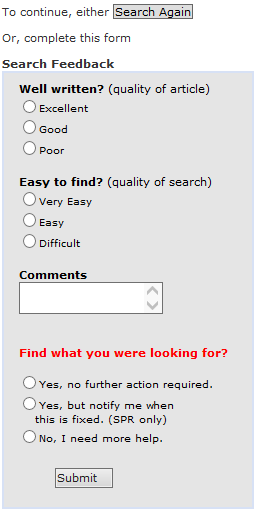 |
When you access a Solution in the SOLIDWORKS Knowledge Base, a feedback form is always available on the left hand side, as shown here. This is where you tell us about your experience. Whether it’s good or bad, and especially when it’s bad, please let us know. We have recently improved our management of feedback forms to more diligently take actions on Solutions you tell us are “Poor” or “Difficult” to find. So you will soon see improvements to the Solutions you bring to our attention. Also, please give us a hint in the Comments field about the nature of your dissatisfaction (Solution may be obsolete, duplicate or incomplete for instance). There’s nothing so obvious that a short comment won’t help clarify. |
SOLIDWORKS 2016 PR1 is available for download. While your computer is downloading and installing all the files, consider putting this time to good use: Learn about 15 great Features coming in SOLIDWORKS 2016 and get ahead of the crowd in your expertise of SOLIDWORKS 2016.
 Why is “Could not load SOLIDWORKS DLL: sldshellutils” error returned when selecting “Pack and Go…” from SOLIDWORKS® or SOLIDWORKS® Explorer?
If your upgrade or install was performed after July 15th, 2015 the most likely explanation is a known conflict caused by Microsoft® update KB 3072630 which was released on July 15th, 2015. This update makes changes to the Windows Installer. To address this problem, try the steps in Solution Id: S-069551 (with your IT department’s assistance if required).
What can cause the error “Failed to create ToolboxLibrary object”, followed by “SOLIDWORKS database is missing” while accessing SOLIDWORKS® Toolbox add-in?
If your upgrade or install was performed after July 15th, 2015 the most likely explanation is a known conflict caused by Microsoft® update KB 3072630 which was released on July 15th, 2015. This update makes changes to the Windows Installer. To address this problem, try the steps in Solution Id: S-069491 (with your IT department’s assistance if required).
Why is “DWG document manager library is invalid or missing” error seen launching SOLIDWORKS® or SOLIDWORKS® Explorer?
If your upgrade or install was performed after July 15th, 2015 the most likely explanation is a known conflict caused by Microsoft® update KB 3072630 which was released on July 15th, 2015. This update makes changes to the Windows Installer. To address this problem, try the steps in Solution Id: S-069521 (with your IT department’s assistance if required).
How will future SOLIDWORKS® releases be tested and supported on Windows 10 across the different update branches offered by Microsoft (e.g. Current Branch, Long Term Servicing branch)?
Below is a summary:
• Future SOLIDWORKS releases will be tested and supported on whatever is the latest CB (Current Branch – “Windows Update”) at the time a SOLIDWORKS Service Pack is released. Refer to this page ( http://wincom.blob.core.windows.net/documents/Win10EditionsCompareTable_FINAL.pdf ) for the differences.
• All CBBs (Current Branch for Business updates) and LTSBs (Long Term Servicing Branch versions) will be inherently supported by SOLIDWORKS since they are an accumulation of all or a subset of CB’s.
• The End Of Life plan for the SOLIDWORKS release will remain unchanged from our current policy. For details visit: http://www.sol >
• Customers who want to take a conservative approach of not taking Win 10 new functionality (i.e. LTSB) will need to purchase Windows 10 Enterprise per this page ( http://wincom.blob.core.windows.net/documents/Win10EditionsCompareTable_FINAL.pdf ).
From Solution Id: S-069650
 What can cause the error ‘The program and the file vault are of incompatible versions’ when I log in to a vault via Web client?
One possible reason is that the web server and web client are on different versions.
For example, a customer may install PDM 2014 version server components, and then upgrade to the 2015 version. If customer does not actually upgrade the PDM web server component thoroughly or if the customer omits the web server in the upgrade, the web server component remains on the 2014 version. This causes version incompatibility because the web server remains on the 2014 version, while the thick client is on the 2015 version.
Troubleshooting instructions can be found in Solution Id: S-069402.
Why can it be the case that a SOLIDWORKS® Enterprise PDM reference does not update in the parent assembly using the Update References tool even when the tool states the update is “successful”?
This will occur when the reference to be update is already contained in the same folder as the parent assembly. See the full explanation in Solution Id: S-069611.
I received the message “ Irregular (not properly resolved) cells in mesh” in version 2015 SP4 but not in version 2014?
The SOLIDWORKS Flow Simulation developers reported that similar ‘irregular cells’ were in the previous version too, but starting from version 2015 SP4 this new message was added as a warning. To avoid ‘irregular cells’ users can sometimes further refine the local regions or just ignore them if the results are not significantly affected. Usually these cells are found in quite difficult complex geometry locations where it is not possible to further refine. Such cell is fully filled by solid or fluid, because of the impossibility to treat the local geometry correctly. See the full explanation in Solution Id: S-069407.
Does SOLIDWORKS® Flow Simulation create a session log file that provides details similar to what the Journal file or Performance file does for SOLIDWORKS?
Yes. To view this SOLIDWORKS® Flow Simulation log file:
1) In Windows® Explorer, type ‘%temp%’ to access the user temp folder (typically ‘C:Users[username]AppDataLocalTemp’).
2) Open the file ‘ngp.log’ in a text viewer such as Notepad.
From Solution Id: S-069597.
 How to zoom in 2D graphs in SOLIDWORKS Simulation?
SOLIDWORKS Simulation allows users to display results in graphs (or diagrams).
It is unclear to many users how to better view the curve in regions where many data points are close to each other.
There are actually three ways to zoom in, each with pros and cons.
– Enlarge or maximize the window of the graph
– Zoom in pressing the Ctrl key while creating a box with the cursor
– Using the Chart properties.
See more in Solution Id: S-018881.
That’s it for this month. Thanks for reading this edition of SOLIDWORKS Support News.
Originally posted by Julien Boissat in the SOLIDWORKS Tech Blog.
Ошибка «Could not load SolidWorks DLL: GdtAnalysisSupport.dll» на моей практике, наверное, самая распространенная проблема. Ниже коротенький мануальчик по устранению.
Способ 1. Если установка была выполнена после 15 июля 2015 года, наиболее вероятным объяснением является известный конфликт, вызванный обновлением операционной системы Windows KB3072630. Это обновление вносит изменения в службу «Установщик Windows».
Для автономной установки:
1. В ветке реестра HKEY_LOCAL_MACHINESOFTWAREPoliciesMicrosoftWindowsInstaller создать значение DWORD с именем RemappedElevatedProxiesPolicy и значением 1. Если раздел не существует — нужно создать.
2. Выполнить восстановление установки SOLIDWORKS. Пуск -> Программы и компоненты -> SolidWorks -> Изменить -> Восстановить.
3 . После восстановления установки изменить значение «RemappedElevatedProxiesPolicy» на «0».
Установки административного образа:
1. Удалить SOLIDWORKS. Пуск -> Программы и компоненты -> SolidWorks -> Изменить -> Удалить .
2. В ветке реестра HKEY_LOCAL_MACHINESOFTWAREPoliciesMicrosoftWindowsInstaller создать значение DWORD с именем RemappedElevatedProxiesPolicy и значением 1. Если раздел не существует — нужно создать.
3. Установить SOLIDWORKS из административного образа.
4. После установки изменить значение «RemappedElevatedProxiesPolicy» на «0».
Способ 2. Если проблема не в обновлении можно
1. Запустить командную строку от имени администратора.