Error message «Service Req E527» with Epson C1100 CX11 CX21
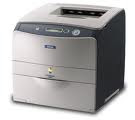
This error message «Service Req E527» means that the toner carousel housing the toner cartridges is obstructed, or is unable to rotate correctly. It can be caused by installing a toner cartridge incorrectly.
Solution 1:
- Check that the toner cartridge at the front of the printer is installed correctly.
Solution 2: Manualy remove all of the toner cartridges.
- Close all the covers, and then power the printer off.
- Open Cover B, and then remove the photoconductor unit (PCU).
- Turn the toner carousel by hand to line up a toner cartridge with the front of the printer.
- Open Cover A.
- If the toner cartridge is not in position to remove it, close Cover A and repeat the steps above.
- Remove the toner cartridge, and then close Cover A.
- Repeat all the steps above until you have removed all four toner cartridges.
- Reinstall the PCU.
- Close all the covers, and then power on the printer.
- Open Cover A and Cover B.
- Check thoroughly for any jammed paper, foreign objects or damaged parts.
- If you can locate an obstruction, remove it. Then, close all the covers and restart the printer again.
- If you can identify any damaged parts, there is an obstruction you cannot remove, or there is no change after restarting the printer, then contact Epson for further advice.
- Reinstall the toner cartridges (Follow the prompts on the LCD display), and then test the printer.
Popular posts from this blog
The error B204 could happen after a cartridge replacement. First of all, when installing, remove the cartridges from the plastic package, but do not drill any plastic membranes, as this will cause this error when placing the cartridge. The error may also appear if you change a completely empty cartridge: when installing a full cartridge, the printer enters a cleaning cycle, but the printhead has not yet received ink from the newly inserted cartridge. Here are some tips to cancel this error B204:: Solution 1: Remove the cartridges Power the printer for 2 minutes Switch on the printer Install the cartrdiges Solution 2: Switch on the printer Unplug the power cable Open the cover Move the print head carriage manually to the usual place where it goes for the cartridge change (If the printhead carriage is not movable, reconnect and then turn on the printer, then unplug it again when the head carriage is in the moving position). Change the cartridges. Close the fr
MAJ11/06/17 Error B200 means the printhead voltage or temperature is not normal. The Printhead could be defective…. but first, try these solutions below: Solution 1 : Disconnect the power cable from the printer. Wait 1 hour. Connect the power cable Solution 2 : Check and Clean Head contact pin condition of the carriage unit Check Cable connection especially the carriage FFC Solution 3 : Turn off the power Open the panel Turn on the power Wait for print carriage to start moving to the left. Let it go past half way Before print carriage reaches left hand side shut the cover. Leave the Printer turned on Solution 4 : Unplug the power cable. Open the printer Push the whole print head mechanic to the center While the printer still open, plug the power and turn it ON. When the printhead still moving and is going to the very LEFT, close the cover. Wait until its boot up. Solution 4a: Take out all of the ink cartridges Lift up the gr
MAJ 25/08/17 The Service Tool V3400 allow to reset the counter of some Canon printers. For the error code 006 , try this : Solution 1: Check your cartridges: an empty cartridge can lead to error 006 Solution 2 : After you avec clicked on «Main», wait a few minutes. If the error still here, restarts the Service Tool Solution 3 : Close the service tool Disconnect the USB cable from the printer After 10 seconds, plug back the cable to the printer On Windows, click next when appears «New device» Open the service tool
EPSON AcuLaser C1100
Class
Panel Messaeg
Service Req E527
Service Req E530
Service Req E533
Service Req E537
Service Req E542
Service Req E546
Service Req E547
Service Req E998
TROUBLESHOOTING
Table 3-3. List of Service Request
Deve Home Position Sensor Error
PWBA MCU could not receive signals output from Rotary Home Position Sensor within the specified time after rotation of Rotary
Developer.
Humidity Sensor Error
When the Input from SENSOR HUM & TEMP is out of specification.
Temp Sensor Error
SENSOR HUM & TEMP detected a temperature below -7°C or over 55°C.
Fuser Fail
• Control Thermistor detected a temperature exceeding the specified temperature.
Safety Thermistor detected a temperature exceeding the specified temperature.
• The Control Thermistor did not detect a Ready even though the specified time elapsed from Main Lamp ON at Warm Up.
• The Main Lamp continues to stay lit even after time specified for the Main Lamp elapsed after the Control Thermistor detected a
Ready.
• The Control Thermistor detected a temperature below the specified temperature even after the specified time elapsed from Main
Lamp ON at Warm Up.
• The latch lever of FUSER ASSY is set incorrectly.
IBT CLN Fail
SENSOR IBT RETRACT cannot detect Advance/Retract of CAM ASSY-IBT CL.
Duplex Motor Failure
The MOTOR ASSY DUP (Lower Roll Motor) or MOTOR ASSY DUP INV (Upper Roll Motor) of Duplex is not rotating at the
specified speed.
Feed Motor Failure
DRIVE ASSY FEED (Feed Motor) of the Feeder is not rotating at the specified speed.
Engine Communication Error
Acommunication error between the controller and the PWBA MCU via the video I/F occured
FIP according to the printer message
Description
Revision B
See FIP
45 (p.198)
55 (p.211)
54 (p.211)
53 (p.210)
58 (p.216)
57 (p.214)
56 (p.212)
78 (p.237)
131
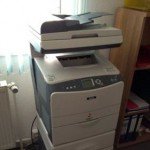 Компания Epson не только разрабатывает и производит струйные принтеры, но так же у нее в копилке имеются цветные лазерные принтеры собственной разработки. К таким моделям относятся принтеры и МФУ: AcuLaser C1100, CX11N, CX21N, — все эти аппараты построены на одной платформе. Аппараты имеют уникальную систему проточной проявки, где девелопер постоянно обновляется (возможно, существуют и другие, но автор таких не встречал). У старых моделей принтеров все основные блоки проектировались со значительным запасом прочности, не стали исключением и запчасти от принтеров Epson c1100. Помимо картриджей в состав расходных материалов входит блок фотокондуктора EPLS051104. Не смотря на то, что указанный ресурс фотокондуктора составляет 42000 тысячи копий при 5% заполнении листа, фактически фотокондуктор блокируется гораздо раньше. Причина преждевременной блокировки кроется в срабатывании оптического датчика отработанного тонера. Менять при каждой блокировке фотокондуктор — дорогое удовольствие, так как его стоимость колеблется в районе 10-11 тысяч рублей. Заметка посвящена самостоятельной профилактике и разблокировании блока.
Инструкция по профилактике и разблокировке счетчика фотокондуктора EPLS051104
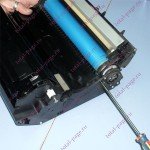
Блок фотокондуктора совмещает в себе блок фотобарабана и ленту переноса, в связи с чем в блоке содержится два блока с отработанным тонером. Начнем с высыпания отработанного тонера ленты переноса. Для того, чтобы добраться непосредственно до бункера с отработкой необходимо снять декоративную крышку. Для извлечения декоративной крышки необходимо открутить с каждой стороны блока по одному шурупу (см. фото)
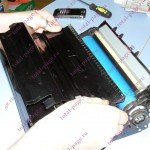 Открутив шурупы и потянув за края, отсоединяем крышку. В процессе извлечения старайтесь не дотрагиваться руками до ленты переноса и фотобарабана, так как это чревато появлением дефектов на изображении. Если все-таки случайно коснулись одной из деталей руками, то место прикосновения рекомендуем обезжирить слабым раствором спирта.
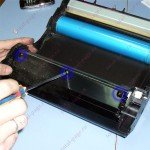 После извлечения декоративной крышки станет видна крышка бункера с отработанным тонером. Крышка фиксируется на трех шурупах. Аккуратно откручиваем шурупы, стараясь чтобы отвертка случайно не соскочила и повредила полотно ленты переноса. Впоследствии, при установке крышки назад, стараемся не перетянуть шурупы, так как, если сорвется резьба, то отработка с ленты переноса будет просыпаться.
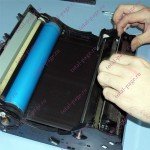
Открутив шурупы и потянув за край, извлекаем крышку. Извлекать крышку лучше на газете, так как с нее будет активно осыпаться отработанный тонер. При отсоединении и присоединении крышки старайтесь не повреждать поролоновые уплотнители. Если все-таки уплотнитель повредился, то в этом месте нужно аккуратно наклеить тонкий кусочек поролона, тем самым восстановив герметичность бункера с отработкой.
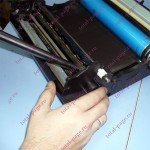 Удаляем отработанный тонер. Лучше всего это делать с помощью пылесоса. Внимание! Для вытягивания тонера используются специальные сервисные пылесосы!!! Домашние пылесосы для данной цели не подходят, так как фильтр домашнего пылесоса (какой бы он ни был навороченный) не способен удержать частички тонера. Попадание частичек тонера в двигатель пылесоса гарантированно выведет его из строя. Если вы не являетесь счастливым обладателем сервисного пылесоса, то просто высыпьте отработанный тонер в мусорный пакет. Частички тонера, попавшие на корпус фотокондуктора, вытрите влажными салфетками. После удаления тонера прикручиваем крышку бункера назад.
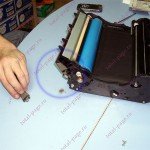 Переходим ко второму бункеру с отработанным тонером. Второй бункер собирает отработанный тонер с фотобарабана. Бункер имеет несколько меньший размер и содержит в себе датчик отработанного тонера. Именно по срабатыванию этого датчика принтер преждевременно блокирует фотокондуктор. Не стоит удалять датчик отработанного тонера, как это пишут в форумах, так как переполнение бункера отработанного тонера может вывести из строя фотокондуктор.
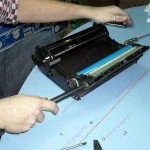
Для того, чтобы извлечь отработанный тонер, нужно открутить два шурупа с бункера отработанного тонера, снять крышку и высыпать отработанный тонер. Часто тонер бывает спрессован до каменного состояния, поэтому возможно придется использовать отвертку для разрыхления спрессованного тонера.Разрыхляя тонер отверткой будьте аккуратны и не повредите фотобарабан и ракель.
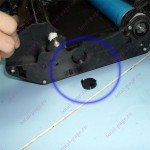
Осталось просто заменить чип, и фотокондуктор снова готов работать.
 Загрузка…