Перейти к содержанию
Ошибка 401 – это код состояния HTTP, который означает, что страница к которой вы пытались получить доступ, не может быть загружена, пока вы не войдете в систему с действительным идентификатором пользователя и паролем.
Если вы только что вошли в систему и получили 401 ошибку, это означает, что введенные вами учетные данные по какой-то причине были недействительными.
401 Несанкционированные сообщения об ошибках часто настраиваются каждым веб-сайтом индивидуально, поэтому имейте в виду, что эта ошибка может проявляться в большем количестве вариаций написания, самые распространенные:
- 401 Несанкционированный доступ
- Требуется авторизация
- Ошибка HTTP 401 unautorized access denided

Ошибка авторизации 401 отображается в окне веб-браузера. Как и большинство подобных ошибок, вы можете встретить их во всех браузерах, работающих в любой операционной системе.
Содержание
- Как исправить ошибку 401
- Коды ошибки 401: основные внутренние ошибки сервера
- Ошибки похожие на 401
Как исправить ошибку 401
-
Проверьте правильность написания URL на наличие ошибок. Возможно, произошла ошибка 401 Unauthorized, потому что URL был введен неправильно или выбранная ссылка указывает на неправильный URL – только для авторизованных пользователей.
-
Если вы уверены, что URL-адрес правильный, посетите главную страницу веб-сайта и найдите ссылку с надписью «Логин» или «Безопасный доступ». Введите свои учетные данные здесь, а затем попробуйте загрузить страницу еще раз.
Если у вас нет учетных данных или вы их забыли, следуйте инструкциям на веб-сайте для настройки учетной записи или изменения пароля.
- Почистите кеш вашего браузера. Возможно, в вашем браузере хранится неверная информация для входа в систему, что нарушает процесс входа и выдает ошибку 401. Очистка кэша устранит все проблемы в этих файлах и даст странице возможность загружать свежие файлы прямо с сервера.
- Если вы уверены, что страница, которую вы пытаетесь открыть, не нуждается в авторизации, сообщение 401 Unauthorized может быть ошибкой. В этот момент, вероятно, лучше всего связаться с веб-мастером или другим контактом веб-сайта и сообщить им о проблеме.
- Перезагрузите страницу. Как бы просто это не показалось, закрытия страницы и ее повторного открытия может быть достаточно для исправления ошибки 401, но только если она вызвана ошибочно загруженной страницей.
Коды ошибки 401: основные внутренние ошибки сервера
Веб-серверы, работающие под управлением Microsoft IIS, могут предоставить дополнительную информацию об ошибке 401 Unauthorized, например:
| Коды ошибок Microsoft IIS 401 | |
|---|---|
| ошибка | объяснение |
| 401,1 | Войти не удалось. |
| 401,2 | Ошибка входа в систему из-за конфигурации сервера. |
| 401,3 | Несанкционированный из-за ACL на ресурс. |
| 401,4 | Авторизация не пройдена фильтром. |
| 401,5 | Ошибка авторизации приложением ISAPI / CGI. |
| 401,501 | Доступ запрещен: слишком много запросов с одного и того же клиентского IP ; Ограничение динамического IP-адреса Достигнут предел одновременных запросов. |
| 401,502 | Запрещено: слишком много запросов с одного IP-адреса клиента; Ограничение динамического IP- адреса Достигнут максимальный предел скорости запросов. |
| 401,503 | Отказ в доступе: IP-адрес включен в список Запретить ограничение IP |
| 401,504 | Отказ в доступе: имя хоста включено в список Запретить ограничение IP |
Ошибки похожие на 401
Просмотров 6.4к.
Обновлено 18.04.2020
Trying to access a WordPress site and being met with an error page is at best inconvenient, whether that site is yours or someone else’s. As with many HTTP response codes, part of what makes a 401 error so frustrating is the lack of information it offers for diagnosing and resolving the issue.
The 401 error can happen with any browser, so it’s a pretty common issue people face. In most cases, this problem is relatively simple and straightforward to fix.
In this post, we’ll explain what 401 error messages are and why they happen. Then, we’ll walk you through five methods you can use to fix them.
Let’s get started!
What is the 401 Error Code?
The Internet Engineering Task Force (IETF) defines the error 401 Unauthorized as:
The 401 (Unauthorized) status code indicates that the request has not been applied because it lacks valid authentication credentials for the target resource. The server generating a 401 response MUST send a WWW-Authenticate header field containing at least one challenge applicable to the target resource.
An Introduction to the 401 Error Code
HTTP 400 status codes are encountered when there is a problem making a request. A 401 error, in particular, happens when your browser denies you access to the page you’re trying to visit.
As a result, instead of loading the web page, the browser will load an error message. 401 errors can happen within any browser so the message appearing may differ.
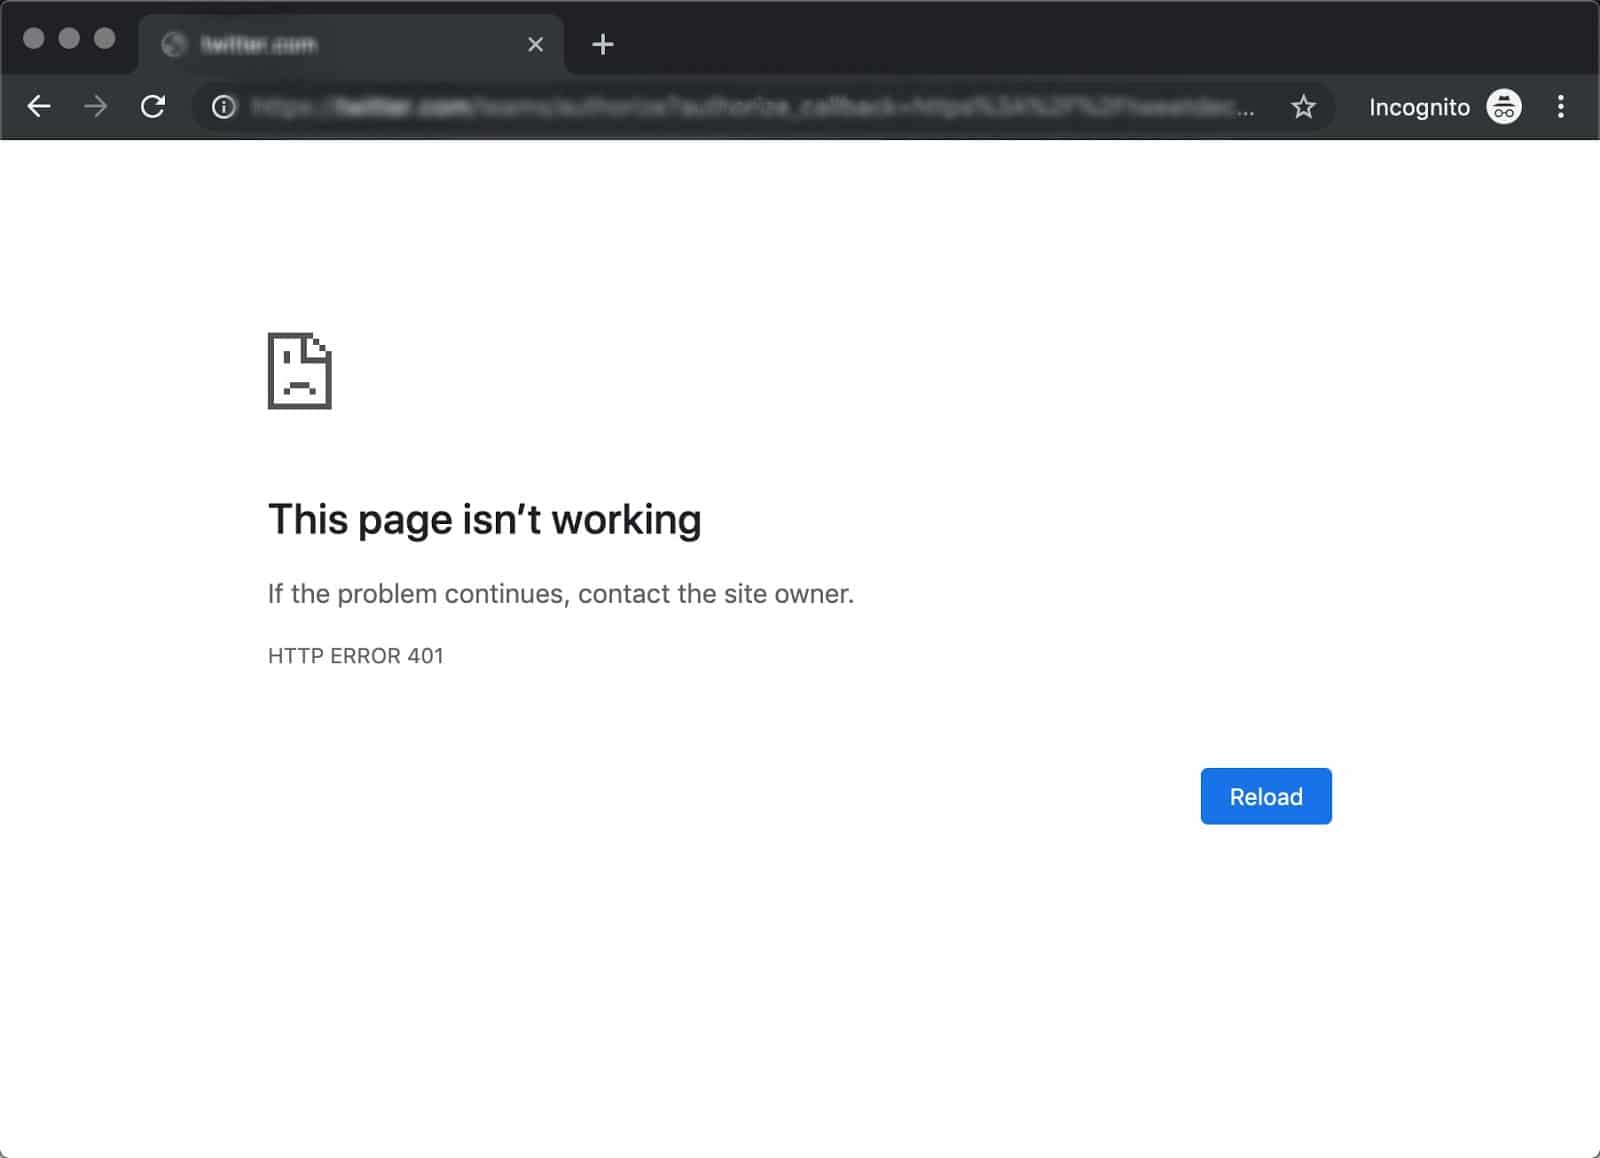
For example, in Chrome or Edge, you’ll likely see a paper icon along with a simple message telling you that the page in question isn’t working. It will include the phrase “HTTP Error 401” at the bottom, and instruct you to contact the site’s owner if the problem persists:
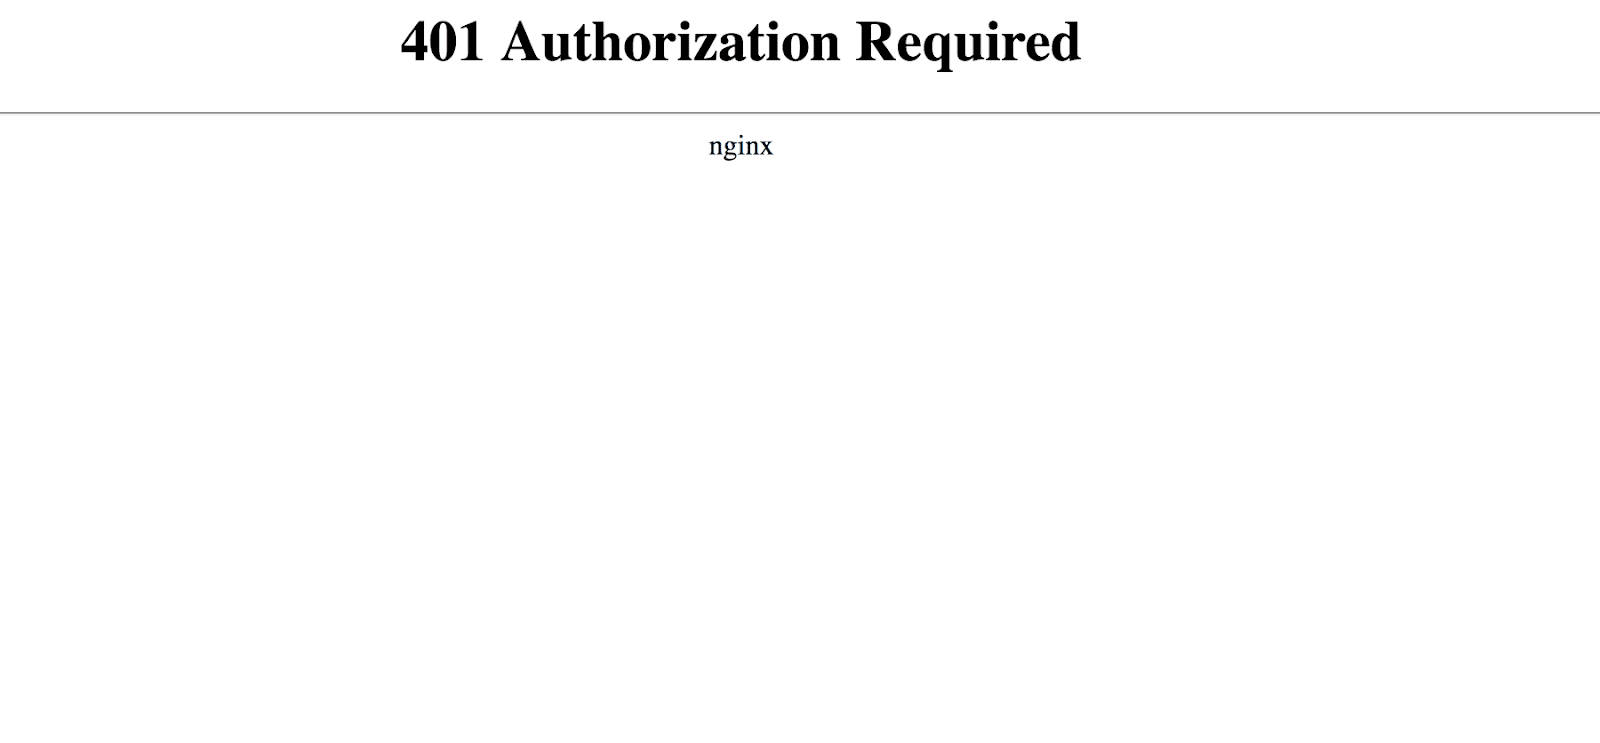
At other times and in other browsers, you might get a slightly less friendly warning that’s just a blank page with a “401 Authorization Required” message:
Other variations include:
- “HTTP 401 Error – Unauthorized”
- “401 Unauthorized”
- “Access Denied”
These errors occur on websites that require a login in order to access them. In most cases, it means that something is either wrong with the credentials or with the browser’s ability to read them as valid.
This is similar to HTTP 403 Forbidden Error, in that access isn’t permitted to the user. However, unlike with the 403 error, the 401 error message indicates that the authentication process failed.
The code is sent via the WWW-Authenticate header, which is responsible for identifying the authentication method used for granting access to a web page or resource.
The HTTP 401 error is all too common 🤦♀️ — and this guide will give you everything you need to fix it the next time you see that message showing up ✅Click to Tweet
What Causes a 401 Error?
If you encounter an error code in the 400s, you know you’re dealing with a client-side (or browser-side) issue. While the problem may be happening within your browser, however, it doesn’t necessarily always mean that’s the culprit, which we’ll explain in more detail later.
401 errors occur on restricted resources, such as password-protected pages of your WordPress site. So it’s safe to assume that the cause of the problem has something to do with the authentication credentials.
Outdated Browser Cache and Cookies
One of the most common reasons you might experience a 401 error is that your browser’s cache and cookies are out of date, preventing the authorization from successfully going through. If your browser isn’t using the valid authentication credentials (or any at all), the server will reject the request.
Plugin Incompatibility
At other times, this error is caused by a plugin incompatibility or error. For example, a firewall or security plugin can mistake your login attempt as malicious activity, and return a 401 error to protect the page.
Incorrect URL or Outdated Link
It’s also possible that the source of the problem can be attributed to a minor mistake. Common culprits in this category include an incorrectly-typed URL or an outdated link.
How to Fix the 401 Error (5 Methods)
Now that we’ve gone through a bit of background on the 401 error, it’s time to discuss how you can resolve it.
Let’s take a look at five methods you can use:
1. Look for Errors in the URL
We’ll start off with the easiest potential fix: making sure you used the correct URL. This may sound simple, but 401 errors can sometimes appear if the URL wasn’t correctly entered in.
Another possibility is that the link you used to visit the page in question points to the wrong URL. For example, it might be outdated, or leading to a page that no longer exists (and no redirects are in place).
Therefore, it’s worth double-checking the URL you used. If you typed it in yourself, verify that you spelled everything correctly. If you clicked on a link, confirm that it’s pointing to the page you’re trying to access (or try to visit that page directly through the website).
2. Clear Your Browser’s Cache
Your browser’s cache is designed to improve your online experience, by reducing page loading times. Unfortunately, sometimes it can also cause unwanted interruptions.
As we mentioned earlier, one of the common causes of the 401 error is outdated or incorrect cache data or cookies. Therefore, if you don’t notice any issues with the page’s URL, the next step is to clear your browser’s cache.
This will clean out any invalid information that’s locally stored in your browser, which could be interrupting the authentication process. Similarly, your browser’s cookies might contain authentication data that simply needs to be refreshed.
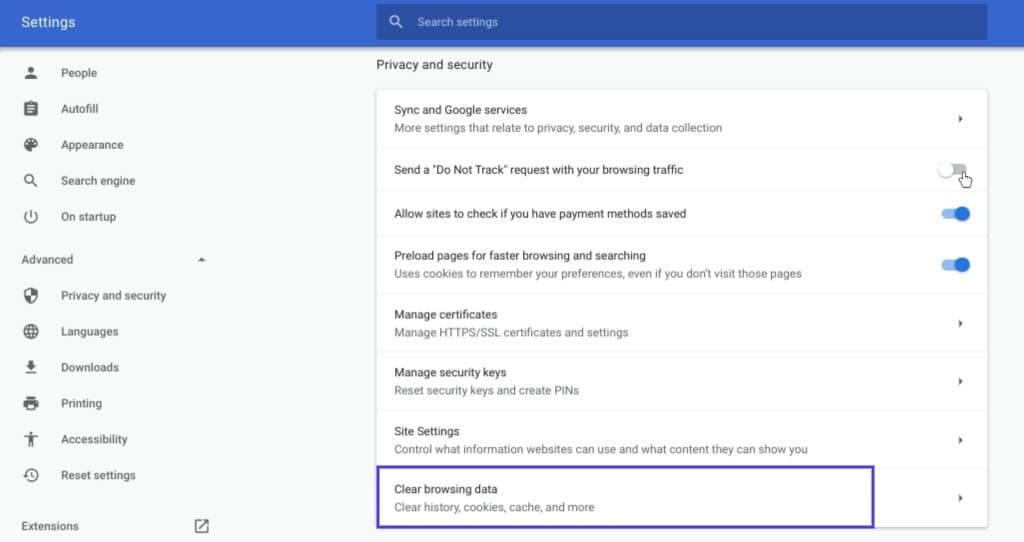
If you’re a Google Chrome user, you can do this by clicking on the menu icon in the top-right corner of the browser, and then going to Settings. Under the Privacy and security section, click on Clear browsing data:
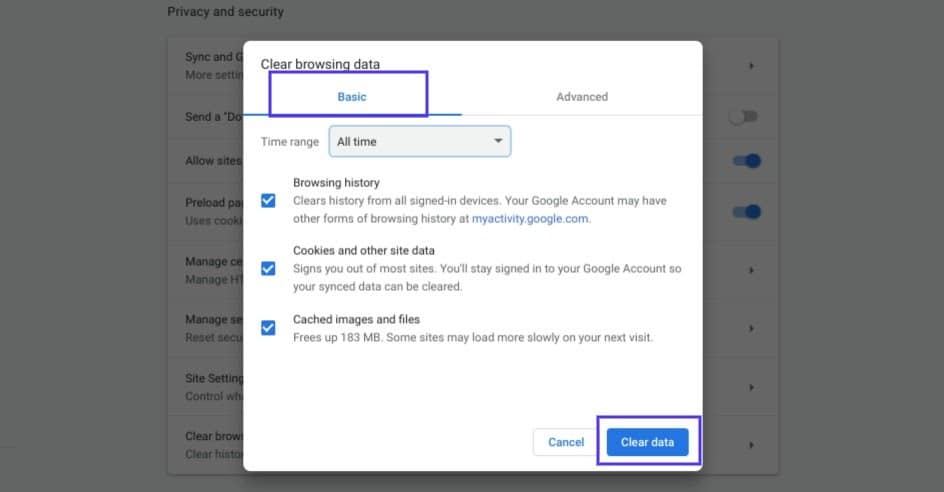
A new window will open. Under the Basic tab, make sure all three boxes are selected, and then select Clear data:
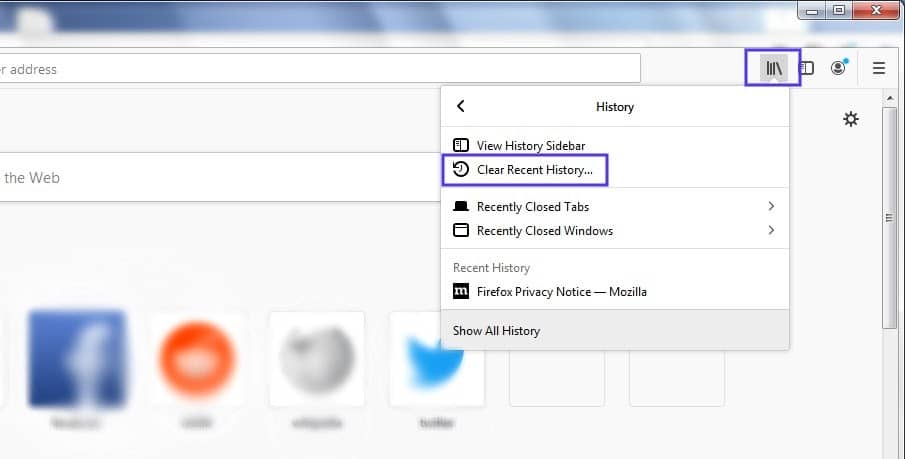
This process will look a little different in other browsers. For example, in Mozilla Firefox, you would click on the library icon in the top-right corner of the browser, followed by History > Clear Recent History:
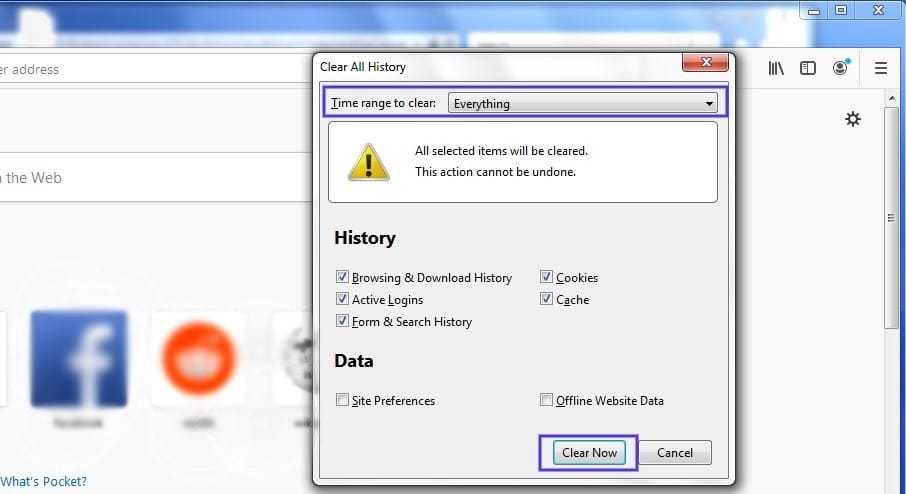
In the panel that opens next, select Everything in the drop-down menu at the top, make sure “Cache” is selected, and then click on the Clear Now button:
If you’re using a different browser, please refer to this guide for clearing the cache
3. Flush Your DNS
Another method you can try to resolve the 401 error is flushing your Domain Name Server (DNS). While this is a rarer issue, it can be a possible cause, so it’s worth giving it a try if the first two solutions don’t work.
To do this in Windows, click on the Start button and type cmd into the search bar. Hit Enter, and the Command Prompt will open. Copy and paste the command ipconfig/flushdns, and then hit Enter again:

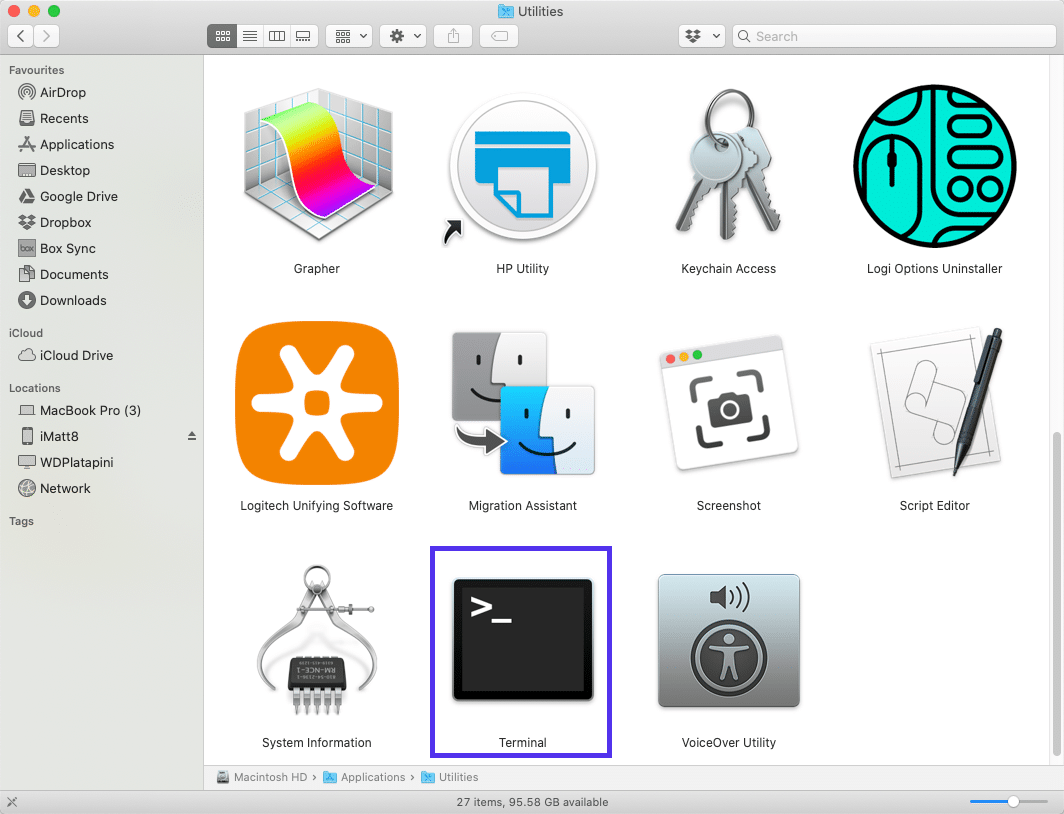
On a Mac, you can do this by going to Finder > Applications > Utilities > Terminal:
Input the command line sudo killall -HUP mDNSResponder and press Enter. Then, you can try refreshing the page you were trying to visit, to see if the 401 error has been resolved.
4. Deactivate Your WordPress Plugins
The problem causing your 401 error might not be due to your browser. If you’re having trouble accessing your WordPress site, it’s also possible that one or more plugins are to blame.
Some plugins, especially security-focused plugins, are configured to show a 401 error when they suspect suspicious login activity that might indicate an attack. Others might just be suffering from compatibility issues. Therefore, it’s a good idea to deactivate all of your WordPress plugins and see if that resolves the issue.
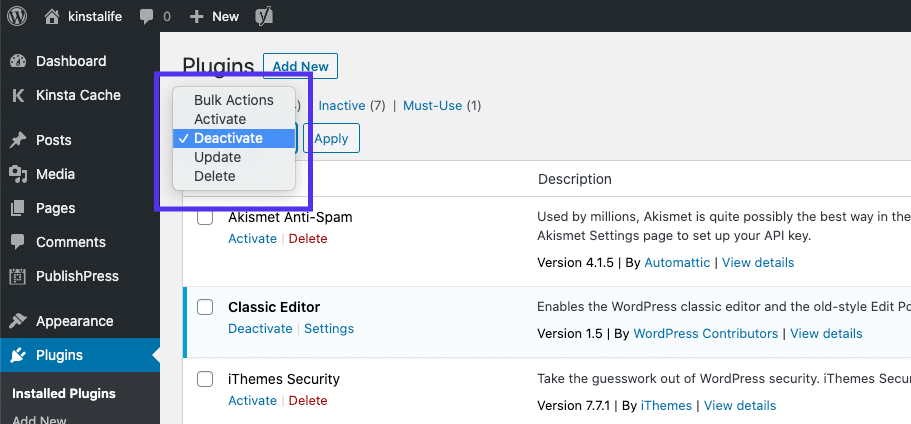
You can deactivate your plugins all at the same time in your dashboard, by going to Plugins > Installed Plugins. Check the box at the top to select all of them. Then under the Bulk Actions drop-down menu, select Deactivate and click on the Apply button:
After that, try reloading the page that returned the 401 error to see if this has resolved the issue. If it has, you can manually activate each plugin one at a time, in order to determine which one is causing the problem.
Then you can remove that plugin, replace it with a new one, or contact its developer for assistance.
5. Check the WWW-Authenticate Header Response
At this point, if the issue hasn’t been fixed, it may be caused by a server-side problem. This means our last fix will be a bit more involved.
As we saw earlier, the 401 response is sent through the WWW-Authenticate header, which appears as “WWW-Authenticate: <type> realm=<realm>”. It includes ‘challenges’, or strings of data that indicate what type of authentication is required in order for access to be granted.
In a nutshell, you’ll want to check and see if the header response was sent, and more specifically, what authentication scheme was used. At the very least, this can help narrow down the cause of the problem, and bring you one step closer to a solution.
To do this, go to the web page that’s displaying the 401 error, and access the developer console in Chrome. You can right-click on the page and select Inspect, or use Ctrl+Shift+J.
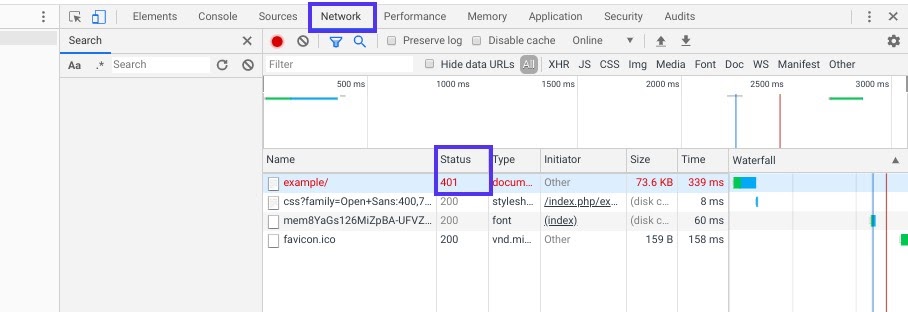
Next, click on the Network tab and reload the page. This will generate a list of resources. Select the Status header to sort the table and locate the 401 status code:
Select that entry, and then click on the Headers tab. Under Response Headers, locate the WWW-Authenticate header:
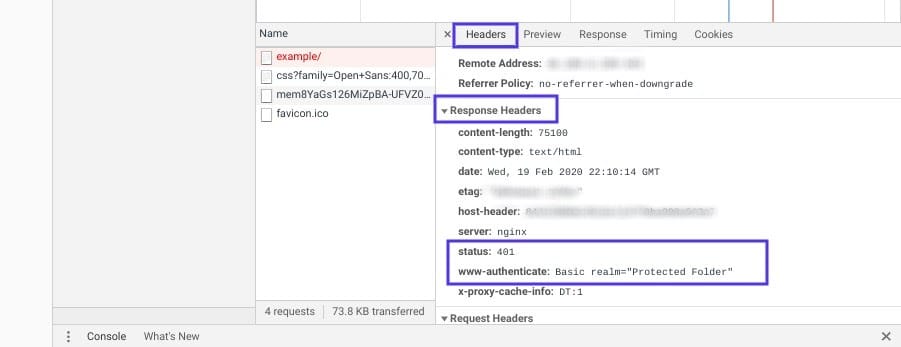
The information that is present in the response header, particularly the authentication schemes, can give you more information about what’s happening and point you towards a solution. It can help you understand what type of authentication the server is expecting.
For example, in the above example, we can see that the authentication scheme is “Basic”. This means the authentication request should only require an ID and password. For more detailed information and instructions on how to use this information, we recommend referring to the HTTP Authentication Scheme Registry.
HTTP 401 errors, begone! 🧙♂️ 5 ways to stop those pesky messages (no magic required) ✨Click to Tweet
Summary
When your browser and server have trouble communicating or authenticating requests, you’re sometimes forced to deal with errors such as the 401 error. While this problem is irritating, the message is usually temporary and fixable.
Here are five methods you can use to fix the 401 error:
- Look for errors in the URL.
- Clear your browser’s cache.
- Flush your DNS.
- Deactivate your WordPress plugins.
- Check the WWW-Authenticate header response.
Get all your applications, databases and WordPress sites online and under one roof. Our feature-packed, high-performance cloud platform includes:
- Easy setup and management in the MyKinsta dashboard
- 24/7 expert support
- The best Google Cloud Platform hardware and network, powered by Kubernetes for maximum scalability
- An enterprise-level Cloudflare integration for speed and security
- Global audience reach with up to 35 data centers and 275+ PoPs worldwide
Test it yourself with $20 off your first month of Application Hosting or Database Hosting. Explore our plans or talk to sales to find your best fit.
Trying to access a WordPress site and being met with an error page is at best inconvenient, whether that site is yours or someone else’s. As with many HTTP response codes, part of what makes a 401 error so frustrating is the lack of information it offers for diagnosing and resolving the issue.
The 401 error can happen with any browser, so it’s a pretty common issue people face. In most cases, this problem is relatively simple and straightforward to fix.
In this post, we’ll explain what 401 error messages are and why they happen. Then, we’ll walk you through five methods you can use to fix them.
Let’s get started!
What is the 401 Error Code?
The Internet Engineering Task Force (IETF) defines the error 401 Unauthorized as:
The 401 (Unauthorized) status code indicates that the request has not been applied because it lacks valid authentication credentials for the target resource. The server generating a 401 response MUST send a WWW-Authenticate header field containing at least one challenge applicable to the target resource.
An Introduction to the 401 Error Code
HTTP 400 status codes are encountered when there is a problem making a request. A 401 error, in particular, happens when your browser denies you access to the page you’re trying to visit.
As a result, instead of loading the web page, the browser will load an error message. 401 errors can happen within any browser so the message appearing may differ.
For example, in Chrome or Edge, you’ll likely see a paper icon along with a simple message telling you that the page in question isn’t working. It will include the phrase “HTTP Error 401” at the bottom, and instruct you to contact the site’s owner if the problem persists:
At other times and in other browsers, you might get a slightly less friendly warning that’s just a blank page with a “401 Authorization Required” message:
Other variations include:
- “HTTP 401 Error – Unauthorized”
- “401 Unauthorized”
- “Access Denied”
These errors occur on websites that require a login in order to access them. In most cases, it means that something is either wrong with the credentials or with the browser’s ability to read them as valid.
This is similar to HTTP 403 Forbidden Error, in that access isn’t permitted to the user. However, unlike with the 403 error, the 401 error message indicates that the authentication process failed.
The code is sent via the WWW-Authenticate header, which is responsible for identifying the authentication method used for granting access to a web page or resource.
The HTTP 401 error is all too common 🤦♀️ — and this guide will give you everything you need to fix it the next time you see that message showing up ✅Click to Tweet
What Causes a 401 Error?
If you encounter an error code in the 400s, you know you’re dealing with a client-side (or browser-side) issue. While the problem may be happening within your browser, however, it doesn’t necessarily always mean that’s the culprit, which we’ll explain in more detail later.
401 errors occur on restricted resources, such as password-protected pages of your WordPress site. So it’s safe to assume that the cause of the problem has something to do with the authentication credentials.
Outdated Browser Cache and Cookies
One of the most common reasons you might experience a 401 error is that your browser’s cache and cookies are out of date, preventing the authorization from successfully going through. If your browser isn’t using the valid authentication credentials (or any at all), the server will reject the request.
Plugin Incompatibility
At other times, this error is caused by a plugin incompatibility or error. For example, a firewall or security plugin can mistake your login attempt as malicious activity, and return a 401 error to protect the page.
Incorrect URL or Outdated Link
It’s also possible that the source of the problem can be attributed to a minor mistake. Common culprits in this category include an incorrectly-typed URL or an outdated link.
How to Fix the 401 Error (5 Methods)
Now that we’ve gone through a bit of background on the 401 error, it’s time to discuss how you can resolve it.
Let’s take a look at five methods you can use:
1. Look for Errors in the URL
We’ll start off with the easiest potential fix: making sure you used the correct URL. This may sound simple, but 401 errors can sometimes appear if the URL wasn’t correctly entered in.
Another possibility is that the link you used to visit the page in question points to the wrong URL. For example, it might be outdated, or leading to a page that no longer exists (and no redirects are in place).
Therefore, it’s worth double-checking the URL you used. If you typed it in yourself, verify that you spelled everything correctly. If you clicked on a link, confirm that it’s pointing to the page you’re trying to access (or try to visit that page directly through the website).
2. Clear Your Browser’s Cache
Your browser’s cache is designed to improve your online experience, by reducing page loading times. Unfortunately, sometimes it can also cause unwanted interruptions.
As we mentioned earlier, one of the common causes of the 401 error is outdated or incorrect cache data or cookies. Therefore, if you don’t notice any issues with the page’s URL, the next step is to clear your browser’s cache.
This will clean out any invalid information that’s locally stored in your browser, which could be interrupting the authentication process. Similarly, your browser’s cookies might contain authentication data that simply needs to be refreshed.
If you’re a Google Chrome user, you can do this by clicking on the menu icon in the top-right corner of the browser, and then going to Settings. Under the Privacy and security section, click on Clear browsing data:
A new window will open. Under the Basic tab, make sure all three boxes are selected, and then select Clear data:
This process will look a little different in other browsers. For example, in Mozilla Firefox, you would click on the library icon in the top-right corner of the browser, followed by History > Clear Recent History:
In the panel that opens next, select Everything in the drop-down menu at the top, make sure “Cache” is selected, and then click on the Clear Now button:
If you’re using a different browser, please refer to this guide for clearing the cache
3. Flush Your DNS
Another method you can try to resolve the 401 error is flushing your Domain Name Server (DNS). While this is a rarer issue, it can be a possible cause, so it’s worth giving it a try if the first two solutions don’t work.
To do this in Windows, click on the Start button and type cmd into the search bar. Hit Enter, and the Command Prompt will open. Copy and paste the command ipconfig/flushdns, and then hit Enter again:
On a Mac, you can do this by going to Finder > Applications > Utilities > Terminal:
Input the command line sudo killall -HUP mDNSResponder and press Enter. Then, you can try refreshing the page you were trying to visit, to see if the 401 error has been resolved.
4. Deactivate Your WordPress Plugins
The problem causing your 401 error might not be due to your browser. If you’re having trouble accessing your WordPress site, it’s also possible that one or more plugins are to blame.
Some plugins, especially security-focused plugins, are configured to show a 401 error when they suspect suspicious login activity that might indicate an attack. Others might just be suffering from compatibility issues. Therefore, it’s a good idea to deactivate all of your WordPress plugins and see if that resolves the issue.
You can deactivate your plugins all at the same time in your dashboard, by going to Plugins > Installed Plugins. Check the box at the top to select all of them. Then under the Bulk Actions drop-down menu, select Deactivate and click on the Apply button:
After that, try reloading the page that returned the 401 error to see if this has resolved the issue. If it has, you can manually activate each plugin one at a time, in order to determine which one is causing the problem.
Then you can remove that plugin, replace it with a new one, or contact its developer for assistance.
5. Check the WWW-Authenticate Header Response
At this point, if the issue hasn’t been fixed, it may be caused by a server-side problem. This means our last fix will be a bit more involved.
As we saw earlier, the 401 response is sent through the WWW-Authenticate header, which appears as “WWW-Authenticate: <type> realm=<realm>”. It includes ‘challenges’, or strings of data that indicate what type of authentication is required in order for access to be granted.
In a nutshell, you’ll want to check and see if the header response was sent, and more specifically, what authentication scheme was used. At the very least, this can help narrow down the cause of the problem, and bring you one step closer to a solution.
To do this, go to the web page that’s displaying the 401 error, and access the developer console in Chrome. You can right-click on the page and select Inspect, or use Ctrl+Shift+J.
Next, click on the Network tab and reload the page. This will generate a list of resources. Select the Status header to sort the table and locate the 401 status code:
Select that entry, and then click on the Headers tab. Under Response Headers, locate the WWW-Authenticate header:
The information that is present in the response header, particularly the authentication schemes, can give you more information about what’s happening and point you towards a solution. It can help you understand what type of authentication the server is expecting.
For example, in the above example, we can see that the authentication scheme is “Basic”. This means the authentication request should only require an ID and password. For more detailed information and instructions on how to use this information, we recommend referring to the HTTP Authentication Scheme Registry.
HTTP 401 errors, begone! 🧙♂️ 5 ways to stop those pesky messages (no magic required) ✨Click to Tweet
Summary
When your browser and server have trouble communicating or authenticating requests, you’re sometimes forced to deal with errors such as the 401 error. While this problem is irritating, the message is usually temporary and fixable.
Here are five methods you can use to fix the 401 error:
- Look for errors in the URL.
- Clear your browser’s cache.
- Flush your DNS.
- Deactivate your WordPress plugins.
- Check the WWW-Authenticate header response.
Get all your applications, databases and WordPress sites online and under one roof. Our feature-packed, high-performance cloud platform includes:
- Easy setup and management in the MyKinsta dashboard
- 24/7 expert support
- The best Google Cloud Platform hardware and network, powered by Kubernetes for maximum scalability
- An enterprise-level Cloudflare integration for speed and security
- Global audience reach with up to 35 data centers and 275+ PoPs worldwide
Test it yourself with $20 off your first month of Application Hosting or Database Hosting. Explore our plans or talk to sales to find your best fit.
Страница с ошибкой при обращении к WordPress-сайту всегда вызывает неудобства, вне зависимости от того, ваш это сайт или чужой. Как и в случае со многими другими кодами ответов HTTP, ошибка 401 не содержит детальных данных для диагностики и решения проблемы.
Ошибка 401 может появиться в любом браузере. В большинстве случаев ее легко решить.
В этой статье мы расскажем, что означает 401 ошибка, почему она происходит, и какие методы ее устранения существуют.
Итак, приступим!
Содержание
- Код ошибки 401 – что это?
- Что вызывает ошибку 401
- Как исправить ошибку 401 (5 методов)
Код ошибки 401 – что это?
Коды состояния HTTP 400 возникают в случае проблем с выполнением запросов. В частности, ошибка 401 появляется, когда браузер отказывает вам в доступе к странице, которую вы хотите посетить.
В результате вместо загрузки страниц браузер выведет сообщение об ошибке. Ошибки 401 могут возникать в любом браузере, потому отображаемое сообщение может варьироваться.
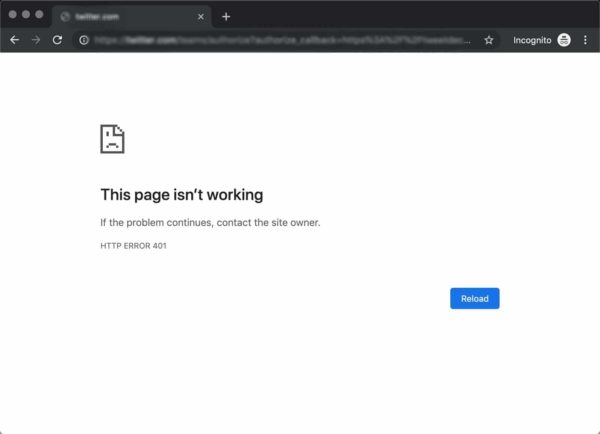
К примеру, в Chrome и Edge вы, скорее всего, увидите иконку бумаги с простым сообщением о том, что запрашиваемая страница не отвечает. Вы увидите фразу «HTTP Error 401». Вам будет предложено связаться с владельцем сайта, если ошибка не пропадет:
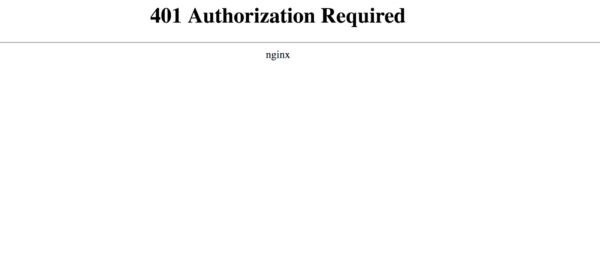
В иных случаях и в других браузерах вы можете получить менее дружелюбное предупреждение. К примеру, может выводиться пустая страница с сообщением «401 Authorization Required»:
Другие вариации текста:
- HTTP 401 Error – Unauthorized
- 401 Unauthorized
- Access Denied
Эти ошибки часто появляются на сайтах, где требуется вводить данные для входа. В большинстве случаев это означает, что что-то не так с учетными данными. Возможно, браузер перестал считать их действительными.
Эта ошибка похожа на HTTP 403 Forbidden Error, когда доступ к сайту для пользователя запрещен. Однако, в отличие от ошибки 403, сообщение об ошибке 401 указывает, что процесс аутентификации завершился неудачно.
Код ошибки передается через заголовок WWW-Authenticate, который отвечает за определение метода аутентификации, используемого для предоставления доступа к веб-странице или ресурсу.
Что вызывает ошибку 401
Если вы столкнулись с кодом ошибки в кодах 400, вы должны знать, что проблема произошла на стороне клиента (либо на стороне браузера). Случается, что виновником проблемы является браузер, но так бывает не всегда. Об этом мы еще расскажем позже.
Ошибки 401 возникают на ресурсах с ограниченным доступом – к примеру, на страницах, защищенных паролем. Потому можно предположить, что причина проблемы связана с данными аутентификации.
Устаревшие Cookie и кэш браузера
Одной из наиболее распространенных причин возникновения ошибки 401 является то, что кэш и файлы cookie вашего браузера устарели, что не позволяет выполнить авторизацию. Если ваш браузер использует недействительные данные для авторизации (либо вообще их не использует их), сервер отклонит запрос.
Несовместимые плагины
Также бывают ситуации, когда ошибка вызвана несовместимостью плагинов или какими-либо сбоями в них. К примеру, плагин безопасности может ошибочно принять вашу попытку входа за вредоносную активность, а потому будет возвращена ошибка 401 для защиты страницы.
Неверный URL или устаревшая ссылка
Бывает, что источником проблемы является незначительная оплошность. К примеру, был неверно введен URL, ссылка была устаревшей и т.д.
Как исправить ошибку 401 (5 методов)
Теперь, когда мы разобрались с причинами ошибки 401, пришло время обсудить, как ее устранить.
Давайте рассмотрим 5 методов, которые вы можете использовать.
- Проверьте ваш URL.
Начнем с самого простого потенциального решения: убедитесь, что вы использовали верный URL. Это может выглядеть банально, но 401 ошибки нередко появляются, если URL-адрес был введен неправильно.
Еще один вариант: ссылка, которую вы использовали для перехода на запрашиваемую страницу, указывает на неправильный URL. К примеру, ссылка устарела, ведет на страницу, которой больше нет (и редиректов не задано).
Стоит тщательно перепроверить URL-адрес, который вы использовали. Если вы набирали адрес самостоятельно, убедитесь, что все написано безошибочно. Если вы переходили по ссылке, убедитесь в том, что она ведет на страницу, к которой вы хотите получить доступ (либо попробуйте перейти на эту страницу непосредственно через сайт).
- Почистите кэш браузера.
Кэш браузера предназначен для улучшения процесса взаимодействия с сайтами в сети за счет сокращения времени загрузки страниц. К сожалению, иногда это может вести к нежелательным последствиям.
Как мы уже говорили выше, одной из распространенных причин появления ошибки 401 являются устаревшие или неправильные данные кэша или cookies. Потому, если URL введен верно, следующий шаг – чистка кэша браузера.
В итоге вы удалите любую недействительную информацию, которая хранится локально в вашем браузере и может приводить к прерываниям процесса аутентификации. Аналогично, файлы cookie вашего браузера могут содержать аутентификационные данные, которые нужно обновить.
Если вы пользуетесь Chrome, вам нужно щелкнуть по иконке с меню в правом верхнем углу браузера и выбрать пункт Settings. В разделе «Privacy and security» нажмите «Clear browsing data:»
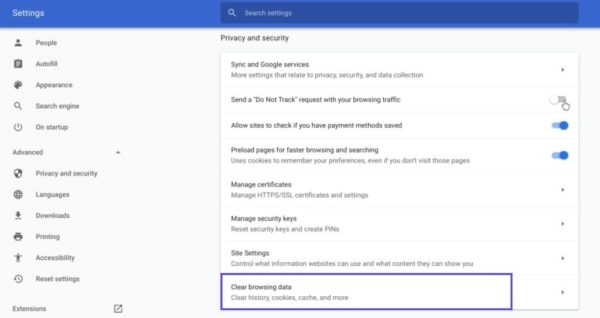
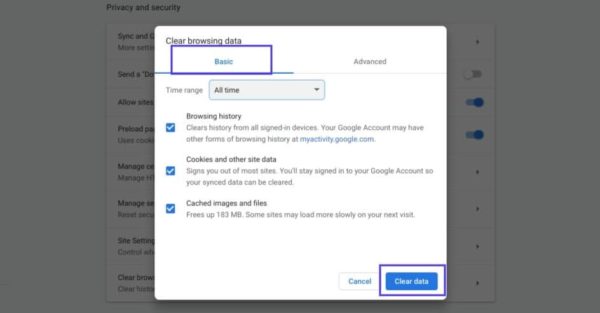
Далее вводим URL требуемого сайта и очищаем для него данные.
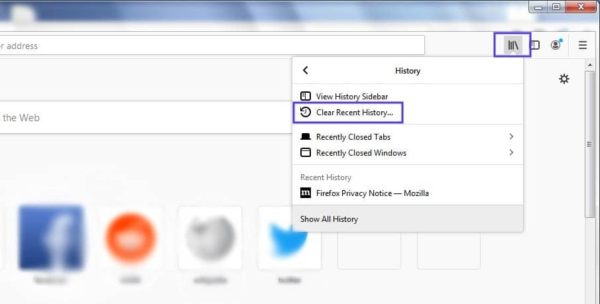
В других браузерах процесс очистки кэша и cookie может отличаться. К примеру, в Firefox нужно щелкать по иконке с библиотекой и выбирать History > Clear Recent History:
Информацию по остальным браузерам вы можете найти в поисковиках.
- Очистка DNS.
Еще один метод, который вы можете попробовать для устранения ошибки 401 – это очистка DNS. Эта причина встречается относительно редко, но стоит попробовать и такой подход, особенно если первые два ничего не дали.
Чтобы очистить DNS, перейдите в Windows к меню «Пуск» и там уже введите в строку поиска cmd. Нажмите Enter. Откроется командная строка. Далее вставьте команду ipconfig/flushdns, после чего снова нажмите Enter.

Если вы пользуетесь Mac, вы можете открыть командную строку следующим образом: Finder > Applications > Utilities > Terminal.
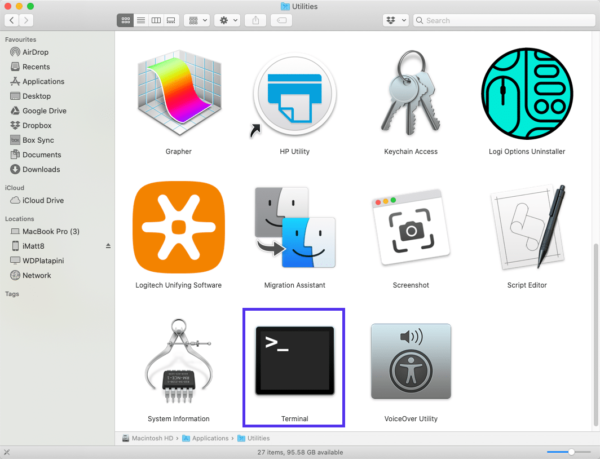
Введите команду sudo killall -HUP mDNSResponder и нажмите Enter. Затем вы можете обновить страницу, чтобы посмотреть, пропала ли ошибка 401 или нет.
- Деактивируйте ваши плагины
Проблема может возникать и по вине плагинов.
Некоторые плагины, особенно связанные с безопасностью, могут выдавать ошибку 401 при подозрении на вредоносную активность. Также у них могут быть проблемы с совместимостью. Потому лучше всего деактивировать все плагины и посмотреть, будет ли страница работать.
Вы можете деактивировать все плагины разом, перейдя в раздел Plugins > Installed Plugins в консоли WordPress. Выберите все плагины и в меню Bulk Actions задайте Deactivate, после чего щелкните по кнопке Apply:
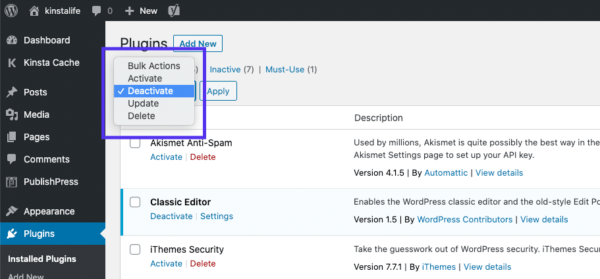
После этого попробуйте перезагрузить страницу с ошибкой. Если ошибка пропала, вы можете вручную по одному активировать плагины заново, чтобы выявить виновника всех бед.
Далее вы уже можете либо удалить плагин, либо написать его разработчикам, чтобы они предоставили рабочее решение.
- Проверьте заголовок WWW-Authenticate
Если проблема все еще остается, то в таком случае она может быть связана с ошибками на сервере. А значит, исправить ее будет чуть сложнее.
Как мы уже писали ранее, ответ 401 передается через заголовок WWW-Authenticate, который отображается как “WWW-Authenticate: <type> realm=<realm>”. Он включает в себя строки данных, указывающие на то, какой тип аутентификации требуется для предоставления доступа.
Вам нужно посмотреть, был ли отправлен ответ в WWW-Authenticate, а точнее какая схема аутентификации была использована. По крайней мере, это позволит вам приблизиться на один шаг к решению.
Перейдите на страницу с ошибкой 401 и откройте консоль разработчика в Chrome. Вы можете щелкнуть правой кнопкой мыши на странице и выбрать Inspect (Ctrl+Shift+J).
Далее перейдите на вкладку Network и перезагрузите страницу. Это позволит сгенерировать список ресурсов. Выберите заголовок Status, чтобы отсортировать таблицу, и найдите код 401:
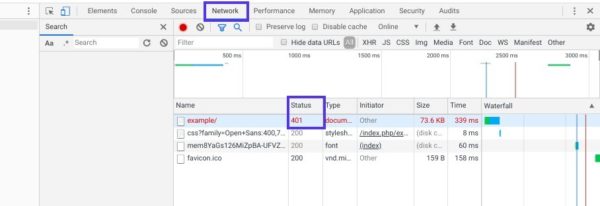
Выберите данную запись, после чего перейдите на вкладку Headers. В Response Headers найдите заголовок WWW-Authenticate:
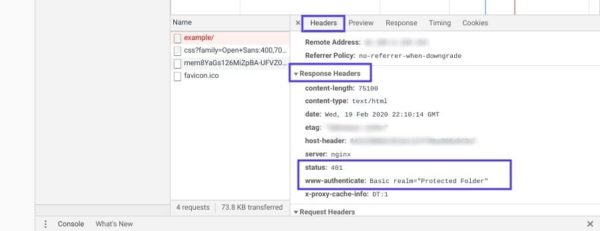
Информация, представленная в заголовке ответа, в частности, в схеме аутентификации, даст вам больше сведений о том, что произошло, и укажет на решение. Это позволит вам понять, какой тип аутентификации требуется серверу.
К примеру, в приведенном выше примере мы видим, что схема аутентификации задана как «Basic». Это означает, что запрос аутентификации требует только ID и password. Для получения более подробной информации и инструкций мы рекомендуем обратиться к HTTP Authentication Scheme Registry.
Источник: kinsta.com
Error: Ошибка 401 — Заголовок запроса не содержал необходимых кодов аутентификации, и клиенту отказано в доступе.
В этой статье представлен номер ошибки Ошибка 401, широко известный как Требуется авторизация, описанный как Заголовок запроса не содержал необходимых кодов аутентификации, и клиенту отказано в доступе.
О кодах состояния
Когда вы получаете коды веб-ошибок, у вас могут быть проблемы либо с клиентом, либо с сервером. Проблема может быть связана с браузером или настройками, которые блокируют ваше соединение, или это могут быть любые другие проблемы, связанные с сервером, к которому вы пытаетесь получить доступ.
Чтобы объяснить проблему подробнее, вот несколько полезных сведений о кодах веб-ошибок, их симптомах, причинах и методах устранения.
Определения (Бета)
Здесь мы приводим некоторые определения слов, содержащихся в вашей ошибке, в попытке помочь вам понять вашу проблему. Эта работа продолжается, поэтому иногда мы можем неправильно определить слово, так что не стесняйтесь пропустить этот раздел!
- Доступ — НЕ ИСПОЛЬЗУЙТЕ этот тег для Microsoft Access, используйте вместо него [ms-access]
- Аутентификация — Аутентификация — это процесс определения того, является ли кто-то или что-то на самом деле тем, кем или чем оно объявлено.
- Авторизация . Авторизация — это процесс определения того, является ли пользователь, программа или устройство разрешен доступ к защищенному ресурсу определенным образом.
- Клиент . Клиент — это приложение или система, которая обращается к службе, предоставляемой сервером.
- Запрещено — все, что связано с отказом системы выполнить какую-либо операцию, запрошенную пользователем.
- Заголовок — этот тег устарел, поскольку в нем отсутствует различение мощность
- Запрос — запрос — это сообщение, отправленное источником другому объекту.
- Обязательно — Обязательный — это HTML атрибут элемента ввода, который заставляет вводить данные.
- Access — Microsoft Access, также известный как Microsoft Offi ce Access — это система управления базами данных от Microsoft, которая обычно сочетает в себе реляционный Microsoft JetACE Database Engine с графическим пользовательским интерфейсом и инструментами разработки программного обеспечения.
Симптомы Ошибка 401 — Требуется авторизация
Коды веб-ошибок также известны как коды состояния http. Существует пять различных классов кодов состояния http, и они всегда начинаются со следующих цифр, в зависимости от того, с какой ошибкой столкнулся пользователь. Это также симптомы ошибки, с которой столкнулся пользователь. Для дальнейшего объяснения ниже приведены коды состояния.
4xx: Ошибка клиента
Эта ошибка отправляется обратно пользователю, если это ошибка на стороне клиента. Пользователь получает уведомления о плохом запросе, о том, что содержимое не найдено, о несанкционированном доступе к содержимому или что-то в этом роде.
400 — Плохой запрос
401 — Неавторизованный доступ
402 — Требуется оплата
403 — Запрещено
404 — Не найдено
405 — Метод не разрешен
406 — Не принято
407 — Требуется прокси-аутентификация
408 — Таймаут запроса
409 — Конфликт
410 — Пропал
411 — Требуется длина
412 — Предварительное условие не выполнено
413 — Request Entity Too Large
414 — Request-URI Too Long
415 — Неподдерживаемый тип носителя
416 — Диапазон запроса не удовлетворен
417 — Ожидание не выполнено
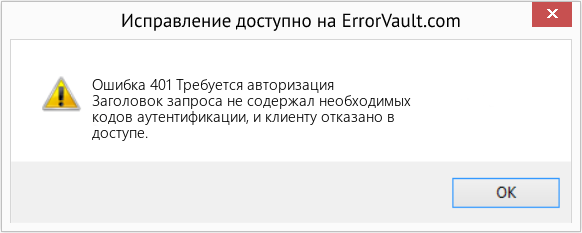
(Только для примера)
Причины Требуется авторизация — Ошибка 401
Коды 4XX возникают по вине пользователя или настроек со стороны пользователя. Запрос не был понят сервером из-за неправильного ввода адресной строки, неправильного синтаксиса, нестабильного соединения или ошибочной ОС.
Методы устранения
Для определенных кодов веб-ошибок существуют конкретные шаги по устранению неполадок. Однако существуют и обобщенные методы устранения, которые пользователи могут применять при возникновении подобных ошибок.
Если метод ремонта вам подошел, пожалуйста, нажмите кнопку upvote слева от ответа, это позволит другим пользователям узнать, какой метод ремонта на данный момент работает лучше всего.
Обратите внимание: ни ErrorVault.com, ни его авторы не несут ответственности за результаты действий, предпринятых при использовании любого из методов ремонта, перечисленных на этой странице — вы выполняете эти шаги на свой страх и риск.
Метод 6 — Проверить конфигурацию сервера
- Устранением неполадок обычно занимается администратор сайта. Если это вы, то вам необходимо иметь представление о конфигурации веб-сервера.
- Вы можете проверить, на каком веб-сервере работает ваш сайт, с помощью средств проверки URL или домена. Вам просто нужно ввести адрес сайта и проанализировать результаты, которые вы получите.
- Вы также можете проверить неработающие ссылки, щелкнув веб-страницу правой кнопкой мыши и выбрав «Проверить». Это должно дать вам код сайта справа. Вы можете проверить каждый якорный текст и убедиться, что связанные с ними ссылки все еще активны.
Метод 1 — Очистить кеш браузера
При доступе к сайту данные сохраняются в кеше браузера. Иногда вы пытаетесь исправить веб-ошибку, но в вашем браузере появляется такое же сообщение. В таких случаях вам необходимо очистить кеш браузера, чтобы избавиться от надоедливого сообщения. Вот способы сделать это в разных браузерах:
- В Google Chrome
- Откройте Chrome и нажмите три точки в правом верхнем углу браузера.
- Нажмите Дополнительные инструменты , а затем нажмите Очистить данные просмотра .
- Вы можете удалить все или только определенный период просмотра.
- Установите флажки рядом с файлами cookie и другими данными сайта и кэшированными изображениями и файлами .
- Наконец, нажмите Очистить данные .
- На краю
- Нажмите … это крайняя правая кнопка под кнопкой закрытия.
- Прокрутите вниз и нажмите «Настройки».
- Найдите пункт «Очистить данные просмотра» и нажмите кнопку «Выбрать, что очистить».
- Это даст вам возможность выбрать, какой тип данных вы хотите очистить, просто поставьте галочку на тех элементах, которые хотите включить, затем нажмите «Очистить».
- В Mozilla
- Перейдите в меню «История» и выберите «Очистить недавнюю историю».
- Вы можете нажать кнопку Alt, если строка меню скрыта.
- Вы увидите раскрывающееся меню, в котором вы можете выбрать период или диапазон, который хотите удалить, и щелкните свой выбор.
- Вы можете нажать «Подробности», чтобы выбрать, что нужно очистить, будь то весь кеш или другие элементы.
- После выбора нажмите «Очистить сейчас» и перезагрузите браузер, чтобы изменения вступили в силу.
Метод 2 — Проверить журналы
- Если вы хотите проверить файлы журналов, вы можете сделать это, сначала убедившись, что вы вошли на компьютер веб-сервера как администратор.
- Нажмите «Пуск», затем «Настройка», затем нажмите «Панель управления».
- Откройте Инструменты администратора и дважды щелкните Диспетчер служб Интернета.
- Выберите веб-сайт из списка различных обслуживаемых сайтов.
- Щелкните веб-сайт правой кнопкой мыши и затем наведите указатель мыши на «Свойства».
- Выберите вкладку «Веб-сайт» и нажмите «Свойства». На нем вы увидите вкладку Общие свойства. Внизу окна вы можете увидеть расположение сгенерированных файлов журнала.
- Открывайте файлы журналов с помощью WordPad, любого средства просмотра текстовых файлов или Microsoft Word.
- Здесь вы сможете проанализировать, где возникли ошибки при доступе к серверу.
Метод 3 — Проверить запрошенный URL
- Бывают случаи, когда вы вручную вводите URL-адрес сайта, который хотите изучить. Если после этого вы получаете ошибки, проверьте URL-адрес, который вы только что ввели в адресной строке, если вы действительно получаете доступ к правильному адресу. Если нет, исправьте элементы, которые вы ввели неправильно.
Метод 4 — Удалить последние обновления
Для Windows 7
- Найдите обновления Windows в строке поиска.
- Нажмите «Ввод», когда он появится в результатах поиска.
- Проверьте последние обновления и нажмите Удалить обновления в те дни, когда возникла ошибка.
Для Windows 8 и Windows 10
- Нажмите одновременно кнопку окна и букву X, чтобы открыть настройки.
- Когда вы перейдете к настройкам Windows, нажмите «Обновление и безопасность».
- Нажмите «Просмотреть историю установленных обновлений», а затем «Удалить обновления».
Метод 5 — Удалить расширения
- Иногда дополнительные расширения могут выдавать коды веб-ошибок.
- Удалите недавно установленные расширения, зайдя в настройки браузера и нажав «Дополнительные инструменты».
- Вы увидите расширения, которые не были установлены в вашем браузере, выберите последнее дополнение, которое, как вы подозреваете, вызвало возникшую у вас проблему.
Метод 7 — Другие техники
- Вы также можете проверить наличие нежелательных символов в кодах и сценариях с помощью отладки кодов приложений и сценариев. Если вы не знаете, как это сделать, вы можете проверить этот ресурс для этого.
- Вы также можете попробовать Обновить веб-сайт. Иногда вы получаете старую ошибку, которая никуда не делась, и простое обновление, нажав F5, может сработать.
Другие языки:
How to fix Error 401 (Authorization Required) — The request header did not contain the necessary authentication codes, and the client is denied access.
Wie beheben Fehler 401 (Autorisierung erforderlich) — Der Anforderungsheader enthielt nicht die erforderlichen Authentifizierungscodes und dem Client wird der Zugriff verweigert.
Come fissare Errore 401 (Autorizzazione Richiesta) — L’intestazione della richiesta non contiene i codici di autenticazione necessari e al client viene negato l’accesso.
Hoe maak je Fout 401 (Autorisatie Vereist) — De aanvraagheader bevat niet de benodigde authenticatiecodes en de client wordt de toegang geweigerd.
Comment réparer Erreur 401 (Autorisation requise) — L’en-tête de la demande ne contient pas les codes d’authentification nécessaires et l’accès est refusé au client.
어떻게 고치는 지 오류 401 (승인 필수) — 요청 헤더에 필요한 인증 코드가 포함되어 있지 않아 클라이언트 액세스가 거부되었습니다.
Como corrigir o Erro 401 (Autorização necessária) — O cabeçalho da solicitação não continha os códigos de autenticação necessários e o acesso foi negado ao cliente.
Hur man åtgärdar Fel 401 (Auktorisering krävs) — Begäranhuvudet innehöll inte nödvändiga autentiseringskoder och klienten nekas åtkomst.
Jak naprawić Błąd 401 (Autoryzacja Wymagana) — Nagłówek żądania nie zawierał niezbędnych kodów uwierzytelniających, a klientowi odmówiono dostępu.
Cómo arreglar Error 401 (Se requiere autorización) — El encabezado de la solicitud no contenía los códigos de autenticación necesarios y se deniega el acceso al cliente.
 Об авторе: Фил Харт является участником сообщества Microsoft с 2010 года. С текущим количеством баллов более 100 000 он внес более 3000 ответов на форумах Microsoft Support и создал почти 200 новых справочных статей в Technet Wiki.
Следуйте за нами: 


Последнее обновление:
26/01/21 08:03 : Пользователь Linux проголосовал за то, что метод восстановления 6 работает для него.
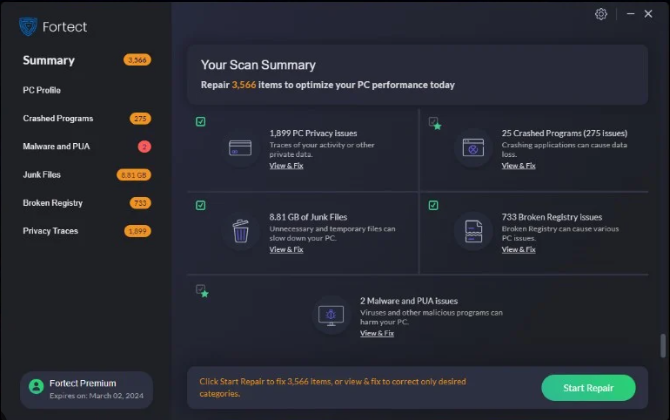
Этот инструмент восстановления может устранить такие распространенные проблемы компьютера, как синие экраны, сбои и замораживание, отсутствующие DLL-файлы, а также устранить повреждения от вредоносных программ/вирусов и многое другое путем замены поврежденных и отсутствующих системных файлов.
ШАГ 1:
Нажмите здесь, чтобы скачать и установите средство восстановления Windows.
ШАГ 2:
Нажмите на Start Scan и позвольте ему проанализировать ваше устройство.
ШАГ 3:
Нажмите на Repair All, чтобы устранить все обнаруженные проблемы.
СКАЧАТЬ СЕЙЧАС
Совместимость
Требования
1 Ghz CPU, 512 MB RAM, 40 GB HDD
Эта загрузка предлагает неограниченное бесплатное сканирование ПК с Windows. Полное восстановление системы начинается от $19,95.
ID статьи: ACX01605RU
Применяется к: Windows 10, Windows 8.1, Windows 7, Windows Vista, Windows XP, Windows 2000
Совет по увеличению скорости #11
Избавьтесь от шпионского ПО:
Шпионское ПО замедляет работу компьютера с Windows. Поскольку шпионское ПО есть повсюду, вам нужна программа мониторинга в реальном времени, чтобы предотвратить установку шпионского ПО или вредоносного ПО на ваш компьютер. Помимо наличия программы защиты от вредоносных программ, вы всегда должны быть осторожны с программным обеспечением и загружаемыми документами, чтобы избежать проблем со шпионскими программами.
Нажмите здесь, чтобы узнать о другом способе ускорения работы ПК под управлением Windows
Ошибки в алфавитном порядке: A B C D E F G H I J K L M N O P Q R S T U V W X Y Z
Логотипы Microsoft и Windows® являются зарегистрированными торговыми марками Microsoft. Отказ от ответственности: ErrorVault.com не связан с Microsoft и не заявляет о такой связи. Эта страница может содержать определения из https://stackoverflow.com/tags по лицензии CC-BY-SA. Информация на этой странице представлена исключительно в информационных целях. © Copyright 2018