DHCP не включен на сетевом адаптере «Беспроводная сеть», «Ethernet», «Подключение по локальной сети»
Самая популярная проблема при подключении ПК или ноутбука к интернету, это когда вроде бы все подключили, но интернет не работает. В этом случае может быть очень много разных симптомов, причин и решений. Первым делом нужно выяснить в чем причина. Рекомендую ориентироваться на ошибки, которые отображаются в Windows. Мало кто сразу запускает диагностику неполадок. А зря, ведь если само средство диагностики и устранения неполадок не сможет все исправить, то хотя бы сообщит нам об ошибке и подскажет где и как искать проблему. Как в нашем случае с ошибкой «DHCP не включен на сетевом адаптере…», которую можно увидеть в Windows 10, Windows 7 и т. д.
Когда после подключения кабеля, или после подключения к Wi-Fi сети (или попытки подключения) вы видите ошибку «Неопознанная сеть», «Подключение к интернету отсутствует», «Нет подключения. Вы не подключены ни к одной сети», «Без доступа к интернету» и т. д., то запустите диагностику неполадок.

Вполне возможно, что в процессе диагностики появится ошибка «DHCP не включен на сетевом адаптере Беспроводная сеть» (при подключении по Wi-Fi):

Или «DHCP не включен на сетевом адаптере Ethernet» (это в Windows 10, при подключении к интернету с помощью сетевого кабеля). В Windows 7 будет указан адаптер Подключение по локальной сети, или Беспроводное сетевое соединение.

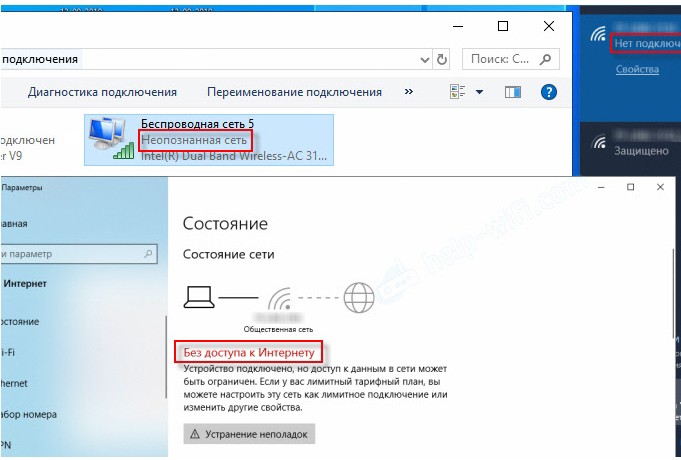
При этом в самой системе (в моем случае в Windows 10) статус подключения к сети будет выглядеть примерно вот так (может немного отличаться в зависимости от способа подключения):

Если у вас все примерно так же, то вы зашли по адресу. Сейчас покажу, как можно решить эту проблему. Но сначала несколько слов о том, почему появляется эта ошибка, и почему этот DHCP не включен на сетевом адаптере.
Если просто и коротко, то DHCP позволяет Windows автоматически получать IP-адреса от роутера, или оборудования вашего интернет-провайдера. А эта ошибка появляется тогда, когда DHCP не может автоматически получит адреса, или не может получить те адреса, которые прописаны вручную. Чаще всего это происходит после того, как сам пользователь, или какой-то софт меняет настройки DHCP в свойствах адаптера «Беспроводная сеть», или «Ethernet». Это в Windows 10. А в Windows 7 это адаптеры «Беспроводное сетевое соединение» и «Подключение по локальной сети».
Для Windows 8 и Windows 7 эти рекомендации так же должны подойти. Некоторые пункты меню и настройки могут немного отличатся. Я буду показывать все на примере Windows 10.
Решение №1: через диагностику сетей Windows
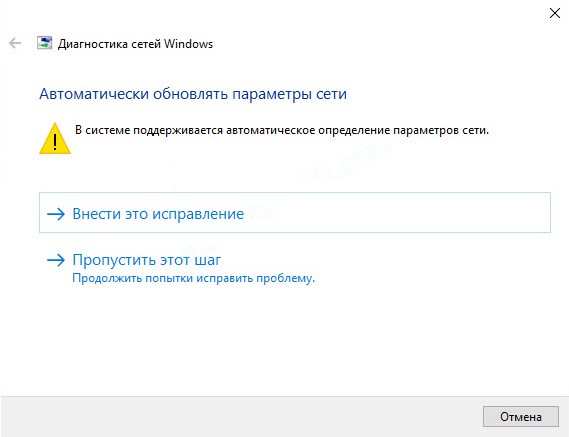
Если вам повезет, то сразу после запуска средства диагностики появится следующее сообщение: «Автоматически обновлять параметры сети. В системе поддерживается автоматическое определение параметров сети». Не задумываясь нажимайте на «Внести это исправление».

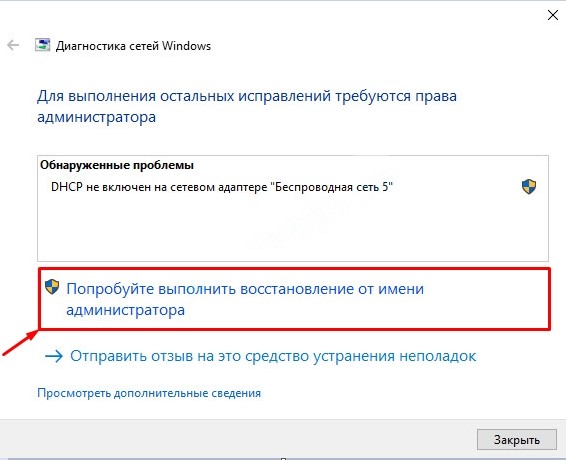
Или после того, как будет обнаружена проблема, например, «DHCP не включен на сетевом адаптере Беспроводная сеть» нажмите на пункт «Попробуйте выполнить восстановление от имени администратора».

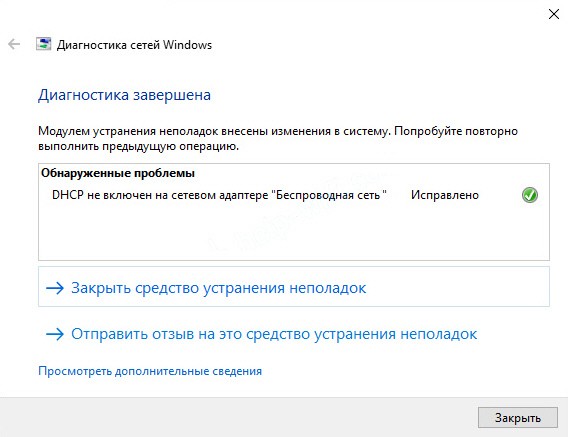
Если системе удастся автоматически решить эту проблему, то напротив обнаруженной проблемы появится надпись «Исправлено» и интернет заработает.

Если не получится с первого раза, то перезагрузите компьютер и запустите диагностику неполадок повторно.
Решение №2: проверяем настройки DHCP вручную
Первым делом нам нужно открыть окно «Сетевые подключения». Сделать это можно с помощью команды ncpa.cpl. Нажмите сочетание клавиш Win+R, скопируйте эту команду в поле «Открыть» и нажмите «Ok».
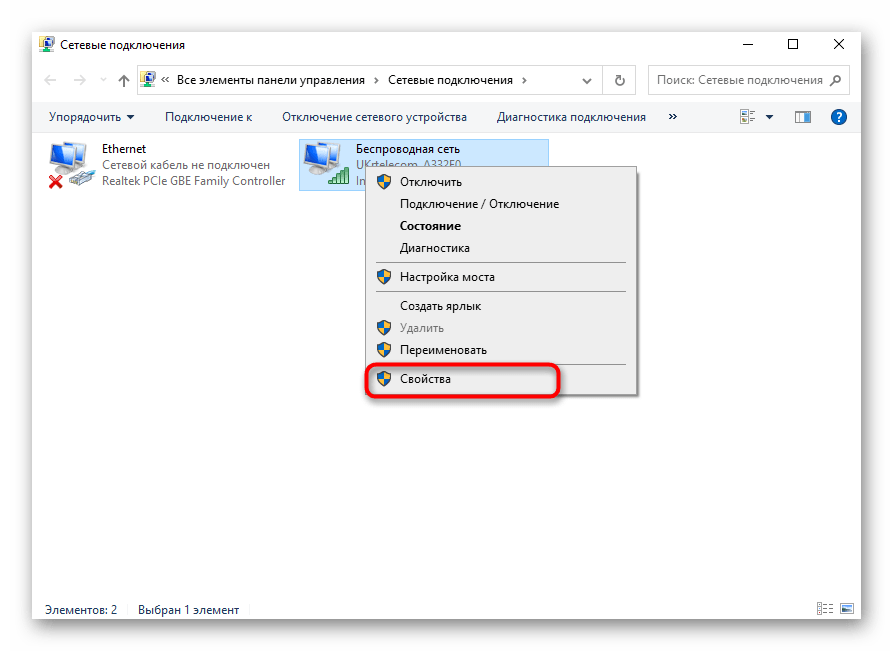
Дальше нужно нажать правой кнопкой мыши и открыть «Свойства» того адаптера, при подключении через который у вас возникла эта ошибка. В случае с Windows 10: «Ethernet» – это подключение по кабелю, а «Беспроводная сеть» – подключение по Wi-Fi.

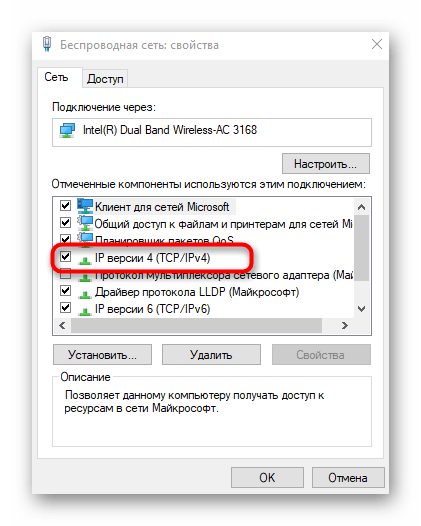
Дальше выделяем протокол «IP версии 4 (TCP/IPv4)» и нажимаем на кнопку «Свойства». Выставляем автоматическое получение IP и DNS адресов, как показано на скриншоте ниже и нажимаем «Ok».

Если подключение к интернет не появится и статус «Неопознанная сеть» возле адаптера не пропадает, то убедитесь, что вы меняли настройки именно того адаптера, через который выполняете подключение. Так же выполните перезагрузку компьютера.
Выше я показал два основных решения, с помощью которых чаще всего удается избавится от этой ошибки. Если у вас ничего не получилось – смотрите другие решения.
Дополнительные решения и подсказки
- Сделайте сброс настроек сети. Здесь инструкция для Windows 10, а здесь для Windows 7 и Windows 8.
- Если подключение через роутер – перезагрузит его. Проверьте, работает ли интернет на других устройствах (через этот же роутер). Чтобы выяснит в чем причина, можете почитать статью Роутер перестал раздавать интернет. Как найти причину и устранить ее.
- Если кабель к компьютеру подключен напрямую от интернет-провайдера, то отключите его и подключите заново. Перезагрузите компьютер. Так же желательно позвонить в поддержку провайдера и выяснить, нет ли неполадок на их стороне. Или попробовать подключить интернет к другому компьютеру.
- Вспомните, что вы делали на компьютере перед появлением ошибки «DHCP не включен на сетевом адаптере». Возможно таким образом получится найти причину и устранить ее. Если перед этим вы что-то устанавливали или меняли настройки, и не знаете как все вернуть обратно – напишите в комментариях.
- Еще одна похожая ошибка: Сетевой адаптер не имеет допустимых параметров настройки IP. Посмотрите, возможно это ваш случай.
- Попробуйте прописать настройки IP вручную. Как это сделать, я показывал в этой статье.
- На всякий случай попробуйте полностью остановить работу антивируса. Если он установлен на вашем компьютере.
- Желательно выполнить переустановку сетевого адаптера. Для этого нужно зайти в диспетчер устройств и удалить сетевую карту, или Wi-Fi адаптер (в зависимости от того, с каким адаптером у вас проблемы).
 После удаления и перезагрузки компьютера может понадобится повторная установка драйвера. Здесь вам может пригодится инструкция по установке драйвера для сетевой карты и инструкция по установке (обновлению) драйвера Wi-Fi адаптера.
 - Не лишней будет проверка компьютера на разного рода вирусы и вредоносное ПО с помощью специальных антивирусных утилит. Можно использовать AdwCleaner, Dr.Web CureIt!, Kaspersky AVP Tool, CrystalSecurity, AVZ и другие.
Вы всегда можете написать мне в комментариях ниже. Зачем? Например, чтобы подробно рассказать о своей проблеме (по теме этой статьи). Возможно я смогу заметить то, что не заметили вы и подсказать вам какое-то решение. Или же вы можете поделиться своим решением, если его нет в статье. Или просто написать, каким способом вам удалось избавится от ошибки с отключенным DHCP на сетевом адаптере.
Содержание
- Общие рекомендации
- Способ 1: Запуск средства исправления неполадок
- Способ 2: Проверка протокола IPv4
- Способ 3: Проверка службы DHCP-клиента
- Способ 4: Обновление сетевых настроек
- Способ 5: Проверка DHCP-сервера в настройках роутера
- Способ 6: Откат драйвера сетевого адаптера
- Вопросы и ответы

Общие рекомендации
Начать решение проблемы «DHCP не включен на сетевом адаптере Ethernet» необходимо с общих рекомендаций, поскольку часто простые действия помогают исправить ситуацию и избежать выполнения сложных манипуляций.
- Перезагрузите маршрутизатор. Возможно, во время текущего сеанса работы роутера в его настройках или в самой операционной системе произошли определенные изменения, которые и мешают организации нормального подключения. В таких ситуациях часто помогает банальная перезагрузка маршрутизатора, после которой произойдет соединение уже с новыми параметрами.
- Перезагрузите компьютер. Примерно то же самое можно отнести и к компьютеру, поскольку измененные конфигурации могут сказаться и на работе операционной системы. Просто отправьте ПК на перезагрузку, а при следующем включении подключитесь к сети и посмотрите, появился ли интернет.
Если ничего из этого не принесло должного результата, переходите к следующим вариантам, начав с первого, поскольку мы их расставили в порядке возрастания сложности и уменьшения эффективности.
Способ 1: Запуск средства исправления неполадок
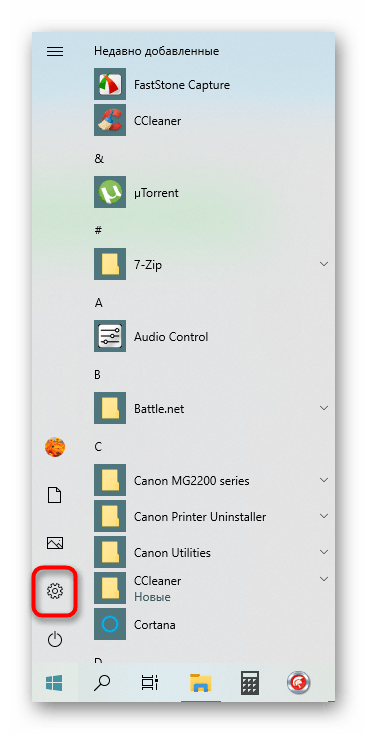
Штатное средство исправления неполадок, присутствующее в Windows 10, иногда помогает избавиться от разных проблем в автоматическом режиме, включая и рассматриваемую. От вас требуется лишь запустить сканирование, что происходит так:
- Откройте «Пуск» и перейдите в меню «Параметры».
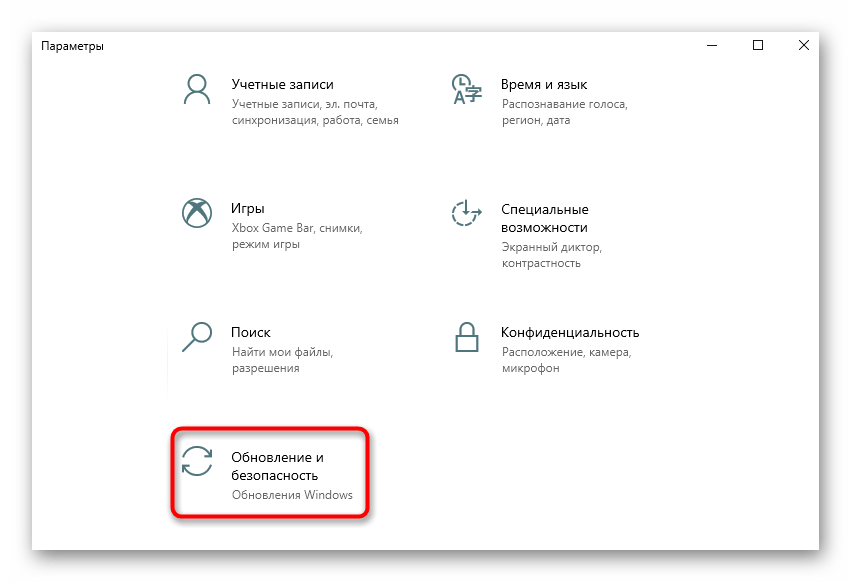
- Там выберите категорию «Обновление и безопасность».
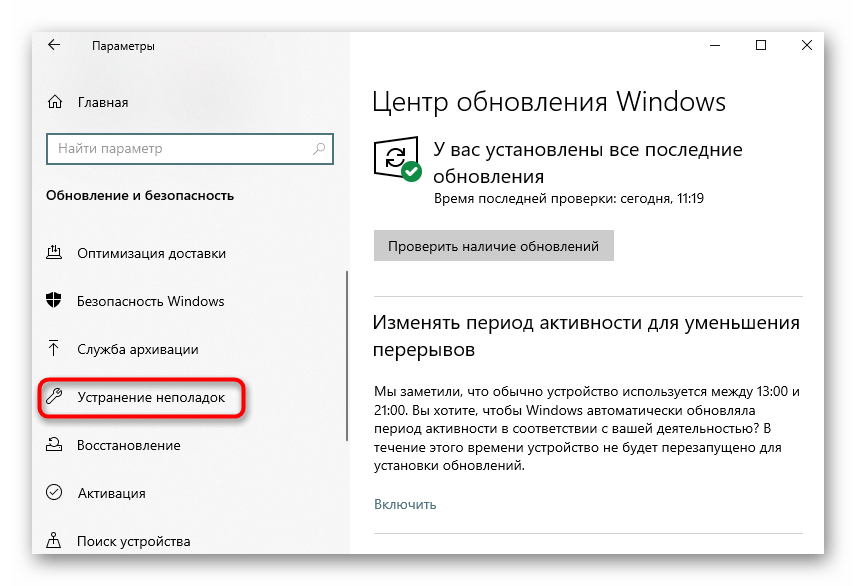
- В меню слева потребуется кликнуть по надписи «Устранение неполадок».
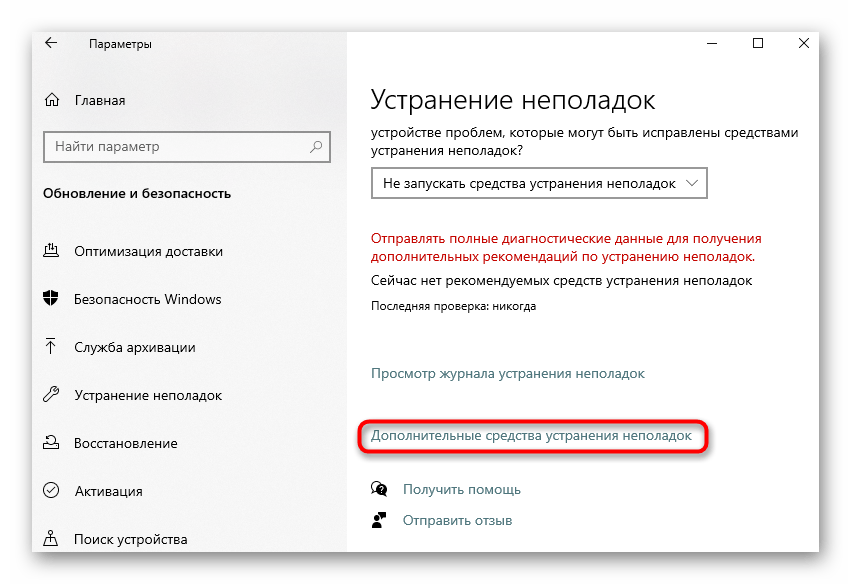
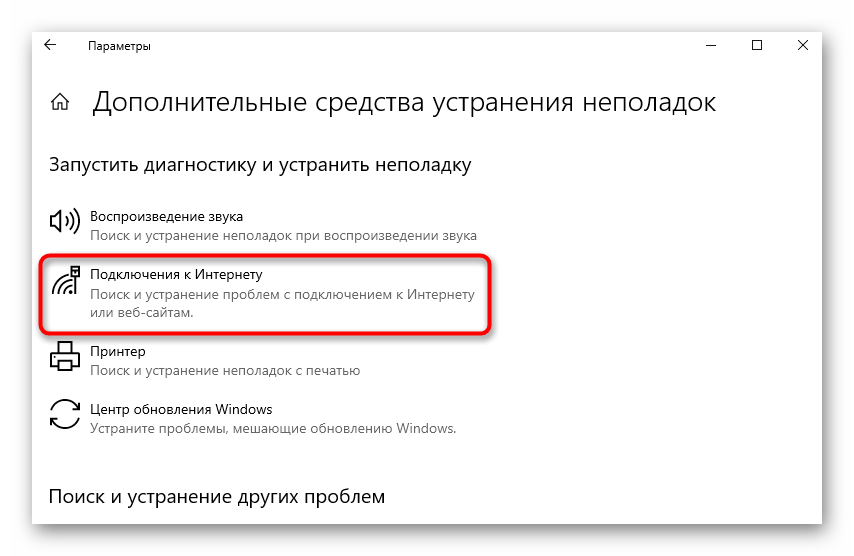
- Далее отыщите текст «Дополнительные средства устранения неполадок» и нажмите по нему.
- Через появившееся меню запустите диагностику «Подключения к Интернету».
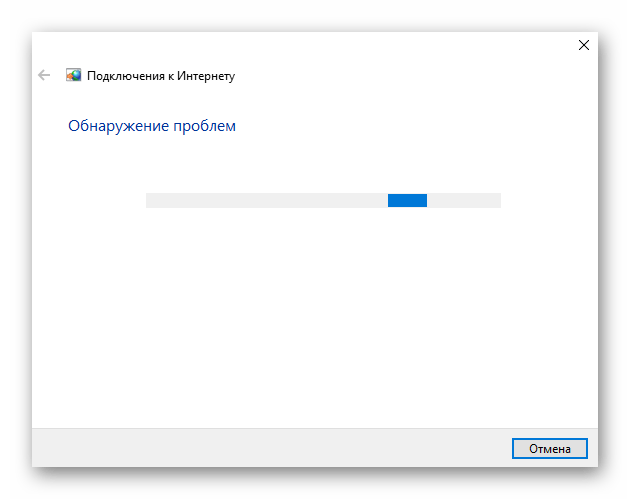
- Ожидайте завершения сканирования и ознакомьтесь с полученным результатом. Если будет предложено использовать учетную запись администратора, подтвердите это действие и переходите к проверке сети.
Способ 2: Проверка протокола IPv4
Сейчас большинство маршрутизаторов функционируют на протоколе IPv4, соответственно, его параметры в операционной системе должны быть настроены правильно. Изменение этих настроек осуществляется вручную, на что уйдет буквально несколько минут.
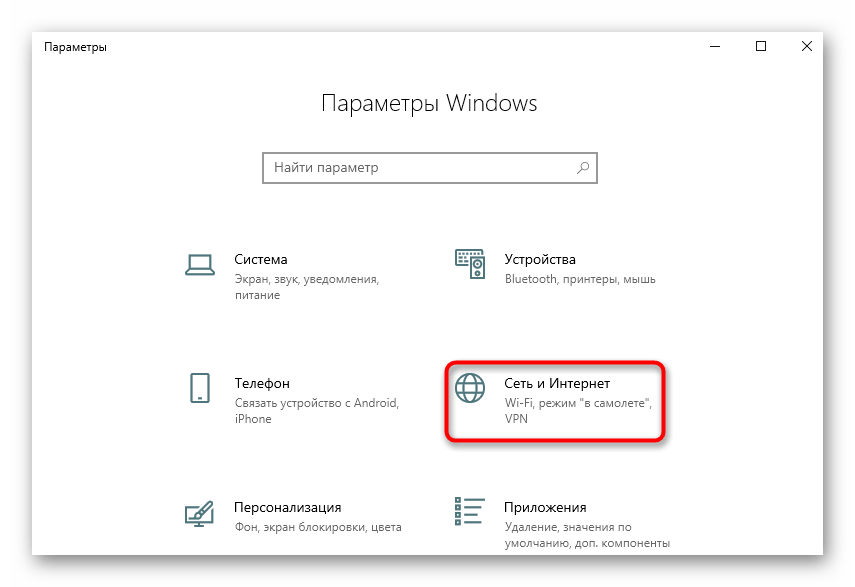
- В том же меню «Параметры» выберите раздел «Сеть и Интернет».
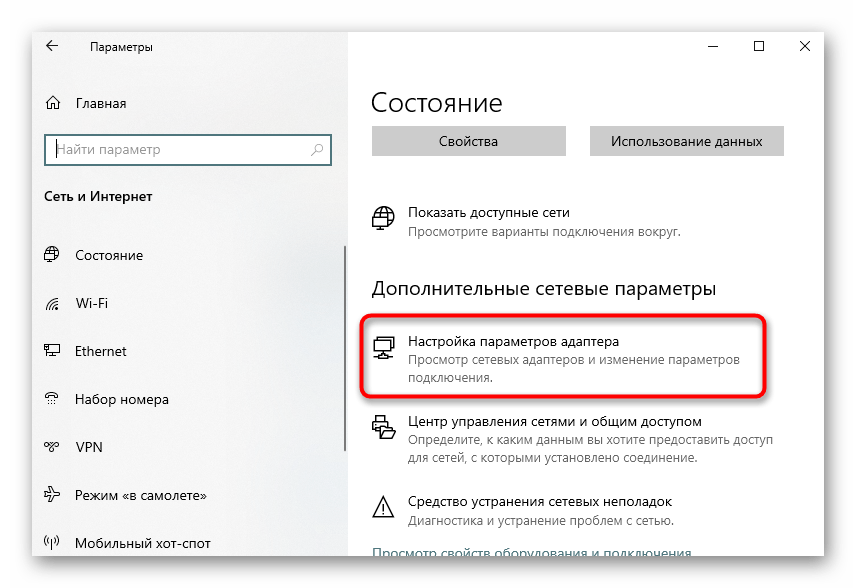
- Через первую категорию «Состояние» перейдите в меню «Настройка параметров адаптера».
- Щелкните по текущей сети правой кнопкой мыши и выберите пункт «Свойства».
- Убедитесь, что строка «IP версии 4 (TCP/IPv4)» отмечена галочкой, а затем нажмите по ней дважды ЛКМ.
- Отметьте маркером параметры «Получить IP-адрес автоматически» и «Получить адрес DNS-сервера автоматически».

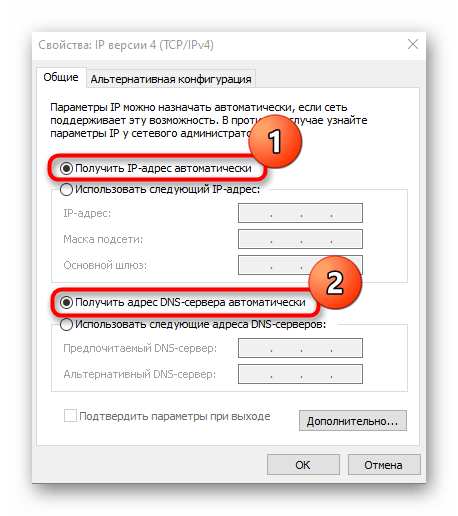
Остается только отправить ПК на перезагрузку, а после следующего входа в операционную систему попытаться выйти в интернет. Если выполненные действия не помогли, оставьте параметры протокола в таком же состоянии и переходите далее.
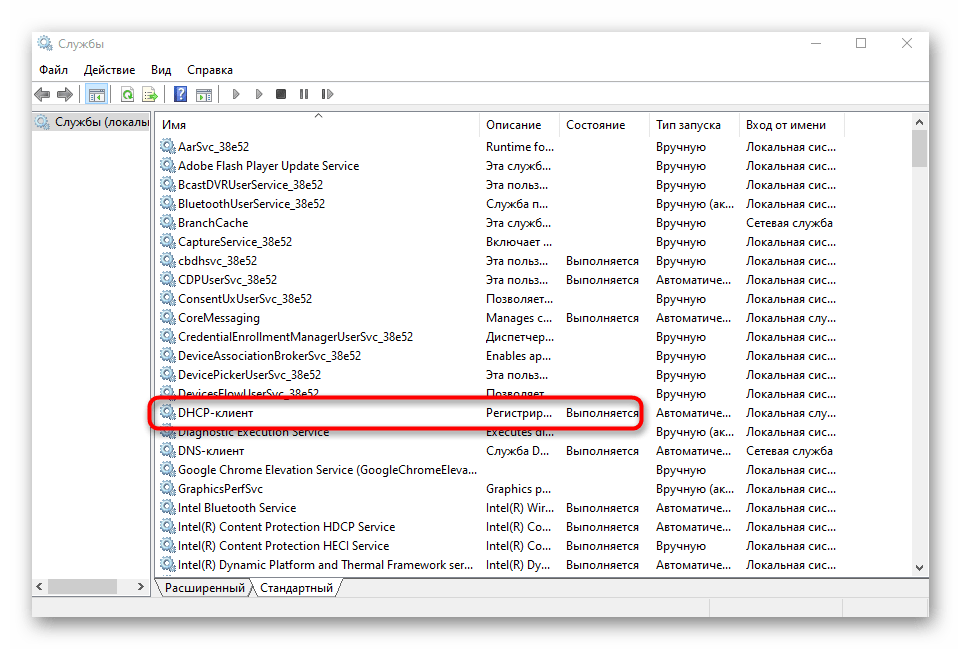
Иногда ошибка «DHCP не включен на сетевом адаптере Ethernet» может возникать из-за проблем со службой DHCP-клиента, поэтому от пользователя требуется проверить ее работоспособность и по необходимости настроить автоматический режим запуска.
- Откройте «Пуск» и перейдите оттуда в «Службы».
- Там отыщите службу «DHCP-клиент» и дважды кликните по ней ЛКМ.
- Установите тип запуска в состояние «Автоматически».
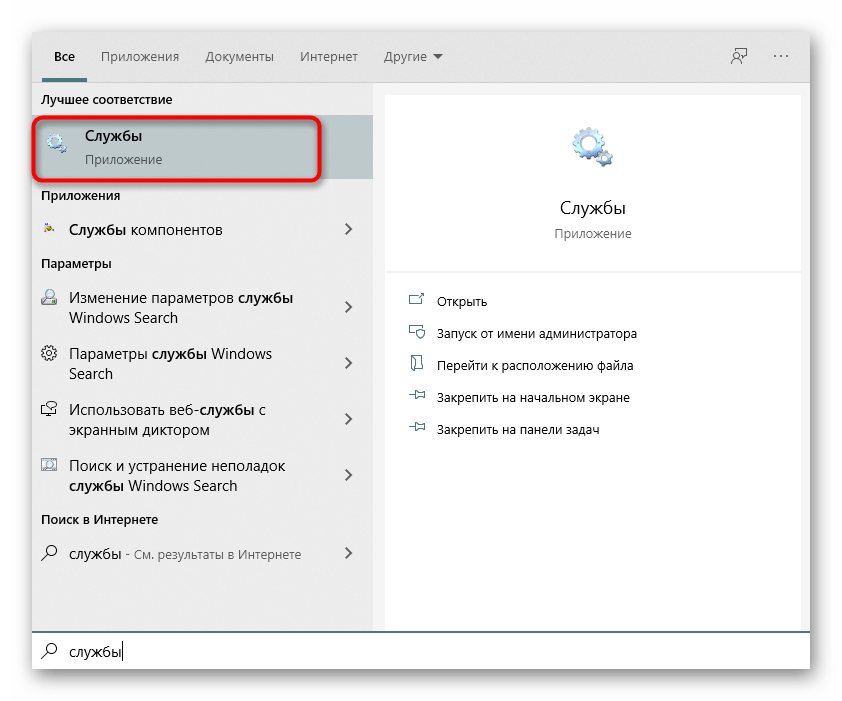
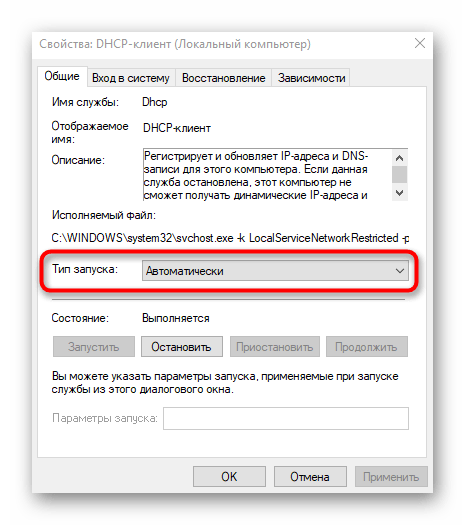
Службу можно сразу же запустить и произвести переподключение к сети. В противном случае нужно будет просто перезагрузить операционную систему, чтобы изменения вступили в силу.
Способ 4: Обновление сетевых настроек
Получение новых настроек сети — еще один способ решить возникшую неполадку. Осуществляется эта задача вручную путем активации специальных команд в консоли.
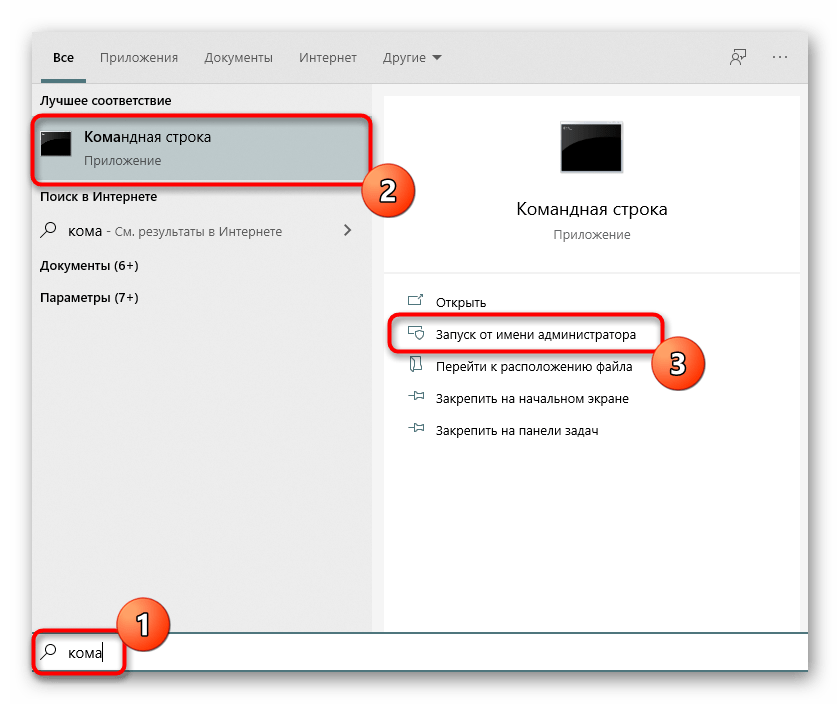
- Сначала откройте «Пуск», отыщите там приложение «Командная строка», воспользовавшись поиском, и справа нажмите по пункту «Запуск от имени администратора».
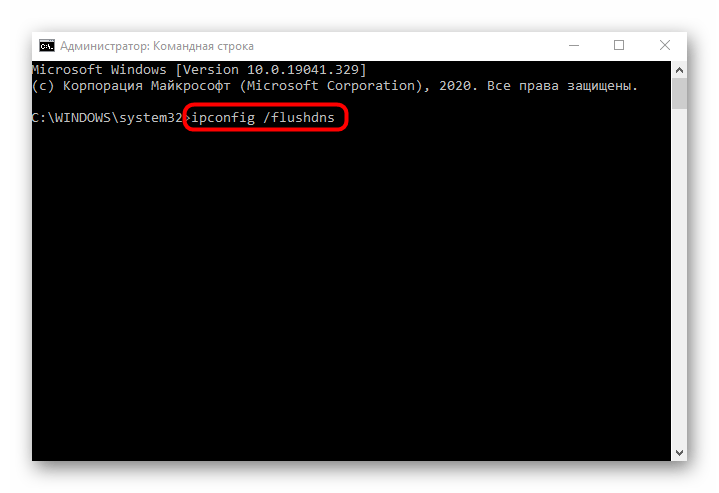
- Введите первую команду
ipconfig /flushdnsи нажмите на клавишу Enter. - После появления об очистке DNS переходите далее.
- Введите
ipconfig /renew, чтобы получить новые настройки.
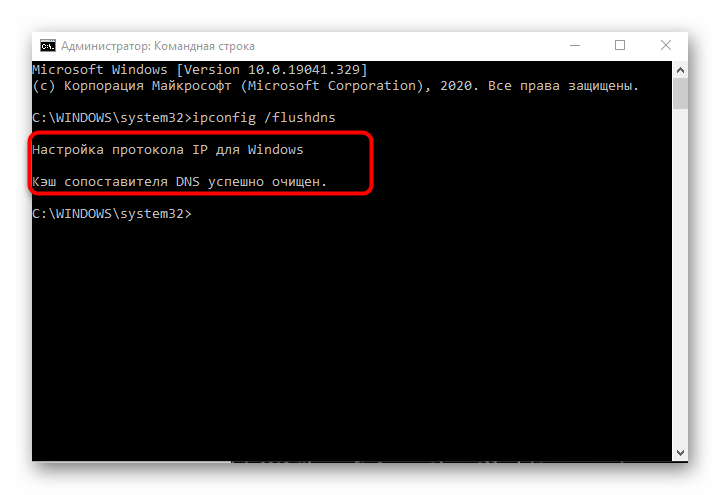
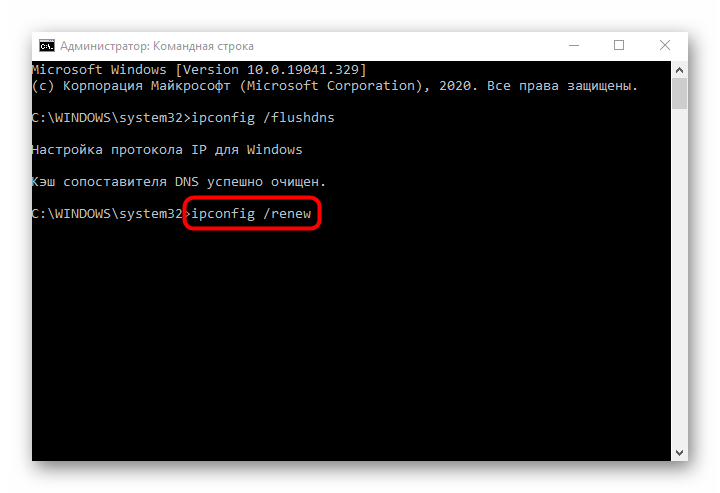
В обязательном порядке следует создать новый сеанс в операционной системе, перезагрузив компьютер. Только тогда новые параметры будут применены.
Способ 5: Проверка DHCP-сервера в настройках роутера
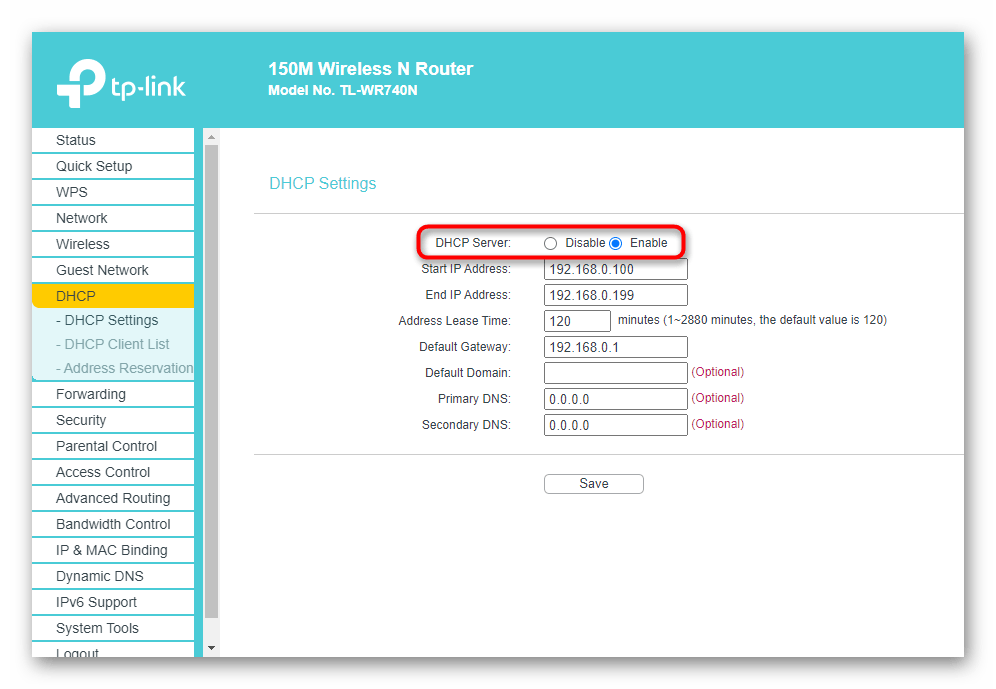
По умолчанию DHCP-сервер должен быть включен в веб-интерфейсе роутера, а отвечает он за автоматическое получение IP-адреса для каждого участника локальной сети. Если этот параметр отключен или по каким-то причинам настроен неправильно, могут возникать проблемы с доступом к интернету.
- Выполните авторизацию в веб-интерфейсе роутера, обратившись за помощью к статье по следующей ссылке.
Подробнее: Вход в веб-интерфейс роутеров
- Найдите там раздел «DHCP».
- В нем откройте категорию «DHCP Settings».
- Убедитесь в том, что сам сервер находится во включенном состоянии.
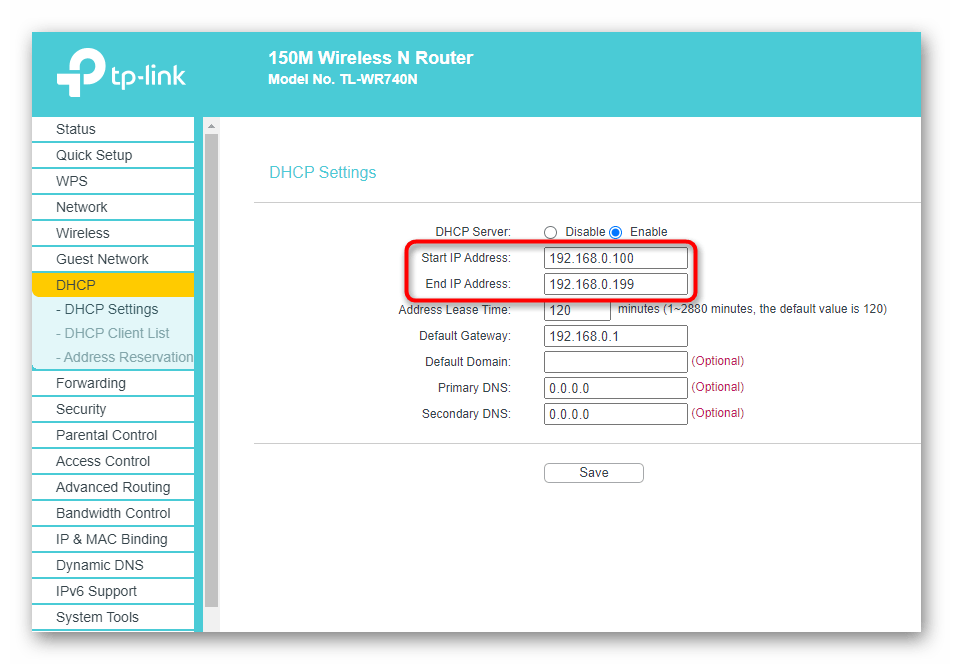
- Проверьте диапазон присваиваемых адресов и убедитесь в том, что под него не попадает стандартный IP роутера (
192.168.0.1или192.168.1.1). Пример правильного диапазона выглядит так: от192.168.0.10до192.168.0.64. Измените его вручную, если это понадобится. - Если DNS-серверы тоже изменены, задайте для них значения
0.0.0.0и сохраните изменения.
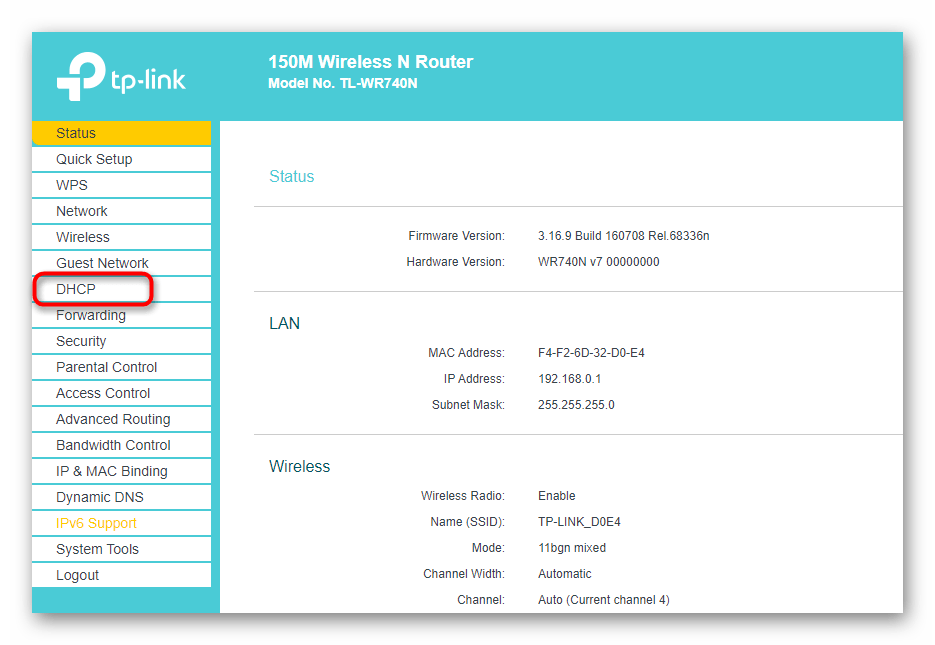
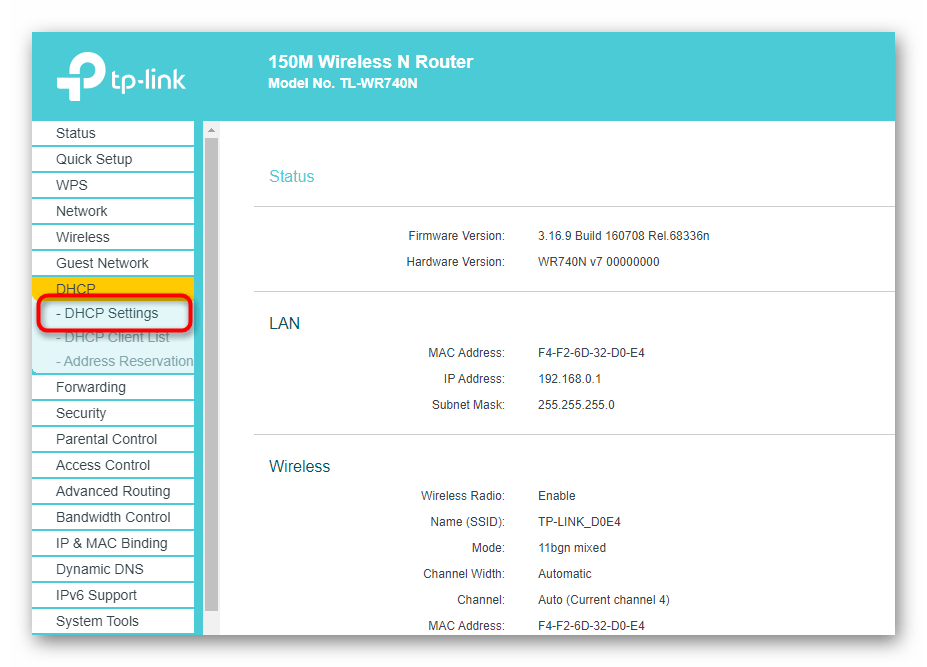
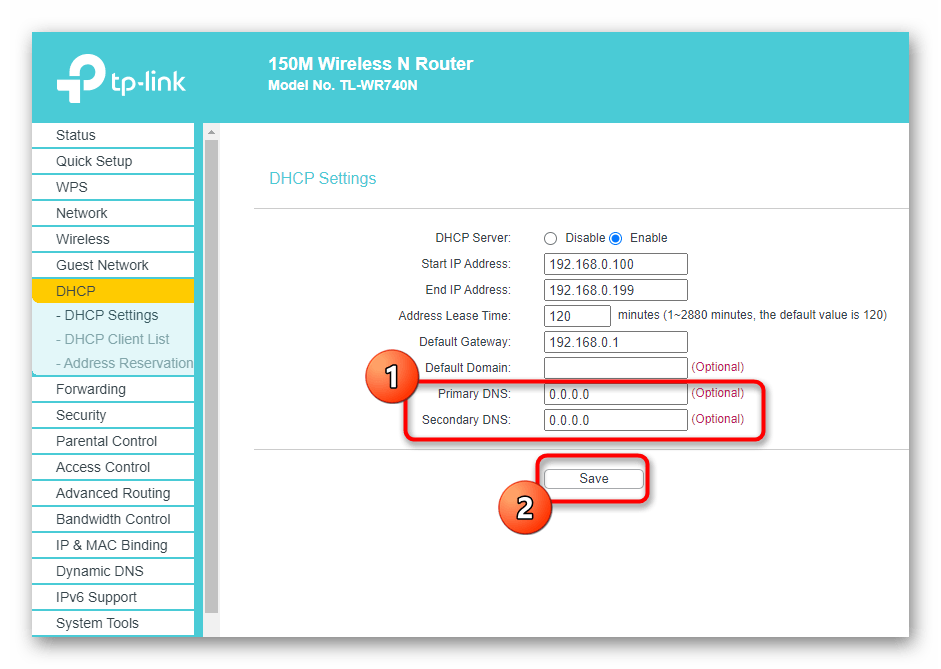
Если роутер не перезагрузился автоматически после сохранения настроек, сделайте это самостоятельно, дождитесь повторного подключения к LAN или беспроводной точке доступа и переходите к проверке действенности метода.
Способ 6: Откат драйвера сетевого адаптера
Последний возможный метод решения возникшей трудности — откат драйвера сетевого адаптера. Это поможет в тех ситуациях, когда проблемы начались после обновления ОС или самого программного обеспечения комплектующего.
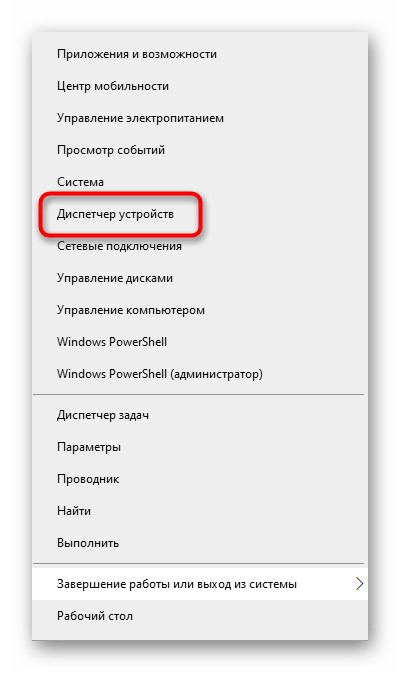
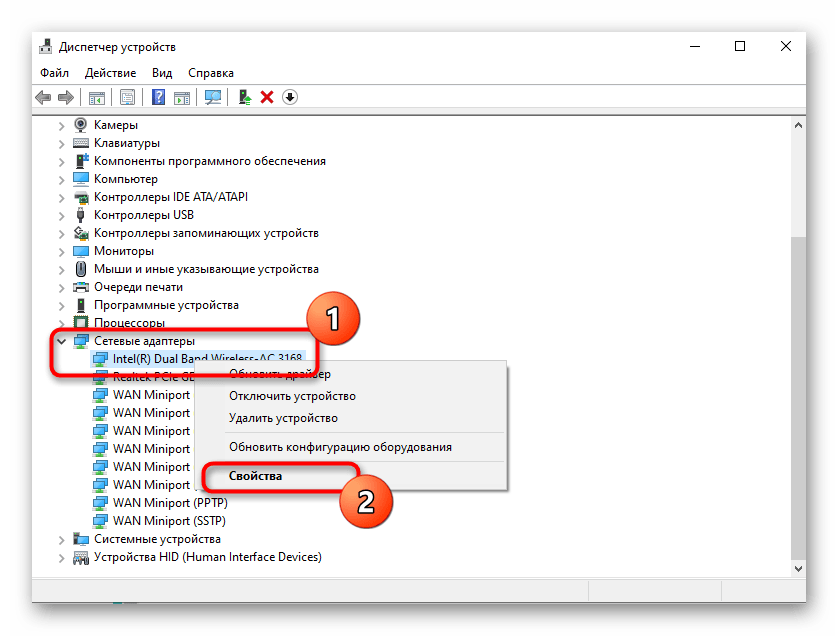
- Нажмите ПКМ по кнопке «Пуск» и в появившемся контекстном меню найдите «Диспетчер устройств».
- В списке отыщите свой сетевой адаптер, кликните по нему ПКМ и перейдите в «Свойства».
- Если кнопка «Откатить» активна, нажмите по ней и дождитесь окончания процедуры.

В этой статье мы не разобрали только метод с проверкой системы на наличие вирусов и восстановление ее до состояния, когда все еще функционировало исправно, поскольку такие действия крайне редко приносят хоть какую-то пользу. Однако если ничего из перечисленного выше не помогло, попытайтесь реализовать их, обратившись за помощью к инструкциям ниже.
Читайте также:
Борьба с компьютерными вирусами
Восстанавливаем ОС Windows 10 к исходному состоянию
Еще статьи по данной теме:
Помогла ли Вам статья?
The Internet makes use of Dynamic Host Configuration Protocol (DHCP) to provide quick, automatic, and centrally managed distribution of IP addresses to different devices wanting to connect within a network. A DHCP server is also used to help in configuring the default gateway, subnet mask, and DNS server information on your device/computer.
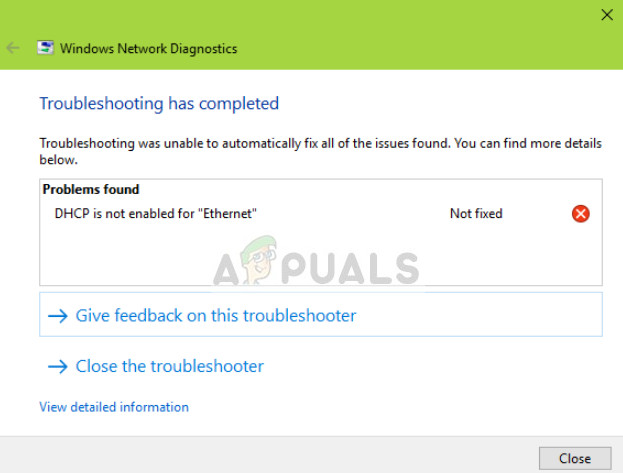
Users experience the error message ‘DHCP is not enabled for Ethernet’ when they troubleshoot their not working internet connection through the Windows troubleshooter. This error usually occurs when you have manually assigned your computer an IP address and subnet mask. The task of DHCP is to take control of this element from you and resolve all the IP addresses and allocate them automatically. You might get your internet access some of the times but if that address is already taken, you will not be able to access the internet.
You might also experience this error with the variations in Wi-Fi, Ethernet, and Local Area connection.
What is Dynamic Host Configuration Protocol (DHCP)?
A DHCP server is used to automatically assign unique IP addresses to computers attempting to connect to a network. In small businesses and homes, the router acts as a DHCP server.
The process is comprised of several different steps:
- The computer (client) requests an IP address from the router (host).
- The router checks for available free IP addresses and assigns it to the computer.
- They both handshake on it before the computer starts using the IP address.
Whenever your device is turned on and connected to a network, it issues a DHCPDISCOVER to the router. Then the process begins and the IP address is assigned.
What causes the error message ‘DHCP is not enabled for Ethernet’?
This error message is caused by simple misconfigurations on your computer. Some of the reasons are:
- You are using a manual entry of IP address for your computer to use in the Network configuration menu.
- The DHCP client service might not be running on your computer. This client service helps your computer to register the IP address and keep track of DNS records.
- Your network driver might be outdated or corrupt. This can occur after potential Windows updates.
- The router might not be working properly. A simple restart usually solves the problem since it clears all the wrongly saved configurations.
Before we start with the solutions, make sure that you are logged in as an administrator on your computer and you are connected to your network properly. Check Ethernet cables, try replacing them or make sure that you have enough strength of Wi-Fi signals.
Solution 1: Automatically fetching IP addresses from DHCP
The most common reason why users face this problem is because they have predefined the IP address they want to use; hence disabling the DHCP mechanism. This might conflict with your network settings if the manual request is not entertained. We will navigate to your internet settings, set both options to automatic and see if this fixes the issue.
- Press Windows + R, type ‘control’ in the dialogue box and press Enter.
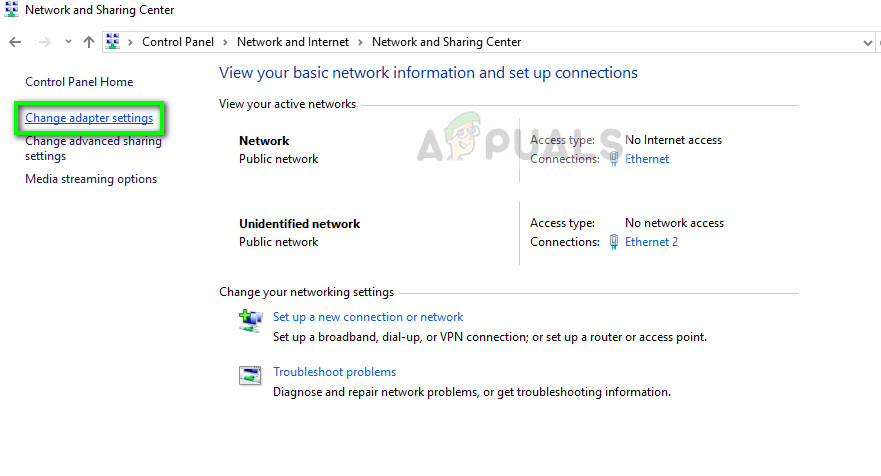
- Once in the control panel, click on Network and Internet > Network and Sharing Center. Now select the option Change adapter settings from the left side of the screen.
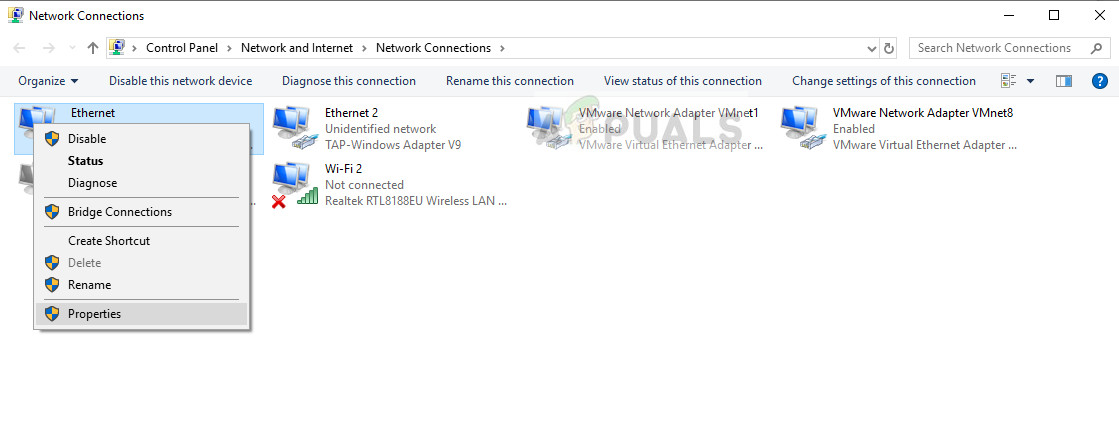
- Now right-click on the adapter which is the medium of your connection and select Properties.
- Double Click on the option of Internet Protocol Version 4 (TCP/IPv4) to open its properties.
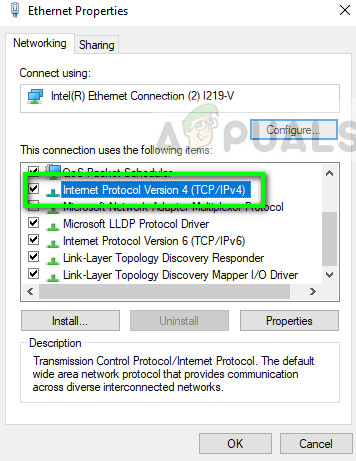
- Select the options Obtain an IP address automatically and Obtain DNS server address automatically.
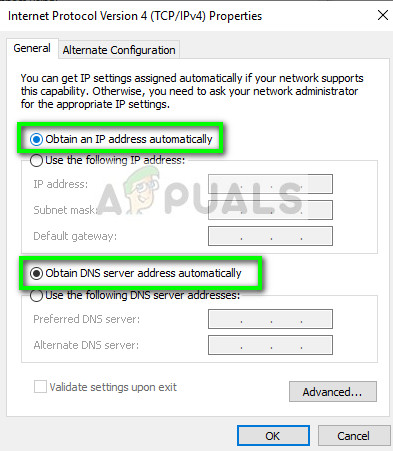
- Press OK to save changes and exit. Restart your computer and after reconnecting to your network, check if the issue is resolved.
Solution 2: Enabling DHCP Client Service
Like mentioned in the introduction, the DHCP client helps the computer register IP addresses and also update the DNS records on your computer. If the very DHCP client is not working on your computer, you cannot expect smooth operation of DHCP on your computer over the network. We will make sure that the client service is up and running properly.
- Press Windows + R, type “services.msc” in the dialogue box and press Enter.
- Once in the services, locate the entry of DHCP client. Make sure that it is running and the startup type is set as Automatic.
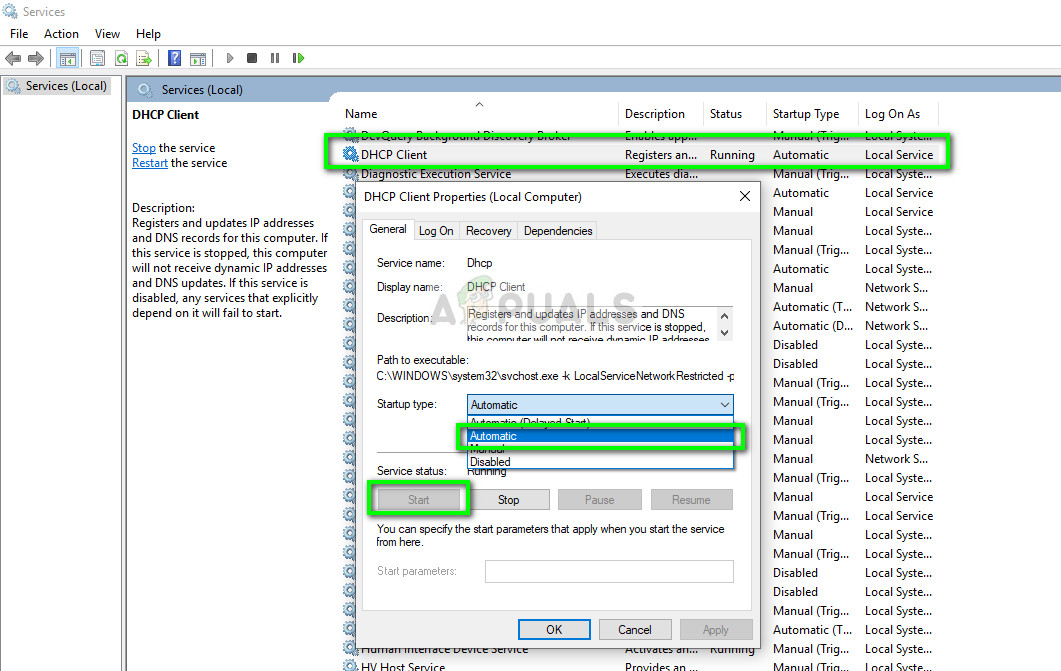
- Press Apply to save changes and exit. Now reconnect to your network and see if you still get connection problems.
Solution 3: Resetting Network configurations
If both the above methods don’t work, you can manually try to reset your network configurations on your computer. We will flush your IP address and after reinitializing all the parameters, request an IP again from the DHCP server properly. Make sure that you are logged in as an administrator before following this solution.
- Press Windows + R, type “command prompt” in the dialogue box, right-click on the application and select “Run as administrator”.
- Once in elevated command prompt, execute the following commands one by one:
ipconfig /flushdns

ipconfig /renew
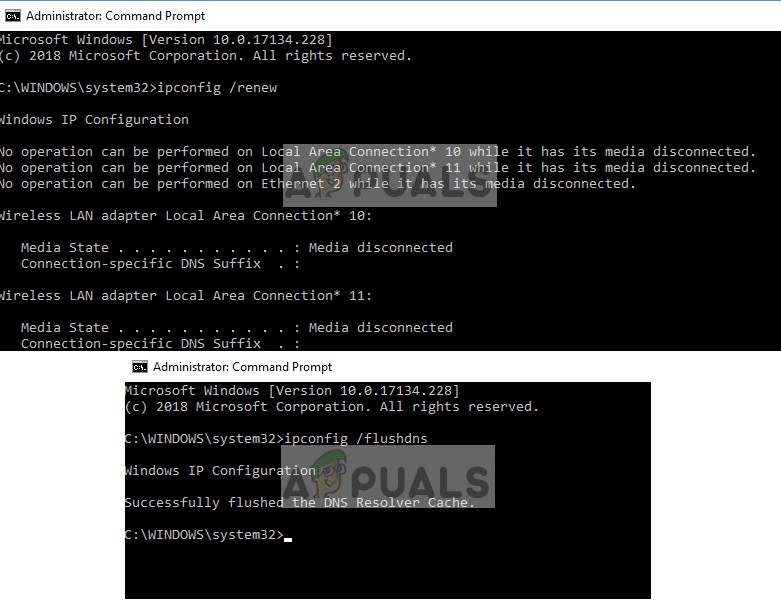
- Restart your computer completely after resetting your network and check if the issue is resolved.
Solution 4: Resetting Router
If you are using a home network with your router acting as your DHCP server, there are chances that your router might be acting out or maybe in an error state. This happens every once in a while and when it does, a simple power cycle usually fixes things. We will try to power cycle both your computer and router just to be sure.
- Turn off the router and your computer. Take out their main power supply and wait for around 10 minutes.
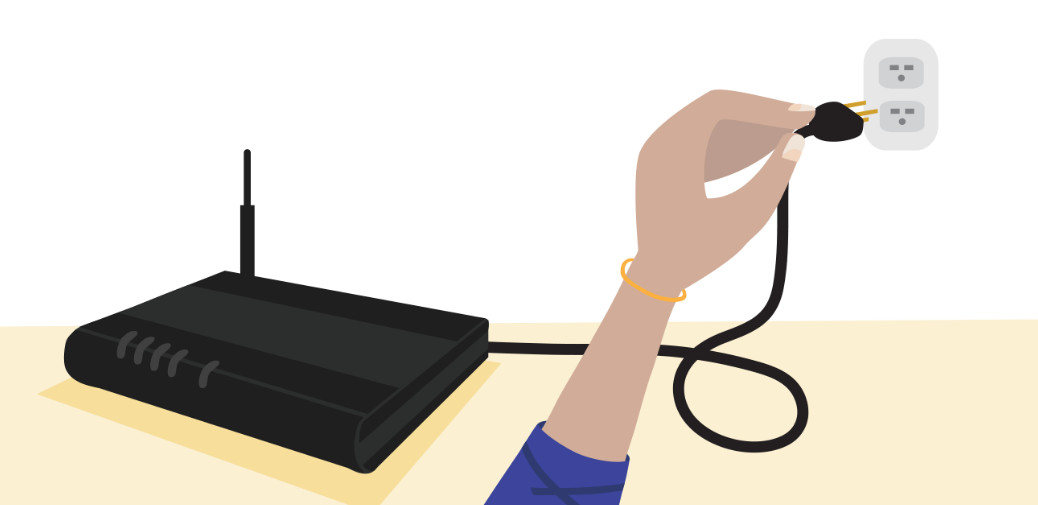
- After the time has passed, plug the power supply back in and turn on both devices. Wait for an additional ~4 minutes before attempting to connect to the network. Check if the issue is solved.
If you still don’t get the issue resolved, you can refer to the following tips:
- Make sure that Windows is updated to the latest version.
- If you are in an organization, it is best to consult your IT administrator since the DHCP server is not a router and there may be other implications as well.
- Update your network drivers after uninstalling them from the device manager.
- Roll back windows to a restore point after backing up your data if this issue occurred after an update.

Kevin Arrows
Kevin is a dynamic and self-motivated information technology professional, with a Thorough knowledge of all facets pertaining to network infrastructure design, implementation and administration. Superior record of delivering simultaneous large-scale mission critical projects on time and under budget.
Всем привет! Если вы читаете этот текст, то скорее всего вы, также как и я, столкнулись с ошибкой: DHCP не включен на сетевом адаптере «Беспроводная сеть» или «Ethernet». Можно попробовать решить проблему сразу – нажмите на кнопку: «Попробовать выполнить восстановление от имени администратора».
В некоторых случаях система сама попробуем решить проблему, поэтому если вы увидите окно с «Автоматическими обновлениями параметров сети», то нажмите «Внести исправление».
Если после этого вы увидите окошко с зеленой галочкой и надпись: «Исправлено», то проблема решена. Если же проблему не удалось решить таким образом, то идем дальше, и давайте разбираться в чем же причина отключенного DHCP.
DHCP функция на компьютере позволяет автоматически получать IP адрес от вашего роутера. В итоге на роутере настроен DHCP-сервер, который раздает эти адреса, а на компьютере DHCP-клиент, их принимающий. В нашем случае сервер или клиент может быть отключен как на компе, так и на роутере. Но чаще все же ошибка возникает из-за проблем с компьютером.
Так как ПК или ноутбук не может получить данные адреса, то и доступа к интернету нет, и в состоянии можно увидеть сообщение. А адаптер будет иметь надпись: «Неопознанная сеть». Не будем долго тянуть и начнем решать проблему. Пробовать все способы не нужно, просто проверяйте – решилась ли проблема после каждого из предложенных вариантов. Если у вас возникнут какие-то вопросы при прочтении – пишите в комментариях.
Содержание
- Способ 1
- Способ 2
- Способ 3
- Способ 4
- Способ 6
- Способ 7
- Задать вопрос автору статьи
Способ 1
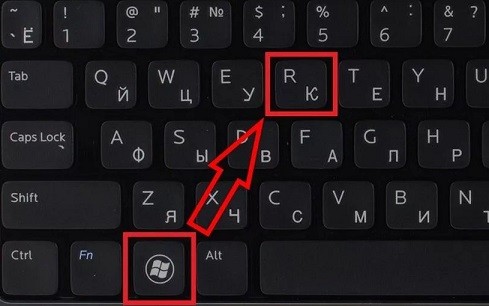
- Найдите на клавиатуре две клавиши и английскую R – нажмите одновременно.
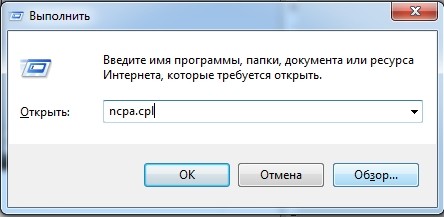
- Выполните команду «ncpa.cpl».
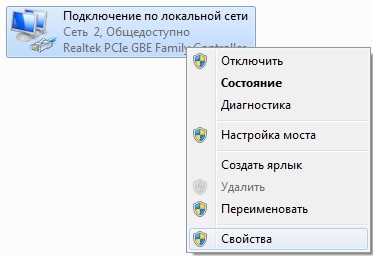
- Далее вы увидите несколько адаптеров. Если вы подключены по кабелю, то вам нужно выбрать «Ethernet» подключение (имеет значок кабеля с сетевым штекером). Если вы подключены по «Wi-Fi», то выбираем «Беспроводную сеть». Нажмите по выбранному подключению и зайдите в «Свойства».
- Один раз нажмите на строку «4 (TCP/IPv4)» и далее зайдите опять в «Свойства». Установите автоматическое получение IP и DNS.
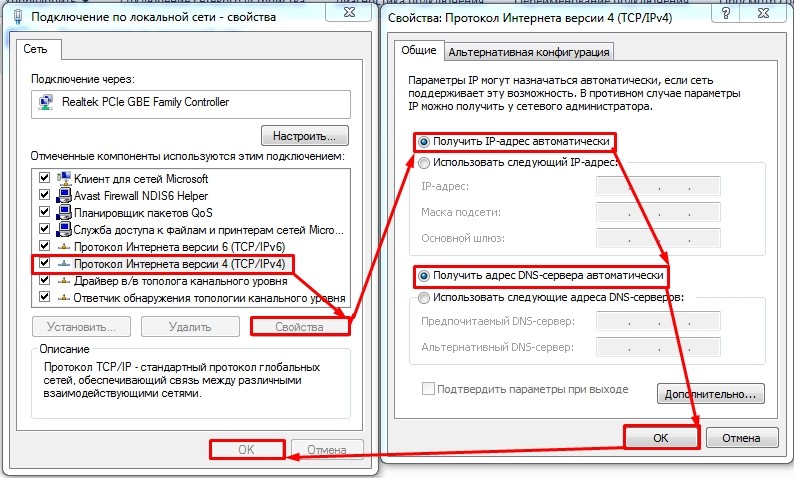
- Два раза нажимаем «ОК».
Если это не поможет, интернета так нет, а ошибка «DHCP не включен в сетевом адаптере…» – все также остается висеть, пробуем другой способ.
Способ 2
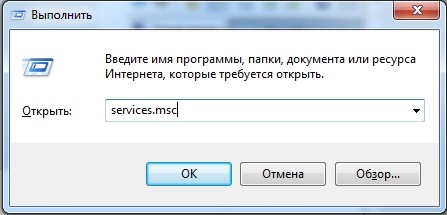
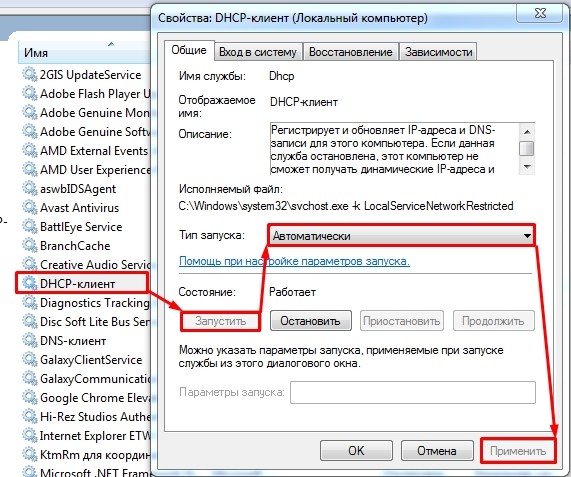
Как я и говорил ранее, на компьютере должен быть включен DHCP-клиент, но возможно он деактивирован. Опять нажимаем на наши любые клавиши и R и прописываем «services.msc».
В списке найдите службу «DHCP-клиента» и откройте «Свойства» двойным щелчком левой мыши. Если служба остановлена – «Запустите». Также установите «Тип запуска» в «Автоматическом» режиме. В самом конце обязательно нажмите «Применить».
Способ 3
Можно попробовать выполнить сброс сетевых настроек адаптера.
Windows 7
Запустите командную строку от имени администратора – проще всего это сделать через меню «Пуск», введя название «cmd» в поисковой строке. Далее нажимаем правой кнопкой по модулю и выбираем соответствующий параметр запуска.
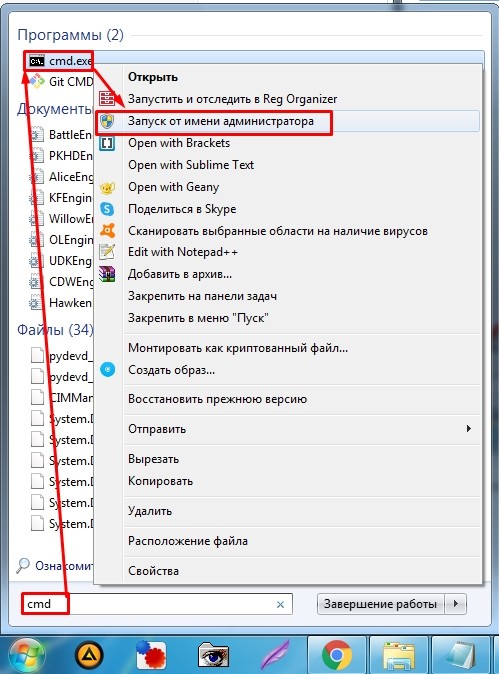
По очереди прописываем команды:
netsh winsock reset
netsh int ip reset
ipconfig /flushdns
netsh int tcp reset
route –f
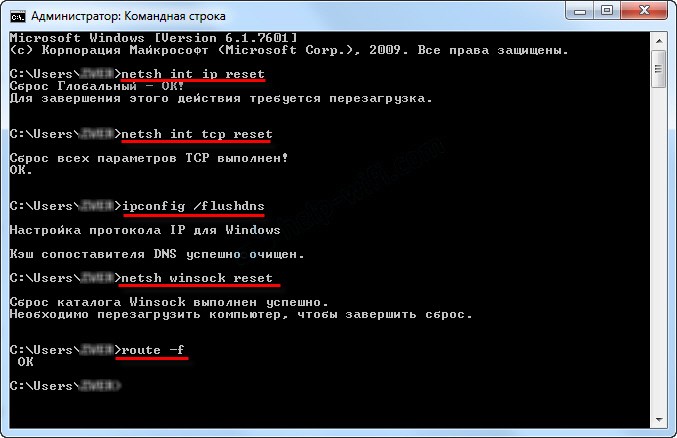
Перезагружаем комп!
Windows 10
«Пуск» – «Параметры» (Шестеренка) – «Сеть и Интернета» – «Состояние» – нажимаем по кнопке «Сброс сети», далее подтверждаем действия сброса. Перезагружаемся.
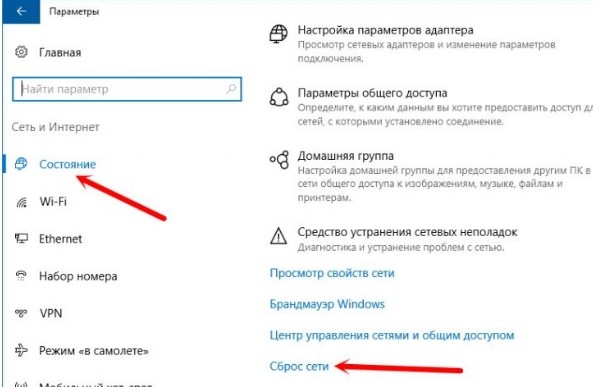
Способ 4
Если ничего из вышеперечисленного не помогло, то значит скорее всего проблема не в вашем компьютере, а в маршрутизаторе. Сначала просто попробуйте его перезагрузить. Подойдите и выключите его, но включать сразу не нужно – подождите хотя бы 5 минут, чтобы он остыл. Для перезагрузки можно использовать кнопку включения или просто выдернуть его из розетки.
Если это не поможет, то скорее всего в роутере выключен DHCP-сервер. По вопросу как включить DHCP на роутере – смотрим инструкцию тут.
Способ 6
Можно попробовать прописать IP и другие настройки вручную. Для начала нам нужно узнать IP адрес вашего роутера. Для этого в командной строке ( + R = cmd) прописываем:
ipconfig
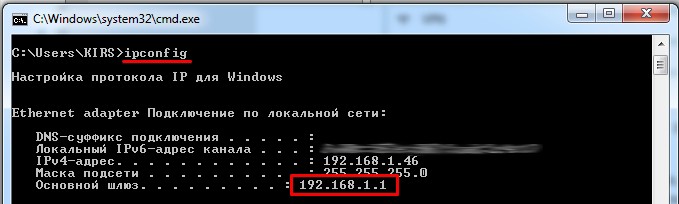
(Win+R=ncpa.cpl) Теперь зайдите в «Свойства» адаптера и пропишите следующие параметры:
- IP-адрес – первые три цифры устанавливаем такие же как у вашего роутера. А последнюю ставим в диапазоне от 10 до 254. Самое главное, чтобы эта цифра была отличная от той, что установлена у маршрутизатора.
- Маска подсети – просто нажмите по строчке, и параметр установится автоматически.
- Основной шлюз – тут прописываем IP роутера.
- Предпочтительный и Альтернативный DNS-сервер – я обычно использую ДНС от Google: 8.8.8.8 и 8.8.4.4.
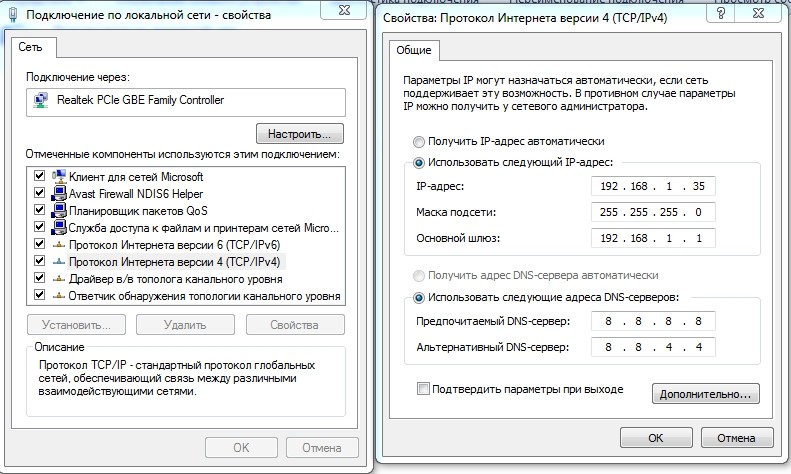
Два раза нажимаем «ОК».
Способ 7
Вспомните – не устанавливали ли вы ранее какие-то программы, которые в теории могут мешать работе вашего модуля. Зайдите в «Программы и компоненты» и проверьте – возможно что-то установилось без вашего ведома. Также проверьте компьютер антивирусной программой. Если у вас включен VPN или запущены подобные приложения – отключите их.
Можно, кстати, попробовать и вообще отключить антивирусник, возможно, это он является виновником. Также можно попробовать установить свежие драйвера на сетевой или Wi-Fi адаптер:
- Сетевая карта.
- Wi-Fi адаптер.
Если подключение происходит не через роутер, а к кабелю провайдера напрямую, то стоит позвонить в техническую поддержку, возможно проблема у них. Также вы можете задавать свои вопросы и описывать свои случаи в комментариях.
Troubleshooting Guide On How to Fix the DHCP is not Enabled for Ethernet Problem. Read and apply the fix.

Are you unable to connect to the internet? Did you run the network troubleshooter and encountered the DHCP is not enabled for Ethernet error message? Recently this happened with me as well and I found out that this problem generally happens when we assign the IP address and DNS server manually. Let’s Fix this issue
For detailed instructions and screenshots, read this post further. if performing this step does not fix your problem then apply other methods mentioned in this blog. DHCP is not enabled for Ethernet is a common error and it can be fixed very easily. Follow the steps given in this blog and you will be able to solve the issue.
Before that let’s take an overview of what DHCP is and why this error happened.
DHCP is not Enabled for Ethernet: Problem Overview
DHCP or dynamic host configuration protocol is a mechanism to assign dynamic IP address when a computer or router connects to the internet. When DHCP is not enabled for Ethernet issue occurs then the router or computer can’t establish a connection with the ISP.
DHCP or the dynamic host configuration protocol is developed to keep changing the IP address of a computer or network to make proper use of different IP addresses in a server. Generally, the IP address is changed on a daily basis. This system is configured on all modern computers and devices. It has also made connecting with other devices possible.
The DHCP is not enabled on Ethernet error is encounter when the user is unable to connect to the internet. Windows offers to run the network troubleshooter as usual. When the user runs the network troubleshooter then the message which says that DHCP is not enabled for ethernet.
The major reason behind this issue is that somehow the computer is unable to obtain the dynamic IP address from the internet service provider. Three main reasons can be responsible for this failure to obtain IP addresses. Some user on computer has changed the network settings or a third party application is interfering with the internet connection. Ultimately, there can also be some issues with your ISP.
Let’s start troubleshooting this issue with some basic steps in the next section of this blog.
Basic Troubleshooting
Some simple steps also fix this issue. What happens is sometimes a small reason get to cause such a big problem. It is always recommended to perform these steps and make sure that we are not missing anything for troubleshooting. Perform these steps on the computer when you encounter the DHCP is not enabled for Ethernet error.
- Restart your computer or laptop and again connect to the internet
- Uninstall any new software
- Remove any network related extensions from your browsers
- Disable if you are using a proxy server
- Make sure your network cards are updated
These steps should be able to fix the DHCP is not enabled for Ethernet matter. You should be able to connect to your internet. If these steps are not able to solve the issue on your PC then we can move ahead to try these methods given in this blog.
Steps To Fix The DHCP Is Not Enabled for Ethernet
- Step-1 : Turn on Automatically Obtain IP Address and DNS Server
- Step-2 : Enable DHCP with Command Prompt
- Step-3 : Restart DHCP in Computer Management
- Step-4 : Enable DHCP in Router
-
Step 1
Turn on Automatically Obtain IP Address and DNS Server
As we have mentioned earlier, the network settings may get changed by some user and it may prevent the mechanism to obtain a dynamic IP address for connecting to the network. It may result in the DHCP is not enabled for Ethernet error. So, follow these steps to fix the isuue.
- Type network connections in the search result.
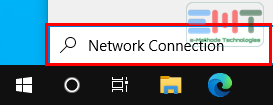
- Select the similar option from the search results
- Right-click on the Ethernet connection and select the properties option.
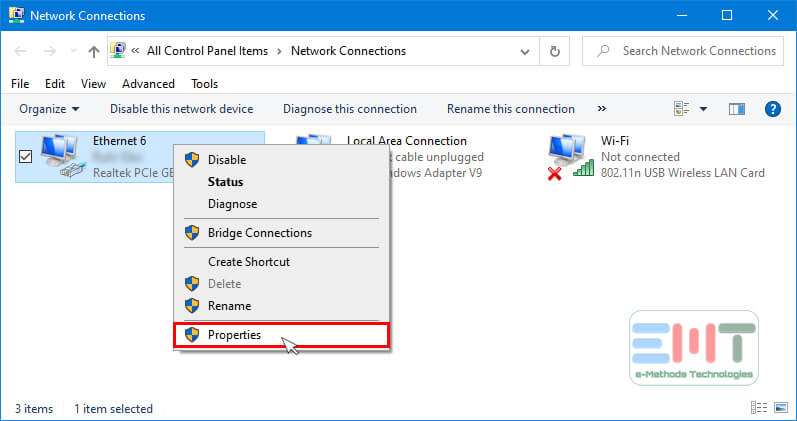
- Now select the Internet protocol version 4 option.
- Click on the Properties button.
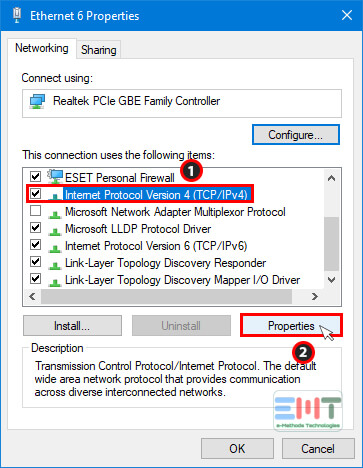
- Make sure that Select the IP address automatically option is selected.
- Also, select the Obtain DNS Server automatically option.
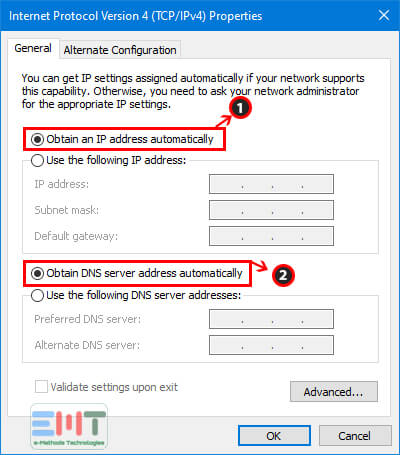
Now when you will try to connect with the internet, it should not face any issues. You have solved the DHCP is not enabled for Ethernet matter. Now you can continue your work. But you are still facing the problem then you should give a try to the method given in the next paragraph.
-
Step 2
Enable DHCP with Command Prompt
If you are still facing the DHCP is not enabled for Ethernet message after following the above method then the problem lies somewhere else. The DHCP may require to start from the core. We have to give commands from the command prompt to fix this error. So, Follow these steps to use command prompt and fix DHCP issue.
- Go to the desktop
- Press the Windows logo key and X button together.

- Select the Command prompt (admin) option.

- On the console, enter the following command.
- “netsh interface IP set address “Ethernet” DHCP”.
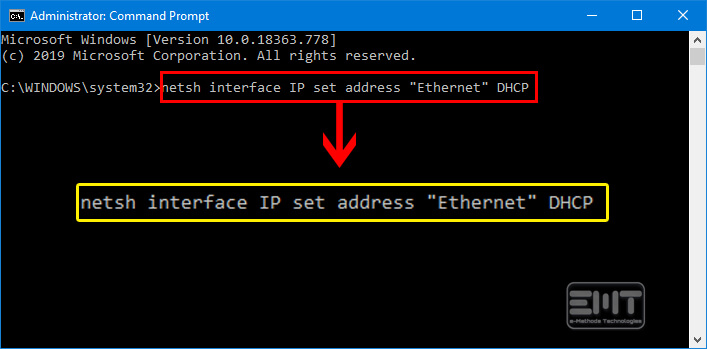
Let the command execute on your system. When the command is successfully executed then your problem with DHCP should be fixed and you should be able to connect to the internet. If this method also does not solve your problem then read the next section of this blog.
whether you are looking especially for a gaming router, mesh router for a big home, latest faster WiFi 6 router or a simple budget router.
-
Step 3
Restart DHCP in Computer Management
It is possible that DHCP is not enabled for an Ethernet message is showing because there is some matter with DHCP services. We may need to restart these services. Follow these steps given below to fix the DHCP is not enabled matter.
- Type Computer management in the search box.
- Select ‘Computer management’ option.
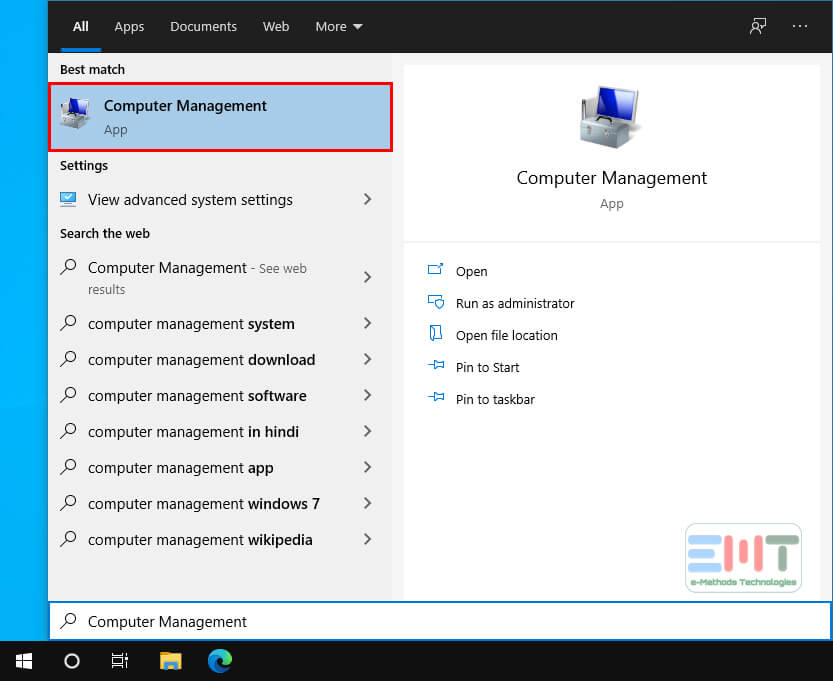
- Click the Services and applications section.
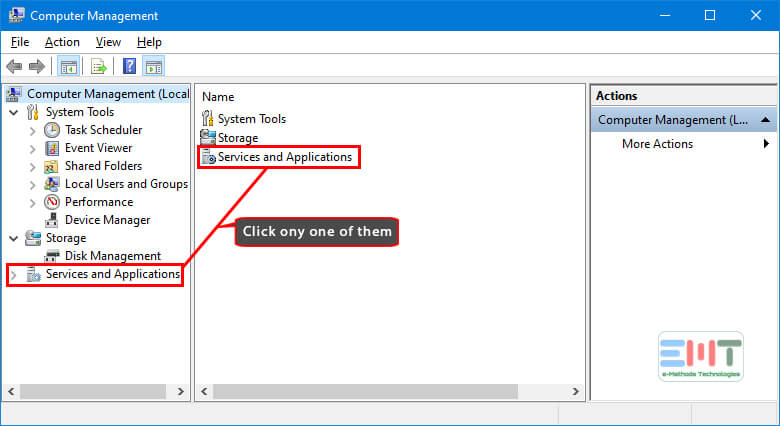
- Click on the Services.
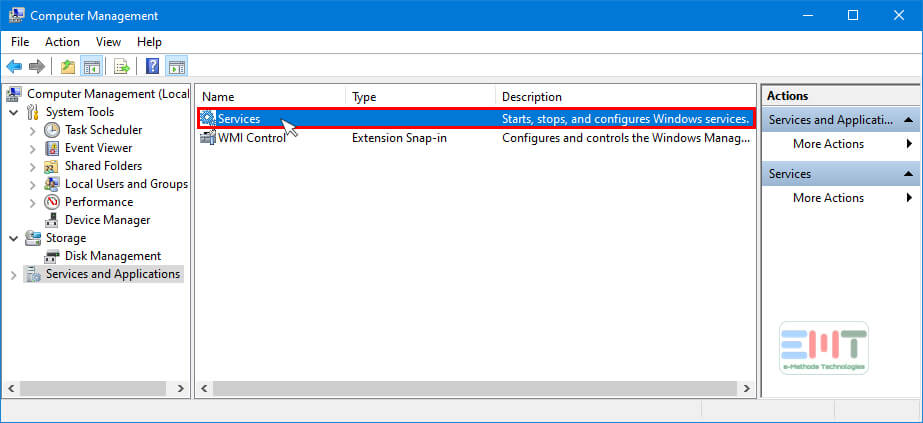
- Select DHCP client in the right pane.
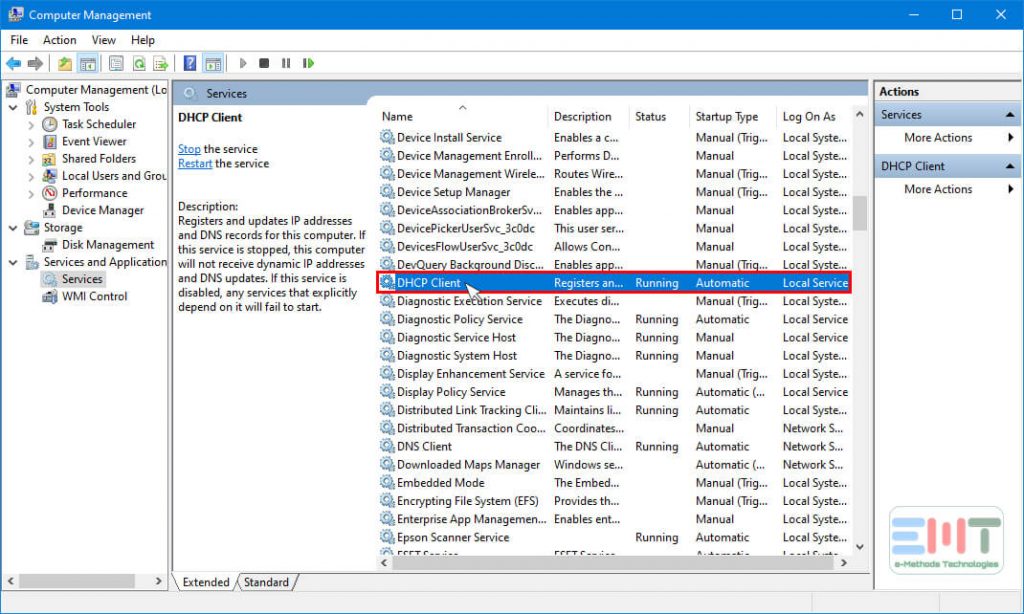
- Now Right-click on the DHCP service and select the restart option.
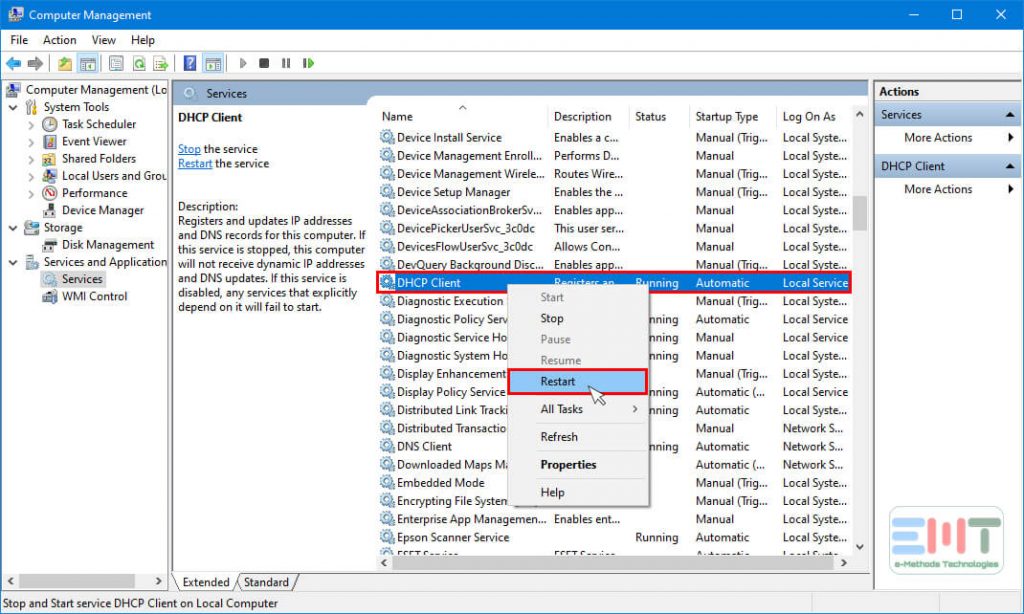
Now you should be able to get rid of DHCP is not enabled for Ethernet issue. In case you are facing the error then try this method given below.
We are making this best laptops list after spending hours in research so that you can find the best laptop as per your liking.
-
Step 4
Enable DHCP in Router
The DHCP is not enabled for Ethernet issues can also occur if your computer is connected with a wifi router which further gives a wireless connection to other devices and DHCP is not enabled there. In this case, we may need to enable DHCP on the router admin page. Follow the steps given below.
- Launch your web browser
- Enter your router IP address
- Login to the admin account
- Go to Network Settings or Advanced Settings
- Look for DHCP option
- Enable the DHCP by taking appropriate action
The method to enable DHCP is different for the different routers admin dashboard. So, Follow the method on your router admin dashboard and enable the DHCP. Now when you will try to connect with the internet, you should be able to connect with the internet and use it.
Tips to Avoid the DHCP is not Enabled for Ethernet Error
The DHCP is not enabled for Ethernet error can bother you again in the future. Ignoring some minor steps can cause this issue once again with your device. So, follow these steps given below to maintain your system and minimize the chances of getting this error again in the future.
- Do not let everyone in your office use your system with an admin account
- Use an admin password on your system
- Avoid installing unknown applications
- Know full functions of any network related extensions before installing them
If you can take care of these steps then you may need not worry about the DHCP is not enabled for Ethernet issue. So, follow our advice and enjoy using your internet connection without any interruptions.
Contact for Official Support
We assure you that this blog is sufficient for fixing the DHCP is not Enabled for Ethernet error, but some things cannot be fixed with the help of steps given in this blog. Like, if there is any problem with your internet service provider or laptop hardware. A technician can only fix these things. Contact your ISP or Laptop official support center in case you are unable to fix the matter yourself.
Final Words: Conclusion
So, This blog is written to help people fix the issue of DHCP is not enabled for Ethernet by themselves. All the methods included in this blog are safe to perform even for a novice user. The methods are tested and work to fix the matter. This is till date the most comprehensive blog on this topic.
We would like to know what you think about this blog. Did it help you to solve your problem or not. Do you find any discrepancy in this blog? Good or bad whatever you think, please let us know in the comments down below.

-
Partition Wizard
-
Partition Manager
- 4 Ways to Fix “DHCP Is Not Enabled for Ethernet” Error
By Linda | Follow |
Last Updated March 04, 2022
Have you received the message “DHCP is not enabled for Ethernet” after running Windows Network Diagnostics? This post from MiniTool Partition Wizard offers you 4 ways to fix this issue.
DHCP Is Not Enabled for Ethernet
Sometimes, your PC may disconnect from the network. In this case, you may want to diagnose the network. The process is as follows:
- Right-click on the network icon in the lower right corner of the Windows screen and choose Open Network & Internet settings.
- In the newly-opened window, click Change adapter options in the right pane. This will open the Control PanelNetwork and InternetNetwork Connections window.
- In the new window, right-click the problematic network (Ethernet) and choose Diagnose. This will detect and fix network issues. If the issue can not be fixed, it will tell you more details about the network issue.
Some people report that they received the message “DHCP is not enabled for Ethernet” after running the Windows Network Diagnostics.
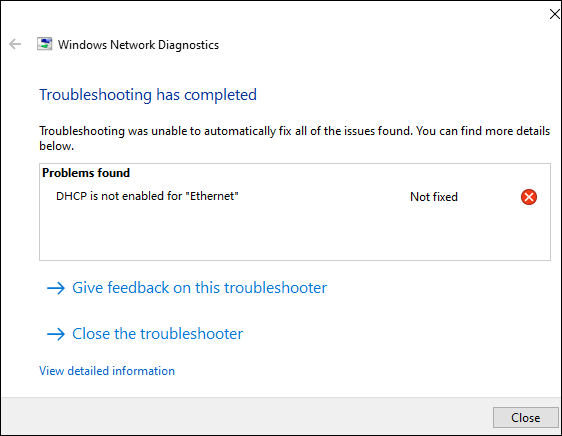
Why does this error occur? Dynamic Host Configuration Protocol (DHCP) is used to automatically assign unique IP addresses to computers attempting to connect to a network. If you have manually assigned your computer an IP address and subnet mask, the DHCP not enabled Windows 10/11 issue will occur.
Of course, other factors may also interfere with DHCP and the resolution is to make it able to assign IP addresses automatically.
5 Ways to DHCP Is Not Enabled for WiFi Windows 10
How to Fix the DHCP Not Enabled for Ethernet Issue
To solve the “DHCP is not enabled for Ethernet” issue, please refer to the following 4 ways.
Way 1. Change Network Properties
- Follow the above steps to open the Control PanelNetwork and InternetNetwork Connections window again.
- Right-click on the problematic network (Ethernet) and choose Properties.
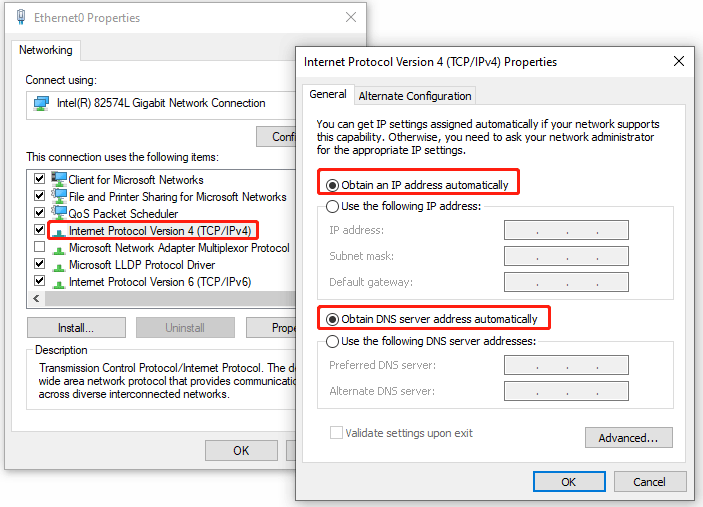
- In the Networking tab, double-click Internet Protocol Version 4 (TCP/IPv4). This will open another window.
- In the new window, select Obtain an IP address automatically and Obtain DNS server address automatically.
- Click the OK button to save change and exit. Then, restart your PC and connect to the network to see if the problem is solved.
How To Enable DHCP Or Change TCP/IP Settings In Windows 11/10
Way 2. Make Sure the DHCP Client Service Is Enabled
- Press Windows key + R to open the Run box.
- In the Run box, type “msc” and press Enter to open the Services tool.
- Scroll down to find the entry of DHCP Client. If it is not running, please right-click it and choose Properties. Set the Startup type as Automatic. Click the Start button to run it. Then, click the Apply and OK buttons the save changes.
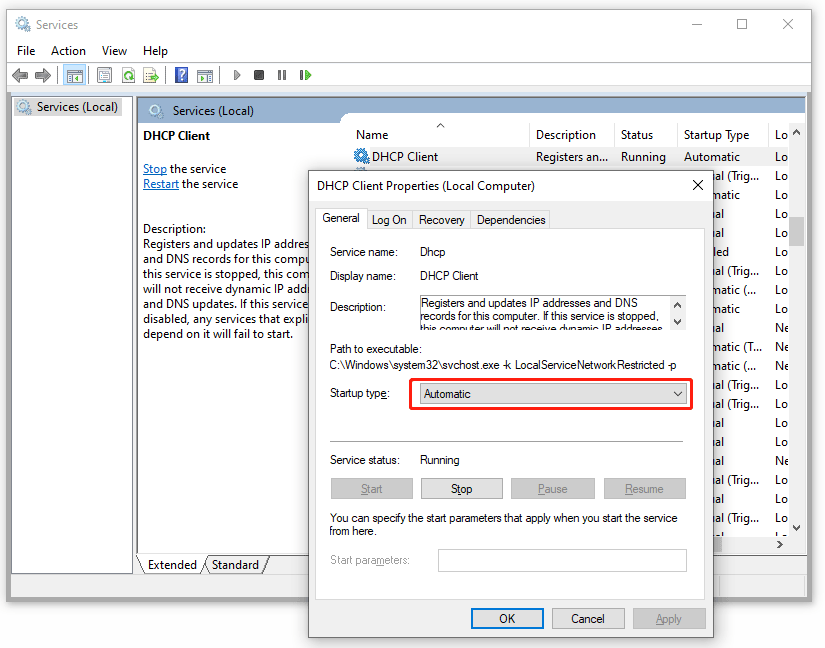
Way 3. Reset Network Configurations
- Type “cmd” in the Windows search bar. Right-click Command Prompt and choose Run as administrator.
- In the Command Prompt window, execute the command ipconfig /flushdns and the command ipconfig /renew one by one.
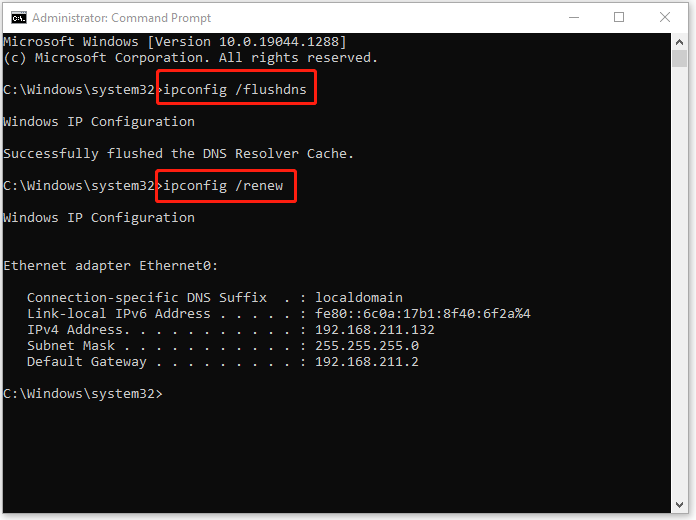
Fix: Unable to Contact your DHCP Server Error — 3 Useful Methods
Way 4. Reset the Router
If you are using a home network with your router acting as your DHCP server, the DHCP not enabled issue may be caused by router errors. In this case, you may need to enable DHCP on the router admin page. The specific steps may vary and please search them online.
About The Author

Position: Columnist
Author Linda has been working as an editor at MiniTool for 1 year. As a fresh man in IT field, she is curious about computer knowledge and learns it crazily. Maybe due to this point, her articles are simple and easy to understand. Even people who do not understand computer can gain something.
By the way, her special focuses are data recovery, partition management, disk clone, and OS migration.
-
Partition Wizard
-
Partition Manager
- 4 Ways to Fix “DHCP Is Not Enabled for Ethernet” Error
By Linda | Follow |
Last Updated March 04, 2022
Have you received the message “DHCP is not enabled for Ethernet” after running Windows Network Diagnostics? This post from MiniTool Partition Wizard offers you 4 ways to fix this issue.
DHCP Is Not Enabled for Ethernet
Sometimes, your PC may disconnect from the network. In this case, you may want to diagnose the network. The process is as follows:
- Right-click on the network icon in the lower right corner of the Windows screen and choose Open Network & Internet settings.
- In the newly-opened window, click Change adapter options in the right pane. This will open the Control PanelNetwork and InternetNetwork Connections window.
- In the new window, right-click the problematic network (Ethernet) and choose Diagnose. This will detect and fix network issues. If the issue can not be fixed, it will tell you more details about the network issue.
Some people report that they received the message “DHCP is not enabled for Ethernet” after running the Windows Network Diagnostics.
Why does this error occur? Dynamic Host Configuration Protocol (DHCP) is used to automatically assign unique IP addresses to computers attempting to connect to a network. If you have manually assigned your computer an IP address and subnet mask, the DHCP not enabled Windows 10/11 issue will occur.
Of course, other factors may also interfere with DHCP and the resolution is to make it able to assign IP addresses automatically.
5 Ways to DHCP Is Not Enabled for WiFi Windows 10
How to Fix the DHCP Not Enabled for Ethernet Issue
To solve the “DHCP is not enabled for Ethernet” issue, please refer to the following 4 ways.
Way 1. Change Network Properties
- Follow the above steps to open the Control PanelNetwork and InternetNetwork Connections window again.
- Right-click on the problematic network (Ethernet) and choose Properties.
- In the Networking tab, double-click Internet Protocol Version 4 (TCP/IPv4). This will open another window.
- In the new window, select Obtain an IP address automatically and Obtain DNS server address automatically.
- Click the OK button to save change and exit. Then, restart your PC and connect to the network to see if the problem is solved.
How To Enable DHCP Or Change TCP/IP Settings In Windows 11/10
Way 2. Make Sure the DHCP Client Service Is Enabled
- Press Windows key + R to open the Run box.
- In the Run box, type “msc” and press Enter to open the Services tool.
- Scroll down to find the entry of DHCP Client. If it is not running, please right-click it and choose Properties. Set the Startup type as Automatic. Click the Start button to run it. Then, click the Apply and OK buttons the save changes.
Way 3. Reset Network Configurations
- Type “cmd” in the Windows search bar. Right-click Command Prompt and choose Run as administrator.
- In the Command Prompt window, execute the command ipconfig /flushdns and the command ipconfig /renew one by one.
Fix: Unable to Contact your DHCP Server Error — 3 Useful Methods
Way 4. Reset the Router
If you are using a home network with your router acting as your DHCP server, the DHCP not enabled issue may be caused by router errors. In this case, you may need to enable DHCP on the router admin page. The specific steps may vary and please search them online.
About The Author
Position: Columnist
Author Linda has been working as an editor at MiniTool for 1 year. As a fresh man in IT field, she is curious about computer knowledge and learns it crazily. Maybe due to this point, her articles are simple and easy to understand. Even people who do not understand computer can gain something.
By the way, her special focuses are data recovery, partition management, disk clone, and OS migration.
Enabling DHCP Client service can help resolve the issue
by Vlad Turiceanu
Passionate about technology, Windows, and everything that has a power button, he spent most of his time developing new skills and learning more about the tech world. Coming… read more
Published on December 21, 2022
Reviewed by
Alex Serban

After moving away from the corporate work-style, Alex has found rewards in a lifestyle of constant analysis, team coordination and pestering his colleagues. Holding an MCSA Windows Server… read more
- Dynamic Host Configuration Protocol (DHCP) is a network protocol that allocates IP addresses to different devices across a network.
- This error might appear if your network driver is not updated or your router is not working correctly.
- Here we will discuss five expert-recommended steps to resolve the DHCP not enabled issue.
XINSTALL BY CLICKING THE DOWNLOAD FILE
This software will repair common computer errors, protect you from file loss, malware, hardware failure and optimize your PC for maximum performance. Fix PC issues and remove viruses now in 3 easy steps:
- Download Restoro PC Repair Tool that comes with Patented Technologies (patent available here).
- Click Start Scan to find Windows issues that could be causing PC problems.
- Click Repair All to fix issues affecting your computer’s security and performance
- Restoro has been downloaded by 0 readers this month.
If you are stuck with a DHCP not enabled for ethernet warning message on the Network troubleshooter window, your DHCP server cannot assign an IP address. No matter how complex that sounds, the fixes to the problem are relatively simple.
In this guide, we will walk you through some troubleshooting steps to resolve this error right after discussing the reasons for the issue’s occurrence.
What does the DHCP is not enabled for ethernet error mean?
The DHCP is not enabled for ethernet means the device using the connection can’t receive an IP address or network configuration information from a DHCP server. Also, this will stop your device from communicating with other devices on the network.
There could be various reasons for this error, but we have mentioned some of the popular ones here:
- The DHCP server is not working – If the DHCP is not configured or not functioning correctly, the ethernet connection won’t be able to receive an IP address or other configuration data from the DHCP server.
- Ethernet device is not configured to use DHCP – If your device is set to use a static IP address or DHCP is disabled in its network settings, you might get this issue.
- Ethernet cable/Device is faulty – If your ethernet cable or device is physically damaged, it might not be able to work correctly, hence the chances of getting the error.
- Network configured to use a different IP address method – If your network is configured to use static IP or IPv6, your ethernet will not receive an IP address from the DHCP server.
How do I fix DHCP not enabled for ethernet?
Some PC issues are hard to tackle, especially when it comes to corrupted repositories or missing Windows files. If you are having troubles fixing an error, your system may be partially broken.
We recommend installing Restoro, a tool that will scan your machine and identify what the fault is.
Click here to download and start repairing.
Perform the following preparatory checks to ensure that the warning message is not a result of fundamental issues which may require only subtle tweaks:
- Restart your PC.
- Restart your router.
- Check updates for Windows.
- Uninstall any new software installed.
- Disable the use of a proxy server option.
- Remove extensions related to the network from browsers.
If these steps are not able to fix the issue, then proceed with the detailed troubleshooting steps mentioned below:
1. Enable the Obtain an IP address and DNS server automatically option
- Press Windows + R to open the Run window.
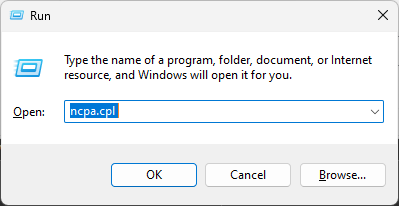
- Type ncpa.cpl and hit Enter to open Network Connections.
- Go to active connection, right-click it, and select Properties from the context menu.
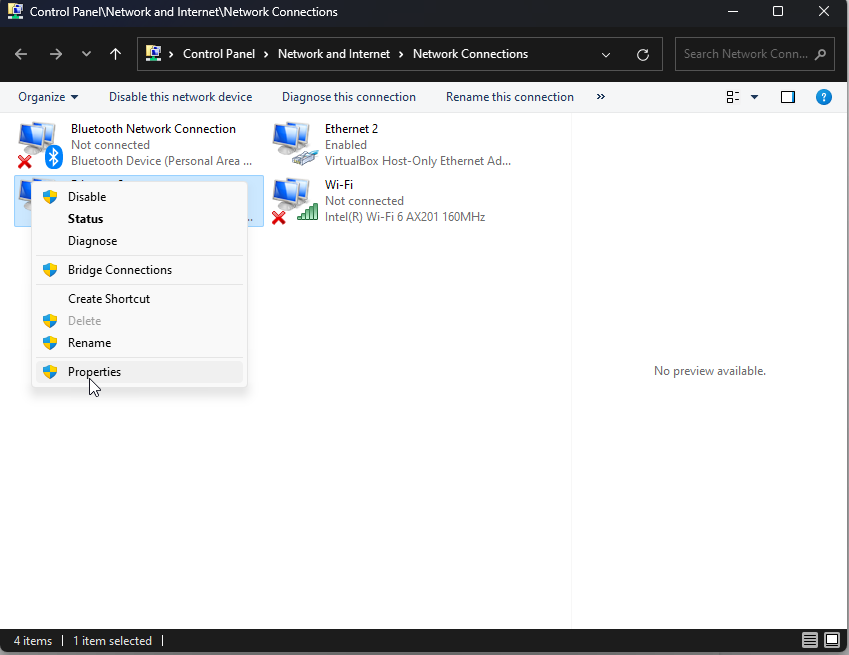
- From This connection uses the following items option, locate and double-click Internet Protocol Version 4 (TCP/IPv4).
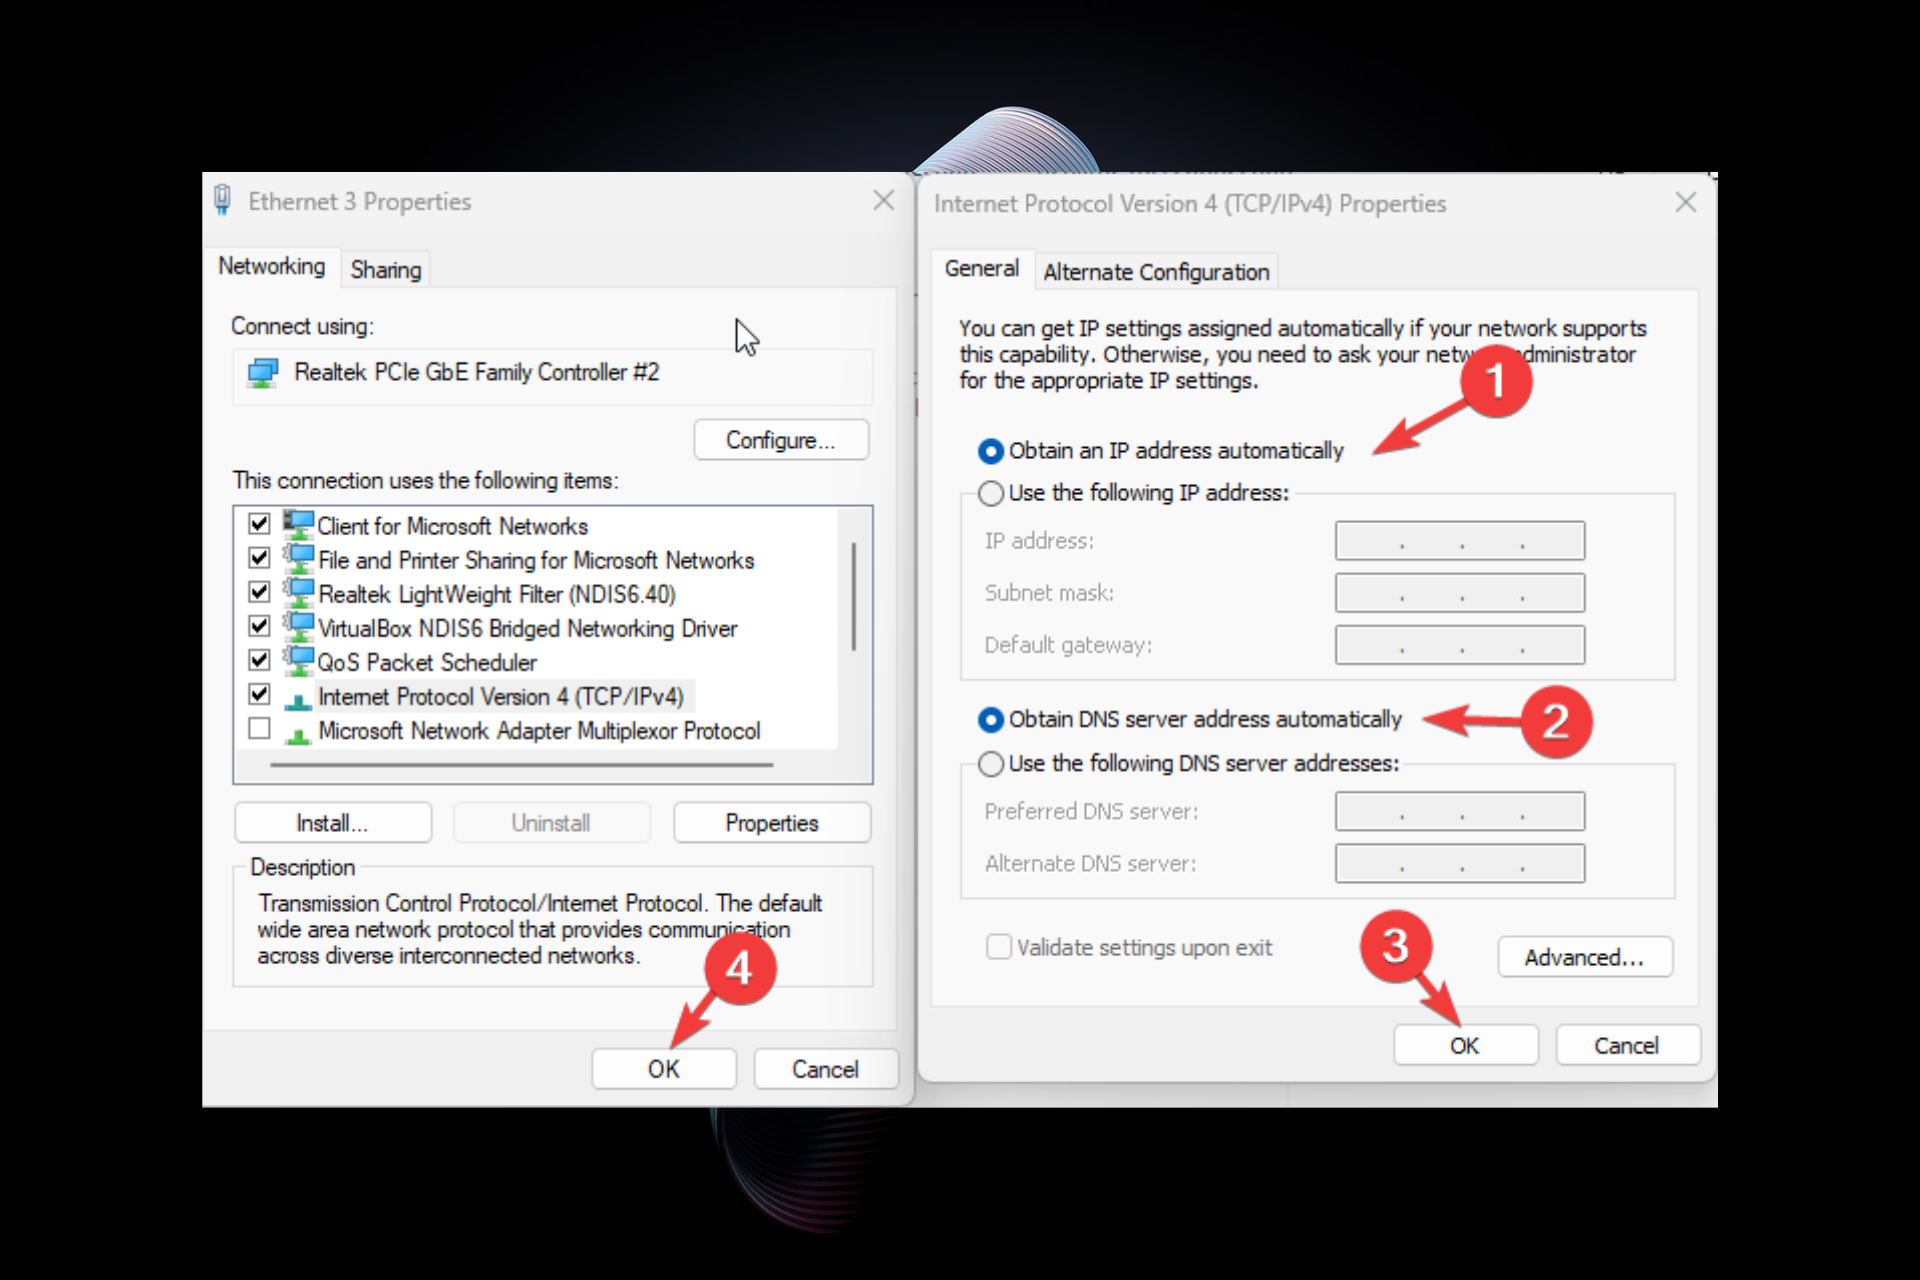
- From the next window, click on the radio buttons beside Obtain an IP address automatically and Obtain DNS server address automatically.
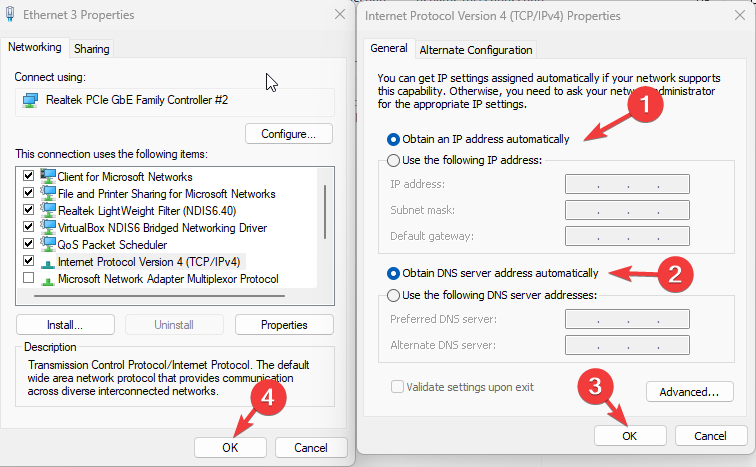
- Click OK and then click OK.
2. Use the Command Prompt
2.1 Enable DHCP
- Press the Windows key, type CMD, and click Run as administrator.
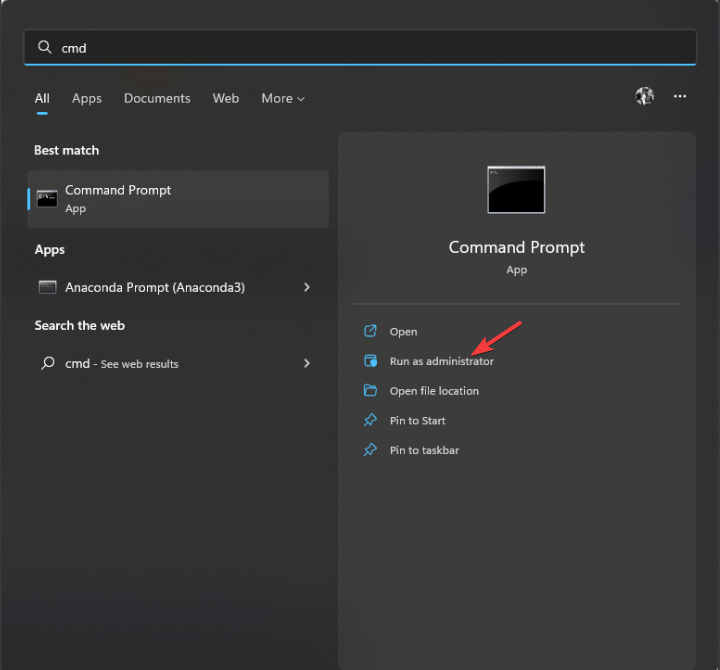
- Type the following command and press Enter:
Netsh Interface IP Set Address "Ethernet" DHCP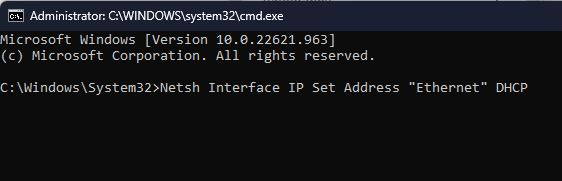
- Once the process is complete, close the window. Restart your PC.
2.2 Reset the network
- Press the Windows key, type CMD and click Run as administrator.
- Copy and paste the following commands and press Enter after every command:
ipconfig/release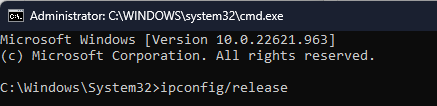
ipconfig/flushdns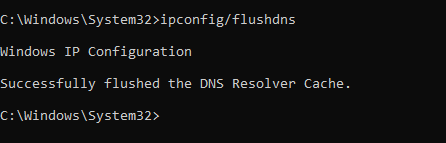
ipconfig/renew - Type the following commands and press Enter after every command:
netsh int ip resetnetsh winsock reset - Close the window and restart your PC.
3. Restart the DHCP Client service
- Press Windows + R to open the Run window.
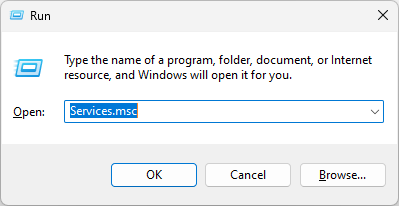
- Type services.msc and hit Enter to open Services.
- Locate and double-click the DHCP client.
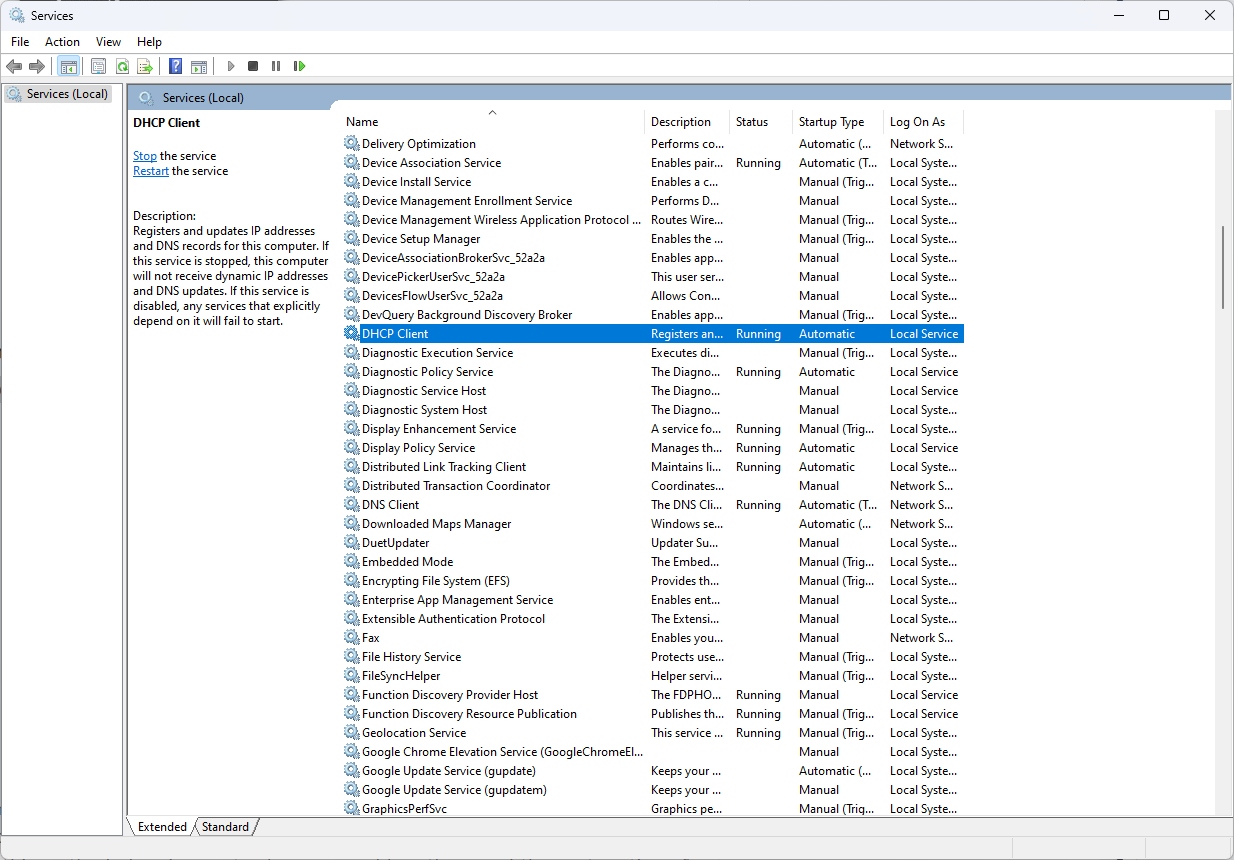
- Go to Startup type, and select Automatic.
- For Service status, click Start.
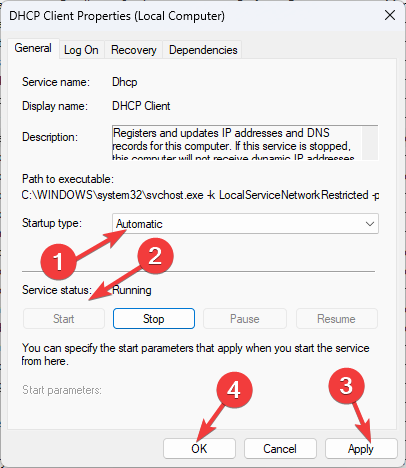
- Click Apply and OK.
- PC did not Start Correctly on Windows 10: Why & How to Fix
- Fix: Sorry we are Having Temporary Server Issues in Office
- How to Find Wi-Fi Password on Chromebook
- How to Create Or Change A Custom Paper Size in Windows 11?
- How to Check Listening Ports With Netstat
4. Enable DHCP via router
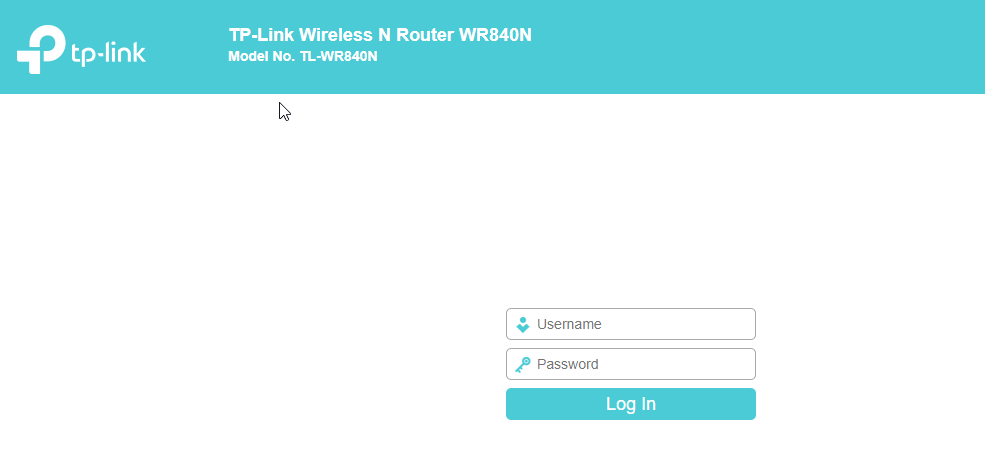
- Launch your preferred browser and go to your router settings page. Here we have used the TP-Link router settings to show you the process.
- Enter your credentials to access router settings.
- From the left pane, click DHCP.
- Now select the radio button beside the Enabled option for the DHCP server.
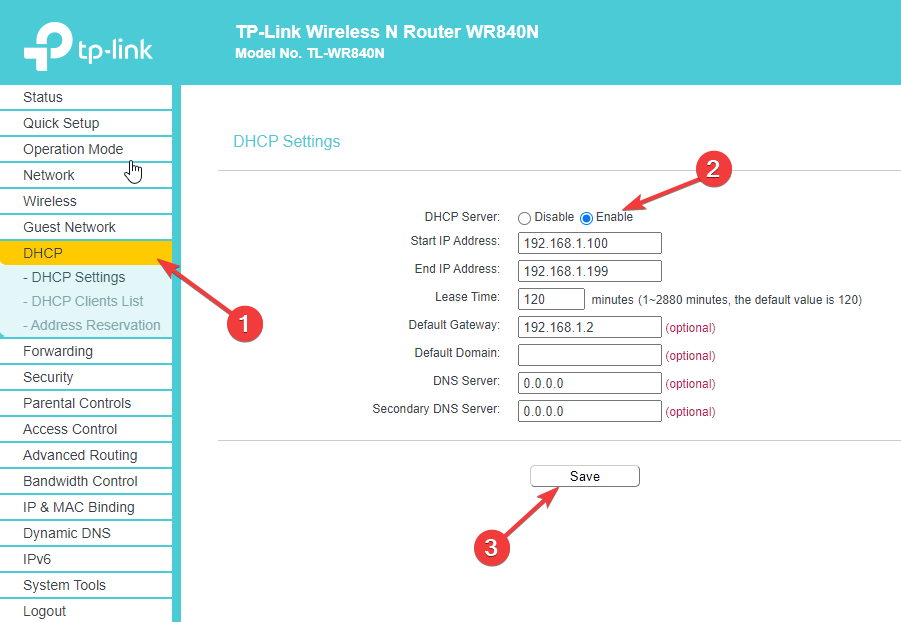
- Click Save or OK as per your router.
- Restart your modem.
5. Update the Network driver
- Press Windows + R to open the Run window.
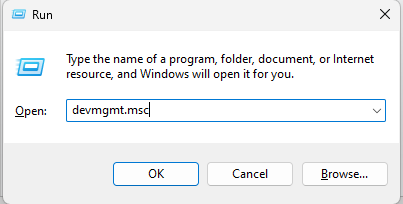
- Type devmgmt.msc and hit Enter to press Device Manager.
- Click on the arrow next to Network adapters to expand.
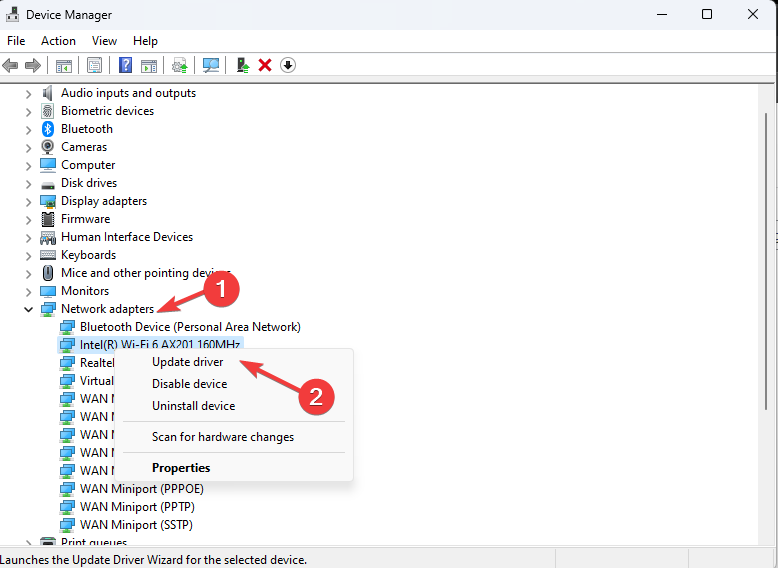
- Right-click the Network adapter and click Update driver.
- On the next window, click Search automatically for drivers.
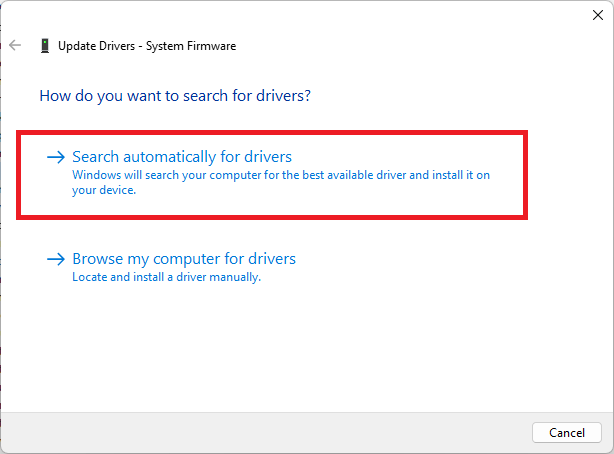
- Follow on-screen prompts to complete the process.
- Restart your PC.
Other than updating your drivers manually, you can use a specialized tool like DriverFix that can do that automatically by scanning your PC for outdated drivers and replacing them with the latest options.

DriverFix
Let DriverFix find the best driver updates and improve your PC’s performance.
So, these steps to resolve the DHCP is not enabled for ethernet error. Try them, and feel free to let us know which worked for you in the comments section below.
Still having issues? Fix them with this tool:
SPONSORED
If the advices above haven’t solved your issue, your PC may experience deeper Windows problems. We recommend downloading this PC Repair tool (rated Great on TrustPilot.com) to easily address them. After installation, simply click the Start Scan button and then press on Repair All.