При попытке играть в Destiny 2, как и в другие онлайн-игры, вы можете столкнуться с различными ошибками и ошибками. Иногда вы можете столкнуться с проблемами с задержкой, а в других случаях вы вообще не сможете войти в игру. Одной из них является код ошибки Marmot, который не позволяет вам войти в Destiny 2, что может быть довольно неприятно, особенно после выпуска DLC The Witch Queen, когда у вас есть масса нового контента для изучения.
К счастью, Bungie официально предоставила решение этой проблемы, и вот как исправить код ошибки Marmot в Destiny 2.
Содержание
- Исправление кода ошибки Destiny 2 Marmot
- Steam
- Microsoft Store
- Консоли
- PlayStation 4 и 5
- Xbox One и Series X/S

Согласно Bungie, код ошибки Marmot появляется, когда файлы Destiny 2 повреждены или нуждаются в восстановлении или проверке. В этом случае вам придется восстановить игру, выполнив следующие шаги в зависимости от используемой вами платформы. Убедитесь, что вы закрыли Destiny 2, прежде чем приступить к исправлениям.
Steam
- Go в библиотеку Steam и вправо щелкните Destiny 2.
- Нажмите «Свойства», а затем перейдите на вкладку «Локальные файлы».
- Выберите параметр Проверить целостность игровых файлов, и он начнет проверку/восстановление игровых файлов.
- После этого вы можете начать играть в Destiny 2.
Если проблема не решается для вас, вам придется удалить все локальные файлы, кроме папки packages, щелкнув параметр «Браузер» на вкладке «Локальные файлы». Затем вам нужно будет выполнить остальные шаги, прежде чем войти в игру.
Microsoft Store
- Перейдите в настройки Windows на своем ПК.
- Перейдите в «Дополнительные параметры» и нажмите «Восстановить».
- Перезапустите Destiny 2 и войдите в свою учетную запись.
Открыть приложения & Особенности и выберите Destiny 2.

Консоли
- Первое, что вам нужно сделать, это очистить кэш консоли.
- Вы можете сделать это, выключив ее, отсоединив шнур питания и дав ей оставайтесь отключенными не менее пяти минут.
- Перезапустите консоль и откройте Destiny 2.
Если код ошибки Marmot по-прежнему не позволяет вам играть в игру, попробуйте выполнить следующие действия.
PlayStation 4 и 5
- Запустите PlayStation в безопасном режиме, удерживая кнопку питания, пока консоль не выключится.
- Затем снова удерживайте кнопку питания около семи секунд.
- Отпустите кнопку, как только консоль издаст двойной звуковой сигнал, и подключите контроллер к консоли. с помощью USB-кабеля.
- Затем выберите параметр «Перестроить базу данных», чтобы сохранить ваши файлы в безопасности, так как другие могут удалить их все.
- Ваш жесткий диск будет просканирован на наличие различных проблем, включая поврежденные файлы.
- После этого снова запустите консоль и откройте Destiny 2.
Xbox One и Series X/S
- Нажмите кнопку Xbox на контроллере и откройте «Настройки».
- Выберите параметр Blue-ray, а затем — «Постоянное хранилище».
- Нажмите «Очистить постоянное хранилище», а затем перезапустите Destiny 2.
Если ни одно из приведенных выше исправлений не приводит к исчезновению кода ошибки Marmot, попробуйте удалить, а затем переустановить Destiny 2. .


Код ошибки Marmot в Destiny 2 появляется только тогда, когда вы играете в версию игры для ПК. Обычно это тесно связано с большими обновлениями и расширениями. Это связано с тем, что всякий раз, когда вы обновляете Destiny 2, некоторые файлы перезаписываются, а другие устаревают, но остаются нетронутыми. И это может вызвать конфликты.
Вот почему самый безопасный способ избежать ошибки Marmot Error в Destiny 2 — всегда выполнять новую установку Destiny 2 на свой компьютер всякий раз, когда появляется большое обновление, которое может испортить ваши локальные файлы. Очистка реестра Windows также является хорошей практикой, если вы хотите избежать конфликтов.
Тем не менее, как бы вы ни были осторожны, иногда ваши файлы Destiny 2 просто повреждаются, и именно тогда вы обычно получаете ошибку Marmot Error. Когда это происходит, это означает, что вам необходимо восстановить и/или проверить игровые файлы Destiny 2 . Вот что вам нужно сделать:
- Закрыть Судьба 2
- Щелкните правой кнопкой мыши Destiny 2 в вашей библиотеке Steam.
- Выберите «Свойства»
- Перейдите в «Локальные файлы»
- Выберите «Проверить целостность файлов игры» и дождитесь окончания.
- Перезагрузите компьютер
- Откройте Destiny 2 и посмотрите, сохраняется ли ошибка.
Если это не помогает и Destiny 2 по-прежнему получает ту же ошибку, проблема может быть серьезнее, чем может решить проверка целостности файлов Steam. В этом случае лучшее, что вы можете сделать, это полностью отключить Destiny 2, удалить все записи реестра о Destiny 2 (используя что-то вроде CCleaner) и перезагрузить компьютер. После этого установите новую копию Destiny 2, и проблем быть не должно. Если даже этого было недостаточно, чтобы исправить ошибку, то мы советуем вам обратиться в службу поддержки Bungie и объяснить проблему.
Players of Destiny 2 are currently encountering an error that is preventing them from accessing the game or logging in. Some players are experiencing this issue and have been unable to resolve it.
JOIN @mrhack membership! Tap JOIN b…
Please enable JavaScript
Many players are frustrated with the current error in Destiny 2, which is causing difficulty in accessing the game or logging in. Despite seeking help on Reddit, some players have been unable to find a solution for the error.
Don’t worry about it!
The CPU Guide brings you the best working solution to solve Destiny 2 Error Code Marmot.
![Destiny 2 Error Code Marmot [Super Guide]](https://www.thecpuguide.com/wp-content/uploads/2022/07/Destiny-2-Error-Code-Marmot-1-1-1024x1024.png "Destiny 2 Error Code Marmot [Super Guide] 2")
Solution 1: Restart the Game
Whenever you encounter Destiny 2 Error Code Marmot and any game bug, you should restart the game before trying any further solutions.
Restarting the game will eliminate any temporary error occurring because of the old cookies and cache or the system’s other software clashing with your gaming software.
All of these errors will be eradicated after a simple restart of the game/PC or any other platform you use.
Read More: Destiny 2 Keeps Crashing? Freezing PC
Solution 2: Check the Server Status
Sometimes the Destiny servers are down for maintenance or having technical issues and this leads to Destiny 2 Error Code Marmot.
So, it is better to check the server status before applying any further solutions.
To check the server status of the Destiny 2 game, follow the steps mentioned down below:
- Go to the help.bungie.net
- Here you can check the server status if the server is down for maintenance they will let you know on this page.
- Similarly when the server is down from the technical issue here the server status will be updated.
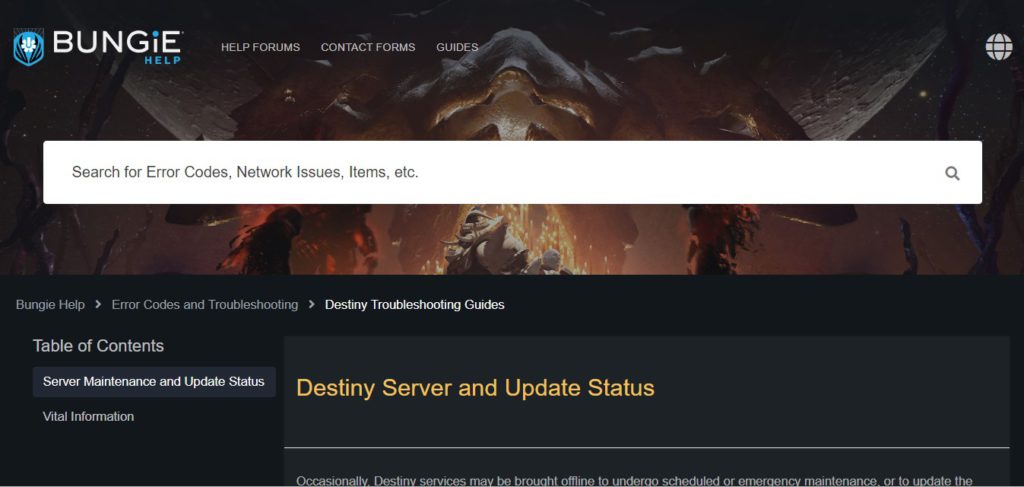
Now if the Destiny 2 server is working fine then most probably there is an issue from your side.
Follow the upcoming solutions to troubleshoot your PC to Fix Bungie Error Code Marmot.
Read More: Top Games You Should Play If You Like Destiny 2
Solution 3: Close Unwanted Programs on Windows 11/10
If there are too many programs running in the background, using too much internet/RAM/Disk can cause the “Error code Marmot Destiny 2” on Windows 11.
Closing unwanted programs will help you eliminate the Destiny 2 Error Code Marmot.
So, let’s close unwanted programs:
- Press Ctrl + Shift + ESC keys to open Task Manager
- Now check which program is using more Network
- Right-click on that program and select End task
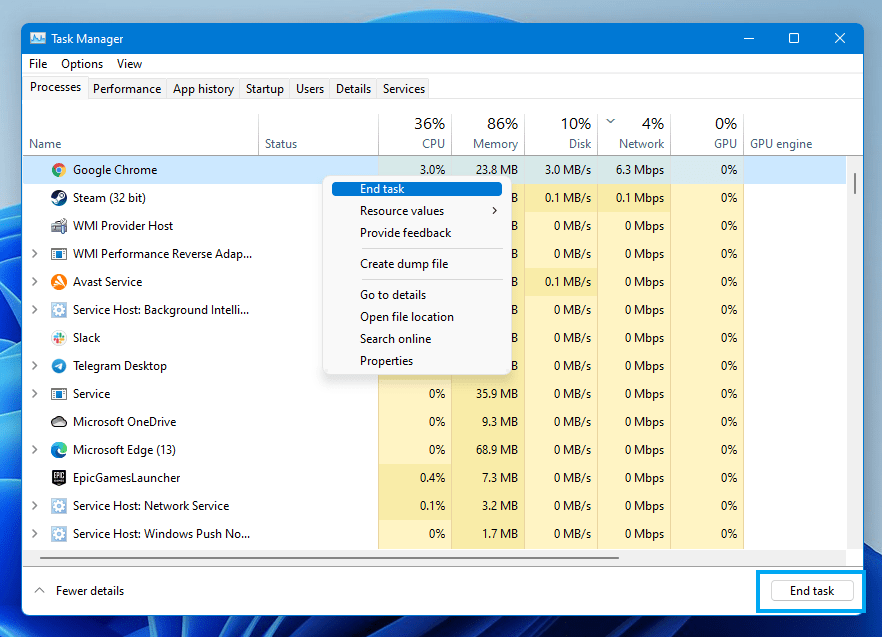
- And check if the “Destiny 2 Error Code Marmot” is solved or not.
Read More: The Guide to Quick Leveling in Destiny 2
Solution 4: Power Cycle Your Router
If the above solution didn’t work then this solution will work and provide a better internet connection which will help you solve the Destiny 2 Error code Marmot.
All you need to do is follow these steps:
- Turn off your router completely by taking out the power cable from the power switch.
- Now leave it for 5 to 10 minutes and then plug it back in.
- And check if the Wi-Fi is visible to you or not.
Make sure you restart those devices which are affected in the process for an accurate fix.
Best Routers To Buy
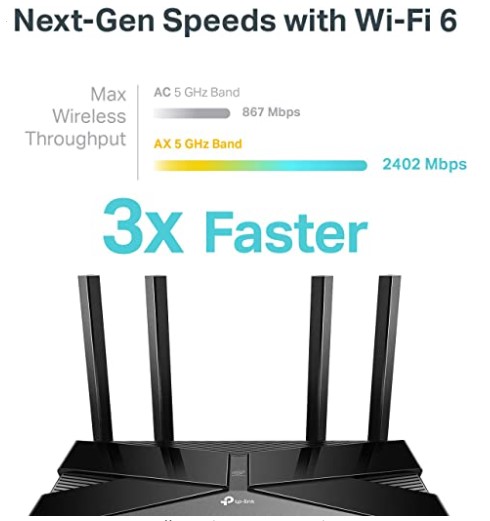
Budget Router
TP-Link WiFi 6 AX3000 Smart WiFi Router
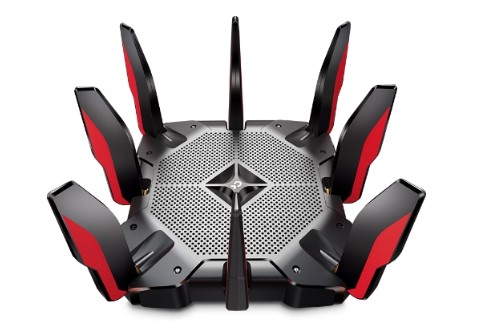
Super Router
TP-Link Archer AX11000 Tri-Band Wi-Fi 6 Router
After power cycling your router it is better to Update your Wi-Fi drivers to avoid any error code Marmot Destiny 2.
Solution 5: Update Wi-Fi Drivers through Device Manager
If you use the Wi-Fi Modem and you don’t update the Wi-Fi drivers in a long time then it’s time to update the Wi-Fi drivers to have uninterrupted internet to avoid error code Marmot Destiny 2.
- Click on the Search icon
- Type Device Manager
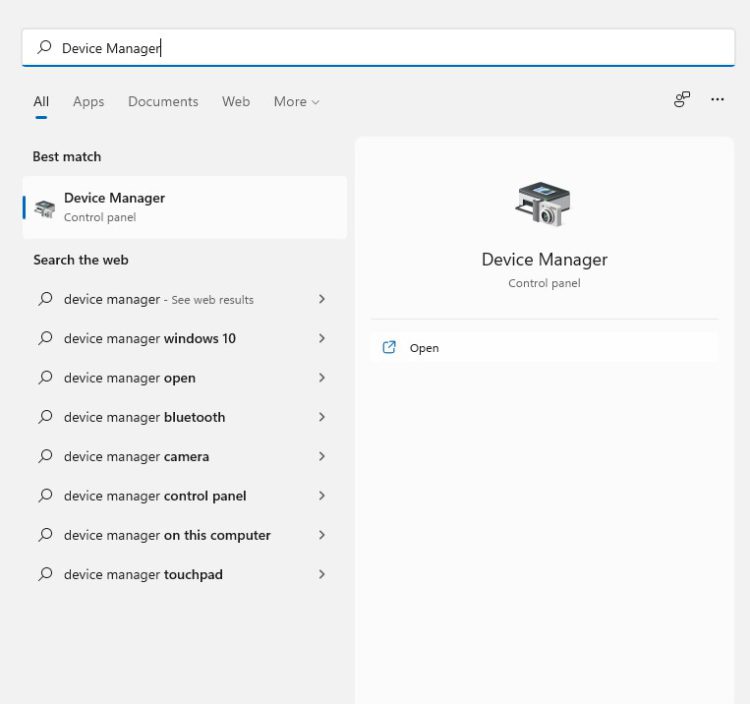
- Click to open the device manager
- Then select the Network adapter
- A further menu will open
- Find your Wi-Fi drivers
- Click right on the Wi-Fi card name
- Click on the updated driver
- Now a new window will open
- Select “Search automatically for drivers“
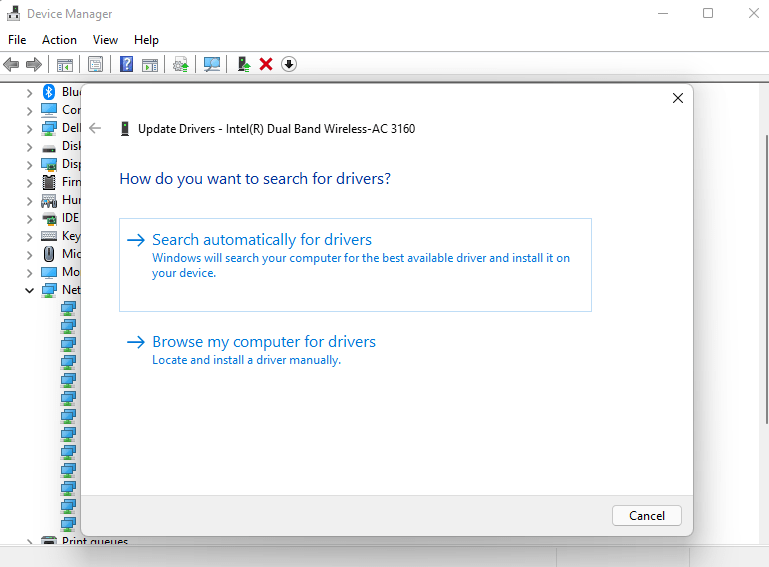
- If you want to install some other driver on your Wi-Fi then
- Select “Browse my computer for drivers“
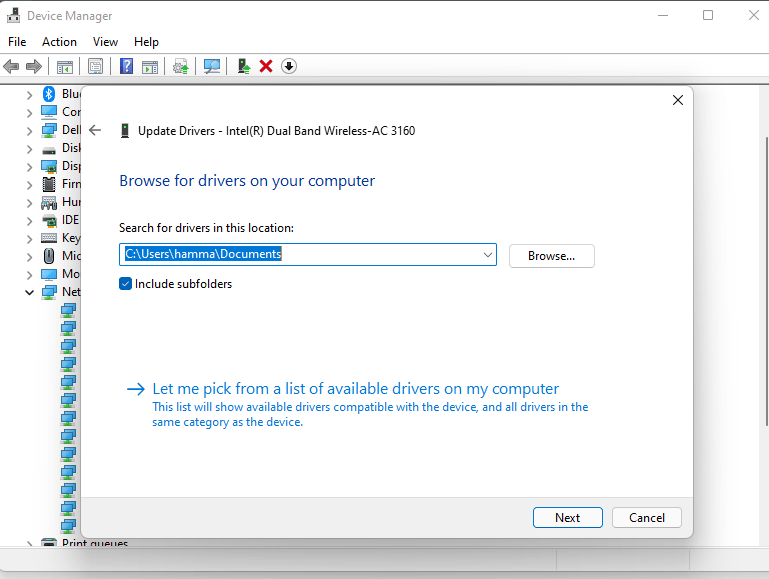
- And then go to the path where you download the new drivers.
After updating the drivers let’s verify the game files on steam.
Solution 6: Verify the Game Files
Sometimes the game file will get corrupted or get deleted, which eventually causes the Error Code Marmot.
Verify the Game File in Steam
Follow the steps to verify the game file on steam software:
- Launch the Steam Software
- Now login in the steam
- Navigate to the library
- Select the game and right-click on the game
- Now select properties
- Now click on the “Local file” Option
- A further menu will open
- Click on the “Verify Integrity of the Game Cache“
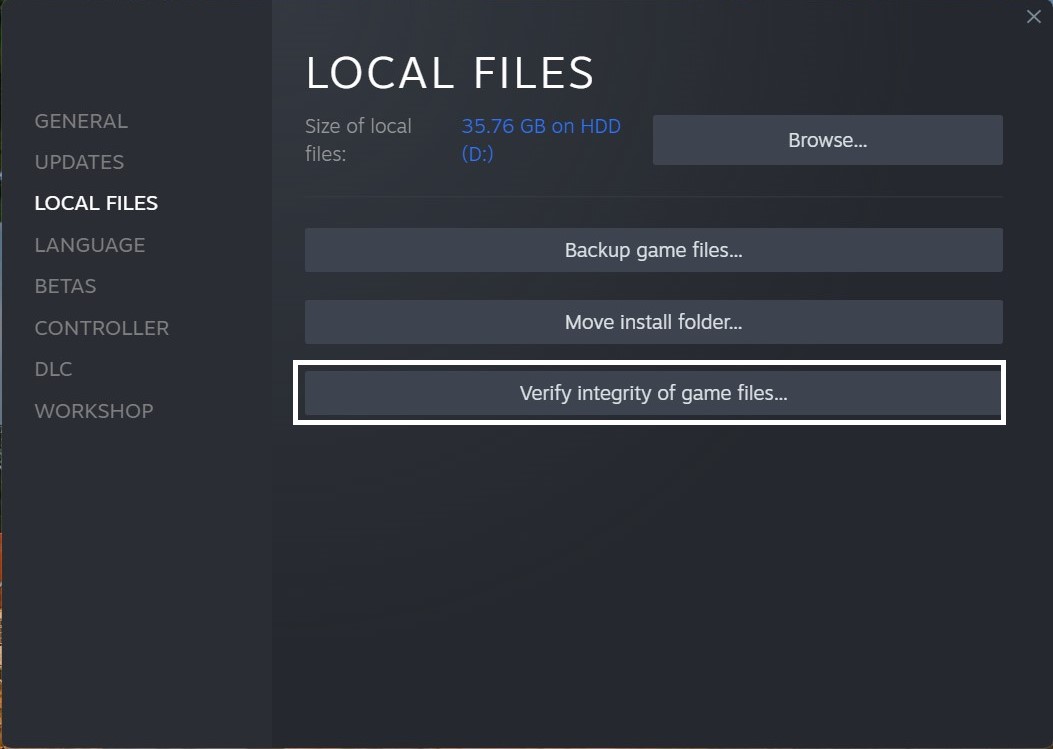
- Now the software is verifying the files, and this will take some time.
Sometimes the game file will get corrupted or get deleted which eventually causes the Error Code Marmot on PC.
After updating the drivers sometimes the inappropriate DNS cache is causing errors while you gaming to fix this follow the next solution.
Solution 7: Clear DNS Cache and Data
Is it OK to clear the DNS cache?
Clearing the DNS cache removes all the entries and forces your computer to repopulate those addresses the next time you try accessing those websites. This won’t affect performance and eliminate Error Code Marmot on Destiny 2.
How do I reset my DNS settings? How do I clear my DNS cache?
- Click on the Windows start icon in the bottom left corner.
- Then press Windows key + R.
- The Run box will appear.
- Type cmd, and click on OK.
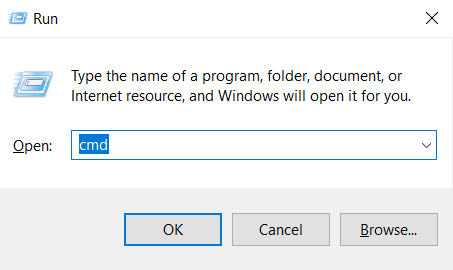
- Then on the cmd window, enter the following commands: (Note: Type the following commands, and hit Enter after every command)
- “ipconfig/flushdns”
- “ipconfig/registerdns”
- “ipconfig/release”
- “ipconfig/renew”

Now after clearing the DNS Cache and Data it’s time to set your DNS settings automatically on your PC/laptop to fix the Error code Marmot Destiny 2.
Solution 8: Setting your DNS to Automatic on Windows
To fix “Destiny 2 Error Code Marmot”, we suggest setting your DNS automatically.
Here is you can set DNS on Automatic:
- Press Windows key + R.
- Then type ncpa.cpl and click OK.
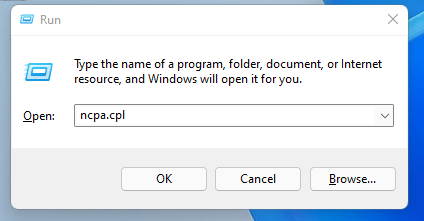
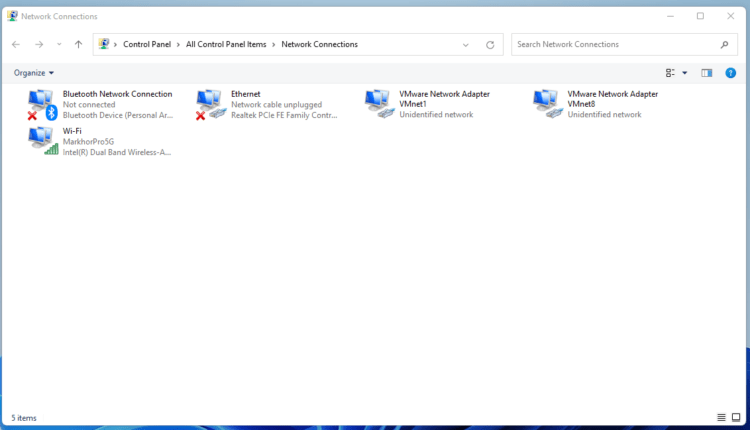
- In the internet connection, right-click on Ethernet and choose properties.
- In the properties window, choose Internet Protocol Version 4 (TCP/IPv4) or Internet Protocol Version 6 (TCP/IPv6)
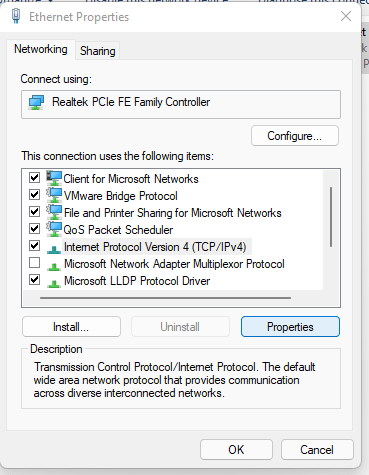
- Click the Properties button
- Now choose the options “Obtain IP address automatically” and “Obtain DNS server automatically”
- Click OK.
If you already using the automatic DNS settings, then you should try the Google DNS manually.
Solution 9: Use DNS manually or Google’s DNS
Here is how you can set Google’s DNS in Windows 11:
- Press Windows key + R.
- Then type ncpa.cpl and click OK.
- In an internet connection, right-click on Ethernet and choose properties.
- In the properties, the window chooses Internet Protocol Version 4 (TCP/IPv4) or Internet Protocol Version 6 (TCP/IPv6)
- Click the Properties button.
- Now write 8.8.8.8 in the box next to ‘Preferred DNS server
- And then write 8.8.4.4 next to the ‘Alternative DNS server
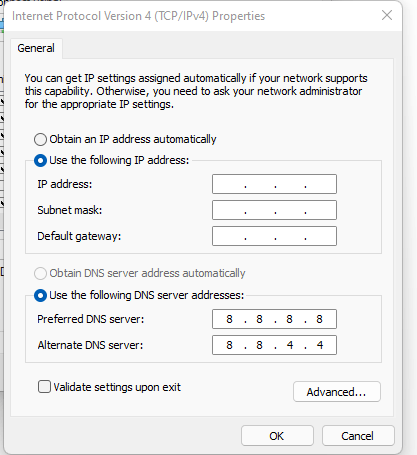
Hope this will help you to fix the Bungie Error code Marmot if not then move on to the next solution.
Solution 10: Switch to a More Reliable VPN
Free VPN did not allow you to stream at full speed they set a limit to the free version which is not a very useful speed for working or gaming.
The premium VPN helps the players to achieve an uninterrupted gaming experience and will not compromise the FPS and ping of the game.
For your convince, I am listing down some most reliable plus they are working with other users without having any Destiny 2 Error code Marmot.
DISCOUNTED VPNS FOR THE CPU GUIDE READERS
- Nord VPN

- Vpyrvpn

- Express VPN

- Avast Secure Line

- Zenmate

Hope the above Solutions help you eradicate the Destiny 2 Error code Marmot.
If you have any queries or suggestions, feel free to share your experience with us in the comments section down below or you can reach us on our social handles.
FAQs
How do I fix error code Marmot Destiny 2?
Here is how you can fix Error Code Marmot Destiny following the upcoming solutions.
1. Restart the Game
2. Check the Server Status
3. Close Unwanted Programs on Windows 11/10
4. Power Cycle Your Router
5. Update Wi-Fi Drivers through Device Manager
Why do I keep getting Destiny error 2?
This might happen due to multiple factors but most of the players experience errors on Destiny 2 due to bad connectivity.

Фанаты долгождали дополнение Сезон of the Plunder. В последнем обновлении представлено множество функций, в том числе новые расы, персонажи и новая карта.
Однако многие игроки сталкиваются с проблемами при использовании нового расширения из-за ошибки «Bungie Marmot», из-за которой они не могут открыть игру. .
Эта ошибка обычно возникает, когда Destiny 2 не может правильно установить новое обновление, а один или несколько файлов в каталоге повреждены. Код ошибки «Bungie Marmot» — довольно неприятная проблема, и у нее никогда не бывает быстрого решения.
Сегодняшнее руководство расскажет о некоторых вещах, которые необходимо сделать игрокам, чтобы решить проблему с «Bungie Marmot» в Destiny 2 Сезон of the Plunder.
Возможные исправления кода ошибки «Bungie Marmot» в Destiny 2 Сезон of the Plunder
Код ошибки «Bungie Marmot» в Destiny 2 Сезон of the Plunder, похоже, повлиял на название на всех основных платформах. Игроки на PS4, PS5, ПК и Xbox One, а также на Xbox Series столкнулись с этой проблемой, что делает ее чрезвычайно раздражающей.
Как уже упоминалось, ошибка обычно возникает, когда обновленные файлы в каталоге, похоже, были повреждены в процессе исправления. Следовательно, чтобы исправить это, вот несколько шагов, которые игроки смогут использовать:
1) Проверка целостности файла игры
Один из самых простых способов справиться с ошибкой «Bungie Marmot» в Destiny 2 — проверить загруженные файлы. после установки исправления.
Игроки могут сделать это, перейдя на страницу игры в Steam, Epic Games Store, PS Store или в клиенте Game Pass. Оказавшись там, поклонники должны перейти в «Свойства» и выбрать параметр «Локальные файлы».
Затем нажмите «Проверить целостность игровых файлов», чтобы начать процесс проверки, в ходе которого клиент сопоставит все файлы в каталоге с заголовком и исправит все поврежденные активы в процессе.
После этого игроки просто будут необходимо перезапустить игру.
2) Переустановка Destiny 2
Если проверка файлов игры не помогает, игроки могут прибегнуть к более крайней мере и переустановить Destiny 2 с нуля. Это также должно быть направлено на устранение проблемы из ядра, и игроки смогут выполнить этот шаг на всех основных платформах, сталкивающихся с ошибкой.
3) Проверьте серверы
Еще одна важная причина, по которой эта проблема может сохраняться у некоторых игроков, связана с простоем сервера игры. Графики технического обслуживания могут часто приводить к этой ошибке для некоторых, и было бы лучше проверить доступность серверов и дождаться, пока они снова подключатся к сети.
4) Создайте тему на справочном форуме
Если игроки по-прежнему не могут решить проблему, то в крайнем случае они могут создать тему на официальном справочном форуме Bungie, чтобы получить дополнительную поддержку. Отчет доведет проблему до сведения разработчиков, и они могут просто активно искать решение проблемы для игрока.
У Destiny 2 дела идут очень хорошо в течение нескольких лет, и недавно выпущенный DLC The Witch Queen теперь доступен для игроков. Хотя для доступа к новому контенту игрокам требуется базовая игра, высока вероятность того, что вы можете столкнуться с многочисленными ошибками или ошибками при попытке войти в игру. Хорошо, Destiny 2 Королева ведьм Код ошибки Marmot — одна из них, и если вы тоже столкнулись с ней, вы можете следовать этому руководству, чтобы решить ее.
Если вы получаете конкретное сообщение об ошибке Marmot, это означает, что установленные файлы игры были повреждены по каким-то неожиданным причинам. Поэтому проверка и восстановление файлов игры на ПК может вам помочь. Принимая во внимание, что удаление и переустановка игры на другом диске также может устранить ошибку Marmot. К счастью, это намного проще, чем мы думаем, и его можно легко исправить вручную. Итак, без лишних слов, давайте приступим к делу.

Содержание страницы
-
Исправлено: Судьба 2 Королева ведьм Код ошибки Сурок
- 1. Восстановить файлы игры
- 2. Попробуйте удалить определенные папки с игрой
- 3. Переустановите игру
- 4. Связаться со службой поддержки Bungie
Исправлено: Судьба 2 Королева ведьм Код ошибки Сурок
Если вы играете в Destiny 2 The Witch Queen на своем ПК через Steam или Microsoft Store, ниже мы предоставили вам несколько возможных обходных путей.
1. Восстановить файлы игры
Здесь мы поделились с вами обоими методами ремонта. Для этого:
Для Steam:
- Закройте игру Destiny 2 Королева ведьм.
- Запуск Пар > Перейти к Библиотека.
- Щелкните правой кнопкой мыши Судьба 2 > Выбрать Характеристики.
- Нажмите на Локальные файлы > Выбрать Проверить целостность игровых файлов…
- Дождитесь завершения процесса, так как это может занять некоторое время.
- Наконец, перезапустите Destiny 2, чтобы проверить наличие проблемы.
Для магазина Майкрософт:
- Закройте Destiny 2 > Нажмите клавиши Win+I, чтобы открыть Настройки.
- Идти к Приложения и функции > Выбрать Судьба 2 из списка игр.
- Теперь выберите Расширенные опции.
- Нажмите на Ремонт и дождитесь завершения процесса.
- Перезапустите Destiny 2 и проверьте наличие проблемы.
2. Попробуйте удалить определенные папки с игрой
Поскольку игроки ПК Destiny 2 The Witch Queen сталкиваются с кодом ошибки Marmot, лучше удалить определенные папки с игрой. Для этого:
- Запуск Пар > Перейти к Библиотека.
- Щелкните правой кнопкой мыши Судьба 2 > Нажмите на Управлять.
- Нажмите на Просмотр локальных файлов > Откроется новое окно со всеми файлами Destiny 2.
- Просто убедитесь, что удалить все кроме папки Packages.
- После этого закройте окно и вернитесь в Steam.
- Теперь снова щелкните правой кнопкой мыши Destiny 2 > нажмите Характеристики.
- Идти к Локальные файлы > Нажмите на Проверка целостности игровых файлов.
- Вам придется дождаться завершения процесса восстановления.
- Наконец, снова проверьте наличие проблемы.
3. Переустановите игру
Попробуйте переустановить игру после полного удаления. Он в основном удаляет все установленные игровые файлы, чтобы убедиться, что на диске нет отсутствующих или поврежденных игровых файлов. Для этого:
Для Steam:
Объявления
- Запустить Steam-клиент на твоем компьютере.
- Теперь иди к Библиотека > Щелкните правой кнопкой мыши на Судьба 2 игра.
- Направляйтесь к Управлять > Выбрать Удалить.
- При появлении запроса нажмите Удалить еще раз и следуйте инструкциям на экране, чтобы завершить процесс удаления.
- После этого обязательно перезагрузите компьютер, чтобы немедленно применить изменения.
- Снова откройте клиент Steam и снова установите игру, используя существующую учетную запись Steam.
Для магазина Майкрософт:
- Нажать на Стартовое меню > Найдите панель управления.
- Открыть Панель управления > Нажмите на Удалить программу.
- Щелкните правой кнопкой мыши Судьба 2 из списка установленных программ.
- Теперь выберите Удалить > Дождитесь полного удаления игры.
- После этого перезагрузите компьютер, чтобы применить изменения> Перейдите в Microsoft Store.
- Найдите Destiny 2 и установите ее снова.
- После установки попробуйте поиграть в игру.
4. Связаться со службой поддержки Bungie
Если ни один из методов не помог вам, вы можете попробовать связаться с Служба поддержки Банги для дальнейшей помощи. Агент поддержки может помочь вам или передать эту проблему разработчикам.
Вот так, ребята. Мы предполагаем, что это руководство было полезным для вас. Для дальнейших запросов, вы можете оставить комментарий ниже.
Объявления

Destiny 2 being always online means that players will run into all sorts of whacky error codes. This can be frustrating when trying to enjoy a game after a long day. Here’s how to fix the MARMOT error code in Destiny 2.
Destiny 2: How to Fix MARMOT Error Code
First off, what is the MARMOT error code?
“This error occurs when the Destiny 2 game files have been corrupted and need to be repaired or verified.”
Bungie has listed step-by-step details for each platform on how to fix the MARMOT error code. So just find your platform below and you can follow the steps to fix the problem. All of this information comes from the official Bungie Help website.
Also, before getting started it’s always important to take a look at Bungie’s server status and see if it is experiencing any problems. This could alleviate any troubleshooting on your end while you wait to see if Bungie fixes it on its end.
Steam
- Close Destiny 2
- Right-click on Destiny 2 in Steam’s Library
- Select “Properties” then “Local Files”
- Select “Verify Integrity of Game Files”
- Restart Destiny 2
If the problem continues, you’re going to have to do an uninstall and clean reinstall of Destiny 2 on Steam.
Consoles
- Go to the console’s home screen and quit out of the Destiny 2 app
- Clear the console cache
- Power down the console
- Once the console is completely powered down, unplug the power cord from the back of the console
- Let the console sit unplugged for at least 5 minutes
- Plug the power cord back into the console and power it on
- Re-launch the Destiny game
- Restart the console
- Restart Destiny 2
If the issues are still persisting on coles, there are more advanced steps that can be taken for PlayStation and Xbox, which we have listed below.
Advanced PS4 and PS5
- Launch the console into Safe Mode by turning by holding down the power button to turn it off
- Once the console is off, press and hold down the power button for seven seconds until it beeps two times, then release the button
- Connect the controller with a USB cable to the console
- Once in Safe Mode, choose “Rebuild Database.” This will not delete any files. This will scan your entire hard drive and fix many issues (such as corruption), leading to faster performance and less of a chance for a game to crash.
Xbox One and Xbox Series X|S
- Go to the console’s home screen and quit out of the Destiny 2 app
- Press the Xbox button on the controller and open Settings
- Under “Devices & connections” select “Blue-ray”
- Select “Persistent Storage”
- Select “Clear persistent storage”
Hopefully, this fixes the MARMOT error code in Destiny 2 for you. If you’re still having trouble with the code you can always submit a support ticket with the team and wait for them to get back to you.
Jesse Vitelli

Jesse loves most games, but he really loves games that he can play together with friends and family. This usually means late nights in Destiny 2 or FFXIV. You can also find him chipping away at his ever-expanding backlog of JRPGS or staring at his massive Amiibo collection.
Image via Bungie
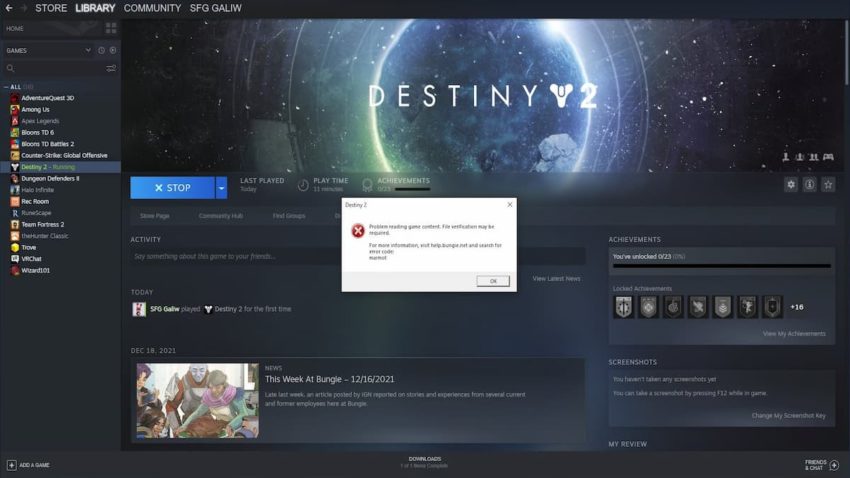
You might face various bugs and errors while trying to play Destiny 2, just like other online games. Sometimes you might face lag issues, while other times, you might not be able to enter the game at all. One of them is the error code Marmot which won’t let you log in to Destiny 2. That can be frustrating, especially after the release of The Witch Queen DLC, when you have tons of new content to explore.
Fortunately, Bungie has officially provided a solution for this problem, and here’s how to fix the error code Marmot in Destiny 2.
According to Bungie, Error Code Marmot appears when the Destiny 2 files are corrupted or need to be repaired or verified. In that case, you will have to repair your game by using the following steps based on the platform that you are using. Make sure that you close Destiny 2 before proceeding with the fixes.
Steam
- Go to Steam’s Library and right click on Destiny 2.
- Click on the Properties and then, go to the Local Files tab.
- Hit the “Verify Integrity of Game Files” option and it will start validating/repairing game files.
- Once it’s done, you can start playing Destiny 2.
If the problem doesn’t solve for you, you will have to delete all the local files except for the “packages” folder by clicking on the Browser option in the Local Files tab. Then, you will have to follow the rest of the steps before logging into the game.
Microsoft Store
- Go to Windows Settings on your PC.
- Open Apps & Features and select Destiny 2.
- Go to the Advanced Options and hit Repair.
- Restart Destiny 2 and log into your account.
Consoles
- The first thing that you need to do is clear the console’s cache.
- You can do it by switching it off, unplugging the power cord, and letting it stay unplugged for at least five minutes.
- Restart the console and open Destiny 2.
If the error code is still stopping you from playing the game, you can try the following steps.
PlayStation 4 and 5
- Launch PlayStation in Safe Mode by holding the power button until the console gets turned off.
- Then, again hold the power button for about seven seconds.
- Release the button once the console beeps twice and connect the controller to the console using a USB cable.
- Then, choose Rebuild Database option to keep your files safe as others might delete all of them.
- Your hard drive will get scanned for various issues including corrupted files.
- Once it’s done, start the console again and open Destiny 2.
Xbox One and Series X/S
- Press the Xbox button on the controller and open Settings.
- Select the Blue-ray option and then the Persistent Storage.
- Hit the Clear Persistent Storage option and then restart Destiny 2.
If none of the above fixes makes the error code disappear, try uninstalling and then reinstalling Destiny 2.