Как устранить ошибку изменения размера контейнера APFS 49180 на Mac (01.28.23)
После нескольких лет использования старой файловой системы HFS + Apple выпустила файловую систему Apple, сокращенно APFS, вместе с выпуском macOS High Sierra. В новой файловой системе были улучшены шифрование, целостность файлов и распределение пространства. Также добавлены функции, такие как клонирование и создание снимков.
Файловая система — это механизм для хранения данных на жестком диске или SSD. Он отслеживает, где на диске находятся части, из которых состоит каждый файл, а также метаданные о каждом файле, включая его имя, размер, даты создания и изменения, а также другие детали. Обычно вы можете увидеть всю эту информацию в Finder. 
APFS (файловая система Apple) — это запатентованная система Apple, предназначенная для организации и структурирования данных в системе хранения. APFS заменила 30-летнюю систему HFS +, которая ранее использовалась на компьютерах Mac.
HFS + и HFS, которые являются более ранними версиями иерархической файловой системы, были созданы во времена гибких дисков, которые были основным носителем информации для Mac в те времена, когда жесткие диски все еще были дорогостоящим вариантом, предлагаемым третьими сторонами.
Apple с самого начала разрабатывала APFS для SSD и других систем хранения на основе флеш-памяти. Несмотря на то, что APFS была создана для твердотельных накопителей, она также хорошо работает с другими современными жесткими дисками. APFS включен в: 
- macOS Catalina (10.15)
- macOS Mojave (10.14)
- macOS High Sierra (10.13)
- macOS Big Sur
- iOS 10.3 и новее,
- tvOS 10.2 и новее
- watchOS 3.2 и новее
APFS имеет ряд функций, которые отличают его от старых файловых систем.
- Клонирование. Клонирование позволяет практически мгновенно копировать файлы даже без использования дополнительного места. Вместо того чтобы копировать файл или документ по одному из одного места в другое, клоны могут вместо этого ссылаться на исходный файл, разделяя блоки данных, которые одинаковы между двумя файлами. Когда вы вносите изменения в один файл, в новый клон записывается только измененный блок данных. И оригинал, и клон продолжают совместно использовать исходные блоки данных. Это не только делает копирование и сохранение файлов исключительно быстрым, но и экономит место для хранения.
- Моментальные снимки: APFS может создать моментальный снимок тома, представляющий определенный момент времени. Моментальные снимки обеспечивают эффективное резервное копирование и позволяют вернуться к тому, как все было в определенный момент времени. Снимки представляют собой доступные только для чтения указатели на исходный том и его данные. Новый снимок не занимает реального места, кроме места, необходимого для хранения указателя на исходный том. Со временем в исходный том вносятся изменения, и в моментальный снимок вносятся только те изменения, которые произошли.
- Шифрование: APFS поддерживает надежное полное шифрование диска с использованием режимов AES-XTS или AES-CBC. И файлы, и метаданные зашифрованы. К поддерживаемым методам шифрования относятся:
- Очистить (без шифрования)
- Один ключ
- Несколько ключей, с ключами для каждого файла как для данных, так и для метаданных
- Совместное использование пространства. Совместное использование пространства позволяет отказаться от предварительного определения размеров разделов. Вместо этого все тома совместно используют базовое свободное пространство на диске. Совместное использование пространства позволяет нескольким томам на диске динамически увеличиваться и уменьшаться по мере необходимости без необходимости повторного разделения.
- Копирование при записи: эта схема защиты данных позволяет совместно использовать структуры данных до тех пор, пока не будут внесены изменения. сделан. После запроса на изменение (запись) создается новая уникальная копия, гарантирующая, что оригинал останется нетронутым. Только после завершения записи информация о файле обновляется до самых последних данных.
- Атомарное безопасное сохранение: это похоже на идею копирования при записи, но применяется к любой операции с файлом, такой как переименование или перемещение файла или каталога. На примере переименования файл, который будет переименован, копируется с новыми данными (именем файла). Только после завершения процесса копирования файловая система обновляется, чтобы указать на новые данные. Это гарантирует, что если по какой-либо причине — например, сбой питания или сбой процессора — запись не будет завершена, исходный файл останется нетронутым.
- Разреженные файлы: этот более эффективный способ распределения файлового пространства позволяет файлу пространство для роста только тогда, когда это необходимо. В не разреженных файловых системах файловое пространство должно быть зарезервировано заранее, даже если данные не готовы к сохранению.
Помимо проблемы с USB-флеш-накопителями, отформатированными в формате APFS, которые не читаются на старых компьютерах Mac или Windows, большинство людей не должны сталкиваться с серьезными ошибками APFS. быстрее, надежнее и безопаснее.
Что такое код ошибки APFS 49180 на Mac?
Как и при любой реализации нового программного обеспечения или набора функций, конечные пользователи могут столкнуться с различными неожиданными причудами и несовместимостью. Одна из таких причуд, с которой столкнулись пользователи, заключалась в попытке изменить размер системного раздела с помощью Дисковой утилиты для сжатия раздела и столкнулась с кодом ошибки 49180.
Пользователи не могут сжать раздел APFS macOS в Дисковой утилите или с помощью используя diskutil. Когда они пытаются использовать любой из этих методов, они получают ошибку изменения размера контейнера APFS 49180 — неиспользуемое дисковое пространство.
В некоторых случаях пользователь пытался удалить раздел Bootcamp, чтобы увеличить объем основного дискового пространства. Пользователь использовал программу Disk Utility, но, к сожалению, Macintosh HD не стал больше. Полученное пространство для хранения просто исчезло, и теперь есть неиспользуемое пространство. При попытке удалить «свободное» пространство в приложении «Дисковая утилита» для увеличения другого раздела, но это всегда возвращает ошибку изменения размера контейнера APFS 49180 на Mac. Удаление «свободного» пространства и попытка создания нового раздела также не работают.
Что вызывает код ошибки 49180 APFS при попытке восстановить свободное пространство?
Когда вы сталкиваетесь с этой ошибкой изменения размера контейнера APFS 49180 — непригодно для использования место на диске, помните об ограничениях этой файловой системы:
- Компьютеры Mac под управлением OS X 10.11 El Capitan и более ранних версий не могут монтировать или читать тома, отформатированные как APFS. Поэтому не форматируйте внешние жесткие диски или USB-накопители как APFS, если вам может понадобиться их использовать на старых компьютерах Mac. Однако компьютеры Mac с High Sierra с дисками в формате APFS отлично работают с внешними жесткими дисками, отформатированными как HFS +.
- Хотя установщик High Sierra может преобразовать том из HFS + в APFS во время установки, вы не можете преобразовать APFS обратно в HFS + без предварительного стирания. Вам нужно будет создать резервную копию любых данных на нем, отформатировать как APFS, а затем восстановить данные.
- Мы не рекомендуем использовать старые программы для восстановления и восстановления дисков, которые не были обновлены для High Sierra, на Том в формате APFS.
- Boot Camp от Apple, который позволяет запускать Windows на Mac, не поддерживает чтение и запись томов Mac в формате APFS.
- Тома, отформатированные как APFS не может предлагать точки общего доступа по сети с использованием AFP и вместо этого должен использовать SMB или NFS.
Итак, если вы используете Boot Camp для удаления раздела, вы, скорее всего, столкнетесь с этой ошибкой из-за проблем с совместимостью.
Еще одна вещь, которую необходимо учитывать, — это состояние диска . Поврежденный диск может вызвать широкий спектр дисковых ошибок, и ошибка изменения размера контейнера APFS 49180 на Mac — лишь одна из них.
Как исправить ошибку изменения размера контейнера APFS 49180 на Mac?
Чтобы исправить контейнер APFS Ошибка изменения размера 49168 в macOS High Sierra, мы рекомендуем сначала очистить компьютер с помощью служебного инструмента премиум-класса, такого как приложение для восстановления Mac. Этот инструмент просканирует вашу систему на предмет любых проблем, ограничивающих производительность, таких как файлы кеша и ненужные приложения. Он также оптимизирует вашу оперативную память, чтобы освободить место для активных приложений, и порекомендует настройки, которые позволят сэкономить энергию.
Теперь после очистки компьютера вы можете приступить к исправлению ошибки 49180 изменения размера контейнера APFS в macOS, используя следующие методы перечислены ниже.
Но сначала сделайте резервную копию своего Mac. Одной из наиболее важных мер предосторожности перед выполнением любой операции является резервное копирование. Благодаря практическому резервному копированию такие проблемы, как восстановление данных, можно легко решить. Но, если в случае, если резервной копии нет или доступная резервная копия не недавняя, не о чем беспокоиться. Существуют безопасные, надежные и мощные программные средства восстановления данных APFS для восстановления потерянных, удаленных или недоступных данных практически во всех сценариях, кроме перезаписи.
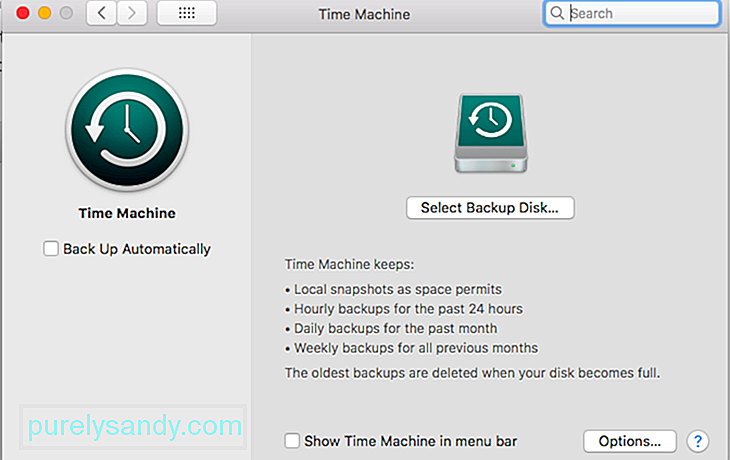 Затем отключите автоматическое резервное копирование с помощью Time Machine:
После того, как вы выполнили подготовительные шаги, описанные выше , вы можете перейти к следующим решениям.
Исправление №1. Создайте раздел с помощью терминала.
Как упоминалось ранее, приложение Disk Utility бесполезно для решения проблемы с разделами диска. Для этого вам придется полагаться на приложение Терминал. Перед запуском Терминала необходимо создать резервную копию данных, а затем отключить автоматическое резервное копирование с помощью Time Machine. Вот как отключить автоматическое резервное копирование с помощью Time Machine:
После отключения опции автоматического резервного копирования Time Machine следующим шагом будет использование Терминала для определения местоположения раздела APFS. Выполните следующие действия: 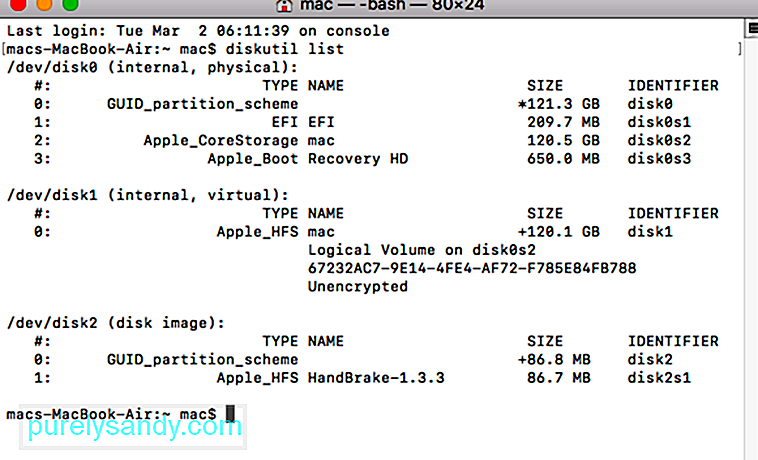
Теперь попробуйте создать раздел APFS на вашем Mac и посмотрите, возникают ли по-прежнему какие-либо ошибки. Если ничего не изменится, следующие методы, хотя и несколько более сложные, помогут решить проблему.
Допустим, вы хотите изменить размер контейнера APFS до определенного размера, например 550 ГБ с жесткого диска 1 ТБ, вам нужно будет ввести в Терминал команду, указывающую на это. В Терминале введите sudo diskutil apfs resizeContainer disk0s2 450g jhfs + Extra 550g. Остальное пространство будет существовать в виде файловых систем HFS +.
Вышеупомянутый метод также можно использовать для создания множества разделов. Командная строка, предназначенная для создания нескольких разделов, будет выглядеть примерно так: sudo diskutil apfs resizeContainer disk0s2 400g jhfs + Media 350g FAT32 Windows 250g.
Еще вы можете задать формулу таким образом — diskutil будет автоматически -определить том для нового раздела: sudo diskutil apfs resizeContainer disk0s2 650g jhfs + Media 0b.
Исправление №2. Используйте Дисковую утилиту.
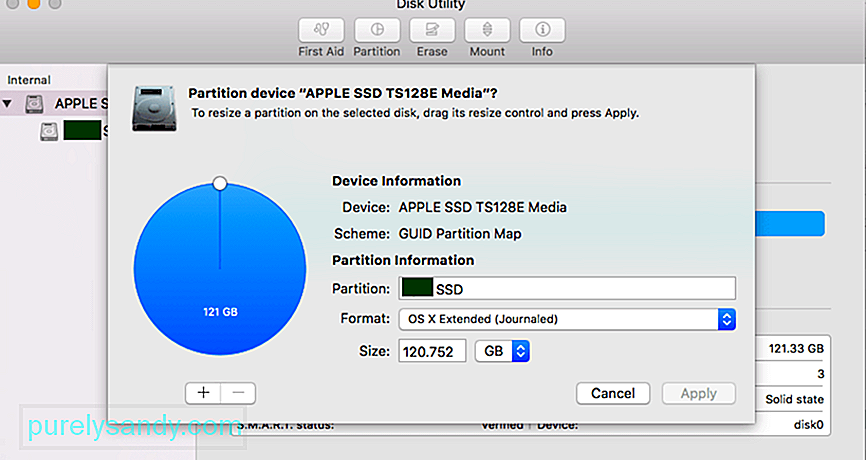 Хотя эта статья началась с упоминания о том, что приложение Дисковой утилиты мало помогает в решении проблемы «невозможно создать новый раздел на Mac», она все же может быть полезна, особенно если вы используете более старую Операционная система. Вы также можете использовать приложение Disk Utility после использования Терминала для выполнения команд, указанных выше.
Исправление №3. Используйте программу дефрагментации диска.
Последнее решение, которое мы рекомендуем, включает использование надежного программного обеспечения для дефрагментации диска, такого как Disk Defrag от Auslogics. Это упростит вам создание новых томов и разделов на вашем компьютере.
Также может быть, что ваш раздел диска поврежден, и поэтому невозможно создать раздел APFS. В этом случае вам следует прочитать эту статью о том, как исправить поврежденный или удаленный раздел macOS.
Если проблема не устранена, но вы все еще получаете код ошибки изменения размера контейнера APFS 49168 на вашем Mac при каждой попытке чтобы создать новый раздел, вам, вероятно, следует обратиться в клинику Mac или обратиться в службу поддержки Apple. Они будут знать, что делать.
Исправление №4: уменьшите размер раздела APFS.
Если вы решите вернуть это пространство в контейнер APFS, вы также можете сделать это с помощью diskutil. Однако сначала вам нужно удалить JHFS + или другой раздел и установить его как свободное место на жестком диске.
В этом случае diskutil автоматически запрашивает все доступное свободное пространство на физическом запоминающем устройстве, но вы также можете заменить 0 значением размера.
Затем вам необходимо повторно активировать Машина времени. Не забудьте снова включить Time Machine, когда закончите сжимать раздел APFS. Переключите этот инструмент:
Резюме
Если вы столкнулись с кодом ошибки 49180 APFS при попытке освободить место на вашем Mac, не беспокойтесь, потому что это не серьезная ошибка. Однако обязательно сделайте резервную копию своих файлов, чтобы предотвратить потерю данных в случае аварии. Затем вы можете попробовать четыре перечисленных выше метода, чтобы узнать, какой из них подойдет вам. Если вам известны какие-либо другие решения этой ошибки, не стесняйтесь сообщить нам об этом в комментариях.
YouTube видео: Как устранить ошибку изменения размера контейнера APFS 49180 на Mac
01, 2023
Looks like no one’s replied in a while. To start the conversation again, simply
ask a new question.
The aftermarket SSD I put in my MacBook is not mounted, nor is the volume on there which is my hard drive.
The “mount“ button for the SSD is grayed out.
When I click on the “mount“ button for the volume (MacBook), I receive the error message:
Could not mount “MacBook“
(com.apple.DiskManagement.disenter error 49180.)
can anyone help?
thank you.
Posted on Feb 9, 2021 9:33 AM
Similar questions
-
Unable to mount external hard drives — error 49218
Two of my external hard drives unmounted last night. In Disk Utility I’m unable to run first aid or mount the disks. The disks are «greyed» out and unable to access. When mounting I’m getting error: (com.apple.DiskManagement.dis enter error 49218.) I also tried reformatting the disk but I’m getting error: An internal error has occurred.: (-69623)Thankfully, I have backups of both of these external disks so data recovery isn’t an issue but any assistance would be appreciated.
About:
MacBook M1 Pro
Mac OS: Ventura130
3
-
can’t mount external hard disk or usb drive
This is the error message when I clicked ‘mount’ in the disk utility, hope someone could help.
Could not mount “Ted_16”. (com.apple.DiskManagement.disenter error -119930872.)On another macbook, the same disk works, so i am sure it’s not the disk itself that has the issue.
I have tried run first aid, still cannot mount. then, I erased it, still got the same error message.402
4
-
Mac doesn’t recognize new SSD external drive
I have an iMac with macOS Monterey 12.6 it will not show my external hard drive. The drive is recognized on the disk utility but when I try to mount it I got the following message «Could not mount “SSD”. (com.apple.DiskManagement.disenter error 49244.)». How can I fix this issue? It is a brand new Portable SSD Mobile Storage with 7TB
94
1
1 reply
Feb 11, 2021 9:53 AM in response to dontgivadang
Hello dontgivadang,
Welcome to Apple Support Communities!
If we understand your post correctly, your SSD is not mounted and when you try to mount it the button is greyed out and you’re getting an error message as well. We’re happy to help!
Did you run Disk Utility on the SSD?
Repair a storage device in Disk Utility on Mac
If Disk Utility isn’t helpful you can try reinstalling the macOS.
How to reinstall macOS
If you’re still having issues we recommend contacting Apple Support directly.
Get Support
Let us know if you have any questions.
Thank you for using Apple Support Communities.
Take care!
Error 49180
Odd one on my Mac Mini this morning as none of my drives other than my boot volume are mounting.
The internal SDD (boot) is all fine, but the internal HDD isn’t. Also neither of my USB/Thunderbolt drives appear.
In disk util they are present but the error 49180 shows when I manually mount the volumes.
I’ve booted in to the internet recovery console and checked the volumes and they appear to be o.k.
Only thing I have done recently was allowed full disk access to Carbon Copy Cloner which I have now revoked.
Last login: Thu Dec 5 10:41:48 on console
The default interactive shell is now zsh.
To update your account to use zsh, please run `chsh -s /bin/zsh`.
For more details, please visit https://support.apple.com/kb/HT208050.
Mac:~ user$ diskutil list
/dev/disk0 (internal, physical):
#: TYPE NAME SIZE IDENTIFIER
0: GUID_partition_scheme *1.0 TB disk0
1: EFI EFI 209.7 MB disk0s1
2: Apple_HFS Mac HDD 999.9 GB disk0s2
/dev/disk1 (internal, physical):
#: TYPE NAME SIZE IDENTIFIER
0: GUID_partition_scheme *240.1 GB disk1
1: EFI EFI 209.7 MB disk1s1
2: Apple_APFS Container disk2 239.8 GB disk1s2
/dev/disk2 (synthesized):
#: TYPE NAME SIZE IDENTIFIER
0: APFS Container Scheme — +239.8 GB disk2
Physical Store disk1s2
1: APFS Volume Mac SSD — Data 182.5 GB disk2s1
2: APFS Volume Preboot 81.0 MB disk2s2
3: APFS Volume Recovery 525.5 MB disk2s3
4: APFS Volume VM 2.1 GB disk2s4
5: APFS Volume Mac SSD 11.0 GB disk2s5
/dev/disk3 (external, physical):
#: TYPE NAME SIZE IDENTIFIER
0: GUID_partition_scheme *240.1 GB disk3
1: Microsoft Basic Data External 240.1 GB disk3s1
/dev/disk4 (external, physical):
#: TYPE NAME SIZE IDENTIFIER
0: GUID_partition_scheme *120.0 GB disk4
1: EFI EFI 209.7 MB disk4s1
2: Apple_HFS EXT_LR 119.2 GB disk4s2
3: Apple_Boot Recovery HD 650.0 MB disk4s3
/dev/disk5 (external, physical):
#: TYPE NAME SIZE IDENTIFIER
0: GUID_partition_scheme *3.0 TB disk5
1: EFI EFI 209.7 MB disk5s1
2: Apple_HFS Ext_data 3.0 TB disk5s2
/dev/disk6 (external, physical):
#: TYPE NAME SIZE IDENTIFIER
0: GUID_partition_scheme *5.0 TB disk6
1: EFI EFI 314.6 MB disk6s1
2: Apple_HFS ext_Backup 4.0 TB disk6s2
3: Apple_HFS MacTM 1.0 TB disk6s3
Help!!!
Replies
The solution provided by CAPYDAN works like a charm for me. I have an issue with Mac.
I did exactly the same, except that I select exFAT (instead of APFS) as I need to share data among MacOS, Windows and Linux as well.
i am facing this same problem. After i updated to Big Sur, no external drive is getting recognised, not even in the volumes section. Tried a usb stick (FAT32 format), WD external HD (macos journaled), both of them are not recognised on the OS
Please help me, have tried all the solutions mentioned in the above thread.
Currently on Big Sur 11.2.1, Macpro 2017
apple is not seeing the wood for the trees here. I had the exact problem. Checkboxed everything. Still no joy. Solution lies in this: mouseover sidebar where it says locations. When u mouseover, an expandable arrow appears (really dumb for it not to always be visible). Click on it and you will see your drives if they are visible say In disk utility.
I have the same problem which came about on February 15th or so.
So far, I did not manage to solve the problem by using some of the suggestions posted above.
I have a MacBook Pro (Retina, 15-inch, Late 2013).
Processor 2 GHz Quad-Core Intel Core i7
Thanks for your help.
I have the same problem. I don’t see CappyDan’s instruction: Select the destination drive hardware (above the existing volume)
I also have this issue — in my case with a 2020 Macbook Air Core i7 (just pre m1)with 16GB and 1TB- I have 2 external SSDs hooked up via USB3 both of which are are formatted under APFS and used as Time Machine backup disks & supposed to alternate.
I had no issues until upgraded to Big Sur 11.2.2 48 hours ago…now neither volume mounts nor is even findable via Disk Utility (or any other method either).
I do not want to reformat and start again because of their use for restoring old document versions.
I ahem tried restarting and every other method I can think of. there is something afoot with the Big Sur External Disk recovnigitopn system…it needs a Bug Fix!!! Or at least that someone at Apple to acknowledge it exists!
I have Big Sur OS with newest upgrade 11.2.2 and Mac Book Pro M1 2020 version. I’m using Thunderbolt 3 Dock Core and connecting external USB hard drives. They are mounted. Can be seen on Finder and there is an icon on pulpit. First aid done. Disc can be seen. Disc utility shows size of files own hard drive but is not showing the files itself. And it is for all external drives. 🙁 On Microsoft Windows it works without any issues. Please help and do not say that I need to format a drive — it’s just ****** and this is not a fix. 😐
I have a similar issue. I’m using an iMac (late 2014) and recently upgraded to Big Sur. For a while Big Sur displayed the external drives in Finder, but now they are gone. I have a Seagate 4 TB External drive with a photo library on it so I do not want to reformat the drive. The external drive shows up in the disk utility but cannot be mounted. My old MacBook Air can recognize and read/write the Seagate drive fine. Need help.
So, I have a 16-inch MacBookPro that just started showing this problem. Big Sur 11.2.3 installed.
The USB drives (yes, now two of them) will no longer auto mount. However, their locations are showing in the /Volumes directory as if they are still mounted — only not really since they are (a) not connected and (b) the folder permissions are locked.
What is more interesting is that on a 15-inch MacBookPro Big Sur 11.2.3 these same exact USB drives mount correctly (as they always had). Both machines are very similarly configured as to software. Very minimal system software installed (iStats and LittleSnitch) plus the assortment of developer tools, browsers, and editors.
Also, I can mount these drives via the terminal (bash shell) via «sudo diskutil mount -mountPoint /path /dev/disk2s1»
In fact, I can even mount them onto the /Volumnes/diskname mount point (/Volumes/Andromeda) and have them work until I unmount them.
Even in Disk Utility, I can see the volumes but not mount them — even if they were mounted and I unmount them with Disk Utility and then try to mount them again. Complete failure with: «Could not mount “Andromeda”. (com.apple.DiskManagement.disenter error 49180.)»
I have rebooted, rebooted in safe mode, rebooted and reset the SMC, etc. I have also tried to remove the /Volumes/Andromeda mount point while the drive was not connected. Nothing lets me, even when booting into the recovery mode. Always claiming it is not permitted.
This seems like some corruption within the OS and it is somewhere written to disk such that it does not clear up and has not cleared up over the days I have been trying to recover from this.
So, I have a 13-inch MacBookPro M1 that just started showing this problem. Big Sur 11.2.3 installed.
The USB flash drive will no longer auto mount. It loaded once, I could see the files, clicked on a file and the computer ejected the external drive. I cannot see any external drive, tried rebooting, disk utility without any success. The drive was created not long ago prior to Big Sur. I have critical files and think is related to what you all have posted. I cannot reformat drive. Need help, any other suggestions?
Hi, I am having the same problem. iMac pro upgrading to big sur, cannot find the external Sandisk extreme pro disk.
But I think there is a temporary way to mount the external disk.
-
go to disk utility
-
find your external disk, click and choose the disk
-
mount (top right corner of the utility window)
-
every time you mount the disk, you need to do 1-3
Hope this helps. Wish apple developers can solve this issue asap.
I have bought a new MacBook Air in Feb 2021 — now all external drives refuse to be recognised and keep flashing — but will not mount — have tried all the solutions but to no avail — they all worked with my old MacBook Air — yes I am using Big Sur — but this has become a frustrating problem — not being able to access external data
MacBook does not mount an external HD or a ScanDisk stick through its USB port
-
Disk Utility, hovering the sidebar and clicking ‘Locations’ as suggested in this post doesn’t work
-
I can boot from the external HD fine (macOS 10.13.6) so I know the HD and the USB cable are fine
-
MacBook running Big Sur sees AirPort Time Capsule via WiFi
-
I can mount the external HD successfully attaching the HD to the AirPort’s USB port
macOS Big Sur version 11.2.3
MacBook Air (13-inch, 2017)
Processor 1.8 GHz Dual-Core Intel Core i5
Disturbing to see this question linger for months. I have the same issue with a new M1 MB Air. External Lacie Mobil USB-C drive, Time Machine can’t use it. Finder can see it, but not any files on it.
Same problem — and since my time machine backup is on an external drive, how can i even revert to an OS that works? Terrible experience with this “update” — not an update if it makes things you rely on useless, @apple.
Did you get a com.apple.diskmanagement.disenter error when you tried to mount your external hard drive on Mac? This indicates a problem with either your external hard drive or macOS. Unfortunately, either case may lead to data loss – but don’t lose hope!
In this article, we’ll explore the possible reasons we encounter DiskManagement Distenter 49135 and how to fix it (without losing your data), as well as other common disk errors. Read on.
Need to recover data from the drive? Go to data recovery section ⤵
When you plug in your external hard drive, the system mounts it and makes its contents viewable in Finder. If it doesn’t show up there, you should still see it in Disk Utility (Finder > Applications > Utilities) where you can also attempt to mount it.
But there are cases when your external hard drive won’t mount, even using Disk Utility. In this scenario, you’ll probably encounter an error that says “Could not mount *name of the drive*”(com.apple.DiskManagement.disenter error 49513).
Several factors could lead to this problem. You may have an incompatible file system. Or, you may be using a Mac Superdrive while running macOS Catalina. Beyond those common reasons, error 49153 may occur simply due to malware, bugs, issues while resizing partitions and interference from local Time Machine backups.
Don’t worry – we’ll show you how to get rid of this pesky error in the next section.
How to Fix com.apple.diskmanagement.disenter error 49153?
There are several ways to address this specific error code, but most fixes can potentially harm your data. We suggest opening your external hard drive in read only mode and copying your files to a separate storage device or to the cloud.
To set your drive to read only mode, right-click your drive > Get Info and scroll down to Sharing and Permissions. Set your user’s privilege to Read only.
Method #1: Connect Your Drive to Another Mac
Disk Utility errors can be caused by either your drive or your Mac. To figure out which methods to try first, connect your drive to another Mac or even a PC. If your drive doesn’t work on other machines, then the problem likely lies with your drive.
If it works on another Mac, then your Mac might be experiencing glitches due to a faulty update or other issue. If it works on a PC, then it’s likely a formatting problem – we wrote more about that in the section of this article that covers other common DiskManagement Disenter errors.
Method #2: Restart your Mac
A temporary bug or glitch may have simply gotten macOS stuck while it attempted to recognize your drive. You may also have a lot of apps running in the background using up the resources macOS needs to properly recognize and mount your drive.
To get your system going, a simple restart might solve the problem. This will automatically close all running apps and reboot the operating system.
Method #3: Use First Aid in Disk Utility
First Aid is a useful tool that finds and repairs disk errors – specifically, it scans the drive and its partitions for issues related to its structure and formatting. These may prevent your drive from properly mounting.
Fortunately, First Aid is a feature of the Disk Utility app, which can recognize unmountable drives or partitions. To repair your drive using First Aid:
Step 1.Launch Disk Utility (Finder > Applications > Utilities).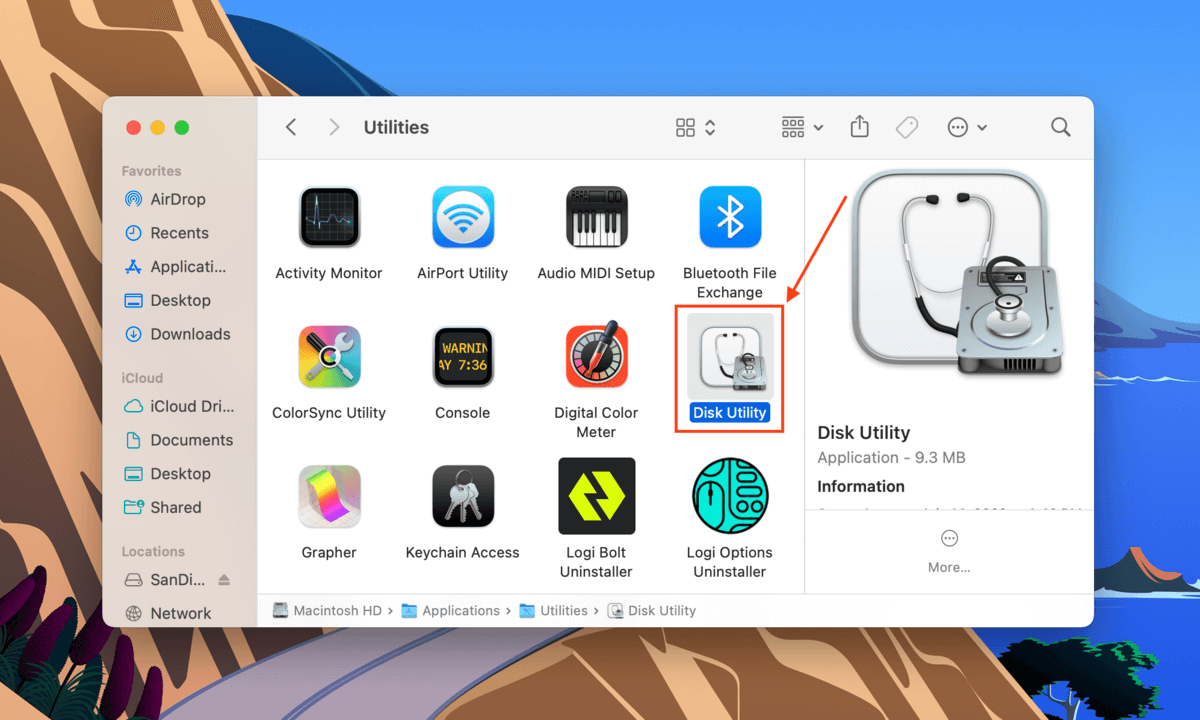
Step 2.Select your drive from the left sidebar, then click the First Aid button at the top of the window.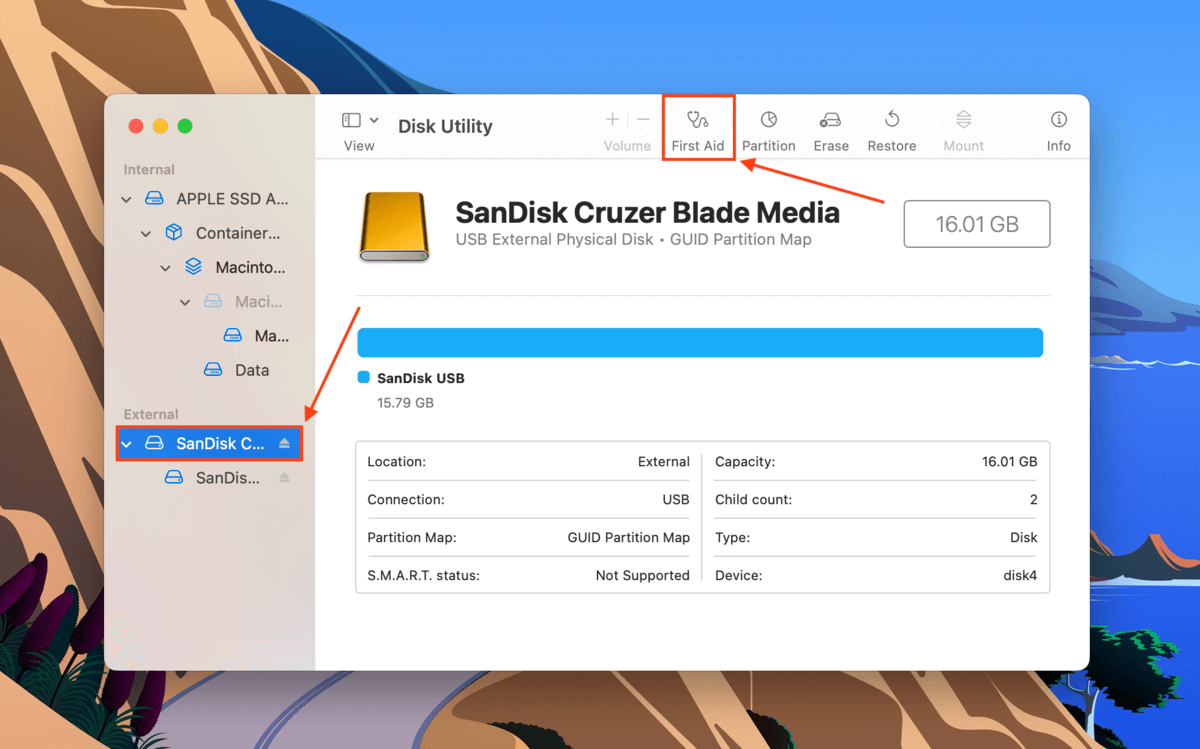
Step 3.In the dialogue box that appears, click Run.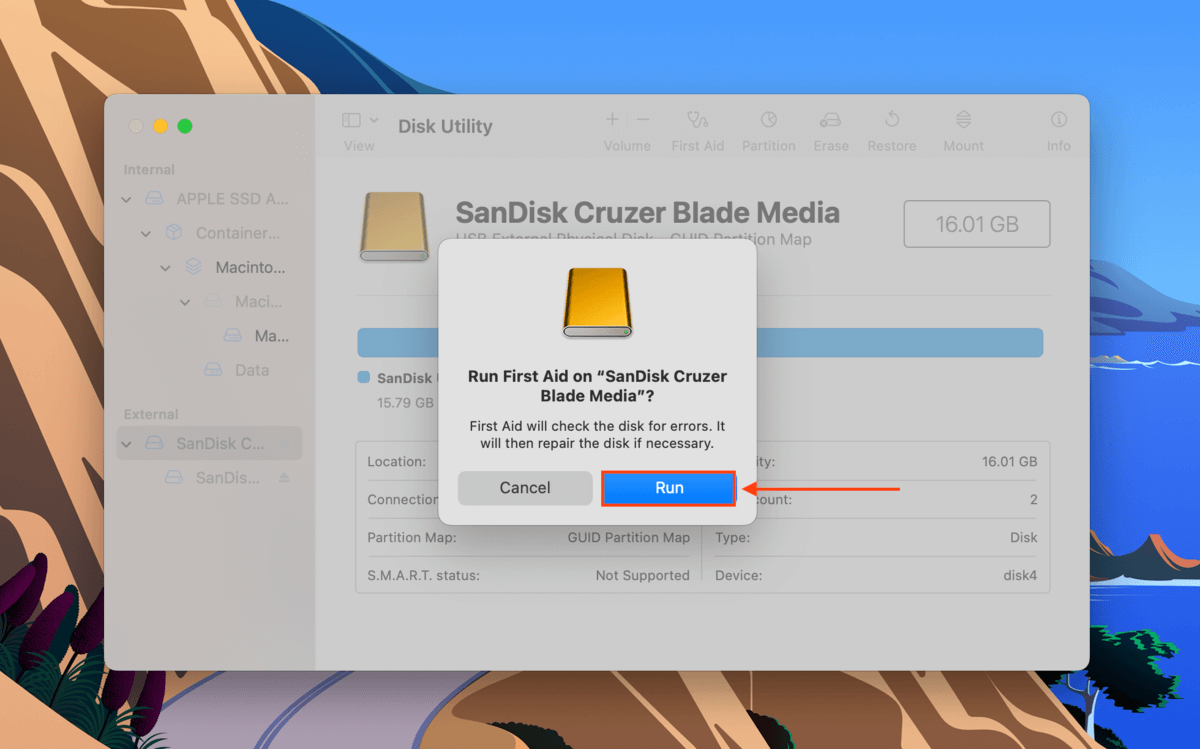
Step 4.Wait for the process to finish. Then, manually mount your hard drive in Disk Utility by selecting your drive or volume in the left sidebar and clicking the Mount button.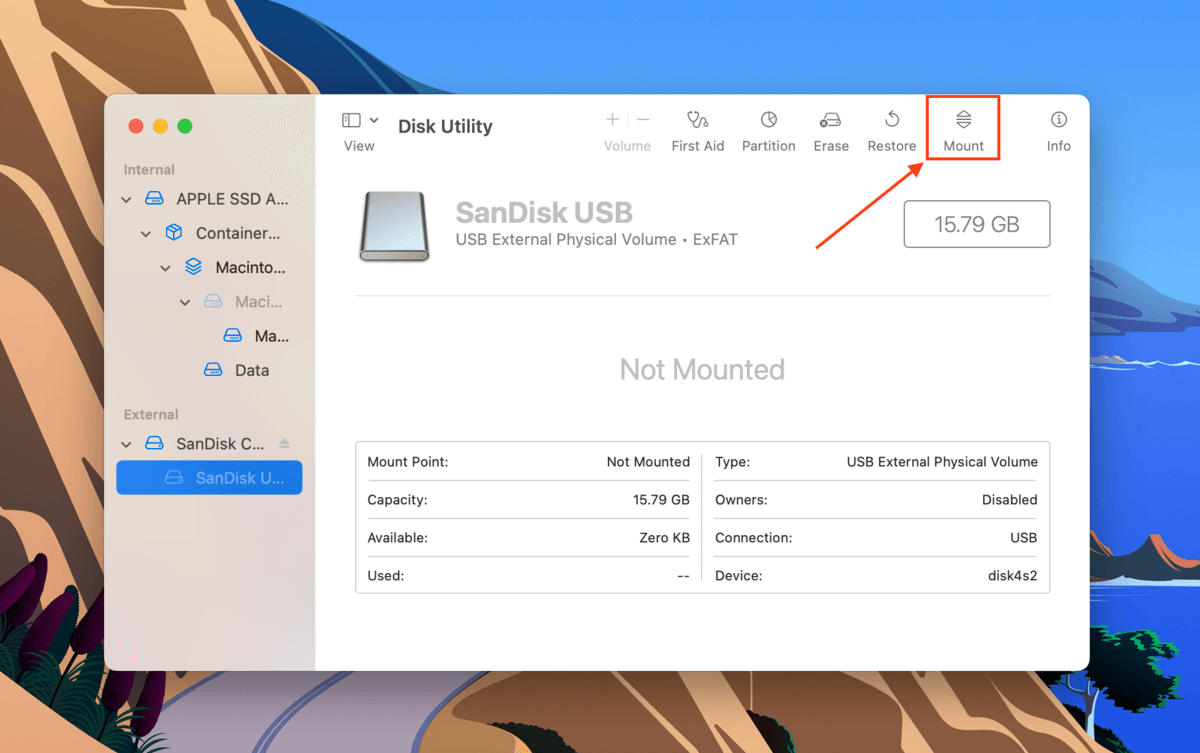
Method #4: Use the fsck Command in Single User Mode
Your external hard drive may not be mounting because of a file system issue. To resolve this problem, you can use Mac’s File System Check command or FSCK through Single User Mode. Here’s how:
Step 1.Enter Single User Mode. To do so, restart your Mac. As soon as it starts to reboot, press and hold the Power button and the CMD + S keys at the same time.
Step 2.You’ll know that you’ve successfully booted into Single User Mode when you see a window that looks like the Terminal app. Once the white text stops appearing, type the following command and hit Return.
/sbin/fsck -fy
Step 3.Once the process is complete, type reboot. This will command your Mac to restart itself.
If you remove your hard drive before ejecting it from Mac, fsck will automatically scan and repair it the next time you use it. This could potentially take a long time, which makes your drive unmountable. To deal with this, force quit the fsck command (Open the Activity Monitor > search fsck > click the x button).
Method #5: Disable Time Machine
Time Machine is a Mac built-in tool that regularly backs up your data, usually automatically. It works well, but on bad days, it can cause the operating system to get stuck while preparing your backup drive. Try disabling Time Machine to free your drive from this process and hopefully allow it to get mounted.
To disable Time Machine, open its settings window by launching System Preferences > Time Machine.
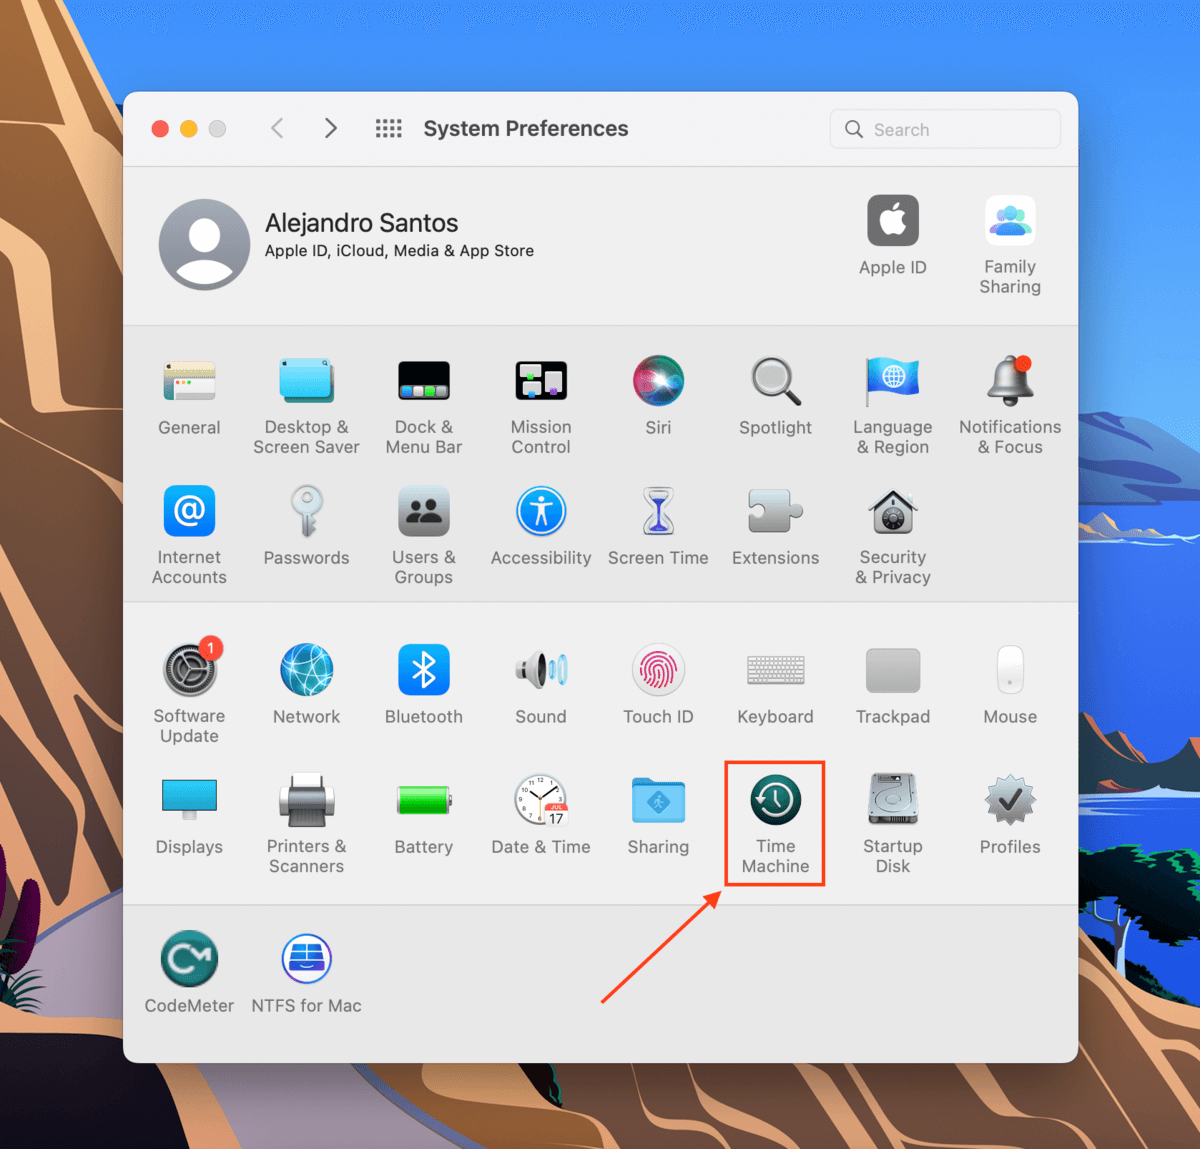
Then, untick the box beside the Back Up Automatically setting.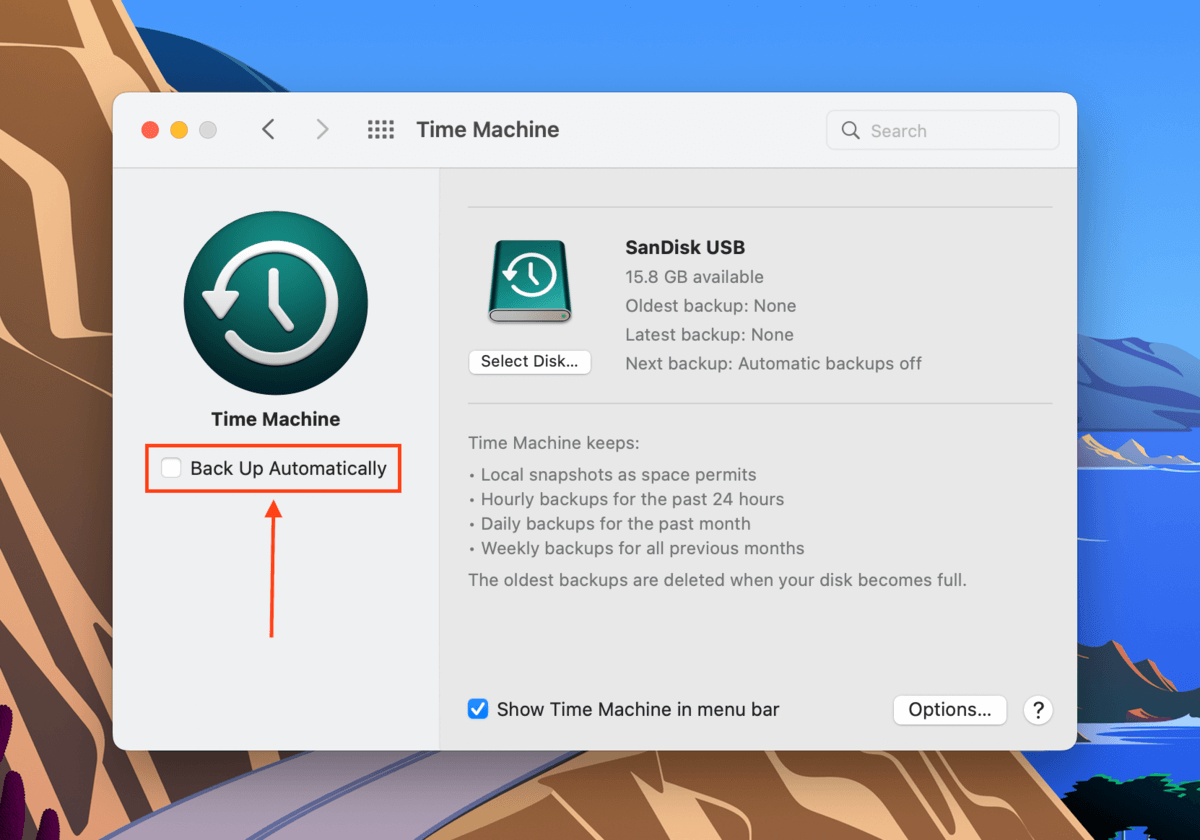
Method #6: Delete Time Machine snapshots using Terminal
Deleting Time Machine snapshots from your Mac may also resolve this disk utility error. Learn how to do it using the Terminal app by following the steps below:
Step 1.Launch Terminal (Finder > Applications > Utilities > Terminal).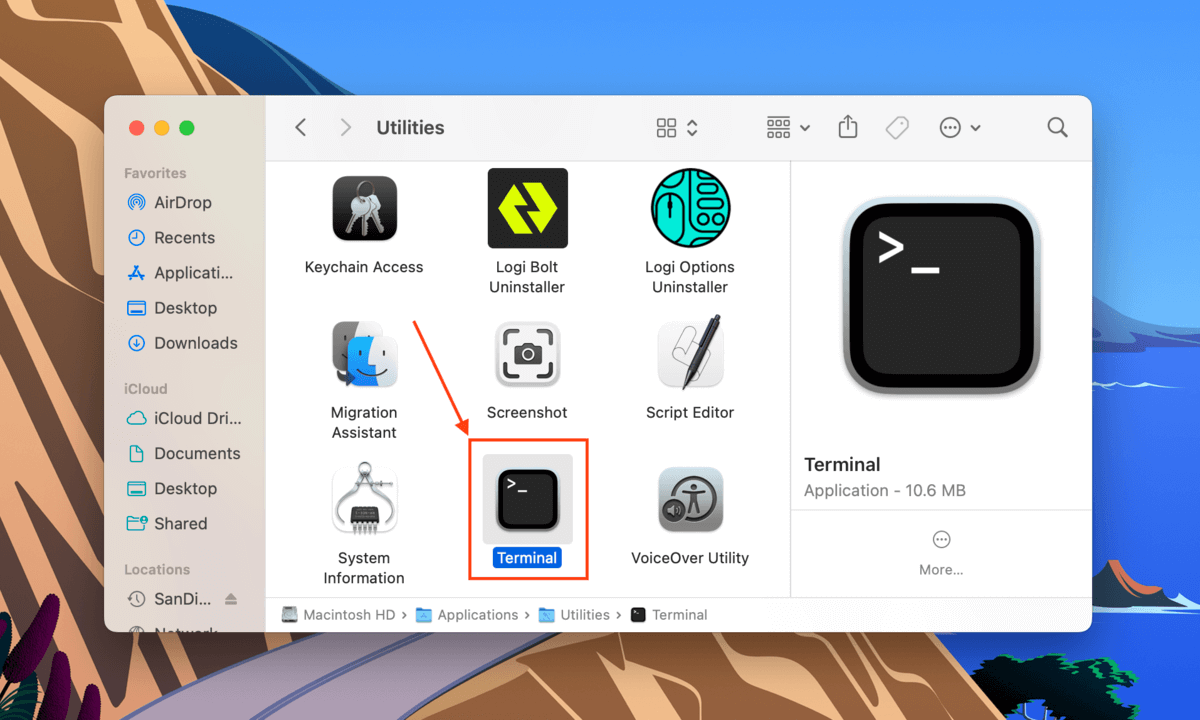
Step 2.The first command we’ll execute will list all locally stored Time Machine snapshots. Type the following command and hit Return:
Tmutil listlocalsnapshots /
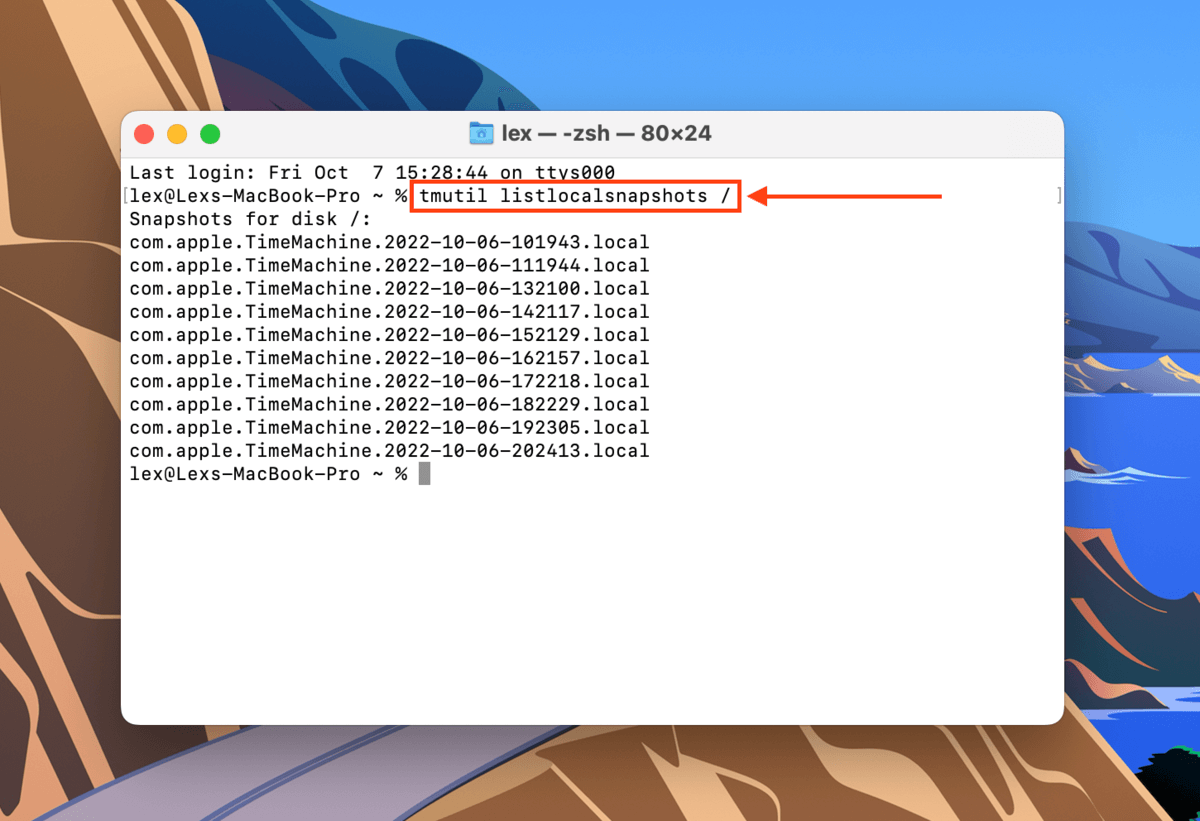
Step 3.Type the following command and hit Return:
Tmutil thinlocalsnapshots /99999999999999
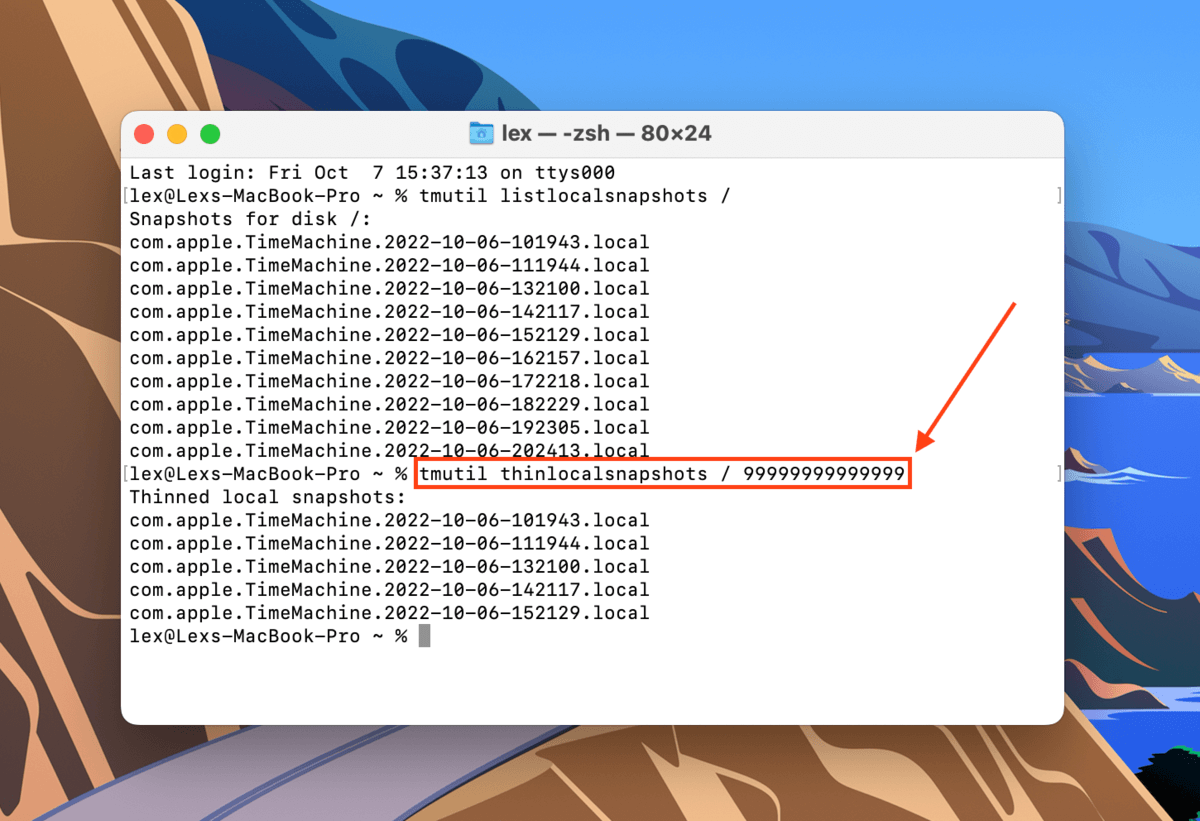
Step 4.Keep using the tmutil listlocalsnaphots and tmutil thinlocalsnapshots commands to make sure you delete all your snapshots.
Method #7: Format Your Drive
If all the above methods failed to get rid of the disk errors, your last resort is to format the drive. As we’ve already discussed earlier, formatting your drive will wipe the disk – including errors, viruses, corruption, and unfortunately, your data. We suggest copying your files to a secure location first.
To transfer your files safely, set your drive to read only mode first. To do this, read our pro tip in the introduction of this section.
Fortunately, formatting your drive on Mac is very easy thanks to the Disk Utility app. First, launch Disk Utility (Finder > Applications) and select your drive from the left sidebar. Then, click the Erase button on the top of the window.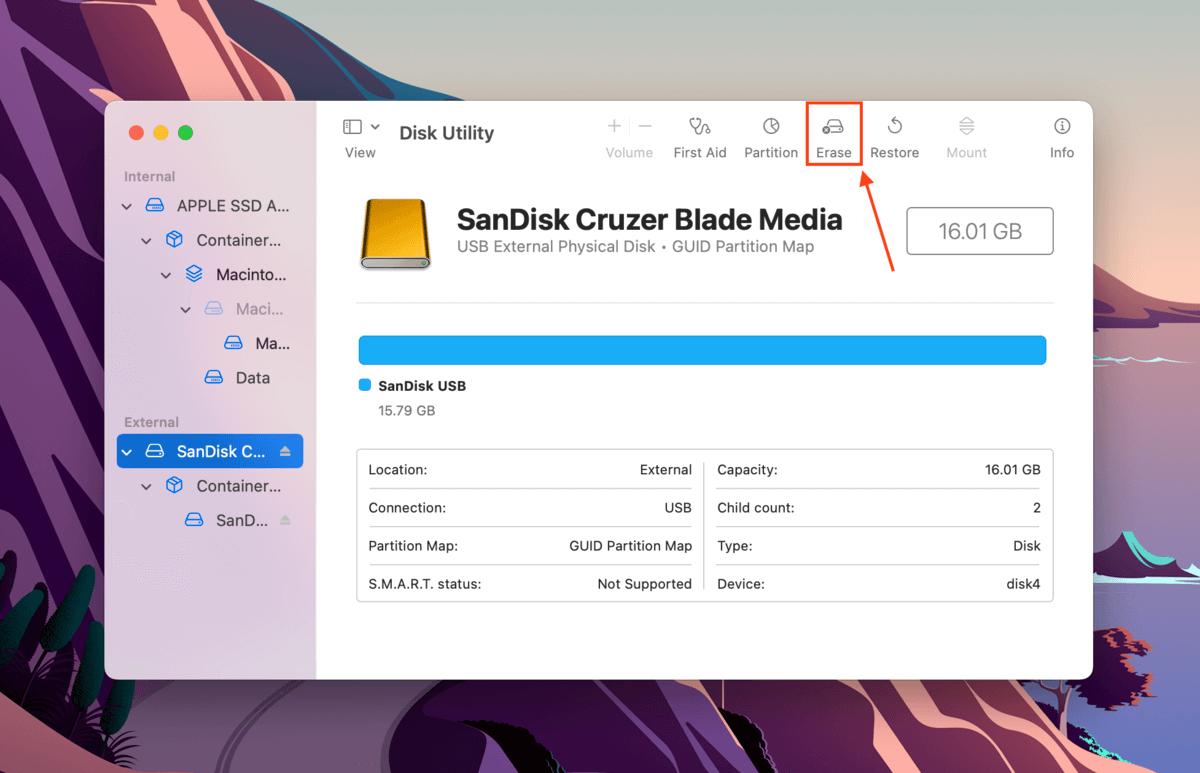
In the dialogue box that appears, name your drive and select a format. If you will only be using your drive with Mac computers, choose APFS. Otherwise, we suggest exFAT for maximum compatibility. Select GUID Partition Map for its scheme, then click Erase to proceed with the format.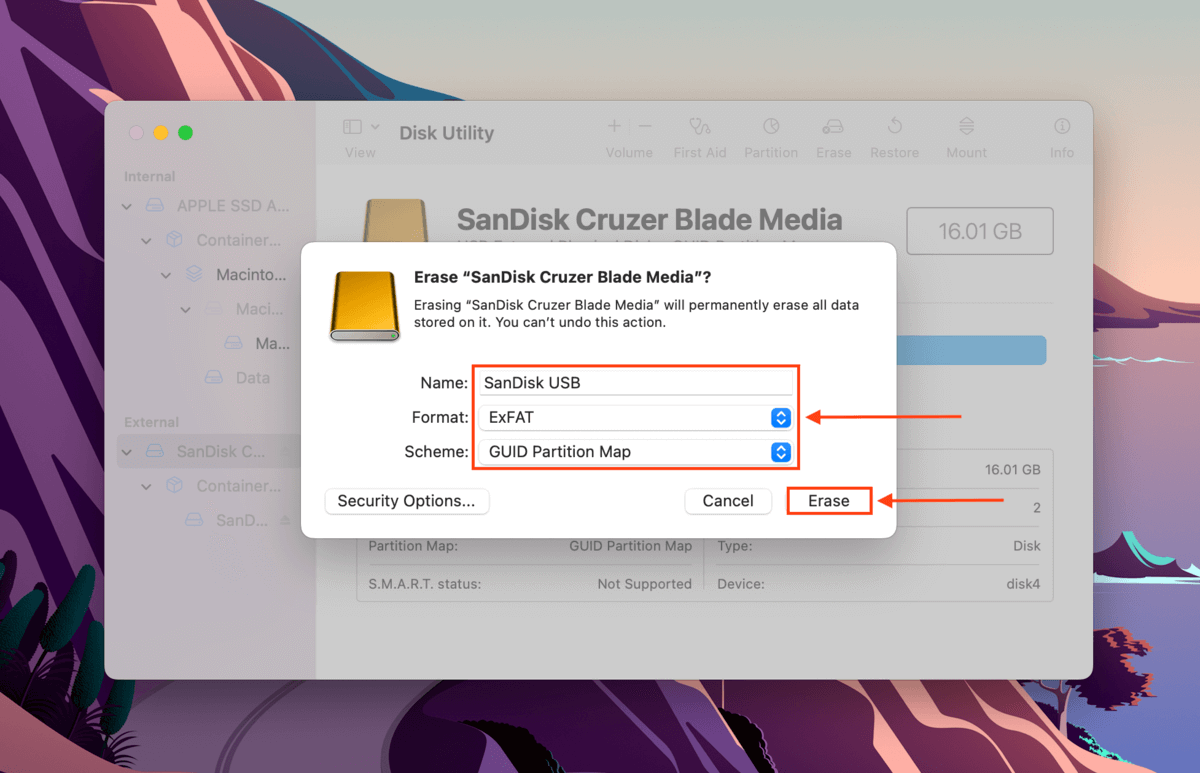
Other Types of DiskManagement Disenter Error
Aside from DiskManagement Disenter Error 49153, there are other DiskManagement Disenter errors that you may encounter that are represented by different codes. Below, we’ve listed the most common ones along with their solutions:
- DiskManagement Disenter Error 49223. An exFAT hard drive that’s been formatted using Windows can cause this error when connected to a Mac, as macOS doesn’t support all the storage block sizes available on Windows. This incompatibility makes MacOS unable to recognize and mount the drive.If you want to use this drive on both Mac and Windows, you need to format it using Mac (but first, back up your data!). If you intend to use it solely on Mac, we suggest formatting it to Apple-based APFS.
- DiskManagement Disenter Error 49221.This error is caused by a glitch in the security updates 2021-003 and 2022-003. After the update, you’ve probably tried to mount a NTFS hard drive in Disk Utility when you got this error. To fix this, reinstall macOS or use a third-party software to mount your NTFS drive.
- DiskManagement Disenter Error 49244. This error often appears when you try to mount your hard drive in Disk Utility while running macOS Catalina. You can use third-party software to mount your drive. If that doesn’t work, you need to format your drive to APFS (again, don’t forget to create a backup!).
- DiskManagement Disenter Error 49218. You might get this error when you remove a hard drive without proper ejection while using macOS Monterey. This error may also be caused by bugs from macOS Monterey itself.To fix it, (1) execute the sudo pkill -f command in the Terminal app, (2) execute the fsck /dev/disk_user_id/ command in single user mode, and finally (3) execute the mount -f /dev/disk_user_id/ command. Remember to replace “disk_user_id” with your disk’s identifier (diskutil list). To boot into single user mode, follow the first instruction in Method #4. If your drive still fails to work after this fix, you may need to format it.
- DiskManagement Disenter Error 49180. This error occurs when there’s a raw partition on the drive, which can happen if you connect an APFS drive to an old Mac or if something went wrong while you were shrinking your partition. You have two ways to address this error: (1) resize the external hard drive using Terminal or (2) format the hard drive altogether.
What to Do If You’d Lost Data After DiskManagement Disenter Error?
Disk Utility errors always have the potential to cause data loss and there’s no guarantee that your files will remain intact after fixing them. The safest and most efficient way to restore data caused by disk errors is to use data recovery software.
Data recovery software can restore files regardless of format – it will even work if you decided to format your drive due to the errors. For this article, we’ll be using a tool called Disk Drill. It’s easy to use and works with most disk formats, and it can restore data even from non-mounting drives. Here’s how to use it:
Disk Drill Basic for Mac does not offer free recovery. However, you can back up and preview your files for free. There are free data recovery solutions available on the internet, but they each have their own limitations – your mileage may vary.
Step 1.Download and install Disk Drill for Mac.
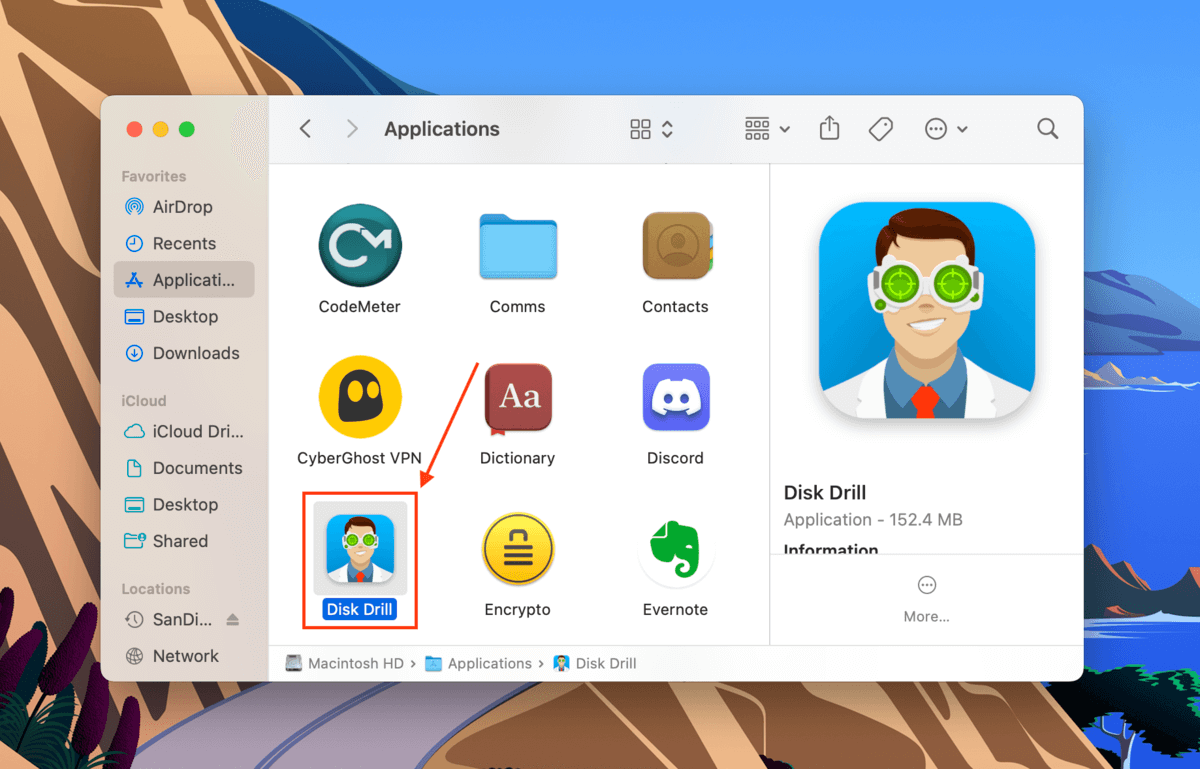
Step 2.Launch Disk Drill (Finder > Applications > Disk Drill).
Step 3.Select your drive from the middle pane and click Search for lost data.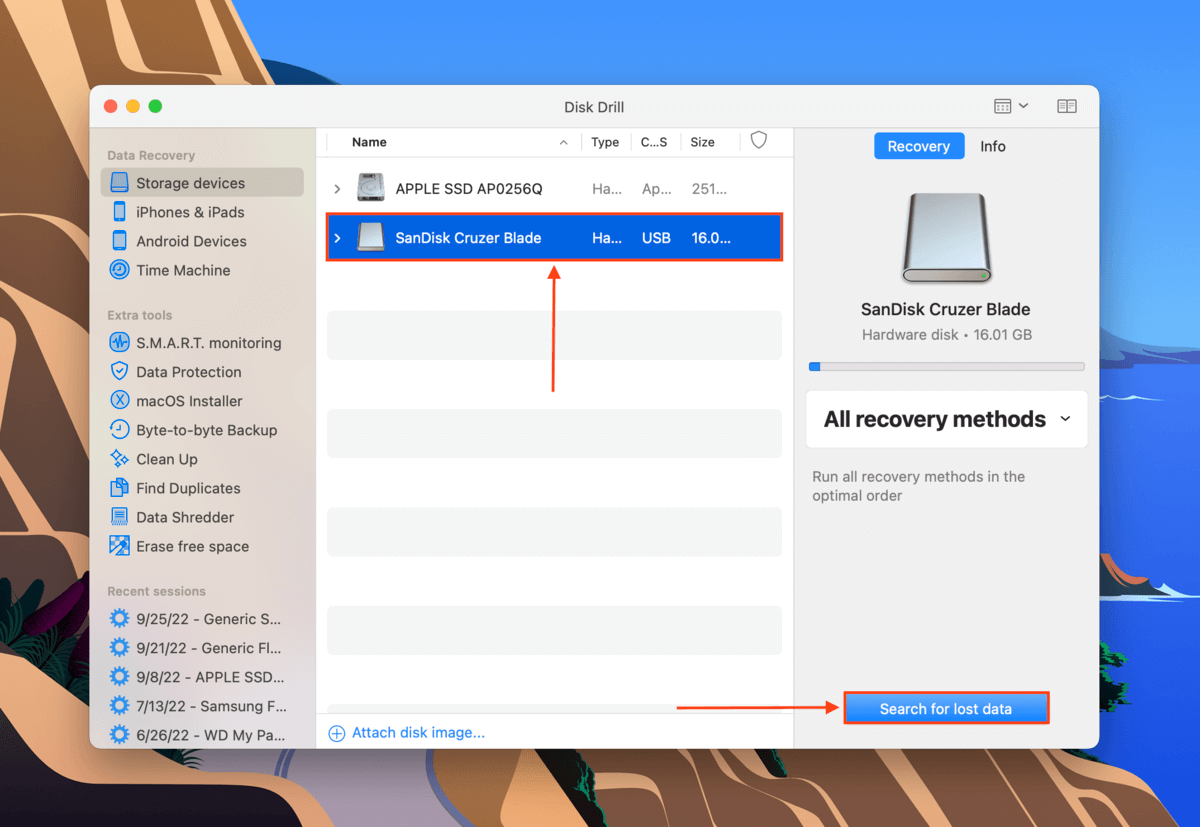
Step 4.Wait for the scan to finish, then click Review found items.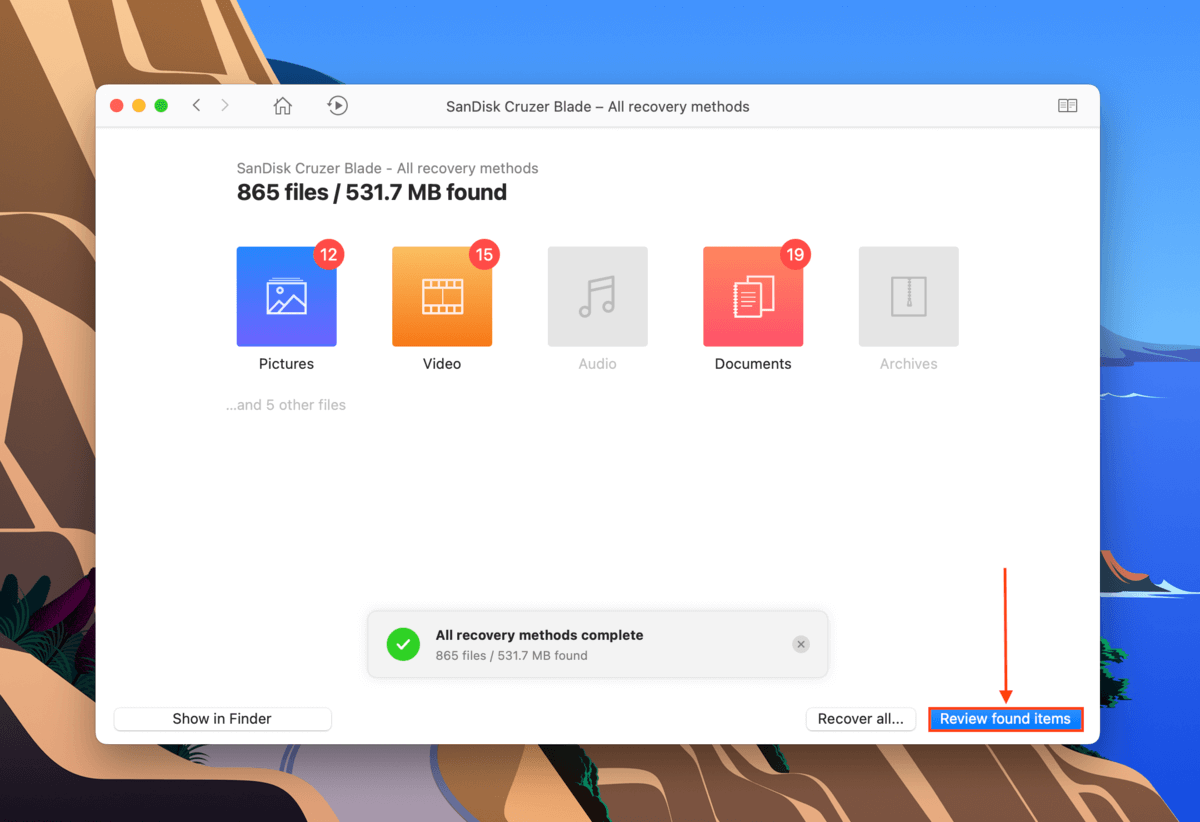
Step 5.Use the search bar to filter the results by name or by file extension, or use the left sidebar. You can also hover your mouse pointer beside any file to enable preview.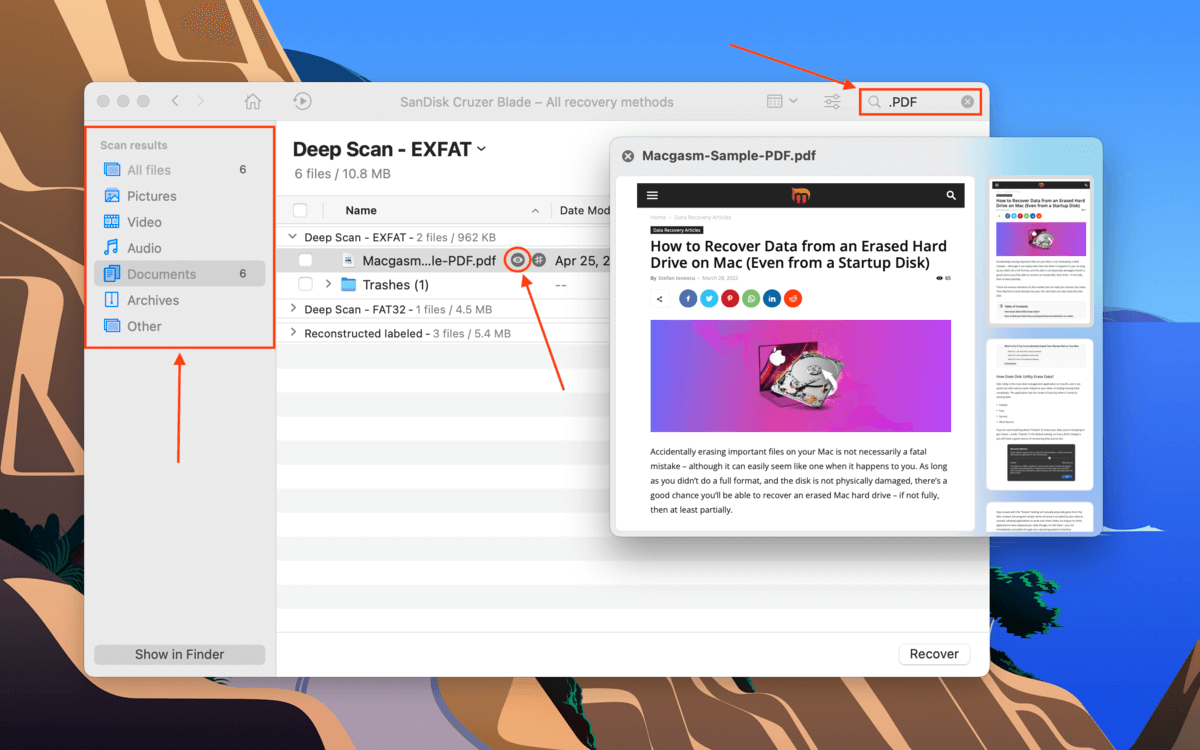
Step 6.Use the boxes in the left-most column to select the files you want to restore, then click Recover.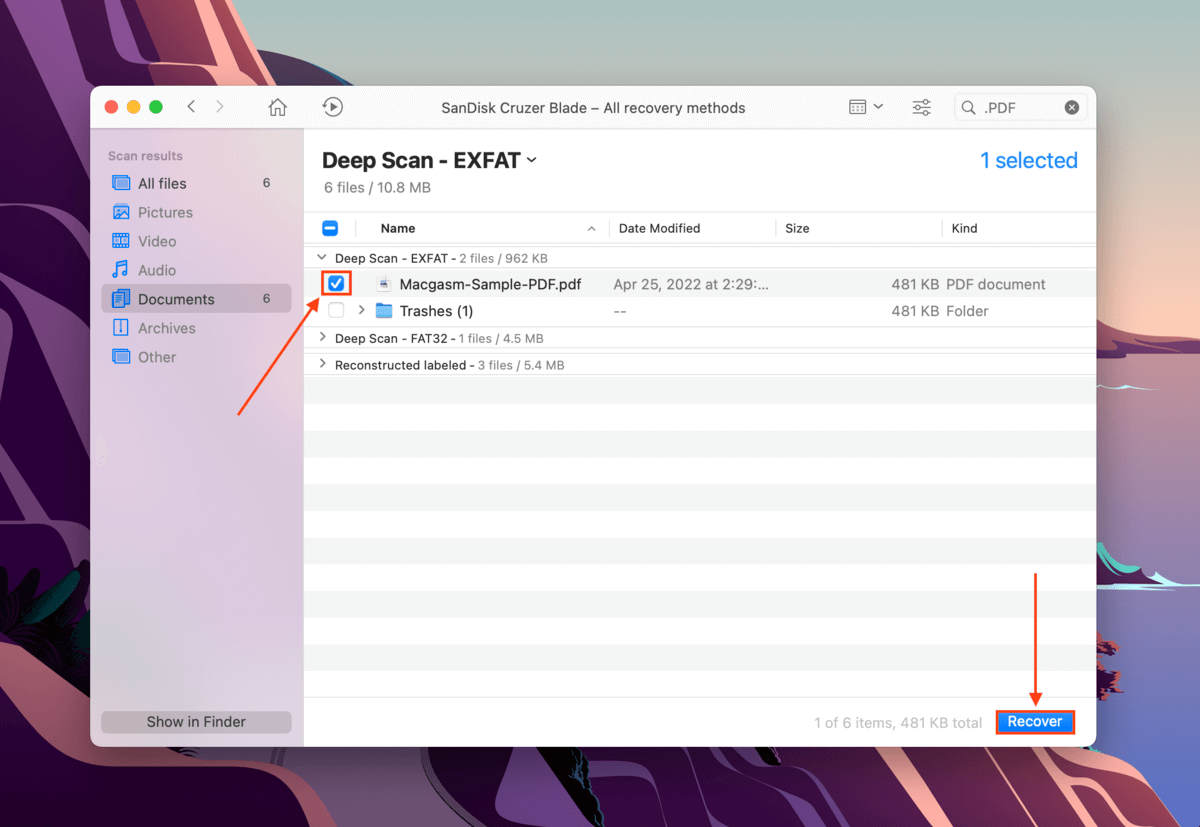
Step 7.Select a location on your non-malfunctioning drive to save the recovered files. Then, click OK.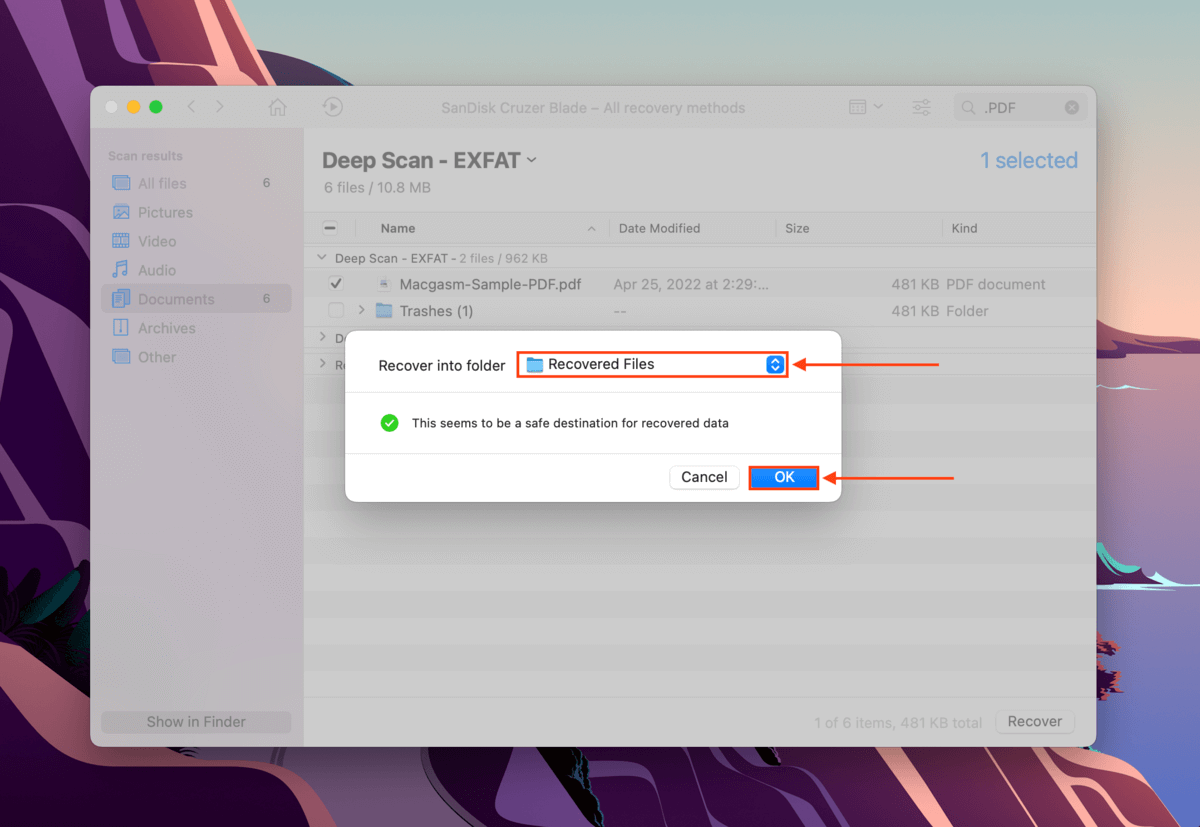
Conclusion
Bluntly, disk utility errors are inevitable. Buggy system updates, improper ejection, power surges, and other factors beyond the user’s control can cause one or multiple disk errors. Not only can these errors cause data loss by themselves, but the process of actually fixing them can also harm your files. The best you can do is to routinely back up your files to avoid the worst consequences of these errors.