BEFORE USING THE MACHINE
Envelopes
Do not use the following envelopes, as misfeeds will occur.
• Envelopes with metal tabs, clasps, strings, holes, or windows.
• Envelopes with rough fibres, carbon paper, or glossy surfaces.
• Envelopes with two or more flaps.
• Envelopes with tape, film, or paper attached to the flap.
• Envelopes with a fold in the flap.
• Envelopes with glue on the flap to be moistened for sealing.
• Envelopes with labels or stamps.
• Envelopes that are slightly inflated with air.
• Envelopes with glue protruding from the seal area.
• Envelopes with part of the seal area peeled off.
Follow these steps to change a tray’s paper size setting.
• The paper size setting cannot be changed when the machine has stopped temporarily due to running out of
Note
paper or a misfeed, or during interrupt copying.
• During printing (even in copy mode), the paper size setting cannot be changed.
• A5 size paper can only be selected in upper paper tray.
• Do not load paper that is a different size than the paper size setting. Copying will not be possible.
1
Hold down the [TRAY SETTING] key
(
) for more than 5 seconds to set
the selected paper size.
12
The currently selected
paper feed location
indicator will blink and the
corresponding paper size
(which is currently set)
indicator will light steadily.
All other indicators will go
out.
2
If the machine has two or more paper
trays, use the [PAPER SELECT] key
(
) to select the paper tray for which
you wish to change the paper size
setting.
Each time the [PAPER
SELECT] key (
) is
pressed, a paper tray will
be indicated with a
blinking paper feed
location indicator.
При использовании любой техники время от времени могут возникать неполадки. Так, например, при использовании копиров, принтеров и МФУ Sharpмогут появляться различные ошибки, вызванные различными причинами. Об их возникновении пользователь информируется с помощью кода, которые выводится на дисплее принтера или другого используемого устройства. Коды ошибок Sharp вы можете идентифицировать с помощью приведенной ниже таблицы. Выяснив причину сбоя в работе устройства, вы сможете устранить ее самостоятельно (например, если произошло замятие бумаги, отсутствует бумага в лотке) либо обратиться в сервисный центр по обслуживанию и ремонту Sharp, если код ошибки сообщает о серьезной поломке.
Sharp AL-840
| Код ошибки | Подкод | Описание |
|---|---|---|
| L1 | 00 | Неисправность при движении сканирующего устройства |
| L3 | 00 | Неисправность сканирующего устройства при возвращении в начальное положение |
| Е7 | 03 | Неисправность, связанная с яркостью свечения лазера |
| 04 | Ошибка при определении уровня белого при выполнении штриховки | |
| 05 | Ошибка при определении уровня черного при выполнении штриховки | |
| 12 | Ошибка уровня выходного сигнала при выполнении штриховки | |
| 14 | Сбой ASIC (MCU PWB) | |
| 15 | Неисправность копировальной лампы | |
| H2 | 00 | Неисправность термодатчика |
| H3 | 00 | Температура вала узла закрепления превысила норму |
| H4 | 00 | Температура вала узла закрепления опустилась ниже положенного уровня |
| U2 | 01 | Неисправность EEPROM (MCU PWB) (ошибка данных счетчика) |
| 04 | Неисправность EEPROM (MCU PWB) (ошибка записи/чтения) | |
| 05 | Неисправность EEPROM (MCU PWB) | |
| 06 | Неисправность ROM (MCU PWB) | |
| C1 | Неисправность, обнаруженная выключателем передней панели (блока питания) | |
| CH | Отсутствует тонер-картридж | |
| E1 | Замятие бумаги при подаче из лотка | |
| E2 | Замятие бумаги | |
| E3 | Замятие бумаги на выходе узла закрепления | |
| P | Отсутствие бумаги в лотке |
Sharp AL-1000
| Код ошибки | Подкод | Описание |
|---|---|---|
| E7 | 03 | Неисправность блока лазера, связанная с излучающим диодом и его цепями |
| 04 | Ошибка при определении уровня белого при выполнении штриховки | |
| 05 | Ошибка при определении уровня черного при выполнении штриховки | |
| 12 | Ошибка уровня выходного сигнала при выполнении штриховки | |
| 14 | Сбой ASIC (MCU PWB) | |
| 15 | Неисправность копировальной лампы | |
| L1 | 00 | Неисправность при движении сканирующего устройства (датчик начального положения сканирующего устройства не видит движения зеркал) |
| L3 | 00 | Неисправность сканирующего устройства при возвращении в начальное положение (сканер не успел вернутся в начальное положение за определенное время) |
| L4 | 01 | Main motor drive overloaded |
| L6 | 10 | Неисправность двигателя многогранника блока лазера (полигон-мотор) |
| H2 | 00 | Неисправность термодатчика |
| H3 | 00 | Температура вала узла закрепления превысила норму |
| H4 | 00 | Температура вала узла закрепления опустилась ниже положенного уровня |
| U2 | 01 | Неисправность EEPROM (MCU PWB) (ошибка данных счетчика) |
| 04 | Неисправность EEPROM (MCU PWB) (ошибка записи/чтения) | |
| CH | Отсутствует тонер-картридж |
Sharp AL-1010
| Код ошибки | Подкод | Описание |
|---|---|---|
| E7 | 03 | Scanner position error |
| 04 | Exposure lamp blown | |
| 05 | CCD calibration error | |
| 12 | White level calibration error | |
| 14 | Main board malfunction | |
| 15 | Exposure lamp blown | |
| L1 | 00 | Scanner position error |
| L3 | 00 | Scanner position error |
| L4 | 01 | Main motor drive overloaded |
| L6 | 10 | Polygon mirror motor not up to speed |
| H2 | 00 | Fusing unit temperature error |
| H3 | 00 | Overheated fusing unit |
| H4 | 00 | The fusing unit doesn’t heat up |
| U2 | 01 | Counter error |
| 04 | EPROM error | |
| CH blinking | Dev unit is not properly installed |
Sharp AR-160 / 161
| Код ошибки | Подкод | Описание |
|---|---|---|
| CC | Original not detected | |
| E1 | 00 | Lost communication with the Sorter |
| 10 | Lost communication with the Sorter | |
| 11 | ASIC error | |
| 12 | Image Processing Unit error | |
| 13 | ROM error | |
| 14 | NVRAM error | |
| 15 | Page memory fault | |
| 16 | SIMM not present or installed incorectly | |
| 17 | Page rotation error in RAM | |
| 80 | Electronic sort board error | |
| 81 | ||
| 82 | ||
| 84 | ||
| 88 | ||
| E7 | 03 | Lens position error |
| 04 | White level calibration error | |
| 05 | Black level calibration error | |
| 12 | CCD calibration error | |
| F1 | 06 | Shift sort motor overloaded |
| F5 | 02 | Exposure lamp blown |
| F6 | 00 | Fax board problems |
| 10 | ||
| 80 | ||
| 81 | ||
| 82 | ||
| 84 | ||
| 88 | ||
| F9 | 00 | Printer board problems |
| 10 | ||
| 80 | ||
| 81 | ||
| 82 | ||
| 84 | ||
| 88 | ||
| H2 | 00 | Fusing unit temperature error |
| H3 | 00 | Overheated fusing unit |
| H4 | 00 | The fusing unit doesn’t heat up |
| L1 | 00 | Scanner position error |
| L3 | 00 | Scanner position error |
| L4 | 01 | Main motor drive overloaded |
| 10 | Separation motor overloaded | |
| L6 | 10 | Polygon mirror motor not up to speed |
| L8 | 01 | Zero cross signal error |
| U2 | 04 | EPROM error |
| 11 | Main counter error | |
| 12 | EPROM error | |
| U3 | 29 | Mirror position error |
| U9 | 00 | Op panel problem |
| 81 | ||
| 82 | ||
| 84 | ||
| 88 | ||
| U95 | Firmware error |
Sharp AR-163 / 201 / 206 / 5015 / 5020
| Код ошибки | Подкод | Описание |
|---|---|---|
| E1 | 00 | Неисправность связи с платой электронного сортировщика |
| 10 | Неисправность платы электронного сортировщика | |
| 11 | Ошибка ASIC электронного сортировщика | |
| 12 | Ошибка CODEC электронного сортировщика | |
| 13 | Ошибка очистки (сброса) ROM электронного сортировщика | |
| 14 | Ошибка RAM электронного сортировщика | |
| 15 | Ошибка сохранения страницы в памяти электронного сортировщика | |
| 16 | Ошибка SIMM электронного сортировщика | |
| 17 | Ошибка RAM | |
| 80 | Неисправность связи с платой электронного сортировщика (PROTOCOL) | |
| 81 | Неисправность связи с платой электронного сортировщика (PARITY) | |
| 82 | Неисправность связи с платой электронного сортировщика (OVERRUN) | |
| 84 | Неисправность связи с платой электронного сортировщика (FRAMING) | |
| 88 | Неисправность связи с платой электронного сортировщика (TIME-OUT) | |
| E7 | 03 | Неисправность блока лазера |
| 04 | Ошибка определения уровня белого CCD | |
| 05 | Ошибка при определении уровня черного CCD | |
| F1 | 06 | Неисправность Shifter (двигателя сдвига копии) |
| F2 | 04 | Ошибка чтения данных CRUM (чипа тонер-картриджа) |
| F5 | 02 | Неисправность копировальной лампы |
| F6 | 00 | Ошибка связи с платой факса |
| 10 | Неисправность платы факса | |
| 80 | Ошибка связи с платой факса (PROTOCOL) | |
| 81 | Ошибка связи с платой факса (PARITY) | |
| 82 | Ошибка связи с платой факса (OVERRUN) | |
| 84 | Ошибка связи с платой факса (FRAMING) | |
| 88 | Ошибка связи с платой факса (TIME-OUT) | |
| F9 | 00 | Ошибка связи с платой принтера |
| 10 | Неисправность платы принтера | |
| 80 | Ошибка связи с платой принтера (PROTOCOL) | |
| 81 | Ошибка связи с платой принтера (PARITY) | |
| 82 | Ошибка связи с платой принтера (OVERRUN) | |
| 84 | Ошибка связи с платой принтера (FRAMING) | |
| 88 | Ошибка связи с платой принтера (TIME-OUT) | |
| H2 | 00 | Неисправность термодатчика |
| H3 | 00 | Температура вала узла закрепления превысила норму |
| H4 | 00 | Температура вала узла закрепления опустилась ниже положенного уровня |
| L1 | 00 | Обнаружена неисправность при определении начального положения сканирующей каретки |
| L3 | 00 | Обнаружена неисправность при обратном ходе сканирующей каретки |
| L4 | 01 | Неисправность главного двигателя |
| 10 | Неисправность двигателя сепаратора | |
| L6 | 10 | Неисправность двигателя многогранника блока лазера (полигон-мотор) |
| L8 | 01 | Ошибка сигнала пересечения нуля |
| U2 | 04 | EEPROM serial communication error |
| 11 | counter check sum error | |
| 12 | adjustment value check sum error(EEPROM) | |
| 40 | CRUM communication error | |
| U3 | 29 | Ошибка в определении начального положения зеркал |
| U9 | 00 | Ошибка связи с панелью управления (PROTOCOL) |
| 80 | Ошибка связи с панелью управления (PARITY) | |
| 82 | Ошибка связи с панелью управления (OVERRUN) | |
| 84 | Ошибка связи с панелью управления (FRAMING) | |
| 88 | Ошибка связи с панелью управления (TIME-OUT) | |
| U95 | Неисправность соединения платы управления | |
| U99 |
Sharp AR-405
| Код ошибки | Подкод | Описание |
|---|---|---|
| C1 | 00 | MC unit malfunction |
| C2 | 00 | TC unit malfunction |
| E7 | 00 | Image Processing Unit error |
| 01 | Memory back-up battery dead | |
| 02 | Laser unit problem | |
| 03 | HDD defective | |
| 10 | black level calibration error | |
| 11 | white level calibration error | |
| 13 | CCD calibration error | |
| 90 | Image Processing Unit error | |
| F1 | 00 | Lost communication with the Sorter |
| 01 | Sorter registration problem | |
| 02 | Paper transport motor overloaded in sorter | |
| 04 | Bin position error in sorter | |
| 05 | Bin position error in sorter | |
| 06 | Shift sort motor overloaded | |
| 08 | Stapler position error | |
| 08 | Stapler overloaded | |
| 11 | Sorter problems | |
| 14 | Second shift tray jammed | |
| 15 | Sorter drive problems | |
| 50 | Sorter not installed properly | |
| 80 | No powerin sorter | |
| F2 | 00 | ID pattern reading error |
| 02 | Toner add mechanism malfunction | |
| 31 | ID pattern reading error | |
| 32 | ID pattern reading error | |
| 39 | Drum thermistor error | |
| F3 | 12 | Paper does not lift in the tray |
| 22 | Paper does not lift in the tray | |
| F9 | 00 | Printer board problems |
| 01 | Printer board problems | |
| 02 | Printer board problems | |
| 03 | Network card error | |
| 04 | Firmware error | |
| 05 | Not enough memory | |
| 10 | Printer board problems | |
| 90 | Printer board problems | |
| H2 | 00 | Fusing unit temperature error |
| 01 | Fusing unit temperature error | |
| H3 | 00 | Overheated fusing unit |
| 01 | Overheated fusing unit | |
| H4 | 00 | The fusing unit doesn’t heat up |
| 01 | The fusing unit doesn’t heat up | |
| H5 | 01 | Papersensordefective in the fusing unit |
| 02 | Fusing unit temperature error | |
| L1 | 00 | Scanner position error |
| L3 | 00 | Scanner position error |
| L4 | 01 | Main motor drive overloaded |
| L6 | 10 | Polygon mirror motor not up to speed |
| L8 | 01 | Zero cross signal error |
| 02 | Zero cross signal error | |
| U2 | 00 | EPROM error |
| 11 | EPROM error | |
| U4 | 02 | Duplex not working properly |
| 03 | Duplex problems | |
| U5 | 00 | Communication with the ADF is lost |
| 01 | Registration sensor problem in ADF | |
| 02 | Exit sensor error in ADF | |
| 03 | Timing sensor problems in ADF | |
| 11 | Paper feed drive overloaded in ADF | |
| U6 | 01 | Paper lift problem in 1’st optional tray |
| 02 | Paper lift problem in 2’nd optional tray | |
| 08 | Paper feed unit without power | |
| 10 | PFU paper transport motor overloaded | |
| 22 | Paper feed unit without power | |
| 50 | Paper feed unit not installed properly | |
| 51 | LCT not installed properly | |
| U7 | 00 | Main board malfunction |
| U9 | 00 | Op panel problem |
| 90 | Op panel problem | |
| EE | EU | Low toner density in the developer |
| EE | EL | High toner density in the developer |
| FA | 01 | Memory back-up battery dead |
| PC | Key counter not installed |
При использовании любой техники время от времени могут возникать неполадки. Так, например, при использовании копиров, принтеров и МФУ Sharpмогут появляться различные ошибки, вызванные различными причинами. Об их возникновении пользователь информируется с помощью кода, которые выводится на дисплее принтера или другого используемого устройства. Коды ошибок Sharp вы можете идентифицировать с помощью приведенной ниже таблицы. Выяснив причину сбоя в работе устройства, вы сможете устранить ее самостоятельно (например, если произошло замятие бумаги, отсутствует бумага в лотке) либо обратиться в сервисный центр по обслуживанию и ремонту Sharp, если код ошибки сообщает о серьезной поломке.
Sharp AL-840
| Код ошибки | Подкод | Описание |
|---|---|---|
| L1 | 00 | Неисправность при движении сканирующего устройства |
| L3 | 00 | Неисправность сканирующего устройства при возвращении в начальное положение |
| Е7 | 03 | Неисправность, связанная с яркостью свечения лазера |
| 04 | Ошибка при определении уровня белого при выполнении штриховки | |
| 05 | Ошибка при определении уровня черного при выполнении штриховки | |
| 12 | Ошибка уровня выходного сигнала при выполнении штриховки | |
| 14 | Сбой ASIC (MCU PWB) | |
| 15 | Неисправность копировальной лампы | |
| H2 | 00 | Неисправность термодатчика |
| H3 | 00 | Температура вала узла закрепления превысила норму |
| H4 | 00 | Температура вала узла закрепления опустилась ниже положенного уровня |
| U2 | 01 | Неисправность EEPROM (MCU PWB) (ошибка данных счетчика) |
| 04 | Неисправность EEPROM (MCU PWB) (ошибка записи/чтения) | |
| 05 | Неисправность EEPROM (MCU PWB) | |
| 06 | Неисправность ROM (MCU PWB) | |
| C1 | Неисправность, обнаруженная выключателем передней панели (блока питания) | |
| CH | Отсутствует тонер-картридж | |
| E1 | Замятие бумаги при подаче из лотка | |
| E2 | Замятие бумаги | |
| E3 | Замятие бумаги на выходе узла закрепления | |
| P | Отсутствие бумаги в лотке |
Sharp AL-1000
| Код ошибки | Подкод | Описание |
|---|---|---|
| E7 | 03 | Неисправность блока лазера, связанная с излучающим диодом и его цепями |
| 04 | Ошибка при определении уровня белого при выполнении штриховки | |
| 05 | Ошибка при определении уровня черного при выполнении штриховки | |
| 12 | Ошибка уровня выходного сигнала при выполнении штриховки | |
| 14 | Сбой ASIC (MCU PWB) | |
| 15 | Неисправность копировальной лампы | |
| L1 | 00 | Неисправность при движении сканирующего устройства (датчик начального положения сканирующего устройства не видит движения зеркал) |
| L3 | 00 | Неисправность сканирующего устройства при возвращении в начальное положение (сканер не успел вернутся в начальное положение за определенное время) |
| L4 | 01 | Main motor drive overloaded |
| L6 | 10 | Неисправность двигателя многогранника блока лазера (полигон-мотор) |
| H2 | 00 | Неисправность термодатчика |
| H3 | 00 | Температура вала узла закрепления превысила норму |
| H4 | 00 | Температура вала узла закрепления опустилась ниже положенного уровня |
| U2 | 01 | Неисправность EEPROM (MCU PWB) (ошибка данных счетчика) |
| 04 | Неисправность EEPROM (MCU PWB) (ошибка записи/чтения) | |
| CH | Отсутствует тонер-картридж |
Sharp AL-1010
| Код ошибки | Подкод | Описание |
|---|---|---|
| E7 | 03 | Scanner position error |
| 04 | Exposure lamp blown | |
| 05 | CCD calibration error | |
| 12 | White level calibration error | |
| 14 | Main board malfunction | |
| 15 | Exposure lamp blown | |
| L1 | 00 | Scanner position error |
| L3 | 00 | Scanner position error |
| L4 | 01 | Main motor drive overloaded |
| L6 | 10 | Polygon mirror motor not up to speed |
| H2 | 00 | Fusing unit temperature error |
| H3 | 00 | Overheated fusing unit |
| H4 | 00 | The fusing unit doesn’t heat up |
| U2 | 01 | Counter error |
| 04 | EPROM error | |
| CH blinking | Dev unit is not properly installed |
Sharp AR-160 / 161
| Код ошибки | Подкод | Описание |
|---|---|---|
| CC | Original not detected | |
| E1 | 00 | Lost communication with the Sorter |
| 10 | Lost communication with the Sorter | |
| 11 | ASIC error | |
| 12 | Image Processing Unit error | |
| 13 | ROM error | |
| 14 | NVRAM error | |
| 15 | Page memory fault | |
| 16 | SIMM not present or installed incorectly | |
| 17 | Page rotation error in RAM | |
| 80 | Electronic sort board error | |
| 81 | ||
| 82 | ||
| 84 | ||
| 88 | ||
| E7 | 03 | Lens position error |
| 04 | White level calibration error | |
| 05 | Black level calibration error | |
| 12 | CCD calibration error | |
| F1 | 06 | Shift sort motor overloaded |
| F5 | 02 | Exposure lamp blown |
| F6 | 00 | Fax board problems |
| 10 | ||
| 80 | ||
| 81 | ||
| 82 | ||
| 84 | ||
| 88 | ||
| F9 | 00 | Printer board problems |
| 10 | ||
| 80 | ||
| 81 | ||
| 82 | ||
| 84 | ||
| 88 | ||
| H2 | 00 | Fusing unit temperature error |
| H3 | 00 | Overheated fusing unit |
| H4 | 00 | The fusing unit doesn’t heat up |
| L1 | 00 | Scanner position error |
| L3 | 00 | Scanner position error |
| L4 | 01 | Main motor drive overloaded |
| 10 | Separation motor overloaded | |
| L6 | 10 | Polygon mirror motor not up to speed |
| L8 | 01 | Zero cross signal error |
| U2 | 04 | EPROM error |
| 11 | Main counter error | |
| 12 | EPROM error | |
| U3 | 29 | Mirror position error |
| U9 | 00 | Op panel problem |
| 81 | ||
| 82 | ||
| 84 | ||
| 88 | ||
| U95 | Firmware error |
Sharp AR-163 / 201 / 206 / 5015 / 5020
| Код ошибки | Подкод | Описание |
|---|---|---|
| E1 | 00 | Неисправность связи с платой электронного сортировщика |
| 10 | Неисправность платы электронного сортировщика | |
| 11 | Ошибка ASIC электронного сортировщика | |
| 12 | Ошибка CODEC электронного сортировщика | |
| 13 | Ошибка очистки (сброса) ROM электронного сортировщика | |
| 14 | Ошибка RAM электронного сортировщика | |
| 15 | Ошибка сохранения страницы в памяти электронного сортировщика | |
| 16 | Ошибка SIMM электронного сортировщика | |
| 17 | Ошибка RAM | |
| 80 | Неисправность связи с платой электронного сортировщика (PROTOCOL) | |
| 81 | Неисправность связи с платой электронного сортировщика (PARITY) | |
| 82 | Неисправность связи с платой электронного сортировщика (OVERRUN) | |
| 84 | Неисправность связи с платой электронного сортировщика (FRAMING) | |
| 88 | Неисправность связи с платой электронного сортировщика (TIME-OUT) | |
| E7 | 03 | Неисправность блока лазера |
| 04 | Ошибка определения уровня белого CCD | |
| 05 | Ошибка при определении уровня черного CCD | |
| F1 | 06 | Неисправность Shifter (двигателя сдвига копии) |
| F2 | 04 | Ошибка чтения данных CRUM (чипа тонер-картриджа) |
| F5 | 02 | Неисправность копировальной лампы |
| F6 | 00 | Ошибка связи с платой факса |
| 10 | Неисправность платы факса | |
| 80 | Ошибка связи с платой факса (PROTOCOL) | |
| 81 | Ошибка связи с платой факса (PARITY) | |
| 82 | Ошибка связи с платой факса (OVERRUN) | |
| 84 | Ошибка связи с платой факса (FRAMING) | |
| 88 | Ошибка связи с платой факса (TIME-OUT) | |
| F9 | 00 | Ошибка связи с платой принтера |
| 10 | Неисправность платы принтера | |
| 80 | Ошибка связи с платой принтера (PROTOCOL) | |
| 81 | Ошибка связи с платой принтера (PARITY) | |
| 82 | Ошибка связи с платой принтера (OVERRUN) | |
| 84 | Ошибка связи с платой принтера (FRAMING) | |
| 88 | Ошибка связи с платой принтера (TIME-OUT) | |
| H2 | 00 | Неисправность термодатчика |
| H3 | 00 | Температура вала узла закрепления превысила норму |
| H4 | 00 | Температура вала узла закрепления опустилась ниже положенного уровня |
| L1 | 00 | Обнаружена неисправность при определении начального положения сканирующей каретки |
| L3 | 00 | Обнаружена неисправность при обратном ходе сканирующей каретки |
| L4 | 01 | Неисправность главного двигателя |
| 10 | Неисправность двигателя сепаратора | |
| L6 | 10 | Неисправность двигателя многогранника блока лазера (полигон-мотор) |
| L8 | 01 | Ошибка сигнала пересечения нуля |
| U2 | 04 | EEPROM serial communication error |
| 11 | counter check sum error | |
| 12 | adjustment value check sum error(EEPROM) | |
| 40 | CRUM communication error | |
| U3 | 29 | Ошибка в определении начального положения зеркал |
| U9 | 00 | Ошибка связи с панелью управления (PROTOCOL) |
| 80 | Ошибка связи с панелью управления (PARITY) | |
| 82 | Ошибка связи с панелью управления (OVERRUN) | |
| 84 | Ошибка связи с панелью управления (FRAMING) | |
| 88 | Ошибка связи с панелью управления (TIME-OUT) | |
| U95 | Неисправность соединения платы управления | |
| U99 |
Sharp AR-405
| Код ошибки | Подкод | Описание |
|---|---|---|
| C1 | 00 | MC unit malfunction |
| C2 | 00 | TC unit malfunction |
| E7 | 00 | Image Processing Unit error |
| 01 | Memory back-up battery dead | |
| 02 | Laser unit problem | |
| 03 | HDD defective | |
| 10 | black level calibration error | |
| 11 | white level calibration error | |
| 13 | CCD calibration error | |
| 90 | Image Processing Unit error | |
| F1 | 00 | Lost communication with the Sorter |
| 01 | Sorter registration problem | |
| 02 | Paper transport motor overloaded in sorter | |
| 04 | Bin position error in sorter | |
| 05 | Bin position error in sorter | |
| 06 | Shift sort motor overloaded | |
| 08 | Stapler position error | |
| 08 | Stapler overloaded | |
| 11 | Sorter problems | |
| 14 | Second shift tray jammed | |
| 15 | Sorter drive problems | |
| 50 | Sorter not installed properly | |
| 80 | No powerin sorter | |
| F2 | 00 | ID pattern reading error |
| 02 | Toner add mechanism malfunction | |
| 31 | ID pattern reading error | |
| 32 | ID pattern reading error | |
| 39 | Drum thermistor error | |
| F3 | 12 | Paper does not lift in the tray |
| 22 | Paper does not lift in the tray | |
| F9 | 00 | Printer board problems |
| 01 | Printer board problems | |
| 02 | Printer board problems | |
| 03 | Network card error | |
| 04 | Firmware error | |
| 05 | Not enough memory | |
| 10 | Printer board problems | |
| 90 | Printer board problems | |
| H2 | 00 | Fusing unit temperature error |
| 01 | Fusing unit temperature error | |
| H3 | 00 | Overheated fusing unit |
| 01 | Overheated fusing unit | |
| H4 | 00 | The fusing unit doesn’t heat up |
| 01 | The fusing unit doesn’t heat up | |
| H5 | 01 | Papersensordefective in the fusing unit |
| 02 | Fusing unit temperature error | |
| L1 | 00 | Scanner position error |
| L3 | 00 | Scanner position error |
| L4 | 01 | Main motor drive overloaded |
| L6 | 10 | Polygon mirror motor not up to speed |
| L8 | 01 | Zero cross signal error |
| 02 | Zero cross signal error | |
| U2 | 00 | EPROM error |
| 11 | EPROM error | |
| U4 | 02 | Duplex not working properly |
| 03 | Duplex problems | |
| U5 | 00 | Communication with the ADF is lost |
| 01 | Registration sensor problem in ADF | |
| 02 | Exit sensor error in ADF | |
| 03 | Timing sensor problems in ADF | |
| 11 | Paper feed drive overloaded in ADF | |
| U6 | 01 | Paper lift problem in 1’st optional tray |
| 02 | Paper lift problem in 2’nd optional tray | |
| 08 | Paper feed unit without power | |
| 10 | PFU paper transport motor overloaded | |
| 22 | Paper feed unit without power | |
| 50 | Paper feed unit not installed properly | |
| 51 | LCT not installed properly | |
| U7 | 00 | Main board malfunction |
| U9 | 00 | Op panel problem |
| 90 | Op panel problem | |
| EE | EU | Low toner density in the developer |
| EE | EL | High toner density in the developer |
| FA | 01 | Memory back-up battery dead |
| PC | Key counter not installed |
Main
Sub
Contents
code
code
66
38
Time setting/check
(Executable only when the
FAX is installed.)
67
50
USB receive speed
adjustment (USB1.1)
(AR-203E only)
A. Trouble codes list
Main
Sub
code
code
E1
00
IMC communication trouble
10
IMC trouble
13
IMC flash ROM error
81
IMC communication interface error (Parity)
82
IMC communication interface error (Overrun)
84
IMC communication interface error (Framing)
E7
01
Duplex model memory setup error, memory not-
detected error
02
LSU trouble
10
Shading trouble (Black correction)
11
Shading trouble (White correction)
[Function]
Use to check the time setting.
[Operation]
1) Initial display
SELECT TO SET
1:DATE
∗ [Clear] key: FAX control is terminated.
2) Select 1
xxxx.xx.xx(xxx)
CHANGE?
1:YES 2:NO
«xxxx.xx.xx(xxx)» is the current value. (No
revision of display)
3) Select 1
INPUT YEAR
(4 DIGITS)____.__.__
∗ Select 2: Returns to «1) Initial display».
4) Enter the year in 4 digits.
INPUT MONTH
(1-12)
1998.__.__
5) Enter the month in 2 digits.
INPUT DAY
(1-31)
1998.01.__
6) Enter the day in 2 digits.
xxxx.xx.xx(xxx)
STORED?
1:YES 2:NO
«xxxx.xx.xx(xxx) is the entered value.
∗ Select 2: Returns to «1) Initial display».
7) Select 1
STORED
After 2sec, returns to «1) Initial display».
Used to set the limitation on the print data receive speed of USB2.0 (Full speed) port (USB port
on the machine).
→ When print images from USB2.0 (Full speed) port are disturbed, change the setting and try
again.
When this simulation is executed, the currently set code number is displayed.
Enter the code number corresponding to the adjustment value, and press [START] key to
change the setting.
Code number
1
2
3
4
Details of trouble
AR-203E/5420/M200/M201 SIMULATION, TROUBLE CODES 10 — 40
Details of function/operation
2:TIME
Setting
FAST
NORMAL1
NORMAL2
SLOW
Main
Sub
code
code
E7
16
Abnormal laser output
F2
02
Toner supply abnormality
04
Improper cartridge (Destination error, life cycle error)
F5
02
Copy lamp lighting abnormality
F6
10
FAX board trouble
H2
00
Thermistor open
H3
00
Heat roller high temperature detection
H4
00
Heat roller low temperature detection
L1
00
Feeding is not completed within the specified time
after starting feeding. (The scan head locking switch
is locked)
2) Select 2
xx:xx
CHANGE?
1:YES 2:NO
«xx:xx» is the current value.
3) Select 1
INPUT HOUR
(0-24)
__:__
∗ Select 2: Returns to «1) Initial display».
4) Enter o’clock in 2 digits.
INPUT MINUTE
(00-59)
01:__
5) Enter minute in 2 digits.
xx:xx
STORED?
1:YES 2:NO
«xx:xx» is the current value.
∗ Select 2: Returns to «1) Initial display».
6) Select 1
STORED
After 2sec, returns to «1) Initial display».
Speed
↑ Fast
↓ Slow
Details of trouble
Предлагаем вашему вниманию самое подробное описание кодов ошибок стиральных машин для марки Sharp.
Мы расскажем про стиральные машины Sharp всё
Профессиональный сервис
Стиральная машина Sharp это очень качественная электронная бытовая техника. Обладает системой самодиагностики которая контролируется электронным блоком, который сообщает о неполадках, показывая на дисплее коды ошибок. Зная расшифровку кода, не составит труда найти решение проблемы.

Советы от мастера Александра.
- Если панель индикации не светиться, то это не обязательно неисправность. Это может быть связанно напряжением в сети. Например не рабочая розетка и стиральная машина Sharp не включается.
- Когда моргают или засветились одновременно лампочки, тогда нужно начать проверку с блока управления (модуля), а уже затем проверять всю остальную периферию стиральной машины.
- Бывает, что ошибка может появится только один раз и для сброса будет достаточно просто перегрузить машинку. Но если код не исчез, тогда придётся его устранить.
-
Может случится так, что ремонт стиральной машины окажется очень сложным, тогда Вы можете перейти по этой ссылке “Ремонт стиральных машин в Самаре” и вызвать нашего мастера или просто проконсультироваться.
5E или SE – Не сливается вода.
Проблема со сливным насосом. Обычно при этом вода не сливается. Скорее всего, неисправна помпа, либо перегнут или засорился сливной шланг.

Причины:
- Засор в сливной системе: сливной фильтр, улитка, патрубок, шланг.
- Засор в канализации.
- Замена сливного насоса (помпы).
- Проблему в модуле управления.
- Повреждение проводки.
H1, H2, E5, E6, HE1 или HE2 – Не греется вода.
Проблемы, связанные с нагревательным элементом (ТЭНом). Может выбивать автомат во время стирки. Вода может не нагреваться или (реже) перегревает, вплоть до кипячения.

Причины:
- Вышел из строя нагревательный элемент.
- Проблема в модуле управления.
- Повреждена проводка.
- Самослив воды в канализацию.
- Выход из строя температурного датчика.
dE, Ed или Door – Дверца не заблокирована.
Неисправность устройства блокировки люка. Машина не начинает режим стирки, но светодиод горит. Люк не заблокирован. По окончании стирки люк не открывается.

Причины:
- Вышел из строя замок (устройство блокировки люка).
- Механическая неисправность.
- Проблема в модуле управления.
LE, LE1 или E93 – Протечка.
Износ манжеты люка. Машинка течет снизу. Требуется установка нового уплотнителя люка.

4E, Е1, 4С – Не заливается вода.
Все коды связаны с набором воды. Чаще всего это проблема в заливном клапане. Не заливается вода в барабан. Неисправен клапан или перегнулся шланг залива воды. Так же встречается выход из строя модуля управления.


Коды ошибок:
С1 00 — MC trouble (ошибка МС)
CE 00 — Another communication error occurs (ошибка связи)
CE 01 — The network card is not installed or broken (отсутствует сетевая карта)
CE 02 — The specified mail server or the FTP server is not found (ошибка FTP-сервера)
CE 03 — The specified server suspends response during transmission of images (ошибка при передачи изображения)
CE 04 — The entered account name of the FTP server or the password for authentication is invalid (неверное имя или пароль FTP-сервера)
CE 05 — The entered directory of the FTP server is invalid (директория FTP-сервера недействительна)
CE 06 — The specified mail server (POP3) is not found (указанный почтовый сервер не найден)
CE 07 — The entered account name of the POP3 server or the password for authentication is invalid (неверное имя или пароль POP3-сервера)
CE 08 — The specified mail server (POP3) suspends response (почтовый сервер приостанавливает ответ)
E6 11 — CIS shading trouble (проблема с затенением лампы сканирования)
E6 14 — CIS communication trouble (проблемы связи лампы сканирования)
E7 01 — System data trouble (неисправность данных системы)
E7 02 — Laser trouble (неисправность лазера)
E7 03 — HDD trouble (неисправность жесткого диска)
E7 06 — Decode error trouble (ошибка декодера)
E7 10 — CCD shading trouble (проблема затенения — черного)
E7 11 — CCD shading trouble (проблема затенения — белого)
E7 12 — CCD shading trouble (проблема затенения — регулировка коррекции белого)
E7 14 — CCD communication trouble (проблема связи CCD)
E7 50 — LSU connection trouble (проблема подключения лазера)
E7 55 — Incompatibility check (несовместимость PCU)
E7 56 — Incompatibility check (несовместимость PCU)
E7 57 — Incompatibility check (несовместимость PCU)
E7 60 — Controller connection trouble (проблема подключения контроллера)
E7 65 — Incompatibility check (несовместимость контроллера MFP)
E7 66 — Incompatibility check (несовместимость контроллера MFP)
E7 67 — Incompatibility check (несовместимость контроллера MFP)
E7 80 — Communication trouble between the MFP control and the scanner (проблема связи между управлением MFP и сканером)
E7 90 — MFP control-PCU communication trouble (проблема связи)
EE EL — Auto developer adjustment trouble (проблема регулировки проявки — много тонера)
EE EU — Auto developer adjustment trouble (проблема регулировки проявки — мало тонера)
F1 00 — Finisher communication trouble (проблема связи финишера)
F1 02 — Finisher transport motor abnormality (ошибка транспортного двигателя финишера)
F1 03 — Finisher oscillation motor trouble (ошибка колебания двигателя финишера)
F1 08 — Finisher staple shift motor trouble (проблема переключения двигателя финишера)
F1 09 — Finisher load capacity sensor trouble (неисправность датчика мощности финишера)
F1 10 — Finisher/staple motor trouble (неисправность двигателя финишера)
F1 11 — Finisher/pusher motor trouble (неисправность двигателя финишера)
F1 15 — Finisher tray lift motor trouble (неисправность двигателя подъема лотка)
F1 19 — Finisher/alignment motor trouble (неисправность двигателя финишера)
F1 31 — Finisher saddle folding sensor trouble (неисправность датчика складывания)
F1 32 — Finisher-saddle communication trouble (проблема связи салазок)
F1 33 — Finisher/punch shift motor trouble (проблема переключения двигателя)
F1 34 — Finisher/punch motor trouble (неисправность двигателя)
F1 37 — Finisher/ backup RAM trouble (проблема в памяти RAM)
F1 38 — Finisher/punch backup ROM trouble (проблема в памяти ROM)
F1 41 — Finisher/saddle positioning plate motor trouble (неисправность пластины позиционирования)
F1 42 — Finisher/saddle guide motor trouble (неисправность двигателя)
F1 43 — Finisher/saddle alignment motor trouble (неисправность двигателя выравнивания)
F1 44 — Finisher/saddle bottom staple motor trouble (неисправность двигателя)
F1 45 — Finisher/saddle front staple motor trouble (неисправность двигателя)
F1 46 — Finisher/saddle push motor trouble (неисправность двигателя)
F1 51 — Finisher/saddle sensor connector connection trouble (неисправность датчика соединения)
F1 52 — Finisher/micro switch trouble (проблема микровыключателя)
F1 60 — Finisher-inserter communication trouble (проблема связи финишера)
F1 61 — Inserter/EEPROM trouble (проблема EEPROM)
F1 62 — Inserter/reverse sensor trouble (несовместимость обратного датчика)
F2 00 — Toner control sensor open (открыт датчик контроля тонера)
F2 02 — Toner supply abnormality (ошибка питания торена)
F2 04 — Improper cartridge (ошибка картриджа, срок службы подошел к концу)
F2 05 — CRUM error (ошибка CRUM)
F2 06 — CRUM ID error (ошибка ID CRUM)
F2 31 — Process control trouble (ошибка фотобарабана)
F2 32 — Process control trouble (проблема с маркировкой барабана)
F2 37 — Drum marking sensor gain adjustment error (ошибка датчика барабана)
F2 39 — Process thermistor breakdown (неисправность термистора процесса)
F2 46 — Developing thermistor breakdown (неисправность термистора проявки)
F2 47 — Room temperature thermistor breakdown (неисправность термистора комнатной температуры)
F2 48 — Developing humidity sensor break down (неисправность датчика влажности)
F3 12 — Machine tray 1 lift-up trouble (неисправность лотка 1)
F3 22 — Machine tray 2 lift-up trouble (неисправность лотка 2)
F3 32 — Machine tray 3 lift-up trouble (неисправность лотка 3)
F3 42 — Machine tray 4 lift-up trouble (неисправность лотка 4)
F4 38 — 38V voltage trouble (ошибка напряжения 38V)
F6 00 — MFP control-FAX communication trouble (ошибка связи между MFP и факсом)
F6 01 — FAX expansion Flash memory trouble (ошибка расширения памяти факса)
F6 04 — FAX modem operation abnormality (неисправность модема факса)
F6 20 — FAX write protect cancel (проблема записи факса)
F6 21 — Abnormal combination of the TEL/LIU PWB and the FAX soft switch (ошибка переключателя)
F6 97 — FAX-BOX incompatibility trouble (несовместимость факса)
F6 98 — Combination error of the FAX-BOX destination information and the machine destination information (ошибка информации региона)
F7 01 — FAX board EEPROM read/write error (ошибка чтения/записи факса)
F9 02 — PRT centro port check error (центр проверки ошибок)
H2 00 — Thermistor open/Fusing unit not installed (ошибка термистора HL1)
H2 01 — Thermistor open/Fusing unit not installed (ошибка термистора HL2)
H2 02 — Thermistor open/Fusing unit not installed (ошибка термистора HL3)
H3 00 — Fusing section high temperature trouble (высокая температура HL1)
H3 01 — Fusing section high temperature trouble (высокая температура HL2)
H3 02 — Fusing section high temperature trouble (высокая температура HL3)
H4 00 — Fusing section low temperature trouble (низкая температура HL1)
H4 01 — Fusing section low temperature trouble (низкая температура HL2)
H4 02 — Fusing section low temperature trouble (низкая температура HL3)
H5 01 — 5-time continuous POD notreached JAM detection (ошибка замятия)
L1 00 — Scanner feed trouble (проблема подачи сканера)
L3 00 — Scanner return trouble (проблема возврата сканера)
L4 01 — Main motor lock detection (обнаружение блокировки главного двигателя)
L4 02 — Drum motor lock detection (обнаружение блокировки двигателя барабана)
L4 03 — Fusing motor lock detection (обнаружение блокировки двигателя печки)
L4 04 — Developing motor lock detection (блокировка двигателя проявки)
L4 06 — Transfer belt separation motor trouble detection (неисправность двигателя ленты переноса)
L4 30 — Controller fan motor lock detection (блокировка двигателя вентилятора)
L4 31 — Paper discharging fan trouble (неисправность вентилятора)
L6 10 — Polygon motor lock detection (блокировка двигателя лазера)
L8 01 — No full wave signal (нет полного волнового сигнала)
PF 00 — RIC copy inhibit command receive (ошибка RIC)
U1 01 — FAX battery abnormality (неисправность аккумулятора факса)
U1 02 — RTC read error (ошибка чтения RTC)
U2 00 — EEPROM read/write error (ошибка EEPROM)
U2 11 — Counter check sum error (ошибка счетчика контрольной суммы)
U2 12 — Adjustment value check sum error (регулировка значения контрольной суммы)
U2 22 — SRAM memory check sum error (ошибка памяти SRAM)
U2 23 — SRAM memory individual data check sum error (проверка памяти SRAM)
U2 50 — HDD section individual data check sum error (проверка раздела HDD)
U2 80 — EEPROM read/write error (ошибка сканера EEPROM)
U2 81 — Memory check sum error (проверка памяти сканера)
U2 90 — EEPROM read/write error (ошибка PCU EEPROM)
U2 91 — Memory check sum error (проверка PCU памяти)
U5 30 — DSPF tray lift-up trouble (неисправность подъема лотка)
U5 31 — DSPF tray lift-down trouble (неисправность опускания лотка)
U6 09 — LCC lift motor trouble (проблема двигателя LCC)
U6 20 — LCC communication trouble (проблема связи LCC)
U6 21 — LCC transport motor trouble (проверка транспортного двигателя LCC)
U6 22 — LCC 24V power abnormality addition (неправильная мощность 24V)
U7 00 — RIC communication trouble (проблема связи RIC)
| Trouble code | Trouble content | ||
|---|---|---|---|
| E1 | 00 | E-Sort board communication trouble | |
| 10 | E-Sort board trouble | ||
| 11 | E-Sort ASIC error | ||
| 12 | E-Sort CODEC error | ||
| 13 | E-Sort flash ROM error | ||
| 14 | E-Sort RAM error | ||
| 15 | E-Sort page memory error | ||
| 16 | E-Sort SIMM error | ||
| 17 | Rotation RAM error | ||
| 80 | E-Sort board communication trouble (Protocol) | ||
| 81 | E-Sort board communication trouble (Parity) | ||
| 82 | E-Sort board communication trouble (Overrun) | ||
| 84 | E-Sort board communication trouble (Framing) | ||
| 88 | E-Sort board communication trouble (Time-out) | ||
| E7 | 03 | LSU trouble | |
| 04 | CCD white level trouble | ||
| 05 | CCD black level trouble | ||
| F5 | 02 | Copy lamp error | |
| F6 | 00 | FAX board communication trouble | |
| 10 | FAX board trouble | ||
| 80 | FAX board communication trouble (Protocol) | ||
| 81 | FAX board communication trouble (Parity) | ||
| 82 | FAX board communication trouble (Overrun) | ||
| 84 | FAX board communication trouble (Framing) | ||
| 88 | FAX board communication trouble (Time-out) |
||
| F9 | 00 | Printer PWB communication trouble | |
| 10 | Printer PWB trouble | ||
| 80 | Printer PWB communication trouble (Protocol) | ||
| 81 | Printer PWB communication trouble (Parity) | ||
| 82 | Printer PWB communication trouble (Overrun) | ||
| 84 | Printer PWB communication trouble (Framing) | ||
| 88 | Printer PWB communication trouble (Time-out) |
||
| H2 | 00 | Thermistor open detection | |
| H3 | 00 | Heat roller abnormally high temperature | |
| H4 | 00 | Heat roller abnormally low temperature | |
| L1 | 00 | Mirror base feed trouble | |
| L3 | 00 | Mirror base return trouble | |
| L4 | 01 | Main motor lock | |
| 10 | Job separator motor abnormality | ||
| L6 | 10 | Polygon motor lock | |
| L8 | 01 | Zero cross pulse (FW) trouble | |
| U2 | 04 | EEPROM serial communication error | |
| 11 | Counter check sum error | ||
| 12 | Adjustment value check sum error (EEPROM) | ||
| U3 | 29 | Mirror base home position error | |
| U9 | 00 | Operation control PWB communication trouble | |
| 80 | Operation control PWB communication trouble (Protocol) |
||
| 81 | Operation control PWB communication trouble (Parity) |
||
| 82 | Operation control PWB communication trouble (Overrun) |
||
| 84 | Operation control PWB communication trouble (Framing) |
||
| 88 | Operation control PWB communication trouble (Time- out) |
||
| U95 | Operation control PWB connection error | ||
| U99 | Operation control PWB connection error | ||
| Details of trouble codes | |||
| Main code |
Sub code |
Detail of trouble | |
| E1 | 00 | Content | E9-*** Communication trouble between MCU and E-Sort. |
| Detail | Communication setup error, framing, parity, protocol error | ||
| Cause | E-Sort PWB connector disconnection
E-Sort PWB MCU PWB harness failure E-Sort Motherboard connector pin breakage. E-Sort PWB ROM defect, data failure |
||
| Check and remedy | Check the connectors and harness of the E-Sort PWB and the MCU PWB.
Check grounding of the machine. Check the ROM of the E-Sort PWB. |
||
| 10 | Content | E-Sort PWB trouble | |
| Detail | Communication trouble between MCU and E-Sort | ||
| Cause | E-Sort PWB connector disconnection
E-Sort PWB MCU PWB harness failure E-Sort Motherboard connector pin breakage. E-Sort PWB ROM defect, data failure |
||
| Check and remedy | Check the connectors and harness of the E-Sort PWB and the MCU PWB.
Check grounding of the machine. Check the ROM of the E-Sort PWB. |
||
| E11 | 11 | Content | E-Sort PWB ASIC error |
| Detail | E-Sort PWB ASIC abnormality | ||
| Cause | An ASIC abnormality is detected in the E-Sort PWB.
Control circuit hung up due to noises ASIC peripheral circuit error |
||
| Check and remedy |
Replace the E-Sort PWB. Check grounding of the machine. |
||
| 12 | Content | E-Sort PWB CODEC error | |
| Detail | E-Sort PWB CODEC error | ||
| Cause | A CODEC error is detected in the E-Sort PWB. Control circuit hung up due to noises CODEC peripheral circuit error | ||
| Check and remedy | Replace the E-Sort PWB. Check grounding of the machine. | ||
| 13 | Content | E-Sort PWB Flash ROM error | |
| Detail | E-Sort PWB Flash ROM abnormality | ||
| Cause | A Flash ROM abnormality is detected in the E-Sort PWB. Control circuit hung up due to noises Flash ROM peripheral circuit error | ||
| Check and remedy | Replace the E-Sort PWB. Rewrite the flash ROM data. Check grounding of the machine. |
||
| 14 | Content | E-Sort PWB Work RAM error | |
| Detail | E-Sort PWB Work RAM abnormality | ||
| Cause | A Work RAM abnormality is detected in the E-Sort PWB. Control circuit hung up due to noises RAM peripheral circuit error | ||
| Check and remedy | Replace the E-Sort PWB. Check grounding of the machine. |
||
| 15 | Content | E-Sort PWB Page Memory error | |
| Detail | E-Sort PWB Page Memory abnormality | ||
| Cause | A Page Memory abnormality is detected in the E-Sort PWB. Control circuit hung up due to noises Page Memory peripheral circuit error | ||
| Check and remedy | Replace the E-Sort PWB. Check grounding of the machine. |
||
| 16 | Content | E-Sort PWB SIMM error | |
| Detail | E-Sort PWB SIMM abnormality | ||
| Cause | A SIMM abnormality is detected in the E-Sort PWB. Control circuit hung up due to noises SIMM peripheral circuit error | ||
| Check and remedy | Replace the E-Sort PWB. Replace the SIMM. Check grounding of the machine. |
||
| 17 | Content | E-Sort PWB image rotating RAM error | |
| Detail | E-Sort PWB image rotating RAM abnormality | ||
| Cause | A image rotating RAM abnormality is detected in the E-Sort PWB. Control circuit hung up due to noises Image rotating RAM peripheral circuit error |
||
| Check and remedy | Replace the E-Sort PWB. Check grounding of the machine. |
||
| E1 | 80 | Content | E-Sort PWB communication trouble (protocol) |
| Detail | Communication trouble between MCU and printer PWB (Protocol error) | ||
| Cause | E-Sort PWB connector disconnection E-Sort PWB MCU PWB harness failure E-Sort Motherboard connector pin breakage. E-Sort PWB ROM defect, data failure | ||
| Check and remedy | Check the connectors and harness of the E-Sort PWB and the MCU PWB. Check grounding of the machine. Check the ROM of the E-Sort PWB. |
||
| 81 | Content | E-Sort PWB communication trouble (Parity) | |
| Detail | Communication trouble between MCU and printer E-Sort (Parity error) | ||
| Cause | E-Sort PWB connector disconnection E-Sort PWB MCU PWB harness failure E-Sort Motherboard connector pin breakage. E-Sort PWB ROM defect, data failure | ||
| Check and remedy | Check the connectors and harness of the E-Sort PWB and the MCU PWB. Check grounding of the machine. Check the ROM of the E-Sort PWB. |
||
| 82 | Content | E-Sort PWB communication trouble (Overrun) | |
| Detail | Communication trouble between MCU and E-Sort PWB (Overrun error) | ||
| Cause | E-Sort PWB connector disconnection E-Sort PWB MCU PWB harness failure E-Sort Motherboard connector pin breakage. E-Sort PWB ROM defect, data failure |
||
| Check and remedy | Check the connectors and harness of the E-Sort PWB and the MCU PWB. Check grounding of the machine. Check the ROM of the E-Sort PWB. |
||
| 84 | Content | E-Sort PWB communication trouble (Framing) | |
| Detail | Communication trouble between MCU and E-Sort PWB (Framing error) | ||
| Cause | E-Sort PWB connector disconnection E-Sort PWB MCU PWB harness failure E-Sort Motherboard connector pin breakage. E-Sort PWB ROM defect, data failure |
||
| Check and remedy | Check the connectors and harness of the E-Sort PWB and the MCU PWB. Check grounding of the machine. Check the ROM of the E-Sort PWB. |
||
| 88 | Content | E-Sort PWB communication trouble (Time-out) | |
| Detail | Communication trouble between MCU and E-Sort PWB (Time-outerror) | ||
| Cause | E-Sort PWB connector disconnection E-Sort PWB MCU PWB harness failure E-Sort Motherboard connector pin breakage. E-Sort PWB ROM defect, data failure |
||
| Check and remedy | Check the connectors and harness of the E-Sort PWB and the MCU PWB. Check grounding of the machine. Check the ROM of the E-Sort PWB. |
||
| E7 | 03 | Content | LSU trouble |
| Detail | After the polygon motor becomes active, BD signal (HSYNC) from the LSU is not detected at the specified times (41 ±10 times within 20msec). | ||
| Cause | LSU connector disconnection or LSU’s inside harness disconnection or breakage Polygon motor rotation abnormality Improper positioning of the laser home position sensor in the LSU. Laser power voltage failure Laser emitting diode abnormality MCU PWB abnormality |
||
| Check and remedy | Improper connection of the LSU connector. Check the polygon motor operation with SIM 25-10. Check printing with SIM64-1. Check laser emission of laser emitting diode. Check the LSU unit. Check the MCU PWB. |
||
| 04 | Content | CCD white level trouble | |
| Detail | CCD white reference level which is read during the copy lamp lighting is abnormal. |
||
| Cause | Flat cable installation failure to CCD unit Dirt on the mirror, lens, and reference white plate Copy lamp lighting failure CCD unit installation failure CCD unit abnormality MCU PWB abnormality | ||
| Check and remedy | Clean the mirror, the lens, and the reference white plate. Check the copy lamp (SIM 5-3) ON. CCD unit check MCU PWB check |
||
| 05 | Content | CCD black level trouble | |
| Detail | CCD black level which is read while the copy lamp is off is abnormal. | ||
| Cause | Flat cable installation failure CCD unit abnormality MCU PWB abnormality | ||
| Check and remedy | Check flat cable installation to the CCD unit. CCD unit check MCU PWB check |
||
| H2 | 00 | Content | Thermistor open detection |
| Detail | Fusing thermistor open | ||
| Cause | Thermistor defect MCU PWB defect Fusing section connector contact failure Power failure Fusing unit not installed |
||
| Check and remedy | Check the harness and the connector of the thermistor and the MCU. Clear the self diag display with SIM 14. |
||
| H3 | 00 | Content | Heat roller abnormally high temperature |
| Detail | Fusing temperature of 220 — 240-C. | ||
| Cause | Thermistor defect MCU PWB defect Fusing connector connection failure Power failure |
||
| Check and remedy | Check the heater lamp blinking with SIM 5-2. | ||
| When the lamp blinks normally: Check the thermistor and the harness. Check the MCU PWB thermistor input circuit. |
|||
| When the lamp lights up instead of blinking: Check the lamp control circuit of the power PWB and the MCU PWB. |
|||
| Clear the trouble with SIM 14. | |||
| H4 | 00 | Content | Heat roller abnormally low temperature |
| Detail | When the temperature does not reach 155’C within 55 sec after turning on the power, or when it falls under 145’C during printing, or when it falls under 100’C during pre-heating. | ||
| Cause | Thermistor failure Heater lamp failure MCU PWB failure Thermostat failure Power failure Interlock switch failure |
||
| Check and remedy | Check blinking of the heater lamp with SIM 5-2. | ||
| When the lamp blinks normally: Check the thermistor and the harness. Check the MCU PWB thermistor input circuit. |
|||
| Check and remedy | When the lamp does not light: Check for heater lamp disconnection or thermostat disconnection. Check the interlock switch. Check the power PWB and MCU PWB lamp control circuit. |
||
| Clear the trouble with SIM 14. | |||
| L1 | 00 | Content | Mirror base feed trouble |
| Detail | The mirror home position (MHPS) does not turn off though the feed operation is completed during mirror initial operation after turning on the power. The mirror home position (MHPS) does not turn off during shading operation. The mirror home position (MHPS) does not turn on when the mirror base is returned for the specified time after copy feed is started and SPF scanning position shift is performed. |
||
| Cause | Mirror unit defect Mirror home position sensor defect MCU PWB defect Scanner wire disconnection | ||
| Check and remedy | Check the scanning operation with SIM 1-1. | ||
| L3 | 00 | Content | Mirror base return trouble |
| Detail | The mirror home position (MHPS) does not turn on though the mirror base returning is completed during mirror initial operation after turning on the power. The mirror home position does not turn on when the mirror is returned to the home position during shading. The mirror home position (MHPS) does not turn on when the mirror base returning is completed for the specified time (about 6 sec) after copy return start. |
||
| Cause | Mirror unit Mirror home position sensor defect MCU PWB defect Scanner wire disconnection |
||
| Check and remedy | Check the scanning operation with SIM 1-1. | ||
| L4 | 01 | Content | Main motor lock |
| Detail | The main motor encoder pulse is not detected for 400msec. | ||
| Cause | Main motor defect Harness disconnection between the MCU PWB and the main motor. Control circuit failure |
||
| Check and remedy | Check the main motor operation with SIM 25-1. Check the harness and the connector between the MCU PWB and the main motor. |
||
| L6 | 10 | Content | Polygon motor lock |
| Detail | The lock signal (the specified rotation speed signal) is not supplied within the specified time (about 6 sec)after starting the polygon motor rotation. | ||
| Cause | LSU connector disconnection or harness disconnection in the LSU. | ||
| Check and remedy | Check the operation of the polygon motor with SIM 25-10. Check the harness and the connector connection. LSU replacement |
||
| L8 | 01 | Content | Zero cross pulse (FW) trouble |
| Detail | Zero cross pulse width is shifted by 55Hz ± 10% or more. | ||
| Cause | MCU PWB defect Power unit breakdown | ||
| Check and remedy | Check the harness and the connector. MCU PWB replacement Power unit replacement |
||
| U2 | 04 | Content | EEPROM serial communication error |
| Detail | Error in communication with EEPROM | ||
| Cause | EEPROM failure Installation of uninitialized EEPROM MCU PWB EERPOM access circuit failure |
||
| Check and remedy | Check that the EEPROM is properly set. To prevent against loss of counter/adjustment values, record the values with simulation. U2 trouble cancel with SIM 16 MCU PWB replacement |
||
| 11 | Content | Counter check sum error | |
| Detail | Counter check sum value stored in the EEPROM is abnormal. | ||
| Cause | EEPROM failure Control circuit hung up by noises MCU PWB EEPROM access circuit defect |
||
| Check and remedy | Check that the EEPROM is properly set. To prevent against loss of counter/adjustment values, record the values with simulation. U2 trouble cancel with SIM 16 MCU PWB replacement |
||
| 12 | Content | Adjustment value check sum error (EEPROM) | |
| Detail | Adjustment value data area check sum error | ||
| Cause | EEPROM failure Control circuit hung up by noises MCU PWB EEPROM access circuit failure |
||
| Check and remedy | Check that the EEPROM is properly set. To prevent against loss of counter/adjustment values, record the values with simulation. U2 trouble cancel with SIM 16 MCU PWB replacement |
||
| U3 | 29 | Content | Mirror base home position error |
| Detail | Home position is not detected when starting mirror base shift. | ||
| Cause | Mirror unit defect Mirror home position sensor defect MCU PWB decfect Scanner wire disconnection |
||
| Check and remedy | Check the scanning operation with SIM 1-1. | ||
| U9 | 00 | Content | U9-** Communication trouble between MCU and OPE (OPE detection) |
| Detail | Communication setup error, framing, parity, protocol error | ||
| Cause | Operation control PWB connector disconnection Operation control PWB MCU PWB harness failure |
||
| Check and remedy | Check the connectors and harness of the operation control PWB and the MCU PWB. Check grounding of the machine. Check the ROM of the operation control PWB. |
||
| 80 | Content | Operation control PWB communication trouble (Protocol) | |
| Detail | Communication trouble between MCU and the operation control PWB (Protocol error) | ||
| Cause | Operation control PWB connector disconnection Operation control PWB MCU PWB harness failure |
||
| Check and remedy | Check the connectors and harness of the operation control PWB and the MCU PWB. Check grounding of the machine. |
||
| 81 | Content | Operation control PWB communication trouble (Parity) | |
| Detail | Communication trouble between MCU and the operation control PWB (Parity error) | ||
| Cause | Operation control PWB connector disconnection Operation control PWB MCU PWB harness failure |
||
| Check and remedy | Check the connectors and harness of the operation control PWB and the MCU PWB. Check grounding of the machine. |
||
| 82 | Content | Operation control PWB communication trouble (Overrun) | |
| Detail | Communication trouble between MCU and the operation control PWB (Overrun error) | ||
| Cause | Operation control PWB connector disconnection Operation control PWB MCU PWB harness failure |
||
| Check and remedy | Check the connectors and harness of the operation control PWB and the MCU PWB. Check grounding of the machine. |
||
| 84 | Content | Operation control PWB communication trouble (Framing) | |
| Detail | Communication trouble between MCU and the operation control PWB (Framing error) | ||
| Cause | Operation control PWB connector disconnection Operation control PWB MCU PWB harness failure |
||
| Check and remedy | Check the connectors and harness of the operation control PWB and the MCU PWB. Check grounding of the machine. |
||
| 88 | Content | Operation control PWB communication trouble (Time-out) | |
| Detail | Communication trouble between MCU and the operation PWB (Time-out error) | ||
| Cause | Operation control PWB connector disconnection Operation control PWB MCU PWB harness failure | ||
| Check and remedy | Check the connectors and harness of the operation control PWB and the MCU PWB. Check grounding of the machine. |
||
| F6 | 00 | Content | F6: Communication trouble between MCU and FAX (MCU detection) |
| Detail | Communication establishment error, framing error, parity error, protocol error | ||
| Cause | Bad connection of FAX control PWB connector Defective harness between FAX control PWB and MCU PWB. Motherboard connector pin breakage FAX control PWB ROM error, data error |
||
| Check and remedy | Check connector/harness of FAX control PWB and MCU PWB. Check grounding of the machine. Check FAX control PWB ROM. |
||
| 10 | Content | FAX control PWB trouble | |
| Detail | Communication trouble between MCU and FAX control WPB | ||
| Cause | Bad connection of FAX control PWB connector Defective harness between FAX control PWB and MCU PWB Motherboard connector pin breakage FAX control PWB ROM error/Data error |
||
| Check and remedy | Check connector/harness between FAX control PWB and MCU PWB. Check grounding of the machine. Check FAX control PWB ROM. |
||
| 80 | Content | FAX control PWB communication trouble (Protocol) | |
| Detail | Communication trouble between MCU and FAX control PWB (Protocol error) | ||
| Cause | Bad connection of FAX control PWB connector Defective harness between FAX control PWB and MCU PWB Motherboard connector pin breakage FAX control PWB ROM error/Data error |
||
| Check and remedy | Check connector/harness between FAX control PWB and MCU PWB. Check grounding of the machine. Check FAX control PWB ROM. |
||
| 81 | Content | FAX control PWB communication trouble (Parity) | |
| Detail | Communication trouble between MCU and FAX control PWB (Parity error) | ||
| Cause | Bad connection of FAX control PWB connector Defective harness between FAX control PWB and MCU PWB Motherboard connector pin breakage FAX control PWB ROM error/Data error |
||
| Check and remedy | Check connector/harness between FAX control PWB and MCU PWB. Check grounding of the machine. Check FAX control PWB ROM. |
||
| 82 | Content | FAX control PWB communication trouble (Overrun) | |
| Detail | Communication trouble between MCU and FAX control PWB (Overrun error) | ||
| Cause | Bad connection of FAX control PWB connector Defective harness between FAX control PWB and MCU PWB Motherboard connector pin breakage FAX control PWB ROM error/Data error |
||
| Check and remedy | Check connector/harness between FAX control PWB and MCU PWB. Check grounding of the machine. Check FAX control PWB ROM. |
||
| 84 | Content | FAX control PWB communication trouble (Framing) | |
| Detail | Communication trouble between MCU and FAX control PWB (Framing error) | ||
| Cause | Bad connection of FAX control PWB connector Defective harness between FAX control PWB and MCU PWB Motherboard connector pin breakage FAX control PWB ROM error/Data error |
||
| Check and remedy | Check connector/harness between FAX control PWB and MCU PWB. Check grounding of the machine. Check FAX control PWB ROM. |
||
| 88 | Content | FAX control PWB communication trouble (Timeout) | |
| Detail | Communication trouble between MCU and FAX control PWB (Timeout error) | ||
| Cause | Bad connection of FAX control PWB connector Defective harness between FAX control PWB and MCU PWB Motherboard connector pin breakage FAX control PWB ROM error/Data error |
||
| Check and remedy | Check connector/harness between FAX control PWB and MCU PWB. Check grounding of the machine. Check FAX control PWB ROM. |
||
| F9 | 00 | Content | F9: Communication trouble between MCU and printer PWB (MCU detection) |
| Detail | Communication establishment error, framing error, parity error, protocol error | ||
| Cause | Bad connection of printer PWB connector Defective harness between printer PWB and MCU PWB. Motherboard connector pin breakage Printer PWB ROM error, data error |
||
| 00 | Check and remedy | Check connector/harness of printer PWB and MCU PWB. Check grounding of the machine. Check printer PWB ROM. |
|
| 10 | Content | Printer PWB trouble | |
| Detail | Communication trouble between MCU and printer PWB | ||
| Cause | Bad connection of printer PWB connector Defective harness between printer PWB and MCU PWB. Motherboard connector pin breakage Printer PWB ROM error, data error |
||
| Check and remedy | Check connector/harness of printer PWB and MCU PWB. Check grounding of the machine. Check printer PWB ROM. |
||
| F9 | 80 | Content | Printer PWB communication trouble (Protocol) |
| Detail | Communication trouble between MCU and printer PWB (Protocol error) | ||
| Cause | Bad connection of printer PWB connector Defective harness between printer PWB and MCU PWB. Motherboard connector pin breakage Printer PWB ROM error, data error |
||
| Check and remedy | Check connector/harness of printer PWB and MCU PWB. Check grounding of the machine. Check printer PWB ROM. |
These instructions describe error code E2-01, E2-02, E2-03, and E2-04 solution for a Panasonic Workio DP-1520p, DP-1820P copier machine.
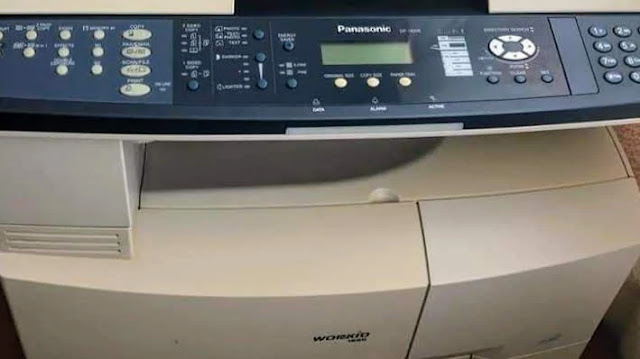 |
| Panasonic Workio DP-1820P error code E02-01 solution |
These instructions describe error code E02-01 solution for a Panasonic Workio DP-1520p, DP-1820P copier machine. This should solve your problem; this introduction will help you to troubleshoot some common error messages related to Panasonic Workio DP-1520p, DP-1820P Error Code E2-01, E2-02, E2-03, and E2-04 that you may receive.
Meaning of E02-01 the Error Code:
E02-01 means the Tray 1 cassette lifting motor unit fault. These machines use a lift motor encased in a plastic drive gear casing. Usually something inside the casing breaks, this usually happens in trays that have Ledger or Legal paper installed. The weight of the paper can cause these gear packs to break. Also if the customer loads letter paper in a tray set up for larger paper sizes.
How to fix the error:
Maybe a problem with tray 1 lift motor either you have a bad motor, Pull the paper tray out and see if the paper is lodged behind the tray, Also make sure the white coupling on the rear wall is in one piece. Check that the flag on the back of the tray is still present. Mostly it is broken and sometimes can be repaired, and otherwise, you have to change it, and to open the back cover and reach that (Part no is (DZTY000357 Paper Lift Motor Assembly, lift up drive).
Some of the possible cause:
- Remove the tray and check for paper behind the tray.
- Check paper falls back causing the gears to break.
- Check cassette Lift Motor connector.
- Replace the Tray 1 lift motor.
- Check the Mainboard.
I hope this was helpful, don’t forget to share it via any of the share buttons on this page are highly welcomed as well.
MODEL
AR-5316
AR-5320
AR-5316 X
AR-5320 X
DIGITAL MULTIFUNCTIONAL
SYSTEM
OPERATION MANUAL
•BEFORE USING
THE MACHINE
•COPY FUNCTIONS
•PRINTER FUNCTIONS
•USER SETTINGS
•TROUBLESHOOTING
•ROUTINE MAINTENANCE
•PERIPHERAL DEVICES
AND SUPPLIES
•APPENDIX
8
18
29
31
40
55
58
60
Page
AR-5316/AR-5316 X
AR-5320/AR-5320 X
HINA
KS
➀
QSZZ
AR-5316-5320-EX.book 1 ページ 2003年11月26日 水曜日 午後5時3分
The CE mark logo label is affixed on an equipment in case that the directives described in the
above sentence are applicable to the product. (This sentence is not applicable in any country
where the above directives are not required.)
Warning
This is a Class A product. In a domestic environment this product may cause radio
interference in which case the user may be required to take adequate measures.
In some areas, the «POWER» switch positions are marked «I» and » » on the copier
instead of «ON» and «OFF».
If your copier is so marked, please read «I» for «ON» and » » for «OFF».
Caution!
For a complete electrical disconnection, pull out the main plug.
The socket-outlet shall be installed near the equipment and shall be easily
accessible.
This equipment complies with the requirements of Directives 89/336/EEC and 73/23/EEC as amended by
93/68/EEC.
Dieses Gerät entspricht den Anforderungen der EG-Richtlinien 89/336/EWG und 73/23/EWG mit Änderung
93/68/EWG.
Ce matériel répond aux exigences contenues dans les directives 89/336/CEE et 73/23/CEE modifiées par la
directive 93/68/CEE.
Dit apparaat voldoet aan de eisen van de richtlijnen 89/336/EEG en 73/23/EEG, gewijzigd door 93/68/EEG.
Dette udstyr overholder kravene i direktiv nr. 89/336/EEC og 73/23/EEC med tillæg nr. 93/68/EEC.
Quest’ apparecchio è conforme ai requisiti delle direttive 89/336/EEC e 73/23/EEC, come emendata dalla
direttiva 93/68/EEC.
Este equipamento obedece às exigências das directivas 89/336/CEE e 73/23/CEE, na sua versão corrigida
pela directiva 93/68/CEE.
Este aparato satisface las exigencias de las Directivas 89/336/CEE y 73/23/CEE, modificadas por medio de
la 93/68/CEE.
Denna utrustning uppfyller kraven enligt riktlinjerna 89/336/EEC och 73/23/EEC så som kompletteras av
93/68/EEC.
Dette produktet oppfyller betingelsene i derektivene 89/336/EEC og 73/23/EEC i endringen 93/68/EEC.
Tämä laite täyttää direktiivien 89/336/EEC ja 73/23/EEC vaatimukset, joita on muutettu direktiivillä
93/68/EEC.
Do not make copies of anything which is prohibited from copying by law. The
following items are normally prohibited from copying by national law. Other
items may be prohibited by local law.
● Checks ● Passports ● Driver’s licenses
● Money ● Stamps ● Bonds ● Stocks ● Bank drafts
AR-5316-5320-EX.book 1 ページ 2003年11月26日 水曜日 午後5時3分

1
CONTENTS
CAUTIONS…………………………..…………….……………..…………….……………….…………..…..…………….………. 3
●CAUTIONS ON USING………………..……………….………………..……………….……………….………….………….………. 3
●IMPORTANT POINTS WHEN SELECTING AN INSTALLATION SITE …………………..………………..……………. 3
●CAUTIONS ON HANDLING …………………….……………….……………….………………..……………….…..……………… 4
●CAUTIONS ON LASER ……………….……………….………………..……………….………….……………….……………….…. 4
●ENVIRONMENTAL INFORMATION………….……………….……………….………………..……………….………………..… 4
USING THE MANUAL ………….….…….…….………….…….………….………….…….………….…….…….….………… 5
●ABOUT THE OPERATION MANUALS……………………….……………….………………..……………….…………..……… 5
●THE MEANING OF «R» IN ORIGINAL AND PAPER SIZE INDICATIONS ……………….………………..……………. 5
●CONVENTIONS USED IN THIS MANUAL………………………..……………….……………….………………..……………. 5
●SPF ………..……………….………………..……………….………………..……………….……………….………………..……………. 5
●DIFFERENCES BETWEEN MODELS…………….………………..……………….……………….………………..…….……… 6
MAIN FEATURES ……….……………………………………………….…………………………….…………………..………… 7
1BEFORE USING THE MACHINE
PART NAMES AND FUNCTIONS ………………… 8
●OPERATION PANEL ………………………..………10
POWER ON AND OFF..…….………….…………... 12
●POWER ON ……………..………………..…………...12
●POWER OFF ………………….………….……………12
LOADING PAPER……..……………..…………..….. 13
●PAPER…………………….………………..……………13
●LOADING PAPER…………………………….………14
●CHANGING A TRAY’S PAPER SIZE
SETTING ..……………….………………..……………16
2COPY FUNCTIONS
NORMAL COPYING .………….………….…….…… 18
●MAKING A COPY DARKER OR LIGHTER ….21
●SELECTING THE TRAY……………………………21
●SETTING THE NUMBER OF COPIES ………..22
REDUCTION/ENLARGEMENT/ZOOM………… 22
●AUTOMATIC RATIO SELECTION ……………..22
●MANUAL RATIO SELECTION……………………23
●
SELECTING THE VERTICAL AND HORIZONTAL
COPY RATIOS SEPARATELY
……………….………24
TWO-SIDED COPYING USING THE BYPASS
TRAY…….…….………….………….…….………….…. 26
DUAL PAGE COPYING……………..……………... 27
INTERRUPTING A COPY RUN …..……………… 28
3PRINTER FUNCTIONS
USING THE PRINTER MODE ….………….…….. 29
●BASIC PROCEDURE FOR PRINTING………. 29
●
OPERATION IN COPY AND PRINTER MODES
…. 30
4USER SETTINGS
ADJUSTING THE AUTOMATIC EXPOSURE
LEVEL……………….……………………………………. 31
TONER SAVE MODE AND HIGH IMAGE
QUALITY MODE…………….………….…….………. 32
CUSTOMISING SETTINGS ……….………….…… 33
●USER PROGRAMS ………………………….…….. 33
●SELECTING A SETTING FOR A USER
PROGRAM …..………………..……………….…….. 35
SETTINGS FOR AUDITING MODE..…….…….. 36
●AUDITING MODE ..……………….………………... 36
●AUDITING MODE SETTINGS ………………….. 36
●
SELECTING AUDITING MODE SETTINGS
….. 37
5TROUBLESHOOTING
TROUBLESHOOTING…………….………….…….. 40
●MACHINE/COPYING PROBLEMS ……………. 41
●PRINTING PROBLEMS…………………….…….. 44
INDICATORS AND DISPLAY MESSAGES …. 46
MISFEED REMOVAL ..………..…………..……….. 47
●MISFEED IN THE SPF …….……………….…….. 47
●MISFEED IN THE BYPASS TRAY ..………….. 48
●MISFEED IN THE MACHINE……………..…….. 49
●MISFEED IN THE UPPER PAPER TRAY ….. 52
●MISFEED IN THE LOWER PAPER TRAY …. 53
REPLACING THE TONER CARTRIDGE …….. 54
AR-5316-5320-EX.book 1 ページ 2003年11月26日 水曜日 午後5時3分
2
6ROUTINE MAINTENANCE
CHECKING THE TOTAL OUTPUT COUNT
AND TONER LEVEL……………………..………..… 55
●CHECKING THE TOTAL OUTPUT COUNT...55
●CHECKING THE TONER LEVEL ……………….56
ROUTINE MAINTENANCE…………………..……. 56
●CLEANING THE DOCUMENT GLASS AND
SPF/DOCUMENT COVER …………..……………56
●CLEANING THE BYPASS TRAY PAPER
FEED ROLLER ……………….……………….………57
●CLEANING THE TRANSFER CHARGER ……57
7
PERIPHERAL DEVICES AND SUPPLIES
PERIPHERAL DEVICES…….……………………… 58
●SINGLE PASS FEEDER………..………………....58
STORAGE OF SUPPLIES ……………………..….. 59
●PROPER STORAGE …………….………………....59
8APPENDIX
SPECIFICATIONS ………….………………………… 60
SOFTWARE LICENSE ……………..………………. 62
INDEX…………………….………….………….………... 64
AR-5316-5320-EX.book 2 ページ 2003年11月26日 水曜日 午後5時3分
3
CAUTIONS
Follow the cautions below when using this machine.
CAUTIONS ON USING
Warning:
• The fusing area is hot. Exercise care in this area when removing misfed paper.
• Do not look directly at the light source. Doing so may damage your eyes.
Caution:
• Do not switch the machine rapidly on and off. After turning the machine off, wait 10 to 15 seconds before turning it
back on.
• Machine power must be turned off before installing any supplies.
• Place the machine on a firm, level surface.
• Do not install the machine in a humid or dusty location.
• When the machine is not used for a long time, for example, during prolonged holidays, turn the power switch off
and remove the power cord from the outlet.
• When moving the machine, be sure to turn the power switch off and remove the power cord from the outlet.
• Do not cover the machine with a dust cover, cloth or plastic film while the power is on. Doing so may prevent heat
dissipation, damaging the machine.
• Use of controls or adjustments or performance of procedures other than those specified herein may result in
hazardous laser radiation exposure.
• The socket-outlet should be installed near the machine and should be easily accessible.
IMPORTANT POINTS WHEN SELECTING AN
INSTALLATION SITE
Improper installation may damage the machine. Please note the following during initial installation and whenever the
machine is moved.
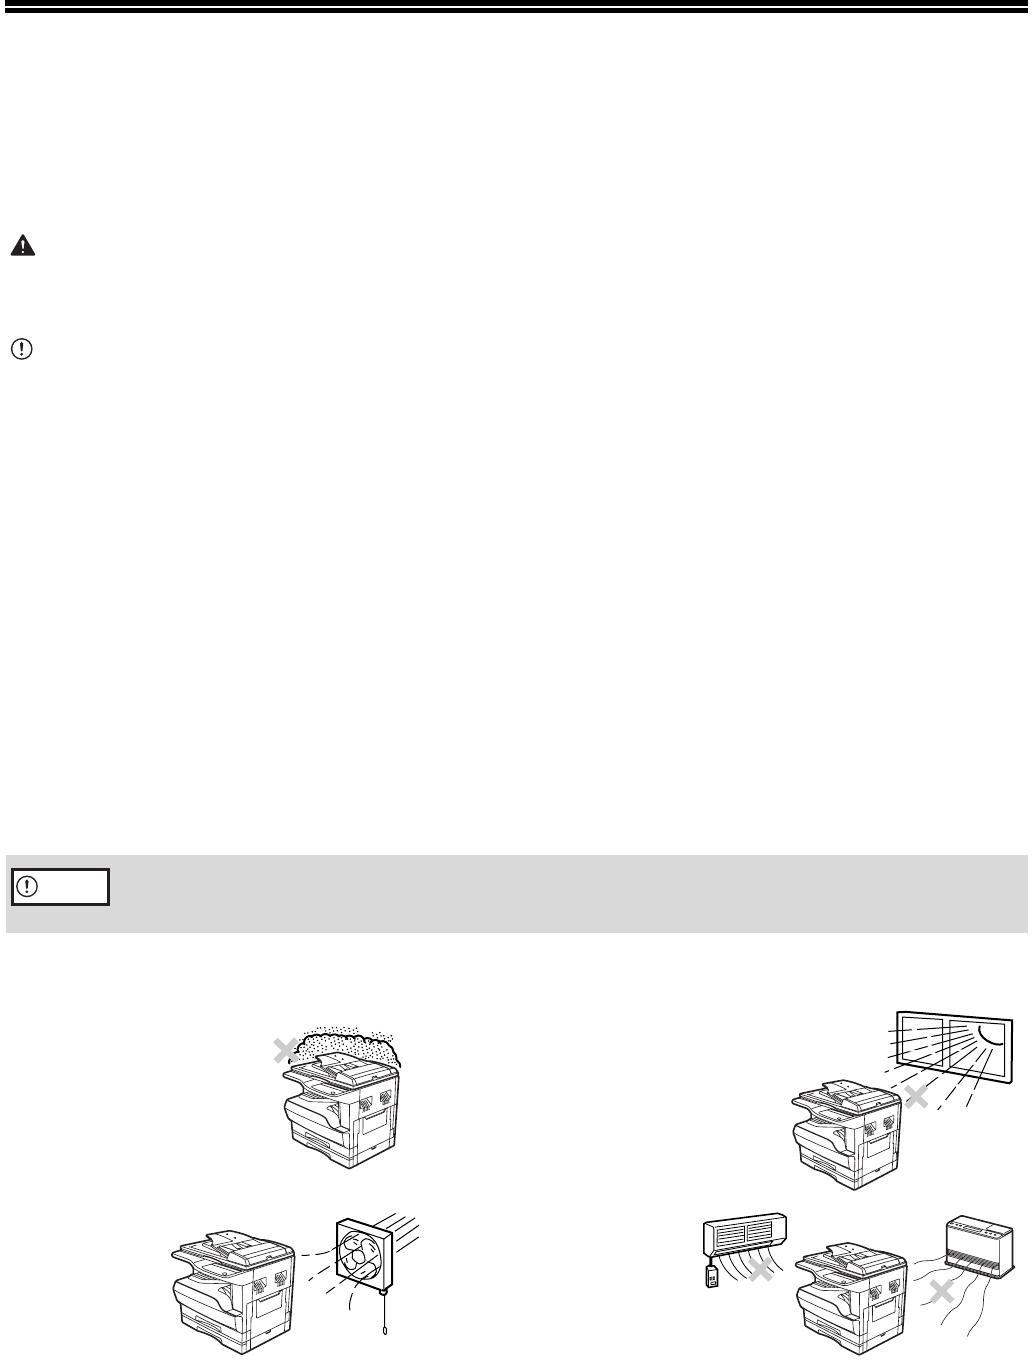
Do not install your machine in areas that are:
If the machine is moved from a cool place to a warm place, condensation may form inside the machine. Operation
in this condition will cause poor copy quality and malfunctions. Leave the machine at room temperature for at least
2 hours before use.
•damp, humid, or very
dusty
•exposed to direct sunlight
•poorly
ventilated
•subject to extreme
temperature or humidity
changes, e.g., near an
air conditioner or
heater.
Caution
AR-5316-5320-EX.book 3 ページ 2003年11月26日 水曜日 午後5時3分
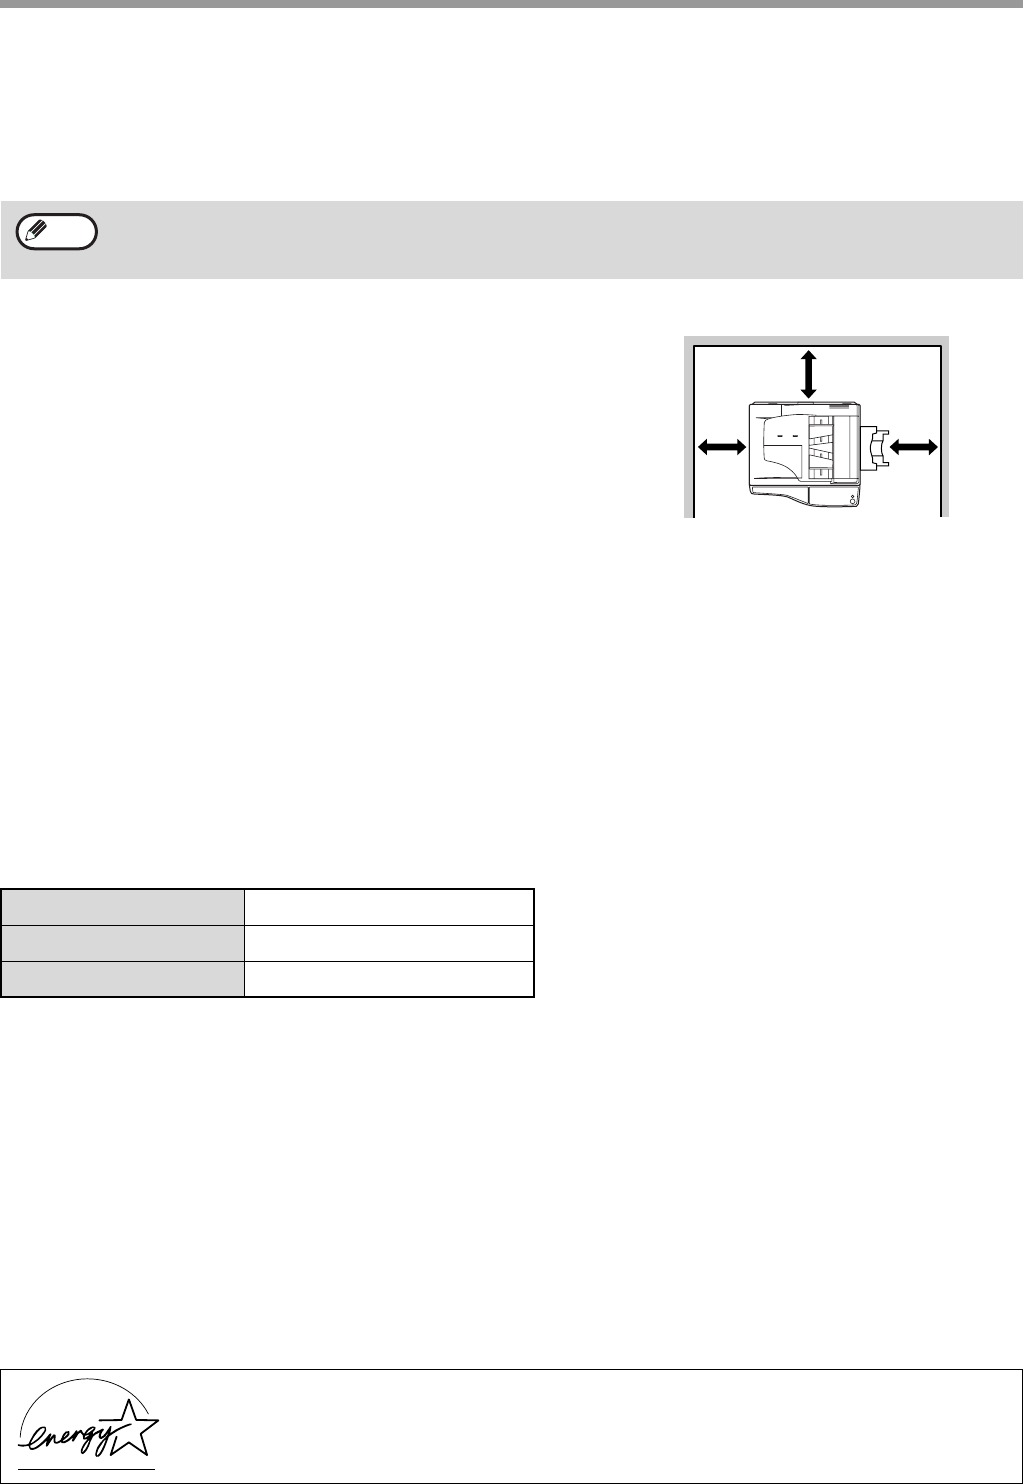
4
The machine should be installed near an accessible power outlet for easy connection and
disconnection.
Be sure to connect the power cord only to a power outlet that meets the specified voltage and
current requirements. Also make certain the outlet is properly grounded.
Be sure to allow the required space around the machine
for servicing and proper ventilation.
CAUTIONS ON HANDLING
Be careful in handling the machine as follows to maintain the performance of this machine.
Do not drop the machine, subject it to shock or strike it against any object.
Store spare toner cartridges in a cool dry place without removing from the package before use.
• If they are exposed to direct sunlight or excessive heat, poor copies may result.
Do not touch the photoconductive drum (green portion).
• Scratches or smudges on the drum will cause dirty copies.
CAUTIONS ON LASER
Trademark acknowledgements
•Microsoft
® Windows® operating system is a trademark or copyright of Microsoft Corporation in the U.S.A. and
other countries.
•
Windows
®
95, Windows
®
98, Windows
®
Me, Windows NT
®
4.0, Windows
®
2000, and Windows
®
XP are trademarks
or copyrights of Microsoft Corporation in the U.S.A. and other countries.
• IBM and PC/AT are trademarks of International Business Machines Corporation.
•
Acrobat
®
Reader Copyright
©
1987- 2002 Adobe Systems Incorporated. All rights reserved. Adobe, the Adobe logo,
Acrobat, and the Acrobat logo are trademarks of Adobe Systems Incorporated.
• All other trademarks and copyrights are the property of their respective owners.
ENVIRONMENTAL INFORMATION
Connect the machine to a power outlet which is not used for other electric appliances. If a lighting fixture is
connected to the same outlet, the light may flicker.
Wave length 785 nm + 10 nm/- 15 nm
Pulse times (8.141 µs ± 0.1 µs)/7 mm
Output power 0.14 mW – 0.22 mW
As an ENERGY STAR® Partner, SHARP has determined that this product meets
the ENERGY STAR® guidelines for energy efficiency.
Note
20 cm (8″)
20 cm
(8″)
20 cm
(8″)
AR-5316-5320-EX.book 4 ページ 2003年11月26日 水曜日 午後5時3分
5
USING THE MANUAL
This machine has been designed to provide convenient copying features in a minimum amount of office space and
with maximum operational ease. To get full use of all machine features, be sure to familiarise yourself with this
manual and the machine. For quick reference during machine use, keep this manual in a handy location.
ABOUT THE OPERATION MANUALS
The operation manuals for the machine are as follows:
Operation Manual (Digital Multifunctional System) (this manual)
This manual contains explanations of the product and procedures for using the machine as a copier.
Online Manual (on the accessory CD-ROM)
This manual explains the procedures for using the machine as a printer.
Software Setup Guide (separate manual)
This manual contains instructions for installing the software that allows the machine to be used with your computer
and procedures for establishing initial printer settings.
THE MEANING OF «R» IN ORIGINAL AND PAPER SIZE
INDICATIONS
An «R» appearing at the end of an original or paper size (A4R (5-1/2″ x 8-1/2″R, 8-1/2″ x 11″R), etc.) indicates that the
original or paper is oriented horizontally as shown below.
Sizes that can be placed only in the horizontal (landscape) orientation (B4, A3 (8-1/2″ x 14″, 11″ x 17″)) do not
contain the «R» in their size indication.
CONVENTIONS USED IN THIS MANUAL
SPF
This operation manual refers to the Single Pass Feeder as the «SPF».
Warns the user that injury may result if the contents of the warning are not properly followed.
Cautions the user that damage to the machine or one of its components may result if the contents
of the caution are not properly followed.
Notes provide information relevant to the machine regarding specifications, functions,
performance, operation and such, that may be useful to the user.
<Horizontal (Landscape) orientation>
Warning
Caution
Note
AR-5316-5320-EX.book 5 ページ 2003年11月26日 水曜日 午後5時3分
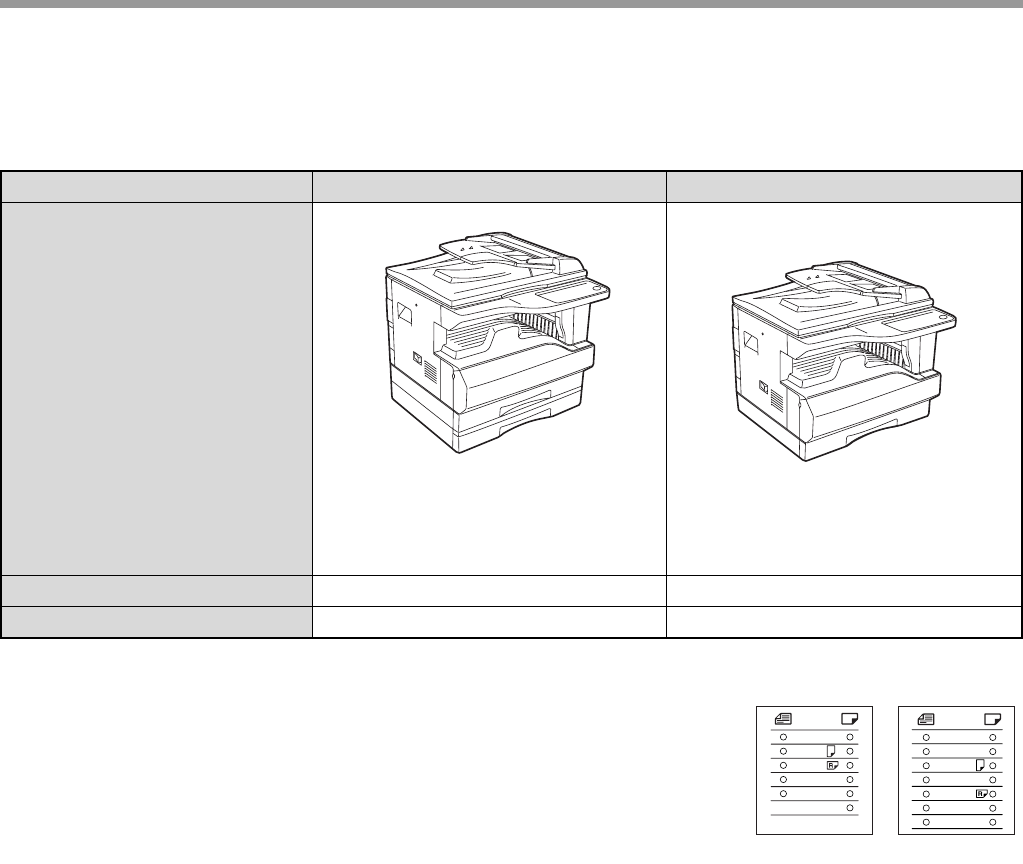
6
DIFFERENCES BETWEEN MODELS
This manual covers the following models.
AB series (metric) and inch series references
Both specifications are quoted where applicable.
For example:
Page 15, step 1 ………………..B4 and A3 (8-1/2″ x 14″ and 11″ x 17″)
Page 60………………….……….50%, 70%, 81%, 86%, 100%, 115%, 122%, 141%,
200% (50%, 64%, 77%, 95%, 100%, 121%, 129%,
141%, 200%)
Although AB series size indications are shown on the operation panel of this manual, inch series indications are
displayed on the inch series machines.
Model AR-5320/AR-5320 X AR-5316/AR-5316 X
Appearance
(With optional SPF installed) (With optional SPF installed)
Copy speed 20CPM 16CPM
Paper trays Two (250 x 2) One (250 x 1)
The above illustration is used in
instances where a function and/
or the operation of the machine
is the same on both models.
A3
A4
A4
A5
B4
EXTRA
11
X
17
8½
X
14
8½
X
13
8½
X
11
8½
X
11
8½
X
5½
EXTRA
[Inch series][AB series]
AR-5316-5320-EX.book 6 ページ 2003年11月26日 水曜日 午後5時3分

7
MAIN FEATURES
High-speed laser copying
•First-copy time*1 at 300 dpi*2 is only 7.2 seconds .
•Copying speed is 20/16 copies per minute. This is ideal for business use and provides a big boost to workplace
productivity.
*1First-Copy time may vary depending on the power-supply voltage, ambient temperature, and other operating conditions.
*2«dpi» («dots per inch») is unit that is used to measure resolution. Resolution indicates how much detail can be reproduced in
a printed or scanned image.
High-quality digital image
•High-quality copying at 600 dpi is performed.
•In addition to automatic exposure adjustment, two original modes can be selected: «TEXT» for text-only originals,
and «PHOTO» for photographs. The exposure can be adjusted to five levels in each mode.
•The photo mode copying function allows clear copying of delicate halftone original images such as monochrome
photos and colour photos.
Enhanced copying features
•Zoom copies can be made from 25% to 400% in 1% increments.
(When the SPF is being used, the zoom copy ratio range is 50% to 200%.)
•Continuous copying of up to 999 copies is possible. (Can be changed to a maximum of 99 copies in the user
programs.)
•The user programs allow customised machine settings and management. Access to the machine can be
controlled by enabling audit mode.
Scan once/Print many
•The machine is equipped with a memory buffer allowing the machine to scan an original once and make up to 999
copies of the scanned image. This improves workflow, reduces operating noise from the machine and reduces
wear and tear on the scanning mechanism, which provides for a higher reliability.
Laser printer function
•The accompanying printer driver can be installed to enable use of the machine as a printer. (See the
accompanying Software Setup Guide.)
Environment and people friendly design
•Preheat and auto power shut-off modes are provided to reduce power consumption when the machine is not in
use.
•A universal design has been implemented in the product whereby the height of the operation panel and shape of
the keys are designed to be usable by as many people as possible.
AR-5316-5320-EX.book 7 ページ 2003年11月26日 水曜日 午後5時3分
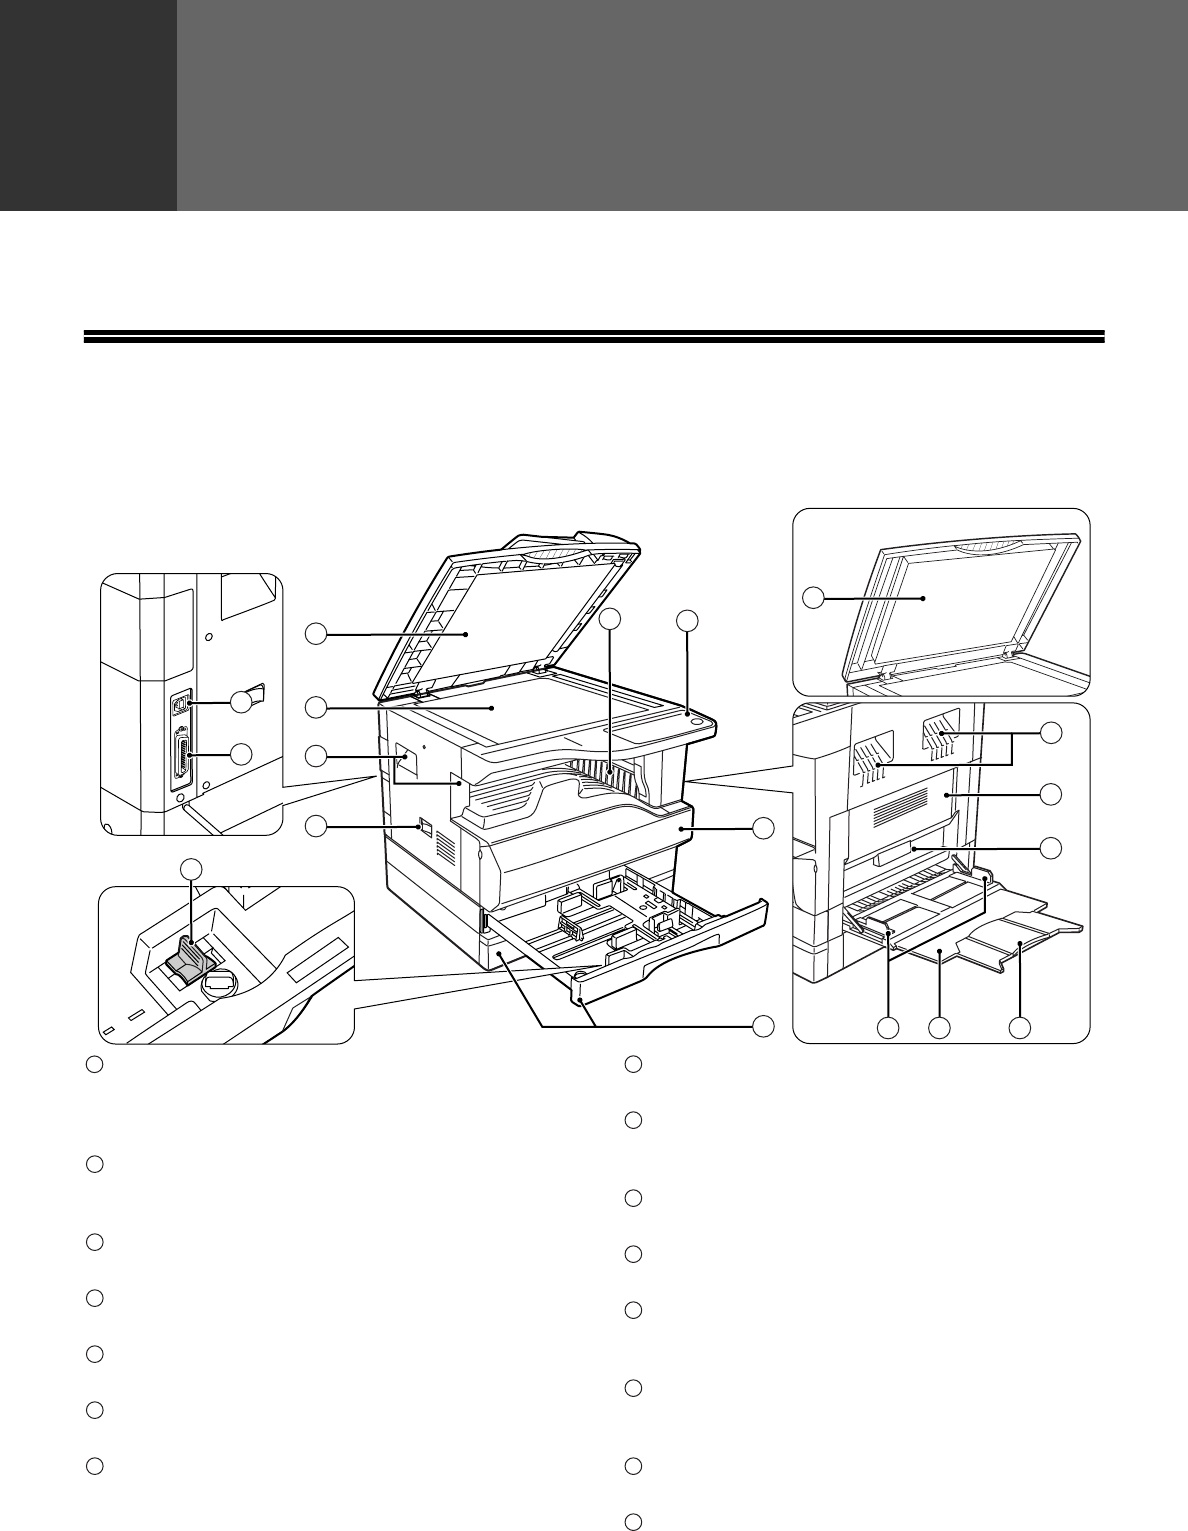
8
1Chapter 1
BEFORE USING THE MACHINE
This chapter contains basic information that should be read before using the machine.
PART NAMES AND FUNCTIONS
Document feeder cover (when the SPF is installed)
/document cover
Open to make copies from the document glass.
(p.18)
Document glass
Place an original that you wish to scan face down
here. (p.18)
Handles
Use to move the machine.
Power switch
Press to turn the machine power on and off. (p.12)
Operation panel
Contains operation keys and indicator lights. (p.10)
Paper output tray
Copies and prints are deposited to this tray.
Front cover
Open to remove paper misfeeds and perform
machine maintenance. (p.50, p.54)
Paper trays
Each tray holds 250 sheets of paper. (p.14)
Side cover
Open to remove paper misfeeds and perform
machine maintenance.
(p.48, p.57)
Side cover handle
Pull to open the side cover. (p.48)
Bypass tray guides
Adjust to the width of the paper. (p.15)
Bypass tray
Paper including special paper (such as transparency
film) can be fed from the bypass tray. (p.15
,
p.26)
Bypass tray extension
Pull out when feeding large paper such as B4 and
A3 (8-1/2» x 14″ and 11″ x 17″). (p.15)
Charger cleaner
Use to clean the transfer charger. (p.57)
USB 1.1 connector
Connect to your computer to use the printer
functions. (Software Setup Guide)
5
14
6
12 13
7
1
1
2
4
9
16
15
10
11
8
3
3
1
2
3
4
5
6
7
8
9
10
11
12
13
14
15
AR-5316-5320-EX.book 8 ページ 2003年11月26日 水曜日 午後5時3分
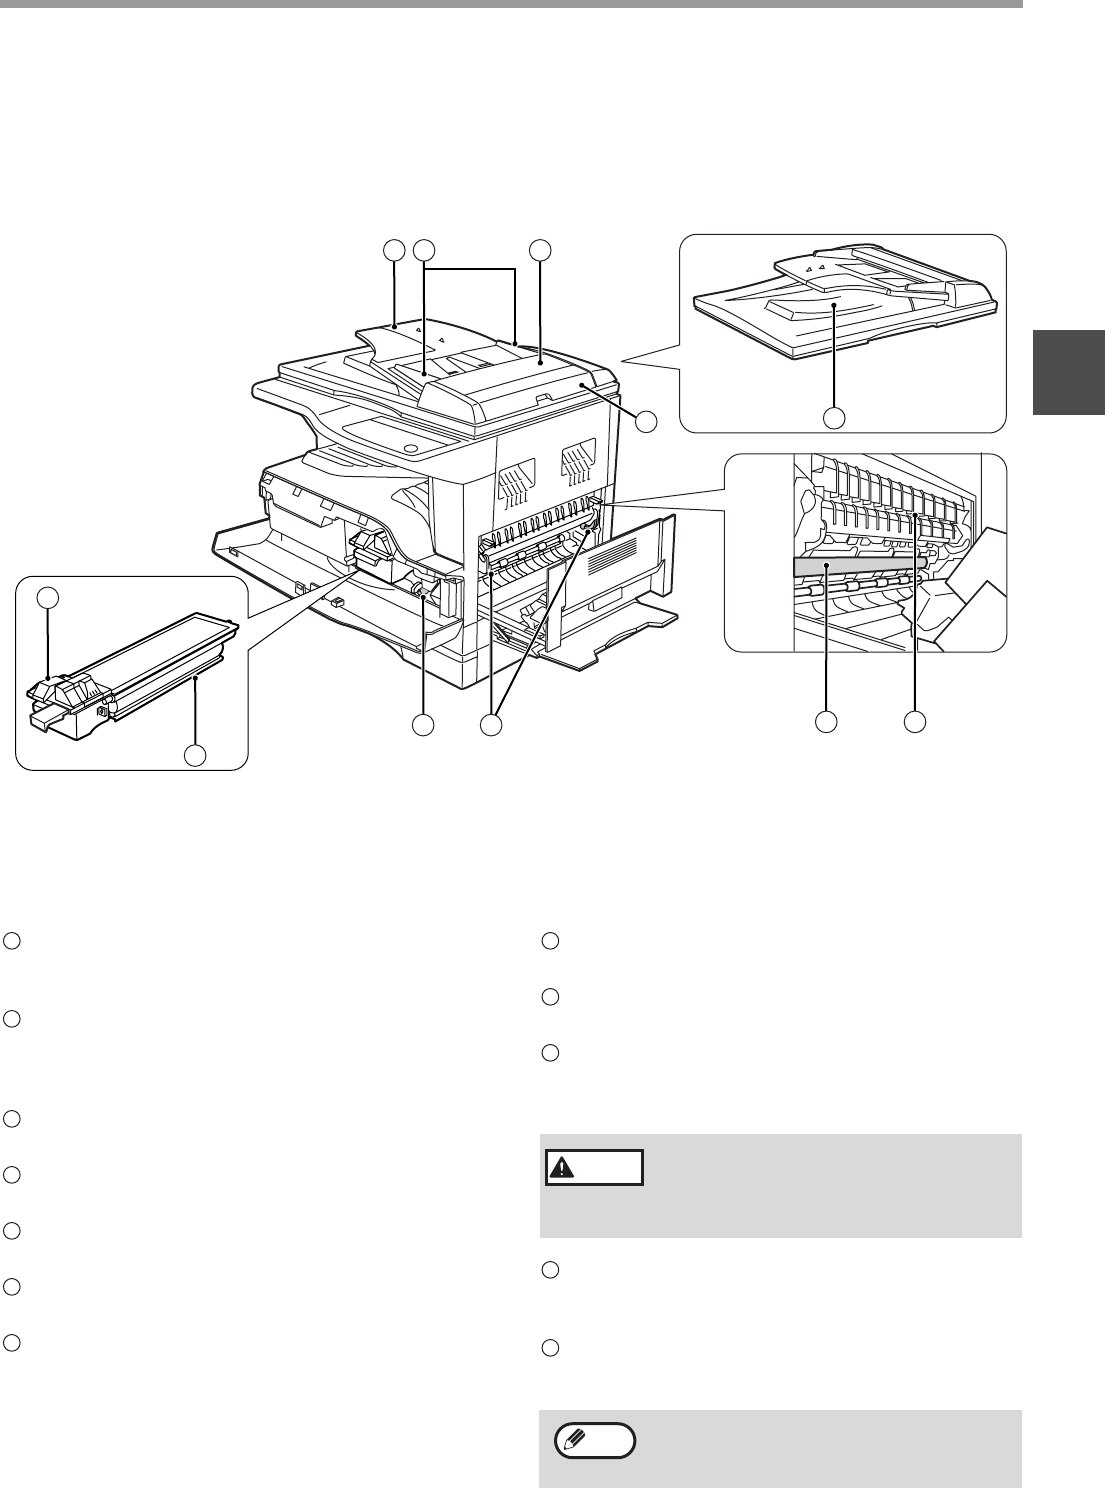
9
BEFORE USING THE MACHINE
1
Parallel connector
Connect to your computer to use the printer
function. (Software Setup Guide)
Document feeder tray (when the SPF is
installed)
Place the original(s) that you wish to scan face up
here. Holds up to 40 originals.
Original guides (when the SPF is installed)
Adjust to the size of the originals.
Feeding roller cover (when the SPF is installed)
Open to remove misfed originals. (p.47)
Right side cover (when the SPF is installed)
Open to remove misfed originals. (p.47)
Exit area (when the SPF is installed)
Originals exit the machine here after copying.
Toner cartridge lock release lever
To replace the toner cartridge, pull out the toner
cartridge while pushing on this lever.
Toner cartridge
Contains toner. (p.54)
Roller rotating knob
Turn to remove misfed paper. (p.49, p.50)
Fusing unit release levers
To remove a paper misfeed from the fusing unit, push
down on these levers and remove the paper. (p.50)
Photoconductive drum
Copy images are formed on the photoconductive
drum.
Fusing unit paper guide
Open to remove misfed paper.
16
17
18
19
20
21
22
The fusing unit is hot. Do not touch
the fusing unit when removing misfed
paper. Doing so may cause a burn or
injury.
The model name can be seen on the machines
front cover.
23
24
25
Warning
26
27
Note
AR-5316-5320-EX.book 9 ページ 2003年11月26日 水曜日 午後5時3分
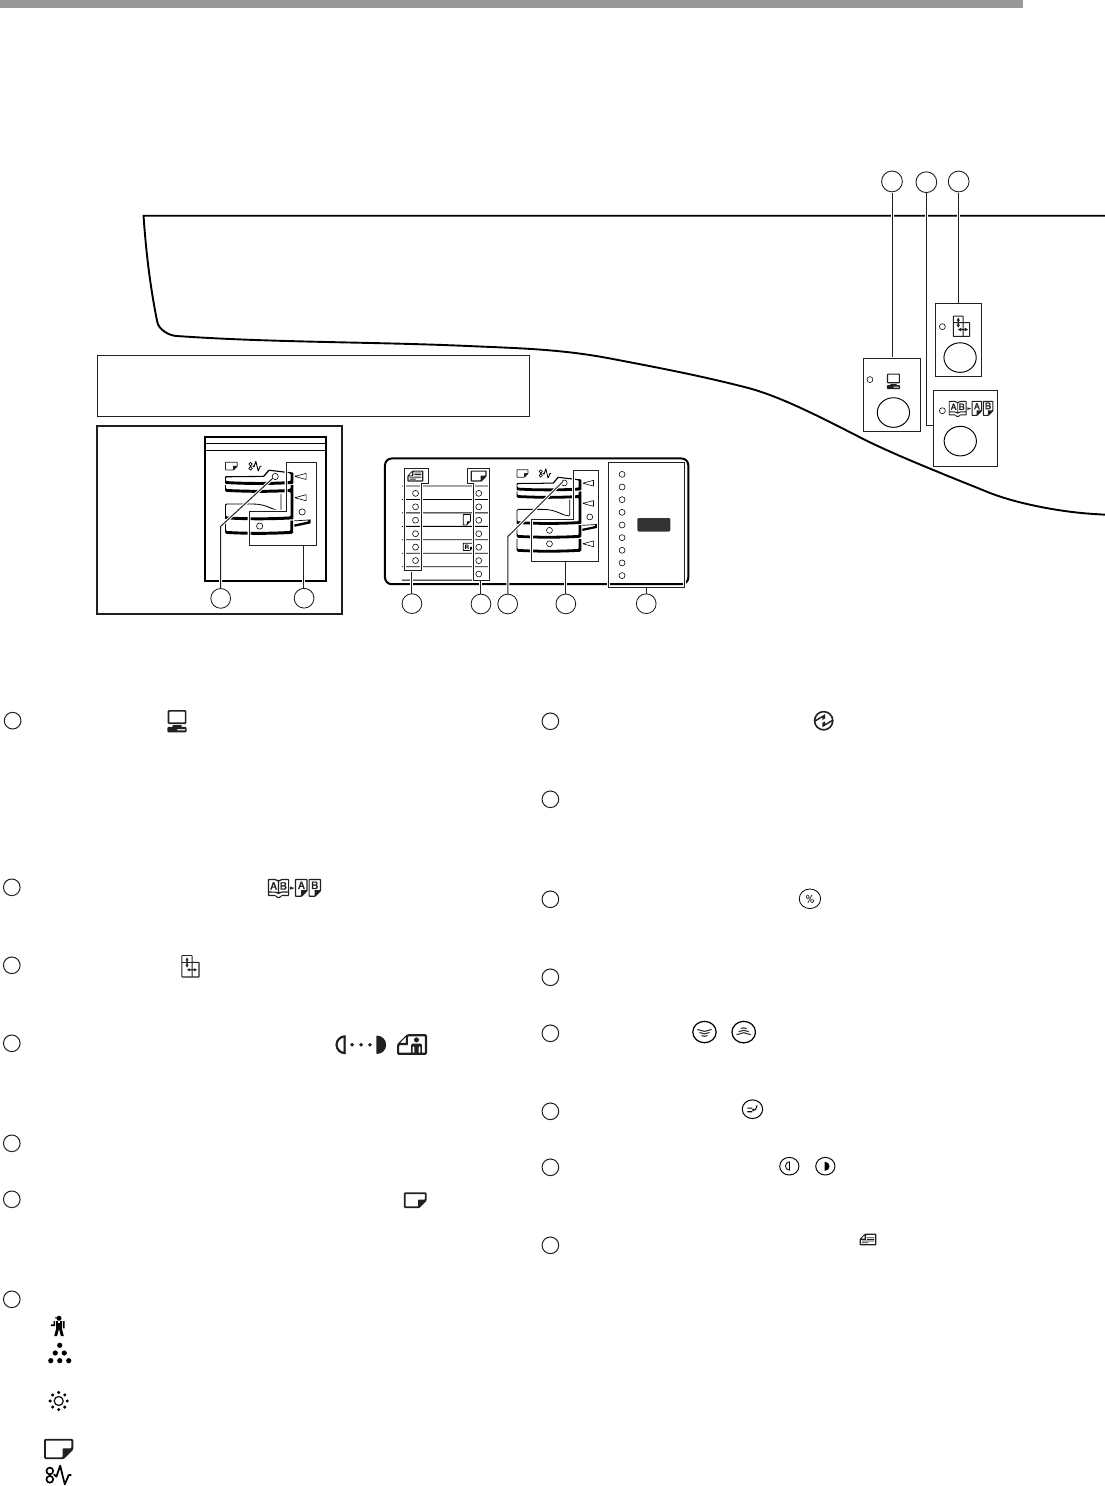
10
BEFORE USING THE MACHINE
OPERATION PANEL
ON LINE key ( ) / indicator
Press to toggle the machine between online and
off-line. The indicator lights up when the machine
is online, and goes off when the machine is
off-line. The indicator blinks while the machine is
receiving print data and while printing is paused.
(p.29)
DUAL PAGE COPY key ( ) / indicator
Use to make individual copies of the two pages of
an open book or other two-page original. (p.27)
XY-ZOOM key ( ) / indicator
Press to change the horizontal and vertical copy
ratios independently. (p.24)
AUTO/TEXT/PHOTO key ( / / ) /
indicators
Use to select the exposure mode:
«AUTO», «TEXT», or «PHOTO». (p.21)
AUDIT CLEAR key ( )
Closes an open account. (p.39)
AUTO PAPER SELECT indicator ( )
Paper of the proper size will be automatically
selected depending on the original size and
selected copy ratio when this indicator is on. (p.20)
Alarm indicators
[ ] Maintenance indicator (p.46)
[ ] Toner cartridge replacement required
indicator (p.46)
[ ] Developer replacement required indicator
(p.46)
[ ] Paper required indicator (p.46)
[ ] Misfeed indicator (p.46)
POWER SAVE indicator ( )
Lights up when the machine is in a power save mode.
(p.12)
Display
Shows the set number of copies, as well as the copy
ratio, user program function or setting code, or an
error code when an error occurs.
Copy ratio display key ( )
Hold down when the machine is not in use to
display the copy ratio in the display. (p.24)
ZOOM indicator
Lights up when a zoom ratio is set. (p.24)
Zoom keys ( , )
Use to select any reduction or enlargement copy ratio
from 25% to 400% in increments of 1%. (p.24)
INTERRUPT key ( ) / indicator
Interrupts a copy run. (p.28)
Light and Dark keys ( , ) / indicators
Use to adjust the TEXT or PHOTO exposure level.
(p.21)
ORIGINAL SIZE ENTER key ( ) / ORIGINAL
SIZE indicators
Use to enter the original size. (p.16) The selected
original size will light up.
1
2
3
4
AUTO
5ACC.#-C
6
AUTO
7
8
9
10
11
12
13
14
15
ENTER
The example of a display of inch series
200
%
50
%
141
95
77
64
129
121
11
X
17
8½
X
14
8½
X
11
8½
X
11
8½
X
5½
EXTRA
8½
X
13
100
%
AR-5316/
AR-5316 X
18 21
The indications of the operation panel may differ
depending on the country and the region.
18 21 22
15 16
23
1
AR-5316-5320-EX.book 10 ページ 2003年11月26日 水曜日 午後5時3分
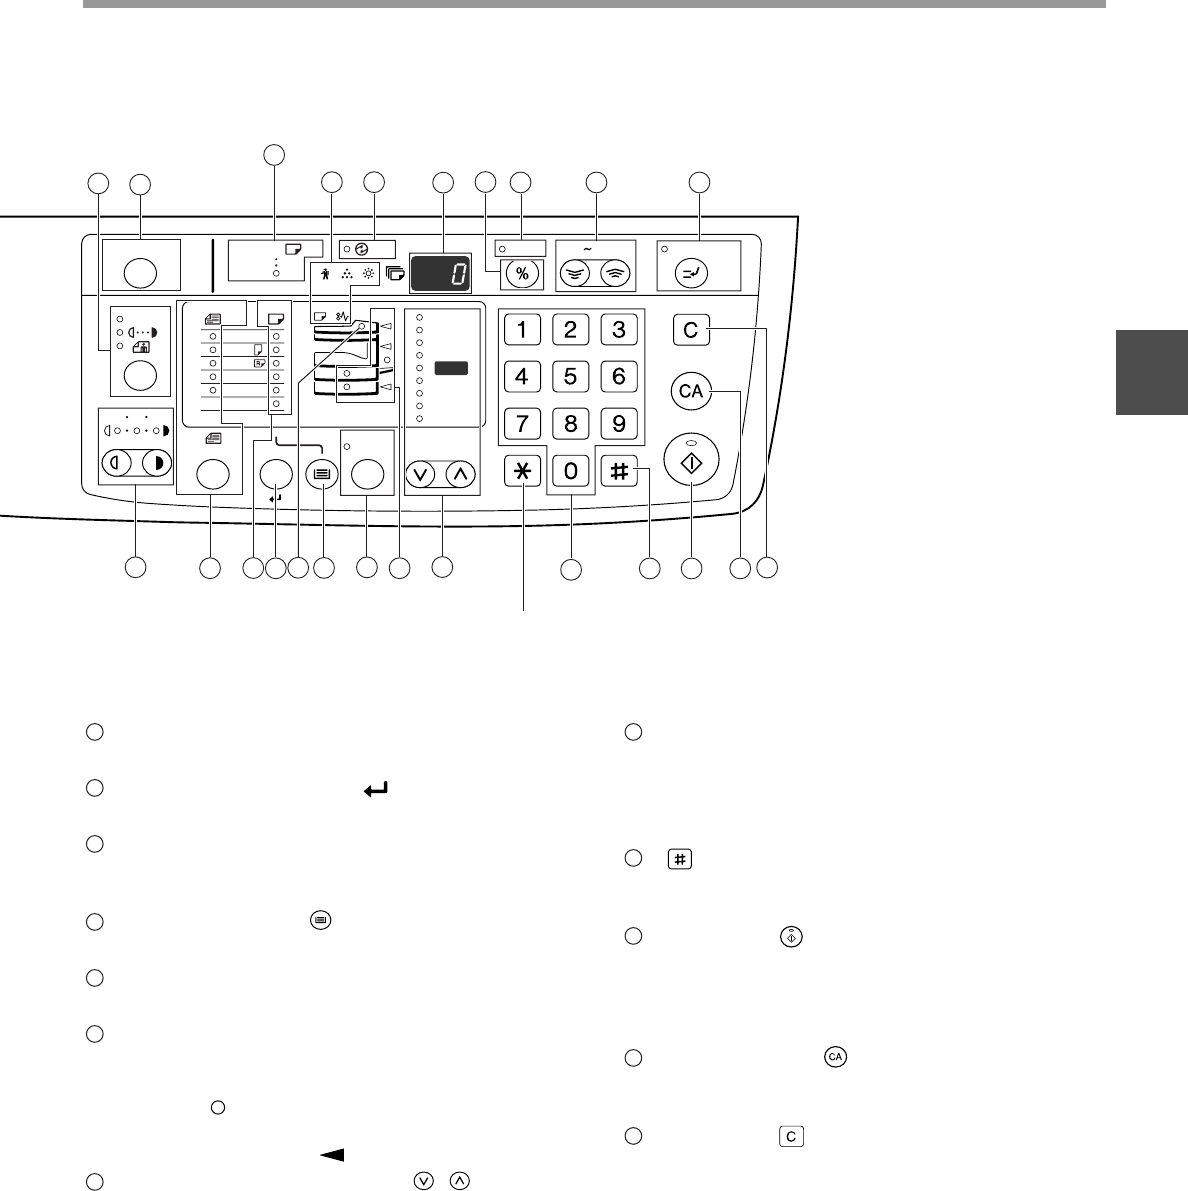
11
BEFORE USING THE MACHINE
1
PAPER SIZE indicators
Light up to show the selected copy paper size. (p.16)
PAPER SIZE ENTER key ( )
Use to set the paper size in the paper trays. (p.16)
SPF indicator (when the SPF is installed)
Lights up when originals are set in the document
feeder tray. (p.19)
TRAY SELECT key ( )
Use to manually select a paper tray. (p.21)
AUTO IMAGE key ( ) / indicator
Press for automatic copy ratio selection. (p.22)
Paper feed location / misfeed location
indicators
The selected paper feed location is shown by a lit
indicator ( ). (p.18)
The general location of misfed paper is shown by a
blinking red indicator ( ). (p.47)
PRESET RATIO selector keys ( , )
/ indicators
Use to select preset reduction/enlargement copy
ratios. (p.23)
Numeric keys
Use to select the desired copy quantity or to make
user program entries. (p.22)
To display the total number of pages output by the
machine, hold the [0] key down. (p.55)
[] key
Use to check the total number of copies made.
(p.55)
START key ( ) /indicator
Press to make a copy (p.18). Also press to exit
«Auto power shut-off» mode and to set a user
program. Copying is possible when the indicator is
on.
CLEAR ALL key ( )
Clears all selected settings and returns the
machine to the initial settings. (p.12)
CLEAR key ( )
Clears the copy quantity display or terminates a
copy run.
16
18
19
20
AUTO %
21
22
23
24
25
26
27
INTERRUPT
ZOOM
135
25 400%
AUTO
ENTER
AUTO
ACC.#-C
AUTO %
A3
A4
A4
A5
B4
EXTRA
200
%
50
%
141
86
81
70
122
115
100
%
(Two-tray model only)
Not used for this machine.
45
6
7 8 9
10 11 12
14 15 16 17 18 19 20 21 22 23 24 25 26 27
13
AR-5316-5320-EX.book 11 ページ 2003年11月26日 水曜日 午後5時3分
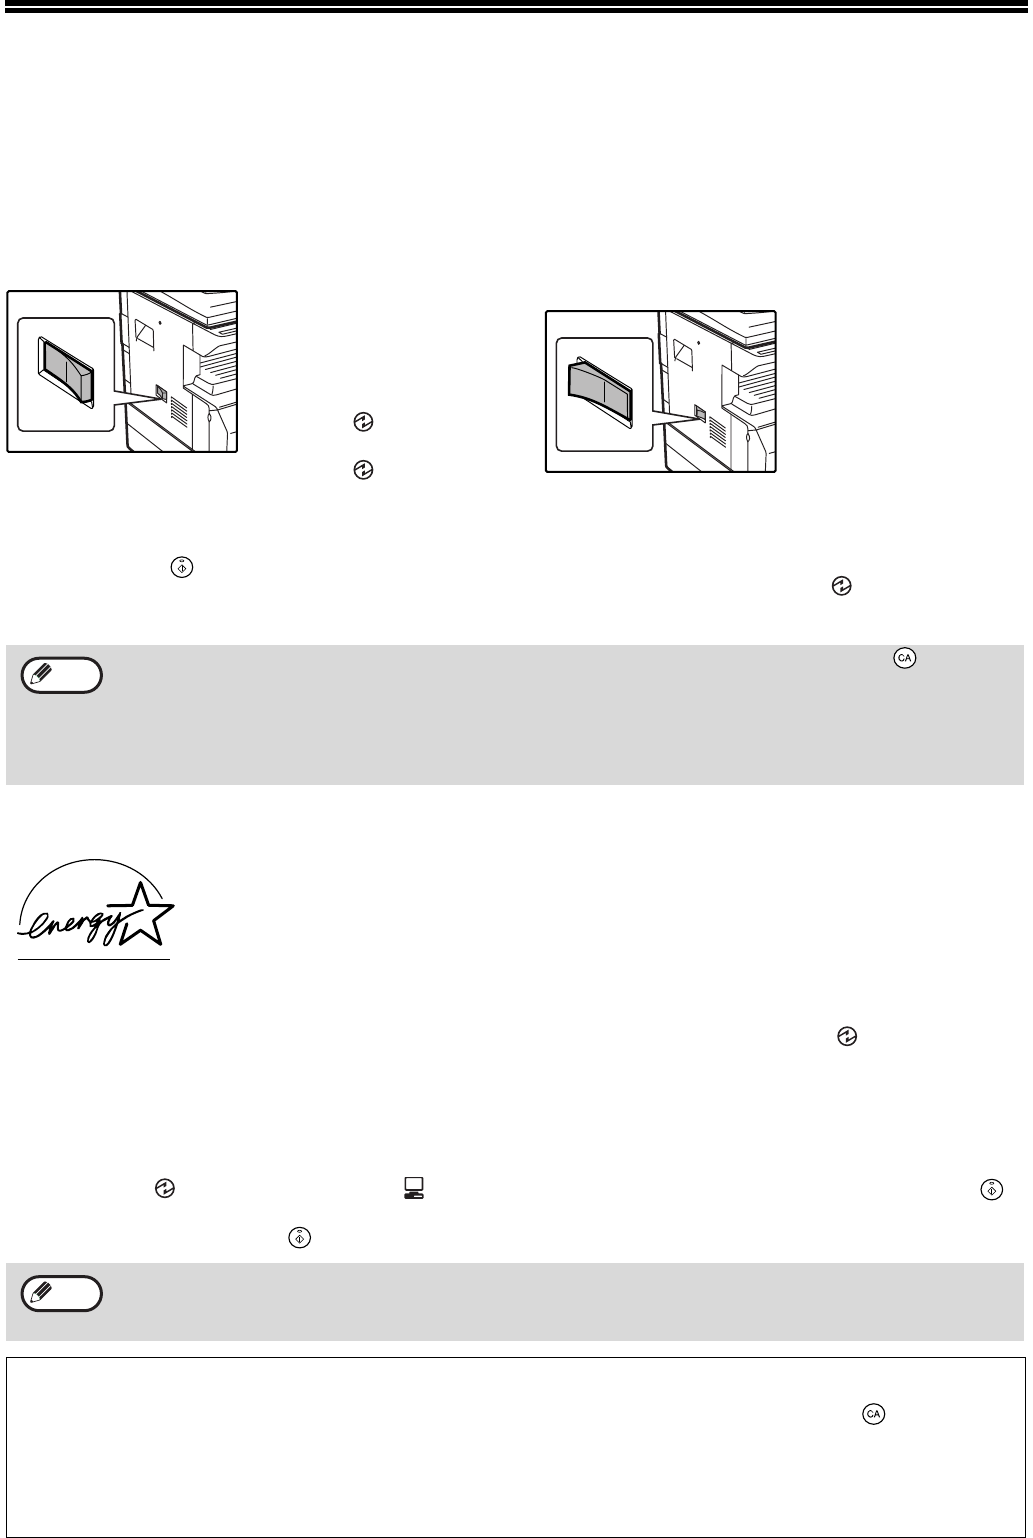
12
POWER ON AND OFF
The power switch is located on the left side of the machine.
POWER ON
Turn the power switch to the «ON»
position.
It will take about 45
seconds for the machine
to warm up. While the
machine is warming up,
the POWER SAVE
indicator ( ) will blink.
(The POWER SAVE
indicator ( ) will go off
when the machine is
ready to copy.)
However, you can make desired settings and press
the [START] key ( ) during warm-up. Copying will
start after warm-up.
POWER OFF
Make sure that the machine is not in
operation and then turn the power switch
to the «OFF» position.
If the power switch is
turned off while the
machine is in operation,
a misfeed may occur and
the job that was in
progress will be
cancelled.
Check the following to make sure the machine is not in
operation:
•The START indicator is lit. (Initial state)
•The POWER SAVE indicator ( ) is lit. («Preheat
mode» or «Auto power shut-off» mode)
Power Save Modes
Preheat mode
This function automatically switches the machine to a low power consumption state if the set duration of time
elapses without the machine being used when the power is on. The POWER SAVE indicator ( ) lights up,
however, the keys on the operation panel can be used. Normal operation automatically resumes when a key on the
operation panel is pressed, an original is placed, or a print job is received.
Auto power shut-off mode
This function automatically switches the machine to a state that consumes even less power than preheat mode if the
set duration of time elapses without the machine being used when the power is on. All lights except the POWER
SAVE indicator ( ) and ON LINE indicator ( ) go off. To resume normal operation, press the [START] key ( ).
Normal operation also resumes automatically when a print job is received. While in auto power shut-off mode, no
keys (except the [START] key ( )) can be used.
•The machine reverts to the initial settings when it is first turned on, when the [CLEAR ALL] key ( ) is pressed,
or when no keys are pressed for the preset «Auto clear» time following the end of a copy job. When the machine
reverts to the initial settings, all settings and functions selected to that point are cancelled. The «Auto clear» time
can be changed in the user settings. (p.33)
•The machine is initially set to automatically enter power save mode if not used for copying or printing, for a
preset period of time. This setting can be changed in the user programs. (p.33)
The machine has two power save modes to reduce overall power consumption thereby
reducing the cost of operation. In addition, these modes conserve natural resources and help
reduce environmental pollution. The two power save modes are «Preheat mode» and «Auto
power shut-off mode».
The preheat activation time and the «Auto power shut-off timer» can be changed using user programs. It is
suggested that you set times that are appropriate for your usage of the machine. (p.33)
Note
Note
Initial settings
The machine assumes the initial settings when it is first turned on, when the [CLEAR ALL] key ( ) is pressed,
and approximately one minute after the last copy is made in any mode.
Copy ratio: 100%, Exposure: Automatic
Copy quantity: 0, All special copier modes: Off
Auto paper selection
: On,
Paper feed station
: The tray selected in the «Default tray setting» in the user programs. (p.34)
AR-5316-5320-EX.book 12 ページ 2003年11月26日 水曜日 午後5時3分
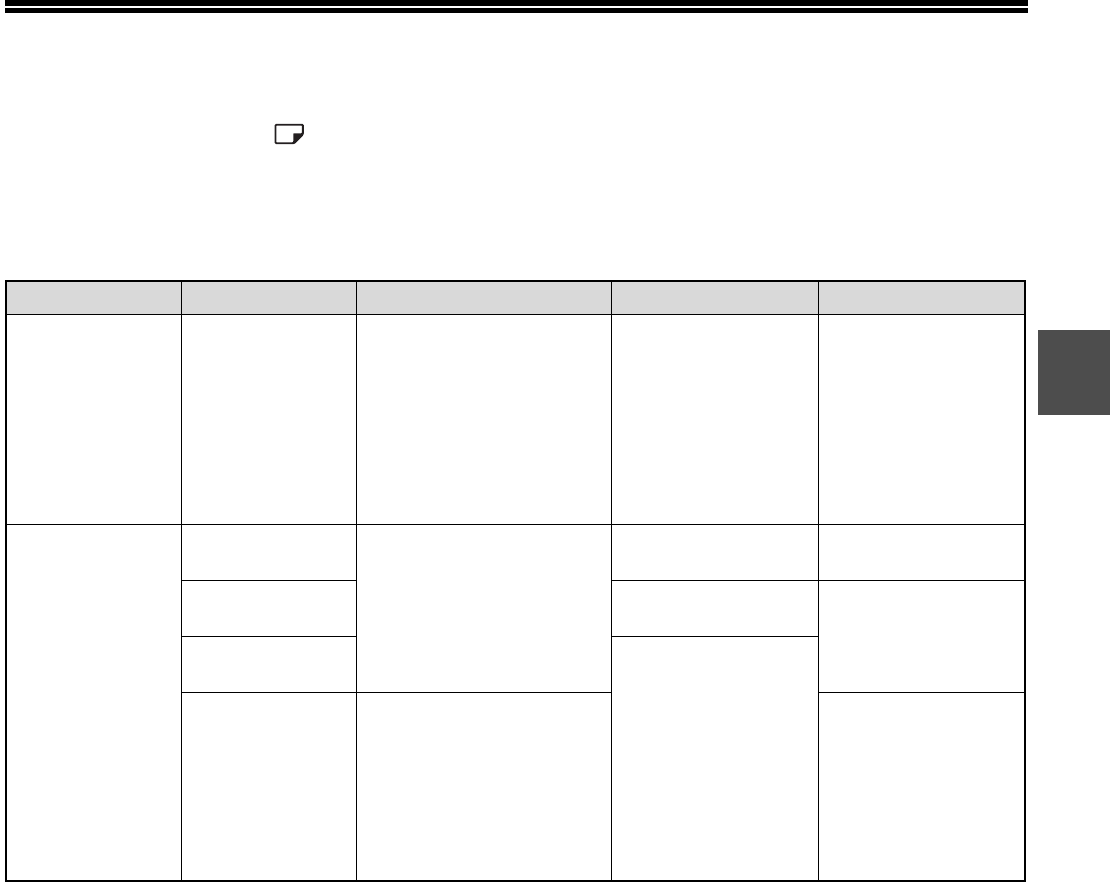
13
1
LOADING PAPER
The paper required indicator ( ) will light up when there is no copy paper in the selected paper feed tray, or when
the selected paper tray is not installed or is improperly installed.
PAPER
For best results, use only SHARP recommended paper.
*1A5 (5-1/2″ x 8-1/2″) can be used in the upper paper tray but cannot be used in other trays.
*2When making a large number of copies or prints using 90 g/m2 (24 lbs.) paper, remove the output from the paper output tray
when about 100 pages have been printed. The output may not stack correctly if more than 100 pages are allowed to
accumulate.
*3The number of sheets of the paper which can be set changes with the weight of a paper.
Special papers
Follow these guidelines when using special papers.
●
●●
●Use SHARP recommended transparency film and label sheets. Using other than SHARP recommended
paper may result in misfeeds or smudges on the output. If other than SHARP recommended media must
be used, feed each sheet one at a time using the bypass tray (do not attempt continuous copying or
printing).
●
●●
●There are many varieties of special paper available on the market, and some cannot be used with this
machine. Before using special paper, contact your authorised service representative.
●
●●
●Before using other than SHARP recommended paper, make a test copy to see if the paper is suitable.
Paper tray type Paper type Size Weight Capacity
Paper tray Standard paper
Recycled paper
A5*1
A4
B4
A3
(5-1/2″ x 8-1/2″*1 (Invoice))
(8-1/2″ x 11″ (Letter))
(8-1/2″ x 13″ (Foolscap))
(8-1/2″ x 14″ (Legal))
(11″ x 17″ (Ledger))
56 g/m2 to 90 g/m2 *2
(15 lbs. to 24 lbs. *2)
250 sheets
(Load paper lower
than the line on the
tray)
Bypass tray Standard paper
Recycled paper
A6R to A3
(5-1/2″ x 8-1/2″ (Invoice)
to 11″ x 17″ (Ledger))
56 g/m2 to 80 g/m2
(15 lbs. to 20 lbs.)
100 sheets *3
Thick paper Max. 200 g/m2 (54
lbs.)
Load one sheet of
these papers at a
time to the bypass
tray.
Transparency film
Labels
Envelopes International DL
(110 mm x 220 mm)
International C5
(162 mm x 229 mm)
Commercial 9
(3-7/8″ x 8-7/8″)
Commercial 10
(4-1/8″ x 9-1/2″)
5 sheets
AR-5316-5320-EX.book 13 ページ 2003年11月26日 水曜日 午後5時3分
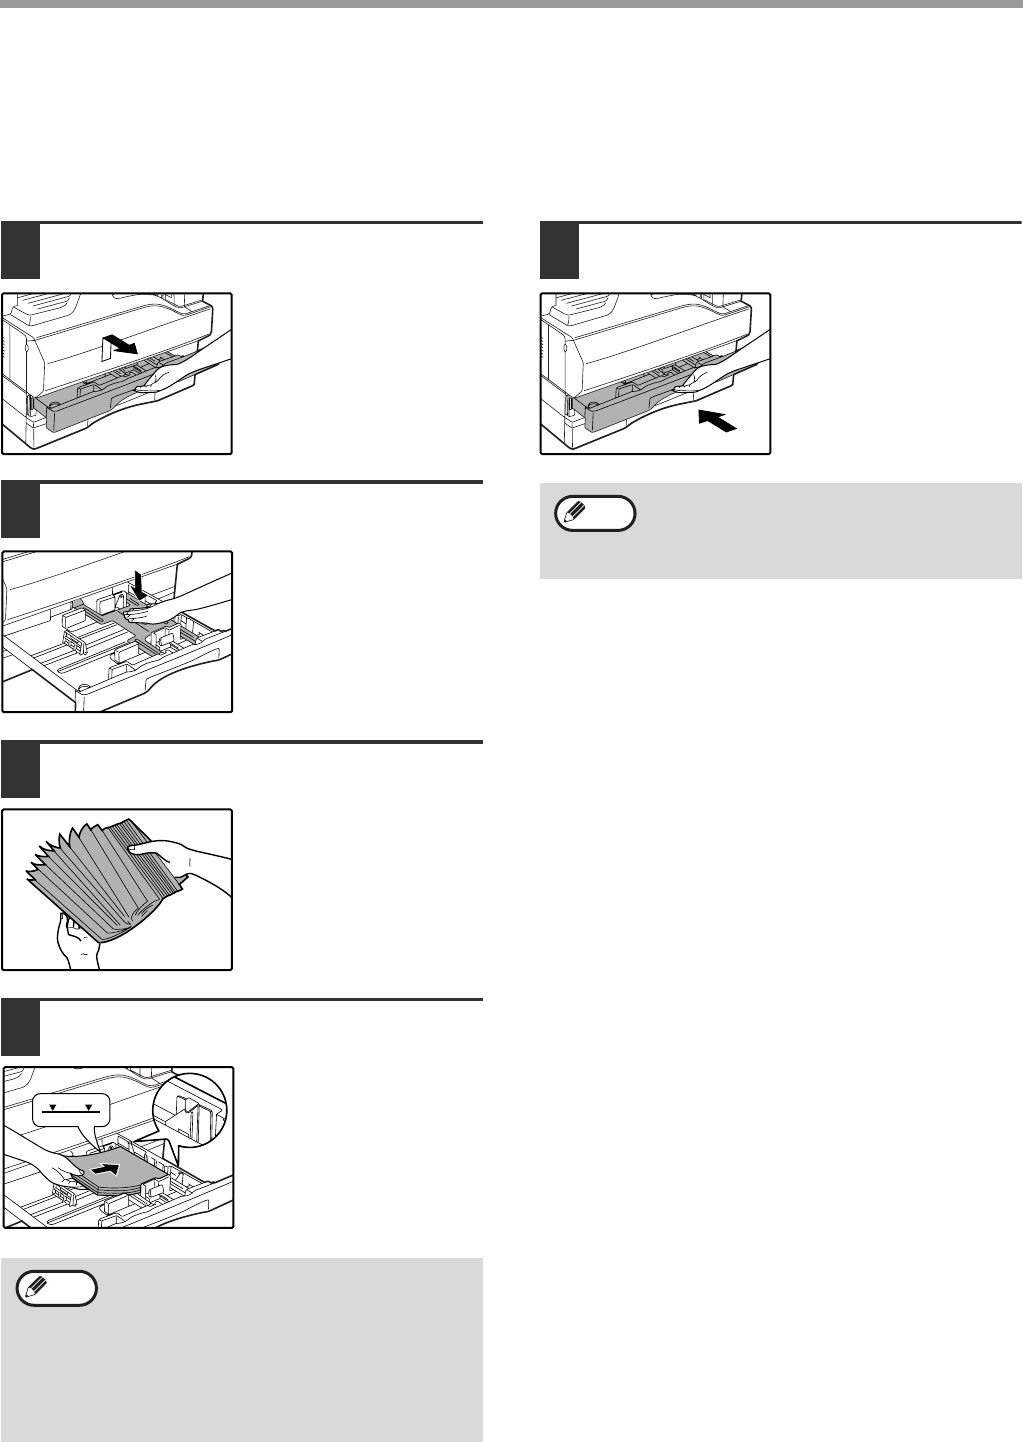
14
BEFORE USING THE MACHINE
LOADING PAPER
Make sure that the machine is not copying or printing, and then follow these steps to load paper.
Loading the paper tray
1Gently lift and pull out the paper tray
until it stops.
2Push the pressure plate down until it
locks in place.
Push the centre of the
pressure plate down until
it locks into place.
3Fan the paper.
If the paper is not fanned,
double-feeds or misfeeds
may occur.
4Load paper into the tray.
5Gently push the paper tray into the
machine.
•Do not load paper higher than the line on
the tray (up to 250 sheets).
•Make sure that the paper fits under the tabs
on the right side of the tray.
•Make sure the stack of paper is straight
before loading it. When adding paper, take
the remaining paper out and combine it into
a single stack with the new paper.
Note
If you loaded a different size of paper than
was loaded previously in the tray, go to
«CHANGING A TRAY’S PAPER SIZE
SETTING» (p.16).
Note
AR-5316-5320-EX.book 14 ページ 2003年11月26日 水曜日 午後5時3分
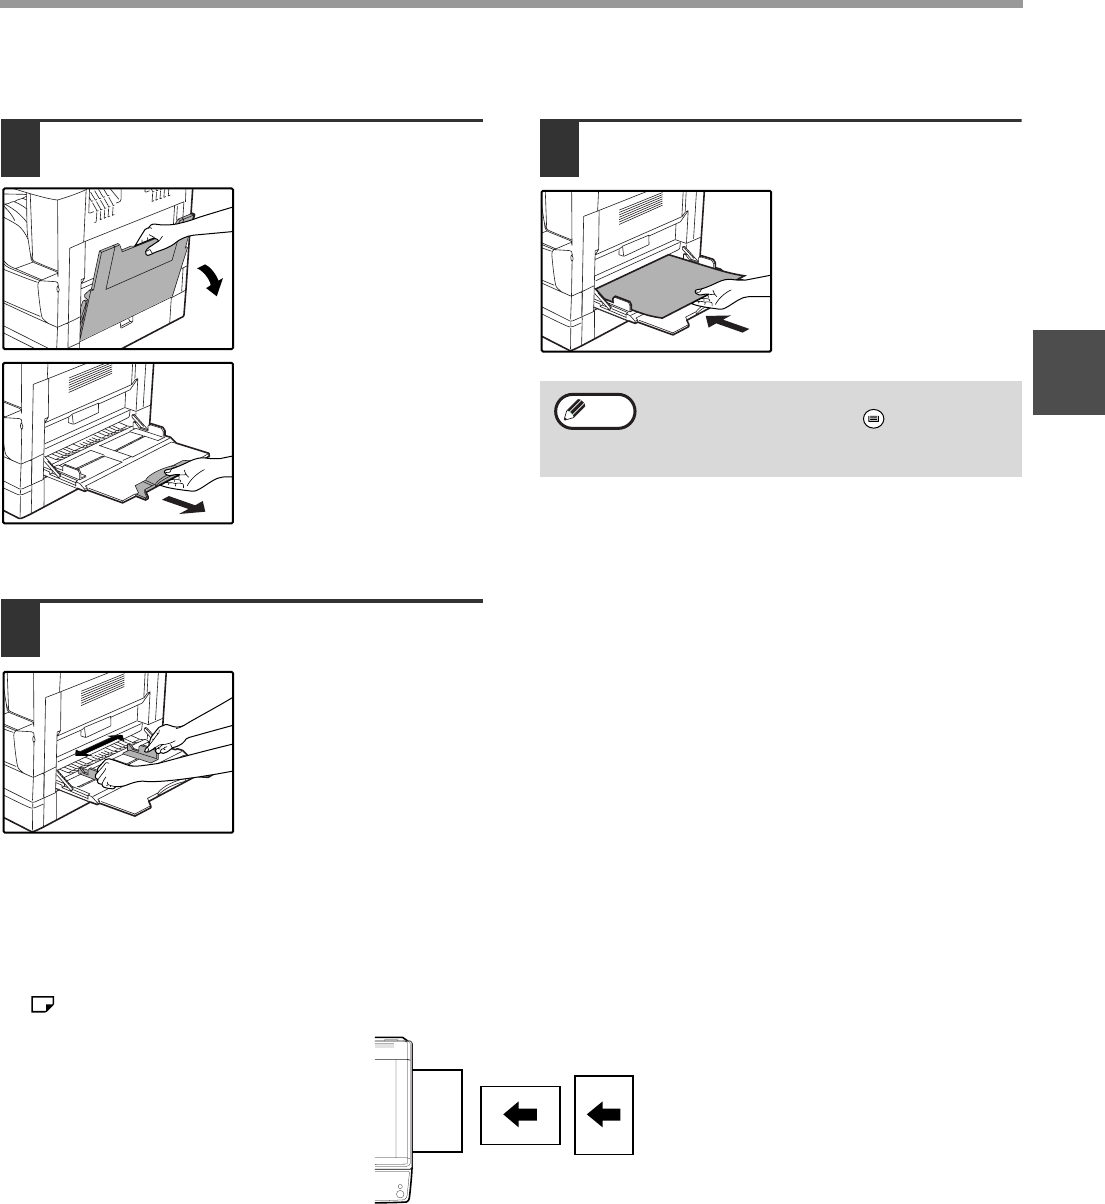
15
BEFORE USING THE MACHINE
1
Loading the bypass tray
1Unfold the bypass tray.
When feeding large
paper such as B4 and A3
(8-1/2» x 14″ and 11″ x
17″), pull out the bypass
tray extension.
2Set the paper guides to the copy
paper width.
3Insert the paper (print face down) all
the way into the bypass tray.
To prevent a misfeed,
verify once more that the
paper guides are
adjusted to the width of
the paper.
Important points when inserting paper in the bypass tray
•Up to 100 sheets of standard copy paper can be set in the bypass tray.
•Be sure to place A6, A5 or 5-1/2″ x 8-1/2″ size paper or envelopes horizontally as shown in the following diagram
().
•When loading envelopes, make sure that they are straight and flat and do not have loosely glued construction
flaps (not the closure flap).
•Special papers except SHARP recommended transparency film, labels, and envelopes must be fed one sheet at a
time through the bypass tray.
•When adding paper, first remove any paper remaining in the tray, combine it with the paper to be added and then
reload as a single stack. The paper to be added must be the same size and type as the paper already in the tray.
•Do not use paper that is smaller than the original. This may cause smudges or unclean images.
•Do not use paper that has already been printed on by a laser printer or plain paper fax machine. This may cause
smudges or unclean images.
If you loaded paper in the bypass tray, press
the [TRAY SELECT] key ( ) to select the
bypass tray. The bypass tray will not be
selected automatically.
Note
Available Not available
AR-5316-5320-EX.book 15 ページ 2003年11月26日 水曜日 午後5時3分
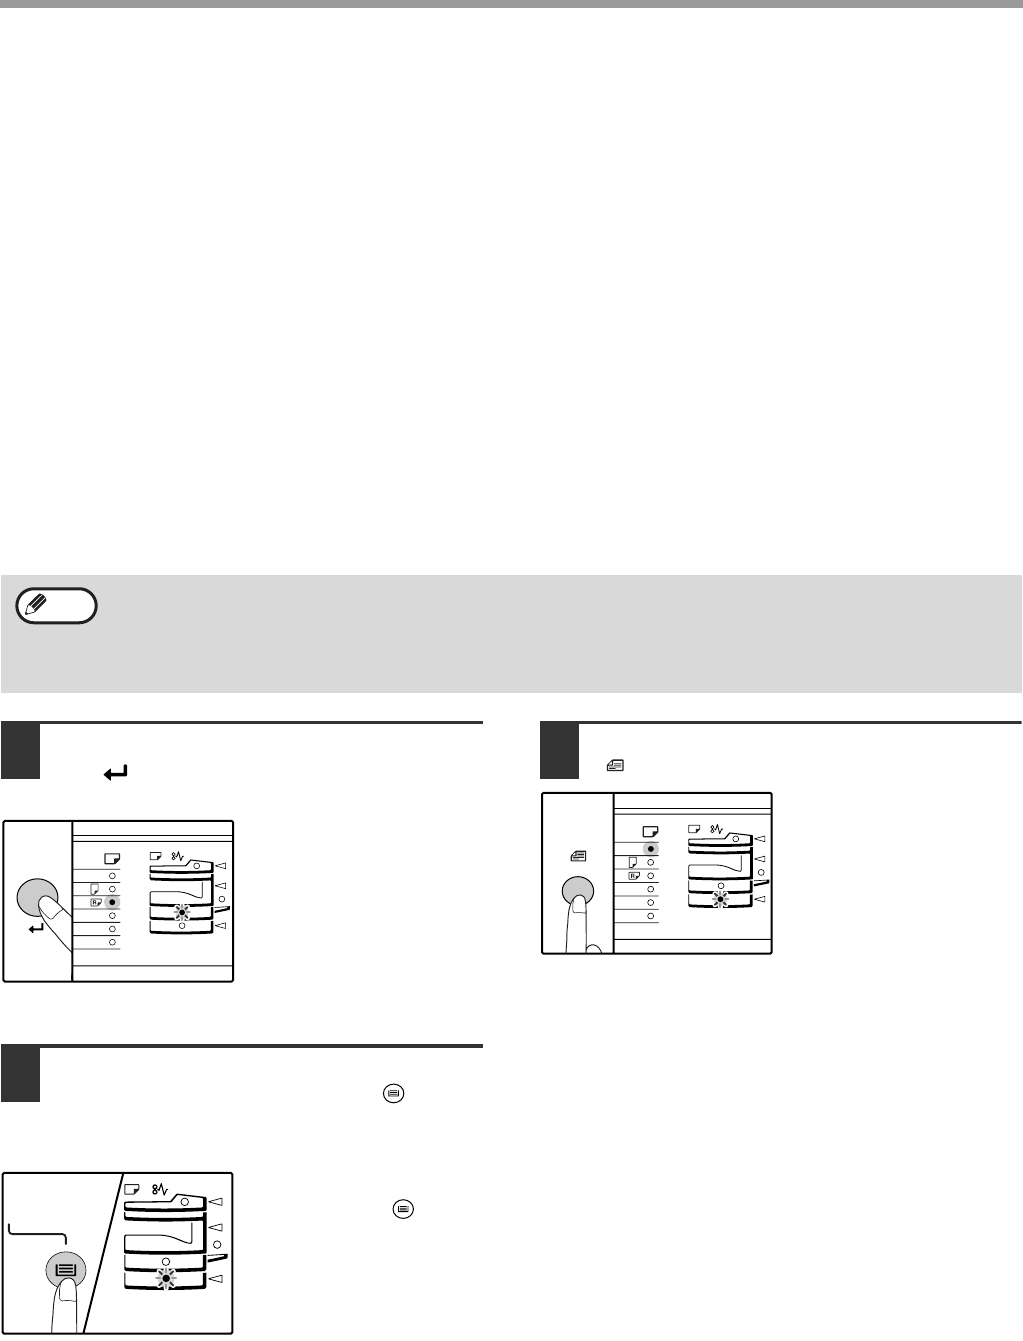
16
BEFORE USING THE MACHINE
Envelopes
Do not use the following envelopes, as misfeeds will occur.
•Envelopes with metal tabs, clasps, strings, holes, or windows.
•Envelopes with rough fibres, carbon paper, or glossy surfaces.
•Envelopes with two or more flaps.
•Envelopes with tape, film, or paper attached to the flap.
•Envelopes with a fold in the flap.
•Envelopes with glue on the flap to be moistened for sealing.
•Envelopes with labels or stamps.
•Envelopes that are slightly inflated with air.
•Envelopes with glue protruding from the seal area.
•Envelopes with part of the seal area peeled off.
CHANGING A TRAY’S PAPER SIZE SETTING
Follow these steps to change a tray’s paper size setting.
1Hold down the [PAPER SIZE ENTER]
key ( ) for more than 5 seconds to
set the selected paper size.
The currently selected
paper feed location
indicator will blink and the
corresponding paper size
(which is currently set)
indicator will light steadily.
All other indicators will go
out.
2If the machine has two paper trays,
use the [TRAY SELECT] key ( ) to
select the paper tray for which you
wish to change the paper size setting.
Each time the [TRAY
SELECT] key ( ) is
pressed, a paper tray will
be indicated with a
blinking paper feed
location indicator.
3Use the [ORIGINAL SIZE ENTER] key
( ) to select the paper size.
The indicator of the
selected paper size lights
up.
•The paper size setting cannot be changed when the machine has stopped temporarily due to running out of
paper or a misfeed, or during interrupt copying.
•During printing (even in copy mode), the paper size setting cannot be changed.
•A5 (5-1/2″ x 8-1/2″) size paper can only be selected in upper paper tray.
•Do not load paper that is a different size than the paper size setting. Copying will not be possible.
Note
ENTER
AR-5316-5320-EX.book 16 ページ 2003年11月26日 水曜日 午後5時3分
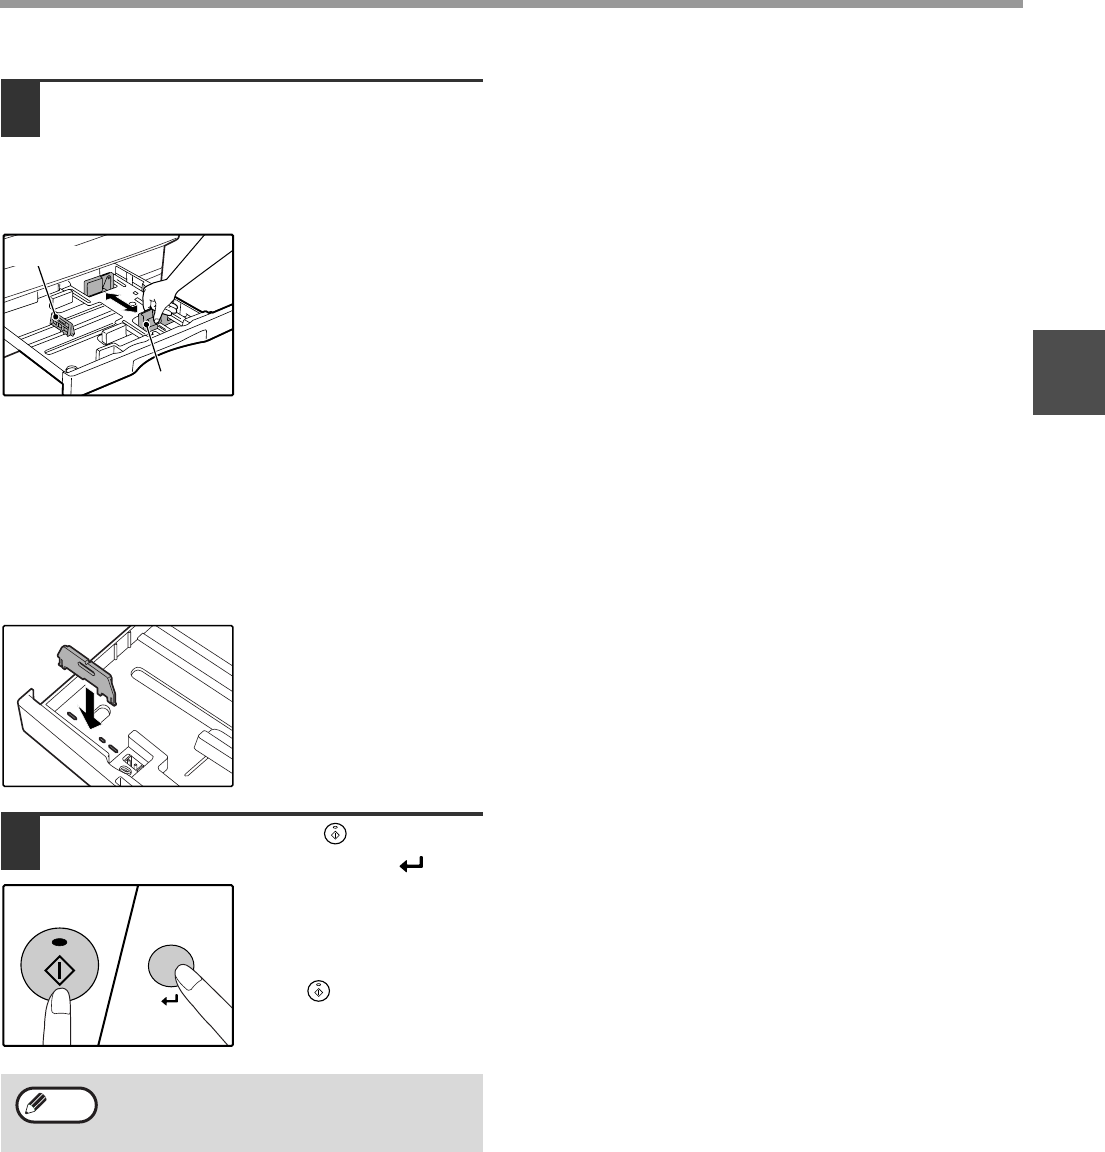
17
BEFORE USING THE MACHINE
1
4Squeeze the lock lever of the front
guide and slide the front guide to
match the width of the paper, and
move the left guide to the appropriate
slot as marked on the tray.
•The front guide is a slide-type guide. Grasp the
locking knob on the guide and slide the guide to the
indicator line of the paper to be loaded.
•The left guide is an insert-type guide. Remove it and
then insert it at the indicator line of the paper to be
loaded.
•When using 11″ x 17″ sized paper store the left guide
in the slot at the left front of the paper tray.
5Press the [START] key ( ) and then
the [PAPER SIZE ENTER] key ( ).
To change the paper size
setting of another tray,
repeat steps 2 to 5 after
pressing the [START]
key ( ).
Important points when using the printer mode
•Make sure that the tray‘s paper size setting is the
same as the tray’s paper size setting in the printer
driver. For example, if the tray’s paper size setting is
A4R, set «Setting Paper Size» to «A4-R». For more
information, see «CONFIGURING THE PRINTER
DRIVER» in the «Software Setup Guide».
Affix the paper size label for the paper size
selected in step 3 to the label position on the
right end of the tray.
Left guide
Front guide
Note
AR-5316-5320-EX.book 17 ページ 2003年11月26日 水曜日 午後5時3分
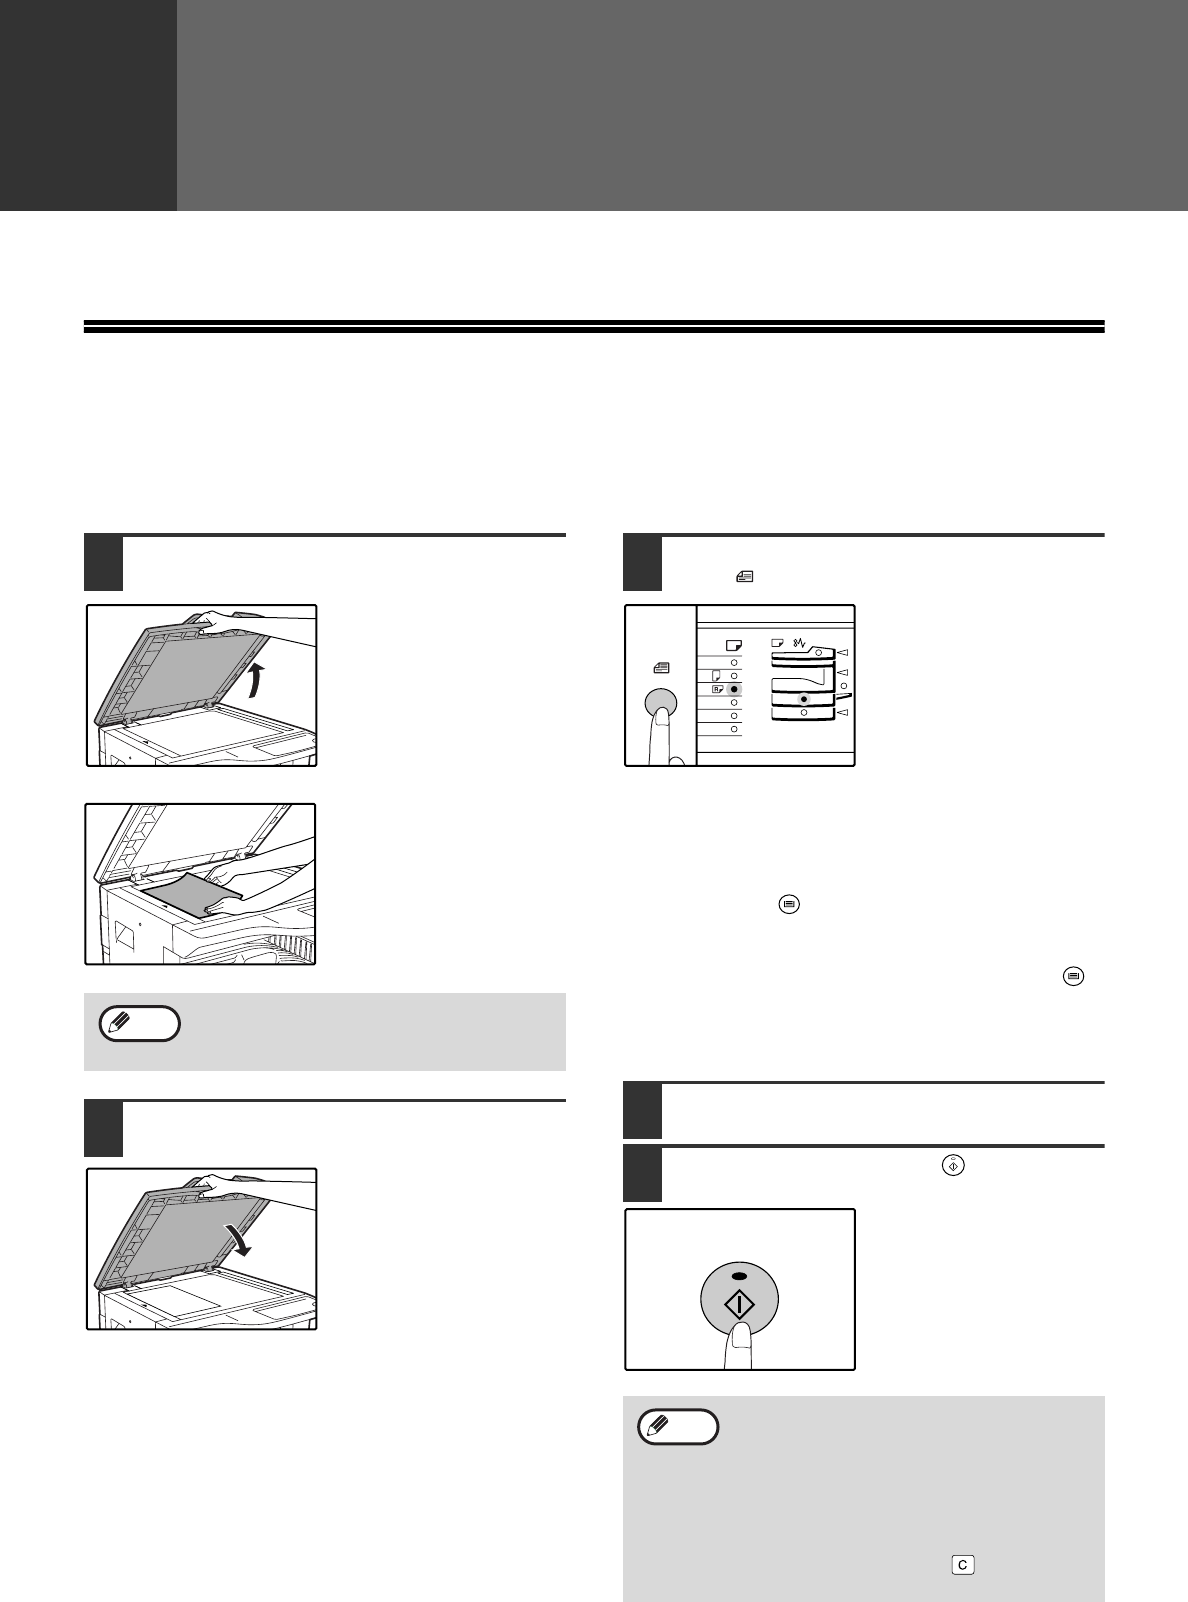
18
2Chapter 2
COPY FUNCTIONS
This chapter explains basic copying functions such as normal copying, reduction or enlargement, and exposure adjustment.
NORMAL COPYING
This section explains how to make a regular copy.
If «Auditing mode» has been enabled (p.39), enter your 3-digit account number.
Copying from the document glass
1Open the document cover/SPF, and
place the original.
Place the original face
down on the document
glass. Align it with the
original size scale.
2Close the document cover/SPF.
3Press the [ORIGINAL SIZE ENTER]
key ( ) and select the original size.
When the original size is
selected, the tray with the
same size of paper is
automatically selected.
(Two-tray model only)
●
Make sure that the PAPER SIZE indicator lights up.
If the indicator is not lit, no tray has the same size of
paper as the original. Load paper of the required size
in a tray, or select the bypass tray with the [TRAY
SELECT] key ( ) and copy from the bypass tray.
●The bypass tray must be manually selected.
●
To copy on paper of a different size than the original,
select the paper with the [TRAY SELECT] key ( ).
●
If the ORIGINAL SIZE indicator is blinking, rorate the
original so that it is in the same orientation as the
blinking ORIGINAL SIZE indicator.
4Set the number of copies.
5Press the [START] key ( ) to begin
copying.
The copy is delivered to
the paper output tray.
An original up to A3 (11″ x 17″) can be placed
on the document glass.
Note
•The paper output tray can hold up to 250
sheets of paper.
•About one minute after copying ends, «Auto
clear» activates and restores the copy
settings to the initial settings. (p.12) The
setting for «Auto clear time» can be changed
in the user programs. (p.33)
•Press the [CLEAR] key ( ) to stop
copying in the middle of a run.
ENTER
ENTER
Note
AR-5316-5320-EX.book 18 ページ 2003年11月26日 水曜日 午後5時3分
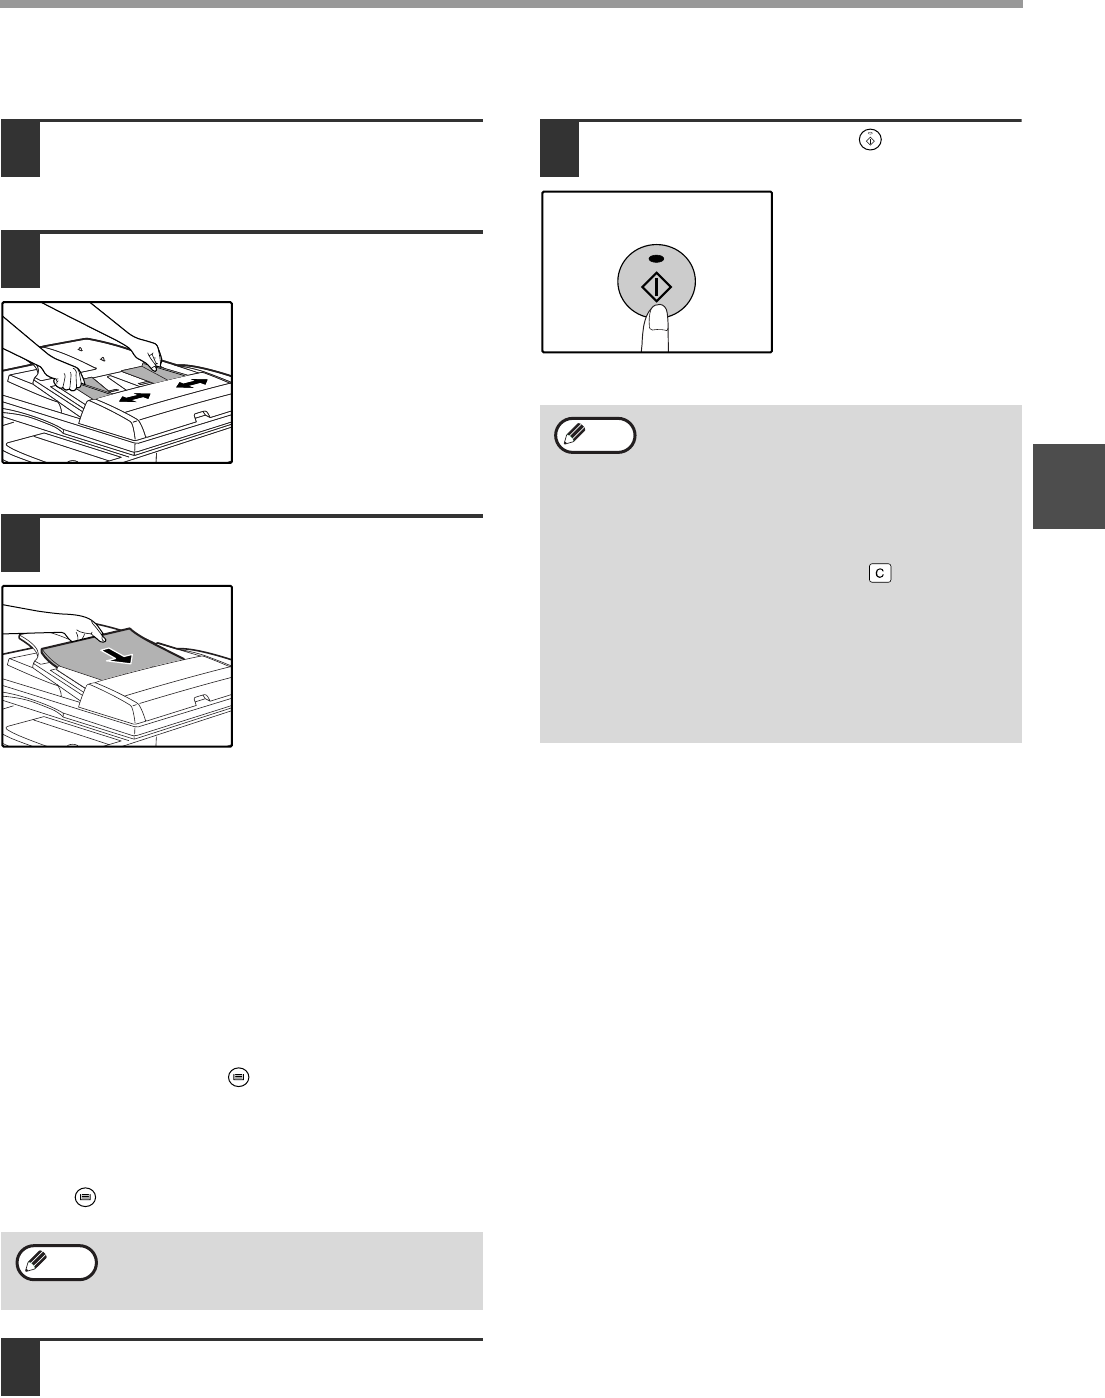
19
COPY FUNCTIONS
2
Copying from the SPF
1Make sure that an original has not
been left on the document glass.
Close the SPF.
2Adjust the original guides to the size
of the original(s).
3Set the original(s) face up in the
document feeder tray.
●Insert the original into the document feeder tray as
far as it will go. When the original is set, the SPF
indicator will light up.
●The ORIGINAL SIZE indicator corresponding to the
size of the original lights up.
●
If the
ORIGINAL
SIZE indicator is blinking, rorate
the original so that it is in the same orientation as the
blinking ORIGINAL SIZE indicator.
●Make sure that the PAPER SIZE indicator is lit.
If the indicator is not lit, no tray has the same size of
paper as the original. Load paper of the required
size in a tray, or select the bypass tray with the
[TRAY SELECT] key ( ) and copy from the
bypass tray.
●The bypass tray must be manually selected.
●To copy on paper of a different size than the
original, select the paper with the [TRAY SELECT]
key ( ).
4Set the number of copies.
5Press the [START] key ( ) to begin
copying.
The copy is delivered to
the paper output tray.
Do not place originals of different sizes
together in the document feeder tray. This
may cause misfeeds.
Note
•The paper output tray can hold up to 250
sheets of paper.
•About one minute after copying ends, «Auto
clear» activates and restores the copy
settings to the initial settings. (p.12) The
setting for «Auto clear» time can be changed
in the user programs. (p.33)
•Press the [CLEAR] key ( ) to stop
copying in the middle of a run.
•If you find it difficult to remove the original
from the document feeder tray, open the
feeding roller cover first and then remove
the original. If you remove the original
without opening the feeding roller cover, the
original may become dirty.
Note
AR-5316-5320-EX.book 19 ページ 2003年11月26日 水曜日 午後5時3分
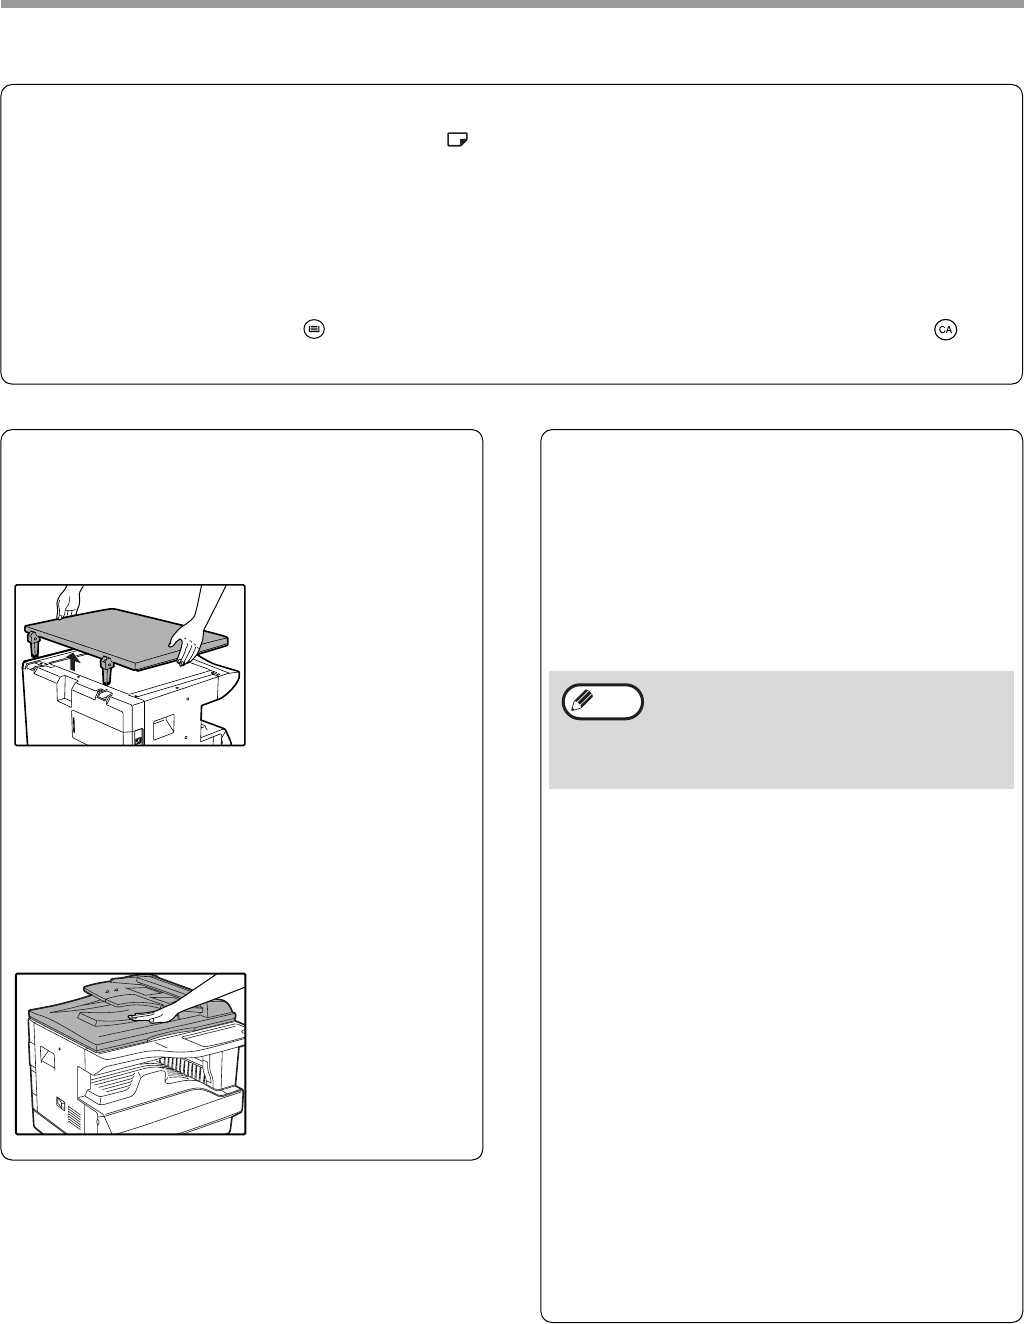
20
COPY FUNCTIONS
Auto paper select mode (Two-tray model only)
When the AUTO PAPER SELECT indicator ( ) lights up, «Auto paper select mode» is enabled. This function
automatically selects the paper that is the same size as the original A5, A4, A4R, B4, A3 (5-1/2″ x 8-1/2″, 8-1/2″ x
11″, 8-1/2″ x 11″R, 8-1/2″ x 13″, 8-1/2″ x 14″ and 11″ x 17″) paper. «Auto paper select mode» can be disabled in the
user programs. (p.33)
•The sizes of paper that can be loaded vary by country and region.
•If a zoom setting is selected after placing the original, the paper size that is appropriate for the zoom setting will
be automatically selected.
•«Auto paper select mode» is cancelled if the automatic ratio selection is enabled (p.22) or if a tray is selected
with the [TRAY SELECT] key ( ). Auto paper select resumes operation when the [CLEAR ALL] key ( ) is
pressed or when «Auto clear time» activates.
Removing the document cover
To copy large originals like newspapers, remove the
document cover. To remove the cover, lift straight
up as shown. To replace the cover, do the reverse.
The SPF cannot be removed.
Copying books or originals with folds or
creases
Press down on the document cover/SPF while
copying as shown. If the document cover/SPF is not
completely closed, shadows may appear on the
copy or it may be fuzzy. Straighten originals with
folds or creases well before placing.
Originals that can be used in the SPF
Originals that are A5 to A3 (5-1/2″ x 8-1/2″ to 11″ x
17″) and 56 g/m2 to 90 g/m2 (15 lbs. to 24 lbs.) can
be used. A maximum of 40 pages can be placed at
once.
For originals that are B4 (8-1/2″ x 14″) or larger (B4,
A3 (8-1/2″ x 14″, 11» x 17″)), a maximum of 30
pages can be placed at once.
Originals that cannot be used in the SPF
The following originals cannot be used. These may
cause misfeeds or smudging and unclear images.
•Transparencies, tracing paper, other transparent or
translucent paper, and photographs.
•Carbon paper, thermal paper.
•Originals that are creased, folded, or torn.
•Glued originals, cut-out originals.
•Originals with binder holes.
•Originals printed using an ink ribbon (thermal
transfer printing), originals on thermal transfer
paper.
Stream feeding mode
If «Stream feeding mode» is enabled in the user
programs (p.33), the SPF indicator will blink for
about 5 seconds after all originals are fed. If a new
original is placed in the SPF during this time, the
original will be automatically fed in and copying will
begin.
•Make sure that there are no paper clips or
staples on the original.
•Straighten curled originals before placing
them in the document feeder tray. Curled
originals may cause misfeeds.
Note
AR-5316-5320-EX.book 20 ページ 2003年11月26日 水曜日 午後5時3分
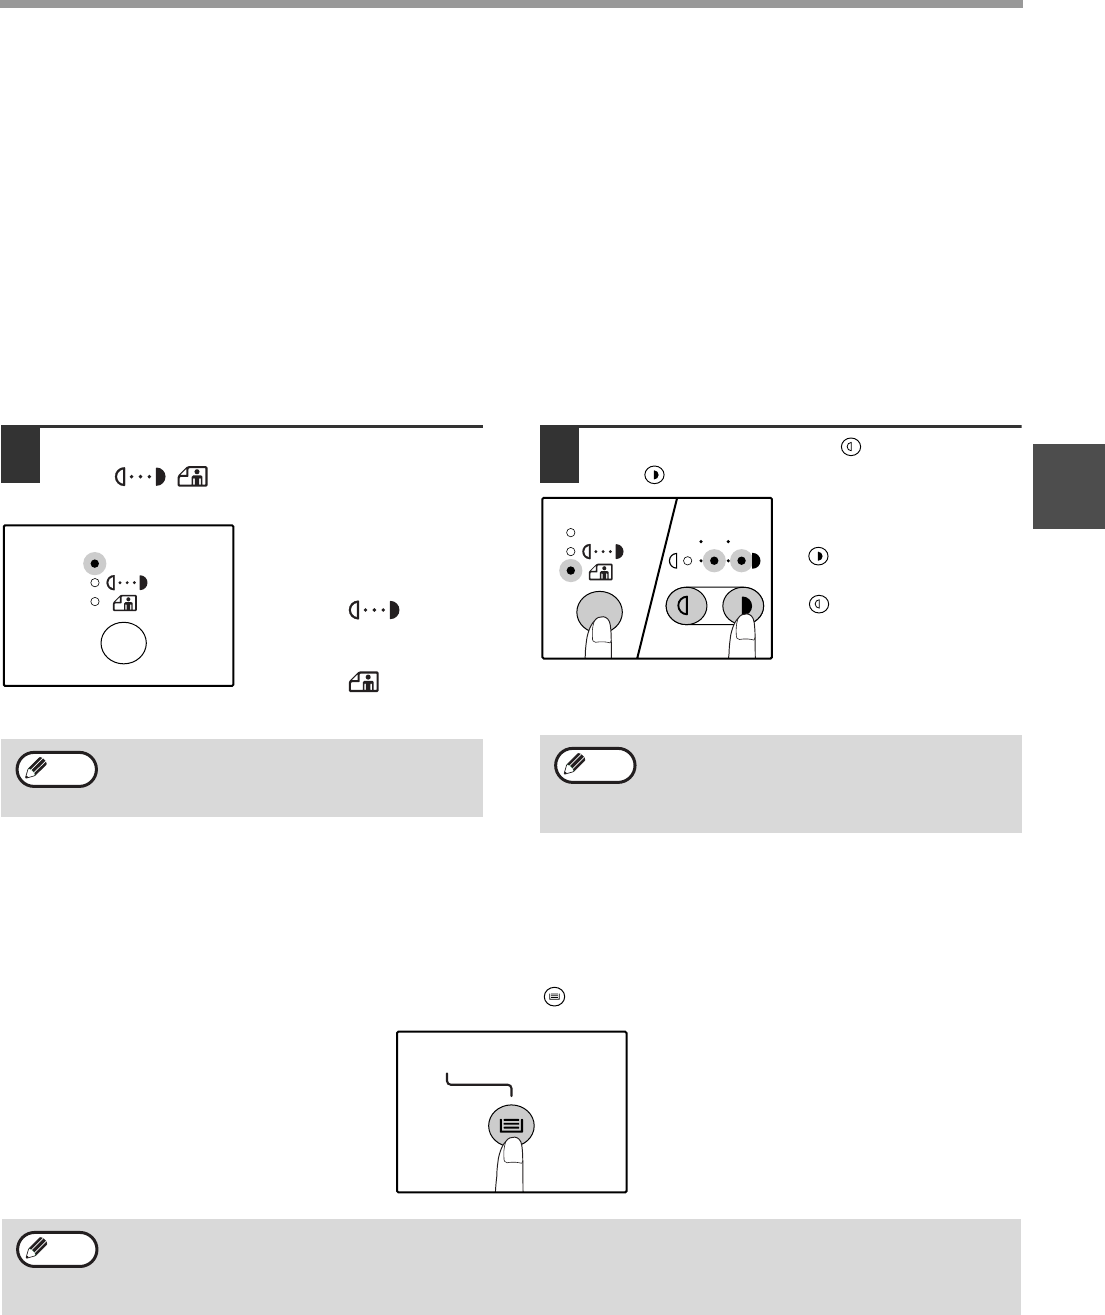
21
COPY FUNCTIONS
2
MAKING A COPY DARKER OR LIGHTER
Automatic exposure adjustment is initially enabled. This function automatically adjusts the copy image according to
the original being copied. If you wish to select the exposure level yourself, follow the steps below. (Select from two
original types and five exposure levels for each original type.) The exposure level used in automatic exposure
adjustment can also be changed. («ADJUSTING THE AUTOMATIC EXPOSURE LEVEL» (p.31) )
Original types
●
AUTO……Automatic exposure adjustment is enabled and the exposure is automatically adjusted according to the
original being copied. The exposure is lowered for coloured areas and background shadows.
●
TEXT…….The exposure is raised for light areas and lowered for dark backgrounds to make text easier to read.
●
PHOTO …Halftones in the photo are reproduced with greater clarity.
1Press the [AUTO/TEXT/PHOTO] key
( / / ) to select the original
type.
To adjust the exposure of
a text original manually,
press until the TEXT
indicator ( ) lights.
To copy a photo, press
until the PHOTO
indicator ( ) lights.
2Press the [Light] key ( ) or [Dark]
key ( ) to adjust the exposure.
For a darker image,
press the [Dark] key
( ). For a lighter image,
press the [Light] key
().
If exposure level 2 or 4 is
selected, the two
indicators will light
simultaneously.
SELECTING THE TRAY
If you wish to use a tray other than the automatically selected tray (for example you wish to enlarge or reduce the
copy or use the bypass tray), press the [TRAY SELECT] key ( ) to select the desired tray.
Auto tray switching (Two-tray model only)
If the tray runs out of paper during copying and there is another tray with the same size of paper and the same
feeding orientation (horizontal or vertical), the other tray is automatically selected and copying continues. «Auto tray
switching» can be disabled in the user programs (p.33).
To return to automatic adjustment, press until
the AUTO indicator ( ) lights.
AUTO
AUTO
AUTO
Exposure value guidelines
1 – 2 Dark originals like newspapers
3 Normal originals
4 – 5 Coloured text or text written in pencil
AUTO
135
•If the desired PAPER SIZE indicator does not light up, change the paper in the tray to the desired paper size.
(p.16)
•Automatic ratio selection (p.22) does not operate when the bypass tray or a tray set for a special paper size is
selected.
Note
AR-5316-5320-EX.book 21 ページ 2003年11月26日 水曜日 午後5時3分
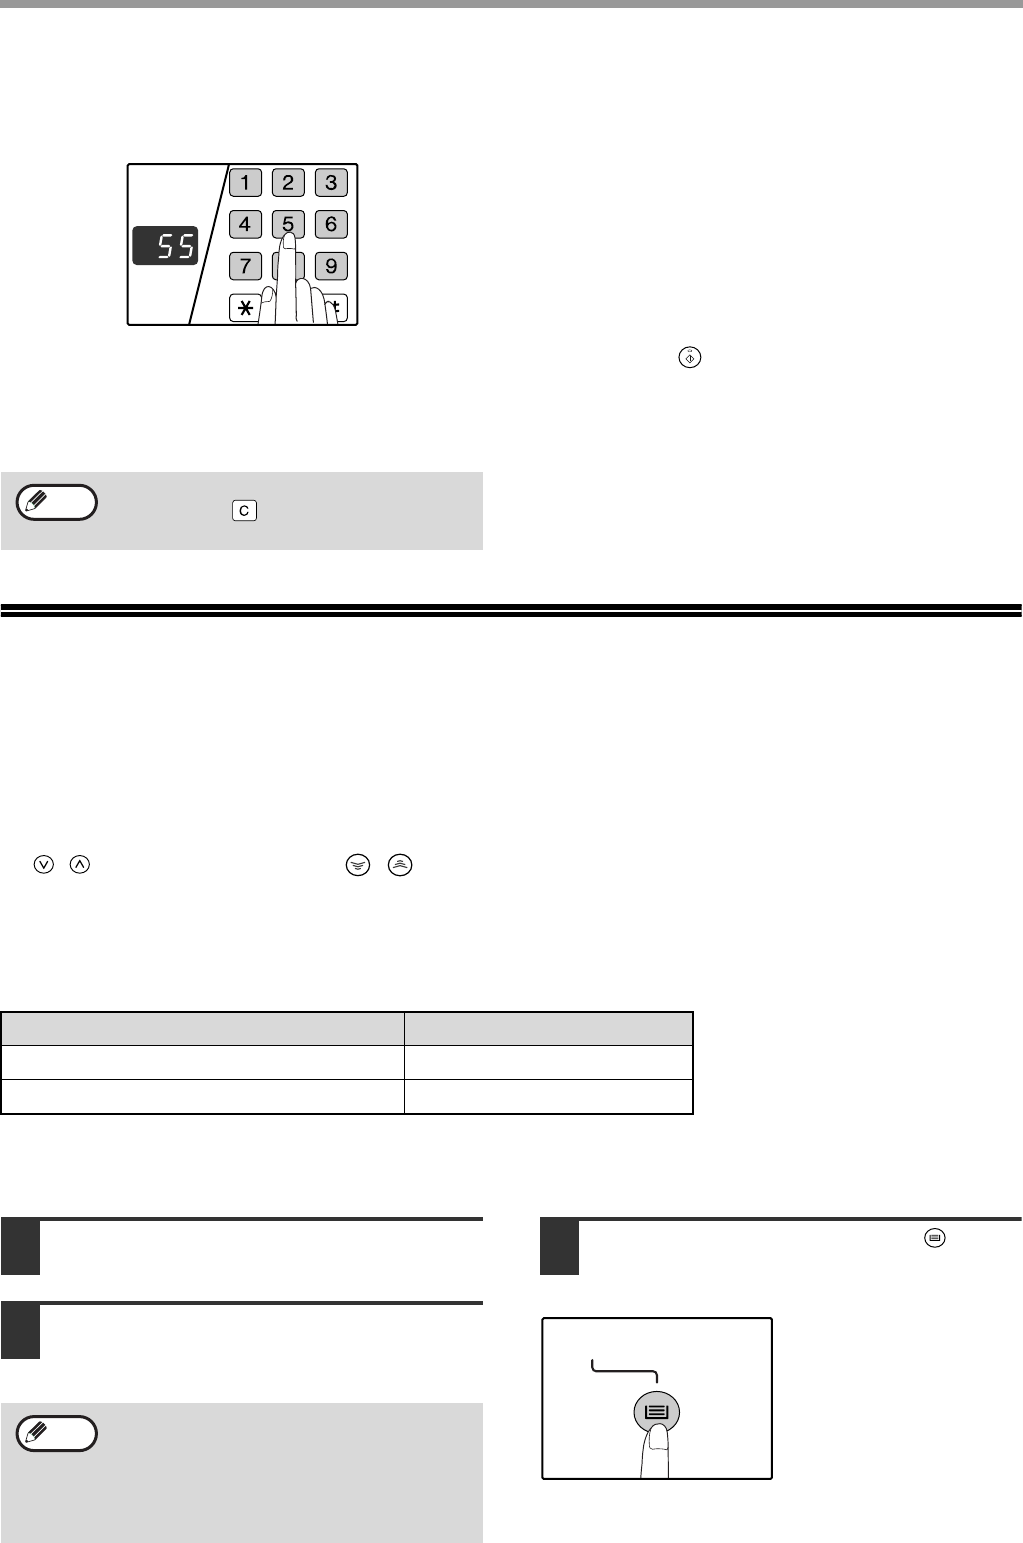
22
COPY FUNCTIONS
SETTING THE NUMBER OF COPIES
Press the numeric keys to set the number of copies.
●The set number of copies appears in the display. A
maximum of 999 copies (factory default setting)
can be set.
●If you wish to make only a single copy, copying is
possible with the display showing «0″.
Important note when making a large number
of copies
The maximum number of copies can be changed in
the user programs. (p.34)
When the maximum number of pages (about 250
pages) that can be held in the paper output tray are
output, copying will temporarily stop. When this
happens, promptly remove the copies and press the
[START] key ( ) to resume copying. Copying will
also stop after about 500 pages and 750 pages.
Remove the pages and resume copying in the same
way.
REDUCTION/ENLARGEMENT/ZOOM
The zoom function enables precise copy ratio selection from 25% to 400% in increments of 1%.
There are three ways to enlarge and reduce copies, as explained below.
•Reduction and enlargement ratios can be selected automatically with the [AUTO IMAGE] key ( ).
«AUTOMATIC RATIO SELECTION» (below)
•Reduction and enlargement ratios can be selected manually with the [PRESET RATIO] selector keys
( , ) and/or the [ZOOM] keys ( , ).
«MANUAL RATIO SELECTION» (p.23)
•Separate settings can be selected for the vertical and horizontal ratios.
«SELECTING THE VERTICAL AND HORIZONTAL COPY RATIOS SEPARATELY» (p.24)
Ratios that can be selected will vary depending on whether the original is placed on the document glass or in the
SPF.
AUTOMATIC RATIO SELECTION
1Place the original(s) in the document
feeder tray or on the document glass.
2If the original is placed on the
document glass, select the original
size. (p.18)
3Use the [TRAY SELECT] key ( ) to
select the paper tray with the desired
paper size.
This feature will not work
when using copy paper
of non-standard size or
when using the bypass
tray.
If you enter the wrong number, press the
[CLEAR] key ( ) and enter the correct
number.
Note
AUTO %
Original position Selectable ratios
Document glass 25% – 400%
SPF 50% – 200%
Automatic ratio selection can be used when the
original size is A5, A4, A4R, B4, A3 (5-1/2″ x
8-1/2«, 8-1/2» x 11″, 8-1/2″ x 11″R, 8-1/2″ x 13″,
8-1/2» x 14″ or 11″ x 17«). The sizes of paper
that can be loaded vary by country and region. It
cannot be used for other sizes.
Note
AR-5316-5320-EX.book 22 ページ 2003年11月26日 水曜日 午後5時3分
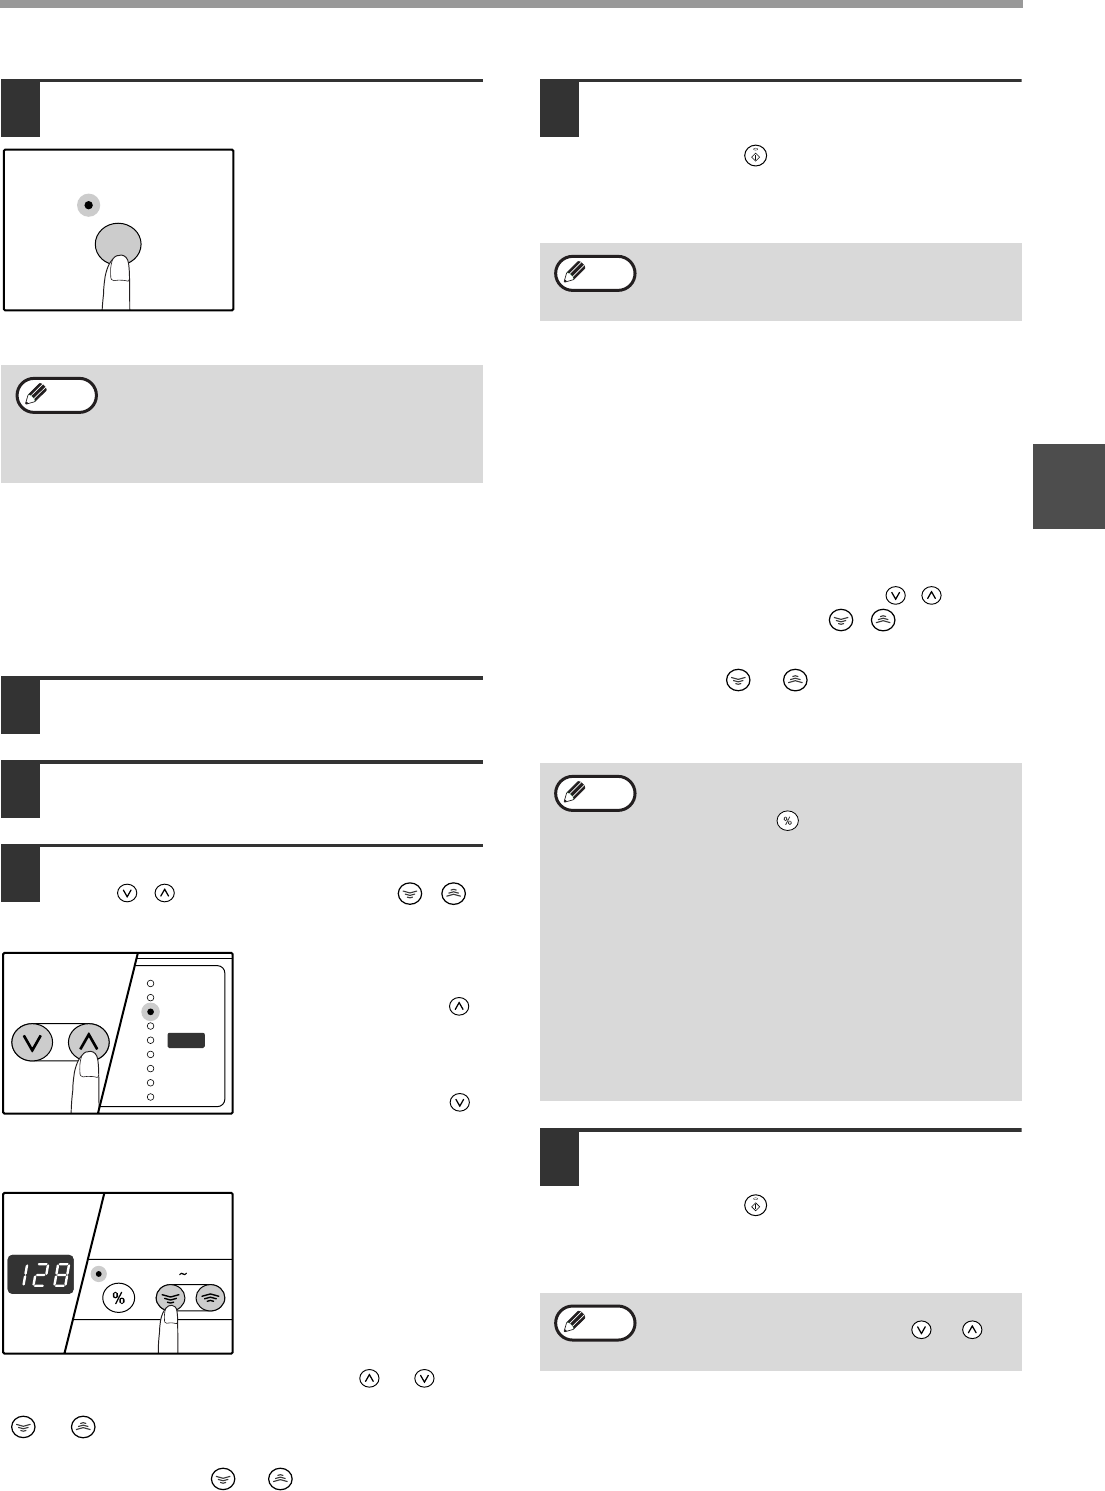
23
COPY FUNCTIONS
2
4Press the [AUTO IMAGE] key ( ).
The AUTO IMAGE
indicator ( ) lights
up and the appropriate
ratio for the original size
and paper size is
selected. (The indicator
of the selected ratio will
light up.)
5Set the number of copies and other
copy settings, and then press the
[START] key ( ).
The copy will be delivered to the paper output
tray.
MANUAL RATIO SELECTION
Copies can be reduced down to 25% or enlarged up to 400%. The [PRESET RATIO] selector keys ( , ) can be
pressed to quickly select a ratio from among eight preset ratios. In addition, the [Zoom] keys ( , ) can be
pressed to select the ratio in increments of 1%.
1Place the original(s) in the document
feeder tray or on the document glass.
2
If the original is placed on the document
glass, select the original size. (p.18)
3Use the [PRESET RATIO] selector
keys ( , ) and [Zoom] keys ( , )
to select the desired copy ratio.
Selecting a preset ratio
Press the [PRESET
RATIO] selector key ( )
to move up through the
preset ratios.
Press the [PRESET
RATIO] selector key ( )
to move down through
the preset ratios.
Fine adjustment of the
ratio
Any ratio from 25% to
400% can be set in
increments of 1%.
Press a [PRESET RATIO] selector key ( or ) to
set the approximate ratio, then press the [Zoom] keys
( or ) to increase or decrease the ratio.
To decrease or increase the zoom ratio rapidly, hold
down the [Zoom] keys ( or ).
When a [Zoom] key ( or ) is pressed, the ZOOM
indicator will light up and the zoom ratio will appear in
the display for about two seconds.
4Set the number of copies and other
copy settings, and then press the
[START] key ( ).
The copy will be delivered to the paper output
tray.
•
If the ORIGINAL SIZE indicator blinks,
change the orientation of the placed original.
•If the copy is made when a PRESET
RATIO selector indicator is blinking, the
copied image may run off the page.
AUTO %
AUTO %
AUTO %
Note
To cancel automatic ratio selection, press the
[AUTO IMAGE] key ( ) again.
Note
AUTO %
200
%
50
%
141
86
81
70
122
115
100
%
•To verify a zoom setting without changing
the zoom ratio, Hold down the [Copy ratio
display] key ( ). When the key is
released, the display will return to the
number of copies display.
•If the copy is made when a PRESET
RATIO selector indicator or the ZOOM
indicator is blinking, the copied image may
run off the page. To ensure that the image
fits on the page, lower the copy ratio until
the indicator stops blinking and lights
steadily.
•If the PAPER SIZE indicator is not lit, there
is no appropriate paper. Load appropriate
paper in a paper tray. (p.14)
To return the ratio to 100%, press the
[PRESET RATIO] selector key ( or )
until the 100% indicator lights up.
Note
AR-5316-5320-EX.book 23 ページ 2003年11月26日 水曜日 午後5時3分
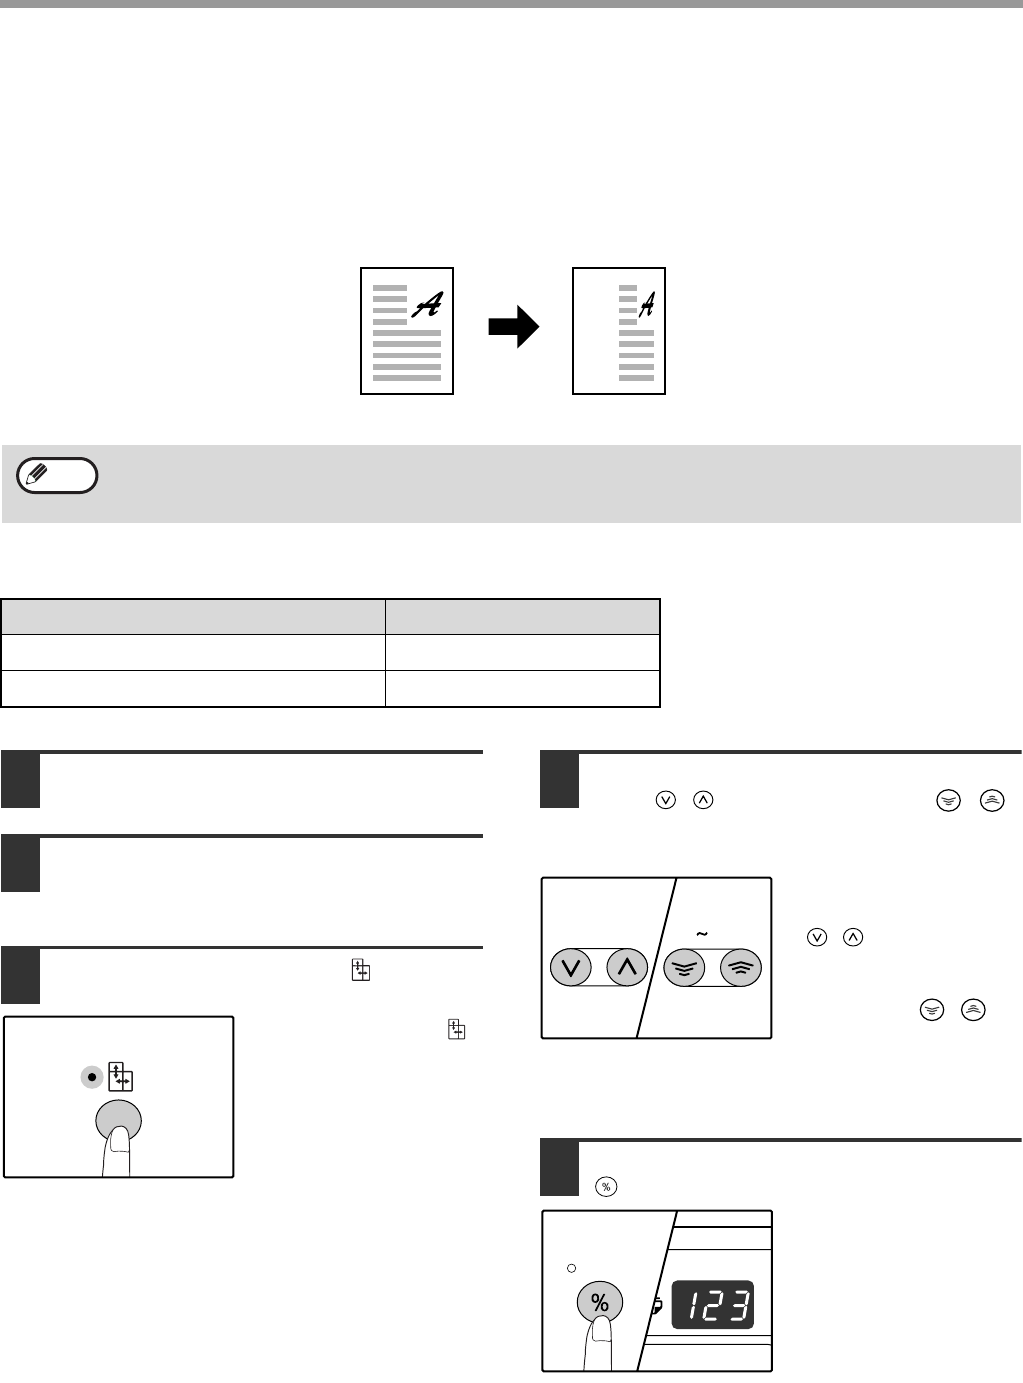
24
COPY FUNCTIONS
SELECTING THE VERTICAL AND HORIZONTAL
COPY RATIOS SEPARATELY
(XY ZOOM copying)
The XY ZOOM feature allows the horizontal and vertical copy ratios to be changed independently.
Example:
Reduction only in the horizontal direction.
Ratios that can be selected will vary depending on the position of the original.
1Place the original(s) in the document
feeder tray or on the document glass.
2If the original is placed on the
document glass, select the original
size. (p.18)
3Press the [XY-ZOOM] key ( ).
XY-ZOOM Indicator ( )
lights up.
The current value for the
vertical direction will
appear in the display.
4Use the [PRESET RATIO] selector
keys ( , ) and [Zoom] keys ( , )
to change the copy ratio in the vertical
direction.
Press the [PRESET
RATIO] selector keys
( , ) to select a ratio
close to the desired ratio,
and then press the
[Zoom] keys ( , ) to
adjust the ratio in
increments of 1%.
The ratio appears in the
display.
5Press the [Copy ratio display] key
().
The selected ratio for the
vertical direction will be
entered.
•To use the XY ZOOM feature with the DUAL PAGE COPY feature, set the DUAL PAGE COPY feature first and
then the XY ZOOM feature.
•The XY ZOOM feature cannot be used in combination with the AUTO IMAGE function.
Original position Selectable ratios
Document glass 25% – 400%
SPF 50% – 200%
Original Copy
Note
25 400%
AR-5316-5320-EX.book 24 ページ 2003年11月26日 水曜日 午後5時3分
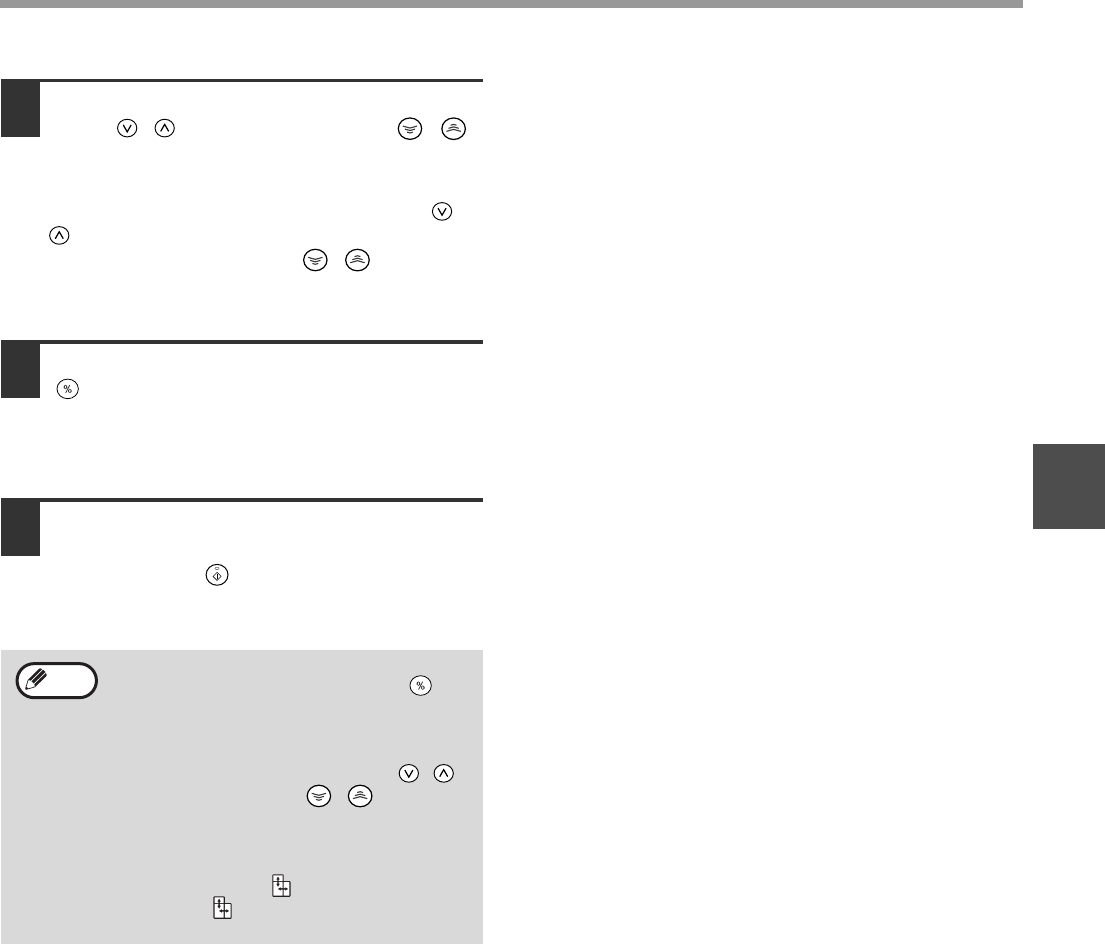
25
COPY FUNCTIONS
2
6Use the [PRESET RATIO] selector
keys ( , ) and [Zoom] keys ( , )
to change the copy ratio in the
horizontal direction.
Press the [PRESET RATIO] selector keys ( ,
) to select a ratio close to the desired ratio, and
then press the [Zoom] keys ( , ) to adjust
the ratio in increments of 1%.
The ratio appears in the display.
7Press the [Copy ratio display] key
().
The selected ratio for the horizontal direction will
be entered and the display will change to the
number of copies display.
8Set the number of copies and other
copy settings, and then press the
[START] key ( ).
The copy will be delivered to the paper output
tray.
•To verify the copy ratios, press and hold
down the [Copy ratio display] key ( ).
The vertical and horizontal ratios will be
alternately displayed.
•If you need to change the ratios, press the
[PRESET RATIO] selector keys ( , )
and the [Zoom] keys ( , ) to reset the
ratios, beginning with the vertical ratio.
(step 4)
•To cancel XY ZOOM copy, press the
[XY-ZOOM] key ( ). The XY-ZOOM
indicator ( ) will go off, indicating that the
function is cancelled.
Note
AR-5316-5320-EX.book 25 ページ 2003年11月26日 水曜日 午後5時3分
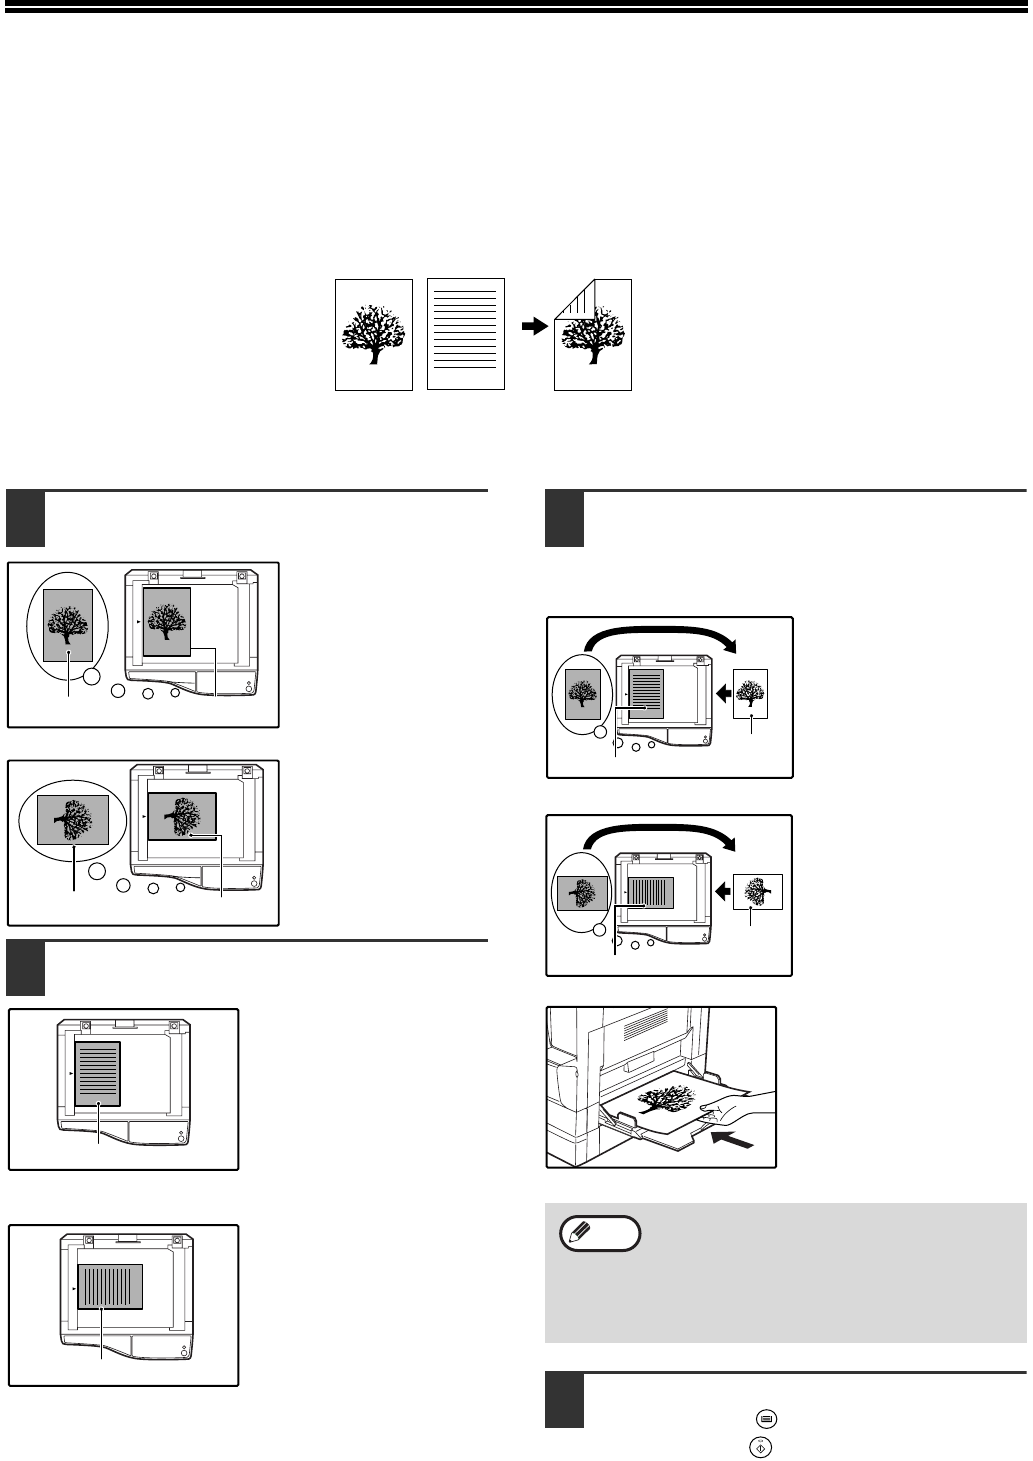
26
TWO-SIDED COPYING USING THE
BYPASS TRAY
To perform manual two-sided copying, follow these steps.
Example: Copying originals A and B onto each side of one sheet of paper
1Copy original A.
2Place original B as shown below.
Vertically-oriented
original:
If the original is oriented
vertically, place it in the
same orientation as
original A.
Horizontally-oriented
original:
If the original is oriented
horizontally, place it with
the top and bottom and
left and right sides
reversed with respect to
the placement of original
A.
3Turn the copy of original A over, and
without changing the position of the
edge closest to you, insert it in the
bypass tray.
Insert the paper all the
way in.
4Select the bypass tray with the [TRAY
SELECT] key ( ), and then press the
[START] key ( ).
The copy is delivered to the paper output tray.
12 1
Original A Original B Copy
1
1
Original A
Copied original A
Original A
Copied original A
2
2
•Copies made on the back side of paper
should always be made one sheet at a time
using the bypass tray.
•Straighten curled or wavy paper before
using it. Curled paper may cause misfeeds,
creases, or a poor-quality image.
Original B
Copied
original A
2
1
1
Original B
Copied
original A
Note
AR-5316-5320-EX.book 26 ページ 2003年11月26日 水曜日 午後5時3分
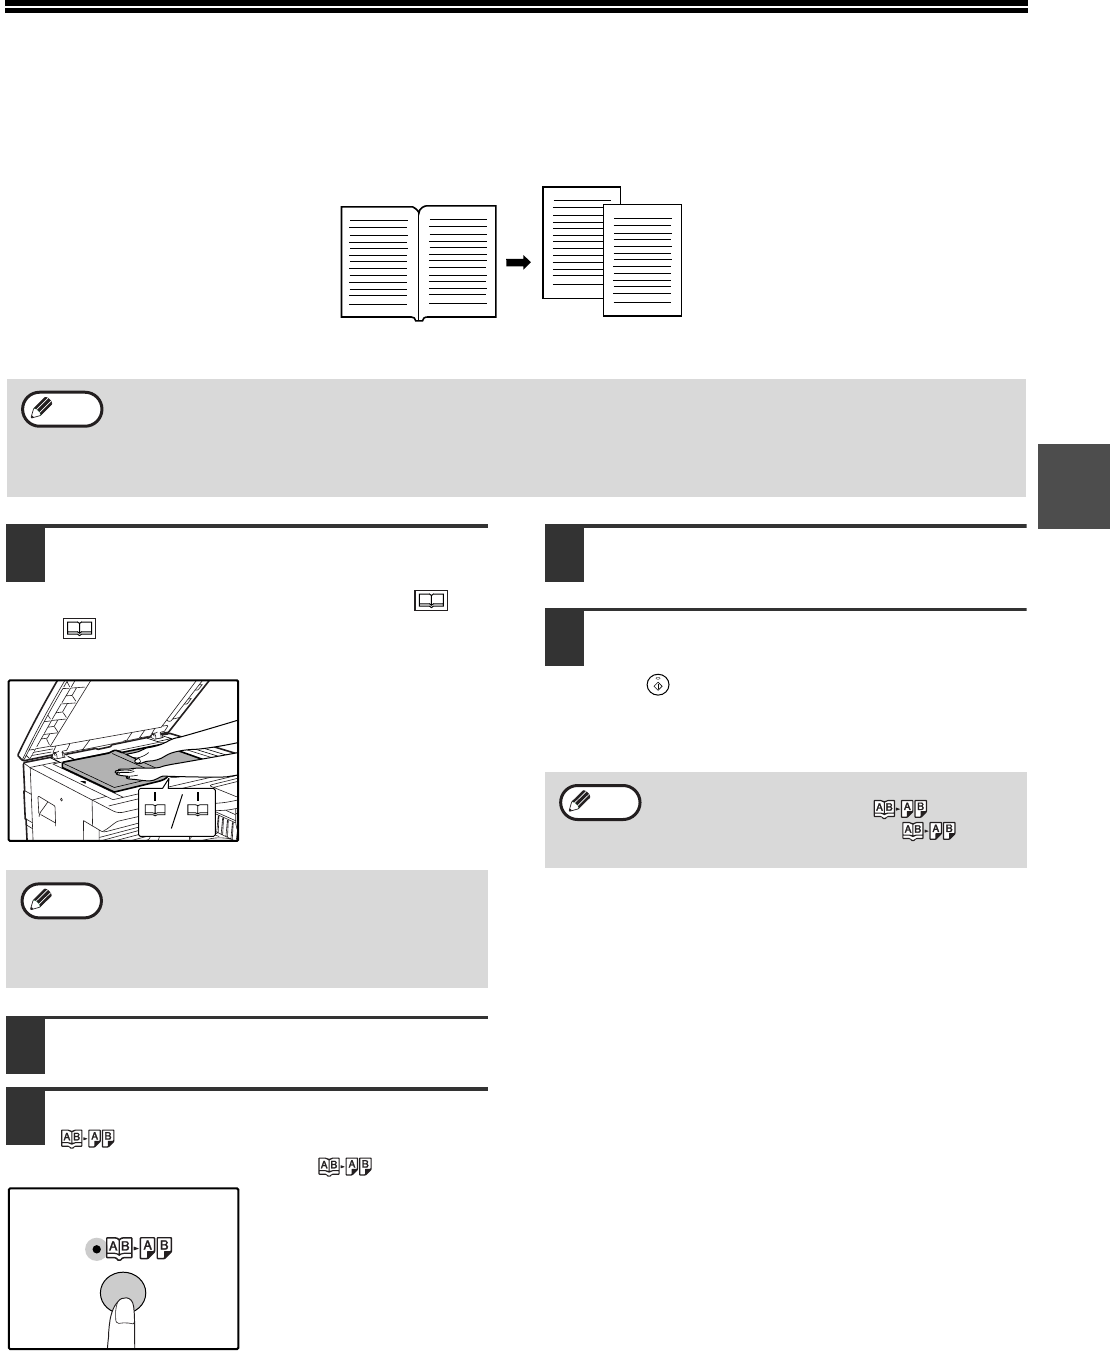
27
2
DUAL PAGE COPYING
A dual page original can be automatically separated into two pages during copying. This feature is convenient for
making copies of books and other dual page originals on individual sheets of paper.
1Place the original on the document
glass, aligning the division between
the pages with the size marker ( A4
(8
1/2)). Close the document cover
SPF.
Copying will begin from
the page to the right of
the size marker.
2Set the original size to A3 (11″ x 17″).
3Press the [DUAL PAGE COPY] key
( ) and make sure that the DUAL
PAGE COPY indicator ( ) is lit.
4Make sure that a paper tray with A4
(8-1/2″ x 11″) size paper is selected.
5Set the number of copies and other
copy settings, and press the [START]
key ( ).
The copy will be delivered to the paper output
tray.
Original Copy
•A4 (8-1/2″ x 11″) paper is used for dual page copying.
•When used in combination with XY ZOOM copying, enlargement is not possible.
•Dual page copying cannot be used in combination with the enlargement copying.
•Automatic ratio selection cannot be used when dual page copying is used.
•Dual page copying cannot be selected when an original is placed in the SPF.
Note
To keep the copies in the correct page order
when performing dual page copying over
multiple pages, make sure that the original is
always placed on the document glass with the
lower page number to the right.
Note
To cancel dual page copying, press the
[DUAL PAGE COPY] key ( ). The
DUAL PAGE COPY indicator ( ) will go
off, indicating that the function is cancelled.
Note
AR-5316-5320-EX.book 27 ページ 2003年11月26日 水曜日 午後5時3分
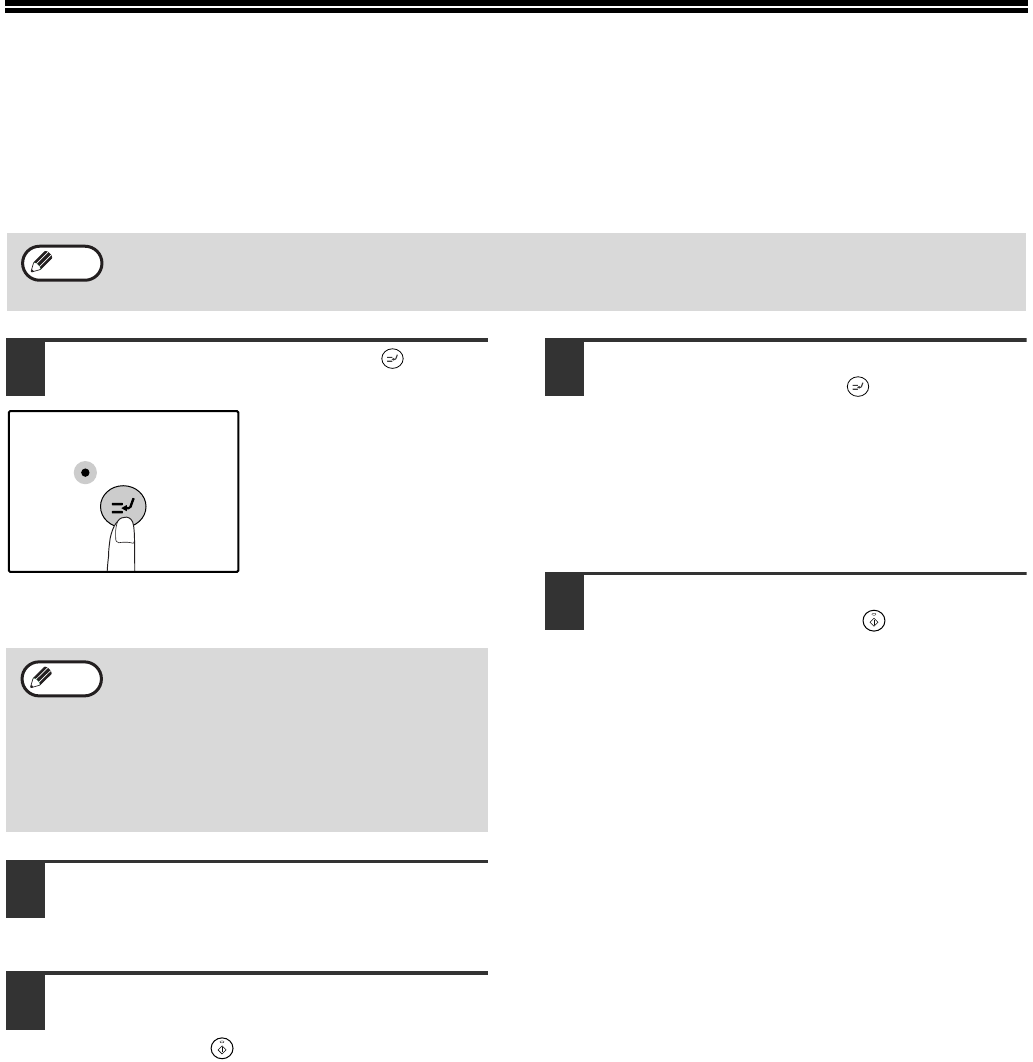
28
INTERRUPTING A COPY RUN
(Interrupt copying)
A copy run can be temporarily interrupted to allow another copy job to be performed. When the other job is finished,
the copy run will resume using the original copy settings.
1Press the [INTERRUPT] key ( ) to
interrupt the copy run.
The INTERRUPT
indicator will light up and
the machine will revert to
the initial settings. (p.12)
The INTERRUPT
indicator will blink until
the current copy run
stops.
2Remove the previous original(s) and
place the original(s) of the interrupt
copy job.
3Set the number of copies and other
copy settings and then press the
[START] key ( ).
4When the copy job is finished, press
the [INTERRUPT] key ( ) and remove
the original(s).
The INTERRUPT indicator will go off, indicating
that the interrupt function is no longer operating.
The copy settings will automatically revert to the
settings selected for the copy run before the run
was interrupted.
5Replace the previous original(s) and
press the [START] key ( ).
The interrupted copy run will resume.
Interrupt copying is not possible when the user programs are being configured.
Note
•If the SPF is being used, the copy run will
not stop until the set number of copies is
completed.
•If «Auditing mode» is enabled:
«- — -» will appear in the number of copies
display. Enter your 3-digit account number.
Copying will not be possible unless a
correct account number is entered. (p.39)
Note
AR-5316-5320-EX.book 28 ページ 2003年11月26日 水曜日 午後5時3分
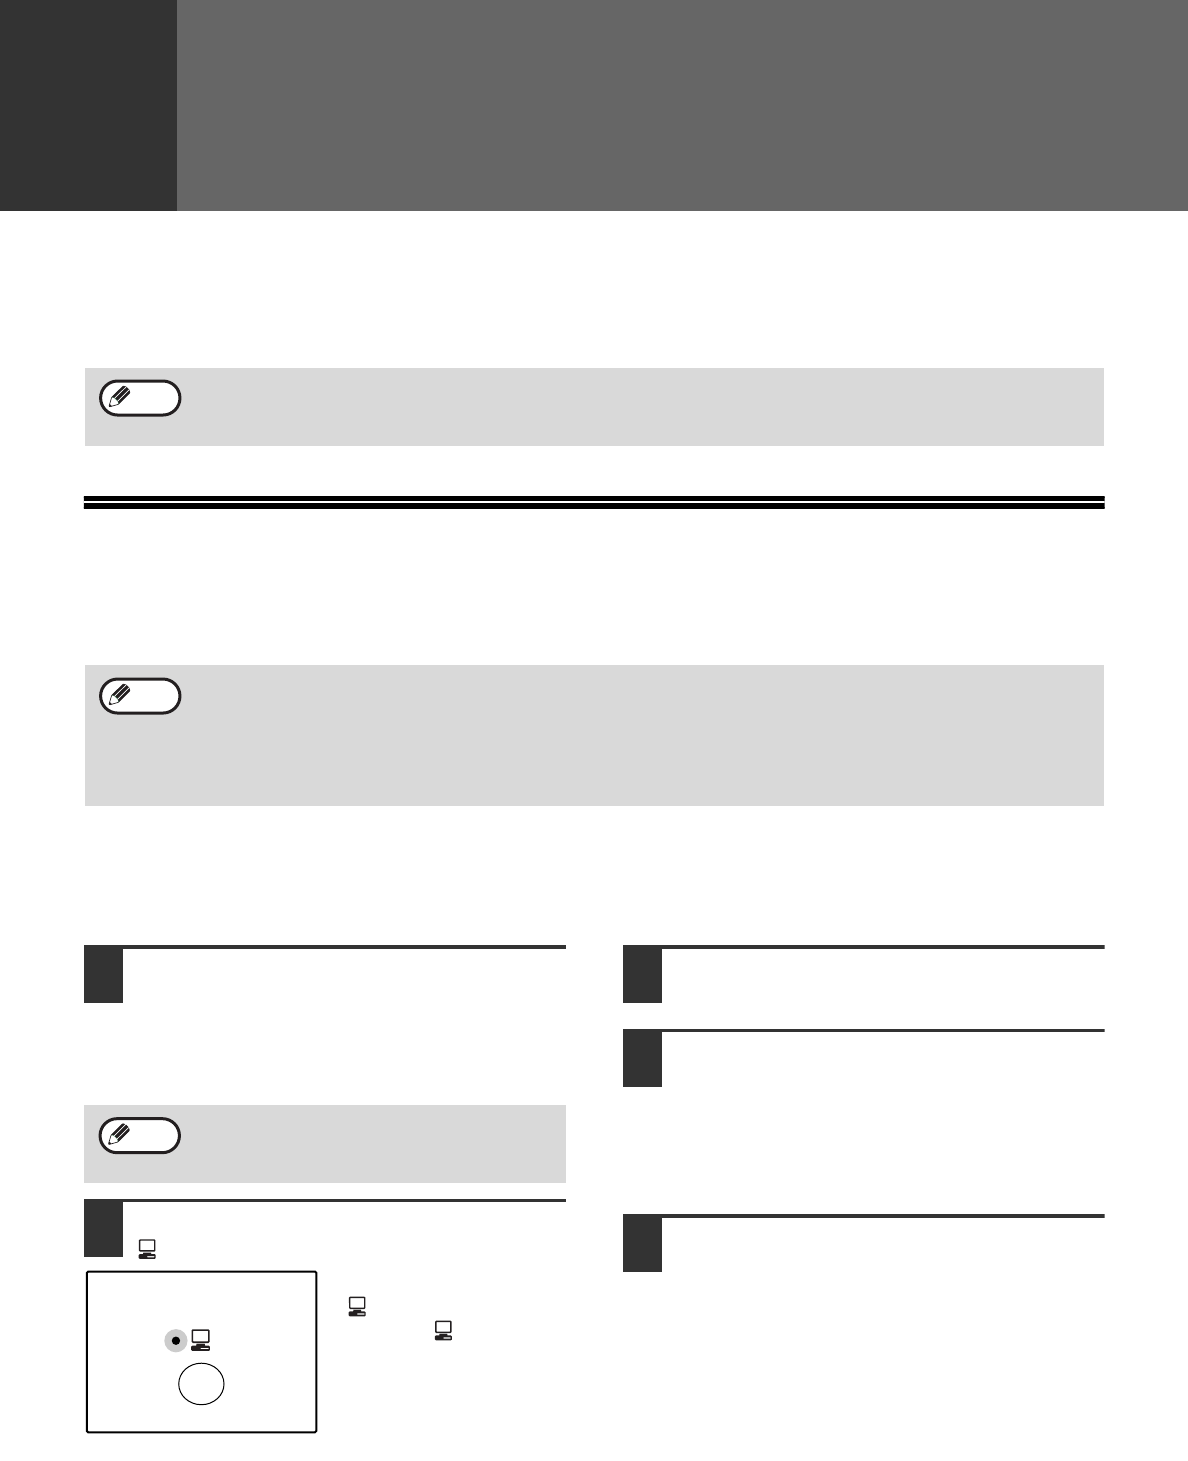
29
3Chapter 3
PRINTER FUNCTIONS
The machine includes a USB 1.1 connector and a parallel connector as standard equipment.
A computer can be connected to these connectors to use the machine as a printer.
To use the machine as a printer, the printer driver must first be installed as explained in the «Software Setup Guide».
USING THE PRINTER MODE
The procedure for loading paper is the same as for loading copy paper. See «LOADING PAPER». (p.13)
BASIC PROCEDURE FOR PRINTING
The basic procedure for printing is explained below. To use convenient printer functions, see the «Online Manual» or
the printer driver help file.
1Make sure that paper is loaded in the
tray.
The procedure for loading paper is the same as for
copying. See «LOADING PAPER» (p.13) and make
sure the paper that you wish to use is loaded.
2Make sure that the ON LINE indicator
( ) on the operation panel is lit.
If the ON LINE indicator
( ) is not lit, press the [ON
LINE] key ( ). When the
indicator is not lit, the
machine is off-line and
cannot print. When the
indicator is blinking, a print
job is transferred to the
machine.
3Open the file that you wish to print
and select «Print» from the File menu.
4Make sure that the printer driver for
the machine is selected, and select
print settings in the printer driver.
For information on the settings in the printer
driver, see the «Online Manual», the «Software
Setup Guide», or the printer driver help file.
5Click the «Print» button or the «OK»
button to begin printing.
The print job will be delivered to the paper output
tray.
Important points when setting the paper size
•Make sure that the tray‘s paper size setting is the
same as the tray’s paper size setting in the printer
driver. For example, if the tray’s paper size setting is
A4R, set «Setting Paper Size» to «A4-R». For more
information, see «CONFIGURING THE PRINTER
DRIVER» in the «Software Setup Guide».
•If a problem occurs in printer mode, see «TROUBLESHOOTING» (p.40).
•When interrupt copying is being performed, printing is not possible.
Note
•Print jobs received while the machine is copying will be stored in memory. When the copy job is finished, the
print jobs will begin printing.
•Printing is not possible when the front or side cover is opened for machine maintenance, or when a misfeed
occurs or the machine runs out of paper or toner, or when the drum cartridge reaches its replacement time.
•If an original misfeed occurs in the SPF, printing will not be possible until the misfed original is removed and the
SPF is restored to a usable state.
Note
Make sure that the paper size setting on the
machine is the same as the paper size set in
the printer driver.
Note
AR-5316-5320-EX.book 29 ページ 2003年11月26日 水曜日 午後5時3分
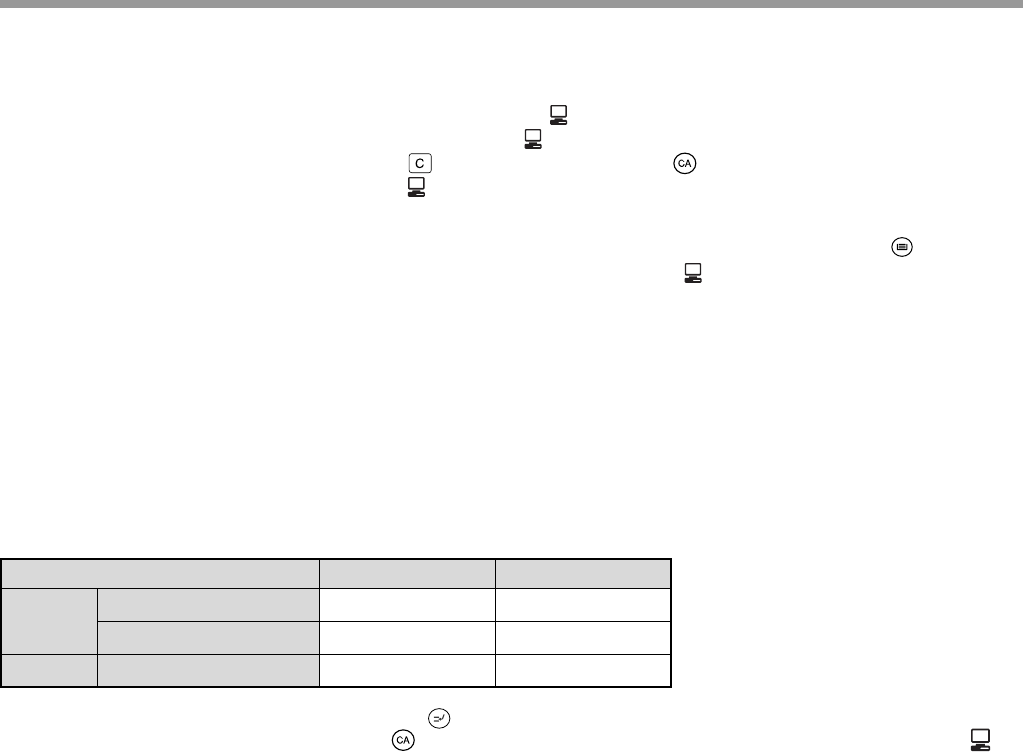
30
PRINTER FUNCTIONS
Pausing a print job
To pause a print job during printing, press the [ON LINE] key ( ) on the operation panel to switch the machine
off-line. Printing will be paused and the ON LINE indicator ( ) will blink.
To cancel a print job, press the [CLEAR] key ( ) or the [CLEAR ALL] key ( ).
To resume printing, press the [ON LINE] key ( ) to switch the machine online.
When «Use close paper size» is disabled
The PAPER SIZE indicator on the operation panel will blink. You can press the [TRAY SELECT] key ( ) to select a
tray manually, or load paper in the bypass tray and press the [ON LINE] key ( ) to begin printing.
When «Use close paper size» is enabled
Printing will take place using a size of paper that is close to the size of the print image.
OPERATION IN COPY AND PRINTER MODES
Some operations cannot be performed simultaneously when the machine is being used in printer mode or copy
mode.
*1Can be used after pressing the [INTERRUPT] key ( ).
*2Printing will begin when the [CLEAR ALL] key ( ) is pressed after the copy job is finished, or when the [ON LINE] key ( ) is
pressed to switch the machine online. Printing will also begin after the set auto clear time elapses, or after 60 seconds if «Auto
clear time» is disabled.
*3The print job is paused and copying begins.
Modes Copying Printing
Copy Copy key input Yes Yes
During copying Yes*1No*2
Printer During printing Yes*3No
AR-5316-5320-EX.book 30 ページ 2003年11月26日 水曜日 午後5時3分
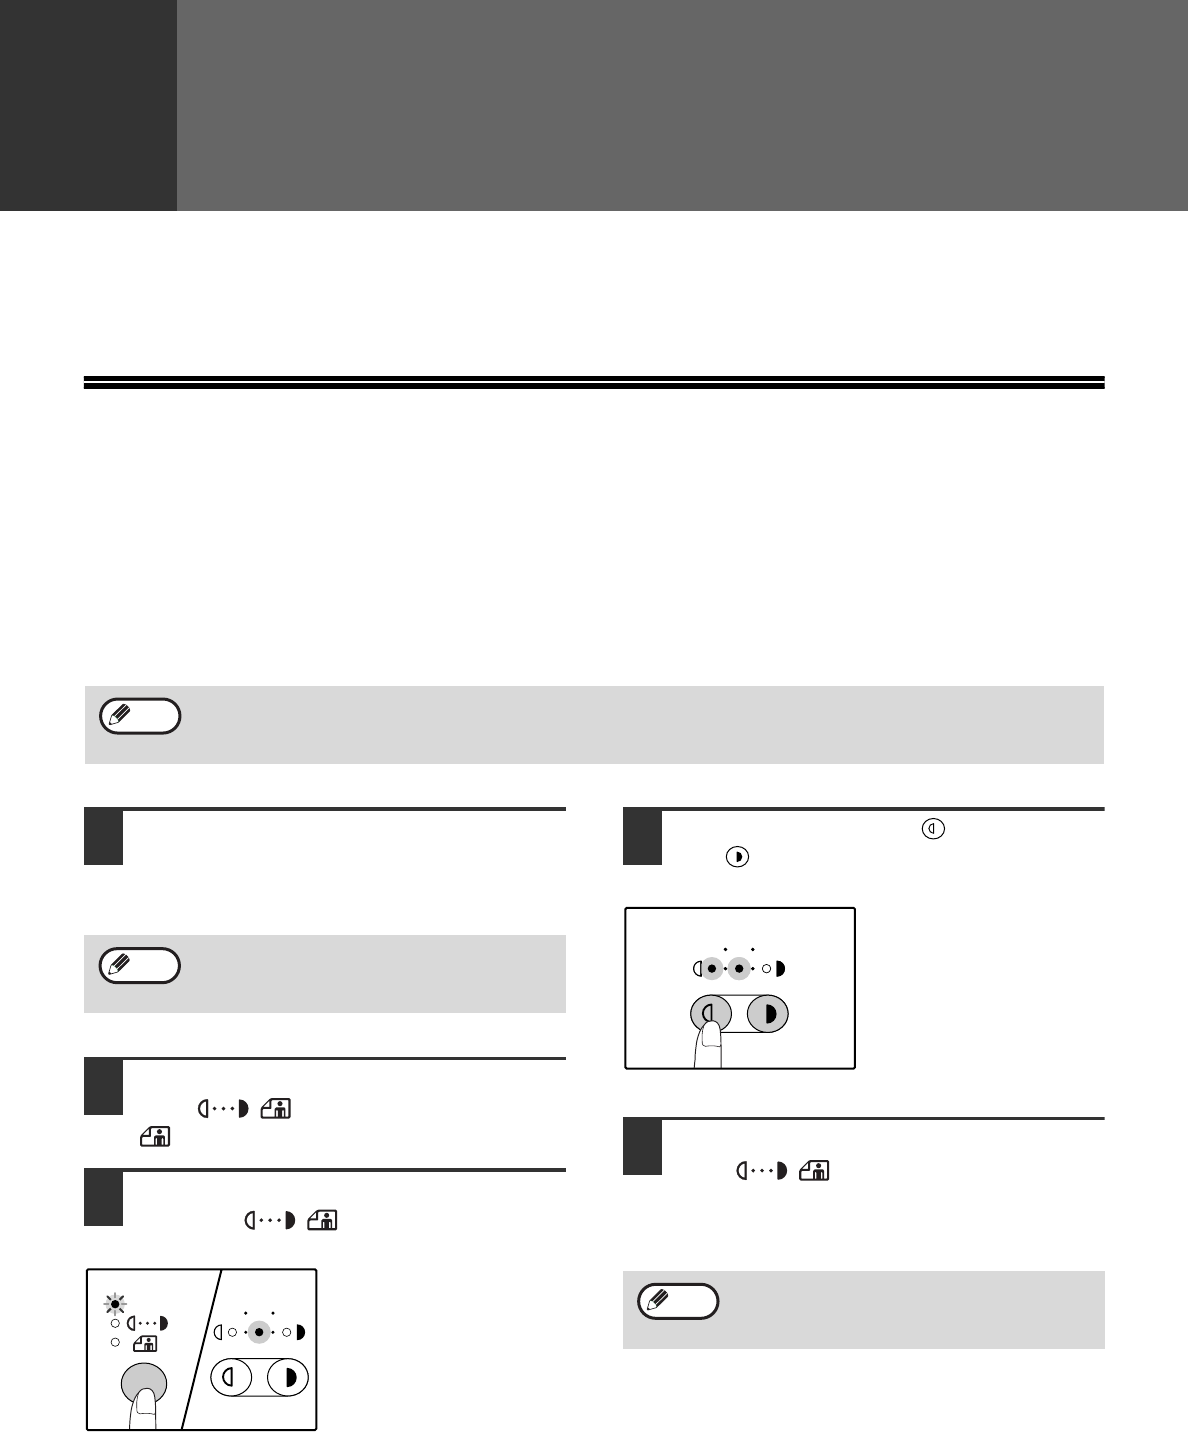
31
4Chapter 4
USER SETTINGS
This chapter explains how to set the automatic exposure level, toner save mode/high image quality mode, and the
user programs, which are custom settings that control fine points of the machine’s operation.
ADJUSTING THE AUTOMATIC
EXPOSURE LEVEL
The exposure level used in automatic exposure adjustment, which automatically adjusts the copy exposure
according to the original, can be adjusted. If copies tend to be too dark or too light when automatic exposure
adjustment is used, follow the steps below to adjust the automatic exposure level.
The automatic exposure level can be adjusted separately for the document glass and the SPF.
1To adjust the automatic exposure
level in the SPF, place the original in
the SPF. (p.19)
Make sure that the SPF indicator is lit.
2Press the [AUTO/TEXT/PHOTO] key
( / / ) to select «PHOTO»
().
3Hold down the [AUTO/TEXT/PHOTO]
key ( / / ) until the AUTO
indicator ( ) blinks.
The exposure level
indicators show the
current setting.
4Press the [Light] key ( ) or [Dark]
key ( ) to lighten or darken the
automatic exposure level as desired.
5Press the [AUTO/TEXT/PHOTO] key
( / / ) to complete the
setting.
The AUTO indicator ( ) stops blinking and
lights steadily.
The copy and printer cannot be used while the automatic exposure level is being adjusted.
Note
To adjust the automatic exposure level for
copies made from originals placed on the
document glass, proceed to step 2.
Note
AUTO
AUTO
AUTO
AUTO
135
After adjusting the automatic exposure level,
it is recommended that you make a test copy
to check the new level.
135
AUTO
AUTO
Note
AR-5316-5320-EX.book 31 ページ 2003年11月26日 水曜日 午後5時3分
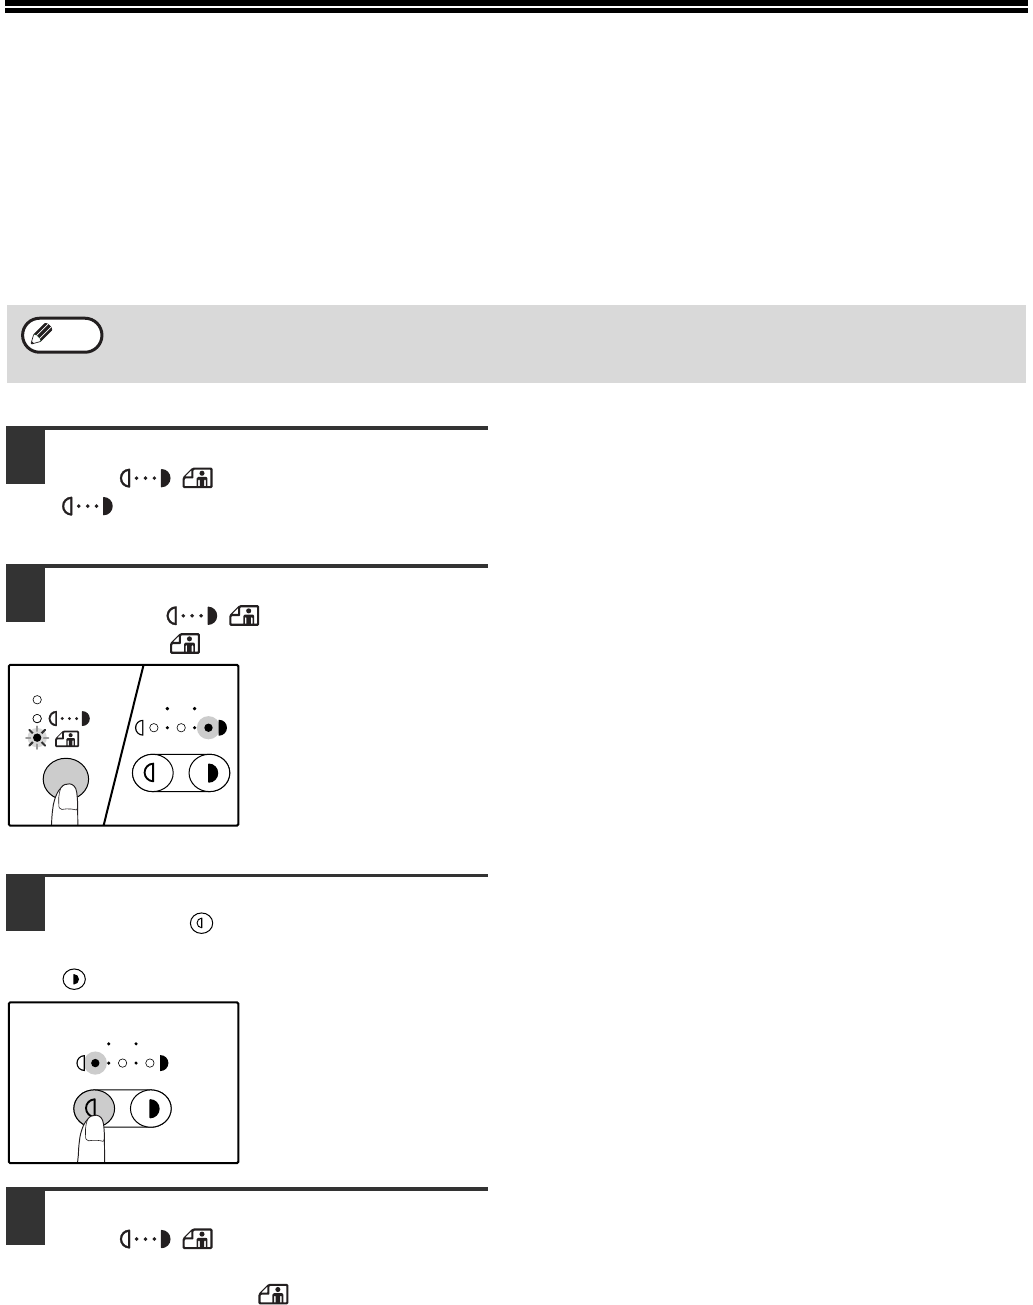
32
TONER SAVE MODE AND HIGH
IMAGE QUALITY MODE
Toner save mode can be enabled to reduce toner consumption by about 10%.
The high image quality mode improves copy image quality in the automatic and manual exposure modes by
increasing copy density with a slight increase of toner consumption.
To switch between toner save mode and high image quality mode, follow the steps below.
1Press the [AUTO/TEXT/PHOTO] key
( / / ) to select «TEXT»
().
2Hold down the [AUTO/TEXT/PHOTO]
key ( / / ) until the PHOTO
indicator ( ) blinks.
The exposure level
indicators show the
current setting.
3To enable toner save mode, press the
[Light] key ( ). To enable high image
quality mode, press the [Dark] key
().
When enabling toner
save mode, make sure
that «1» is lit.
When enabling high
image quality mode,
make sure that «5» is lit.
4Press the [AUTO/TEXT/PHOTO] key
( / / ) to complete the
setting.
The PHOTO indicator ( ) stops blinking and
lights steadily.
In Europe, high image quality mode is initially selected. In regions other than Europe, toner save mode is initially
selected.
Note
AUTO
AUTO
AUTO
AR-5316-5320-EX.book 32 ページ 2003年11月26日 水曜日 午後5時3分
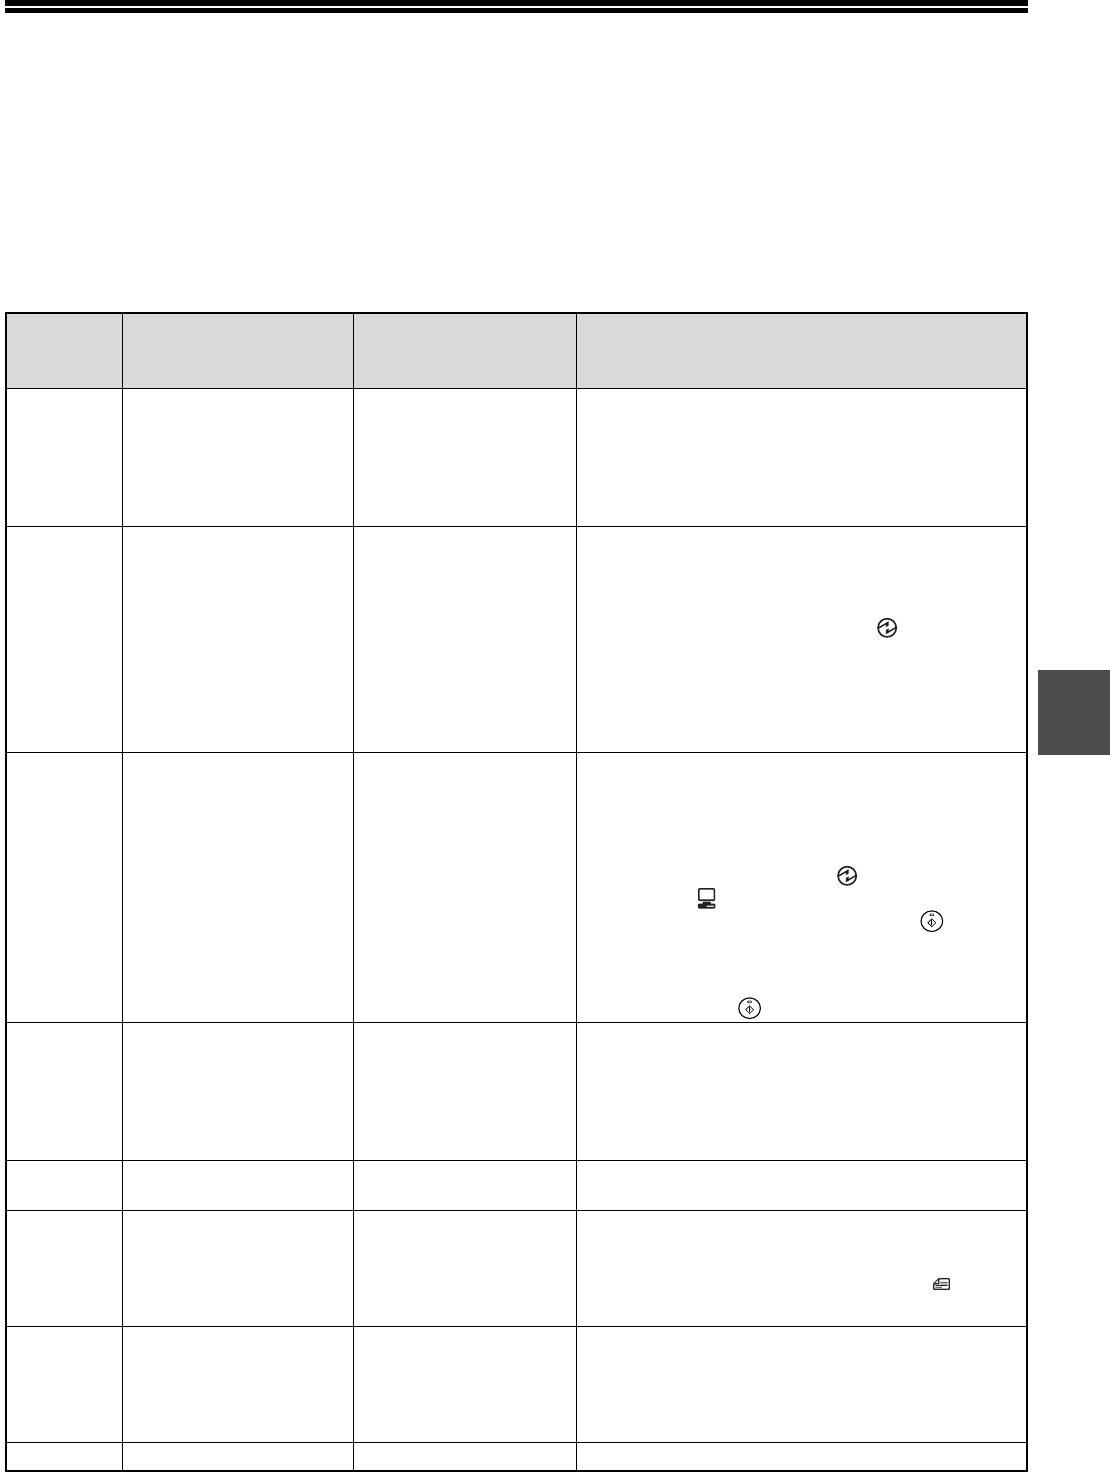
33
4
CUSTOMISING SETTINGS
(User programs)
The user programs allow you to customise the machine to match your needs.
USER PROGRAMS
Program
number Program name
Setting codes
(factory default setting
appears in bold)
Explanation
1 Auto clear time
1: OFF
2: 10 sec.
3: 20 sec.
4: 60 sec.
5: 90 sec.
6: 120 sec.
•«Auto clear time» automatically returns the
copy settings to the initial settings (p.12) when
a certain period of time elapses after a copy is
made. This program is used to select the
period of time. «Auto clear time» can also be
disabled.
2 Preheat mode
1: 1 min.
2: 5 min.
3: 30 min.
4: 60 min.
5: 120 min.
6: 240 min.
•This function automatically switches the
machine to a low power consumption state if
the set duration of time elapses without the
machine being used when the power is on.
The POWER SAVE indicator ( ) lights up,
however, the keys on the operation panel can
be used. Normal operation automatically
resumes when a key on the operation panel is
pressed, a print job is received or an original is
placed.
3Auto power shut-off
timer
1: 5 min.
2: 30 min.
3: 60 min.
4: 120 min.
5: 240 min.
•This function automatically switches the
machine to a state that consumes even less
power than preheat mode if the set duration of
time elapses without the machine being used
when the power is on. All lights except the
POWER SAVE indicator ( ) and ON LINE
indicator ( ) go off. To resume normal
operation, press the [START] key ( ).
Normal operation also resumes automatically
when a print job is received. While in auto
power shut-off mode, no keys (except the
[START] key ( )) can be used.
4
Stream feeding mode
*1
0: OFF
1: ON
•When copying using the SPF, during the
period of time that the SPF indicator blinks
after an original has been scanned
(about 5 seconds), a subsequent original can
be placed and automatically fed into the
machine.
5Auto power shut-off
setting
0: OFF
1: ON
•Use this setting to enable or disable auto
power shut-off.
8Auto paper select
mode
*2
0: OFF
1: ON
•This function automatically selects paper that
is the same size as the original placed in the
SPF, or the same size as that selected with
the [ORIGINAL SIZE ENTER] key ( ) The
function can be disabled.
9 Auto tray switching
*2
0: OFF
1: ON
•If the paper runs out during printing and there
is paper of the same size and orientation in
another tray, this function automatically
switches to that tray (excluding the bypass
tray). The function can be disabled.
10 to 15 Auditing mode –See «AUDITING MODE SETTINGS» (p.36).
*1When the SPF is installed.
*2On model with the two trays.
AR-5316-5320-EX.book 33 ページ 2003年11月26日 水曜日 午後5時3分
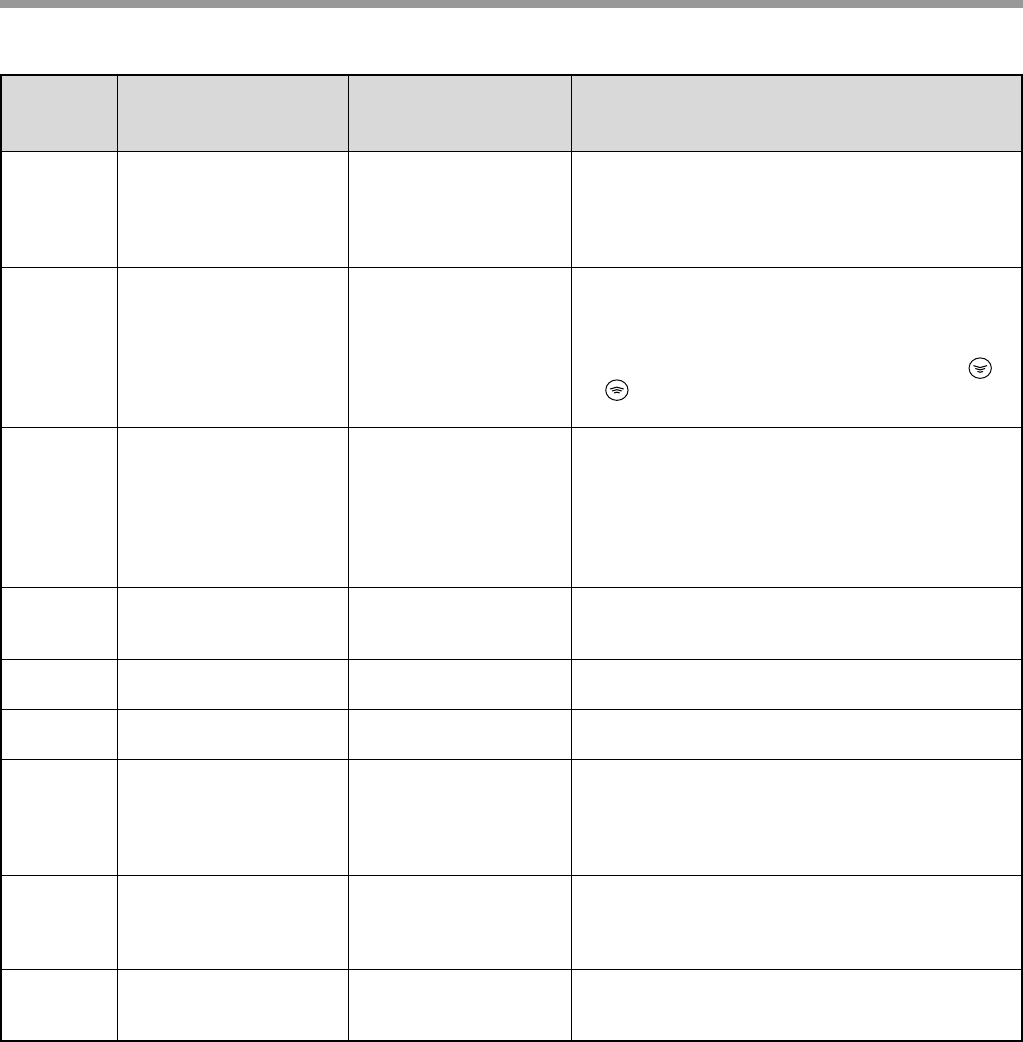
34
USER SETTINGS
*3AR-5316/AR-5316 X is as follows:
1: Paper tray (factory default),
5: Bypass tray
23 Resolution in
Auto/Text mode
1: 300 dpi
2: 600 dpi
•This setting is used to change the copy
resolution in AUTO and TEXT mode from 600
x 300 dpi to 600 x 600 dpi (high-quality mode).
Scanning is slower when high-quality mode is
used.
25 Key auto repeat 0: OFF
1: ON
•Use this setting to select whether or not
holding down a key causes repeated input of
the key. For keys that normally cause a set
value to increase when held down (for
example, holding down the [ZOOM] key ( ,
)), this program can be used to have the set
value not change when the key is held down.
26 Key press time
1: Minimum
(current response
speed)
2: 0.5 sec.
3: 1.0 sec.
4: 1.5 sec.
5: 2.0 sec.
•Use this setting to select how long a key must
be pressed for the input to be accepted. By
selecting a longer time, you can prevent
settings from being changed by the accidental
pressing of a key.
27 Audible signals volume
1: Short beep
2: Long beep
3: OFF
•This sets the volume of beep signals. (p.35)
28 Base setting beep
signal
0: OFF
1: ON
•Use this to sound a beep when a base setting
is selected. (p.35)
29 Number of copies limit 1: 99 copies
2: 999 copies
•Use this setting to select 99 or 999 for the
maximum number of copies.
30 Use close paper size 0: OFF
1: ON
•When this function is enabled, printing in
printer mode will automatically continue using
a different size of paper if the specified size of
paper runs out in all trays. This feature does
not function in copy mode.
31 Default tray setting
1: Upper paper tray*3
2: Lower paper tray*3
5: Bypass tray*3
•Use this program to select a default tray. This
tray is automatically selected each time the
power is turned on or each time the machine
reverts to the initial settings.
32 Default exposure
mode
1: AUTO
2: TEXT
3: PHOTO
•Use this program to set «AUTO«, «TEXT», or
«PHOTO» as the default exposure mode.
Program
number Program name
Setting codes
(factory default setting
appears in bold)
Explanation
AR-5316-5320-EX.book 34 ページ 2003年11月26日 水曜日 午後5時3分
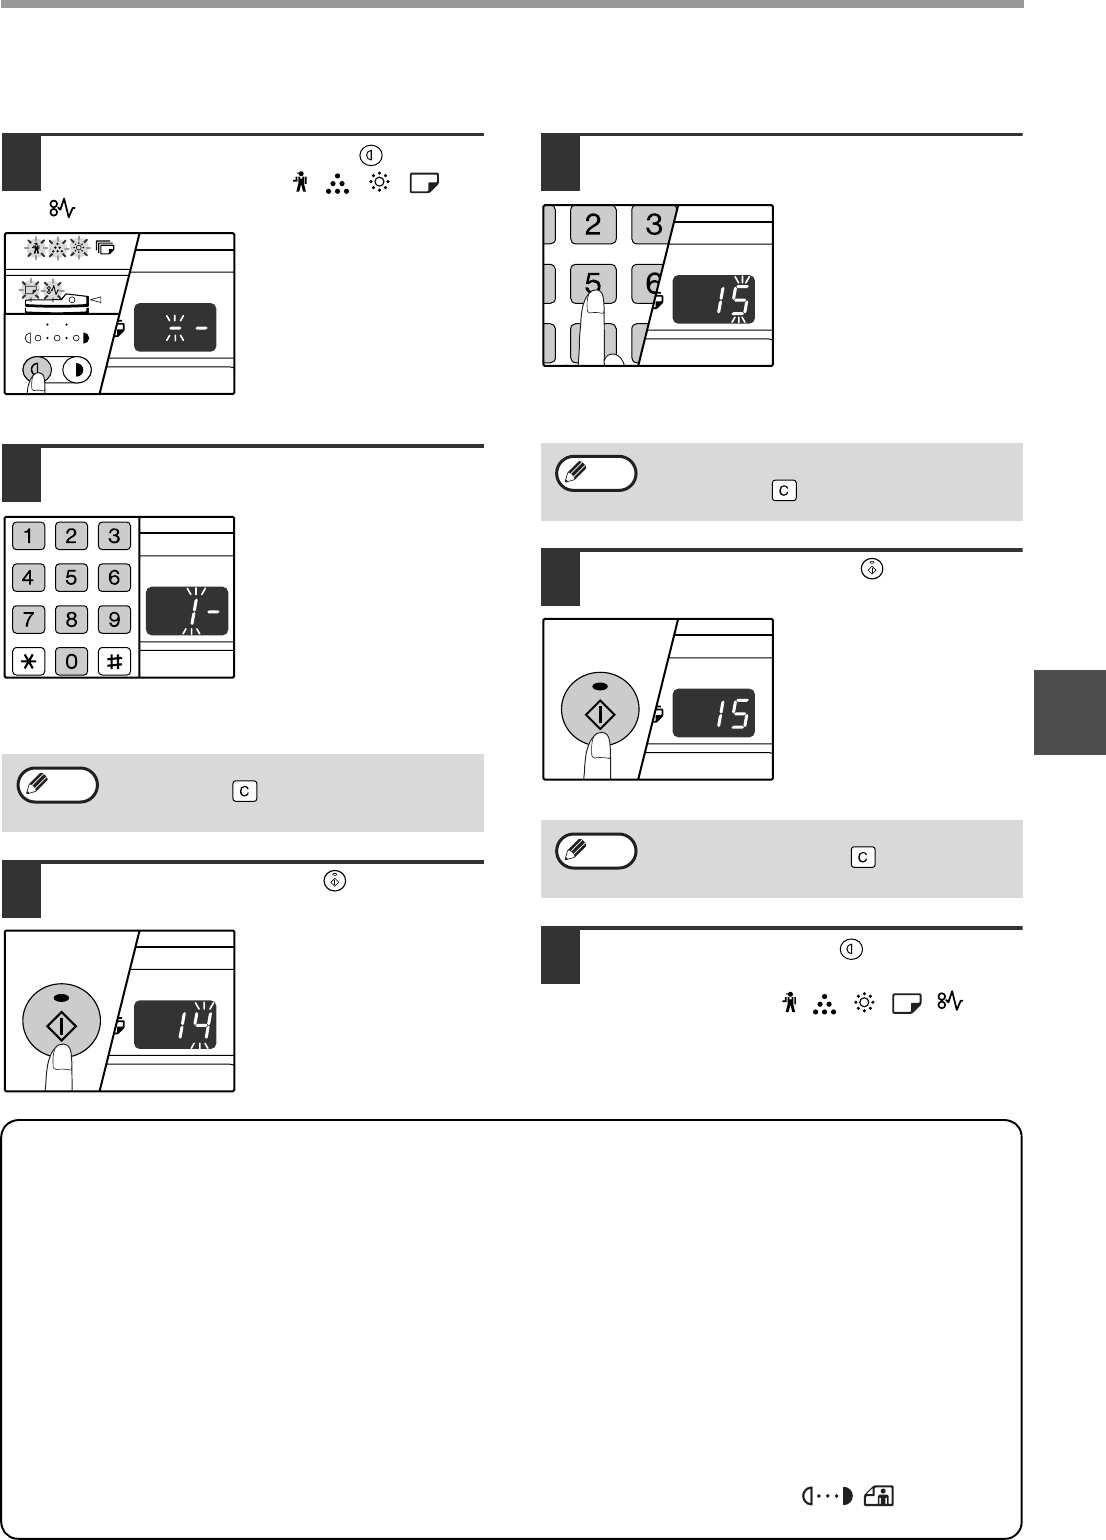
35
USER SETTINGS
4
SELECTING A SETTING FOR A USER PROGRAM
1Hold down the [Light] key ( ) until
the alarm indicators ( , , , ,
) blink.
The display shows «- -»
with the left hyphen
blinking.
2Enter the program number with the
numeric keys.
•See «USER
PROGRAMS» (p.33 to
p.34) for the program
numbers.
•The selected program
number blinks.
•For example, to select
«Auto clear timer»,
press the [1] key.
3Press the [START] key ( ).
•The selected program
number stops blinking
and lights steadily.
•The currently selected
setting code blinks on
the right side of the
display.
4Enter the desired setting code by
pressing a numeric key.
•For the setting codes,
see «USER
PROGRAMS». (p.33 to
p.34)
•The selected setting
code blinks.
•For example, to select
90 seconds, press the
[5] key.
5Press the [START] key ( ).
The selected setting
code stops blinking and
lights steadily.
6Press the [Light] key ( ) to complete
the settings.
The alarm indicators ( , , , , ) go
off and the display returns to the number of
copies display.
Audible signals (key entry beep, invalid key beep, base setting beep)
The machine sounds three different types of beep signals: a key entry beep that sounds when a valid key is
pressed, an invalid key beep that sounds when an invalid key is pressed, and a base setting beep that sounds
when a setting is the same as the base setting (base settings are explained below). The base setting beep is
initially disabled. If you wish to enable the base setting beep, see «Base setting beep signal» on page 34. If you
wish to change the volume of the beep signals or disable them, see «Audible signals volume» on page 34.
The beep patterns of each type of beep signal are as follows:
Key entry beep ……………………. One beep
Invalid key beep …………….……Two beeps
Base setting beep ………….… Three beeps
Base settings
The base settings are preset standard selections for each copy setting. The base settings are as follows:
Copy ratio …….……………….………….. 100%
Light and Dark indicator…………….…….. 3
Paper feed location ……. Upper paper tray
ORIGINAL SIZE………………A4 (8-1/2″ x 11″)
AUTO/TEXT/PHOTO ( / / )
…………………………….………………..…… AUTO
If you enter the wrong number, press the
[CLEAR] key ( ) and then enter the correct
number.
If you enter the wrong number, press the
[CLEAR] key ( ) and return to step 2.
To select a setting for another user program,
press the [CLEAR] key ( ) and then return
to step 2.
Note
Note
AUTO
AR-5316-5320-EX.book 35 ページ 2003年11月26日 水曜日 午後5時3分
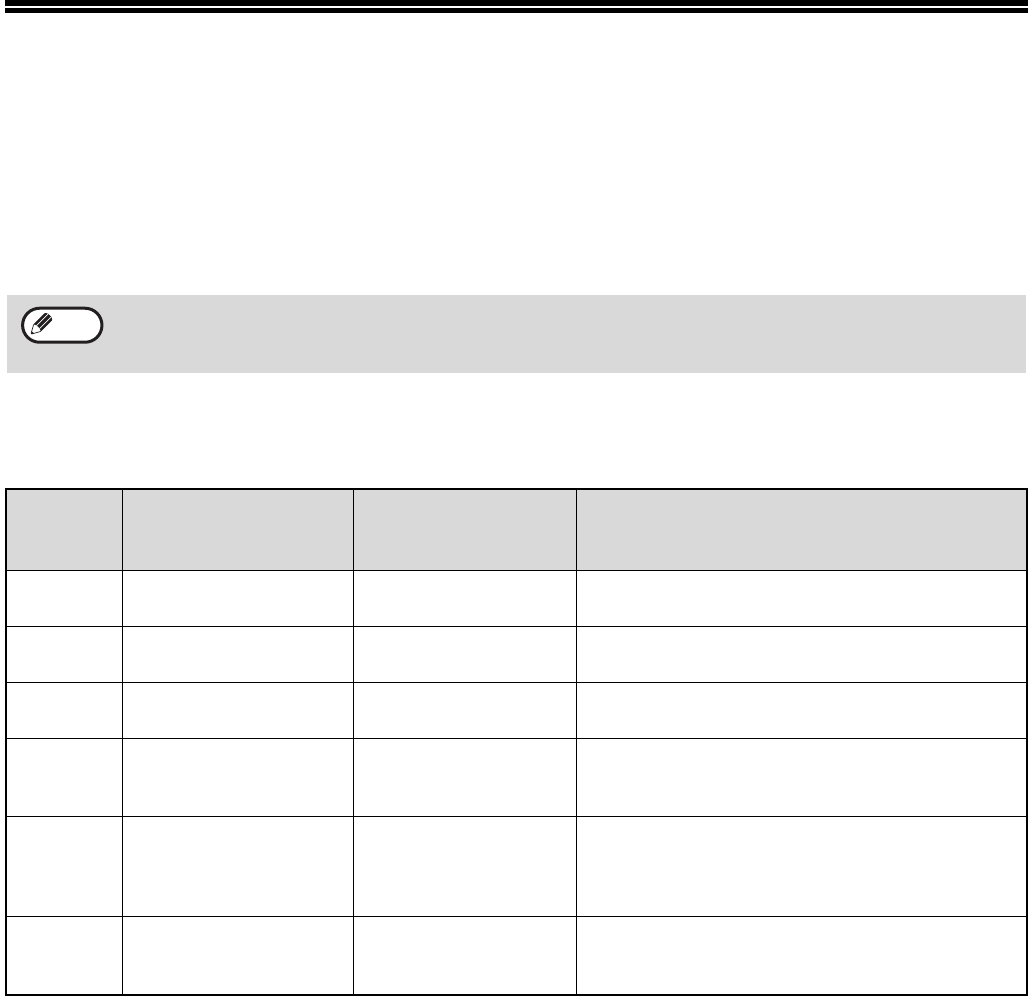
36
SETTINGS FOR AUDITING MODE
AUDITING MODE
When «Auditing mode» is enabled, a count is kept of the number of copies made by each account (up to 20 accounts
can be established), and the counts can be displayed and totalled as necessary. In «Auditing mode», the display
shows «- — -«, and this indicates that a 3-digit account number must be entered in order to use the machine for
copying.
AUDITING MODE SETTINGS
The administrator of the machine should complete the following settings:
•Enable «Auditing mode» (p.38)
•Account number entry (p.38)
Note
Program
number Program name
Setting codes
(factory default settings
are indicated in bold)
Explanation
10 Auditing mode 0: OFF
1: ON
Use to enable or disable «Auditing mode».
«Auditing mode» is initially disabled.
11 Account number entry None Use to set up account numbers. Up to 20
accounts can be established.
12 Account number
change None Use to change an account number.
13 Account number
deletion
0: Delete single account
1: Delete all accounts
Use to delete an account number.
A single account number can be deleted, or all
account numbers at once.
14 Number of copies per
account None
This displays the number of copies made by
each account.
The maximum count is 49,999. If this number is
exceeded, the count will start over from 0.
15 Resetting account
0: Reset single account
1: Reset all accounts
Use to reset the copy count of an account to 0.
The copy count of a single account or of all
accounts can be reset.
AR-5316-5320-EX.book 36 ページ 2003年11月26日 水曜日 午後5時3分
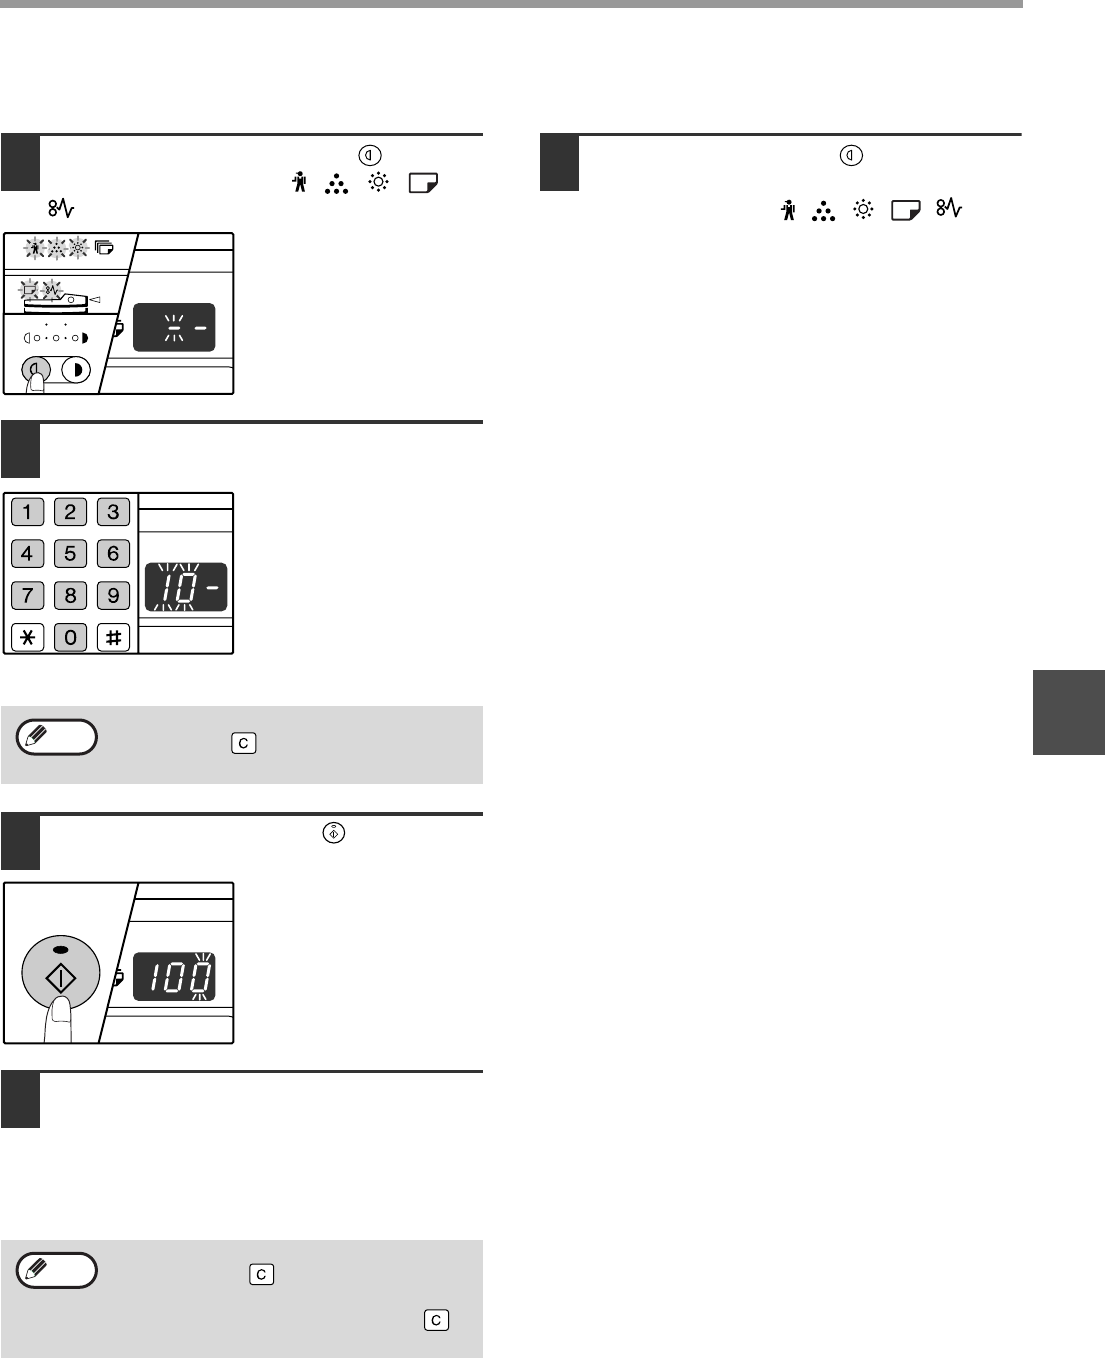
37
USER SETTINGS
4
SELECTING AUDITING MODE SETTINGS
1Hold down the [Light] key ( ) until
the alarm indicators ( , , , ,
) blink.
The display shows «- -»
with the left hyphen
blinking.
2Enter the program number with the
numeric keys.
•See «AUDITING MODE
SETTINGS» (p.36) for
the program numbers.
•The selected program
number blinks.
•For example, to select
«Auditing mode», enter
«10».
3Press the [START] key ( ).
•The selected program
number stops blinking
and lights steadily.
•The currently selected
setting code blinks on
the right side of the
display.
4Enter the desired setting code for the
program as explained in the detailed
procedures on the following pages.
For the setting codes, see «AUDITING MODE
SETTINGS». (p.36)
5Press the [Light] key ( ) to complete
the settings.
The alarm indicators ( , , , , ) go
off and the display returns to the number of
copies display.
If you enter the wrong number, press the
[CLEAR] key ( ) and then enter the correct
number.
•If you enter the wrong number, press the
[CLEAR] key ( ) and return to step 2.
•If «E» (error code) blinks in the first digit of
the display, press the [CLEAR] key ( )
and return to step 2.
Note
AR-5316-5320-EX.book 37 ページ 2003年11月26日 水曜日 午後5時3分
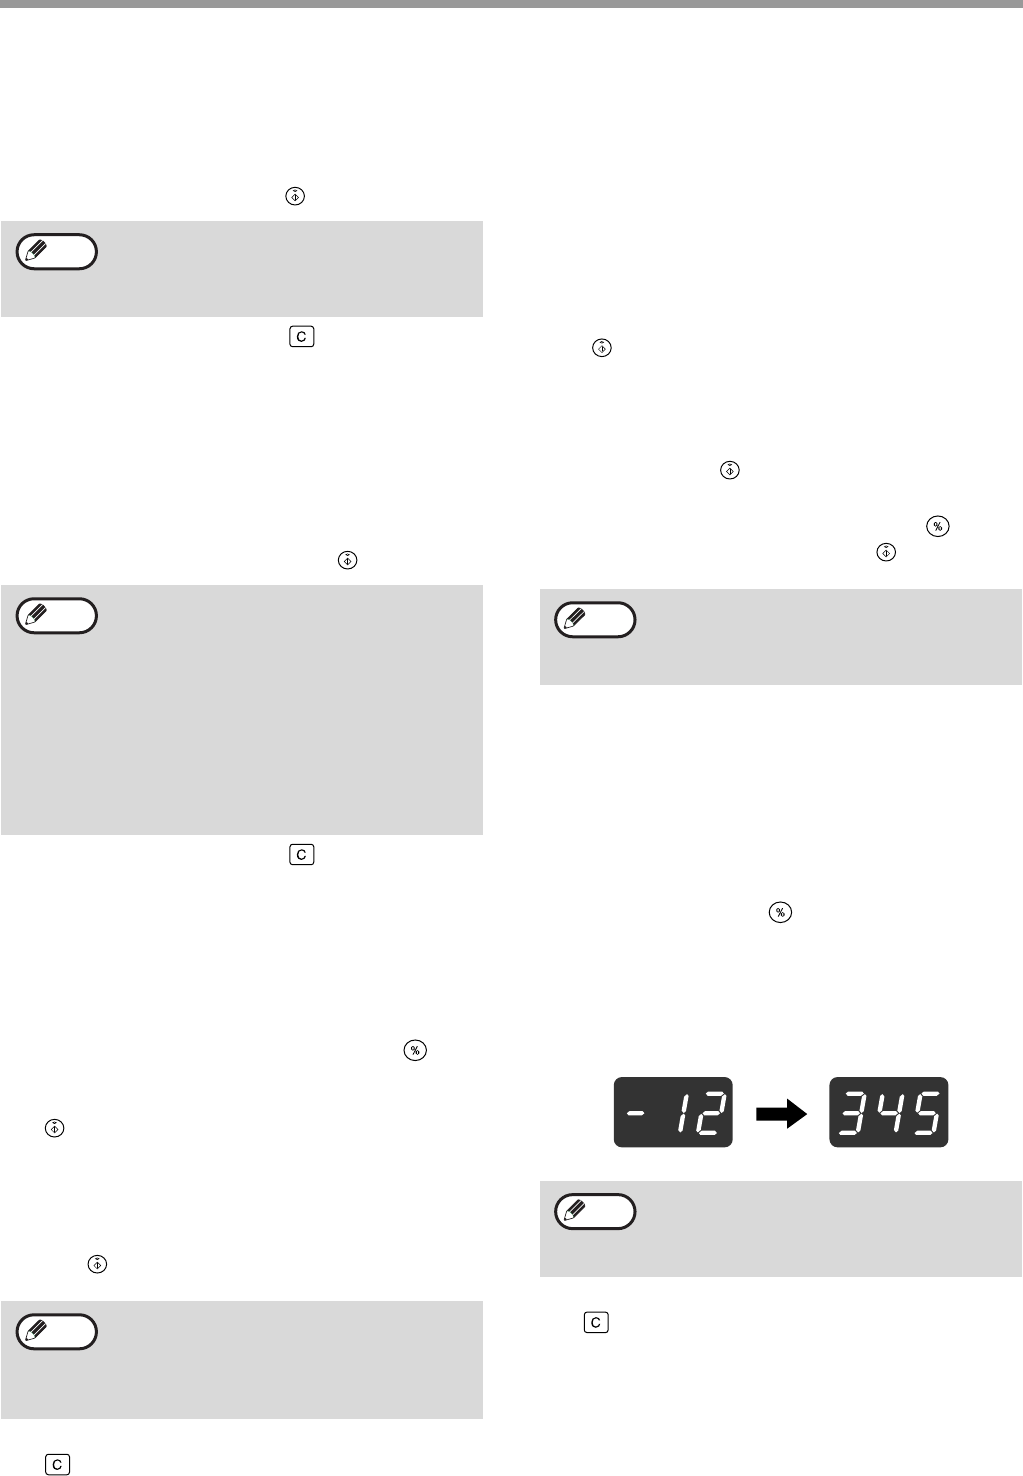
38
USER SETTINGS
Auditing mode
(program No.10)
1 Press the [1] key to enable «Auditing
mode» or the [0] key to disable it, and then
press the [START] key ( ).
2 Press the [CLEAR] key ( ).
Account number entry
(program No.11)
If 20 accounts have already been established, the
error code «11E» will appear in the display.
1 Use the numeric keys to enter a 3-digit
number (any number except «000») and
then press the [START] key ( ).
2 Press the [CLEAR] key ( ).
Account number change
(program No.12)
Use this procedure to change an account number. If
no account numbers have been established, the error
code «12E» will appear in the display.
1 Press the [Copy ratio display] key ( ) to
select the account number that you wish to
change, and then press the [START] key
().
The display will show 3 blinking hyphens «- — -«.
2 Press the numeric keys to enter a new
account number (any 3-digit number
except «000»), and then press the [START]
key ( ).
3 When finished, press the [CLEAR] key
().
Account number deletion
(program No.13)
Use this procedure to delete account numbers. A
single account number can be deleted, or all account
numbers at once.
If no account numbers have been established, the
error code «13E» will appear in the display.
[Deleting all accounts at once]
Press the [1] key and then press the [START]
key ( ).
All account numbers will be deleted.
[Deleting a single account]
1 Press the [0] key, and then press the
[START] key ( ).
2 Select the account number to be deleted
with the [Copy ratio display] key ( ) and
then press the [START] key ( ).
Number of copies per account
(program No.14)
Use this procedure to display the copy count of each
account. If no account numbers have been
established, the error code «14E» will appear in the
display.
1 Select the account number with the [Copy
ratio display] key ( ).
2 Hold down the [0] key.
The copy count of the selected account will appear in
the display while you hold down the [0] key. The count
is displayed sequentially as shown below.
Example: 12,345 copies
3 When finished, press the [CLEAR] key
().
After enabling «Auditing mode», use «Account
number entry» to establish account numbers
for each account (up 20 accounts can be
established).
•If you enter «000» or a number that has
already been stored, the number will blink
in the display. Enter a different number. (Up
to 20 accounts can be established.)
•Repeat the same procedure to enter any
other account numbers that you wish to
establish.
•Keep a record of what group is using each
account number (account names cannot be
stored, so keep a record to prevent
confusion when totalling account values).
•If you enter «000» or a number that has
already been stored, the number will blink
in the display. Enter a different number.
•To change another account number, repeat
steps 1 and 2.
Note
Note
Note
To delete another account number, enter the
program number (13) for account number
deletion and then repeat the procedure for
«Deleting a single account».
•Each A3 (11″ x 17″) size page is counted as
two pages.
•To view the copy count of another account,
repeat steps 1 and 2.
Note
Note
AR-5316-5320-EX.book 38 ページ 2003年11月26日 水曜日 午後5時3分
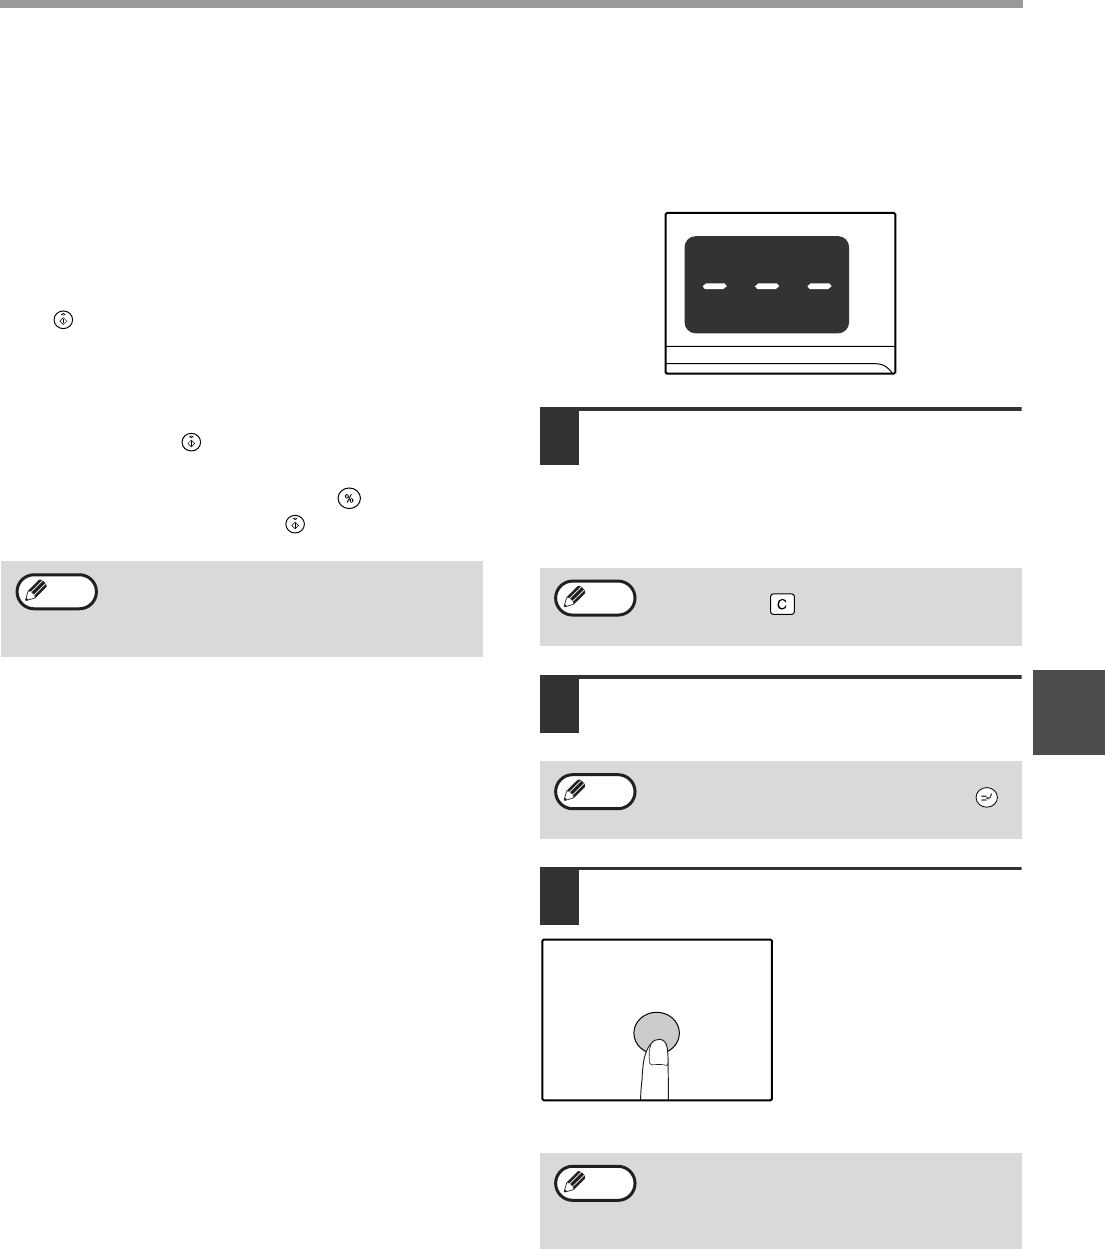
39
USER SETTINGS
4
Resetting account
(program No.15)
The copy count of a single account or all accounts can
be reset to 0. If no account numbers have been
established, the error code «15E» will appear in the
display.
[Resetting all accounts]
Press the [1] key and then press the [START]
key ( ).
The copy counts of all accounts will be deleted.
[Resetting a single account]
1 Press the [0] key, and then press the
[START] key ( ).
2 Select the account number to be reset with
the [Copy ratio display] key ( ) and then
press the [START] key ( ).
Copying when «Auditing mode» is
enabled
When «Auditing mode» is enabled, «- — -» appears in the
display.
1Enter your 3-digit account number
with the numeric keys.
When you enter your account number, «0»
appears in the display to indicate that copying is
possible.
2Follow the appropriate steps to make
the copy.
3When finished, press the [AUDIT
CLEAR] key ( ).
To reset another account number, enter the
program number (15) for account number
deletion and then repeat the procedure for
«Resetting a single account«.
Note
If you enter an incorrect number, press the
[CLEAR] key ( ) and then enter the correct
number.
If you are performing an interrupt copy (p.28),
be sure to press the [INTERRUPT] key ( )
when finished to exit interrupt mode.
If a misfeed occurs or the paper runs out
during copying, your session will not end even
if the [AUDIT CLEAR] key ( ) is
pressed.
Note
ACC.#-C
Note
ACC.#-C
AR-5316-5320-EX.book 39 ページ 2003年11月26日 水曜日 午後5時3分
40
5Chapter 5
TROUBLESHOOTING
This chapter describes troubleshooting and misfeed removal.
TROUBLESHOOTING
If you experience difficulty using the machine, check the following troubleshooting guide before calling for service.
Many problems can be easily resolved by the user. If you are unable to solve the problem using the troubleshooting
guide, turn off the power switch and unplug the machine, and contact your authorised service representative.
MACHINE/COPYING PROBLEMS
The machine does not operate. …….……………….………………..……………….……………….…………..…………… 41
Copies are too dark or too light.…….……………….………………..……………….……………….……….………………. 41
Blank copies…..……………….……………….………………..……………….……………….………………..……………….… 41
Part of the image is cut off or there is too much blank space. …………………….………………..………….……... 41
Wrinkles appear in the paper or the image disappears in places. ………….……………….………………..……… 41
Paper misfeed.…….……………….………………..……………….……………….………………..………….……………….… 42
Original size not selected automatically.……………………..……………….………………..………………...………….. 42
Copies are smudged or dirty.….………………..……………….……………….………………..……………..……………… 43
White or black lines appear on copies. ..………………..……………….……………….………………..………….……… 43
Paper size for a paper tray cannot be set. …………………..………….……………….………………..……….………… 43
A copy job stops before it is finished.………………………….……………….………………..……………….……………. 43
The POWER SAVE indicator ( ) is lit. …………..………………..……………….……………….………………..……… 43
Any one of the alarm indicators ( ,,, ,) is lit or blinking. …..……………….………………..……… 43
Lighting fixture flickers. …….……………….………………..……………….……………….……………..………………….… 43
PRINTING PROBLEMS
The machine does not print. (ON LINE indicator ( ) does not blink.) ………………..……………….……………. 44
The machine does not print. (ON LINE indicator ( ) was blinking.) ……………………….………………..……… 44
Printing is slow. ……………….……………….………………..……………….……………….…………..………………………. 45
The printed image is light and uneven. ..………………..……………….……………….………………..………….……… 45
The printed image is dirty.…………….……………….………………..……………….……………….…….………….……… 45
The printed image is skewed or it runs off the paper. …………………….………….………………..…………….…… 45
Any one of the alarm indicators ( ,, , ,) is lit or blinking. …………….……………….……………. 45
Removing the software …….……………….………………..……………….……………….………………..……………….… 45
INDICATORS AND DISPLAY MESSAGES…….…….……….…….…….………... 46
MISFEED REMOVAL …..…….…….……..…….…….…….…….……..…………….….. 47
REPLACING THE TONER CARTRIDGE.…………………………………………….. 54
AR-5316-5320-EX.book 40 ページ 2003年11月26日 水曜日 午後5時3分
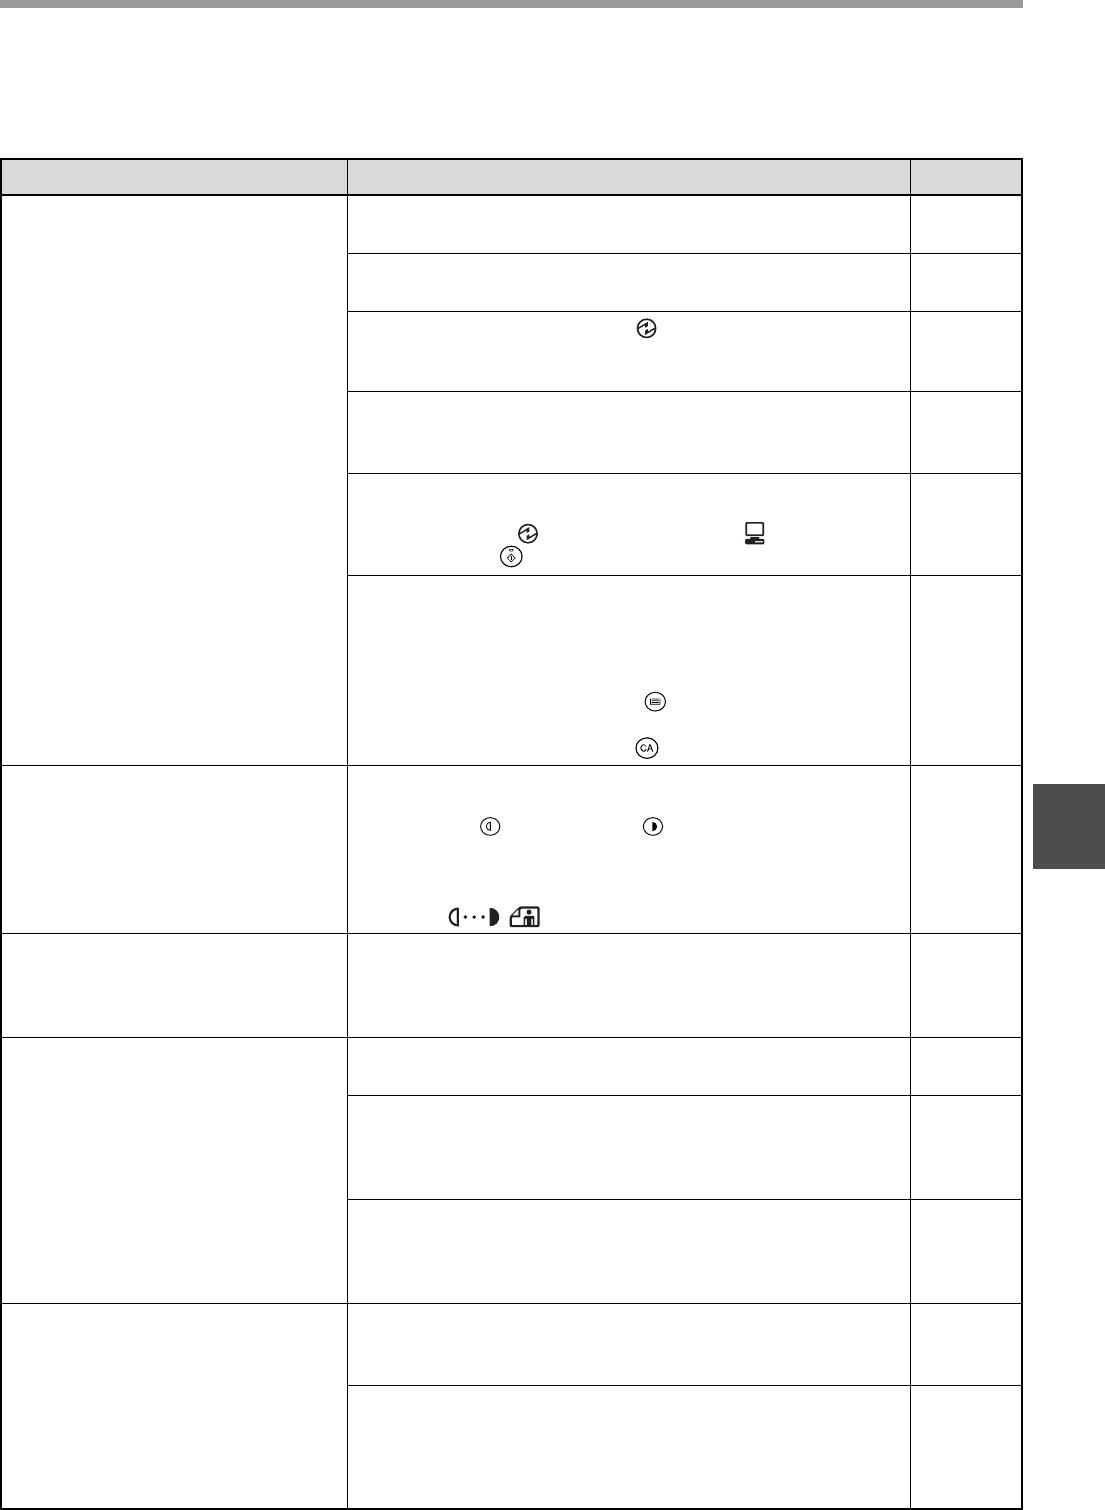
41
TROUBLESHOOTING
5
MACHINE/COPYING PROBLEMS
The following problems are related to the general operation of the machine and copying.
Problem Cause and solution Page
The machine does not operate.
The machine is not plugged into a power outlet.
→Plug the machine into a grounded outlet. –
Power switch OFF.
→Turn the power switch ON. 12
The POWER SAVE indicator ( ) is blinking.
→Indicates that the machine is warming up. Copies cannot be
made until the machine has finished warming up.
12
The front cover or the side cover is not completely
closed.
→Close the front cover or the side cover.
–
The machine is in auto power shut-off mode.
→In auto power shut-off mode, all lights are off except the POWER
SAVE indicator ( ) and ON LINE indicator ( ). Press the
[START] key ( ) to resume normal operation.
12
PAPER SIZE indicator is blinking.
→A blinking PAPER SIZE indicator means that the size of paper
loaded in the tray is different from the paper size setting for the
tray. Change the paper size setting.
To clear the display, do one of the following:
•Use the [TRAY SELECT] key ( ) to change the tray selection.
•Open and close the tray.
•Press the [CLEAR ALL] key ( ).
16
Copies are too dark or too light.
Select the correct original type for the original.
→Select AUTO with the [AUTO/TEXT/PHOTO] key or press the
[Light] key ( ) and [Dark] key ( ) to manually select an
appropriate exposure.
→If the copy is too light or too dark even though AUTO was
selected with the [AUTO/TEXT/PHOTO] key
( / / ), adjust the automatic exposure level.
21
31
Blank copies.
The original is not placed face up in the SPF or face down
on the document glass.
→Place the original face up in the SPF or face down on the
document glass.
18, 19
Part of the image is cut off or there
is too much blank space.
The original was not placed in the correct position.
→Place the original correctly. 18, 19
An appropriate ratio was not used for the size of the
original and the size of the paper.
→Press the [AUTO IMAGE] key ( ) to have the copy made
using the appropriate ratio for the original and paper.
22
The size of paper loaded in the tray was changed without
changing the tray’s paper size setting.
→Be sure to change the tray’s paper size setting whenever you
change the size of paper loaded in the tray.
16
Wrinkles appear in the paper or
the image disappears in places.
The paper is outside of the specified size and weight
range.
→Use copy paper within the specified range.
13
Paper curled or damp.
→Do not use curled or crimped paper. Replace with dry copy paper.
During periods when the machine is not used for a long time,
remove the paper from the tray and store it in a dark place in a
bag to prevent moisture absorption.
–
AUTO
AUTO %
AR-5316-5320-EX.book 41 ページ 2003年11月26日 水曜日 午後5時3分
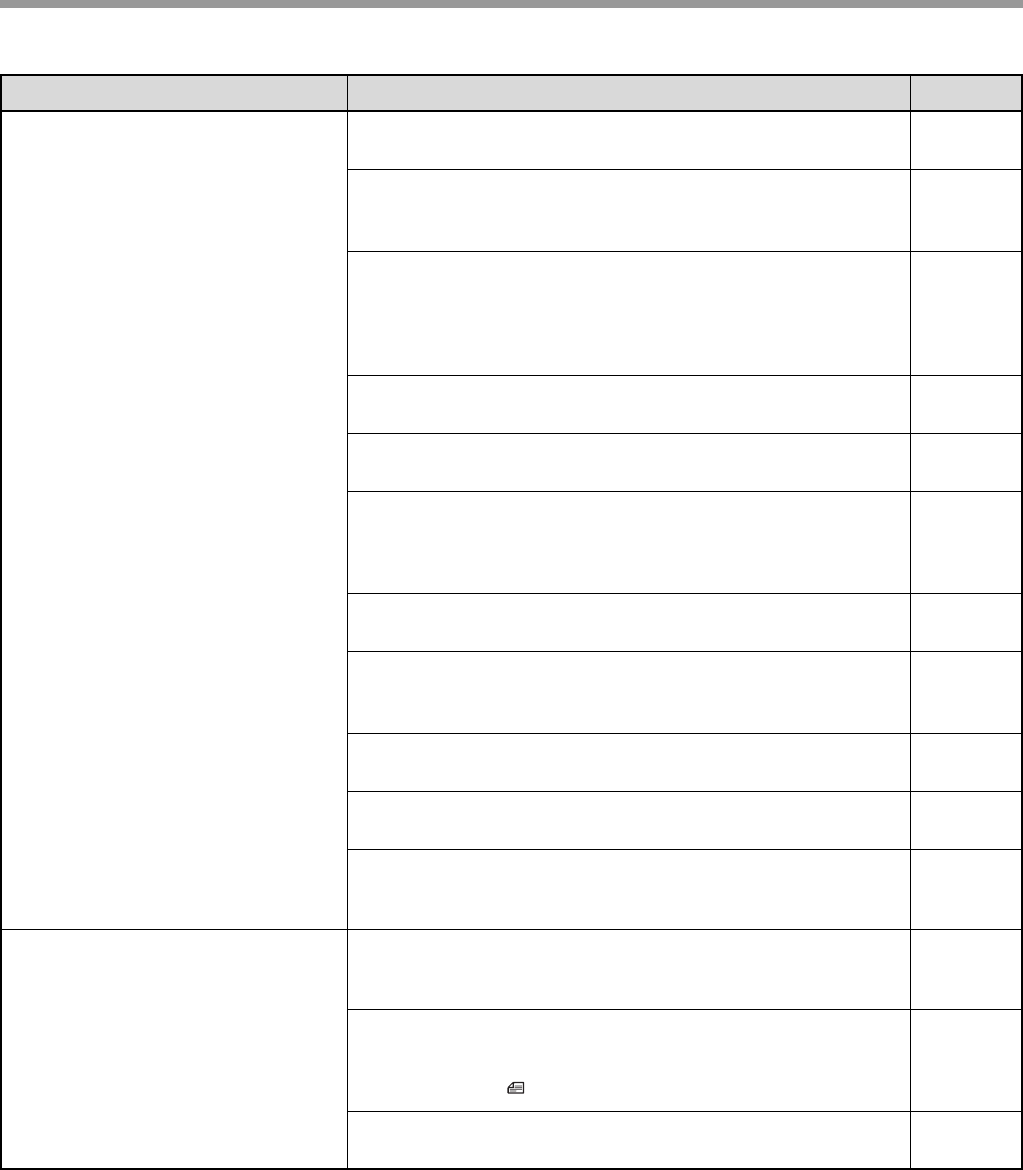
42
TROUBLESHOOTING
Paper misfeed.
Misfeed occurs.
→To remove the misfeed, see «MISFEED REMOVAL». 47
The paper is outside of the specified size and weight
range.
→Use copy paper within the specified range.
13
Paper curled or damp.
→Do not use curled or crimped paper. Replace with dry copy paper.
During periods when the machine is not used for a long time,
remove the paper from the tray and store it in a dark place in a
bag to prevent moisture absorption.
–
Paper is not loaded properly.
→Make sure the paper is properly installed. 14
Pieces of paper inside machine.
→Remove all pieces of misfed paper. 47
Too much paper is loaded in the tray.
→If the stack of paper is higher than the indicator line on the tray,
remove some of the paper and reload so that the stack does not
exceed the line.
14
Some sheets of paper stick together.
→Fan the paper well before loading it. 14
The guides on the bypass tray do not match the width of
the paper.
→Adjust the guides to match the width of the paper.
15
The bypass tray extension is not pulled out.
→When loading a large size of paper, pull out the extension. 15
The bypass paper feed roller is dirty.
→Clean the roller. 57
A5 (5-1/2″ x 8-1/2″) paper is loaded in lower paper tray.
→A5 (5-1/2″ x 8-1/2″) size paper must be loaded in upper paper
tray or the bypass tray.
13, 14
Original size not selected
automatically.
(When the SPF is installed.)
Original(s) curled.
→The original size cannot be correctly detected if the original is
curled or folded. Straighten the original.
–
The original includes any large black solid areas.
→If the original includes any large black solid areas, the original
size may not be detected automatically. Use the [ORIGINAL SIZE
ENTER] key ( ) to select the paper size.
–
The machine is directly exposed to sunlight.
→Install in a location that is not exposed to sunlight. –
Problem Cause and solution Page
ENTER
AR-5316-5320-EX.book 42 ページ 2003年11月26日 水曜日 午後5時3分
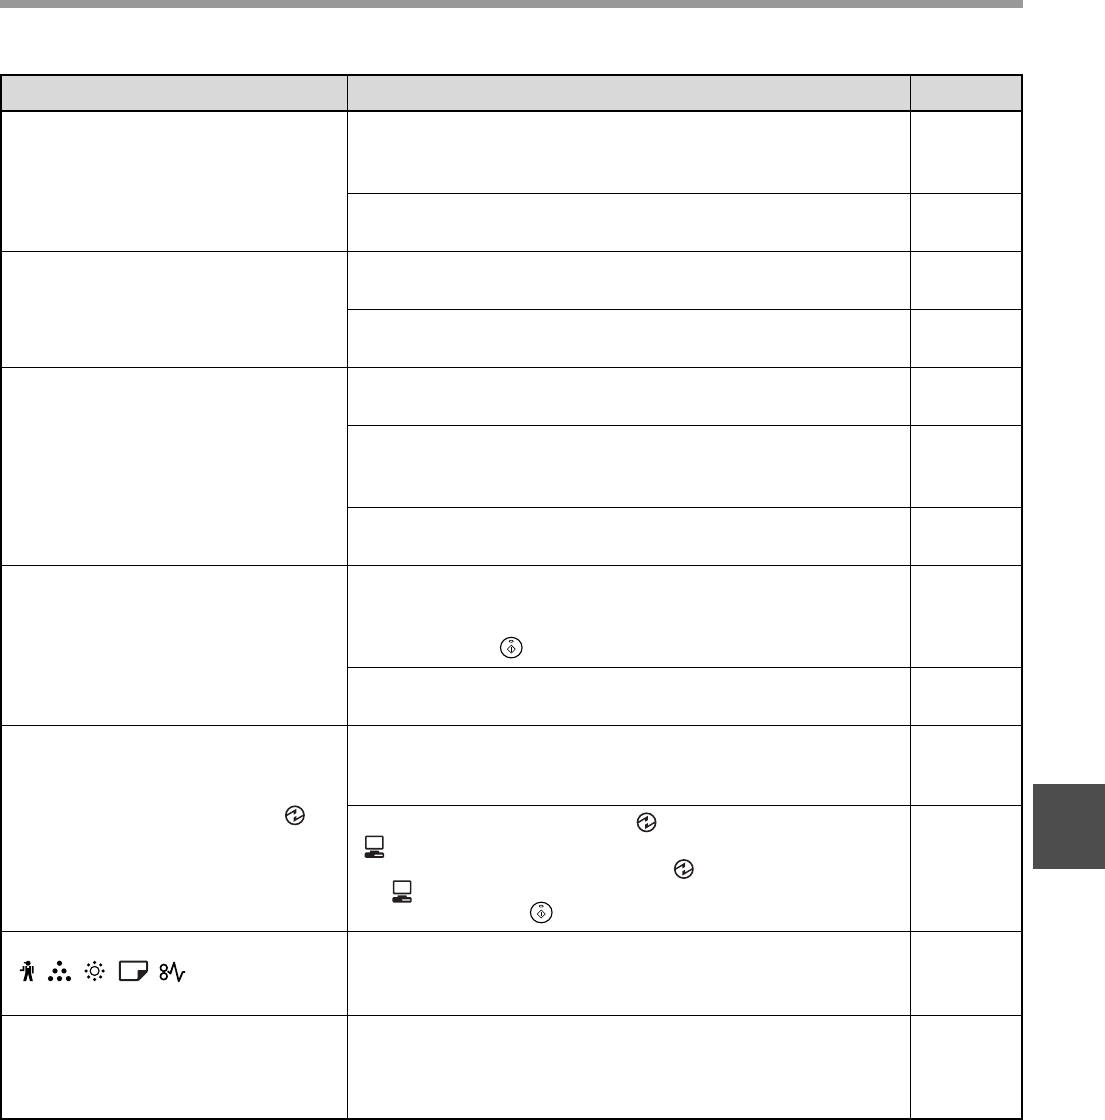
43
TROUBLESHOOTING
5
Copies are smudged or dirty.
The document glass or the underside of the document
cover/SPF is dirty.
→Clean regularly.
56
Original smudged or blotchy.
→Use a clean original. –
White or black lines appear on
copies.
The scanner glass in the SPF is dirty.
→Clean the long, narrow glass in the SPF. 56
The transfer charger is dirty.
→Clean the transfer charger. 57
Paper size for a paper tray cannot
be set.
Copying or printing is performed.
→Set the paper size after copying is complete. –
The machine has stopped temporarily due to running out
of paper or a misfeed.
→Load paper or remove the misfeed, and then set the paper size.
14, 47
An interrupt copy job is in progress.
→Set the paper size after the interrupt copy job is finished. 28
A copy job stops before it is
finished.
The paper output tray is full.
→Long copy runs are automatically paused every 250 copies.
Remove the copies in the paper output tray and press the
[START] key ( ) to resume copying.
22
The tray is out of paper.
→Load paper. 14
The POWER SAVE indicator ( ) is
lit.
Any other indicators are lit.
→If other indicators are lit, the machine is in «Preheat mode». Press
any key on the operation panel to resume normal operation.
12
The POWER SAVE indicator ( ) and ON LINE indicator
( ) are only lit.
→If only the POWER SAVE indicator ( ) and ON LINE indicator
( ) are lit, the machine is in auto power shut-off mode. Press
the [START] key ( ) to resume normal operation.
12
Any one of the alarm indicators
( , , , , ) is lit or
blinking.
See «INDICATORS AND DISPLAY MESSAGES» to check
the meaning of the alarm indicator and error message in
the display, and take appropriate action.
46
Lighting fixture flickers.
The same power outlet being used is for the lighting
fixture and the machine.
→Connect the machine to a power outlet which is not used for other
electric appliances.
–
Problem Cause and solution Page
AR-5316-5320-EX.book 43 ページ 2003年11月26日 水曜日 午後5時3分
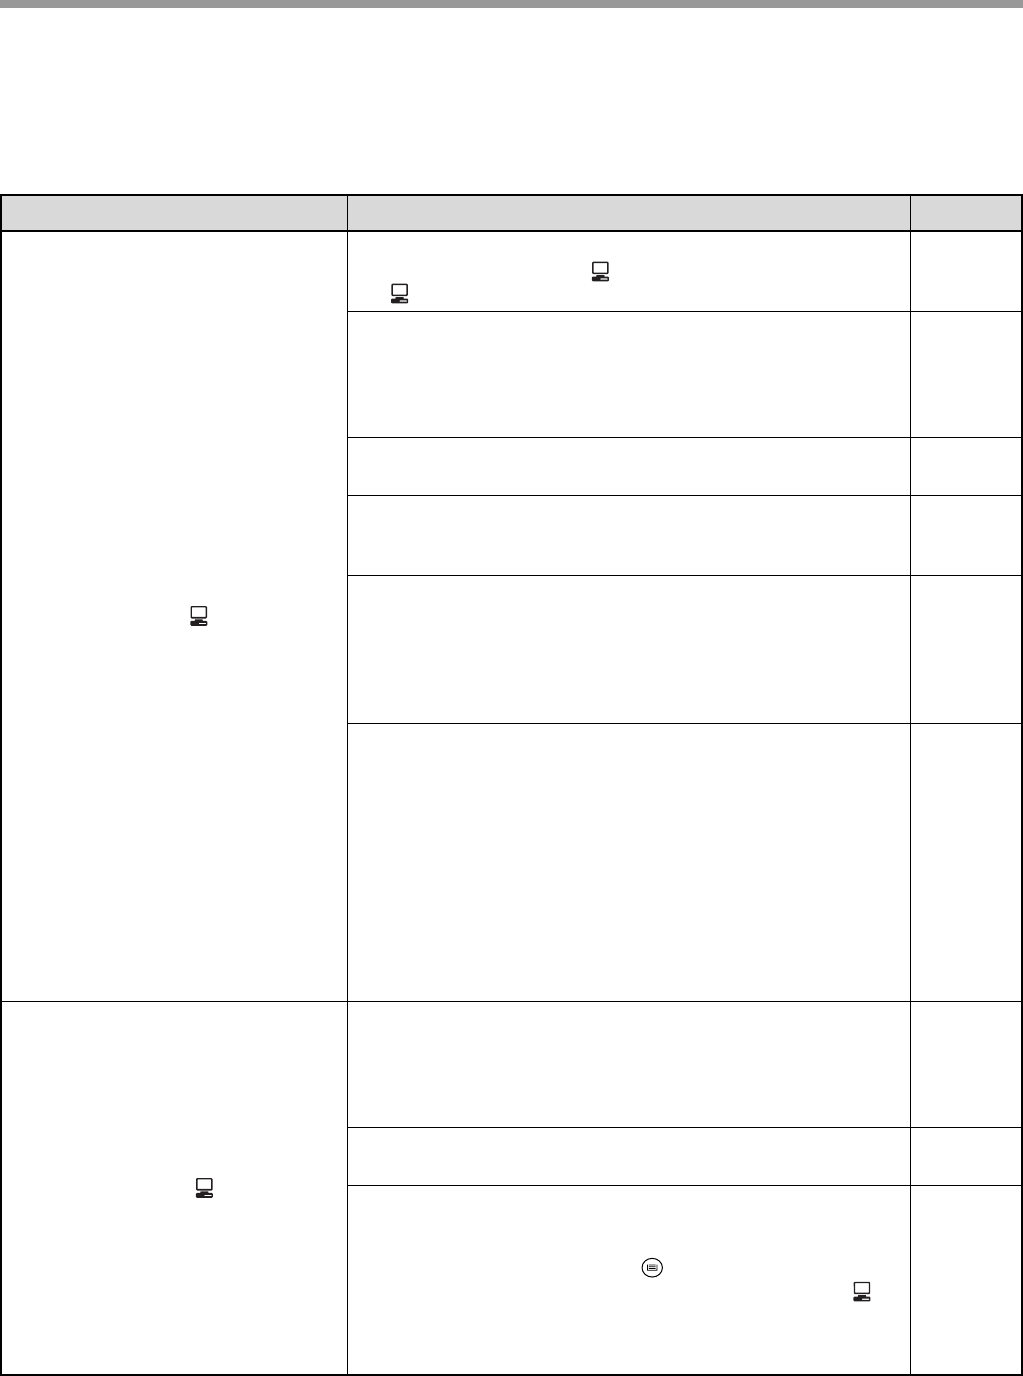
44
TROUBLESHOOTING
PRINTING PROBLEMS
In addition to this section, troubleshooting information can also be found in the README files for each of the
software programs. To view a README file, see the «Software Setup Guide».
Problem Cause and solution Page
The machine does not print.
(ON LINE indicator ( ) does not
blink.)
The machine is set to off-line mode.
→Press the [ON LINE] key ( ) to turn on the ON LINE indicator
().
29
The machine is not correctly connected with your
computer.
→Check both ends of the printer cable and make sure you have a
solid connection. Try a known good cable. For information on
cables, see «SPECIFICATIONS».
60
Copy job is performed.
→Wait until the copy job is complete. –
The port setting is not correct.
→Printing is not possible if the printer driver port setting is not
correct. Set the port correctly.
Software
Setup
Guide
Your machine is not selected correctly in the current
application for the print job.
→When choosing «Print» from the «File» menu located in
applications, be sure you have selected «SHARP AR-XXXX»
(where XXXX is the model name of your machine) printer
displayed in the «Print» dialog box.
–
The printer driver has not been installed properly.
→Follow these steps to check and see if the printer driver is
installed.
1 Click the «start» button, click «Control Panel», click «Printers
and Other Hardware», and then click «Printers and Faxes».
(On Windows 95/98/Me/NT 4.0/2000, click the «Start» button,
select «Settings» and then click «Printers».)
2 The «SHARP AR-XXXX» printer driver icon is not shown
(where XXXX is the model name of your machine).
3 If the icon is shown but you still cannot print, the printer driver
may not have been installed correctly. In this case, delete
AR-5316/5320/5316 X/5320 X Software and then reinstall it.
–
The machine does not print.
(ON LINE indicator ( ) was
blinking.)
The tray size settings are not the same on the machine
and in the printer driver.
→Make sure that the same tray paper size is set on the machine
and in the printer driver. To change the tray paper size setting in
the printer driver, see the Software Setup Guide.
16
Software
Setup
Guide
The specified size of paper has not been loaded.
→Load the specified size of paper in the paper tray. 14
The PAPER SIZE indicator is blinking.
→When «Use close paper size (user program)» is disabled, the
PAPER SIZE indicator on the operation panel will blink. You can
press the [TRAY SELECT] key ( ) to select a tray manually, or
load paper in the bypass tray and press the [ON LINE] key ( ) to
begin printing.
→When «Use close paper size» is enabled, printing will take place
using a size of paper that is close to the size of the print image.
16, 21
–
AR-5316-5320-EX.book 44 ページ 2003年11月26日 水曜日 午後5時3分
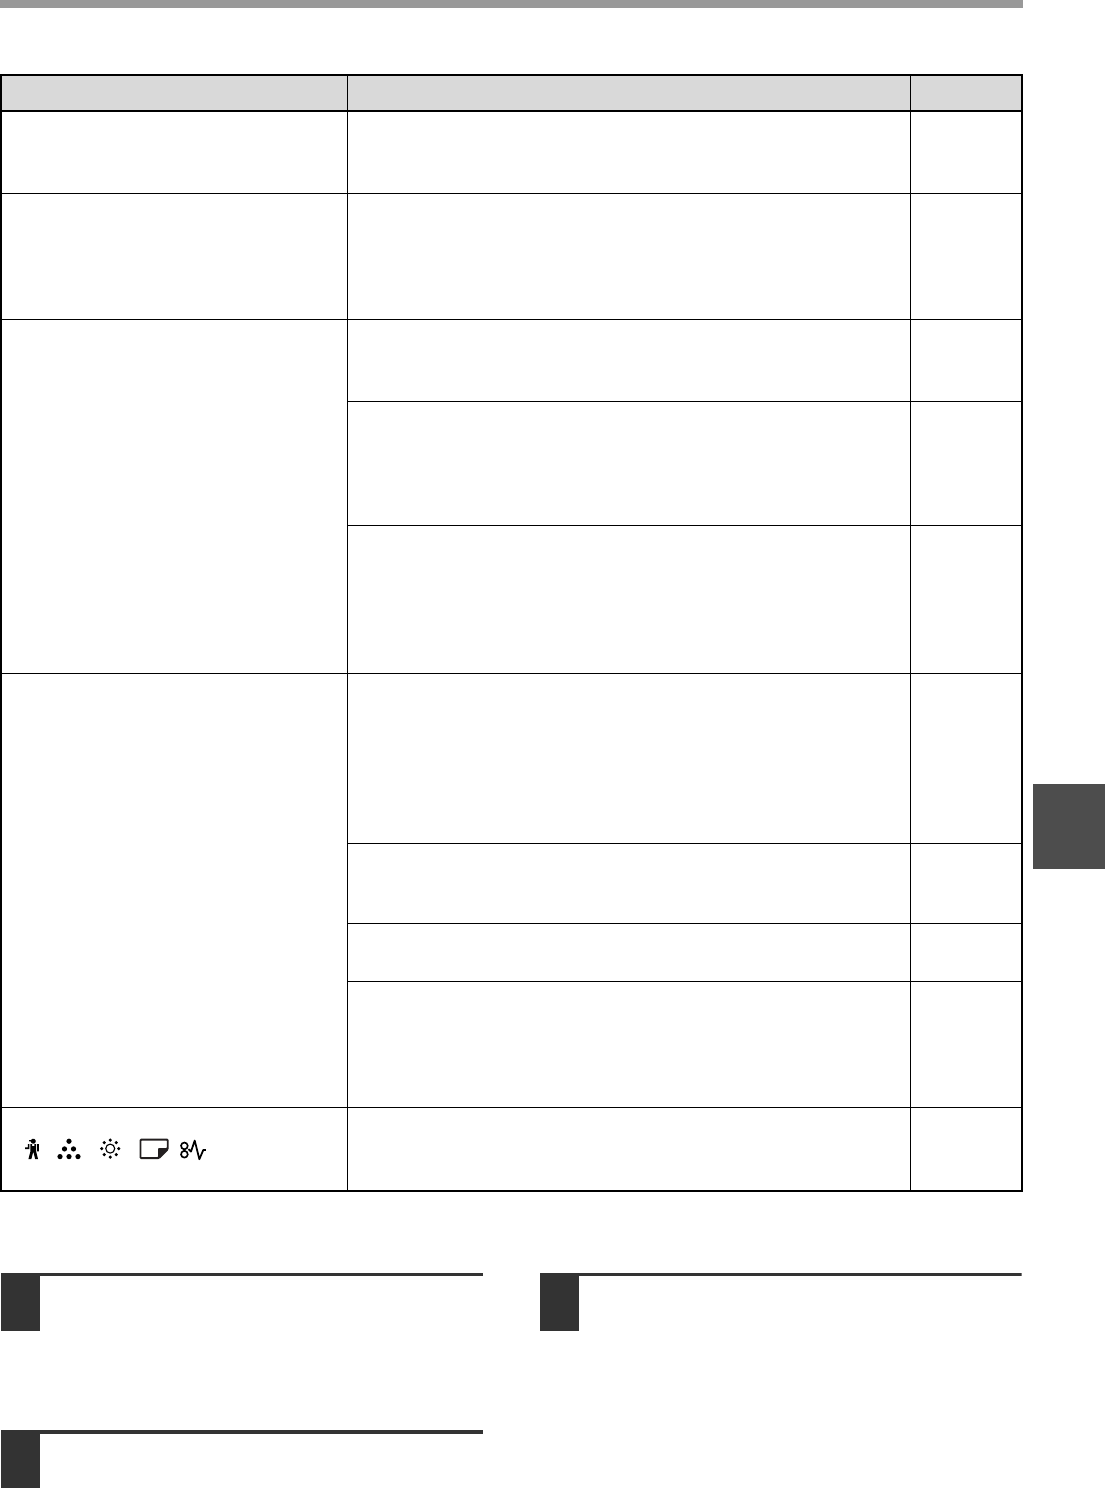
45
TROUBLESHOOTING
5
Removing the software
If you need to remove the software, follow these steps.
1
Click the «start» button, and then click
«Control Panel».
On Windows 95/98/Me/NT 4.0/2000, click the
«Start» button, select «Settings», and then click
«Control Panel».
2Click «Add or Remove Programs».
On Windows 95/98/Me/NT 4.0/2000, double-click
the «Add/Remove Programs» icon.
3Select «SHARP AR-5316/5320 Series
Printer Driver» from the list, and
remove the software.
For more information, refer to your operating
manual or to the help files for your operating
system.
Printing is slow.
Simultaneous use of two or more application software
programs.
→
Start printing after quitting all unused application software programs.
–
The printed image is light and
uneven.
The paper is loaded so that printing takes place on the
back side of the paper.
→Some paper types have a front and back side. If the paper is
loaded so that printing takes place on the back side, toner will not
adhere well to the paper and a good image will not be obtained.
14
The printed image is dirty.
You are using paper that is outside the specified size and
weight range.
→Use copy paper within the specified range.
13
Paper curled or damp.
→Do not use curled or crimped paper. Replace with dry copy paper.
During periods when the machine is not used for a long time,
remove the paper from the tray and store it in a dark place in a
bag to prevent moisture absorption.
–
You did not set sufficient margins in the paper settings of
your application.
→The top and bottom of the paper may be dirty if the margins are
set outside of the specified print quality area.
→Set the margins in the software application within the specified
print quality area.
–
The printed image is skewed or it
runs off the paper.
The paper loaded in the tray is not the same size as that
specified in the printer driver.
→Check if the «Paper Size» options suit the size of the paper loaded
in the tray.
→If the «Fit To Page» setting is activated, make sure that the paper
size selected from the drop-down list of the «Fit To Paper Size»
option is the same as the size of the loaded paper.
–
The orientation of document setting is not correct.
→Click the «Paper» tab in the printer driver setup screen, and verify
if the «Image Orientation» option is set to your requirements.
–
Paper is not loaded properly.
→Make sure the paper is properly loaded. 14
You did not correctly specify the margins for the
application in use.
→Check the layout of the document margins and the paper size
settings for the application you are using. Also check if the print
settings are specified correctly to suit the paper size.
–
Any one of the alarm indicators
(,, , ,) is lit or
blinking.
See «INDICATORS AND DISPLAY MESSAGES» to check
the meaning of the alarm indicator and error message in
the display, and take appropriate action.
46
Problem Cause and solution Page
AR-5316-5320-EX.book 45 ページ 2003年11月26日 水曜日 午後5時3分
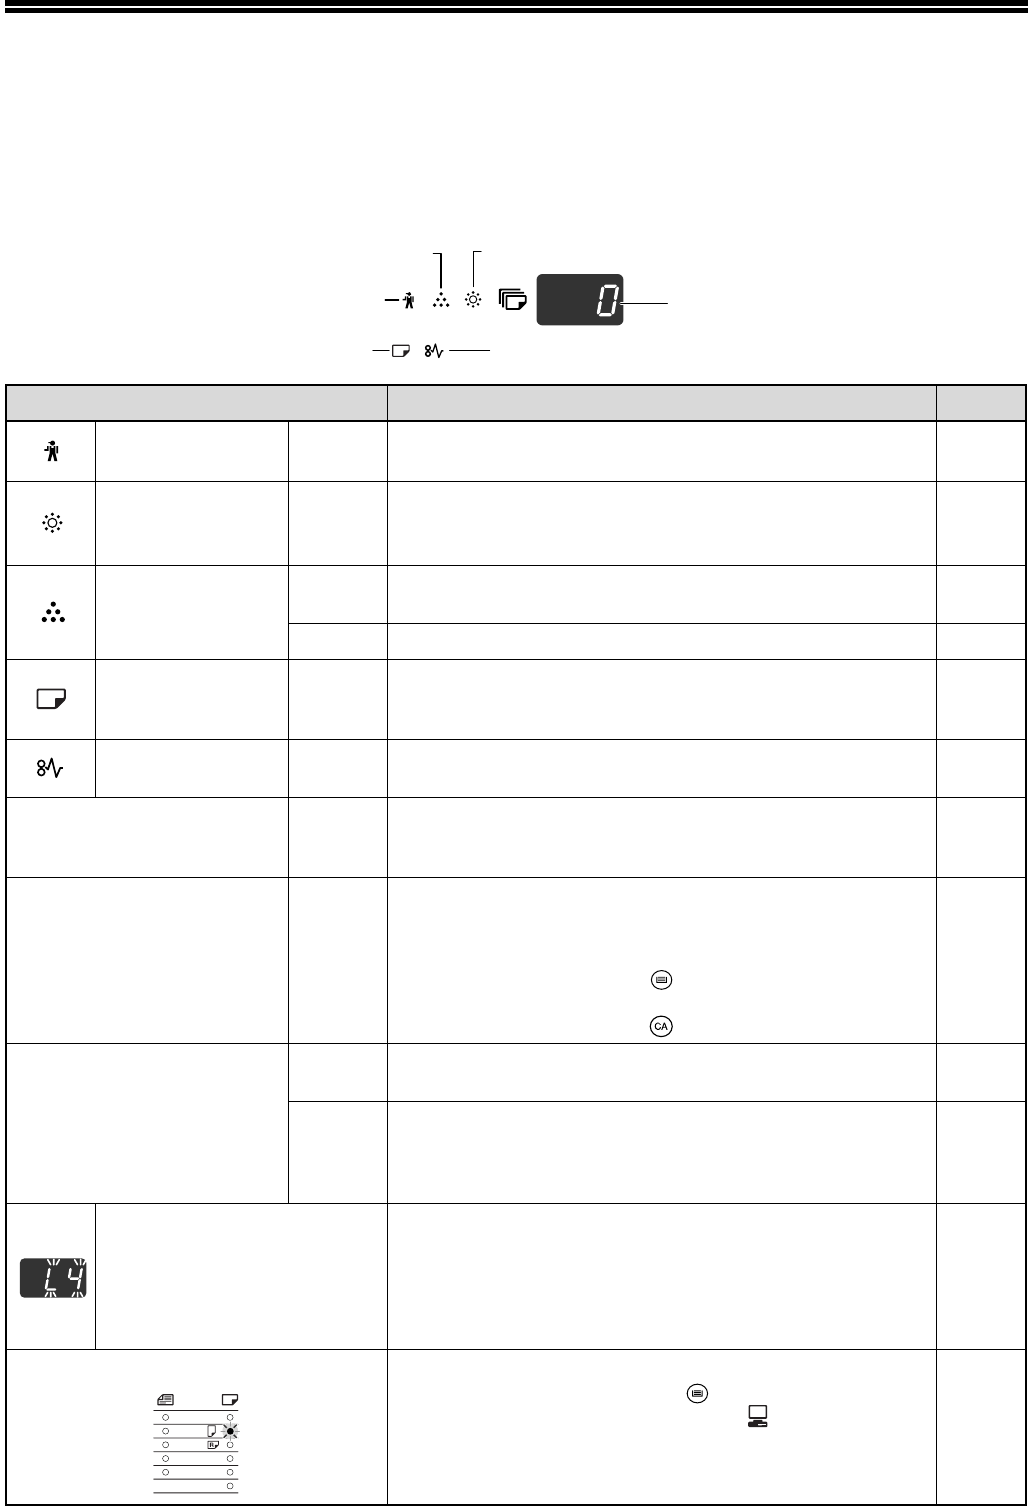
46
INDICATORS AND DISPLAY
MESSAGES
If one of the following indicators lights up or one of the following messages appears in the display, check the
meaning of the indicator or message in the following table and take appropriate action.
Indication Cause and solution Page
Maintenance
indicator
Steadily
lit
Service by an authorised SHARP service technician is
required. –
Developer
replacement
required indicator
Steadily
lit
Developer is required. Contact your authorised service
representative. –
Toner cartridge
replacement
required indicator
Steadily
lit
Replacement of toner cartridge will be needed soon.
Prepare a new cartridge. –
Blinking
Toner cartridge must be replaced. Replace it with a new one.
54
Paper required
indicator
Steadily
lit
The tray is out of paper. Load paper. It is also possible that
the tray is not inserted completely into the machine. Make
sure it is inserted correctly.
14
Misfeed indicator Blinking A paper misfeed has occurred. Remove the misfeed as
explained in «MISFEED REMOVAL«. 47
ORIGINAL SIZE indicator Blinking
The original is not placed in the correct orientation. Rotate
the original so that it is in the same orientation as the
blinking ORIGINAL SIZE indicator.
18,19
PAPER SIZE indicator Blinking
A blinking PAPER SIZE indicator means that the size of paper
loaded in the tray is different from the paper size setting for the
tray. Change the paper size setting.
To clear the display, do one of the following:
•Use the [TRAY SELECT] key ( ) to change the tray selection.
•Open and close the tray.
•Press the [CLEAR ALL] key ( ).
16
[CH] appears in display
Steadily
lit
The front cover or the side cover is open. Close the front
cover or the side cover. –
Blinking
The toner cartridge is not installed correctly. Reinstall the
toner cartridge. If [CH] still blinks in the display after
reinstalling the toner cartridge, contact your authorised
service representative.
54
Letters and numbers appear
in the display
Turn off the power switch, wait about 10 seconds, and then
turn on the switch again. If this does not clear the message,
write down the code that appears and then unplug the
power cord and contact your authorised. Tell service
representative what code appeared and the circumstances
under which it appeared.
–
When «Use close paper size» is disabled
Press the [TRAY SELECT] key ( ) to manually select the
tray and then press the [ON LINE] key ( ). Printing will
begin. If you are selecting the bypass tray, load paper in the
bypass tray.
Online
manual
Misfeed indicator
Paper required indicator
Maintenance indicator
Toner cartridge replacement
required indicator
Developer replacement required indicator
Display
A3
A4
A4
A5
B4
EXTRA
AR-5316-5320-EX.book 46 ページ 2003年11月26日 水曜日 午後5時3分
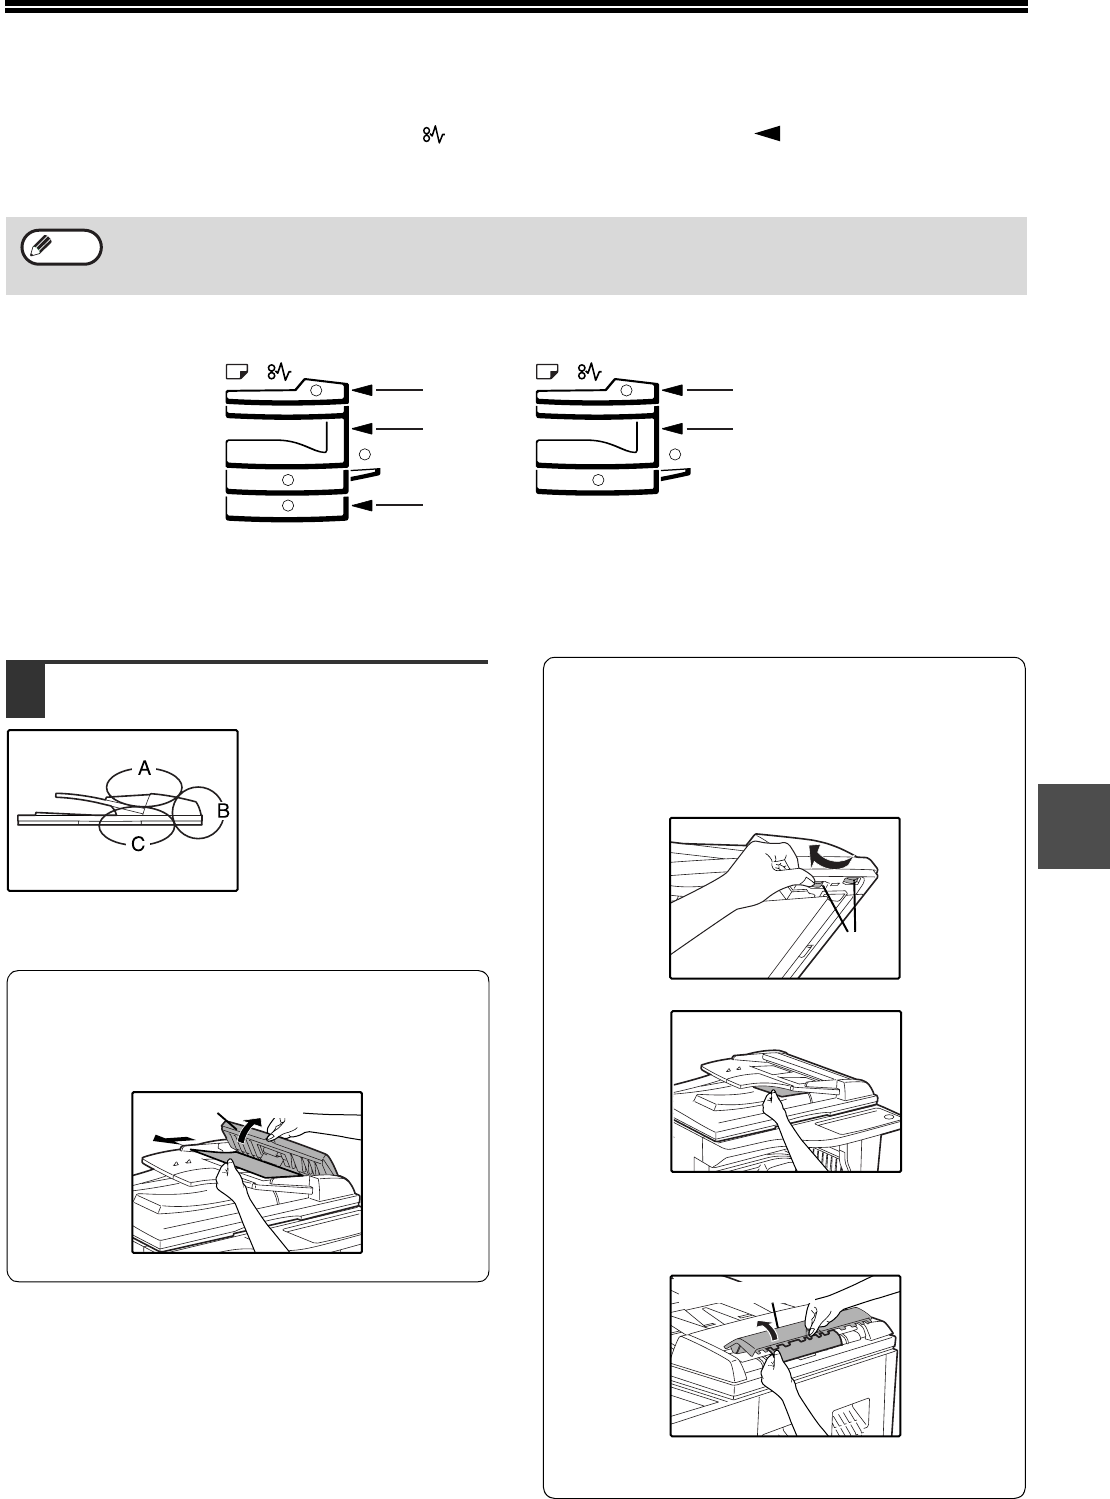
47
5
MISFEED REMOVAL
When a misfeed occurs, the misfeed indicator ( ) and a misfeed location indicator ( ) will blink and the machine
will automatically stop.
Check the blinking misfeed location indicator to identify the location of the misfeed and remove it.
MISFEED IN THE SPF
1Remove the misfed original.
Check sections A, B, and
C in the left shows the
illustration (see the next
page), and remove the
misfed original.
Section A
Open the feeding roller cover and remove the
misfed original from the document feeder tray.
Close the feeding roller cover.
Section B
Open the SPF and rotate the two release rollers
in the direction of the arrow to feed the original
out. Close the SPF and then remove the
original.
If a small original (A5 (5-1/2″ x 8-1/2″), etc.) is
misfed, open the right side cover and remove
the original. Close the right side cover.
The paper may tear when you remove a misfeed. In this event, be sure to remove all torn pieces of paper from the
machine, taking care not to touch the photoconductive drum (the green part). Any scratches or damage to the
surface of the drum will cause dirty copies.
Note
(p.47)
(p.48)
(p.52)
AR-5320/AR-5320 X
(p.47)
(p.48)
AR-5316/AR-5316 X
AR-5316-5320-EX.book 47 ページ 2003年11月26日 水曜日 午後5時3分
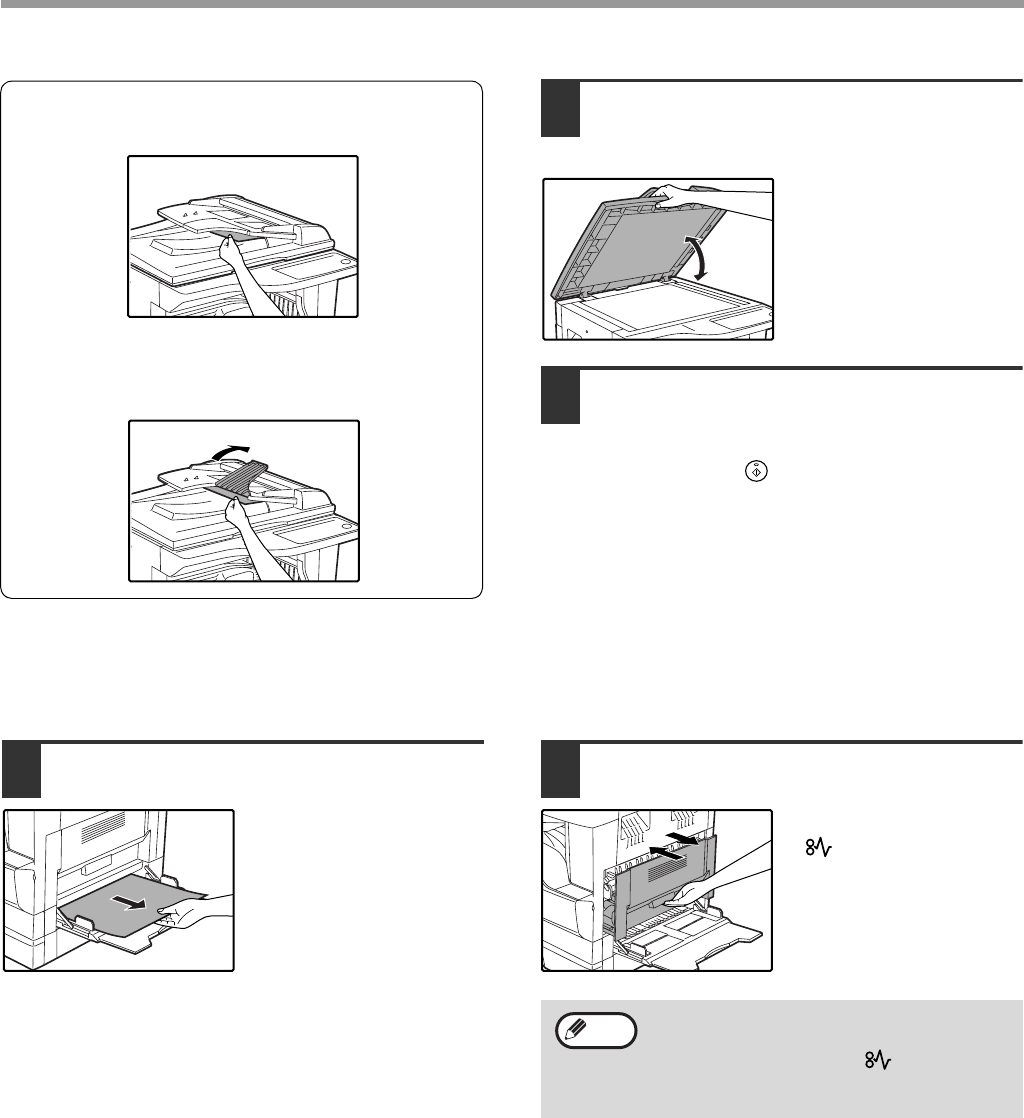
48
TROUBLESHOOTING
Section C
Remove the misfed original from the exit area.
If the misfed original cannot be easily removed
from the exit area, open the moveable part of the
document feeder tray and remove the original.
2Open and close the SPF to make the
misfeed location indicator stop
blinking.
You can also make the
misfeed indicator stop
blinking by opening and
closing the feeding roller
cover or the right side
cover.
3Return the originals indicated by the
minus number in the display to the
document feeder tray and press the
[START] key ( ).
Copying will resume from the originals that still
remained when the misfeed occurred.
MISFEED IN THE BYPASS TRAY
1Gently pull the misfed paper out. 2Open and close the side cover.
The misfeed indicator
( ) will go out.
•When closing the side cover, press down
on the handle.
•If the misfeed indicator ( ) does not stop
blinking, check for torn pieces of paper in
the machine.
Note
AR-5316-5320-EX.book 48 ページ 2003年11月26日 水曜日 午後5時3分
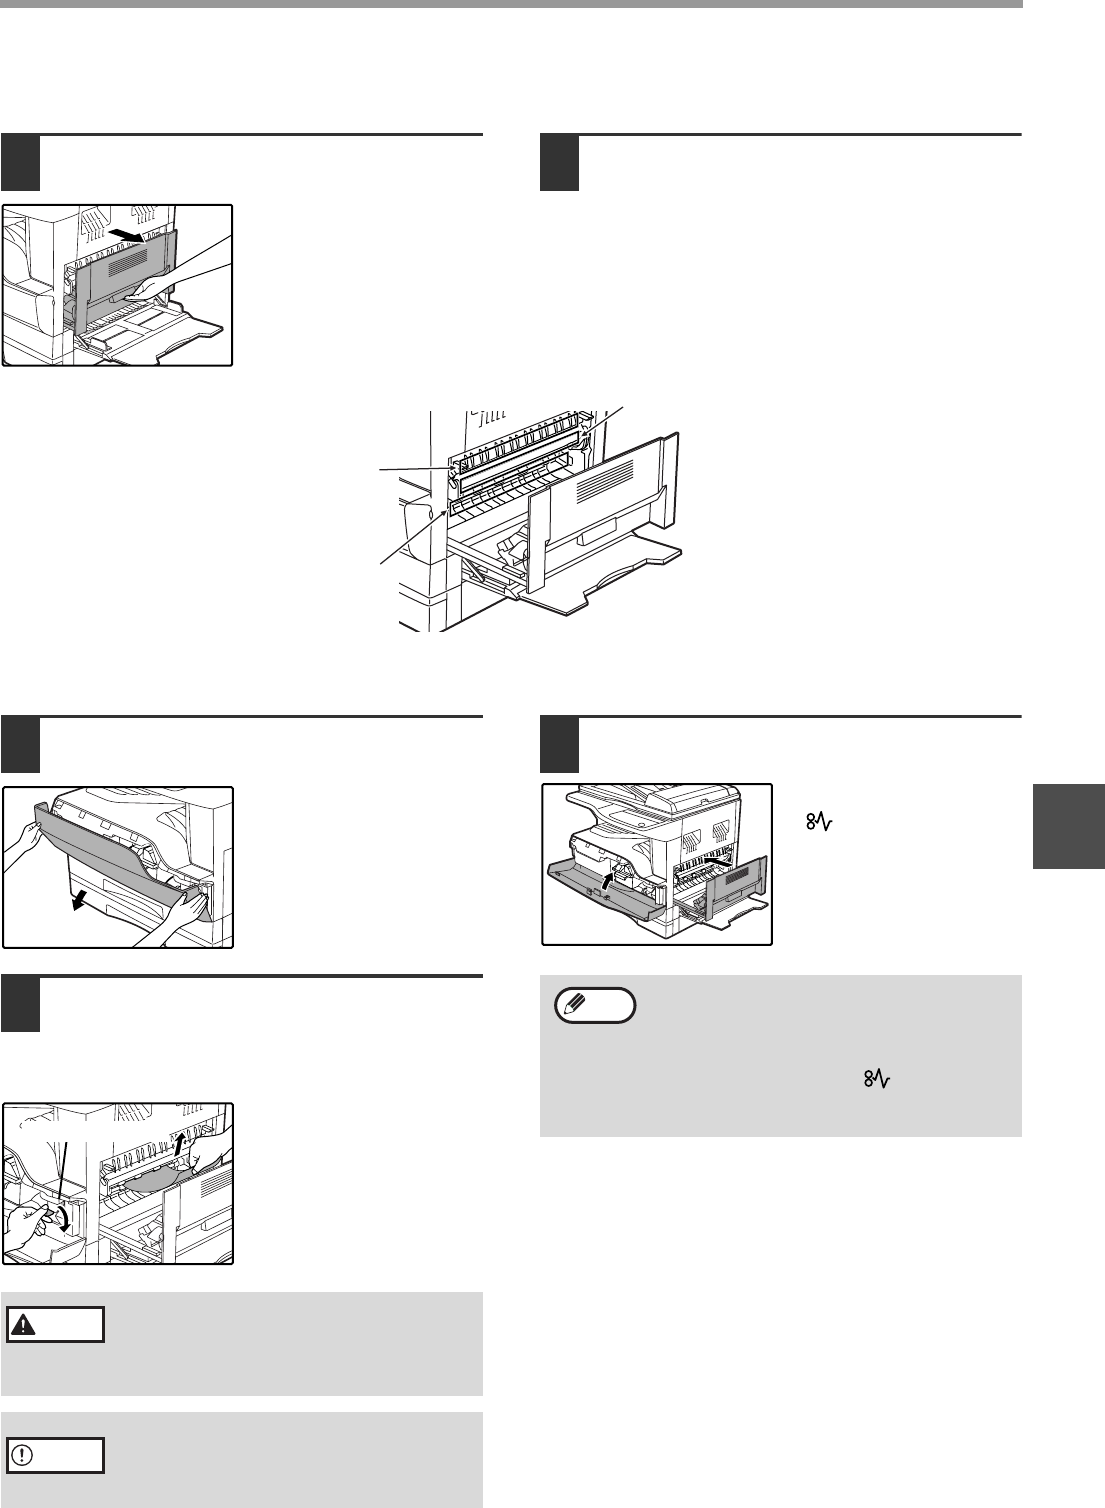
49
TROUBLESHOOTING
5
MISFEED IN THE MACHINE
1Open the bypass tray and the side
cover. 2Check the misfeed location. Remove
the misfed paper following the
instructions for each location in the
illustration below.
A. Misfeed in the paper feed area
1Push gently on both ends of the front
cover.
2Carefully remove the misfed paper.
Turn the roller rotating knob in the
direction of the arrow to assist in
removing it.
Be careful not to tear the
misfed paper during
removal.
3Close the front cover and side cover.
The misfeed indicator
( ) will go out.
If paper is misfed here, go to «B.
Misfeed in the fusing area».
If paper is misfed here, go to «A.
Misfeed in the paper feed area».
If the misfed paper is visible
here, go to «C. Misfeed in the
transport area«.
The fusing unit is hot. Do not touch
the fusing unit when removing misfed
paper. Doing so may cause a burn or
injury.
Do not touch the photoconductive drum
(green portion) when removing the misfed
paper. Doing so may damage the drum and
cause smudges on copies.
Warning
Caution
•When closing the front cover, gently hold
both ends.
•When closing the side cover, press on the
handle.
•If the misfeed indicator ( ) does not stop
blinking, check for torn pieces of paper in
the machine.
Note
AR-5316-5320-EX.book 49 ページ 2003年11月26日 水曜日 午後5時3分
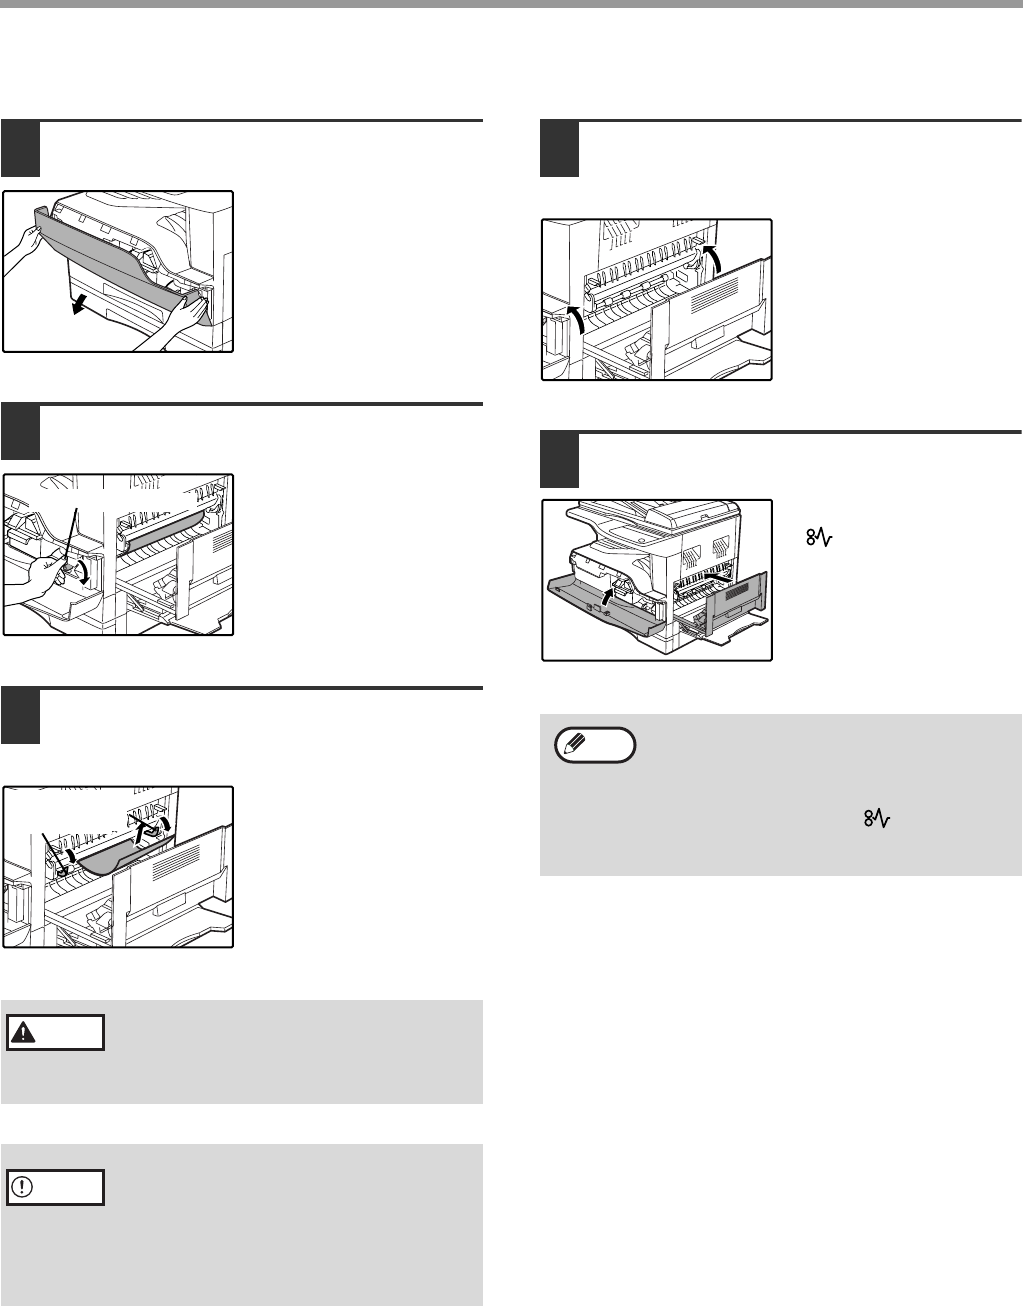
50
TROUBLESHOOTING
B. Misfeed in the fusing area
1Push gently on both ends of the front
cover.
2Turn the roller rotating knob in the
direction of the arrow.
3Carefully remove the misfed paper.
Lower the fusing unit release levers to
allow easier removal.
Be careful not to tear the
misfed paper during
removal.
4Lift the fusing unit release levers, to
return them to their operating
positions.
5Close the front cover and side cover.
The misfeed indicator
( ) will go out.
The fusing unit is hot. Do not touch
the fusing unit when removing misfed
paper. Doing so may cause a burn or
injury.
•Do not touch the photoconductive drum
(green portion) when removing the misfed
paper. Doing so may damage the drum and
cause smudges on copies.
•Be careful about unfixed toner on the
misfed paper not to soil your hands or
clothes.
Fusing unit
release lever
Warning
Caution
•When closing the front cover, gently hold
both ends.
•When closing the side cover, press on the
handle.
•If the misfeed indicator ( ) does not stop
blinking, check for torn pieces of paper in
the machine.
AR-5316-5320-EX.book 50 ページ 2003年11月26日 水曜日 午後5時3分
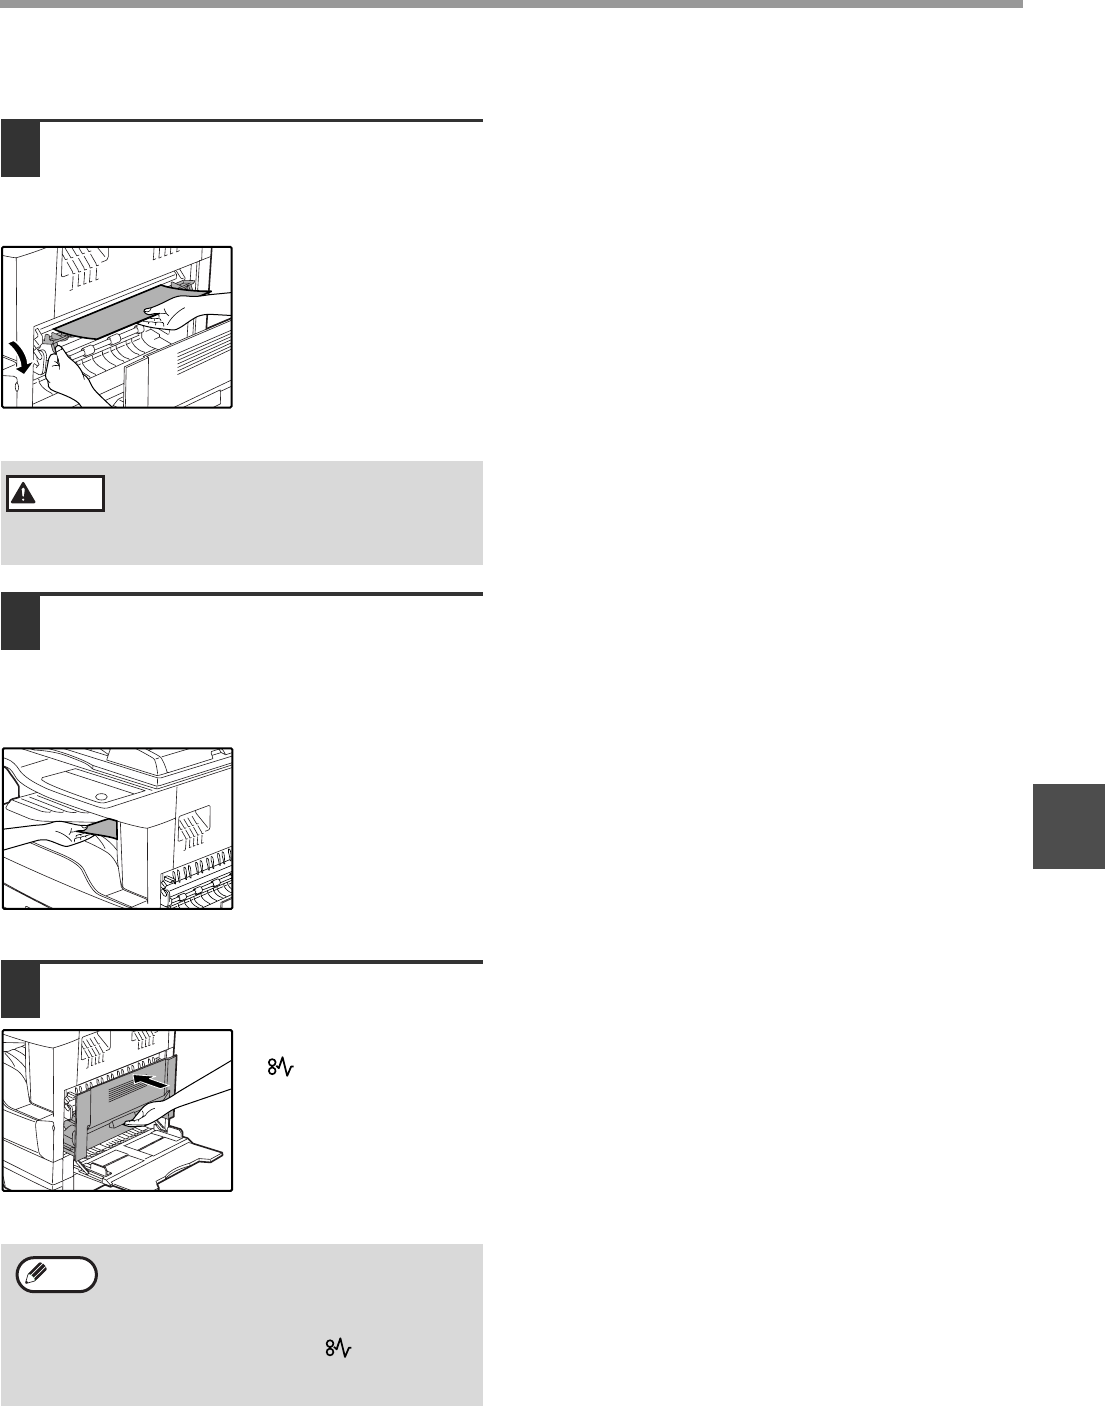
51
TROUBLESHOOTING
5
C. Misfeed in the transport area
1Open the fusing paper guide by
pressing down the projection on
either side of the guide and remove
the misfed paper.
Be careful not to tear the
misfed paper during
removal.
2If the misfed paper cannot be removed
by the previous step but is visible in
the paper output area, remove the
paper by pulling it into the paper
output area.
Be careful not to tear the
misfed paper during
removal.
3Close the side cover.
The misfeed indicator
( ) will go out.
The fusing unit is hot. Do not touch
the fusing unit when removing misfed
paper. Doing so may cause a burn or
injury.
•When closing the side cover, press on the
handle.
•If the paper was torn, make sure that no
torn pieces remain in the machine.
•If the misfeed indicator ( ) does not stop
blinking, check for torn pieces of paper in
the machine.
Warning
Note
AR-5316-5320-EX.book 51 ページ 2003年11月26日 水曜日 午後5時3分
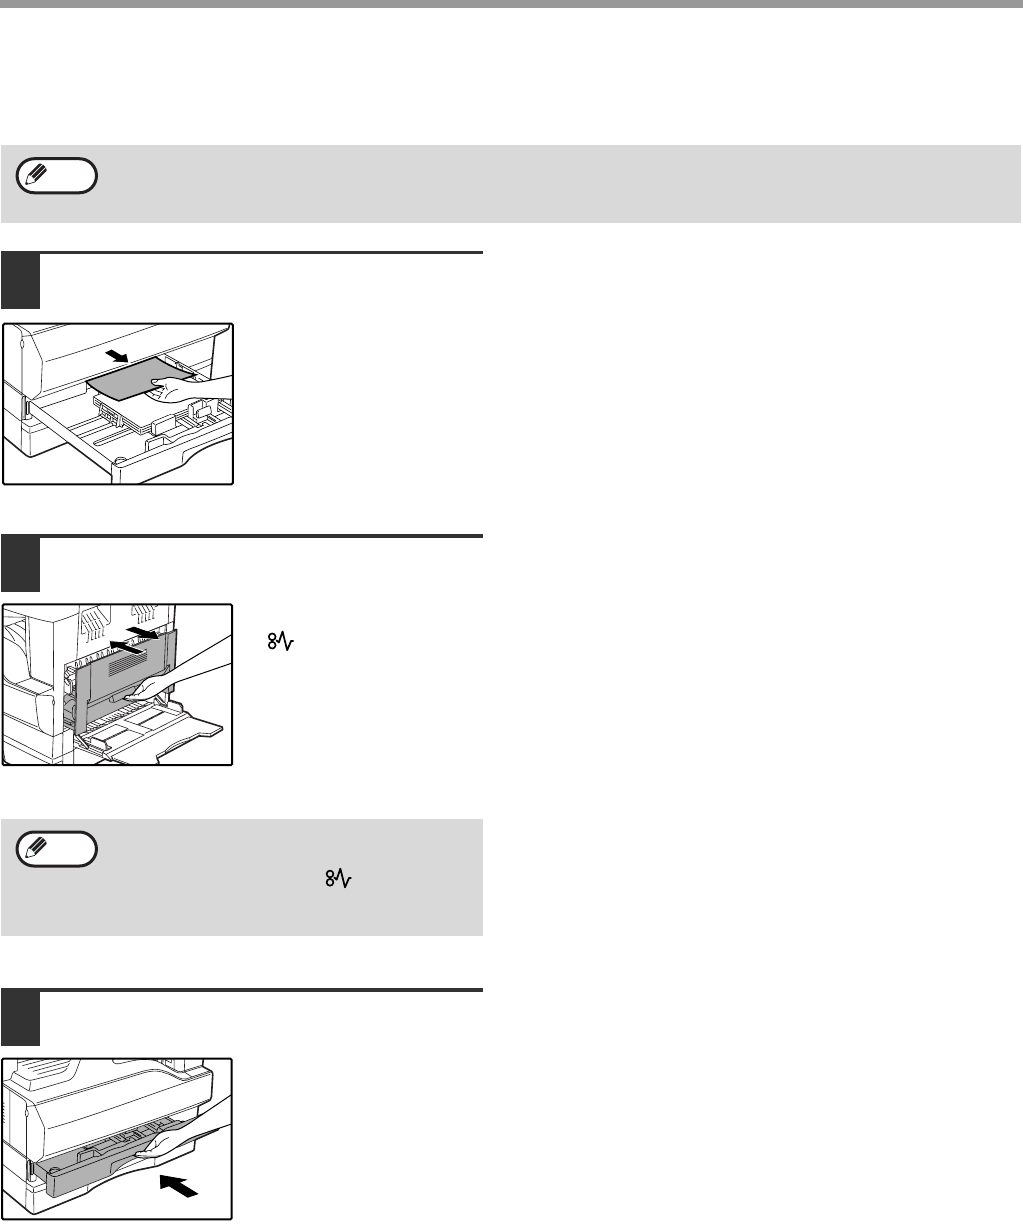
52
TROUBLESHOOTING
MISFEED IN THE UPPER PAPER TRAY
1Lift and pull out the upper paper tray
and remove the misfed paper.
Be careful not to tear the
misfed paper during
removal.
2Open and close the side cover.
The misfeed indicator
( ) will go out.
3Close the upper paper tray.
Push the upper paper
tray in completely.
Make sure that there is no misfed paper in the tray before pulling it out. (p.49)
Note
•When closing the side cover, press on the
handle.
•If the misfeed indicator ( ) does not stop
blinking, check for torn pieces of paper in
the machine.
Note
AR-5316-5320-EX.book 52 ページ 2003年11月26日 水曜日 午後5時3分
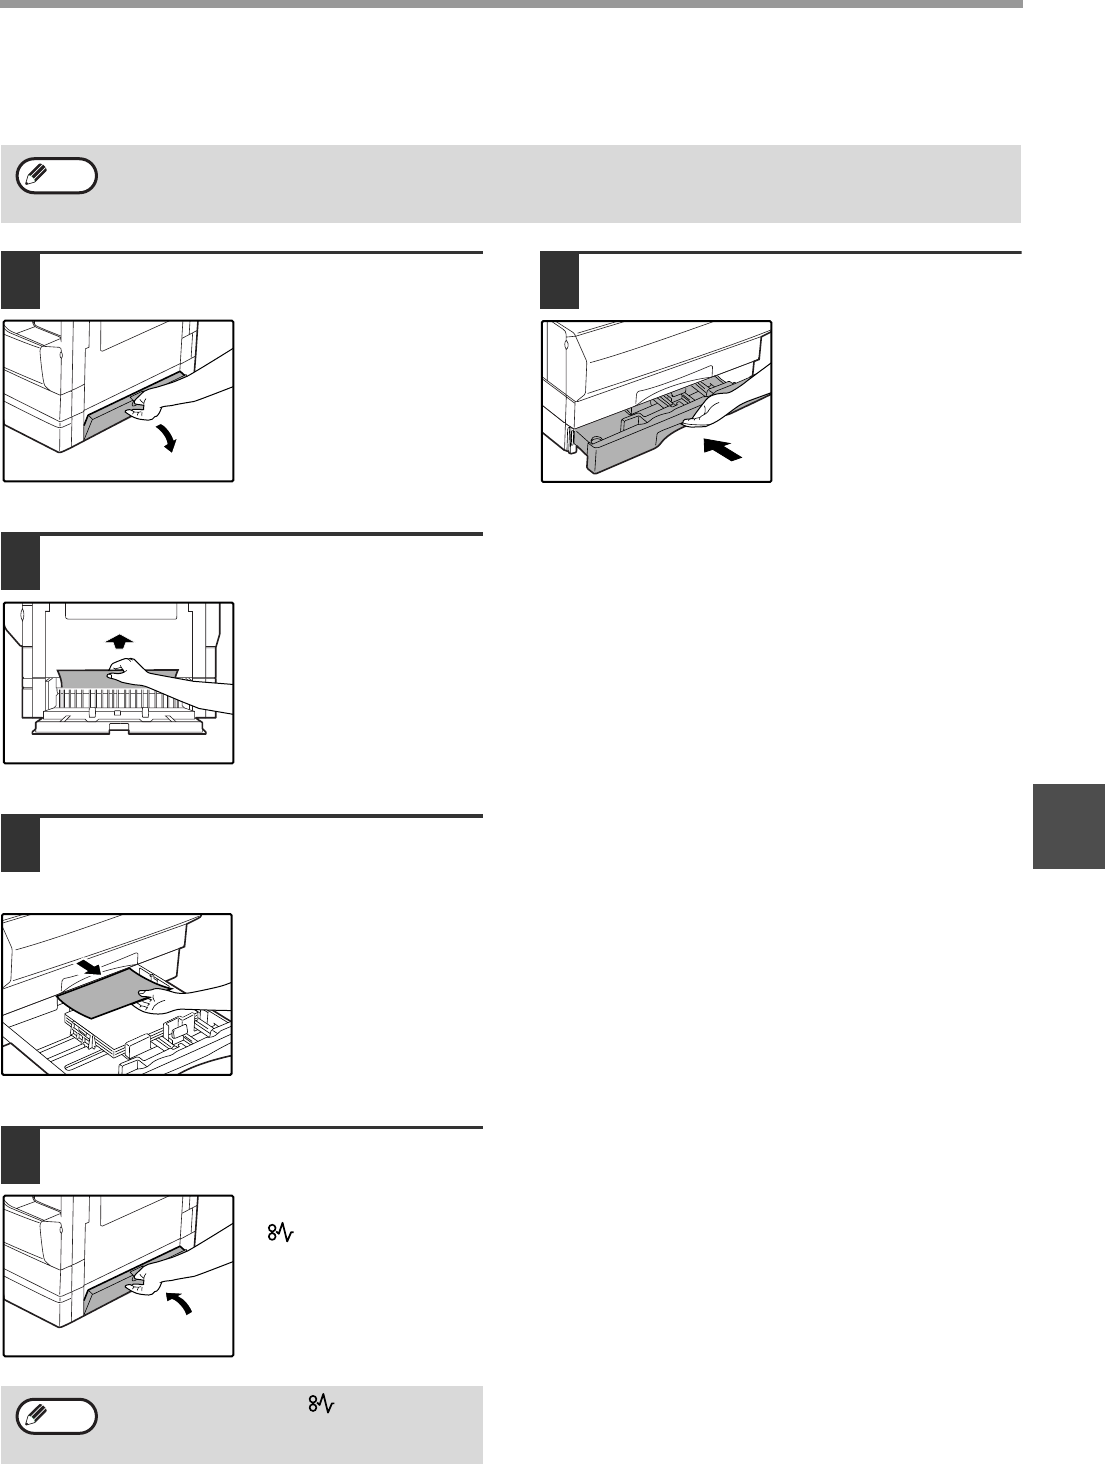
53
TROUBLESHOOTING
5
MISFEED IN THE LOWER PAPER TRAY
(Two-tray model only)
1Open the lower side cover.
Grasp the handle to open
the lower side cover.
2Remove the misfed paper.
Be careful not to tear the
misfed paper during
removal.
3If the misfed paper is not seen in step
2, lift and pull out the lower paper tray
and remove the misfed paper.
Be careful not to tear the
misfed paper during
removal.
4Close the lower side cover.
The misfeed indicator
( ) will go out.
5Close the lower paper tray.
Make sure that there is no misfed paper in the tray before pulling it out. (p.49)
Note
If the misfeed indicator ( ) does not stop
blinking, check for torn pieces of paper in the
machine.
Note
AR-5316-5320-EX.book 53 ページ 2003年11月26日 水曜日 午後5時3分
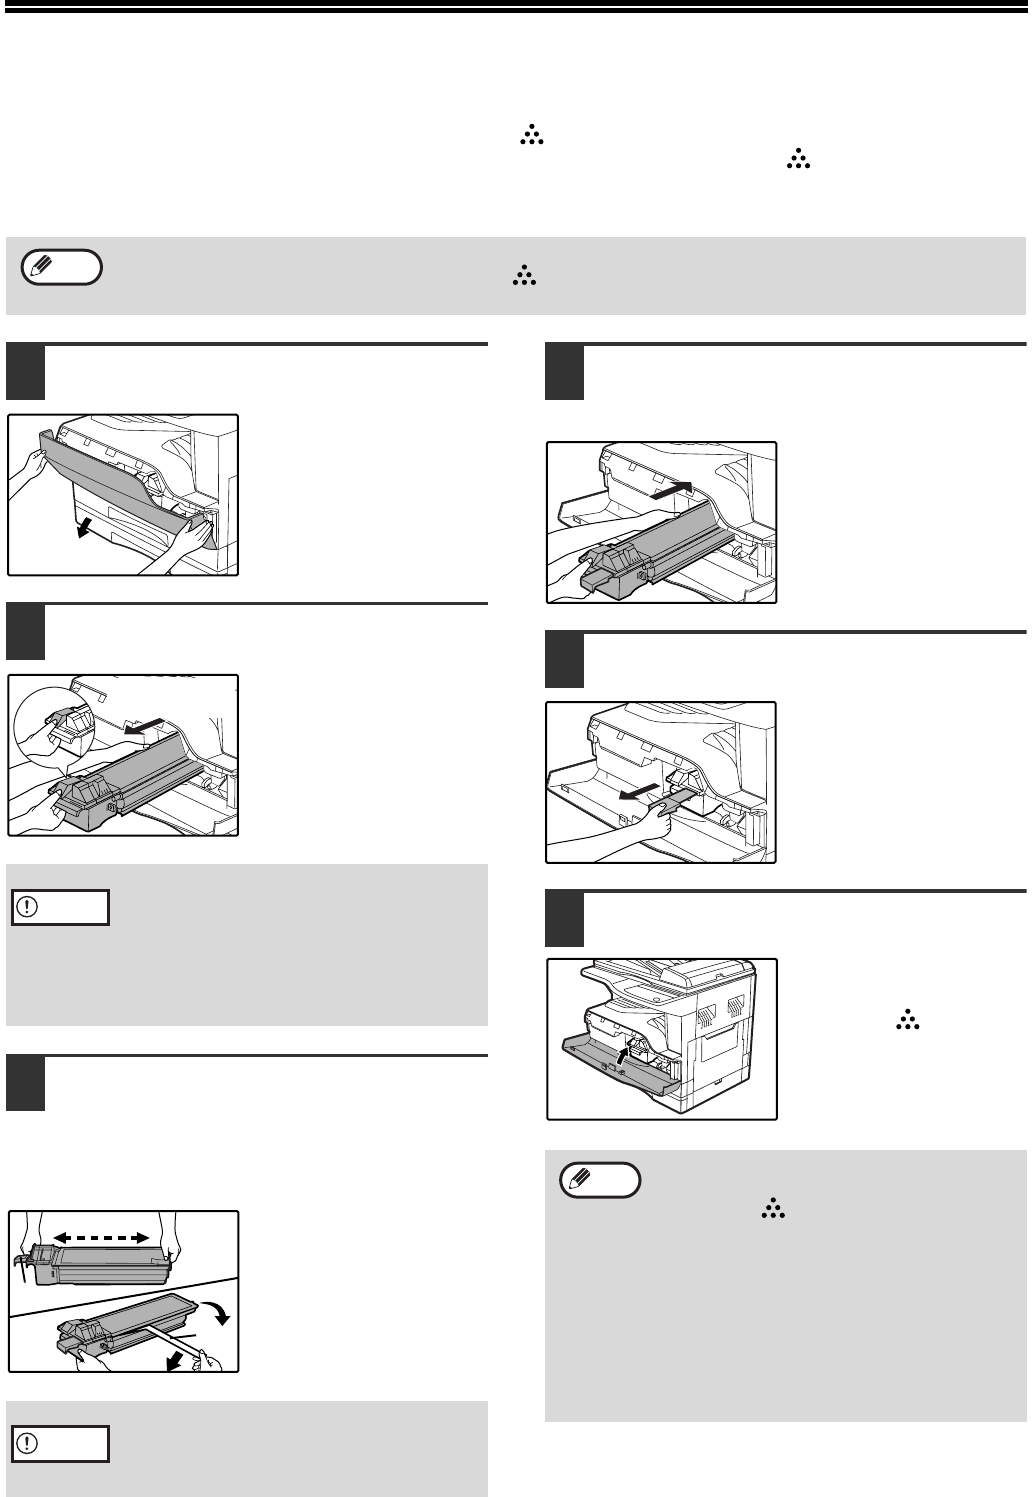
54
REPLACING THE TONER CARTRIDGE
When the toner cartridge replacement required indicator ( ) lights up, the toner cartridge will need replacement
soon. Obtain a new cartridge. When the toner cartridge replacement required indicator ( ) blinks, the toner
cartridge must be replaced before copying can be resumed.
Replace the toner cartridge by following the procedure below.
1Push on both ends of the front cover
and open it.
2Pull the toner cartridge out while
pressing the lock release lever.
When pulling out the
toner cartridge, place
your other hand on the
green part of the
cartridge.
3Remove the new toner cartridge from
the bag. Grasp the cartridge on both
sides and shake it horizontally four or
five times. After shaking the cartridge,
remove the tape.
4Insert the toner cartridge along the
guides until it locks in place while
pushing the lock release lever.
If there is any dirt or dust
on the toner cartridge,
remove it before
installing the cartridge.
5Remove the tape from the shutter. Pull
the shutter out of the toner cartridge.
Discard the shutter.
6Close the front cover.
The toner cartridge
replacement required
indicator ( ) will go
out.
When the toner cartridge replacement indicator ( ) lights up, little toner remains and thus copies may be faint.
Note
After removing the toner cartridge, do not
shake it or tap on it. Doing so may cause
toner to leak from the cartridge. Put the old
cartridge immediately in the bag contained in
the box of the new cartridge. Dispose of the
old toner cartridge in accordance with local
regulations.
•Grasp the grip when holding the cartridge.
Do not hold the cartridge by the shutter.
•Be sure to shake the cartridge only before
the tape is removed.
Toner cartridge
lock release lever
Caution
Caution
•Even after a new toner cartridge is installed,
the toner cartridge replacement required
indicator ( ) may still light up, indicating
that copying cannot be resumed (toner is
not fed sufficiently). In this case, open and
close the front cover. The machine will feed
toner again for about two minutes and then
copying can be resumed.
•Before closing the front cover, make sure
that the toner cartridge is correctly installed.
•When closing the front cover, gently hold
both ends.
Note
AR-5316-5320-EX.book 54 ページ 2003年11月26日 水曜日 午後5時3分
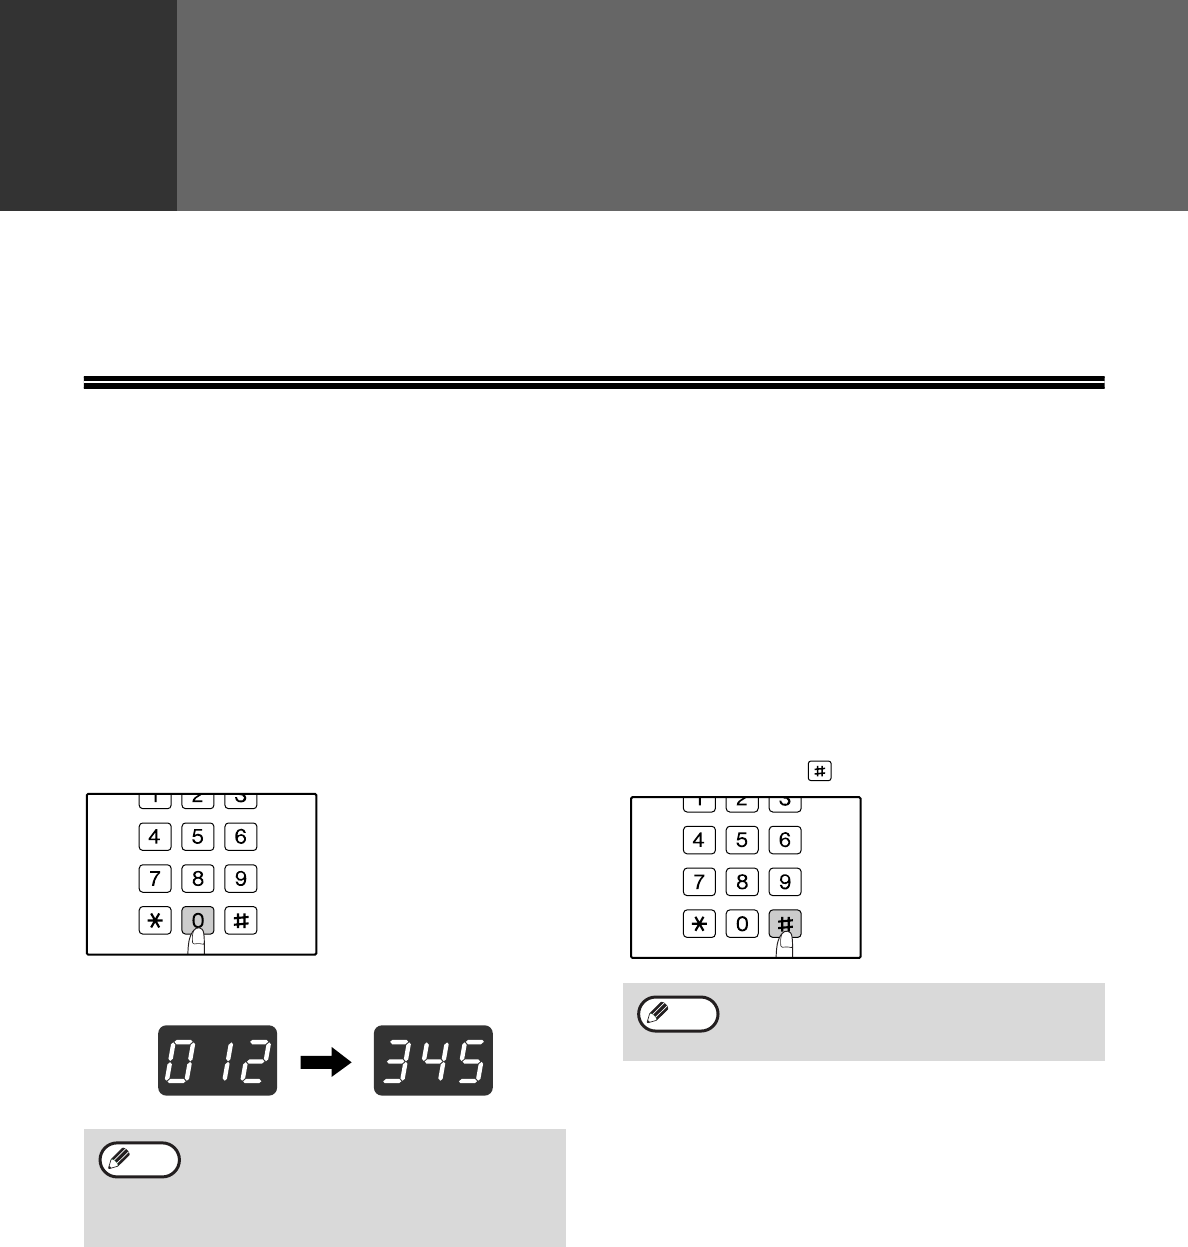
55
6Chapter 6
ROUTINE MAINTENANCE
This chapter explains how to keep the machine operating smoothly, including viewing copy count, the toner level
indicator, and cleaning the machine.
CHECKING THE TOTAL OUTPUT
COUNT AND TONER LEVEL
CHECKING THE TOTAL OUTPUT COUNT
From the «0″ display, you can check the total output count, total copy count, as explained below.
The total output count is all pages (for both printing and copying) printed by the machine and the total output count
can be counted up to 999,999.
[Total output count]
Hold down the [0] key.
The total output count
appears sequentially in
two parts while you hold
down the [0] key.
Example: Total number of pages output is 12,345.
[Total copy count]
Hold down the [ ] key.
The count display and
counting method are the
same as for the total
output count.
•Each A3 (11″ x 17″) size page is counted as
two pages.
•During a copy run, pressing the [0] key
shows the number of completed copy
pages, not the total output count.
Note
The total number of pages printed in printer
mode can be calculated by subtracting the
total copy count from the total output count.
Note
AR-5316-5320-EX.book 55 ページ 2003年11月26日 水曜日 午後5時3分
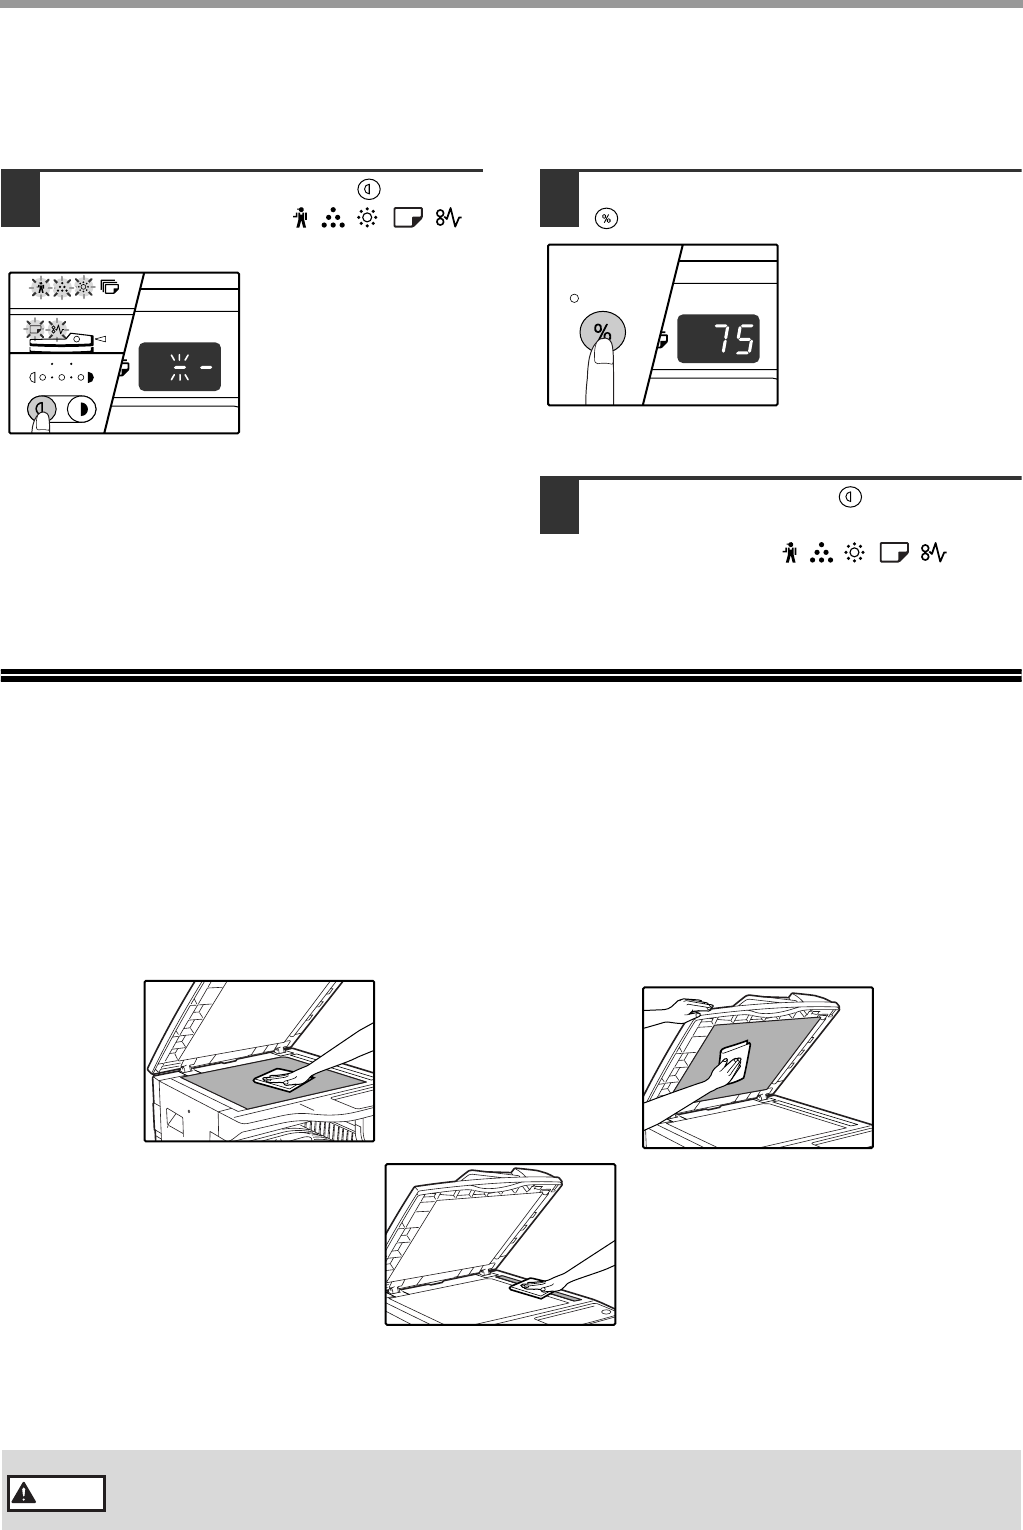
56
ROUTINE MAINTENANCE
CHECKING THE TONER LEVEL
The toner level is indicated by a 6-level display. Use it as a guideline for replacing the toner cartridge.
1Hold down the [Light] key ( ) until
the alarm indicators ( , , , , )
blink.
The display will show
«- -«.
2
Hold down the [Copy ratio display] key
( ) for more than 5 seconds.
The approximate quantity
of toner remaining will be
indicated in the display
as a percentage. («100»,
«75», «50», «25″, «10″ is
displayed.) When the
percentage is less than
10%, «LO» will be
displayed.
3Press the [Light] key ( ) to return to
the normal display.
The alarm indicators ( , , , , ) go off.
The display returns to the number of copies
display.
ROUTINE MAINTENANCE
CLEANING THE DOCUMENT GLASS AND SPF/
DOCUMENT COVER
If the document glass, SPF, underside of the document cover, or the scanner for originals coming from the SPF (the
long narrow glass surface on the right side of the document glass) become dirty, the dirt may appear on copies.
Always keep these parts clean.
Stains or dirt on the document glass/SPF will also be copied. Wipe the document glass, document cover portion of
the SPF and the scanning window on the document glass with a soft, clean cloth.
If necessary, dampen the cloth with water. Do not use thinner, benzene, or similar volatile cleaning agents.
Do not spray flammable cleaner gas. Gas from the spray may come in contact with the internal
electrical components or high-temperature parts of the fusing unit, creating a risk of fire or
electrical shock.
Warning
AR-5316-5320-EX.book 56 ページ 2003年11月26日 水曜日 午後5時3分
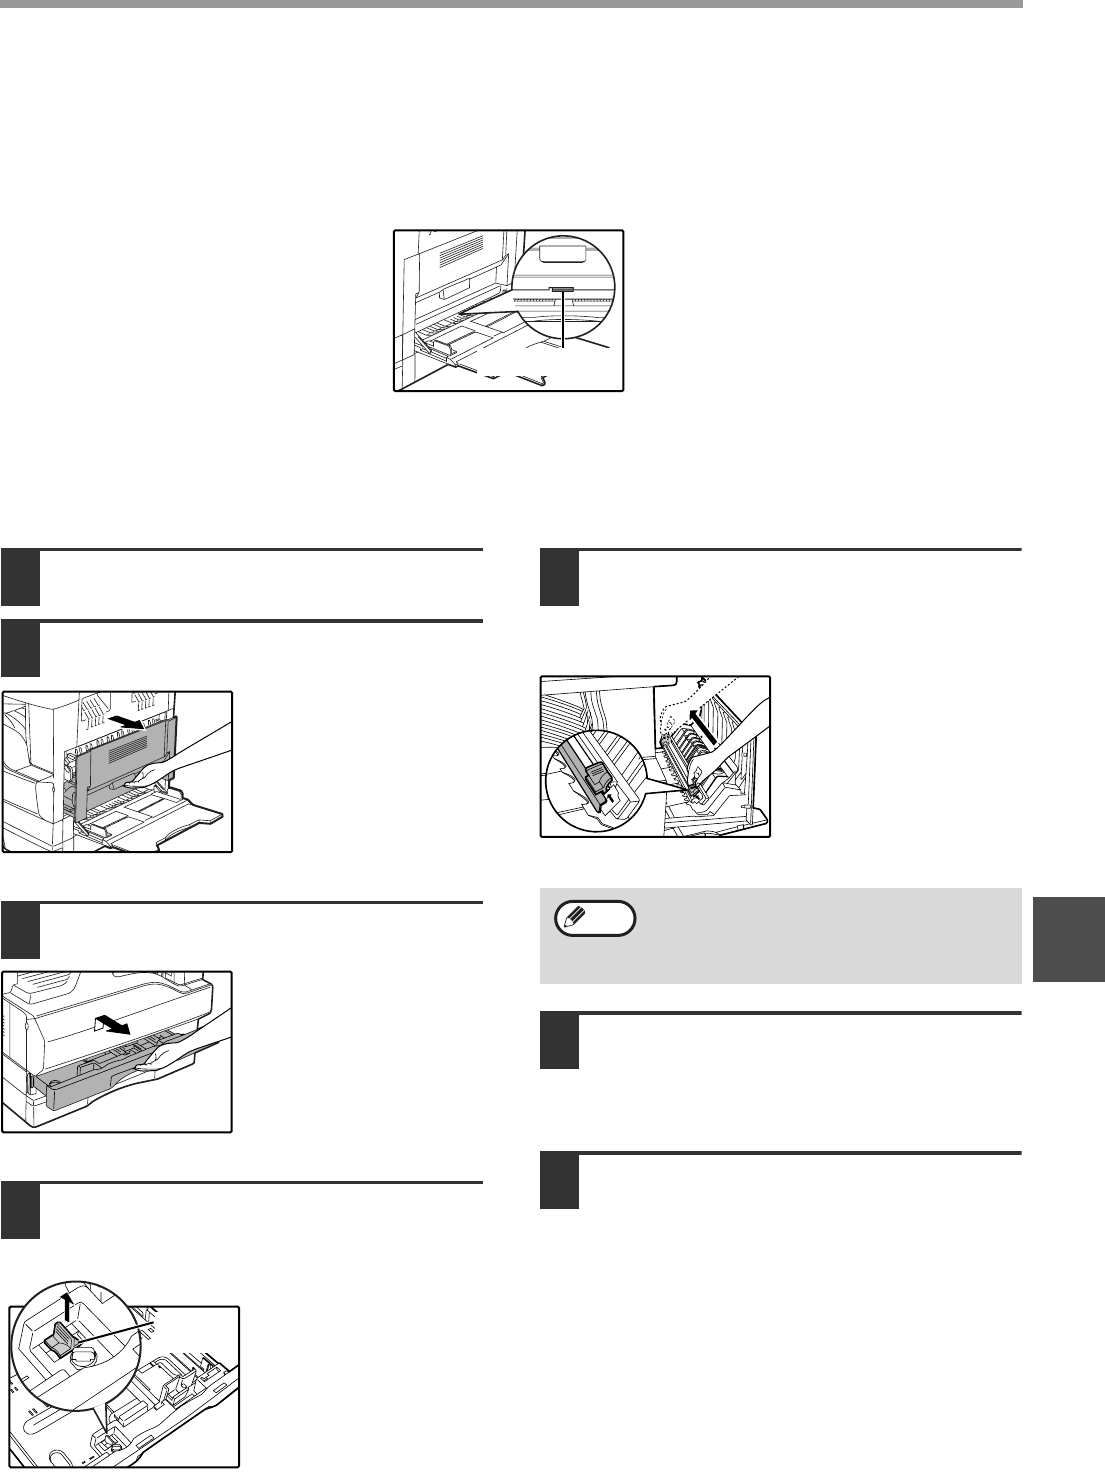
57
ROUTINE MAINTENANCE
6
CLEANING THE BYPASS TRAY PAPER FEED
ROLLER
If misfeeds occur frequently when feeding envelopes, thick paper, etc. through the bypass tray, wipe the paper feed
roller at the feed slot of the bypass tray with a soft, clean cloth dampened with alcohol or water.
CLEANING THE TRANSFER CHARGER
If copies start becoming streaky or blotchy, the transfer charger may be dirty.
Clean the charger using the following procedure.
1Turn the power switch off.
2Open the bypass tray and the side
cover.
3Lift and pull out the upper paper tray.
4Take the charger cleaner out by
holding the tab.
5Set the charger cleaner onto the
transfer charger and gently slide the
cleaner in the direction indicated by
the arrow two or three times.
If the white sheet metal is
smudged with toner,
wipe it with a soft, clean
cloth.
6Return the charger cleaner to its
original position. Close the upper
paper tray. Close the side cover by
pressing the handle on the cover.
7Turn the power switch on.
Paper feed roller
Slide the charger cleaner from one end to the
other end along the groove of the transfer
charger. If the cleaner is stopped on the way,
smudges on copies may occur.
Note
AR-5316-5320-EX.book 57 ページ 2003年11月26日 水曜日 午後5時3分
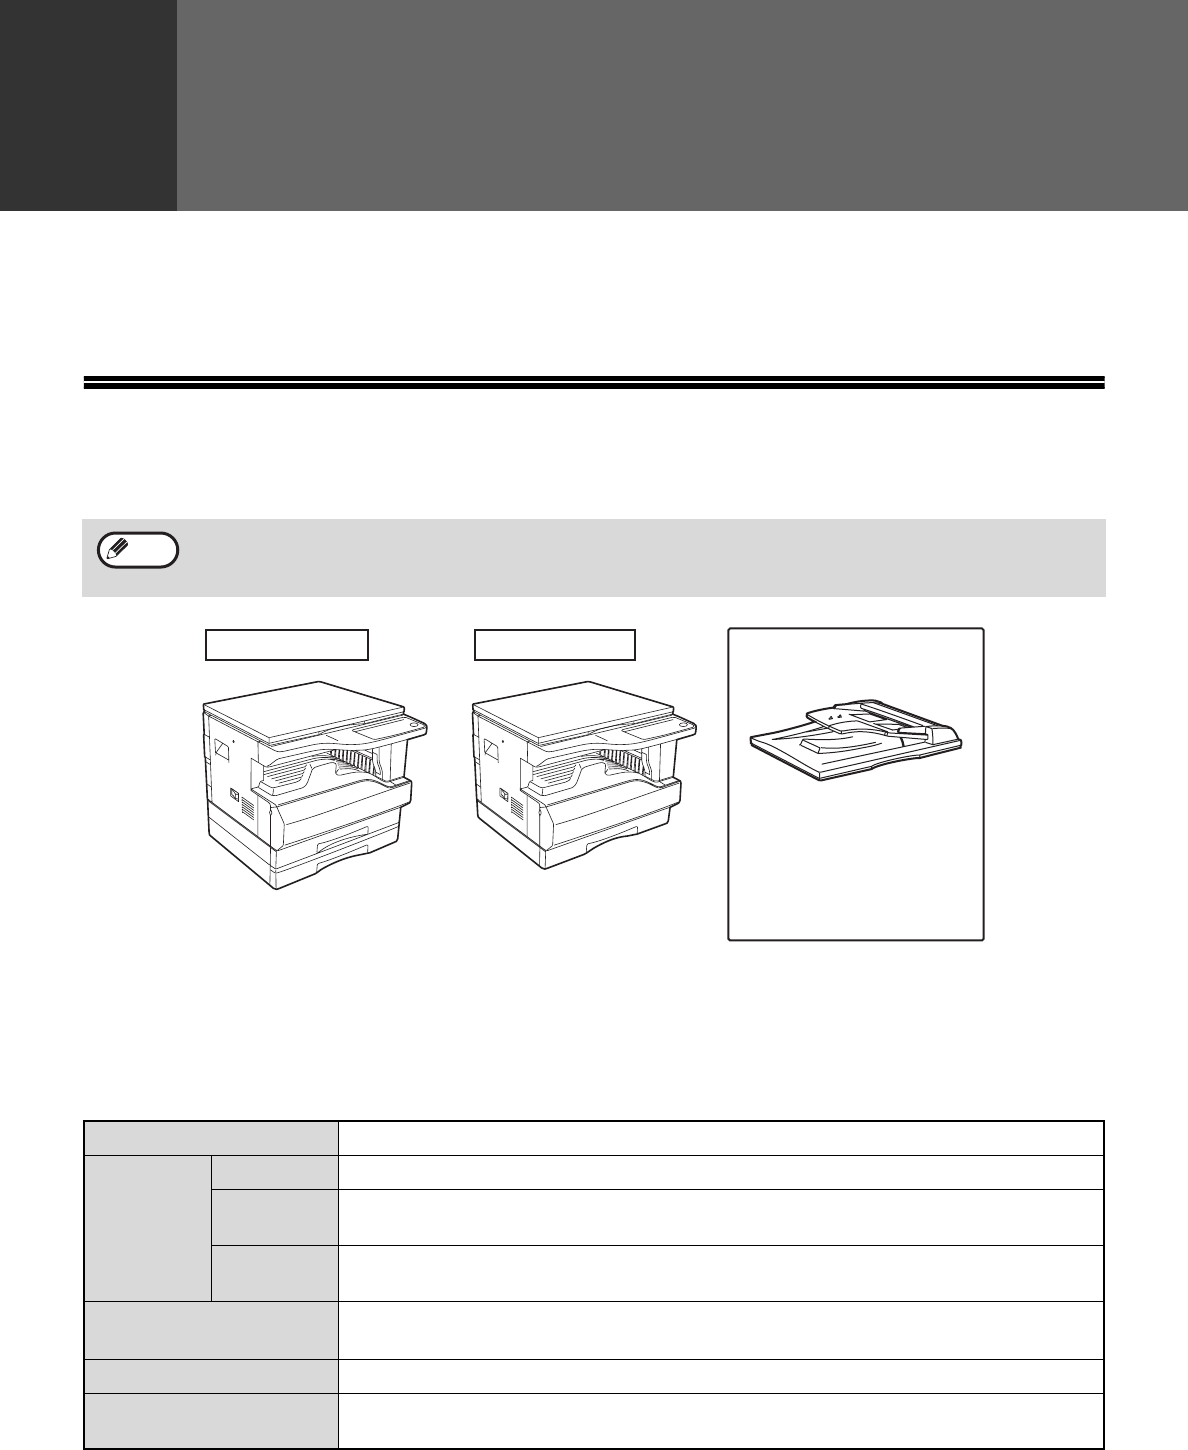
58
7Chapter 7
PERIPHERAL DEVICES AND SUPPLIES
Optional equipment and supplies are explained in this chapter. To purchase optional equipment and supplies,
contact your authorised service representative.
PERIPHERAL DEVICES
SINGLE PASS FEEDER
For the names of the parts of the SPF, see «PART NAMES AND FUNCTIONS». (p.8)
Specifications
* The detectable original sizes vary by country and region.
As a part of our policy of continuous improvement, SHARP reserves the right to make design and specification
changes for product improvement without prior notice. The performance specification figures indicated are nominal
values of production units. There may be some deviations from these values in individual units.
Note
AR-5320/5320 X AR-5316/5316 X
Single pass feeder
(AR-SP6)
AR-SP6 (Single pass feeder)
Acceptable
original
Weight 56 g/m2 to 90 g/m2 (15 lbs. to 24 lbs.)
Size A5 to A3 (5-1/2″ x 8-1/2″ to 11″ x 17″)
(5-1/2 x 8-1/2″ size originals cannot be used in the duplex copy mode.)
Capacity Up to 40 sheets (Thickness 4 mm (5/32″) and below)
For B4 (8-1/2″ x 13«) and larger sizes, up to 30 sheets
Detectable original
sizes*
A5, A4, A4R, B4, A3
5-1/2″ x 8-1/2″, 8-1/2» x 11″, 8-1/2″ x 11″R, 8-1/2″ x 13«, 8-1/2» x 14″, 11″ x 17″
Weight 5.0 kg (11.1 lbs.)
Dimensions 583 mm (W) x 435 mm (D) x 133 mm (H)
(22-61/64″ (W) x 17-9/64» (D) x 5-1/4″ (H))
AR-5316-5320-EX.book 58 ページ 2003年11月26日 水曜日 午後5時3分
59
7
STORAGE OF SUPPLIES
Standard supplies for this product that are to be replaced by the user are paper and toner cartridge.
PROPER STORAGE
●Store the supplies in a location that is:
clean and dry,
at a stable temperature,
not exposed to direct sunlight.
●Store paper in the wrapper and lying flat.
Paper stored out of the wrapper or in packages
standing on end may curl or get damp, resulting in
paper misfeeds.
For best copying results, be sure to use only SHARP products.
Only genuine SHARP consumables carry the Genuine Supplies label.
GENUINE SUPPLIES
AR-5316-5320-EX.book 59 ページ 2003年11月26日 水曜日 午後5時3分
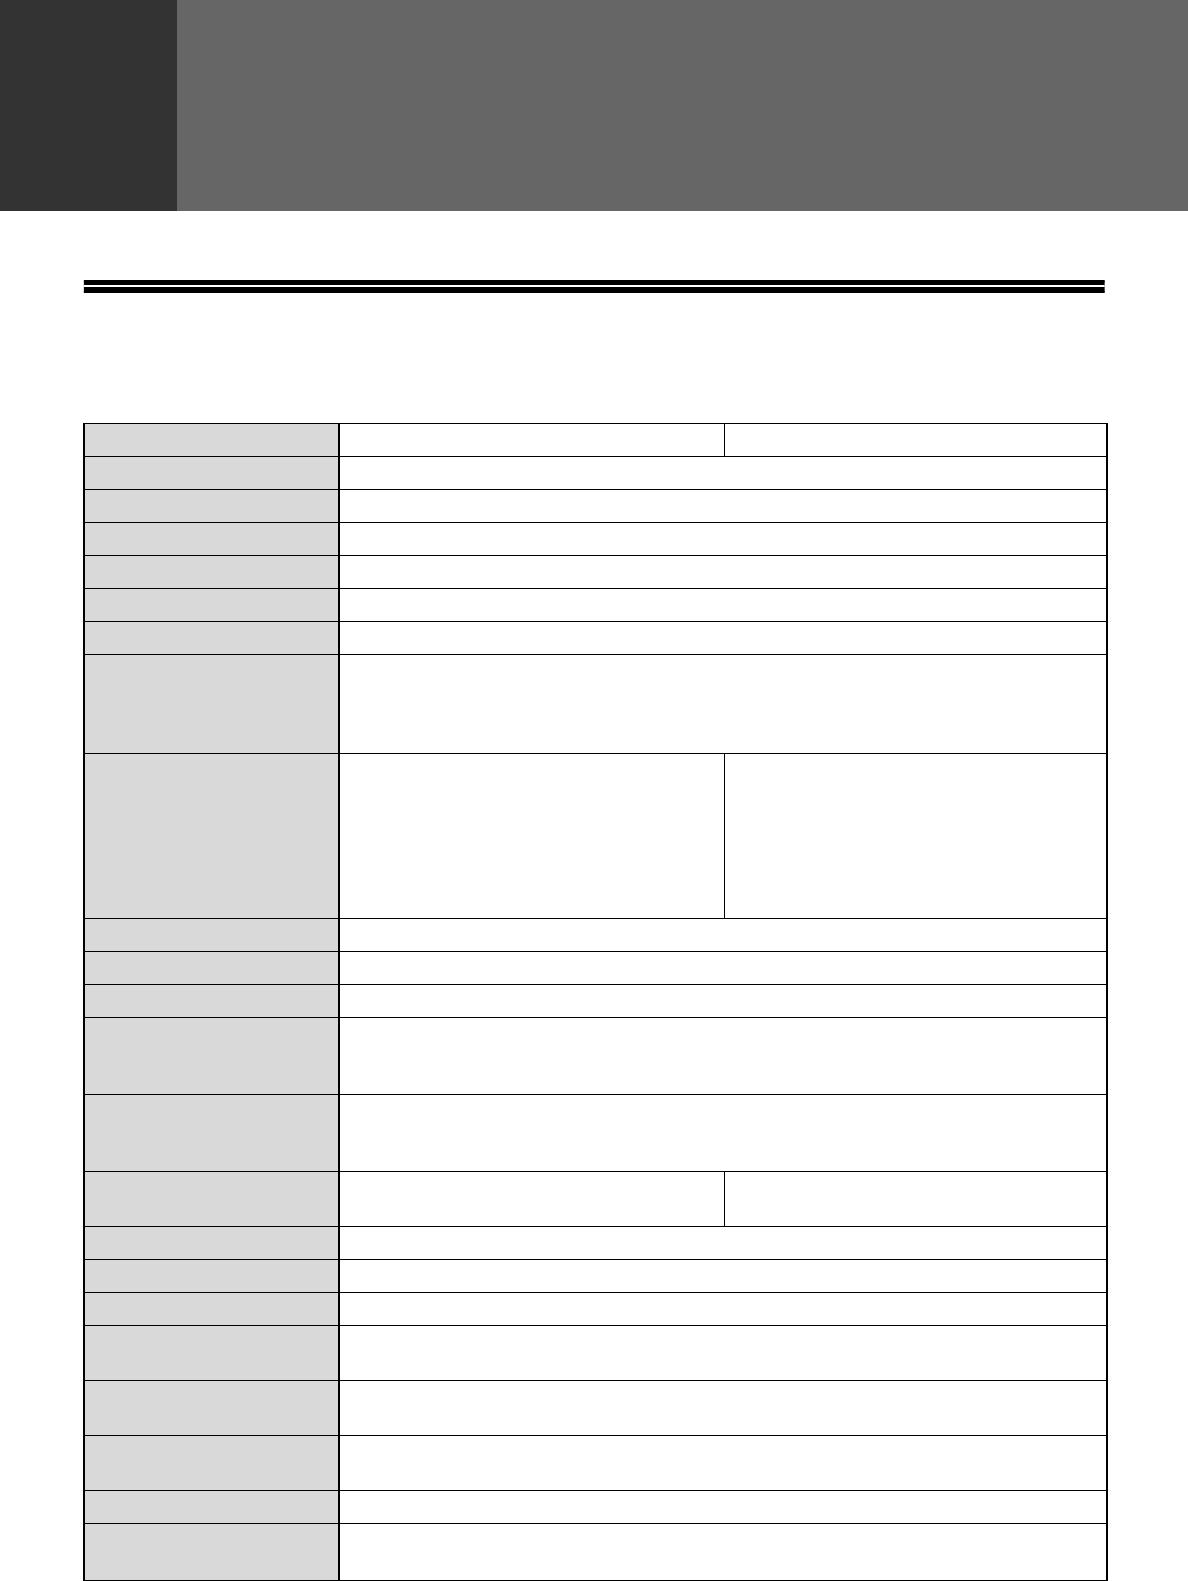
60
8Chapter 8
APPENDIX
SPECIFICATIONS
Model AR-5316/5316 X AR-5320/5320 X
Type Digital Multifunctional System, Desktop
Photoconductive type OPC drum
Document glass type Fixed
Copy system Dry, electrostatic transfer
Originals Sheets, bound documents
Original sizes Max. A3 (11″ x 17«)
Copy size
Max. A3 (11″ x 17«)
Min. A6 (5-1/2″ x 8-1/2″) (A6 must be fed from the bypass tray)
Image loss: Max. 4 mm (5/32″) (leading and trailing edges)
Max. 4 mm (5/32″) (along other edges in total)
Copying speed
(one-sided copying at
100% copy ratio)
9 copies/min.
10 copies/min.
11 copies/min.
12 copies/min.
16 copies/min.
A3 (11″ x 17″)
B4 (8-1/2» x 14″)
8-1/2″ x 13″
A4R (8-1/2″ x 11″R)
A4, A5 (8-1/2″ x 11″,
5-1/2″ x 8-1/2″)
10 copies/min.
11 copies/min.
12 copies/min.
14 copies/min.
15 copies/min.
20 copies/min.
11″ x 17«
A3
B4 (8-1/2″ x 14«, 8-1/2» x 13″)
A4R
8-1/2″ x 11″R
A4, A5 (8-1/2″ x 11″,
5-1/2″ x 8-1/2″)
Continuous copy Max. 999 copies; subtractive counter
First-copy time* Approx. 7.2 sec.
Warm-up time* Approx. 45 sec.
Copy ratio
Variable: 25% to 400%, in 1% increments (total 376 steps)
Fixed preset: 50%, 70%, 81%, 86%, 100%, 115%, 122%, 141%, 200%
(50%, 64%, 77%, 95%, 100%, 121%, 129%, 141%, 200%)
Exposure system
Document glass: Moving optical source, slit exposure (stationary platen) with
automatic exposure
SPF: Moving original
Paper feed One automatic feeding paper tray (250
sheets) + bypass tray (100 sheets)
Two automatic feeding paper trays (250
sheets each) + bypass tray (100 sheets)
Fusing system Heat rollers
Developing system Magnetic brush development
Light source Cold cathode fluorescent lamp
Resolution Scan: 600 x 300 dpi Output: 600 x 600 dpi (AUTO/TEXT mode)
Scan: 600 x 600 dpi Output: 600 x 600 dpi (PHOTO mode)
Gradation Scanning: 256
Printing: 2 value
Power supply Local voltage ±10% (For this machine’s power supply requirements, see the name
plate located on the back of the machine.)
Power consumption Max. 1.2 kW
Overall dimensions
(with bypass tray folded) 590 mm (W) x 577 mm (D) (23-15/64″ (W) x 22-23/32″ (D))
AR-5316-5320-EX.book 60 ページ 2003年11月26日 水曜日 午後5時3分
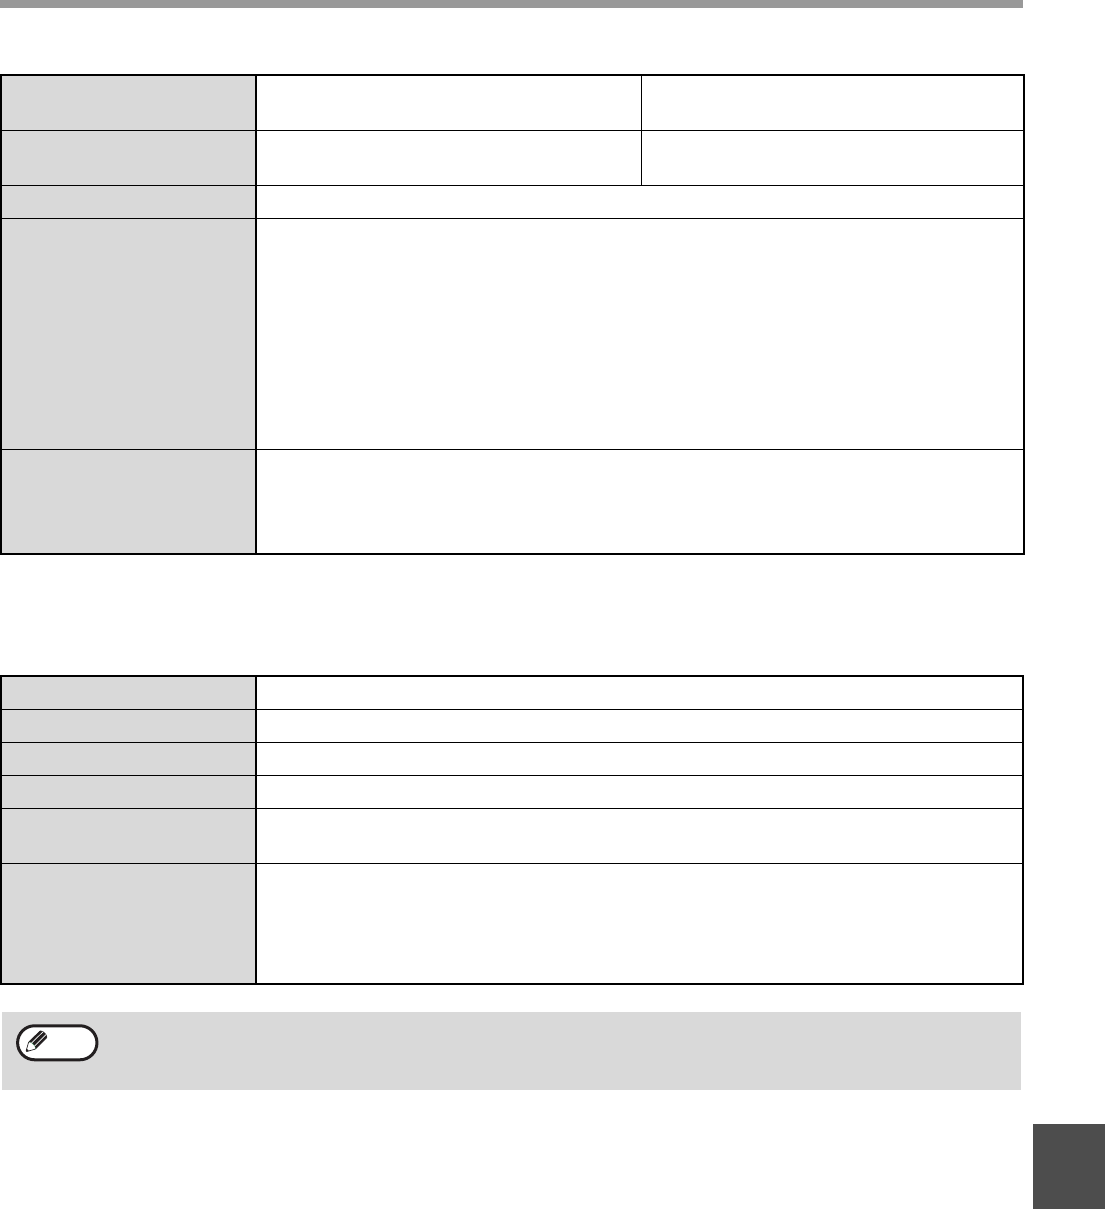
61
APPENDIX
8
* The first-copy time and warm-up time may vary depending on the power-supply voltage, ambient temperature, and other
operating conditions.
Printer Function
Weight Approx. 31.3 kg (69.1 lbs.)
(Not including toner cartridge)
Approx. 36.3 kg (80.1 lbs.)
(Not including toner cartridge)
Dimensions 590 mm (W) x 577 mm (D) x470 mm (H)
(23-15/64″ (W) x 22-23/32″ (D) x 18-33/64″ (H))
590 mm (W) x 577 mm (D) x555 mm (H)
(23-15/64″ (W) x 22-23/32″ (D) x 21-55/64″ (H))
Operating conditions Temperature: 15°C to 30°C (59°F to 86°F), Humidity: 20% to 85%
Noise level
Sound Power Level LwA(1B=10dB)
Copying: 6.2[B]
Standby: 3.1[B]
Sound Pressure Level LpA (bystander positions)
Copying: 48[dB(A)]
Standby: 16[dB(A)]
Sound Pressure Level LpA (operator position)
Copying: 50[dB(A)]
Standby: 18[dB(A)]
Noise emission measurement in accordance with ISO 7779.
Emission concentration
(measured according to
RAL-UZ62: Edition Jan.
2002)
Ozone: 0.02 mg/m3 or less
Dust: 0.075 mg/m3 or less
Styrene: 0.07 mg/m3 or less
Print speed 12 ppm
Resolution 600 dpi
Memory 16 MB
Emulation SHARP GDI
Interface IEEE1284 parallel connector/
USB connector (USB1.1)
Interface cables
[Parallel cable]
Shielded bi-directional (IEEE1284) cable (max. length 3 m (10 feet))
Please purchase a commercially available parallel cable.
[USB cable (only for connection to USB 1.1 connector)]
Shielded twisted pair cable (max. length 3 m (10 feet))
As a part of our policy of continuous improvement, SHARP reserves the right to make design and specification
changes for product improvement without prior notice. The performance specification figures indicated are
nominal values of production units. There may be some deviations from these values in individual units.
Note
AR-5316-5320-EX.book 61 ページ 2003年11月26日 水曜日 午後5時3分

62
SOFTWARE LICENSE
PLEASE READ THIS LICENSE CAREFULLY BEFORE USING THE SOFTWARE. BY USING THE
SOFTWARE, YOU ARE AGREEING TO BE BOUND BY THE TERMS OF THIS LICENSE.
1. License. The application, demonstration, system and other software accompanying this License,
whether on disk, in read only memory, or on any other media (the «Software») and related documentation
are licensed to you by SHARP. You own the disk on which the Software is recorded but SHARP and/or
SHARP’s Licensors retain title to the Software and related documentation. This License allows you to use
the Software on one or more computers connected to a single printer and make one copy of the Software
in machine-readable form for backup purposes only. You must reproduce on such copy the SHARP
copyright notice, the copyright notice of SHARP’s Licensors and any other proprietary legends of SHARP
and/or its Licensors that were on the original copy of the Software. You may also transfer all your license
rights in the Software, the backup copy of the Software, the related documentation and a copy of this
License to another party, provided the other party reads and agrees to the terms and conditions of this
License.
2. Restrictions. The Software contains copyrighted material, trade secrets and other proprietary material
which is owned by SHARP and/or its Licensors and in order to protect them you may not decompile,
reverse engineer, disassemble or otherwise reduce the Software to a human-perceivable form. You may
not modify, network, rent, lease, loan, distribute or create derivative works based upon the Software in
whole or in part. You may not electronically transmit the Software from one computer to another or over a
network.
3. Termination. This license is effective until terminated. You may terminate this License at any time by
destroying the Software and related documentation and all copies thereof. This License will terminate
immediately without notice from SHARP and/or SHARP’s Licensors if you fail to comply with any provision
of this License. Upon termination you must destroy the Software and related documentation and all copies
thereof.
4. Export Law Assurances. You agree and certify that neither the Software nor any other technical data
received from SHARP, nor the direct product thereof, will be exported outside the United States except as
authorized and as permitted by the laws and regulations of the United States. If the Software has been
rightfully obtained by you outside of the United States, you agree that you will not re-export the Software
nor any other technical data received from SHARP, nor the direct product thereof, except as permitted by
the laws and regulations of the United states and the laws and the regulation of the jurisdiction in which
you obtained the Software.
5. Government End Users. If you are acquiring the Software on behalf of any unit or agency of the
United States Government, the following provisions apply. The Government agrees:
(i) if the Software is supplied to the Department of Defense (DoD), the Software is classified as
«Commercial Computer Software» and the Government is acquiring only «restricted rights» in the Software
and its documentation as that term is defined in Clause 252.227-7013 (c)(1) (Oct., 1988) of the DFARS;
and
(ii) if the Software is supplied to any unit or agency of the United States Government other than DoD, the
Government’s rights in the Software and its documentation will be as defined in Clause 52.227-19 (c)(2) of
the FAR or, in the case of NASA, in Clause 18-52.227-86 (d) of the NASA Supplement to the FAR.
AR-5316-5320-EX.book 62 ページ 2003年11月26日 水曜日 午後5時3分

63
6. Limited Warranty on Media. SHARP warrants the disks on which the Software is recorded to be free
from defects in materials and workmanship under normal use for a period of ninety (90) days from the
date of purchase as evidenced by a copy of the receipt. The entire liability of SHARP and/or its Licensors
and your exclusive remedy will be replacement of the disk which fails to meet the limited warranty
provided by this Clause 6. A disk will be replaced when it is returned to SHARP or a SHARP authorized
representative with a copy of the receipt. SHARP will have no responsibility to replace a disk damaged by
accident, abuse or misapplication.
ANY IMPLIED WARRANTIES ON THE DISKS, INCLUDING THE IMPLIED WARRANTIES OF
MERCHANTABILITY AND FITNESS FOR A PARTICULAR PURPOSE, ARE LIMITED IN DURATION TO
NINETY (90) DAYS FROM THE DATE OF DELIVERY. THIS WARRANTY GIVES YOU SPECIFIC
LEGAL RIGHTS, AND YOU MAY ALSO HAVE OTHER RIGHTS WHICH VARY FROM JURISDICTION
TO JURISDICTION.
7. Disclaimer of Warranty on Software. You expressly acknowledge and agree that use of the Software
is at your sole risk. The Software and related documentation are provided «AS IS» and without warranty of
any kind and SHARP and SHARP’s Licensor(s) (for the purpose of provisions 7 and 8, SHARP and
SHARP’s Licensor(s) shall be collectively referred to as «SHARP») EXPRESSLY DISCLAIM ALL
WARRANTIES, EXPRESS OR IMPLIED, INCLUDING, BUT NOT LIMITED TO, THE IMPLIED
WARRANTIES OF MERCHANTABILITY AND FITNESS FOR A PARTICULAR PURPOSE. SHARP
DOES NOT WARRANT THAT THE FUNCTIONS CONTAINED IN THE SOFTWARE WILL MEET YOUR
REQUIREMENTS, OR THAT THE OPERATION OF THE SOFTWARE WILL BE UNINTERRUPTED OR
ERROR-FREE, OR THAT DEFECTS IN THE SOFTWARE WILL BE CORRECTED. FURTHERMORE,
SHARP DOES NOT WARRANT OR MAKE ANY REPRESENTATIONS REGARDING THE USE OR THE
RESULTS OF THE USE OF THE SOFTWARE OR RELATED DOCUMENTATION IN TERMS OF THEIR
CORRECTNESS, ACCURACY, RELIABILITY, OR OTHERWISE. NO ORAL OR WRITTEN
INFORMATION OR ADVICE GIVEN BY SHARP OR A SHARP AUTHORIZED REPRESENTATIVE
SHALL CREATE A WARRANTY OR IN ANY WAY INCREASE THE SCOPE OF THIS WARRANTY.
SHOULD THE SOFTWARE PROVE DEFECTIVE, YOU (AND NOT SHARP OR A SHARP
AUTHORIZED REPRESENTATIVE) ASSUME THE ENTIRE COST OF ALL NECESSARY SERVICING,
REPAIR OR CORRECTION, SOME JURISDICTIONS DO NOT ALLOW THE EXCLUSION OF IMPLIED
WARRANTIES, SO THE ABOVE EXCLUSION MAY NOT APPLY TO YOU.
8. Limitation of Liability. UNDER NO CIRCUMSTANCES INCLUDING NEGLIGENCE, SHALL SHARP
BE LIABLE FOR ANY INCIDENTAL, SPECIAL OR CONSEQUENTIAL DAMAGES THAT RESULT
FROM THE USE OR INABILITY TO USE THE SOFTWARE OR RELATED DOCUMENTATION, EVEN IF
SHARP OR A SHARP AUTHORIZED REPRESENTATIVE HAS BEEN ADVISED OF THE POSSIBILITY
OF SUCH DAMAGES. SOME JURISDICTIONS DO NOT ALLOW THE LIMITATION OR EXCLUSION
OF LIABILITY FOR INCIDENTAL OR CONSEQUENTIAL DAMAGES SO THE ABOVE LIMITATION OR
EXCLUSION MAY NOT APPLY TO YOU.
In no event shall SHARP’s total liability to you for all damages, losses, and causes of action (whether in
contract, tort (including negligence) or otherwise) exceed the amount paid by you for the Software.
9. Controlling Law and Severability. For a portion of the Software related with Apple Macintosh and
Microsoft Windows, this license shall be governed by and construed in accordance with the laws of the
state of California and Washington, respectively. If for any reason a court of competent jurisdiction finds
any provision of this License, or portion thereof, to be unenforceable, that provision of the License shall be
enforced to the maximum extent permissible so as to effect the intent of the parties, and the remainder of
this License shall continue in full force and effect.
10. Complete Agreement. This License constitutes the entire agreement between the parties with
respect to the use of the Software and related documentation, and supersedes all prior or
contemporaneous understandings or agreements, written or oral, regarding such subject matter. No
amendment to or modification of this License will be binding unless in writing and signed by a duly
authorized representative of SHARP.
AR-5316-5320-EX.book 63 ページ 2003年11月26日 水曜日 午後5時3分

64
INDEX
Symbols
[] key…………………………………….……………11, 55
A
About the operation manuals
— Online Manual………..……………….………………..…5
— Operation Manual ……………………………………..…5
— Software Setup Guide…………………….…………….5
Adjusting the automatic exposure level………………..31
Alarm indicators …………………….10, 35, 37, 43, 45, 46
Appendix ………………..……………….……………….……..60
Audible signals ….……………….………………..……..34, 35
AUDIT CLEAR key………..……………….……………10, 39
Auditing mode ………………………….…33, 36, 37, 38, 39
Auto clear ………………………….…………….12, 18, 19, 33
AUTO IMAGE indicator ……….………………..……..11, 21
AUTO IMAGE key …………………….………………...11, 21
AUTO PAPER SELECT indicator …………..……..10, 20
Auto paper select mode ………………….………….……..20
Auto power shut-off mode ……………………..……..12, 33
Auto tray switching ………..……………….……………21, 33
AUTO/TEXT/PHOTO key.……………….…10, 21, 31, 32
B
Base setting ………………………………….……………34, 35
Basic procedure for printing …………….………………...29
Before using the machine ……………………..…………….8
Bypass tray ………………….……………….…..8, 13, 15, 26
Bypass tray extension …………………………..……….8, 15
Bypass tray guides…………………………………….….8, 15
Bypass tray paper feed roller .………………..…………..57
C
Caution
— Cautions on handling ……………………..…………….4
— Cautions on laser ……………….……………….……….4
— Cautions on using ………..………………..…………….3
— Installation site …………….………………..…………….3
Changing a tray’s paper size setting ……….…………..16
Charger cleaner …………………………….……………..8, 57
Checking the total output count………..………………...55
Checking the toner level………………….………………...56
Cleaning
— Bypass tray paper feed roller …………..…………..57
— Document cover..……………….……………….……..56
— Document glass ……..……………….………………...56
— SPF ……..……………….……………….………………...56
— Transfer charger ………………..……………….……..57
CLEAR ALL key ……………………….………………...11, 12
CLEAR key….……………….……………….………11, 18, 19
Conventions used in this manual ..………….…………….5
Copy functions ……………..……………….………………...18
Copy ratio display key …………………….…10, 23, 38, 56
D
Dark indicator …………………….………………..……..10, 21
Dark key ……..……………….……………….…10, 21, 31, 32
Developer replacement required indicator ………10, 46
Differences between models..………………..………….…6
Display ………………….………………..………….. 10, 39, 46
Document cover ……..………………..………. 8, 18, 20, 56
Document feeder tray………………..……………….… 9, 19
Document glass ……..………………..……………. 8, 18, 56
DUAL PAGE COPY indicator ……………………... 10, 27
DUAL PAGE COPY key …………….……………….. 10, 27
E
Environmental information ………………………….……… 4
Exit area .……………….………………..……………….……… 9
F
Feeding roller cover ……………………….……………. 9, 47
Front cover …………………..……………….……………….... 8
Fusing unit paper guide……….………………..……… 9, 51
Fusing unit release levers ……………………..……… 9, 50
H
Handles ..……………….………………..……………….……… 8
High image quality mode………………………………….. 32
I
Indicators and display messages ………………………. 46
Initial settings ……………….……………….……………….. 12
INTERRUPT indicator …………………………..……. 10, 28
INTERRUPT key ………………..………………..……. 10, 28
L
Light indicator…………………….………………..……. 10, 21
Light key.……………….……………. 10, 21, 31, 32, 35, 37
Loading paper …..……………….………………..……. 13, 14
Loading the bypass tray …………….……………….……. 15
Loading the paper tray ………..………………..…………. 14
M
Main features ……………….……………….……………….... 7
Maintenance indicator ……………….……………….. 10, 46
Making a copy darker or lighter …………………………. 21
Misfeed indicator …….………………..………….. 10, 46, 47
Misfeed location indicator.……………….…….. 11, 46, 47
Misfeed removal
— Bypass tray …………………………………..…………. 48
— Lower paper tray …….……………….……………….. 53
— Machine.………………..……………….………….……. 49
— SPF …………..……………….………………..…………. 47
— Upper paper tray …….………….……………….……. 52
N
Normal copying
— Document glass …………..………………..…………. 18
— SPF …………..……………….………………..…………. 19
Numeric keys ……………….………………... 11, 22, 35, 37
O
ON LINE indicator …..………………..……………….. 10, 29
ON LINE key ………….………………..……………….. 10, 29
Operation panel………………….………………..……… 8, 10
Original guides ….……………….………….……………. 9, 19
ORIGINAL SIZE ENTER key …………..…….. 10, 16, 18
ORIGINAL SIZE indicator ……………….………….. 10, 19
AR-5316-5320-EX.book 64 ページ 2003年11月26日 水曜日 午後5時3分

65
Original types
— AUTO ……………………………….……………….……..21
— PHOTO …………………………….……………….……..21
— TEXT…………………….……………….………………...21
P
Paper……………………..……………….……………….……..13
Paper feed location indicator………………………...11, 16
Paper output tray……..……………….……………….……….8
Paper required indicator………………………....10, 13, 46
PAPER SIZE ENTER key ……………………..……..11, 16
PAPER SIZE indicator ………..…………….11, 16, 18, 19
Paper tray……………….……………….………..8, 14, 52, 53
Parallel connector ………………………………..………….…9
Part names and functions ……………………..…………….8
Peripheral devices…………………….……………….……..58
Photoconductive drum ………..………………..…………4, 9
Power ………………………….……………….………………...12
Power off ………….……………….………………..……….8, 12
Power on ………….……………….………………..……….8, 12
POWER SAVE indicator ..……………….……………10, 12
Power save modes………..……………….………………...12
Power switch .……………….……………….……………..8, 12
Preheat mode……………….………….………………...12, 33
PRESET RATIO selector indicator…………………11, 23
PRESET RATIO selector keys…………………11, 23, 24
Printer functions …………………………….………………...29
R
Reduction/enlargement/zoom
— Automatic ratio selection.………………..…………..22
— Manual ratio selection ………………………….……..23
— XY ZOOM copying ….……………….………………...24
Removing the document cover …………………………..20
Replacing the toner cartridge …………..………………...54
Right side cover …………………………….……………..9, 47
Roller rotating knob …………….………………..….9, 49, 50
Routine maintenance ………….………………..……..55, 56
S
Selecting the tray ………….……………….………………...21
Setting the number of copies …………..………………...22
Side cover …..……………….……………….………………..…8
Side cover handle ………………………………..…………….8
Single pass feeder (SPF) ………………..………….……..58
Software license…………………………………..…………..62
Specifications ………….……………….……………….……..60
SPF indicator…………..……………….……………11, 19, 20
START indicator..……………….………………..……..11, 12
START key…………………..……….11, 12, 18, 19, 35, 37
Storage of supplies …………….………………..…………..59
Stream feeding mode…….……………….……………20, 33
T
Toner cartridge….……………….………………..……… 9, 54
Toner cartridge lock release lever …….……………. 9, 54
Toner cartridge replacement required indicator
….. 10, 46, 54
Toner save mode ………….……………….……………….. 32
Total output count …..………………..……………….……. 55
Transfer charger……..………………..……………….……. 57
TRAY SELECT key …………….… 11, 16, 18, 19, 21, 22
Troubleshooting
— Machine/copying problems …………………..……. 41
— Printing problems …………………….………….……. 44
Two-sided copying using the bypass tray ..…………. 26
U
USB 1.1 connector ………..……………….……………….... 8
User programs ……………..……………….………….. 33, 35
User settings ………….………………..……………….……. 31
Using the manual ……………………..……………….……… 5
Using the printer mode ……………………………….……. 29
X
XY-ZOOM indicator…………………..……………….. 10, 24
XY-ZOOM key…..……………….………………..……. 10, 24
Z
ZOOM indicator………………….………………..……. 10, 23
Zoom keys…………………………………….…….. 10, 23, 24
AR-5316-5320-EX.book 65 ページ 2003年11月26日 水曜日 午後5時3分
66
Copying
Automatic ratio selection ……..………………..…………..22
Cancelling a copy run.……………….………….……..18, 19
Copying, starting ……..……………….………………...18, 19
Dual page copying ……………..………….……………….. 27
Enlargement/reduction …..……………….……………….. 22
Exposure adjustment …….……………….……………….. 21
Exposure selector ………………………………..…………. 21
Interrupt copying …………..……………….……………….. 28
Manual ratio selection ……………….……………….……. 23
Number of copies, setting ……………………..…………. 22
Original cover, removing ……..………………..…………. 20
Original size, specifying ………………………..…………. 18
Original, placing
— Document cover..……………….……………….……..18
— SPF ……..……………….……………….………………...19
Tray selection………….……………….………….…………..21
Two-sided copies using bypass tray ……….…………..26
XY Zoom …….……………….……………….…………………24
Machine settings
Auditing mode
— Copies, how to make ……………….………………...39
— Setting procedures….……………….………………...37
— Settings ..……………….……………….………………...36
Automatic exposure level, setting …….………………...31
High image quality mode……..………………..…………..32
Toner save mode ……………….………………..…………..32
User programs …………………..………………..…………..33
— Setting procedures….……………….………………...35
— Settings ..……………….……………….………………...33
Problem occurs
Misfeeds
— Bypass tray …………………………………..…………. 48
— Machine (fusing area) …..………………..…………. 49
— Machine (paper feed area)…..……………….……. 49
— Machine (transfer area)…………………..…………. 51
— SPF …………..……………….………………..…………. 47
— Tray (Lower paper tray)…………….……………….. 53
— Tray (Upper paper tray)…………….……………….. 52
Troubleshooting ……………………….……………….……. 40
Indicators, lit and blinking
[ ] Developer replacement required indicator …. 46
[ ] Maintenance indicator………………….…………. 46
[ ] Misfeed indicator ……….………………..……. 46, 47
[ ] Paper required indicator ……………………. 13, 46
[ ] Toner cartridge replacement required
indicator
— Blinking ………………..………………..……. 46, 54
— Lit ……….……………….………………..……. 46, 54
INDEX BY PURPOSE
AR-5316-5320-EX.book 66 ページ 2003年11月26日 水曜日 午後5時3分
MEMO
AR-5316-5320-EX.book 67 ページ 2003年11月26日 水曜日 午後5時3分
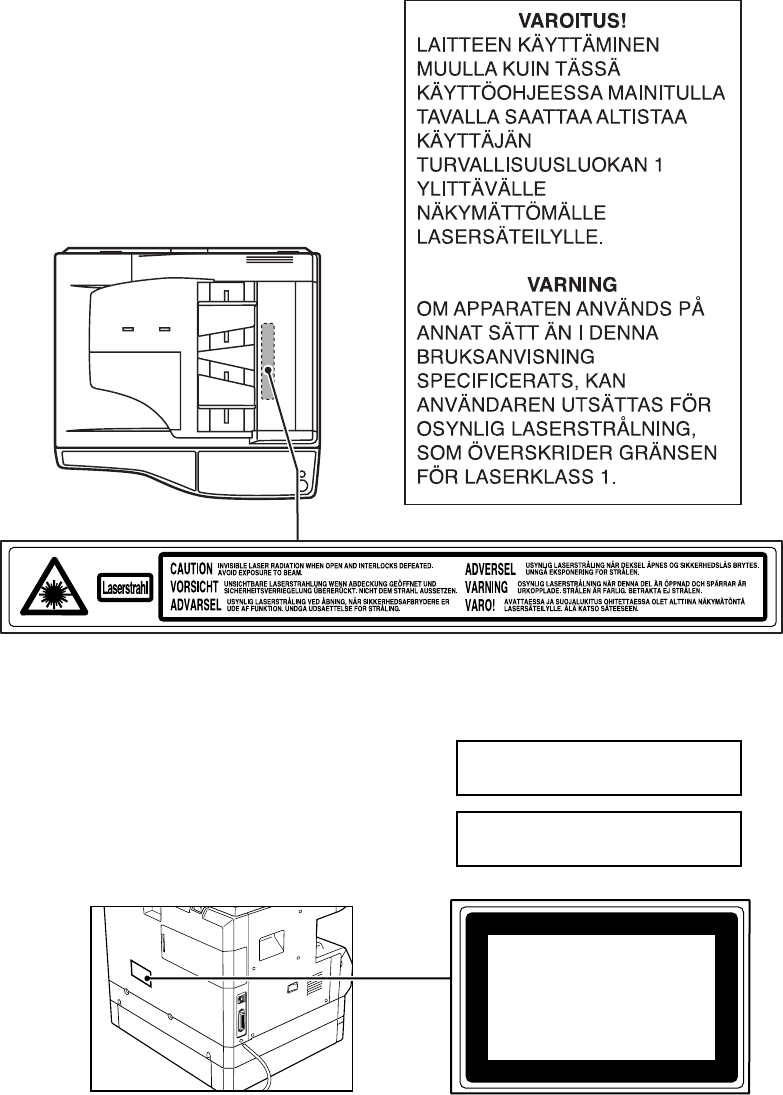
LUOKAN 1 LASERLAITE
KLASS 1 LASERAPPARAT
CLASS 1
LASER PRODUCT
LASER KLASSE 1
AR-5316-5320-EX.book 68 ページ 2003年11月26日 水曜日 午後5時3分
AR-5316-5320-EX.book 1 ページ 2003年11月26日 水曜日 午後5時3分

PRINTED IN CHINA
2003M KS
➀
TINSE1152QSZZ
Printed on 100% post-consumer recycled paper
SHARP CORPORATION
AR-5316/AR-5320/AR-5316 X/AR-5320 X
AR-5316-5320-EX.book 1 ページ 2003年11月26日 水曜日 午後5時3分
 04:32
04:32
#114 МФУ Sharp AR-6020 ошибка — замятие бумаги, застревание | Типичная проблема МФУ Sharp и MB
 02:31
02:31
Sharp AR-5316E reset error code
 03:15
03:15
SHARP AR-6020 первый запуск
 08:16
08:16
How to refill sharp AR toner cartridge
 05:48
05:48
How to remove and service sharp AR-5316 drum cartridge and developer
 04:53
04:53
Заправка картриджа Sharp AR-016 // Cartridge refill Sharp AR-016
 06:36
06:36
HOW TO CLEANING DRUM UNIT Sharp AR Series, Sharp MX Series.
 19:15
19:15
Сервисное обслуживание Sharp AR-5516 / AR-5520
9
2
4
Gently push the paper tray back into the unit.
• After loading paper, to cancel the blinking
without restarting
copying, press the clear (
) key. The
in the display will go out
and the start (
) indicator will light up.
• Be sure that paper is free of rips, dust, wrinkles, and curled or bent
edges.
• Make sure all the paper in the stack is the same size and type.
• When loading paper, ensure there is no space between the paper and
the guide, and check if the guide is not set too narrow causing the
paper to bend. Loading paper in these ways will result in document
skew or a paper jam.
• When not using the unit for an extended period, remove all paper from
the paper tray and store it in a dry place. If paper is left in the unit for
an extended period, the paper will absorb moisture from the air,
resulting in paper jams.
• When adding new paper to the paper tray, remove the old paper
already contained in the tray. Placing new paper on top of the paper
already contained in the tray may result in feeding two sheets at one
time.

10 bypass feed (including special paper)
Page 12
- Image
- Text
10
BYPASS FEED (including special paper)
The multi-bypass tray can be used to feed standard paper, transparency film, labels,
envelopes and other special purpose paper. Paper measuring from 3-1/2″ x 5-1/2″ to
8-1/2″ x 14″ and in the weight range of 14 lbs. to 34.5 lbs. can be used in this tray.
(For paper weighing from 28 lbs. to 34.5 lbs., 8-1/2″ x 11″ is the maximum size.)
1
Open the multi-bypass tray and extend the tray.
2
Set the paper guides to the paper width. Insert the paper (print
face down) all the way into the multi-bypass tray.
• The multi-bypass tray can hold maximum of 50 sheets of paper.
(Capacity will vary depending on the type of paper loaded.)
• The original image must be smaller than the paper or media for
copying. If the original image is bigger than the paper or media, this
may cause smudges on the edges of the copies.
To close the multi-
bypass tray,
perform step 1
and then step 2 in
the illustration and
push the round
projections at the
right of the tray
until they click.
Print face

11
2
3
Press the tray select (
) key to select the multi-bypass tray.
• Paper must be fed narrow side into the feed slot.
• Special papers such as transparency film and labels must be
fed one sheet at a time through the multi-bypass tray.
• When copying onto transparency film, remove each copy
promptly. Do not let copies stack up.
Note for loading envelopes
• Envelopes must be fed narrow side into the feed slot one at a time.
• Do not use non-standard envelopes, and envelopes that have metal clasps, plastic
snappers, string closures, windows, linings, self-adhesive, patches or synthetic
materials. Do not use envelopes that are filled with air or envelopes that have labels
or stamps attached.
• Envelopes of which the surface is not flat because of embossing may cause the
copies/prints to become smudged.
• Under high humidity and temperature conditions the glue flaps on some envelopes
may become sticky and be sealed closed when copied/printed.
• Use only envelopes which are flat and crisply folded. Curled or poorly formed
envelopes may be poorly copied/printed or may cause misfeeds.
• It is recommended that you perform a test copy before performing the actual copied/
printed job.
• Be sure to select either Com 10, DL, C5 or Monarch on the paper size setting of the
printer driver. (For detailed information on printer driver, refer to the online manual.)

12
This chapter explains basic and other copying functions.
The unit is equipped with a one-page memory buffer. This memory allows the unit to
scan an original once only and make up to 99 copies. This feature improves
workflow, reduces operation noise from the copier, and provides higher reliability by
reducing wear and tear on the scanning mechanism.
COPY FLOW
If the unit does not function properly during use, or if a function cannot
be used, see «TROUBLESHOOTING THE UNIT» (p.30).
1 Make sure that paper has been loaded in the paper tray (p.8)
or multi-bypass tray (p.10), and check the paper size (p.7).
If paper is not loaded, see page 8.
2 Turn on the unit (p.13).
3 Place the original.
If you are using the original table, see «Using the original table» (p.14).
If you are using the RSPF/SPF, see «Using the RSPF/SPF» (p.15).
When copying onto paper larger than 8-1/2″ x 11″ size, pull out the paper
output tray extension.
5 Start copying.
Press the start ( ) key.
4 Select the copy settings.
If you wish to copy using the initial settings (p.13), proceed to the next
step.
To set the number of copies, see page 16.
To adjust the resolution and contrast settings, see page 16.
To enlarge or reduce the copy, see page 18.
To change the tray, see page 19.
To print on both sides of paper, see page 20. (AR-157E)
3
MAKING COPIES
13
3
POWER ON
Turn the power switch on the left side of the unit to the «ON» position. The start (
)
indicator will light up.
About the scan head
The scan head lamp remains on constantly when the unit is in the ready condition
(when the start (
) indicator is illuminated).
The unit adjusts the scan head lamp periodically to maintain copying quality. At this
time, the scan head moves automatically. This is normal and does not indicate unit
trouble.
Initial settings of operation panel
When the unit power is on, the operation panel will revert to the initial settings when
the time set with the «Auto clear time» setting (p.22) elapses after a copy or scanner
job is finished, or when the clear (
) key is pressed twice.
The initial settings of the operation panel are shown below.
When copying is begun in this state, the settings in the following table are used.
• The unit will enter a power save mode once the set time has elapsed
without any unit operation. The settings of the power save modes can
be modified. See «USER PROGRAMS» (p.23).
• The unit will return to the initial settings a preset amount of time after
the end of copy or scanner job. The preset amount of time (auto clear
time) can be changed. See «USER PROGRAMS» (p.23).
Copy quantity
1 copy
Exposure adjustment
AUTO
Zoom
100%
Tray
Paper tray 1
Original to copy (AR-157E)
The «Original to copy» indicator does
not illuminate. (One-sided copying only)
«0» is displayed in the display.
14
Power off methods
If not used for a certain period of time, the unit will automatically enter auto power
shut-off mode (p.22) in order to minimize power consumption. In cases where the
machine will not be used for a long time, turn off the power switch and remove the
power cord from the outlet.
ORIGINAL PLACEMENT
Using the original table
1
Open the original cover/RSPF/SPF, and place the original.
2
Place an original face down on the original table. Align it with
the original scale and the centering (
) mark. Gently close the
original cover/RSPF/SPF.
Setting a large original (AR-153E)
The original cover can be removed to allow copying of bulky objects.
1
Simply lift the original cover straight
up.
2
To reattach the original cover, reverse the above procedure.
• The original table can read up to 8-1/2″ x 14″ original.
• Image loss 5/32″ can occur at the leading and trailing edges of the
copies. Also image loss 11/64″ in total can occur along the other
edges of the copies.
• When copying a book or an original which has been folded or a
crumpled original, press down the original cover lightly. If the original
cover is not securely closed, the copies may be striped or blurred.
mark
Original scale

SPF is designed to hold up to …
Page 17
- Image
- Text
15
3
Using the RSPF/SPF
The RSPF/SPF is designed to hold up to 30 originals measuring from 5-1/2″ x 8-1/2″
to 8-1/2″ x 14″ and weighting from 14 lbs. to 23.9 lbs.
1
Make sure that no original is left on the original table.
2
Adjust the original guides to the size
of originals.
3
Set the originals face up in the
original feeder tray.
Stream feeding mode
The stream feeding mode allows easy operation of continuous copying from the
RSPF/SPF. If the stream feeding mode has been enabled using user program No.4,
the RSPF/SPF (
) indicator will blink approximately 5 seconds after the last
original has been fed by the RSPF/SPF. While this indicator is blinking, any new
originals placed in the original feeder tray will be fed and copied automatically. If the
stream feeding mode has been disabled, the start (
) key must be pressed each
time the originals are set even immediately after completion of a copy run from the
RSPF/SPF. The default setting of the stream feeding mode is «ON». See «USER
PROGRAMS» (p.23).
• Before feeding originals in the original feeder tray, be sure to remove
any staples or paper clips from them.
• Before placing curled or wavy originals into the original feeder tray, be
sure to flatten them. If not, original misfeeds may result.
• The RSPF/SPF (
) indicator on the operation panel will light up. If
this indicator does not light up, the originals are not properly set or the
RSPF/SPF is not properly closed.
• Badly damaged originals may misfeed in the RSPF/SPF. It is
recommended that such originals be copied from the original table.
• Special originals such as transparency film should not be fed through
the RSPF/SPF, but should be placed directly on the original table.
• Image loss (max. 5/32″) can occur at the leading and trailing edges of
the copies. Also image loss (max. 11/64″ in total) can occur along the
other edges of the copies. It can be 15/64″ (max.) at the trailing edge
of the second copy of two-sided copying.
• To stop continuous copying using the RSPF/SPF, press the clear
(
)
key.
• Copying using one-sided to one-sided mode (AR-157E):
Ensure that no indicator is lit among the original to copy indicators.
Original face up
EQR[HOࡍࠫ㧞㧜㧜㧞ᐕ㧢㧝㧜ᣣޓᦐᣣޓඦ೨㧝㧝ᤨ㧡㧟ಽ

16 set the copy quantity, Exposure adjustment/photo copying
Page 18
- Image
- Text
16
SET THE COPY QUANTITY
Set the number of copies using the two copy quantity (
,
) keys when copying
from the original table or copying from RSPF/SPF.
• Press the right copy quantity key to set the unit digit
from 0 to 9. This key will not change the tens digit.
• Press the left copy quantity key to set the tens digit
from 1 to 9.
EXPOSURE ADJUSTMENT/PHOTO COPYING
Exposure adjustment
Copy density adjustment is not required for most originals in the automatic exposure
mode. To adjust the copy density manually or to copy photographs, the exposure
level can be adjusted in five steps manually.
1
Press the exposure mode selector key to
select the MANUAL (
) mode or
PHOTO (
) mode.
2
Use the light (
) and dark (
) keys to
adjust the exposure level. If exposure level
2 is selected, the two left-handmost
indicators for that level will light up
simultaneously. Also, if level 4 is selected,
the two right-handmost indicators for that
level will light up simultaneously.
• Press the clear (
) key to clear an entry if a mistake is made.
• A single copy can be made with the initial setting, i.e., when «0» is
displayed.
The copy resolution used for AUTO and MANUAL (
) mode can be
changed. (p.23)
Tens digit
Unit digit

Automatic exposure adjustment The automatic exposure level …
Page 19
- Image
- Text
17
3
Automatic exposure adjustment
The automatic exposure level can be adjusted to suit your copying needs. This level is
set for copying from the original table and copying from the RSPF/SPF respectively.
1
When adjusting the automatic exposure level for copying from
the RSPF/SPF, place an original in the original feeder tray and
make sure that the RSPF/SPF (
) indicator lights up. When
adjusting the level for copying from the original table, make
sure that no original is left in the original feeder tray.
2
Press the exposure mode selector key to
select the PHOTO (
) mode.
3
Press and hold down the exposure mode
selector key for approximately 5 seconds.
The PHOTO (
) indicator will go out and
the AUTO indicator will begin to blink. One
or two light and dark indicators
corresponding to the automatic exposure
level which has been selected will light up.
4
Press the light (
) or dark (
) key to
lighten or darken the automatic exposure
level as desired. If exposure level 2 is
selected, the two left-handmost indicators
for that level will light up simultaneously.
Also, if level 4 is selected, the two right-
handmost indicators for that level will
light up simultaneously.
5
Press the exposure selector key. The AUTO indicator will stop
blinking and light up steadily.
This automatic exposure level will remain in effect until you change it
again by this procedure.

18 reduction/enlargement/zoom
Page 20
- Image
- Text
18
REDUCTION/ENLARGEMENT/ZOOM
Three preset reduction ratios and two enlargement ratios can be selected. The zoom
function enables copy ratio selection from 25% to 400% in 1% increments.
1
Set the original and check the paper size.
2
Use the copy ratio selector key and/or ZOOM (
,
) keys to
select the desired copy ratio.
3
Set the reduction/enlargement ratio.
To select a preset copy ratio:
Preset reduction and enlargement ratios are:
25%, 64%, 78%, 129% and 400%.
To select a zoom ratio:
When a ZOOM (
or
) key is pressed, the
ZOOM indicator will light up and the zoom ratio will
be displayed in the display.
• To verify a zoom setting without changing the zoom ratio,
press and hold down the copy ratio display (%) key. When the
key is released, the display will return to the copy quantity
display.
• To reset the ratio to 100%, press the copy ratio selector key
repeatedly until the 100% indicator lights up.
To decrease or increase the zoom ratio rapidly, press and hold
down the ZOOM (
) or (
) key. However the value will
stop at the preset reduction or enlargement ratios. To move
beyond these ratios, release the key and then press and hold it
down again.
