Дигитайзер (оцифровщик) Carestream Vita Flex.
После получения снимка с оцифровщика выплюнул кассету с не полностью вставленным экраном, и при этом появились ошибки: 7078, 7075, 7089.
Самодиагностика не помогает. Вставляем другие кассеты, пытается захватить экран и всё. Приходится вручную доставать кассету, из которой вытянут, оказывается, экран на 1-2 см.
При выключении компа и оцифровщика и последующего его включения, моргает оранжевым кнопка и эти же ошибки сразу сыплются на экране.
Описание ошибок:
7089: Загруженная кассета плохо закреплена или была удалена до извлечения экрана из устройства считывания.
Закрепите кассету или повторно вставьте использовавшуюся ранее кассету, убедившись в её надёжной фиксации.
Чтобы проверить сканер на наличие типичных ошибок, нажмите кнопку для запуска самопроверки.
7078: Сканер не может продолжать работу.
Нажмите ОК приведёт к извлечению кассеты. Примечание. Стирание экрана не будет выполнено. После прочтения данного сообщения об ошибке сотрите кассету вручную.
7075: Сканер не может продолжать работу.
Нажмите ОК приведёт к извлечению кассеты. Примечание. Стирание экрана не будет выполнено. После прочтения данного сообщения об ошибке сотрите кассету вручную.
Note
The first two digits of the error message indicate the error type. If the first two digits are 70XXX,
the occurred error is System error. If the first two digits are 80XXX, the occurred error is related
to Screen Transportation Unit.
Note
The below table provides possible causes and common solutions to the listed errors. After trying
the provided solutions, perform the System Self Test to make sure the system functions properly.
Run System Self Test
Symptom
Error 41, 42, 45
Cassette was ejected due
to time-out. You may
insert cassette again to
perform a scan.
6K7304 | 2014-10-20
Possible Cause
The cassette was ejected due to
two minutes timeout.
Troubleshooting the CR System
Solution
•
Manually eject the cassette from the
scanner, using the manual release
handle under the Screen Transporta-
tion Unit.
•
Short-press the On/Off button to
reset the scanner.
•
Verify that the scanner status is
Ready, before inserting the cassette
and scanning.
8–5
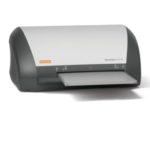
Нас, как и других производителей, часто просят сравнить Vita CR с другими системами. Недавно в руки нам попал документ, производящий такое сравнение моделей, содержащий спорные доводы не в пользу Carestream Vita CR.
Давайте разберемся вместе.
- Максимальное пространственное разрешение. Это сколько вертикальных или горизонтальных линий/точек способна различить система. Чем это число больше, тем изображение информативнее. Другими словами, тем более мелкие особенности мы можем увидеть. Если точек 10 на мм – видим все, что крупнее 0,1 мм, если 12 на мм – все что крупнее 0,083 мм. Вторая сторона пространственного разрешения — это на сколько можно увеличить изображение без появления нерезкости, «мути». При увеличении точки увеличиваются в размерах, становятся расплывчатыми. Чем точка была меньше изначально, тем ее больше можно увеличить, тем самым больше можно увеличить изображение без потери качества. Существуют способы обработки, заявляющие возможности увеличения изображения в два, даже в три раза без потери качества. Картинка при этом будет выглядеть не размытой, но за счет чего? Если на некотором участке было 12 точек, то при увеличении изображения в три раза точек на участке этого же размера будет будет только 4.
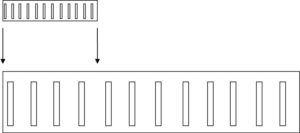
Изменение изображения при увеличении
Что бы изображение воспринималось как раньше, нужно сделать увеличенные полоски тоньше и дорисовать недостающие несколько штук, лучше всего восемь. Будет красиво, только это будет совсем другое изображение, где в угоду красоте восприятия что-то тоньше, что-то толще, что-то добавили-убрали. И что именно, неизвестно, а может вот его то и нужно было рассмотреть!
Чтобы сравнить Vita CR имеет пространственное разрешение 12 точек на мм
- Градационная разрешающая способность бит/пиксель (уровней шкалы серого) при считывании изображения. Т.к. изучаемые нами изображения являются черно-белыми, очень важным параметром является отображаемое количество оттенков серого. Если две соседние линии одного оттенка, быстрее всего мы воспримем их как одну и не различим. Тут все просто, чем число оттенков больше, тем лучше. Количество оттенков записывается двоичным числом, если битов 16, значит можем использовать 2 в степени 16 оттенков серого, т.е. 65536 вариантов серого может быть у каждого пикселя изображения. Опять некоторые хитрые способы нам обещают, что где-то там в глубине будем использовать 20 битов, т.е. раскрасим каждый пиксель в 1048576 вариантов серого, но ПОТОМ, когда будем показывать вам, все снова перекрасим, и вам покажем 65536 вариантов. Т.е. по богатству палитры изображение будет все тем же шестнадцати битным. Даст ли такое двойное преобразование дополнительные преимущества, а главное, увидим ли мы их в реальности, очень спорный вопрос.
Чтобы сравнить Vita CR имеет имеет градационную разрешающую способность 16 бит/пиксель.
- Вес системы. Когда вес системы 1 кг против 8, и каждый день куда-то носить — это существенная разница, а когда это 36 против 29 разница не так уж и важна. Все равно вдвоем нести. А когда стоит на столе и носить не надо, то вообще все равно, стоять будет крепче. А вдруг это все же мобильная система и нужно каждый день ездить в поле? Vita CR всегда готова – погрузил в багажник джипа и поехал. Никаких дополнительных приспособлений для транспортировки не требуется, в отличии от систем конкурентов. Недаром Vita CR стоит на вооружении полевых госпиталей армии США. В нашей стране Vita CR активно устанавливается на грузовики в передвижных рентгеновских комплексах для массовых обследований. Был случай, когда Vita CR замерзла в машине за ночь покрывшись льдом – отогрели строительным феном и начали работать.
Чтобы сранить Vita CR имеет вес 36 кг, всегда готова к транспортировке без дополнительных приспособлений.
- Количество одновременно открытых изображений. Сколько было отсканировано изображений, столько и будет открыто. Обычно открывают одно-два и на этом ограничиваются. Но если очень нужно, откройте пятнадцать, зачем столько, это уже другой вопрос.
Чтобы сравнить Vita CR одновременно может открыть серию из изображений.
- Ресурс одной кассеты, гибкий или жесткий экран. 25-44 кассеты в час. Гибкий экран или нет, не важно, главное качественное изображение с него считывается или нет. Ресурс кассеты тоже не показатель. Если кассета выдерживает большое количество циклов, но и стоит при этом во столько же раз больше, так ли это важно? Важно сравнивать стоимость одного цикла. Скорость обработки. Vita CR и 25 кассет в час и 44 может обрабатывать в зависимости от модификации. Потратить на одну кассету 2 мин 24 сек или 1 мин 22 сек это важно? Пока сканируете одну проекцию, вряд ли быстрее чем за минуту успеете снять другую. Но если скорость вам важна, возьмите модификацию Vita CR 44 кассеты в час.
Чтобы сравнить Vita CR имеет гибкий экран, который ходит 8 тыс. циклов. Кассета на имеет ограничений на количество циклов.
- Программное обеспечение Vita CR работает на системе Windows 7 или 8. Все исследования автоматически подготавливаются к архивированию. По вашему желанию мы можем добавить диск зеркалирования для большей надежности, но за нашу семилетнюю практику диски компьютеров физически ни разу не разрушались. А так как исследования все равно необходимо сохранять на носителе, не принадлежащем данному компьютеру, мы считаем зеркалирование избыточным. Отличительной особенностью ПО Vita CR является способность работать по локальной сети, предоставляя дополнительные четыре полноценные рабочих места через web-браузер, обслуживая таким образом одновременно пять специалистов, в том числе и через Интернет. Для подключения данной возможности требуется ввести лишь ключ активации.
- Гарантийный срок. Мы даем два года гарантии на приобретаемое оборудование Vita CR, вводим его в эксплуатацию и обучаем персона заказчика. За прошедшие шесть лет поставок не было ни одного нарекания к нашей службе поддержки, клиенты звонят даже в выходные и получают совет. Все консультации по телефону бесплатны в течение всего срока эксплуатации. Случаи поломок единичны, максимально быстро проводим ремонт.
Возможно, Вас также заинтересует
-
Contents
-
Table of Contents
-
Troubleshooting
-
Bookmarks
Quick Links
Related Manuals for Carestream DRYVIEW 5700
Summary of Contents for Carestream DRYVIEW 5700
-
Page 1
User’s Guide… -
Page 2
Carestream Health, Inc. 150 Verona Street Rochester, New York 14608 © Carestream Health, Inc., 2011 Pub No. 9G3886_en Rev. A… -
Page 3: Table Of Contents
Table of Contents 1 Overview Major internal assemblies ……………………..1-2 How the laser imager works ……………………..1-3 Film sizes …………………………..1-4 Automatic image quality and processing ………………….1-4 Configuring and monitoring the system (using the Web Portal) ……………1-4 Enhancing serviceability with remote monitoring ………………..1-5 Agency compliance ……………………….
-
Page 4
5 Specifications Equipment Specifications ……………………..5-1 Operating Space Requirements ……………………5-1 Environmental Requirements …………………….. 5-1 Environmental Effects ……………………….. 5-2 Power Requirements ……………………….5-2 Network Requirements ……………………… 5-2… -
Page 5: Overview
Overview Overview The Laser Imaging System is a continuous-tone laser imager with an internal photothermographic film processor. Heat, rather than photo chemicals, is used to develop the film. This easy-to-use and reliable laser imager provides high quality prints. Use the prints from this system for: •…
-
Page 6: Major Internal Assemblies
Overview Major internal assemblies H210_1012HC Exposure transport. Moves the film past the scanning laser beam. Transport guides. Orient and center the film while moving the film from the supply to the imaging portion of the laser imager. DICOM Raster Engine (DRE). A computer board that receives, processes, and manages the images. Feed rollers.
-
Page 7: How The Laser Imager Works
Overview How the laser imager works The laser imager receives, processes, manages, and prints the images on film. The laser imager has limited storage to hold a small number of digital images. As images are received for printing, they are stored in memory, placed in a sequential print queue, and are printed in order.
-
Page 8: Film Sizes
Overview Film sizes The laser imager supports four sizes: • 35 x 43 cm (14 x 17 in.) • 28 x 35 cm (11 x 14 in.) • 25 x 30 cm (10 x 12 in.) • 20 x 25 cm (8 x 10 in.) For the specific films that are supported, see the Publications Cover Page.
-
Page 9: Enhancing Serviceability With Remote Monitoring
Overview Enhancing serviceability with remote monitoring Remote Management Services is set up through the Web Portal, and is designed to enhance efficient system serviceability and simplify analytical and service processes through the monitoring of your equipment. Additionally, this simplifies the service process by providing qualified service personnel with faster, easier, and more complete access to the operational history of each system.
-
Page 11: Basic Operating Tasks
Basic Operating Tasks Basic Operating Tasks During normal operation, the laser imager receives and automatically prints images sent by modalities over a network. Very little interaction is required. You may do the following: • Turn the power on (|) and off (0). •…
-
Page 12: Understanding The Display Screen
Basic Operating Tasks Understanding the display screen The display screen communicates the status of the laser imager. Symbol or code Description Top left of the Error or status code. The 3-digit code displays when the error or status condition is present. display screen: for a complete list of the codes and how “Chapter 3 Maintenance and Troubleshooting”…
-
Page 13: Turning The Power On And Off
Basic Operating Tasks Turning the power on and off To start the laser imager, press the power switch on the back of the laser imager to on (|). Wait as the laser imager warms up. The warm-up period might last up to 30 minutes. The display screen shows the progress as the laser imager becomes ready to print.
-
Page 14
Basic Operating Tasks Restarting the laser If the laser imager encounters an error that is usually corrected with a restart, the display screen shows the Restart symbol. imager The error code indicates Restart the error condition. You may want to check the “Troubleshooting”… -
Page 15: Working With Film Cartridges
Basic Operating Tasks Working with film cartridges Checking film count The film count displays on the laser imager display screen. Film count 125 indicates a full cartridge Checking the size of The film size displays in the same location as the film count. The display screen alternates between the film count and the size of the loaded film.
-
Page 16
Basic Operating Tasks Inserting a new film Before you insert a new film cartridge, make sure that the Pause symbol is off. During normal operation, the symbol is off. When the film cartridge cartridge cover is open, the symbol is on. To avoid exposing the film to light, do not open the film supply until the Pause symbol is off. -
Page 17
Basic Operating Tasks Loading a different If a print request requires a different film size, the requested film size flashes on the display screen. Change the installed film to match the print film size to match a request. print request Screen 1: «35»… -
Page 18: Deleting Pending Jobs
Basic Operating Tasks Deleting pending jobs To cancel all print requests, press and hold the Film Size symbol for five seconds. All print requests are deleted from the queue. Press this symbol for five seconds NOTE: • A print request that cannot be printed is automatically deleted from the laser imager.
-
Page 19: Calibrating The Laser Imager For The Installed Film
Basic Operating Tasks Calibrating the laser imager for the installed film In normal operating conditions, it is not necessary to calibrate the laser imager for the film. Run a calibration when: • Code 001 appears on the display screen. • A calibration error occurs, indicated by codes 624, 631, or 632 on the display screen.
-
Page 20: Using The Web Portal To Access Additional Functionality
Basic Operating Tasks Using the Web Portal to access additional functionality The Web Portal is your interface to additional features. In addition to the installation and setup of your system, you can view and manage the laser imager’s connections over the network, configure features, view error messages and access general status information at the Web Portal.
-
Page 21: Maintenance And Troubleshooting
Maintenance and Troubleshooting Maintenance and Troubleshooting Use the information in this chapter to keep the laser imager in the best condition and to correct minor problems. • “Overview: Status and error messages and codes” on page 3-1 • “Preventive maintenance” on page 3-2 — Learn how to respond to the Maintenance symbol when it appears •…
-
Page 22: Preventive Maintenance
Maintenance and Troubleshooting Preventive maintenance NOTE: These conditions are also reported at the Web Portal. CAUTION Replacing the filter In the U.S., exhausted filters are considered to be non-hazardous waste according to the US Environmental Protection Agency Resource Conservation Recovery Act (RCRA).
-
Page 23: Error Indicators On The Display Screen
Maintenance and Troubleshooting 3. Install a new charcoal filter. 4. Close the film supply. 5. To reset the laser imager for the new filter and to clear the Maintenance symbol, press and then release the Maintenance and Calibrate symbols at the same time. 550 code and If the laser imager needs a preventive maintenance service call, the 550 code and Maintenance symbol appear:…
-
Page 24
Maintenance and Troubleshooting Required restart When the Restart symbol appears, you must restart before the laser imager can continue to print. Restart the laser imager 1. Press the power switch on the back of the laser imager off (0). 2. Press the power switch on (|). 3. -
Page 25: Using The Web Portal To Gain More Information On Errors
Maintenance and Troubleshooting Using the Web Portal to gain more information on errors The Web Portal is your interface to additional functions on the laser imager. You can view and correct error messages and access general status information at the Web Portal. To access the Web Portal, see “Using the Web Portal to access additional functionality”…
-
Page 26
Maintenance and Troubleshooting Printer Printer Display Screen Web Portal DICOM Status Description Status Cover is open Code: 701 20701: Cover WARNING / COVER The top cover is open or one of Open OPEN the side panels may be off. The Power symbol is yellow laser imager is not ready to print. -
Page 27
Maintenance and Troubleshooting Film Cartridge Film Display Screen Web Portal Description Cartridge State Failed Power symbol is yellow Failed An error has occurred that affects normal operation. This film Pause and Calibrate symbols are off cartridge is currently not usable. Film count is replaced by dashes Reinsert the cartridge. -
Page 28
Maintenance and Troubleshooting Film Display Screen Web Portal Description Cartridge State Cartridge closure Power symbol is green Pause Requested You pressed the Pause button, but is pending the rollback has not started because Calibrate symbol is off films are still moving through the Pause symbol is on laser imager. -
Page 29: Condition Codes
Maintenance and Troubleshooting Condition codes Condition codes are shown on the display screen in the order in which they are generated. If there is more than one code associated with the current condition of the laser imager, the first code is shown on the display screen for six seconds, while other codes in the list display for three seconds as the list is cycled.
-
Page 30
Maintenance and Troubleshooting Display Web Portal Action Screen Portal Message 20154 MCS: Internal Restart the laser imager. See page 2-4. Communications Failure If the error persists, call for service. 20155 Incompatible MCS Printer Restart the laser imager. See page 2-4. Configuration for Hardware If the error persists, call for service. -
Page 31
Maintenance and Troubleshooting Display Web Portal Action Screen Portal Message 21118 Film Supply: Internal If the Pause symbol is on, press it to cover the film cartridge. Hardware Failure When the Pause symbol stops flashing, remove the film cartridge from the laser imager. Then reinsert the film cartridge into the laser imager. -
Page 32
Maintenance and Troubleshooting Display Web Portal Action Screen Portal Message 21178 Rollback Failed to Leave If the Pause symbol is on, press it to cover the film cartridge. Home When the Pause symbol stops flashing, remove the film cartridge from the laser imager. Insert a different film cartridge into the laser imager. -
Page 33
Maintenance and Troubleshooting Display Web Portal Action Screen Portal Message 27607 Optics: Calibration Failed Restart the laser imager. See page 2-4. If the error persists, call for service. 27611 Optics: Internal Hardware Restart the laser imager. See page 2-4. Failure If the error persists, call for service. -
Page 34: Correcting Film Jams
Maintenance and Troubleshooting Correcting film jams When film is jammed, the display screen indicates a jam and an error code that provides guidance on where to check for the jammed film. NOTE: These errors are also reported at the Web Portal. Check the code to know where to find the jammed film…
-
Page 35
Maintenance and Troubleshooting For some jams, you can remove the film by turning a knob to move the film out of the laser imager. See details in the film jam instructions. Knobs for manual film removal Manual rollback knob Exit Roller Knob Front of laser imager Exposure Transport Knob H210_1013HAB… -
Page 36
Maintenance and Troubleshooting Film jam code 323 / NOTE: This error displays as code 26323 at the Web Portal. Jam in Area 2 1. If the Pause symbol is on, press it and wait until it goes off. 2. Open the film supply. 3. -
Page 37
Maintenance and Troubleshooting Film jam code 326 / NOTE: This error displays as code 26326 at the Web Portal. Jam in Area 2 or 3 1. If the Pause symbol is on, press it and wait until it goes off. 2. -
Page 38: Display Screen Is Not Functional
Maintenance and Troubleshooting Film jam code 543 / This error displays as code 26543 at the Web Portal. Jam in Area 3 1. If the Pause symbol is on, press it and wait until it goes off. 2. Open the top cover. 3.
-
Page 39: Film Technical Information
Film Technical Information Film Technical Information General description This section describes the characteristics of Laser Imaging Film, not the operation of the laser imager. The Laser Imaging Film is a high-resolution, infrared-sensitive, photothermographic film designed specifically for the Laser Imager. Spectral sensitivity The Laser Imaging Film is infrared sensitive and has been sensitized to the infrared laser diode of the laser imagers.
-
Page 40
Film Technical Information Environmental impact Tests show that the Laser Imaging Film is not considered hazardous to the environment. As a result, you can develop, recycle, and dispose of film with less impact on the environment than if you were using wet-developed silver halide films. -
Page 41
Film Technical Information Take care when using spotlight viewing for more than 30 seconds because temperatures near the light source may exceed 82.2° C (180° F). Use in slide projectors is not recommended due to the high temperatures generally found in these devices. With dry technology, a small amount of final development occurs when the film exits the laser imager and is initially exposed to ambient or view-box lighting. -
Page 43
Specifications Equipment specifications Unpacked Packed Height 47 cm (19 in.) 74 cm (29 in.) Width 61 cm (24 in.) 79 cm (31 in.) Depth 66 cm (26 in.) 85 cm (34 in.) Weight 54 kg (120 lbs) 73 kg (160 lbs) Operating space requirements Allow 5 cm (2 in.) clearance around the top, sides, and back of the laser imager. -
Page 44
Specifications Power requirements A power cord is provided with this equipment. All countries must use an Agency-approved power cord with a plug type suitable for the country of use. Contact a qualified dealer for help. Connect the equipment to a power source that is suitable for the voltage and current ratings shown on the rating label.
-
Contents
-
Table of Contents
-
Troubleshooting
-
Bookmarks
Quick Links
Related Manuals for Carestream DRYVIEW 5700
Summary of Contents for Carestream DRYVIEW 5700
-
Page 1
User’s Guide… -
Page 2
Carestream Health, Inc. 150 Verona Street Rochester, New York 14608 © Carestream Health, Inc., 2011 Pub No. 9G3886_en Rev. A… -
Page 3: Table Of Contents
Table of Contents 1 Overview Major internal assemblies ……………………..1-2 How the laser imager works ……………………..1-3 Film sizes …………………………..1-4 Automatic image quality and processing ………………….1-4 Configuring and monitoring the system (using the Web Portal) ……………1-4 Enhancing serviceability with remote monitoring ………………..1-5 Agency compliance ……………………….
-
Page 4
5 Specifications Equipment Specifications ……………………..5-1 Operating Space Requirements ……………………5-1 Environmental Requirements …………………….. 5-1 Environmental Effects ……………………….. 5-2 Power Requirements ……………………….5-2 Network Requirements ……………………… 5-2… -
Page 5: Overview
Overview Overview The Laser Imaging System is a continuous-tone laser imager with an internal photothermographic film processor. Heat, rather than photo chemicals, is used to develop the film. This easy-to-use and reliable laser imager provides high quality prints. Use the prints from this system for: •…
-
Page 6: Major Internal Assemblies
Overview Major internal assemblies H210_1012HC Exposure transport. Moves the film past the scanning laser beam. Transport guides. Orient and center the film while moving the film from the supply to the imaging portion of the laser imager. DICOM Raster Engine (DRE). A computer board that receives, processes, and manages the images. Feed rollers.
-
Page 7: How The Laser Imager Works
Overview How the laser imager works The laser imager receives, processes, manages, and prints the images on film. The laser imager has limited storage to hold a small number of digital images. As images are received for printing, they are stored in memory, placed in a sequential print queue, and are printed in order.
-
Page 8: Film Sizes
Overview Film sizes The laser imager supports four sizes: • 35 x 43 cm (14 x 17 in.) • 28 x 35 cm (11 x 14 in.) • 25 x 30 cm (10 x 12 in.) • 20 x 25 cm (8 x 10 in.) For the specific films that are supported, see the Publications Cover Page.
-
Page 9: Enhancing Serviceability With Remote Monitoring
Overview Enhancing serviceability with remote monitoring Remote Management Services is set up through the Web Portal, and is designed to enhance efficient system serviceability and simplify analytical and service processes through the monitoring of your equipment. Additionally, this simplifies the service process by providing qualified service personnel with faster, easier, and more complete access to the operational history of each system.
-
Page 11: Basic Operating Tasks
Basic Operating Tasks Basic Operating Tasks During normal operation, the laser imager receives and automatically prints images sent by modalities over a network. Very little interaction is required. You may do the following: • Turn the power on (|) and off (0). •…
-
Page 12: Understanding The Display Screen
Basic Operating Tasks Understanding the display screen The display screen communicates the status of the laser imager. Symbol or code Description Top left of the Error or status code. The 3-digit code displays when the error or status condition is present. display screen: for a complete list of the codes and how “Chapter 3 Maintenance and Troubleshooting”…
-
Page 13: Turning The Power On And Off
Basic Operating Tasks Turning the power on and off To start the laser imager, press the power switch on the back of the laser imager to on (|). Wait as the laser imager warms up. The warm-up period might last up to 30 minutes. The display screen shows the progress as the laser imager becomes ready to print.
-
Page 14
Basic Operating Tasks Restarting the laser If the laser imager encounters an error that is usually corrected with a restart, the display screen shows the Restart symbol. imager The error code indicates Restart the error condition. You may want to check the “Troubleshooting”… -
Page 15: Working With Film Cartridges
Basic Operating Tasks Working with film cartridges Checking film count The film count displays on the laser imager display screen. Film count 125 indicates a full cartridge Checking the size of The film size displays in the same location as the film count. The display screen alternates between the film count and the size of the loaded film.
-
Page 16
Basic Operating Tasks Inserting a new film Before you insert a new film cartridge, make sure that the Pause symbol is off. During normal operation, the symbol is off. When the film cartridge cartridge cover is open, the symbol is on. To avoid exposing the film to light, do not open the film supply until the Pause symbol is off. -
Page 17
Basic Operating Tasks Loading a different If a print request requires a different film size, the requested film size flashes on the display screen. Change the installed film to match the print film size to match a request. print request Screen 1: «35»… -
Page 18: Deleting Pending Jobs
Basic Operating Tasks Deleting pending jobs To cancel all print requests, press and hold the Film Size symbol for five seconds. All print requests are deleted from the queue. Press this symbol for five seconds NOTE: • A print request that cannot be printed is automatically deleted from the laser imager.
-
Page 19: Calibrating The Laser Imager For The Installed Film
Basic Operating Tasks Calibrating the laser imager for the installed film In normal operating conditions, it is not necessary to calibrate the laser imager for the film. Run a calibration when: • Code 001 appears on the display screen. • A calibration error occurs, indicated by codes 624, 631, or 632 on the display screen.
-
Page 20: Using The Web Portal To Access Additional Functionality
Basic Operating Tasks Using the Web Portal to access additional functionality The Web Portal is your interface to additional features. In addition to the installation and setup of your system, you can view and manage the laser imager’s connections over the network, configure features, view error messages and access general status information at the Web Portal.
-
Page 21: Maintenance And Troubleshooting
Maintenance and Troubleshooting Maintenance and Troubleshooting Use the information in this chapter to keep the laser imager in the best condition and to correct minor problems. • “Overview: Status and error messages and codes” on page 3-1 • “Preventive maintenance” on page 3-2 — Learn how to respond to the Maintenance symbol when it appears •…
-
Page 22: Preventive Maintenance
Maintenance and Troubleshooting Preventive maintenance NOTE: These conditions are also reported at the Web Portal. CAUTION Replacing the filter In the U.S., exhausted filters are considered to be non-hazardous waste according to the US Environmental Protection Agency Resource Conservation Recovery Act (RCRA).
-
Page 23: Error Indicators On The Display Screen
Maintenance and Troubleshooting 3. Install a new charcoal filter. 4. Close the film supply. 5. To reset the laser imager for the new filter and to clear the Maintenance symbol, press and then release the Maintenance and Calibrate symbols at the same time. 550 code and If the laser imager needs a preventive maintenance service call, the 550 code and Maintenance symbol appear:…
-
Page 24
Maintenance and Troubleshooting Required restart When the Restart symbol appears, you must restart before the laser imager can continue to print. Restart the laser imager 1. Press the power switch on the back of the laser imager off (0). 2. Press the power switch on (|). 3. -
Page 25: Using The Web Portal To Gain More Information On Errors
Maintenance and Troubleshooting Using the Web Portal to gain more information on errors The Web Portal is your interface to additional functions on the laser imager. You can view and correct error messages and access general status information at the Web Portal. To access the Web Portal, see “Using the Web Portal to access additional functionality”…
-
Page 26
Maintenance and Troubleshooting Printer Printer Display Screen Web Portal DICOM Status Description Status Cover is open Code: 701 20701: Cover WARNING / COVER The top cover is open or one of Open OPEN the side panels may be off. The Power symbol is yellow laser imager is not ready to print. -
Page 27
Maintenance and Troubleshooting Film Cartridge Film Display Screen Web Portal Description Cartridge State Failed Power symbol is yellow Failed An error has occurred that affects normal operation. This film Pause and Calibrate symbols are off cartridge is currently not usable. Film count is replaced by dashes Reinsert the cartridge. -
Page 28
Maintenance and Troubleshooting Film Display Screen Web Portal Description Cartridge State Cartridge closure Power symbol is green Pause Requested You pressed the Pause button, but is pending the rollback has not started because Calibrate symbol is off films are still moving through the Pause symbol is on laser imager. -
Page 29: Condition Codes
Maintenance and Troubleshooting Condition codes Condition codes are shown on the display screen in the order in which they are generated. If there is more than one code associated with the current condition of the laser imager, the first code is shown on the display screen for six seconds, while other codes in the list display for three seconds as the list is cycled.
-
Page 30
Maintenance and Troubleshooting Display Web Portal Action Screen Portal Message 20154 MCS: Internal Restart the laser imager. See page 2-4. Communications Failure If the error persists, call for service. 20155 Incompatible MCS Printer Restart the laser imager. See page 2-4. Configuration for Hardware If the error persists, call for service. -
Page 31
Maintenance and Troubleshooting Display Web Portal Action Screen Portal Message 21118 Film Supply: Internal If the Pause symbol is on, press it to cover the film cartridge. Hardware Failure When the Pause symbol stops flashing, remove the film cartridge from the laser imager. Then reinsert the film cartridge into the laser imager. -
Page 32
Maintenance and Troubleshooting Display Web Portal Action Screen Portal Message 21178 Rollback Failed to Leave If the Pause symbol is on, press it to cover the film cartridge. Home When the Pause symbol stops flashing, remove the film cartridge from the laser imager. Insert a different film cartridge into the laser imager. -
Page 33
Maintenance and Troubleshooting Display Web Portal Action Screen Portal Message 27607 Optics: Calibration Failed Restart the laser imager. See page 2-4. If the error persists, call for service. 27611 Optics: Internal Hardware Restart the laser imager. See page 2-4. Failure If the error persists, call for service. -
Page 34: Correcting Film Jams
Maintenance and Troubleshooting Correcting film jams When film is jammed, the display screen indicates a jam and an error code that provides guidance on where to check for the jammed film. NOTE: These errors are also reported at the Web Portal. Check the code to know where to find the jammed film…
-
Page 35
Maintenance and Troubleshooting For some jams, you can remove the film by turning a knob to move the film out of the laser imager. See details in the film jam instructions. Knobs for manual film removal Manual rollback knob Exit Roller Knob Front of laser imager Exposure Transport Knob H210_1013HAB… -
Page 36
Maintenance and Troubleshooting Film jam code 323 / NOTE: This error displays as code 26323 at the Web Portal. Jam in Area 2 1. If the Pause symbol is on, press it and wait until it goes off. 2. Open the film supply. 3. -
Page 37
Maintenance and Troubleshooting Film jam code 326 / NOTE: This error displays as code 26326 at the Web Portal. Jam in Area 2 or 3 1. If the Pause symbol is on, press it and wait until it goes off. 2. -
Page 38: Display Screen Is Not Functional
Maintenance and Troubleshooting Film jam code 543 / This error displays as code 26543 at the Web Portal. Jam in Area 3 1. If the Pause symbol is on, press it and wait until it goes off. 2. Open the top cover. 3.
-
Page 39: Film Technical Information
Film Technical Information Film Technical Information General description This section describes the characteristics of Laser Imaging Film, not the operation of the laser imager. The Laser Imaging Film is a high-resolution, infrared-sensitive, photothermographic film designed specifically for the Laser Imager. Spectral sensitivity The Laser Imaging Film is infrared sensitive and has been sensitized to the infrared laser diode of the laser imagers.
-
Page 40
Film Technical Information Environmental impact Tests show that the Laser Imaging Film is not considered hazardous to the environment. As a result, you can develop, recycle, and dispose of film with less impact on the environment than if you were using wet-developed silver halide films. -
Page 41
Film Technical Information Take care when using spotlight viewing for more than 30 seconds because temperatures near the light source may exceed 82.2° C (180° F). Use in slide projectors is not recommended due to the high temperatures generally found in these devices. With dry technology, a small amount of final development occurs when the film exits the laser imager and is initially exposed to ambient or view-box lighting. -
Page 43
Specifications Equipment specifications Unpacked Packed Height 47 cm (19 in.) 74 cm (29 in.) Width 61 cm (24 in.) 79 cm (31 in.) Depth 66 cm (26 in.) 85 cm (34 in.) Weight 54 kg (120 lbs) 73 kg (160 lbs) Operating space requirements Allow 5 cm (2 in.) clearance around the top, sides, and back of the laser imager. -
Page 44
Specifications Power requirements A power cord is provided with this equipment. All countries must use an Agency-approved power cord with a plug type suitable for the country of use. Contact a qualified dealer for help. Connect the equipment to a power source that is suitable for the voltage and current ratings shown on the rating label.

+7 495 230 11 55 info@ds-med.ru

| Максимальный размер кассеты | 43х35 см |
|---|---|
| Производительность | до 45 кассет в час |
получить коммерческое предложение
ПОЛУЧИТЕ ВЫГОДНОЕ ПРЕДЛОЖЕНИЕ
Укажите свои контактные данные ниже:
- Описание
- Детали
- ОПЛАТА И ДОСТАВКА
Описание
Компактная, легкая и прочная однокассетная система компьютерной рентгенографии с производительностью 45 кассет в час позволяет быстро получать цифровое рентгеновское изображение в любом месте, где требуется помощь пациенту.
Carestream Vita Flex разработана для небольших и средних лечебных учреждений, частных клиник и частных врачей, которым требуется решение для получения цифровых рентгеновских снимков по доступной цене.
Преимущества
- Максимальный размер кассеты: 43х35 см
- Разрешение серой шкалы: Глубина — 16 бит на 1 px
- Габариты (В х Ш х Г): 45,0 х 68,0 х 34,0 см. Вес 25 кг
- Питание: Одна фаза 50/60 Гц, 100-240 В, 4А
ОПЛАТА И ДОСТАВКА

- Быстрая доставка в любой город России.
- Cтрахование груза.
- Короткие сроки поставки от производителя.
- Гибкие условия оплаты: рассрочка и лизинг.
- Гарантия выгодной цены.
Описание
Технические характеристики
Описание
Инновационные возможности установки и обслуживания
При использовании системы Vita Flex используется новый подход к процедурам установки и обслуживания. Разумеется, вы можете заказать выполнение данных процедур, обратившись к специалистам технической поддержки нашей компании. Однако если вы хоть немного разбираетесь в установке или обслуживании систем, то сможете самостоятельно выполнить данные процедуры, экономя при этом собственное время и деньги. Вам не потребуются специальные инструменты или углубленные технические знания!
Упрощенный рабочий процесс
- Отсутствие необходимости в приобретении расходных материалов
- Отсутствие необходимости в работе с агрессивными химикатами
- Отсутствие необходимости в печати снимков на пленке
Небольшая и легкая конструкция
- Экономия пространства благодаря компактной конструкции системы Vita Flex
- Возможность размещения в вертикальном или горизонтальном положении для установки в маленьких помещениях
- Легкое перемещение для проведения визуализации вне рабочего кабинета
Изображения высокого качества
- Переход к получению высококачественных цифровых изображений
- Удобное и простое использование программы получения изображений Image Suite
- Большой выбор высокоэффективных инструментов анализа, повышающих качество диагностики
Оперативность
- Мгновенный просмотр высококачественных изображений
- Выбор необходимой скорости сканирования (30 или 45 кассет в час)
Многофункциональность
- Возможность выбора кассет разного размера, включая кассеты для получения стоматологических интраоральных изображений
- Уверенное проведение всех основных типов исследования
ИДЕАЛЬНА ДЛЯ ИСПОЛЬЗОВАНИЯ ВНЕ РАБОЧЕГО КАБИНЕТА
Необходимо взять систему Vita Flex с собой? Благодаря небольшому размеру и весу систему можно с легкостью перевозить и использовать в полевых условиях.
Технические характеристики
| Разрешение | |
|---|---|
| Пространственное разрешение | 12 пикселей/мм и 6 пикселей/мм |
| Размер матрицы для формата 35×43 см | 4048×4932 пикселей |
| Разрешение в оттенках серого получение | 16 бит на пиксель |
| Разрешение в оттенках серого вывод | 12 бит на пиксель |
| Производительность | |
| при разрешении 6 пикселей/мм | 45 пластин в час |
| при разрешении 12 пикселей/мм | 33 пластины в час |
| Время стирания | от 7 до 80 с (в зависимости от облучения экрана) |
| Физические характеристики | |
| Вес | 25 кг |
| Габариты | 68(Ш)×34(Г)×45(В) см |
| Тип экрана | Гибкий люминесцентный экран GP2 |
| Расположение устройства | Горизонтальное или вертикальное |
| Динамический диапазон | от 0 до 40 мР |
| Номинальное электропитание | 100–240 В переменного тока, 50–60 Гц |
| Максимальная потребляемая мощность | 120 Вт |
| Энергопотребление в «режиме ожидания» | 42 Вт |
Воспользуйтесь нашими главными преимуществами
Бесплатная аппробация
Даем возможность протестировать оборудование до приобретения.
Комплексное решение
Сопровождаем на всех этапах запуска бизнеса от получения необходимой документации на рентген кабинет до ввода в эксплуатацию оборудования.
Доступный лизинг и рассрочка
Предлагаем удобные для вас финансовые условия и формы платежа.
Поставка в течение 7 дней
Оснащение вашего бизнеса «под ключ» в течение одной недели.
Прямые поставки с завода
Все оборудование в наличии и готово к отгрузке в удобное для вас время.
Сервисная поддержка
Инженеры высшей категории оказывают круглосуточную поддержку наших клиентов.
Получить консультацию