1 Introduction
The right place to report bugs is Blender’s bug tracker. Before you start writing your ticket, please read the following post. It will help you write a good bug report that allows developers to identify the source of the problem and thus fix the issue as soon as possible.
2 Preparation
The first step is to ensure that the issue is actually a bug in Blender and that you can provide enough information for others to
reproduce it on their system.
2.1 Minimum requirements
In order to run Blender properly, you have to ensure that your hardware fulfills the minimum requirements. The supported graphics
cards are particularly important. If your hardware is not supported, you may experience graphics glitches, crashes or may not be able
to start Blender at all. The developers do not provide support on the bug tracker for hardware that doesn’t meet the minimum requirements.
Please note that the requirements for GPU rendering are higher than the minimum requirements for running Blender. In case you don’t see any GPUs listed as render device in the preferences («No compatible GPUs found for path tracing»), then this is most likely the reason why. It could also happen that your graphics driver is out-dated as explained in the next section.
If you’re able to start Blender, you can get all the system information through Help > Save System Info.
2.2 Update graphics driver
Crashes of Blender or even the entire operating system can be caused by bugs in the graphics driver. Updating the graphics driver to the most recent version should minimize the likelihood that this is the cause of your problem. You may have to update the driver for both your integrated GPU and dedicated GPU.
Blender’s manual provides additional information for troubleshooting on all supported operating systems.
2.2.1 Windows
The most recent driver for Nvidia, AMD and Intel graphics cards can be downloaded from their respective websites.
2.2.2 macOS
On macOS the graphics card driver is tied to the operating system version, therefore it may be necessary to update the OS.
At the time of writing the GPU rendering support for Cycles is limited. GPU rendering with OpenCL is only available in versions prior to 2.80 because Apple has deprecated their OpenCL compiler. GPU rendering with CUDA is only possible in versions before 2.9x because Nvidia discontinued the development of the CUDA Toolkit for macOS. For a more detailed explanation see this answer. As a consequence you may not find your GPUs listed as supported render device in the user preferences. This is not a bug.
2.2.3 Linux
Please note that OpenCL GPU rendering with AMD graphics cards on Linux requires the installation of the AMDGPU-PRO Driver. Consult your distribution’s documentation to install and update the driver.
2.3 Reproducible steps and minimal project
Try to identify and write down a precise list of steps that result in the issue that you’re experiencing. Ideally these instructions should allow to reproduce the problem beginning from the default startup file. If the problem only occurs in a specific project, try to create a minimal version of it. Remove anything that’s not relevant to the issue.
The instructions should be detailed enough that anyone who is proficient in Blender is able to produce the same result that you’re getting. Please use standard nomenclature in your description. Should you be unsure how certain parts of the user interface are called, consult the manual.
2.4.1 Test the latest versions
The issue may already be fixed in a more recent version of Blender. Test with both the latest stable release and the most recent daily build.
If you need to test a specific project file, create a backup copy of it. This is meant as a precaution, since files saved in a newer version of Blender may not open in the older versions of Blender that you’re usually using. When you’re trying to check if the issue still occurs in the most recent version of Blender, use File > Open to load the project file. Don’t open the project file from your operating system’s file browser as this may open a different version of Blender that is associated with the file extension.
In case the issue doesn’t occur in the latest stable release, you should continue to use that version. If the issue is fixed in the daily build, you should continue to use your current version and update as soon as a new stable release is published.
2.4.2 Test previous versions (optional)
If you are able to, check if you can find the most recent previous releases of Blender that does not have the issue. This can help the developers to narrow down when the bug was introduced and what change has caused it. The portable releases (*.zip and *.tar.xz) don’t require any installation, they just have to be extracted and thus allow for easy testing. You should not test further back than Blender 2.79b.
2.5 Check if it’s a (new) bug
If you’re unsure whether or not the issue is a bug, or if it could be a misunderstanding how Blender works, post a question on one of our community websites. For example:
- Blender’s chat support channel
- Blender’s StackExchange
- blenderartists.org
In case your issue requires an enhancement or new feature in Blender, it’s not a bug. Feature requests can be posted on right-click select.
Should you be fairly certain that it’s a bug, verify that it hasn’t already been reported. If you find an existing ticket that matches your issue exactly and others had trouble reproducing it, please add your step by step instructions in a comment.
2.6 Create a debug log
Blender can output detailed debug information when one of the debug CLI flags are used. If you’re either experiencing a crash or Blender displays an error message, you should create a debug log file that can be attached to your bug report.
Additional log files with different CLI flags may be requested by the developers, but should’t be provided up front.
2.6.1 Windows
Open Blender’s installation directory and double-click on the blender_debug_log.cmd. This will start Blender in debug mode and create log files. Try to reproduce the error while Blender is open in debug mode. Close it once the error occured. The Windows Explorer should open automatically and show you two files. Copy them to a location that you know and attach them to your bug report in the following chapter.
In case Blender 2.9x or later crashes, it will create a crash log that contains valuable information about where the error occurred. This file should also be attached to your report. The location is determined by the environment variable TEMP. If you haven’t modified this environment variable, it will point to C:Users[your username]AppDataLocalTemp (replace [your username] with the actual username on your system). In order to locate the crash log, open the Windows Explorer (Win+E) and type %TEMP% into the path bar. The name of the crash log will be the same as your project file, but with the file extension .crash.txt. If you haven’t previously saved the project before, it will be blender.crash.txt.
2.6.1 Linux
Open Blender and save the system information through Help > Save System Info. Open a terminal in Blender’s installation directory and start Blender with the --debug and --debug-cycles flag. Redirect the output for both stdout and stderr to a file. The example command below places the log file in your home directory.
./blender --debug --debug-cycles > ~/blender_debug_output.txt 2>&1
Attach the system information and log file to your bug report in the following chapter.
In case Blender 2.9x or later crashes, it will also create a crash log that contains a stack trace. The file can be found in the /tmp directory. It will be named like your project file, but with the file extension .crash.txt. If you haven’t previously saved the project before, it will be saved as blender.crash.txt. This file should also be attached to your report.
2.6.2 macOS
Open Blender and save the system information through Help > Save System Info. Open a terminal and start Blender with the --debug and --debug-cycles flag. Redirect the output for both stdout and stderr to a file. The example command below places the log file in your home directory.
/Applications/Blender.app/Contents/MacOS/Blender --debug --debug-cycles > ~/blender_debug_output.txt 2>&1
Attach the system information and log file to your bug report in the following chapter.
In case Blender crashes the macOS Crash Reporter will open and show you a detailed report with a stack trace. You should copy the text, save it in a text file and also attach it to your report.
3 Create the report
Create an account on developer.blender.org.
There are two different templates for reporting bugs, one for add-ons and one for Blender itself.
If you want to report a bug in an add-on:
- Open Blender.
- Open the preferences and navigate to the add-ons (Edit > Preferences > Add-ons).
- Find the add-on you would like to report a bug for.
- Check that it’s an official add-on that is shipped with Blender. If it isn’t, contact the developer directly.
The bug tracker is only for add-ons that are distributed with Blender. - Open the details section of the add-on and click Report a Bug.
If you want to report a bug in Blender:
- Open Blender.
- Use Help > Report a Bug.
- Add which versions of Blender do not work.
- Add which version of Blender works.
If you cannot open Blender and want to report a bug:
- Use the bug report template.
- Add your operating system and graphics card information.
- Add which versions of Blender do not work.
- Add which version of Blender works.
Once you’ve logged in you should see the submission template. Anything in square brackets should be replaced
with the information about your problem. Should you have trouble writing in English, then please write the report in your native language and include a machine translated text alongside.
- Give your ticket a descriptive title. It should ideally explain what’s broken and where.
- Add a short description of your problem to «Short description of the error». You may include a screenshot
if the problem is hard to describe. - Add the detailed steps to reproduce the issue from section «2.3 Reproducible steps and minimal project» to
«Exact steps for others to reproduce the error». - Attach your system information file, debug log and crash log to the bug report by pressing the upload button or dragging and dropping the file into the browser window.
- Attach your .blend project file (only if the bug can’t be reproduced with the default startup file).
- Click «Create New Task» to create the bug report.
3.1 Example of a good bug report
Title: Crash using color drag and drop in the image editor
**System Information**
Operating system: Windows-10-10.0.18362 64 Bits
Graphics card: GeForce GTX 1080 Ti/PCIe/SSE2 NVIDIA Corporation 4.5.0 NVIDIA 436.30

**Blender Version**
Broken:
 - version: 2.82 (sub 7), branch: master, commit date: 2020-03-12 05:06, hash: `rB375c7dc4caf4`
 - version: 2.83 (sub 12), branch: master, commit date: 2020-04-06 15:48, hash: `rB71a52bbe2a2e`
Worked: 2.80

**Short description of error**
Blender crashes when dragging and dropping a color onto the texture in the image editor.

**Exact steps for others to reproduce the error**
 1. Open the Texture Paint workspace.
 2. Create a new texture in the image editor.
 3. Put the mouse cursor over the current color in the header and drag it onto the texture.
4 Triage and bug fix
Once your bug report is submitted, volunteers and developers will try to reproduce the issue. They may have additional questions, so check once in a while if somebody has left a comment on your ticket. If the status of your ticket is «Needs information from user» and you do not reply within a week, the ticket will be closed.
- Do not assign the task to anyone (unless they’ve told you to).
- Do not change the status.
- Do not change the priority.
- Do not change the edit policy.
- Do not edit parent or subtasks.
The ticket will then go through the «Life of a Bug». Once the bug is confirmed the developers will try to fix this as soon as possible. Please be aware that the developers get many bug reports and the more serious ones are being prioritized. It may take a while until the issue is fixed.
Please be kind, many of the people helping on the bug tracker are volunteers and our developers are working as hard as they can.
1 Introduction
The right place to report bugs is Blender’s bug tracker. Before you start writing your ticket, please read the following post. It will help you write a good bug report that allows developers to identify the source of the problem and thus fix the issue as soon as possible.
2 Preparation
The first step is to ensure that the issue is actually a bug in Blender and that you can provide enough information for others to
reproduce it on their system.
2.1 Minimum requirements
In order to run Blender properly, you have to ensure that your hardware fulfills the minimum requirements. The supported graphics
cards are particularly important. If your hardware is not supported, you may experience graphics glitches, crashes or may not be able
to start Blender at all. The developers do not provide support on the bug tracker for hardware that doesn’t meet the minimum requirements.
Please note that the requirements for GPU rendering are higher than the minimum requirements for running Blender. In case you don’t see any GPUs listed as render device in the preferences («No compatible GPUs found for path tracing»), then this is most likely the reason why. It could also happen that your graphics driver is out-dated as explained in the next section.
If you’re able to start Blender, you can get all the system information through Help > Save System Info.
2.2 Update graphics driver
Crashes of Blender or even the entire operating system can be caused by bugs in the graphics driver. Updating the graphics driver to the most recent version should minimize the likelihood that this is the cause of your problem. You may have to update the driver for both your integrated GPU and dedicated GPU.
Blender’s manual provides additional information for troubleshooting on all supported operating systems.
2.2.1 Windows
The most recent driver for Nvidia, AMD and Intel graphics cards can be downloaded from their respective websites.
2.2.2 macOS
On macOS the graphics card driver is tied to the operating system version, therefore it may be necessary to update the OS.
At the time of writing the GPU rendering support for Cycles is limited. GPU rendering with OpenCL is only available in versions prior to 2.80 because Apple has deprecated their OpenCL compiler. GPU rendering with CUDA is only possible in versions before 2.9x because Nvidia discontinued the development of the CUDA Toolkit for macOS. For a more detailed explanation see this answer. As a consequence you may not find your GPUs listed as supported render device in the user preferences. This is not a bug.
2.2.3 Linux
Please note that OpenCL GPU rendering with AMD graphics cards on Linux requires the installation of the AMDGPU-PRO Driver. Consult your distribution’s documentation to install and update the driver.
2.3 Reproducible steps and minimal project
Try to identify and write down a precise list of steps that result in the issue that you’re experiencing. Ideally these instructions should allow to reproduce the problem beginning from the default startup file. If the problem only occurs in a specific project, try to create a minimal version of it. Remove anything that’s not relevant to the issue.
The instructions should be detailed enough that anyone who is proficient in Blender is able to produce the same result that you’re getting. Please use standard nomenclature in your description. Should you be unsure how certain parts of the user interface are called, consult the manual.
2.4.1 Test the latest versions
The issue may already be fixed in a more recent version of Blender. Test with both the latest stable release and the most recent daily build.
If you need to test a specific project file, create a backup copy of it. This is meant as a precaution, since files saved in a newer version of Blender may not open in the older versions of Blender that you’re usually using. When you’re trying to check if the issue still occurs in the most recent version of Blender, use File > Open to load the project file. Don’t open the project file from your operating system’s file browser as this may open a different version of Blender that is associated with the file extension.
In case the issue doesn’t occur in the latest stable release, you should continue to use that version. If the issue is fixed in the daily build, you should continue to use your current version and update as soon as a new stable release is published.
2.4.2 Test previous versions (optional)
If you are able to, check if you can find the most recent previous releases of Blender that does not have the issue. This can help the developers to narrow down when the bug was introduced and what change has caused it. The portable releases (*.zip and *.tar.xz) don’t require any installation, they just have to be extracted and thus allow for easy testing. You should not test further back than Blender 2.79b.
2.5 Check if it’s a (new) bug
If you’re unsure whether or not the issue is a bug, or if it could be a misunderstanding how Blender works, post a question on one of our community websites. For example:
- Blender’s chat support channel
- Blender’s StackExchange
- blenderartists.org
In case your issue requires an enhancement or new feature in Blender, it’s not a bug. Feature requests can be posted on right-click select.
Should you be fairly certain that it’s a bug, verify that it hasn’t already been reported. If you find an existing ticket that matches your issue exactly and others had trouble reproducing it, please add your step by step instructions in a comment.
2.6 Create a debug log
Blender can output detailed debug information when one of the debug CLI flags are used. If you’re either experiencing a crash or Blender displays an error message, you should create a debug log file that can be attached to your bug report.
Additional log files with different CLI flags may be requested by the developers, but should’t be provided up front.
2.6.1 Windows
Open Blender’s installation directory and double-click on the blender_debug_log.cmd. This will start Blender in debug mode and create log files. Try to reproduce the error while Blender is open in debug mode. Close it once the error occured. The Windows Explorer should open automatically and show you two files. Copy them to a location that you know and attach them to your bug report in the following chapter.
In case Blender 2.9x or later crashes, it will create a crash log that contains valuable information about where the error occurred. This file should also be attached to your report. The location is determined by the environment variable TEMP. If you haven’t modified this environment variable, it will point to C:Users[your username]AppDataLocalTemp (replace [your username] with the actual username on your system). In order to locate the crash log, open the Windows Explorer (Win+E) and type %TEMP% into the path bar. The name of the crash log will be the same as your project file, but with the file extension .crash.txt. If you haven’t previously saved the project before, it will be blender.crash.txt.
2.6.1 Linux
Open Blender and save the system information through Help > Save System Info. Open a terminal in Blender’s installation directory and start Blender with the --debug and --debug-cycles flag. Redirect the output for both stdout and stderr to a file. The example command below places the log file in your home directory.
./blender --debug --debug-cycles > ~/blender_debug_output.txt 2>&1
Attach the system information and log file to your bug report in the following chapter.
In case Blender 2.9x or later crashes, it will also create a crash log that contains a stack trace. The file can be found in the /tmp directory. It will be named like your project file, but with the file extension .crash.txt. If you haven’t previously saved the project before, it will be saved as blender.crash.txt. This file should also be attached to your report.
2.6.2 macOS
Open Blender and save the system information through Help > Save System Info. Open a terminal and start Blender with the --debug and --debug-cycles flag. Redirect the output for both stdout and stderr to a file. The example command below places the log file in your home directory.
/Applications/Blender.app/Contents/MacOS/Blender --debug --debug-cycles > ~/blender_debug_output.txt 2>&1
Attach the system information and log file to your bug report in the following chapter.
In case Blender crashes the macOS Crash Reporter will open and show you a detailed report with a stack trace. You should copy the text, save it in a text file and also attach it to your report.
3 Create the report
Create an account on developer.blender.org.
There are two different templates for reporting bugs, one for add-ons and one for Blender itself.
If you want to report a bug in an add-on:
- Open Blender.
- Open the preferences and navigate to the add-ons (Edit > Preferences > Add-ons).
- Find the add-on you would like to report a bug for.
- Check that it’s an official add-on that is shipped with Blender. If it isn’t, contact the developer directly.
The bug tracker is only for add-ons that are distributed with Blender. - Open the details section of the add-on and click Report a Bug.
If you want to report a bug in Blender:
- Open Blender.
- Use Help > Report a Bug.
- Add which versions of Blender do not work.
- Add which version of Blender works.
If you cannot open Blender and want to report a bug:
- Use the bug report template.
- Add your operating system and graphics card information.
- Add which versions of Blender do not work.
- Add which version of Blender works.
Once you’ve logged in you should see the submission template. Anything in square brackets should be replaced
with the information about your problem. Should you have trouble writing in English, then please write the report in your native language and include a machine translated text alongside.
- Give your ticket a descriptive title. It should ideally explain what’s broken and where.
- Add a short description of your problem to «Short description of the error». You may include a screenshot
if the problem is hard to describe. - Add the detailed steps to reproduce the issue from section «2.3 Reproducible steps and minimal project» to
«Exact steps for others to reproduce the error». - Attach your system information file, debug log and crash log to the bug report by pressing the upload button or dragging and dropping the file into the browser window.
- Attach your .blend project file (only if the bug can’t be reproduced with the default startup file).
- Click «Create New Task» to create the bug report.
3.1 Example of a good bug report
Title: Crash using color drag and drop in the image editor
**System Information**
Operating system: Windows-10-10.0.18362 64 Bits
Graphics card: GeForce GTX 1080 Ti/PCIe/SSE2 NVIDIA Corporation 4.5.0 NVIDIA 436.30

**Blender Version**
Broken:
 - version: 2.82 (sub 7), branch: master, commit date: 2020-03-12 05:06, hash: `rB375c7dc4caf4`
 - version: 2.83 (sub 12), branch: master, commit date: 2020-04-06 15:48, hash: `rB71a52bbe2a2e`
Worked: 2.80

**Short description of error**
Blender crashes when dragging and dropping a color onto the texture in the image editor.

**Exact steps for others to reproduce the error**
 1. Open the Texture Paint workspace.
 2. Create a new texture in the image editor.
 3. Put the mouse cursor over the current color in the header and drag it onto the texture.
4 Triage and bug fix
Once your bug report is submitted, volunteers and developers will try to reproduce the issue. They may have additional questions, so check once in a while if somebody has left a comment on your ticket. If the status of your ticket is «Needs information from user» and you do not reply within a week, the ticket will be closed.
- Do not assign the task to anyone (unless they’ve told you to).
- Do not change the status.
- Do not change the priority.
- Do not change the edit policy.
- Do not edit parent or subtasks.
The ticket will then go through the «Life of a Bug». Once the bug is confirmed the developers will try to fix this as soon as possible. Please be aware that the developers get many bug reports and the more serious ones are being prioritized. It may take a while until the issue is fixed.
Please be kind, many of the people helping on the bug tracker are volunteers and our developers are working as hard as they can.
Bug Reports
Best practices, tips and tricks for effective bug reporting.
These issues are not considered bugs:
- Functionality which works as intended but could be improved.
- Crashes running out of memory.
- Crashes from loading corrupted Blend files.
In addition to the content on this page, here is a video on How to Report a Bug:
Avoid Walls of Text
Please, avoid copy/pasting the content of text files like system-info, debug/console/command line output, scripts directly in the report’s Description field. It makes the report difficult to read and breaks up the formatting. Include them as files instead (.txt). On how to include files, look at the Appending files to the report section.
Bugs in Blender or Add-ons included with Blender can be reported at developer.blender.org, through links on the front page. You will need an account, so that developers can follow up with questions and notify you when the bug is fixed. You will receive an email each time there is an update to the bug report.
The bug report page has concise instructions and a template for creating reports. More advice on how to create good reports is listed below. Following these steps will make life easier for you, the user, and us, the developers.
Avoid Duplicates
Before you think of posting any bug report, first consult the bug tracker advanced search for an existing report on the bug you have spotted. Make sure you search in all bug reports, including closed ones.
It may very well be that the bug has already been reported/ fixed.
Simplify
First try to simplify the process that triggers the bug, so that it is reproducible in the least amount of steps. The less steps there are, the easier it is for us to spot the problem in the code. Typically if you have a complex .blend file, it is possible to keep removing objects, modifiers, nodes, and other data until the problem has been isolated to a simple setup.
Very important is, that the bug is reproducible, that is, not occurring on a random basis. It is fine if the bug randomly happens for example 1 out of 10 times you perform some operation. However if the bug randomly happens without any clear steps leading up to it, then it is unlikely developers will be able to fix the bug.
Provide Backup
A .blend or screenshot illustrating the bug will help to speed up the process. As in the previous paragraph, make them as simple as possible, so that the developers can spot the problem without too much effort.
You can even provide a backtrace which lead to possible crash. That may help developers as well. A backtrace is not necessary and producing a useful one requires special debug build and a debugger. See troubleshooting docs for ways to narrow down the issue.
How to Append Files to the Report
Files like .blend, .txt, images can be included into the report by dragging and dropping them into the Description field. At the bottom of the bug report page, there is a Preview of how the report will look like when posted. If everything is OK, a link will show up with the file name. In the Description field itself, the file is represented by a set of letters and numbers in brackets. To move the link to an appropriate place if needed, cut and paste it and be sure that there are spaces between it and the rest of the text.
If you include a screencast of a problem make sure it is as short and clear as possible, edit it if necessary. A video is not the main way to convey information, but can be used as support.
Be Complete
Apart from the actual bug report it is always good (if not necessary) to include operating system, software (drivers) and hardware specifications of your configuration. Some bugs can be related to either area and including this information can help the developers to pinpoint problems better. And let’s not forget mentioning what Blender version you are using, and in which version of Blender things still worked properly. Please look in the splash top right corner for all build details and include that as well.
How to Provide System Information
Including the system-info.txt generated from the Help > Save System Info Menu will give information about the OS, hardware, drivers, Blender version and add-ons enabled.
Triaging
For anyone willing to help with bug triaging please follow the Bug Triaging Playbook.
Окно консоли
Окно консоли это текстовое окно операционной системе, которое отображает сообщения об операциях, статусах, и внутренних ошибках.
Варианты использования:
-
Если Blender неожиданно завершает работу, сообщения могут указать на причину или ошибку.
-
Чтобы получить результат в консоль есть команда Python print().
-
Варианты запуска Blender c Command Line Arguments
-
При устранении неполадок, чтобы увидеть результат сообщения об отладке –debug.
Платформо-зависимые инструкции
Linux

Запуск Blender из консольного окна Linux.
Консольное окно Blender в Linux обычно видна только на рабочем столе, если Blender запускается вручную из терминала, то Консольное окно будет то, откуда запускался Blender.
В зависимости от среды рабочего стола настройка, Blender может быть значок на рабочем столе или запись для Blender добавлены в меню после установки Blender. Когда вы запускаете Blender, с помощью ярлыка на рабочем столе или пункта меню, а не в окне терминала, Blender Консольное окно будет скорее всего скрыт на терминале, XWindows откуда он был запущен.
Этот скриншот показывает, как Blender запускается из терминала Linux, и в результате текст консоли печатается в нем.
Mac OSX

Запуск Blender из консольного окна Mac OSX.
Mac-OSX использует “файлы” с расширением .app которые называются приложениями. Эти файлы на самом деле папки, которые отображаются в виде файлов в Finder. Для того, чтобы запустить Blender Вам придется указать путь к исполняемому файлу Blender’a внутри этой папки, чтобы получить все выходные данные в терминал. Вы можете запустить терминал из Приложения –> Утилиты. Путь к исполняемому файлу в .app папка это ./blender.app/Contents/MacOS/blender.
Если у вас есть Blender установлен в папке “программы”, то можно использовать следующую команду:
/Applications/blender-|BLENDER_VERSION|/blender.app/Contents/MacOS/blender
MS-Windows

Окно консоли Blender в операционной системе MS-Windows.
Когда Blender запускается на операционной системе MS-Windows, окно консоли сначала создается как отдельное окно на рабочем столе. Основное окно Blender также появится и в консоли, затем окно консоли будет скрыто. Для вызова консоли снова идем .
На скриншоте изображено Консольное окно Blender на MS-Windows прямо после запуска Блендер и потом спустя короткое время после открытия файла вместе с соответствующими сообщениями.
Совет
Закрытие окна консоли Blender
Закрытие окна консоли после запуска. Blender, потеряет все несохраненные данные.
Чтобы выключить консоль, не закрывая Blender, просто запустите Показать/скрыть системную консоль снова из меню (как упоминалось выше).
Статусы и сообщения об ошибках
В окне консоли Blender может отображаться различные типы сообщений о состоянии и ошибках. Некоторые сообщения просто сообщают пользователю, о том что делает Blender, но не имеет никакого реального влияния функционирование Blender. Другие сообщения могут указывать на серьезные ошибки, которые могут помешать Blender при выполнении конкретной задачи и Blender может даже не отвечает, или выключиться полностью. В окно консоли Blender сообщения могут также попадать из самого Blender или из кода внешних источников, таких как скрипты Python.
Общие сообщения
-
найден комлект Python: (ПАПКА)
Эти сообщения указывает на то, что Blender смог найти Python библиотека для интерпретатора Python встроенного в Blender. Если данная папка отсутствует или не может быть найден, есть вероятность, что произойдет ошибка, и сообщение не появится.
-
функция malloc возвращает nil()
Когда Blender выполняет операции, которые требуют дополнительной памяти (ОЗУ), он вызывает функцию malloc (сокращение от Memory allocate), которая пытается выделить требуемый объем памяти для Blender. Если нельзя выделить дополнительную память, функция malloc возвращает nil/null/0, чтобы указать, что просьба о выделении памяти не выполнена. Если это произойдет Blender не сможет выполнять операции, запрошенные пользователем. Если это произойдет, то операции в Blender будут выполняться очень медленно или Blender завершит свою работу. Если вы хотите, избежать нехватки памяти, вы можете установить больше памяти в вашу систему, уменьшить количество деталей в моделей, в Blender или закрыть Другие программы и сервисы, которые могут занимать память, которую мог бы использовать Blender.
The paths for the crash logs are platform dependent. The following information can also be found in Blender’s manual.
If you intend to add these information to a bug report, please attach the logs as file.
Windows
On Windows the location is determined by the environment variable TEMP. If you haven’t modified this environment variable, it will point to C:Users[your username]AppDataLocalTemp. In order to locate the crash log, open the Windows Explorer (Win+E) and type %TEMP% into the path bar. The name of the crash log be the same as your project file, but with the file extension .crash.txt. If you haven’t previously saved the project before, it will be blender.crash.txt.
Linux
On Linux the crash log is written to the /tmp directory. The name of the crash log be the same as your project file, but with the file extension .crash.txt. If you haven’t previously saved the project before, it will be blender.crash.txt.
macOS
The crash log will be presented through the macOS Crash Reporter. You will have to copy the text and save it in a file yourself.
Additional information can be retrieved by starting Blender with debug command line flags.
Windows
The Windows version provides batch files for convenience that allow to create log files without using the command line. They are located in the same directory as the blender.exe.
blender_debug_gpu.cmd(--debugand--debug-gpuflags)blender_debug_gpu_glitchworkaround(--debug,--debug-gpuand--debug-gpu-force-workaroundsflags)blender_debug_log.cmd(--debugand--debug-cyclesflags)blender_factory_startup.cmd(--factory-startupflag)
Double-clicking on the batch script will start Blender with the listed debug flags and write log files to %TEMP%blenderdebug_logs. Once Blender has either crashed or was manually closed, the Windows Explorer should automatically open and display the log files. If Blender was able to start, then this will also include a file that contains the system information blender_system_info.txt.
Linux
The log file creation requires to redirect stderr and stdout into a file. Open a terminal, navigate to the directory where Blender’s binary is located and then use the following command or a variation with different command line flags:
./blender --debug --debug-cycles > ~/blender_debug_output.txt 2>&1
The resulting log file will be placed in your home directory, assuming that your terminal supports the alias ~ for it.
macOS
The log file creation requires to redirect stderr and stdout into a file. Open a terminal and then use the following command or a variation with different command line flags
/Applications/Blender.app/Contents/MacOS/Blender --debug --debug-cycles > ~/blender_debug_output.txt 2>&1
The resulting log file will be placed in your home directory.
Blender’s command line also allows to configure additional logging options for more fine grained reporting.
Здесь вы можете задать интересующий Вас вопрос по Blender:
Полезные ссылки: Стартовый курс
Статус-бар
Создано02.05.2020
Последнее обновление09.06.2020
Строка состояния (или статус-бар) расположена в самом низу окна блендера и используется для представления информации. Строку состояния можно скрыть, перетащив ее вниз или из меню “Window”.
Информация о клавишах
Область слева от статус-бара отображает информацию о том, что делают кнопки мыши и клавиши для каждого редактора, режима и инструмента. Она она обновляется при удержании клавиш-модификаторов.
В редакторах с панелью инструментов нажатие клавиши Alt показывает горячую клавишу для перехода к нужному инструменту.
Сообщения о состоянии
Область в середине строки состояния отображает информацию о текущих запущенных задачах или инструментах.
- Выполняющиеся задачи – индикатор выполнения и кнопка отмены отображаются при выполнении более длительных вычислительных задач, таких как рендер или запекание. Поверх показывается приблизительное время.
- Сообщение с отчетом – метка для оператора для отображения результатов или предупреждений. Она исчезает через короткое время. Щелчок по значку в левой части сообщения отчета откроет редактор Info, который покажет полное сообщение.
Информация о ресурсах
Область справа от статус-бара показывает информацию о текущем .blend файле.

- Активная коллекция – отображает название текущей выбранной коллекции
- Активный объект – отображает название текущего выбранного объекта
- Геометрия – отображает информацию о текущей загруженной сцене в зависимости от режима и типа объекта. Когда показываются два числа, первое означает выбранную геометрию, а второе – общее её количество. Это может быть число вершин, граней, треугольников (трисов) или костей.
- Объекты – отображает число выбранных объектов
- Память – метка “Mem” (или Пам.) показывает расчетное потребление памяти Blender’ом. Это может помочь определить, когда вы достигаете пределов вашего оборудования.
- Версия Blender – показывает версию программы.
Редактировать STL-файлы можно в двух видах программного обеспечения — системах автоматизированного проектирования (CАПР, CAD), либо специализированных программах для работы с полигональными сетками. Рассмотрим наиболее популярные варианты.
Содержание:
- Tinkercad
- FreeCAD
- Blender
- Meshmixer
- MeshLab
- 3D Slash
- SculptGL
САПР задуманы как инструменты проектирования — высокоточные, с возможностью построения твердотельных моделей. Эти инструменты изначально не предназначались для 3D-печати. Например, в САПР круги являются «настоящими» кругами, то есть криволинейными фигурами, а в 3D-печати и в файлах STL любые круги представлены в виде многоугольников. Таким образом, инструменты САПР не могут проявить себя в полную силу при редактировании файлов STL. Тем не менее, их можно использовать для работы с STL-файлами. Три из четырех инструментов, которые мы приведем ниже, как раз попадают в категорию САПР — это Tinkercad, FreeCAD и Blender.
С другой стороны, есть инструменты редактирования полигональных сеток, также называемых «мешами» — такие, как Meshmixer и MeshLab. Они предназначены для моделирования, анимации и воспроизведения объектов, представленных двухмерными поверхностями. Это означает, что у этих объектов есть только оболочка, то есть они пустотелые. Если такие модели не переделать в твердотельные, у стенок не будет толщины и их нельзя будет напечатать, но подобные трансформации можно проводить в том же Meshmixer. На самом деле редакторы мешей — отличные инструменты, когда дело доходит до редактирования STL-файлов.
1. Tinkercad
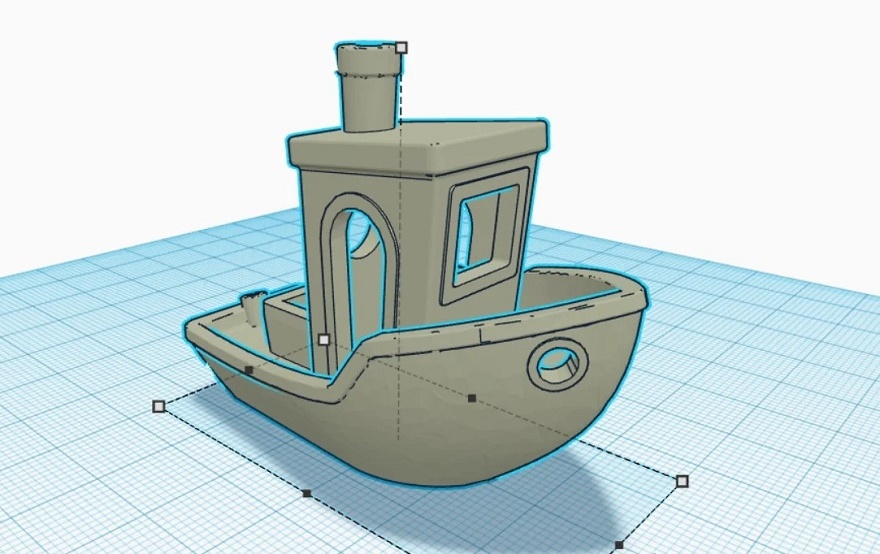
Tinkercad — это полностью бесплатная онлайн-САПР, разработанная компанией Autodesk. ЕЕ главная особенность в том, что она позволяет использовать простые геометрические формы — так называемые «примитивы» — в качестве строительных блоков для создания 3D-моделей, однако Tinkercad также позволяет импортировать и редактировать STL. Это может быть очень полезно для простых правок, таких как добавление текста, удаление части дизайна или объединение двух STL в одну модель.
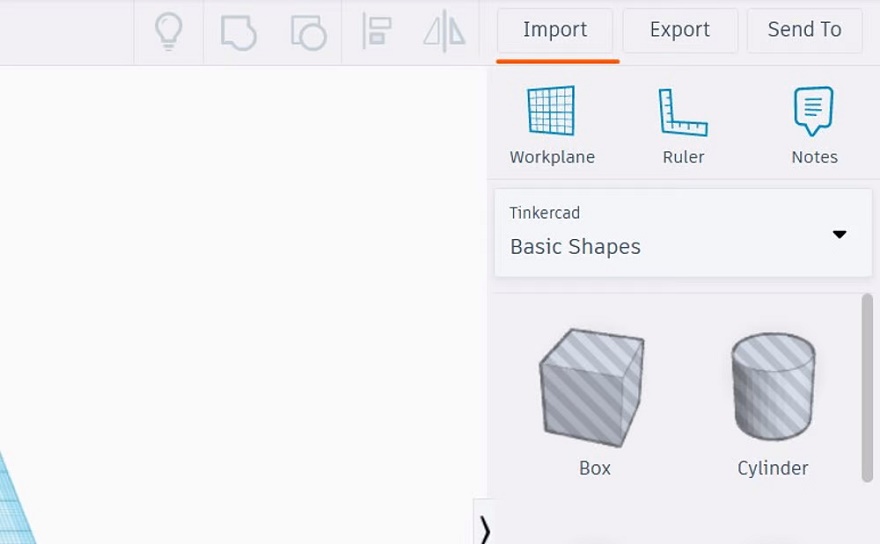
Шаг 1: Импортируйте STL
Во-первых, вам нужно создать бесплатную учетную запись, если у вас ее еще нет, и войти в нее.
Откройте новый дизайн.
Нажмите Импорт (Import) в правом верхнем углу.
Выберите Выбрать файл (Choose a File).
Выберите нужный STL и нажмите OK.
Шаг 2. Примените настройки размера и масштабирования
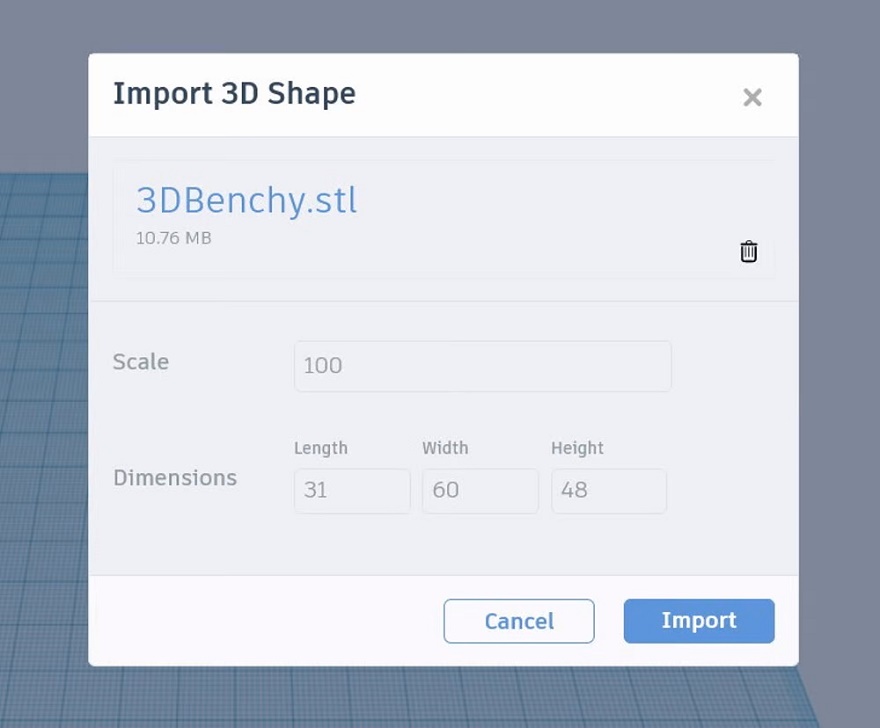
Перед импортом в рабочую область Tinkercad дает базовый обзор STL, включая размеры детали. Если вам нужно масштабировать свой дизайн до определенного масштаба, это самый простой способ.
Просто введите процент масштабирования или желаемые размеры в поля.
Щелкните Импорт (Import).
Загрузка файла в рабочую область Tinkercad может занять несколько минут, в зависимости от сложности и размера файла.
Шаг 3: Отредактируйте файл STL
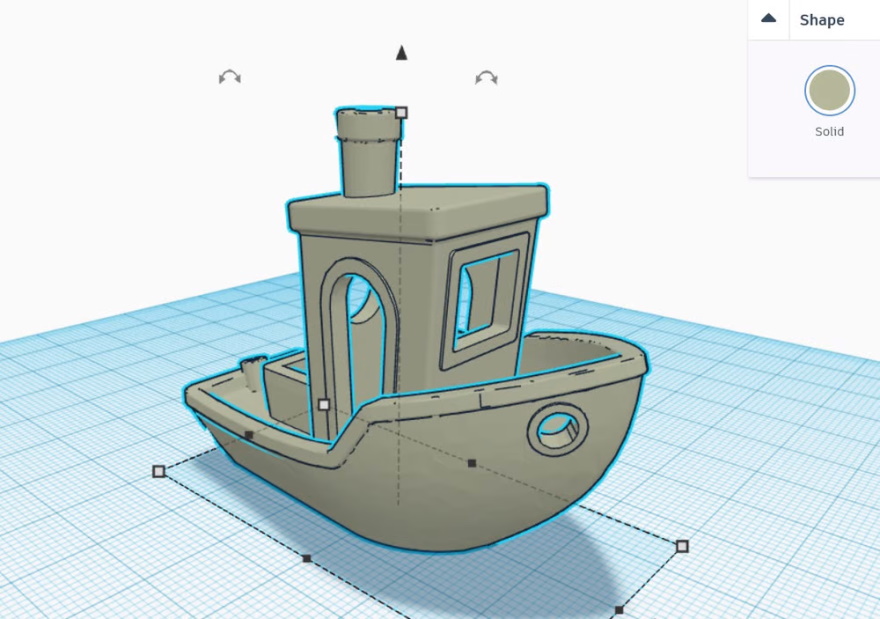
После того как Tinkercad завершит импорт файла, вы можете использовать любые простые формы, генераторы форм или различные другие формы, предоставляемые Tinkercad, для редактирования STL. Кроме того, вы можете импортировать другие файлы STL и использовать их для дальнейшего изменения дизайна. Также можно настроить размер и масштаб, используя точки перетаскивания в рабочей области.
Шаг 4: Экспортируйте как STL
После того как вы отредактировали дизайн, его можно экспортировать как STL.
Выберите все, что вы хотите экспортировать.
Нажмите Экспорт (Export) в правом верхнем углу.
Следуйте инструкциям, чтобы экспортировать дизайн в виде файла STL.
Плюсы и минусы Tinkercad
Tinkercad прост в использовании, работает без сбоев и имеет все основные инструменты, необходимые для создания простой 3D-модели. С другой стороны, в нем отсутствуют некоторые ключевые функции «правильного» редактора STL, в частности инструменты для моделирования поверхностей и ремонта сеток.
2. FreeCAD
FreeCAD — это бесплатная САПР с открытым исходным кодом, предлагающая множество различных инструментов проектирования. Программу можно скачать бесплатно с веб-сайта проекта FreeCAD, только не забудьте выбрать правильную версию для вашей операционной системы.
У FreeCAD есть одно серьезное ограничение — проблемы с пересекающимися структурами вплоть до того, что она может испортить сетку, если та содержит пересекающиеся ребра.
Шаг 1: Откройте файл STL и преобразуйте его в твердотельную модель
Откройте FreeCAD и создайте новый документ, нажав Файл > Создать (File > New).
Нажмите Файл > Импорт (File > Import) и выберите объект, который хотите изменить. FreeCAD также может открывать другие форматы, такие как OBJ и AST.
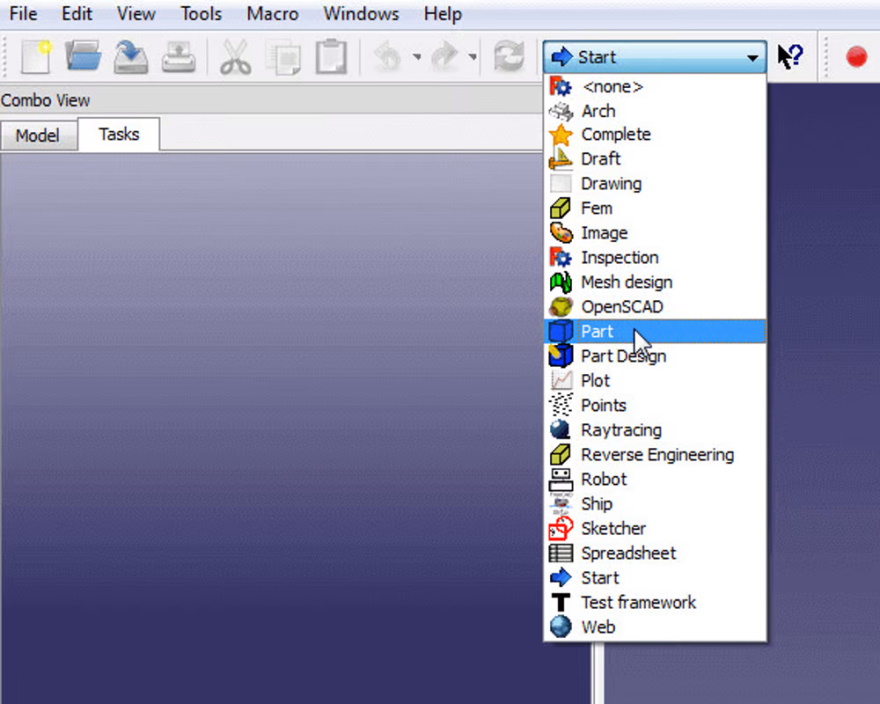
Измените рабочую область на Деталь (Part).
Выберите импортированный объект во вкладке Модель (Model).
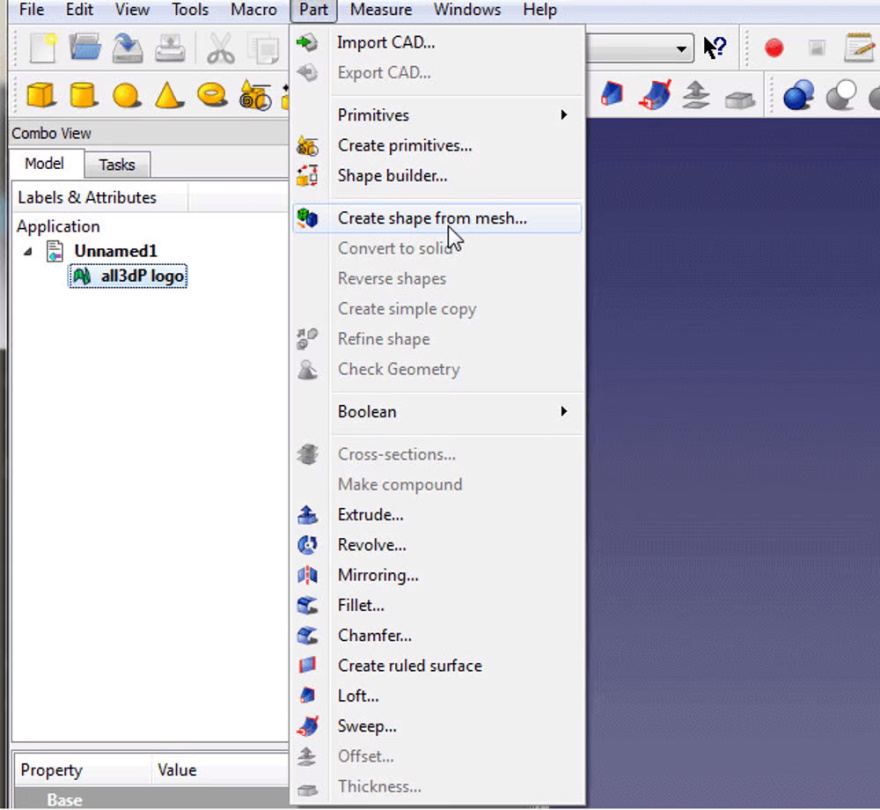
Теперь нажмите Деталь > Создать фигуру из сетки (Part > Create shape from mesh). Это разделит импортированный объект на множество маленьких треугольников. Вы можете настроить точность тесселяции, но 0,10 вполне подходит для большинства объектов. Чем меньше это значение, тем дольше займет преобразование объекта.
Теперь можно удалить или скрыть импортированную сетку. Останется форма импортированного объекта, состоящая из множества треугольников.
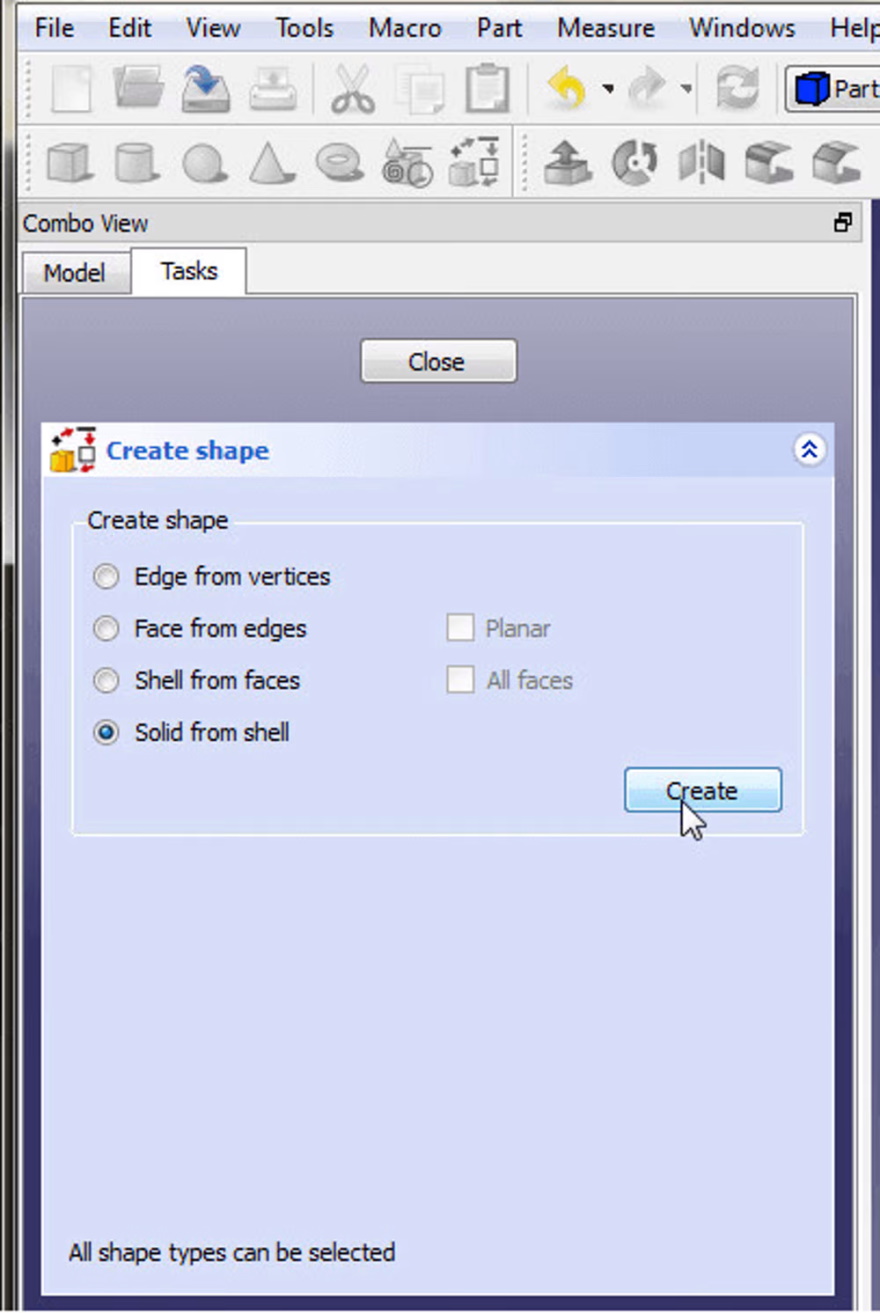
Щелкните Продвинутые (Advanced) и выберите Твердое тело из оболочки (Solid from shell). Теперь нажмите на любой треугольник в импортированном объекте, а затем выберите Создать (Create). Поначалу вы ничего не заметите, потому что форма перекрывает твердое тело. Нажмите Закрыть (Close), чтобы закончить.
Затем удалите или скройте старую форму. Теперь у вас есть твердое тело, готовое к редактированию.
Шаг 2: Отредактируйте файл STL
Переключите рабочую область на Дизайн детали (Part Design).
Нажмите на любую грань, к которой вы хотите добавить или удалить материал, чтобы она стала зеленой.
Теперь нажмите Создать эскиз (Create Sketch).
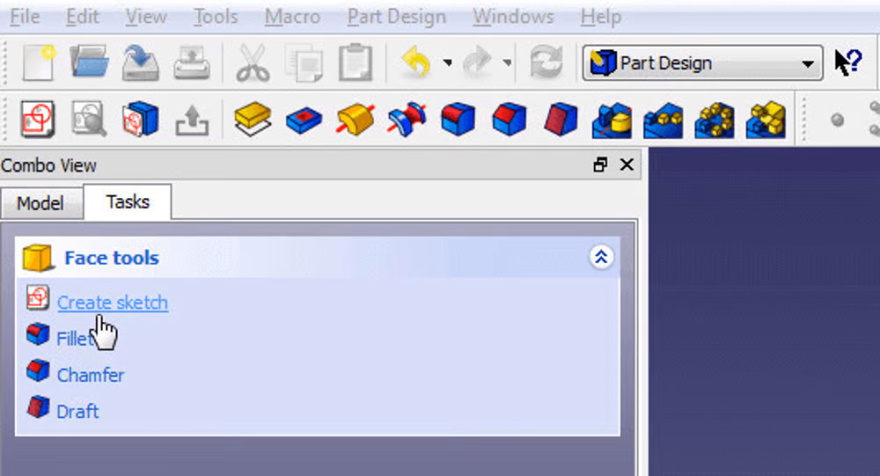
Создайте фигуру, которую хотите выдавить или вырезать, используя инструменты для рисования кругов, прямоугольников и линий.
Нажмите Закрыть (Close), чтобы подтвердить эскиз. Если вы захотите отредактировать эскиз, дважды щелкните его в дереве модели.
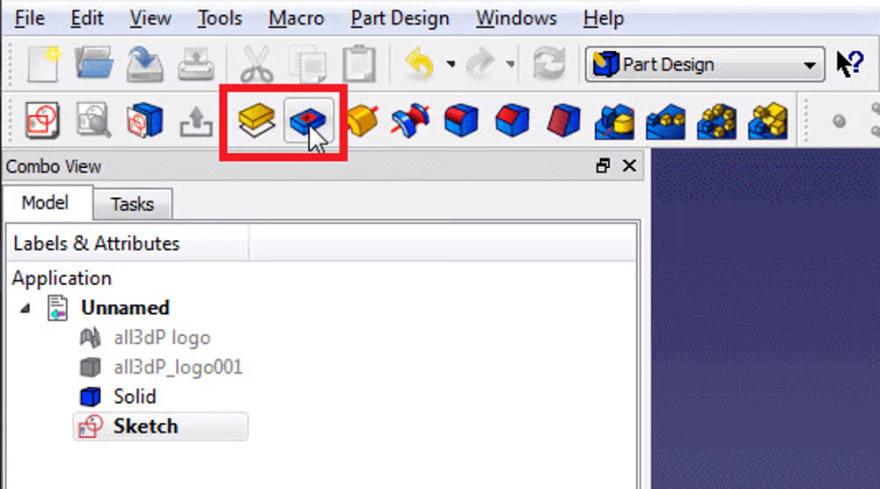
Теперь выберите функцию, которую хотите применить — инструмент Pad для выдавливания или Pocket для вырезания элементов.
Шаг 3: Ремонт STL
FreeCAD имеет обширный набор инструментов для восстановления мешей.
Выберите Сетки > Анализ > Оценить и восстановить сетку (Meshes > Analyze > Evaluate).
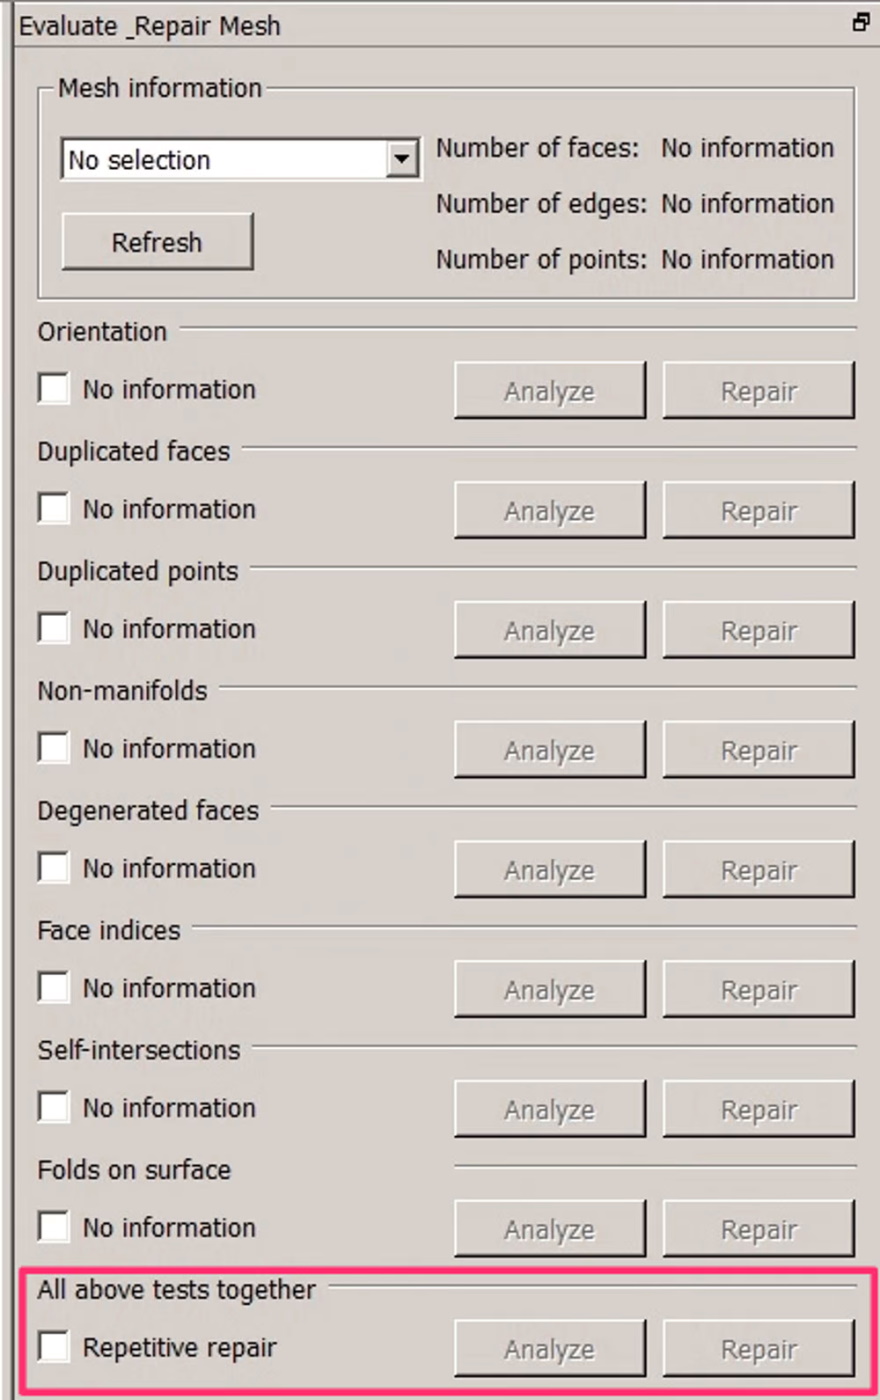
Если вы уже знаете, какие дефекты есть у вашего меша, выберите соответствующий пункт в списке и нажмите Анализировать (Analyze).
В противном случае выберите Все вышеуказанные тесты вместе (All above tests together) и нажмите Анализировать (Analyze).
После завершения анализа нажмите Отремонтировать (Repair).
Шаг 4: Экспортируйте как файл STL
Чтобы снова экспортировать объект в виде файла STL, выберите последний элемент в дереве модели. Затем нажмите Файл > Экспорт (File > Export) и выберите Форматы сетки (Mesh formats).
Плюсы и минусы использования FreeCAD
При использовании FreeCAD в качестве редактора STL вы заметите его настоящее назначение: это САПР для создания механических деталей, а не для моделирования. Это хорошо, если вы хотите построить технический объект, но ваять 3D-модели во FreeCAD очень сложно, поскольку отсутствует 3D-вид со свободным перемещением, а лепка практически невозможна.
3. Blender
Blender — еще одна отличная бесплатная программа для создания моделей для 3D-печати, игр или видеоклипов. Она содержит множество полезных инструментов, например различные алгоритмы сглаживания или интерпретации поверхности. Также очень легко импортировать и подготавливать STL-файлы для моделирования. Тем не менее, потребуется некоторое время, чтобы привыкнуть к Blender, так как из-за огромного количества различных инструментов и команд он может быть довольно непонятным. Также может потребоваться мощный компьютер, особенно если вы собираетесь генерировать высокополигональные модели.
Программу можно скачать с веб-сайта проекта Blender.
Шаг 1: Откройте файл STL
Удалите куб, наведя на него курсор мышки и нажав кнопку Del.
Нажмите Файл > Импорт > STL (File > Import > STL), найдите файл, который хотите открыть, и импортируйте его.
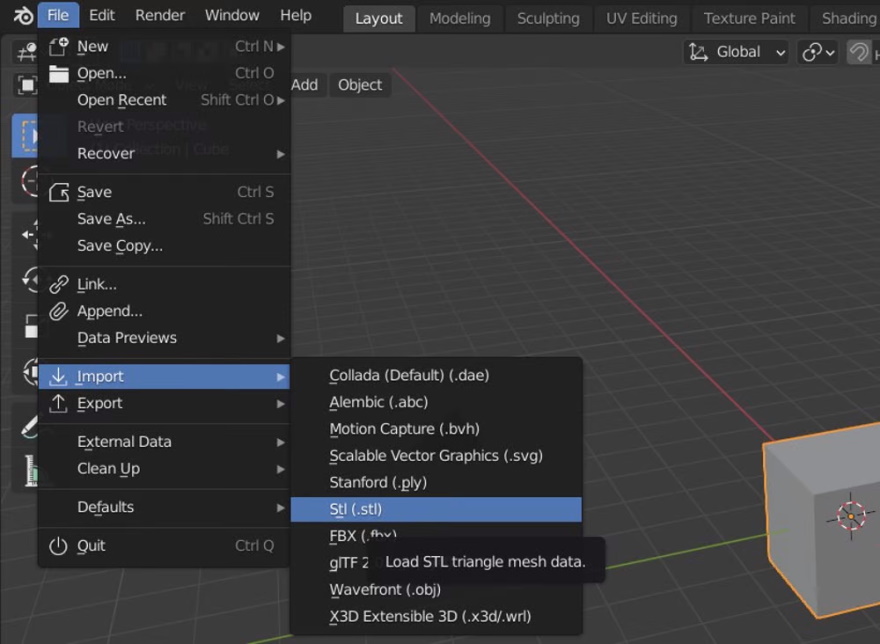
Шаг 2: Отредактируйте файл STL
Переключитесь из режима Объект (Object) в режим Редактирование (Edit). Теперь вы сможете видеть все ребра, из которых состоит ваша модель.
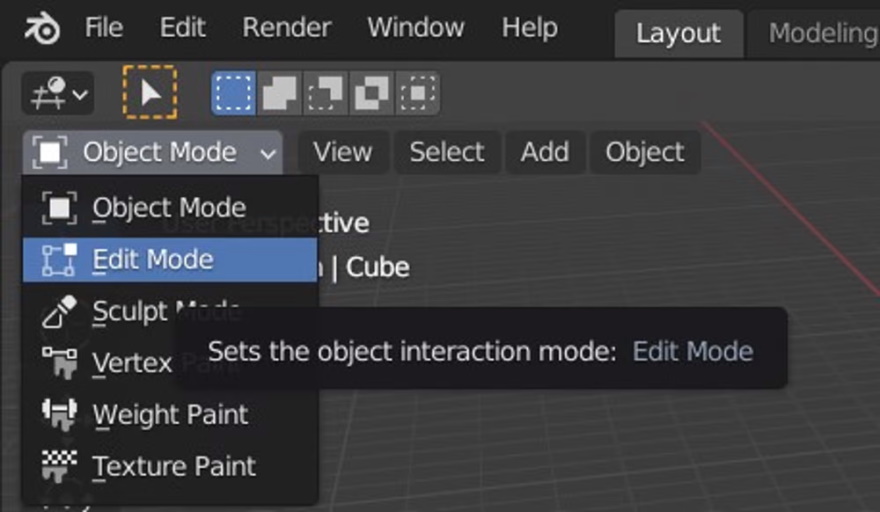
Затем нажмите Alt+L, чтобы выбрать все элементы — модель станет оранжевой. Вы также можете выбрать отдельные точки, ребра или плоскости, щелкнув их правой кнопкой мыши.
Чтобы преобразовать треугольники в прямоугольники, используйте Alt+J.
Теперь можно изменить количество граней, из которых состоит модель, с помощью команд Subdivide или Un-Subdivide. Щелкните правой кнопкой мыши для доступа к инструменту Subdivide.
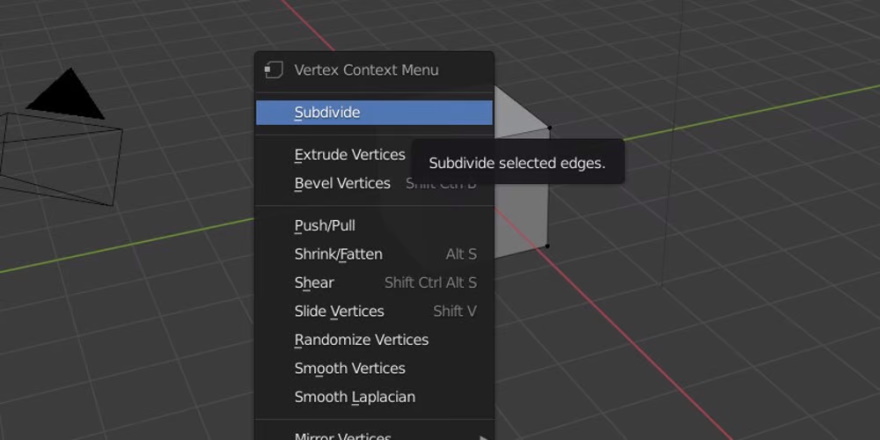
Используйте функции Vertex, Edge и Face select, чтобы выдавливать, перемещать или удалять части модели.
При необходимости во вкладе Add можно найти и добавить в модель разные элементы — плоскости, кубы, сферы и так далее.
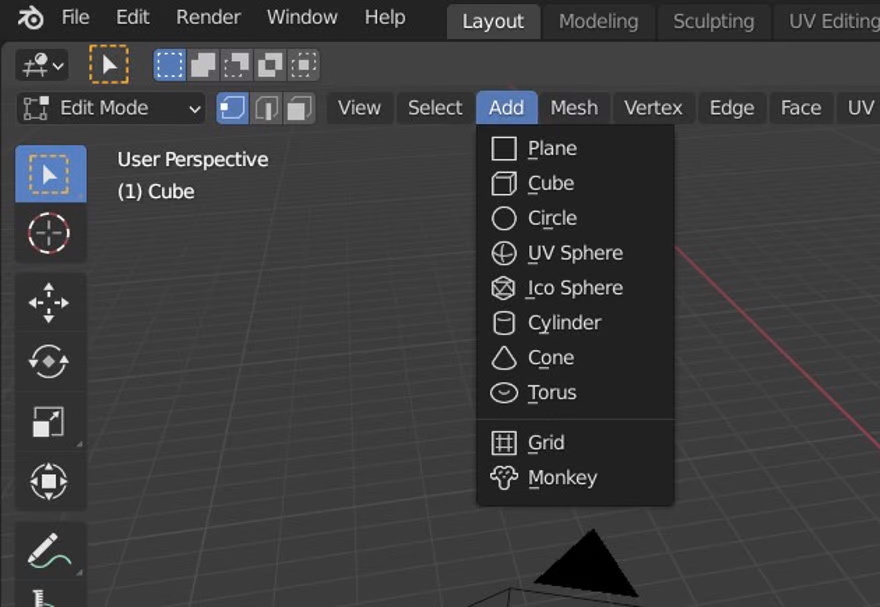
Команда Extrude выдавливает обозначенную область.
Используйте команду Boolean, чтобы вырезать или объединить одну форму с другой.
Шаг 3: Восстановление STL
Помимо импорта STL-файлов Blender предлагает и собственный инструмент восстановления STL.
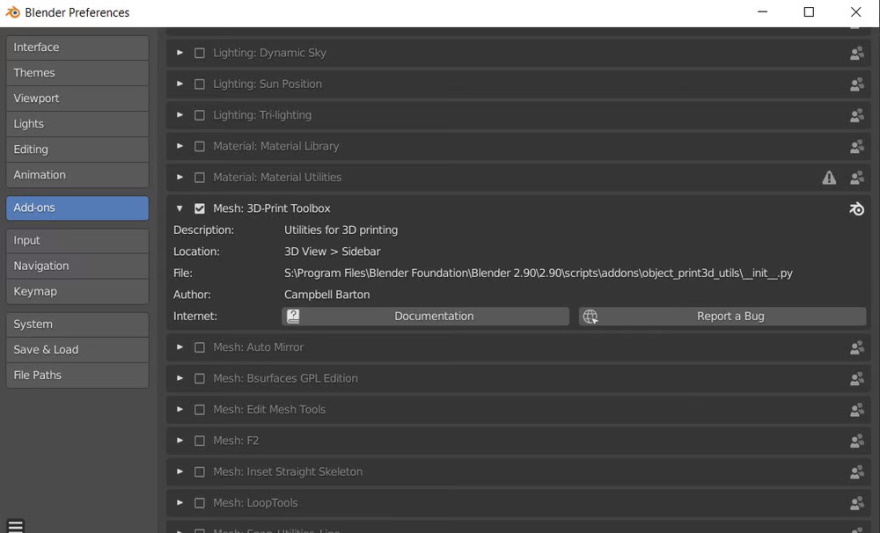
Активируйте 3D Print Toolbox: Edit > Preferences > Add-Ons > Mesh: 3D-Print Toolbox.
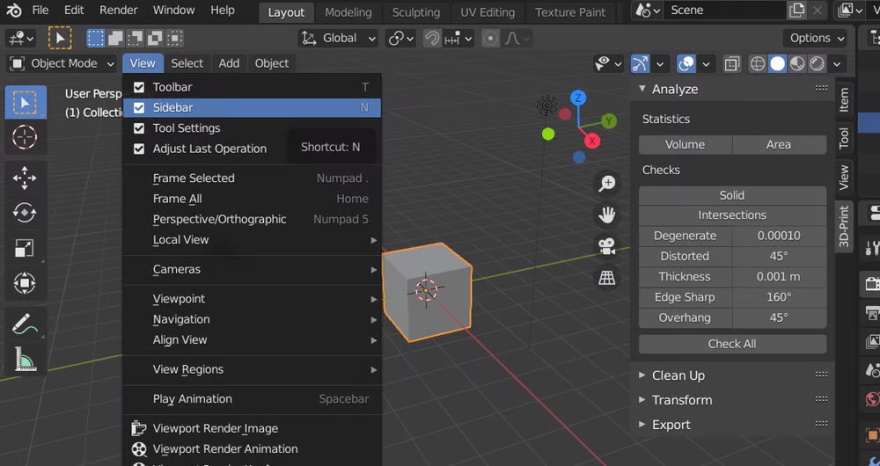
Теперь у вас будет доступ к панели инструментов на левой боковой панели (убедитесь, что боковая панель включена в разделе Вид (View) и нажмите N, чтобы включить эту функцию).
Набор инструментов Blender для 3D-печати позволяет решать все проблемы c STL-файлами, которые могут привести к неправильной 3D-печати. Просто нажмите Проверить все (Check All), и программа проанализирует модель. Список ошибок, если таковые имеются, отобразится в нижней части панели инструментов.
Чтобы исправить вершины и ребра, нажмите Isolated.
Чтобы сделать сетку многообразной (то есть просчитанной и снаружи, и изнутри), нажмите Make Manifold.
Шаг 4: Экспортируйте как файл STL
Чтобы экспортировать объект, выберите Файл > Экспорт > STL (File > Export > STL) и следуйте инструкциям по сохранению файла.
Плюсы и минусы использования Blender
Blender — отличный STL-редактор, если вы хотите создавать высокополигональные модели. Он предлагает множество инструментов для лепки и проработки мелких деталей моделей. Обратная сторона медали в том, что на привыкание к работе с Blender требуется некоторое время, а для действительно сложных мешей могут потребоваться высокие вычислительные мощности.
4. Meshmixer
Meshmixer — бесплатная программа для редактирования полигональных сеток, которую можно скачать с веб-сайта компании Autodesk. C ее помощью очень просто редактировать STL-файлы, заодно в ней имеется встроенный слайсер. Это означает, что вы сможете отправлять отредактированные и нарезанные модели прямо на 3D-принтер.
Шаг 1: Откройте файл STL
Чтобы импортировать STL, просто нажмите Импорт (Import) и найдите нужный файл.
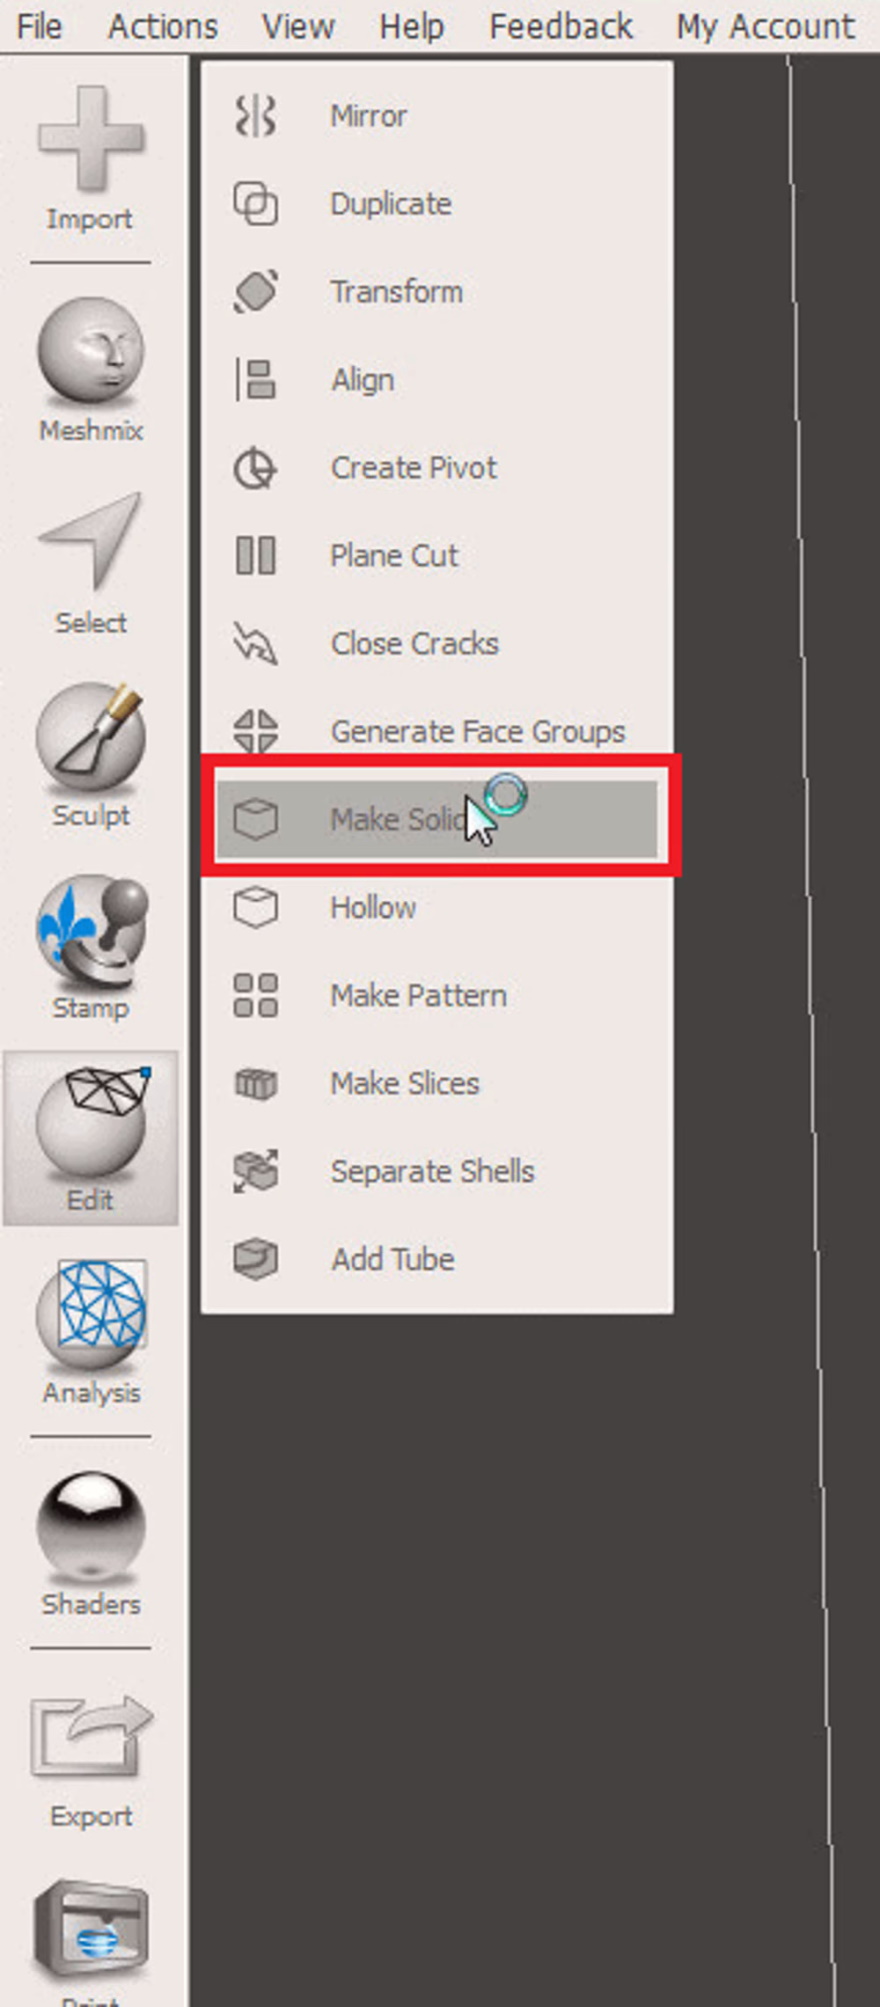
Нажмите Редактировать > Сделать твердым (Edit > Make solid).
Шаг 2: Отредактируйте файл STL
Теперь можно использовать функцию Select, чтобы выделить нужные части модели.
Выделенные полигоны можно удалить нажатием на Del.
При необходимости можно добавлять и комбинировать различные формы с помощью инструмента Sculpt.
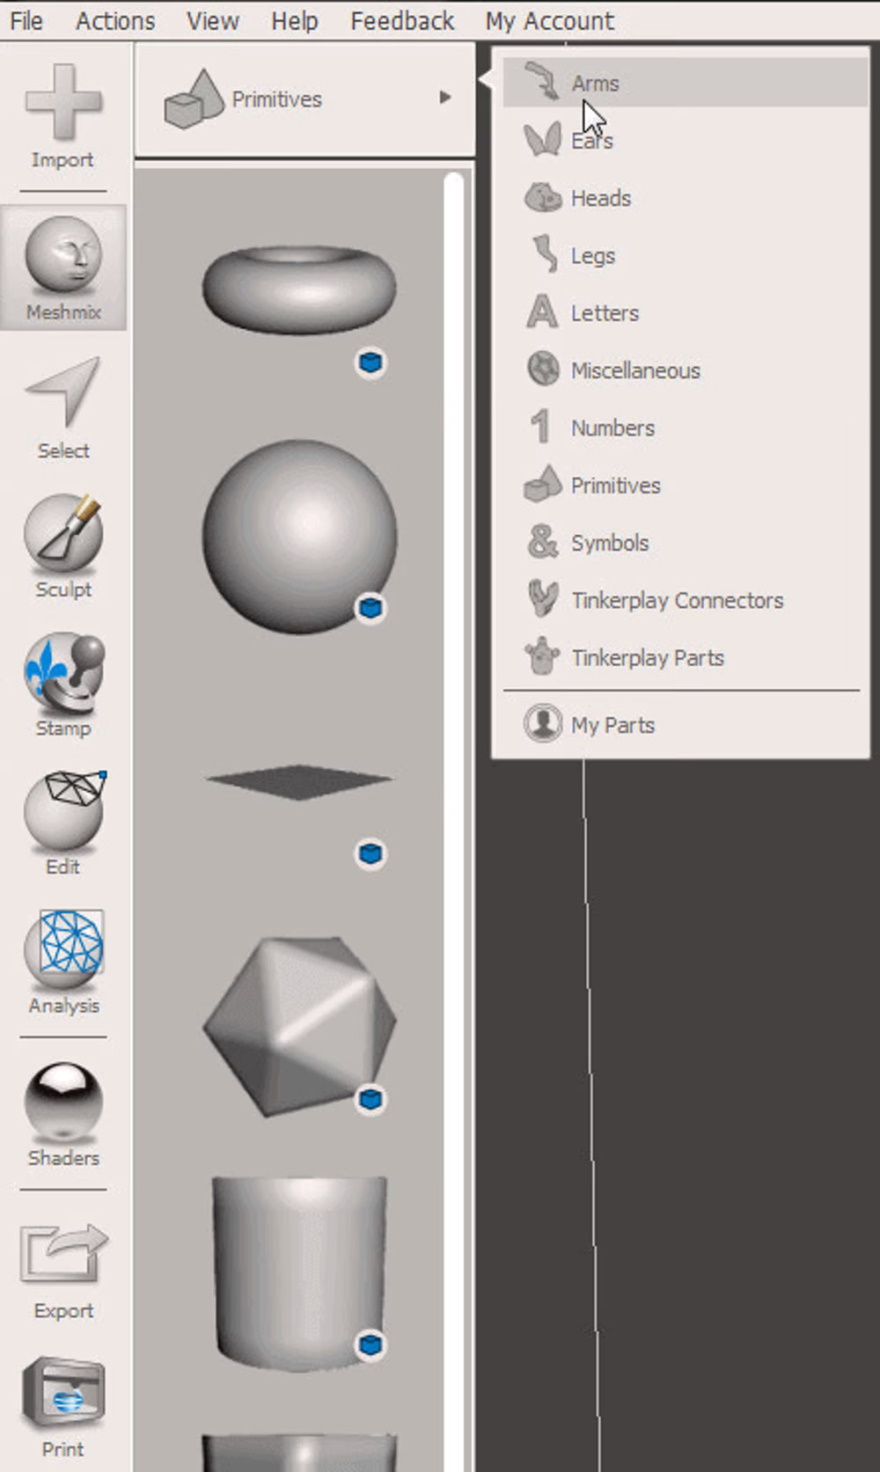
Перетащите объект, который хотите вставить, а рабочее поле, затем используйте разноцветные стрелки для перемещения или вращения модели, а маленький квадрат в середине стрелок — для масштабирования.
Нажмите Sculpt, чтобы сгладить или выдавить различные области модели.
Шаг 3: Ремонт STL и подготовка к 3D-печати
На боковой панели выберите Печать (Print). Здесь вы найдете полный набор инструментов, которые помогут подготовить STL-файл к 3D-печати.
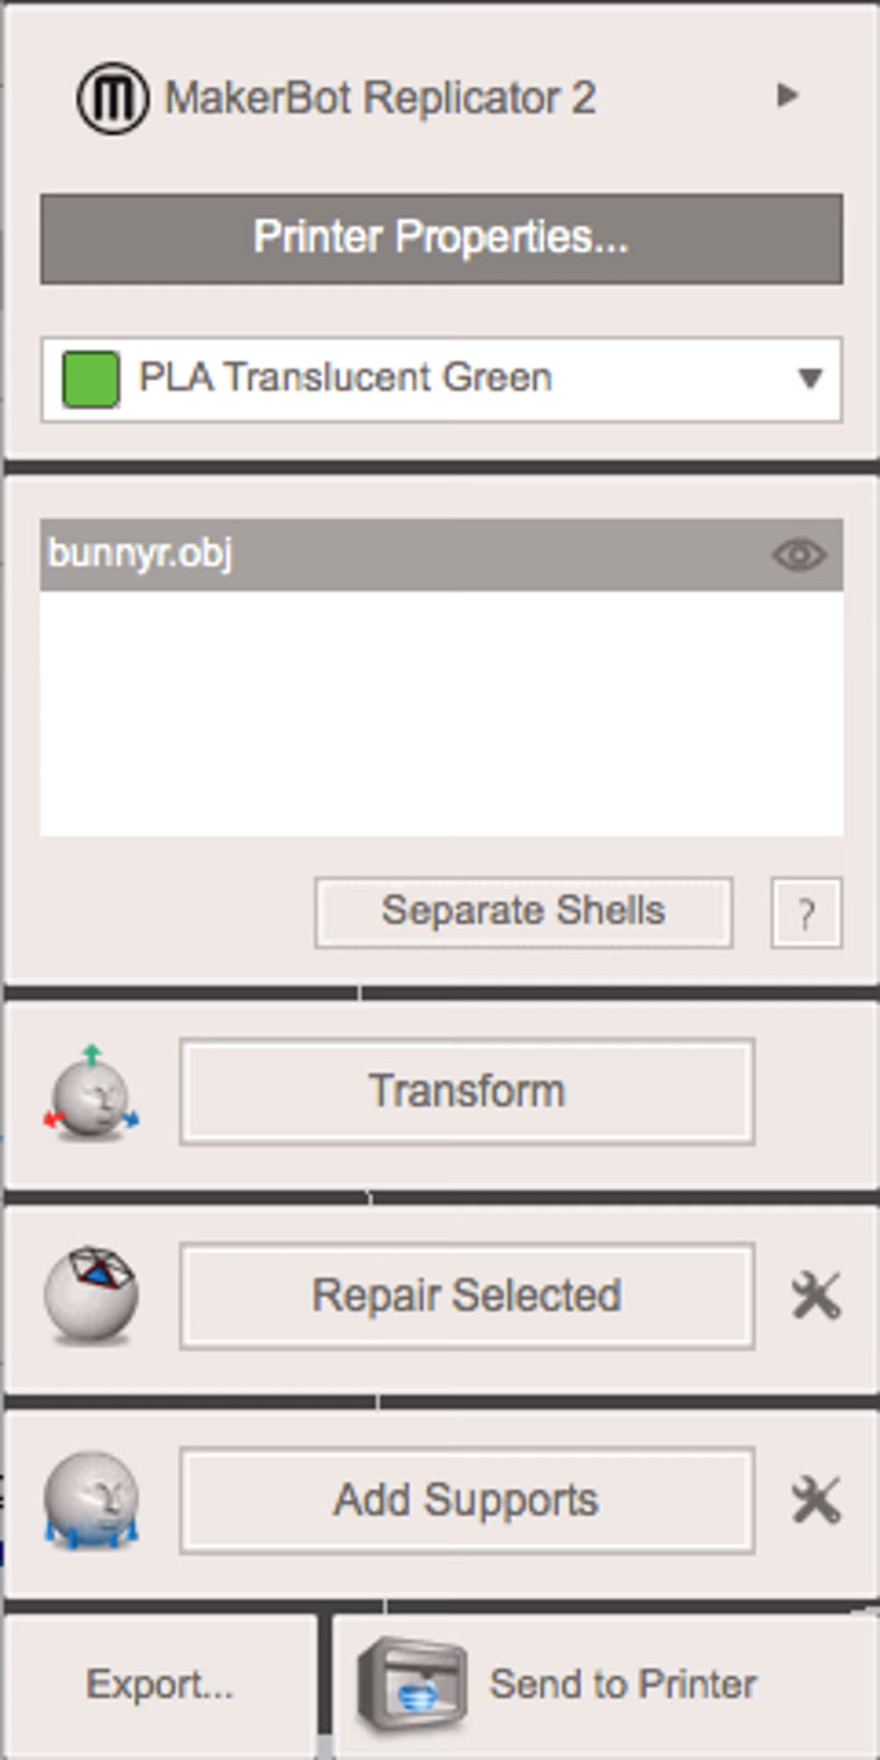
Сначала выберите свой 3D-принтер из выпадающего списка — в него входят самые распространенные модели на рынке. Если ваше оборудование в списке отсутствует, его можно добавить вручную и указать характеристики. Для этого обратитесь к руководству по эксплуатации.
Чтобы отремонтировать сетку, выберите Восстановить выбранное (Repair Selected). Этот инструмент автоматически исправит все дефекты.
Кроме того, можно сделать сетку полой, чтобы использовать меньше материала во время 3D-печати, а заодно настроить минимальную толщину стенок.
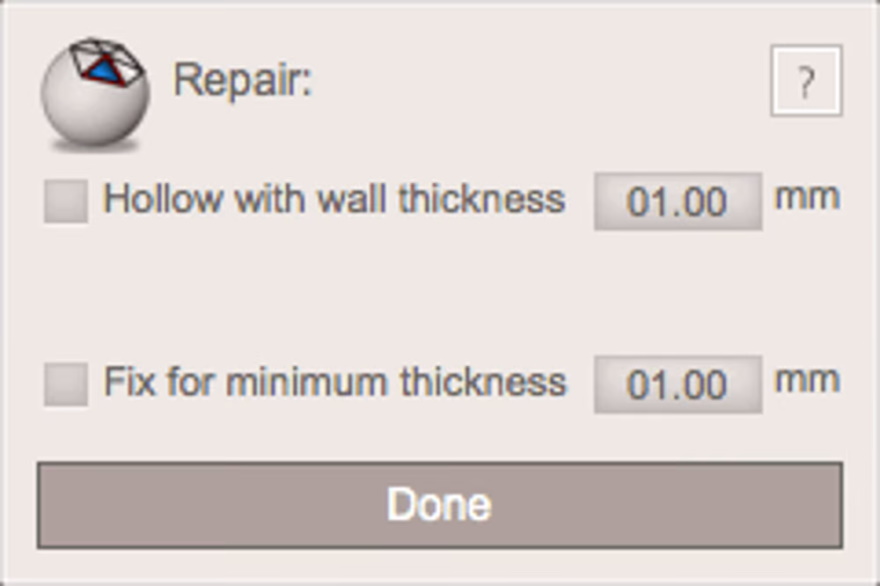
Если вы хотите добавить опорные структуры, выберите Добавить поддержку (Add Support). Адаптируйте настройки к требованиям вашего 3D-принтера и нажмите Создать поддержку (Generate Support), а затем Готово (Done).
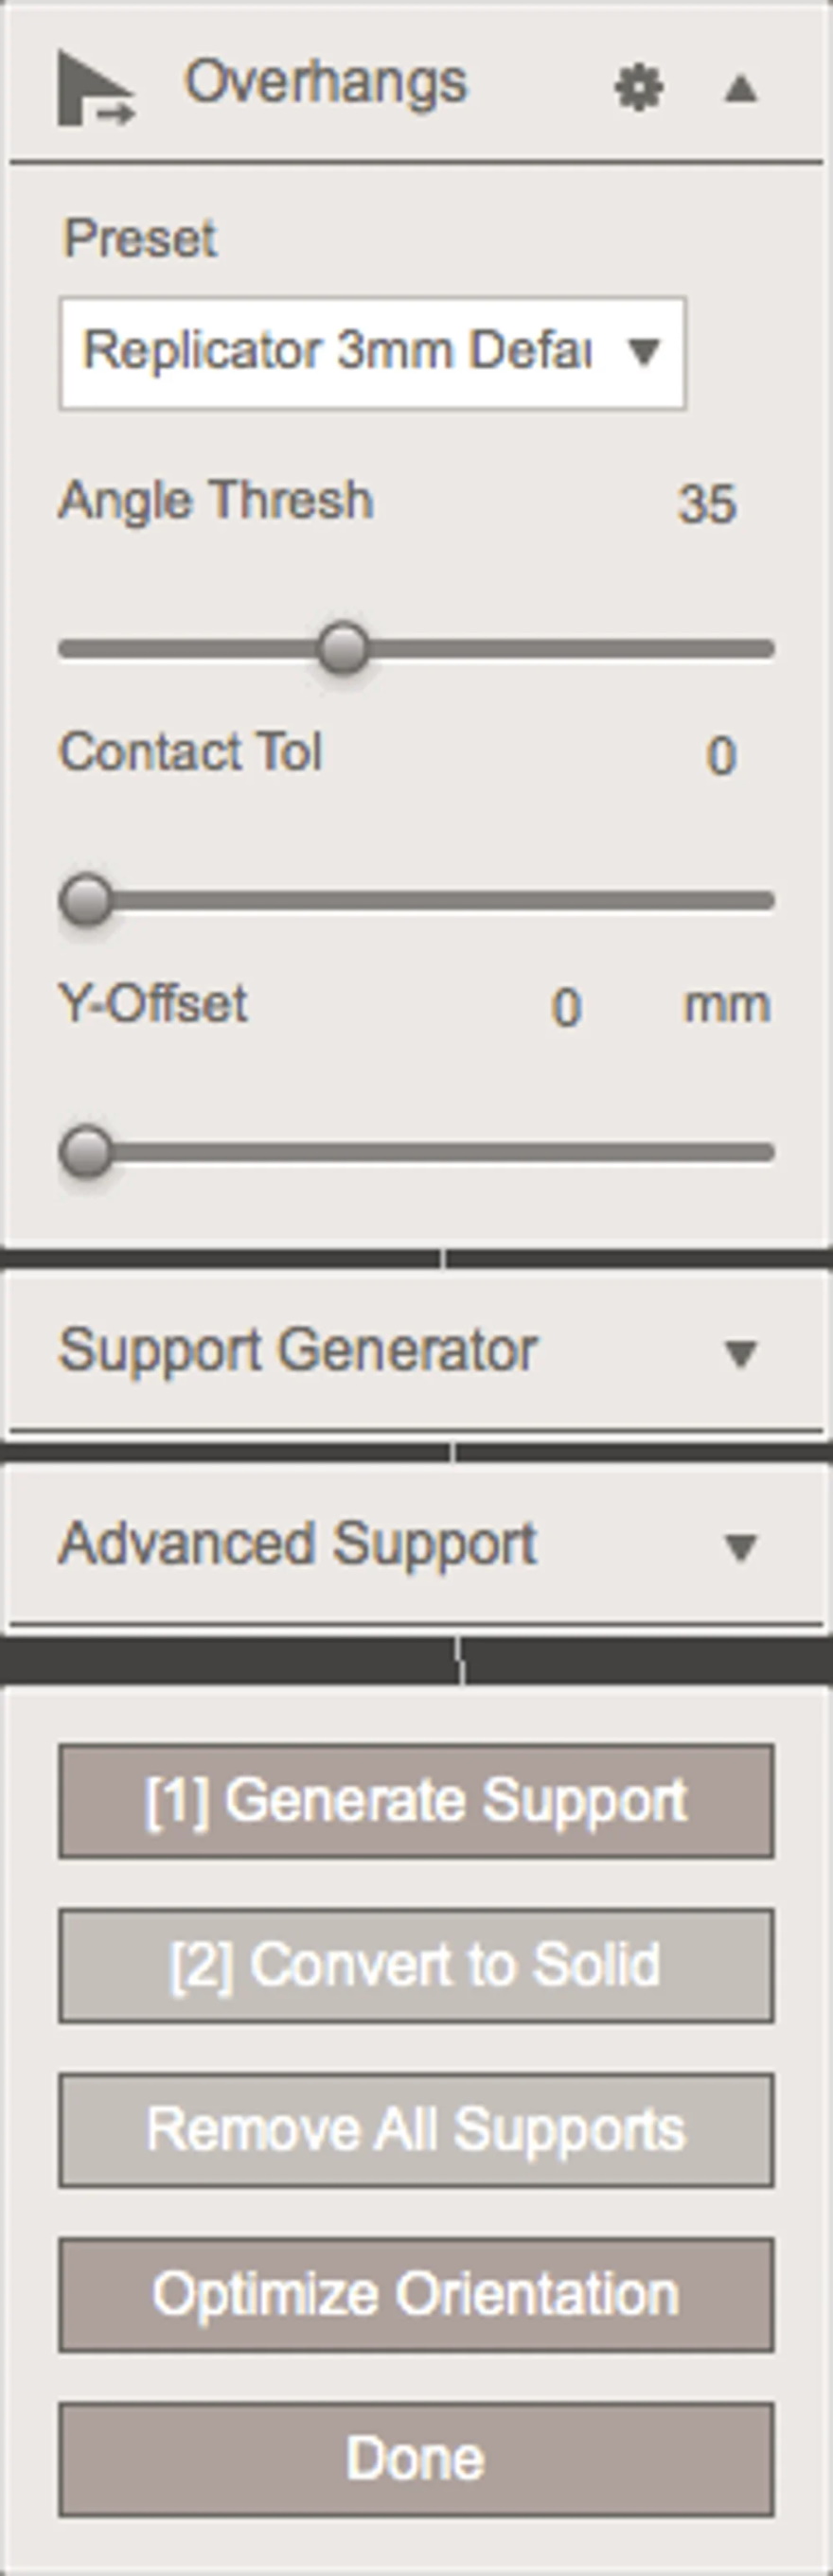
Когда вы будете удовлетворены состоянием сетки, нажмите Отправить на принтер (Send to Printer).
Шаг 4: Экспортируйте как файл STL
Чтобы экспортировать объект, перейдите в меню Файл > Экспорт (File > Export) и выберите формат STL.
Плюсы и минусы использования Meshmixer
Meshmixer — один из лучших инструментов для редактирования STL-файлов, он учитывает все возникающие проблемы, такие как стены толщиной с бумагу. Работать с Meshmixer в качестве редактора STL легко и удобно, если вы просто хотите изменить размер модели или быстро что-то отредактировать.
5. MeshLab
MeshLab — это бесплатная программа с открытым исходным кодом, позволяющая просматривать, объединять, преобразовывать и восстанавливать STL, PLY, STL, OFF, OBJ, 3DS и многие другие типы файлов, а также облака точек. Программу можно скачать с веб-сайта Sourceforge.
Шаг 1: Откройте файл STL
Чтобы открыть файл с мешем, перейдите в меню Файл > Импорт сетки (File > Import Mesh) и найдите нужную модель.
Шаг 2: Отредактируйте файл STL
В MeshLab нет инструментов для создания новых объектов. Тем не менее, это отличный инструмент для объединения двух сеток, например полученных 3D-сканированием.Также можно удалять части сеток и ремонтировать отверстия в моделях.

Как объединить две сетки
Сначала загрузите обе модели.
Щелкните Показать слои (Show Layers), выберите модели в сцене.
Чтобы преобразовать, повернуть или масштабировать объект, сначала выберите его в меню Слой (Layer), а затем нажмите Инструменты манипуляции (Manipulator Tools).
Теперь можно выбрать функцию трансформации нажатием на T, поворот модели нажатием на R или масштабирование нажатием на S.
Система координат определяется ракурсом. Просто перетащите стрелки, чтобы переместить или масштабировать модель в том или ином направлении. Поверните круг вокруг объекта, чтобы развернуть модель. Если вы хотите изменить ракурс, нажмите Escape, поменяйте угол обзора на нужный, а затем снова нажмите Escape, чтобы продолжить преобразование. Нажмите Enter, чтобы подтвердить изменения.
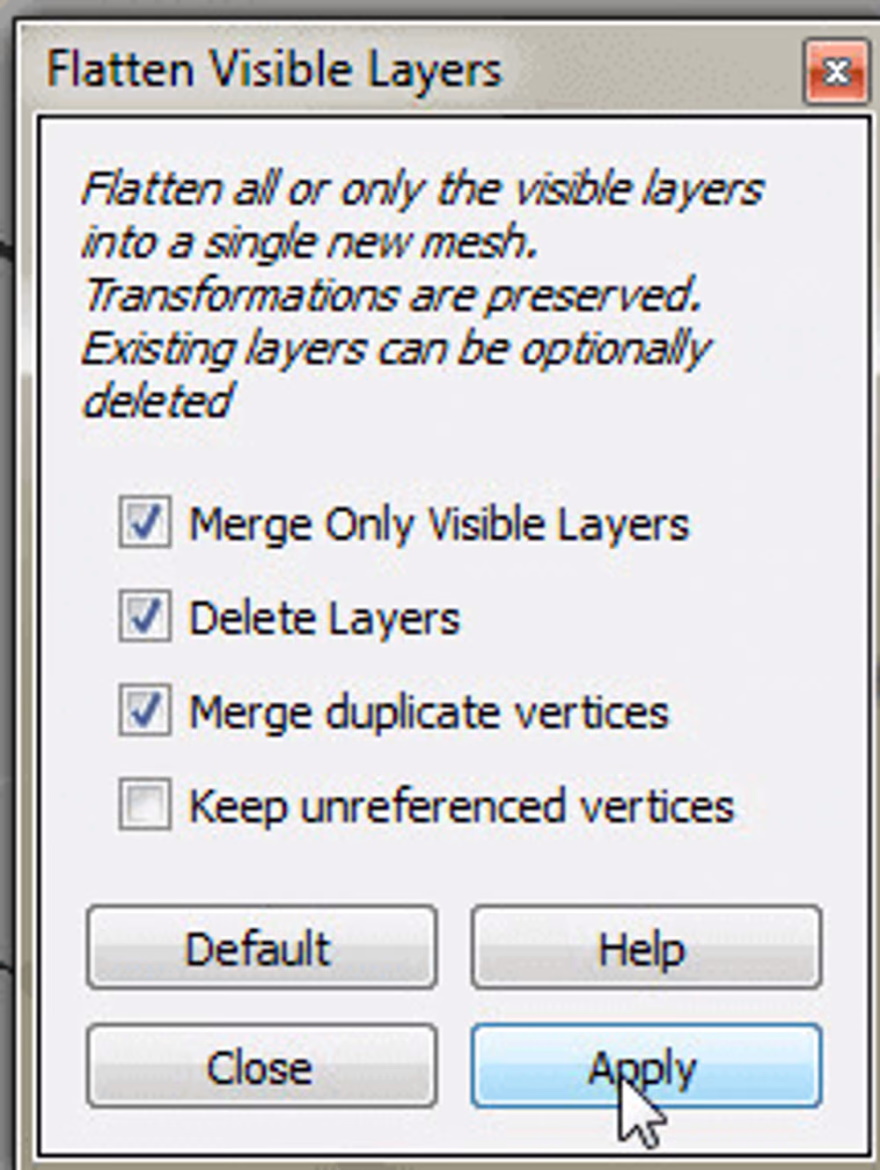
Когда все части будут на своих местах, щелкните правой кнопкой мыши на любой участок объединенной сетки и выберите Сгладить видимые слои (Flatten Visible Layers). Поставьте галочки в первых трех полях и нажмите Применить (Apply).
Как удалить часть модели
Чтобы удалить часть сетки, щелкните Выбрать грань (Select Face), затем щелкните Удалить текущую выбранную грань и вершины (Delete the Current Selected Face and Vertices).
Как отремонтировать объект или найти дыры
Нажмите Заполнить отверстие (Fill Hole). Для этой опции модель должна быть многообразной. Появится окно, показывающее все отверстия в модели. Теперь можно выбрать отверстия, которые необходимо заполнить. При выборе они будут выделены зеленым цветом. Нажмите Заполнить (Fill), а затем Принять (Accept).
Шаг 3: Восстановление STL
Чтобы проверить, является ли ваш файл STL «водонепроницаемым», выберите Фильтры > Показатели качества и вычисления > Вычислить геометрические показатели (Filters > Quality Measures and Computations > Compute Geometric Measures). Том файла или отчет об ошибках будет доступен в диалоговом окне с правой стороны.
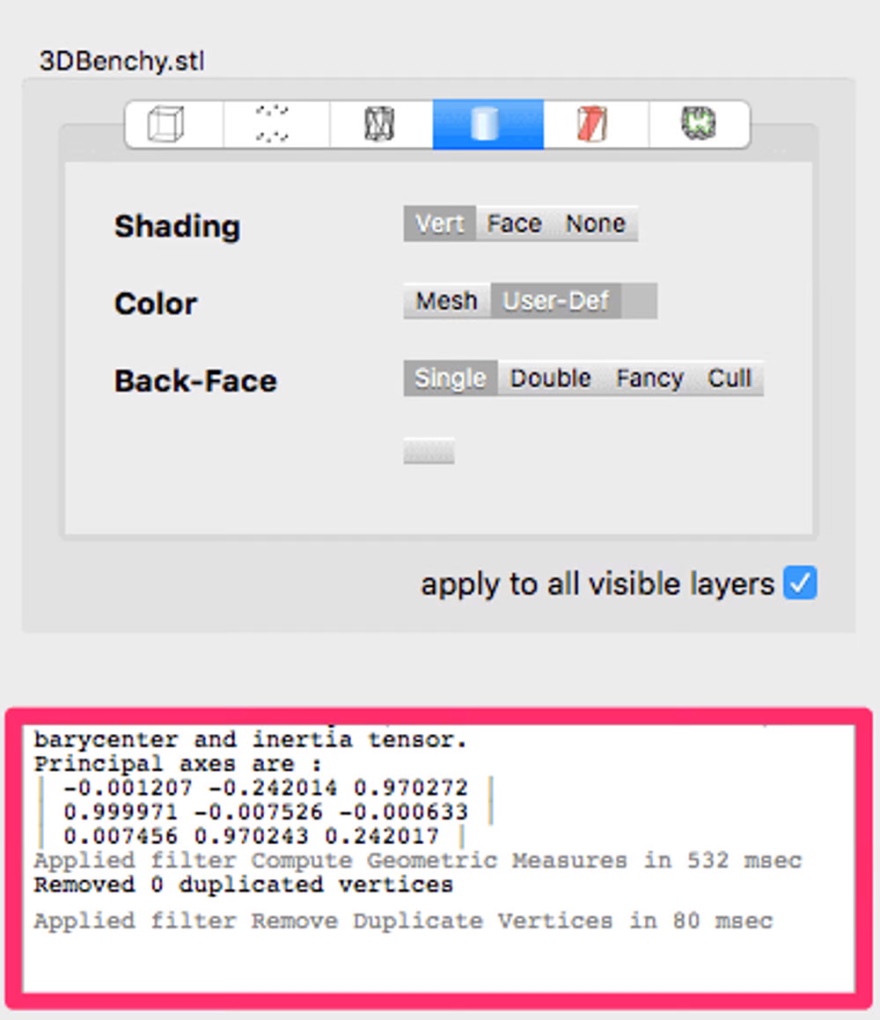
Если в модели есть бреши, выберите Фильтры > Очистка и восстановление > Объединить близкие вершины (Filters > Cleaning and Repairing > Merge Close Vertices) и нажмите Применить (Apply).
Выберите Фильтры > Очистка и восстановление > Удалить повторяющиеся грани (Filters > Cleaning and Repairing > Remove Duplicate Faces), нажмите Применить (Apply).
Выберите Фильтры > Очистка и восстановление > Удалить повторяющиеся вершины (Filters > Cleaning and Repairing > Remove Duplicated Vertices), нажмите Применить (Apply).
Перепроверьте STL-файл.
Шаг 4: Экспортируйте как файл STL
Чтобы экспортировать модель, выберите Файл > Экспорт сетки (File > Export Mesh).
Плюсы и минусы использования MeshLab
Даже если MeshLab не дает возможность создавать новые объекты, это отличный STL-редактор для объединения или восстановления мешей. С помощью MeshLab можно без труда объединять 3D-сканы или просто создавать новые модели путем слияния.
6. 3D Slash
3D Slash — это бесплатное и простое в использовании программное обеспечение для 3D-моделирования, позволяющее создавать модели с использованием концепции строительных блоков, аналогичной игре Minecraft. Программу можно скачать бесплатно или даже установить в браузер.
Шаг 1: Откройте файл STL
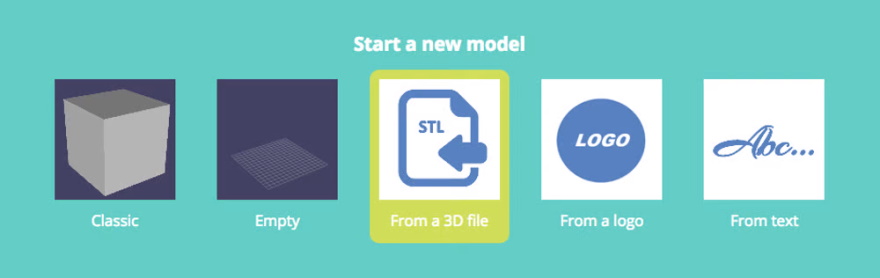
Чтобы открыть STL-файл, перейдите в раздел Начать новую модель (Start a new model) и выберите Из 3D-файла (From a 3D file). Файл можно найти на жестком диске или просто перетащить в браузер.
Шаг 2: Отредактируйте файл STL
Сетка автоматически преобразуется в пиксельный объект, который можно редактировать с помощью 3D Slash.
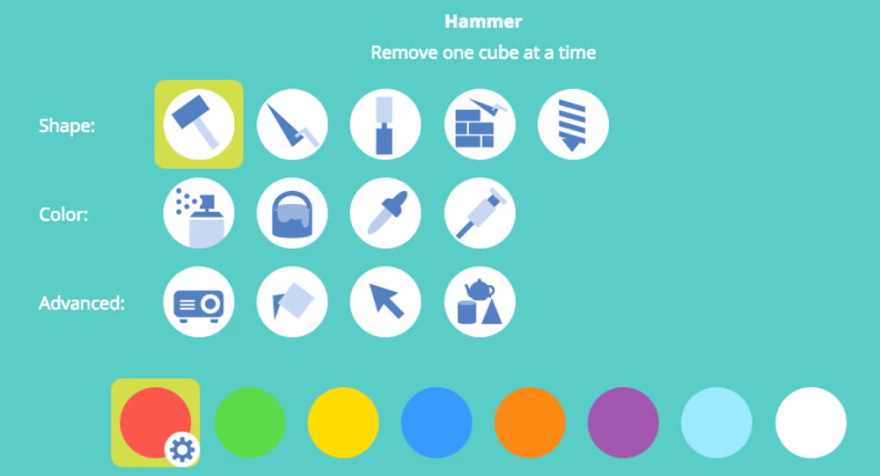
Выберите инструмент в левом верхнем углу окна просмотра. Можно выбрать один из нескольких инструментов для добавления или вычитания кубических мешей различных размеров:
- молоток (Hammer): удалить кубики;
- мастерок (Trowel): перестроить кубики;
- стамеска (Chisel): удалить срезы кубиков;
- стена (Wall): перестроить срезы кубиков;
- сверление (Drill): удалить все, что находится в выбранных пределах.
В сцену можно добавить различные примитивы, чтобы начать работу над новым проектом.
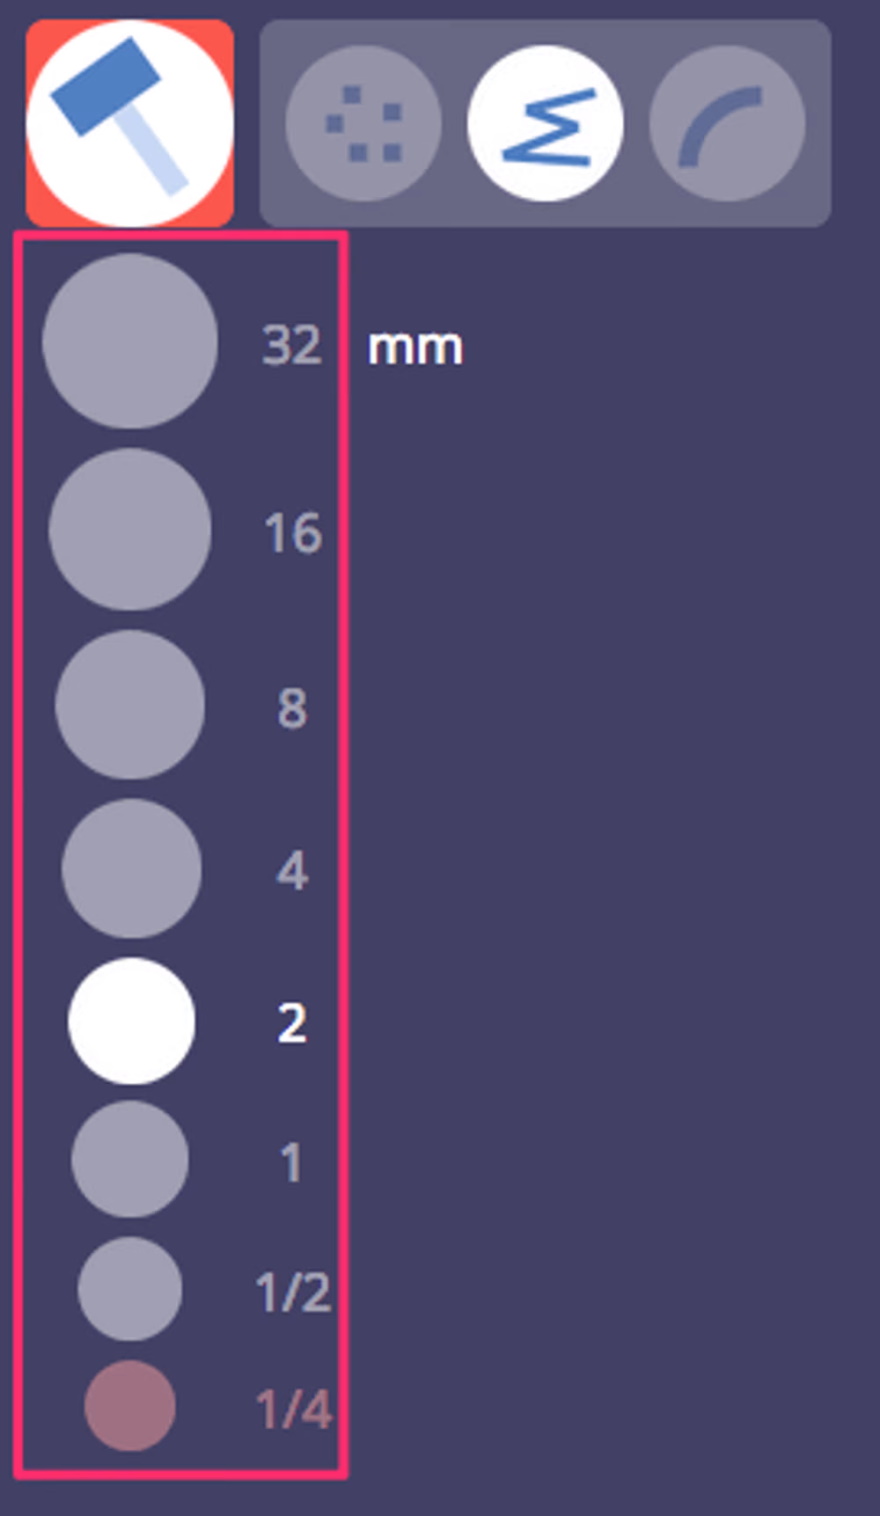
Отрегулируйте размер кубов с помощью палитры в левой части окна просмотра.
Шаг 3: Экспортируйте как файл STL
Чтобы экспортировать сетку, выберите значок дискеты в правом верхнем углу.
Выберите Сохранить как файл STL (Save as STL file).
Плюсы и минусы использования 3D Slash
3D Slash особенно понравится любителям, которым нужно время от времени создавать свои 3D-проекты без необходимости в постижении тайн обычного программного обеспечения для 3D-моделирования. К сожалению, 3D Slash не позволяет пользователям бесплатной версии сохранять измененные 3D-проекты в формате STL.
7. SculptGL
SculptGL — бесплатный инструмент для создания 3D-скульптур. В отличие от своих профессиональных собратьев, таких как ZBrush, SculptGL включает только самые необходимые инструменты и позволяет почувствовать себя скульптором с помощью веб-браузера.
Один серьезный недостаток этого приложения в том, что оно может иногда создавать немногообразные вершины.
Шаг № 1: Откройте файл STL
Щелкните Сцена > Очистить сцену (Scene > Clear Scene), чтобы удалить примитив по умолчанию.
Загрузите файл STL, выбрав Файл (импорт/экспорт) > Добавить (File (import/export) > Add).
Шаг № 2: Отредактируйте файл STL
Определите большие элементы сетки (руки, головы, конечности) с помощью большого инструмента. Перейдите к меньшим кистям для мелких деталей.
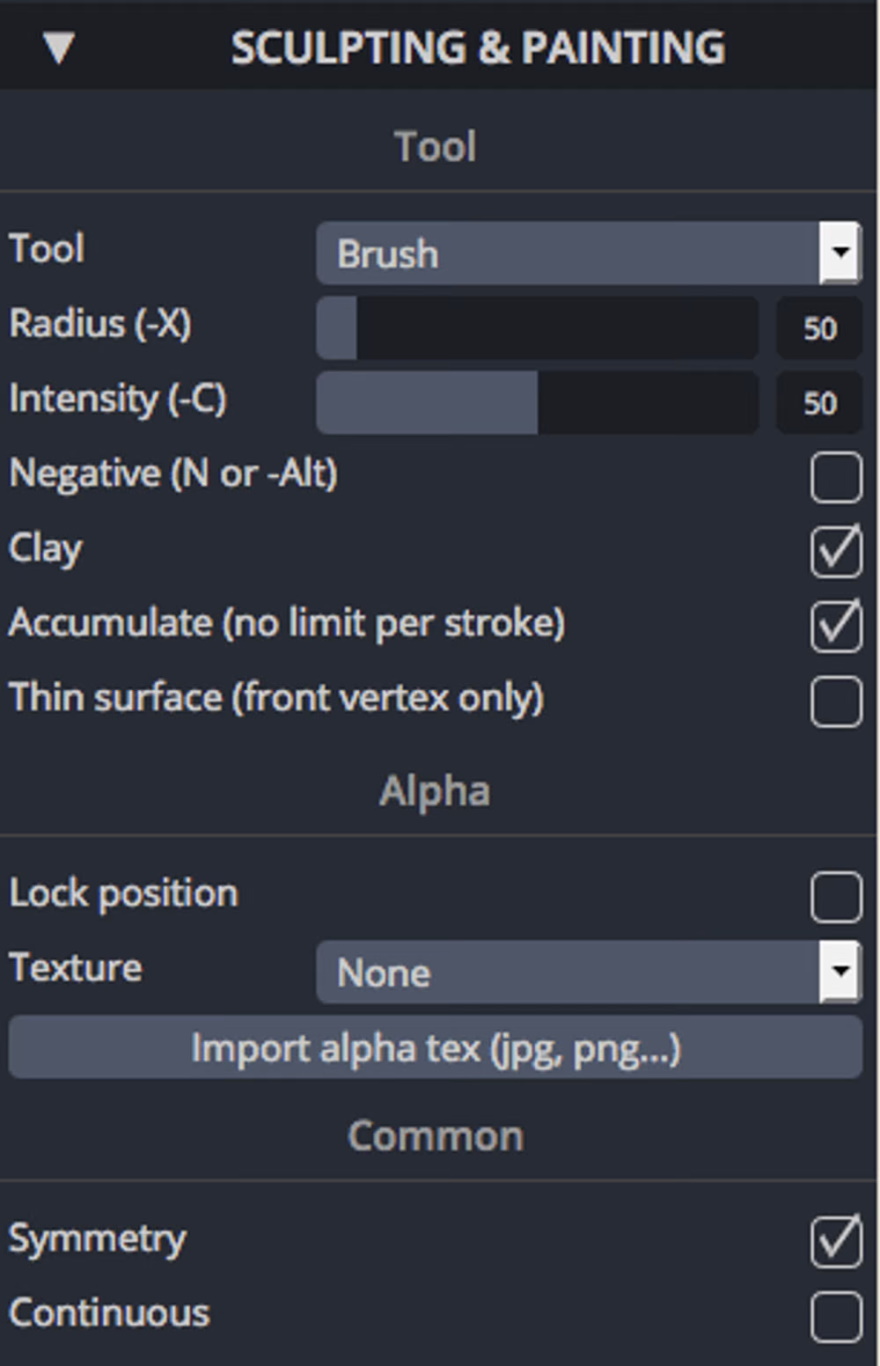
Отрегулируйте размер инструмента на панели Скульптура и рисование (Sculpting & Painting) в разделе Радиус (Radius).
Выбор инструментов широк.
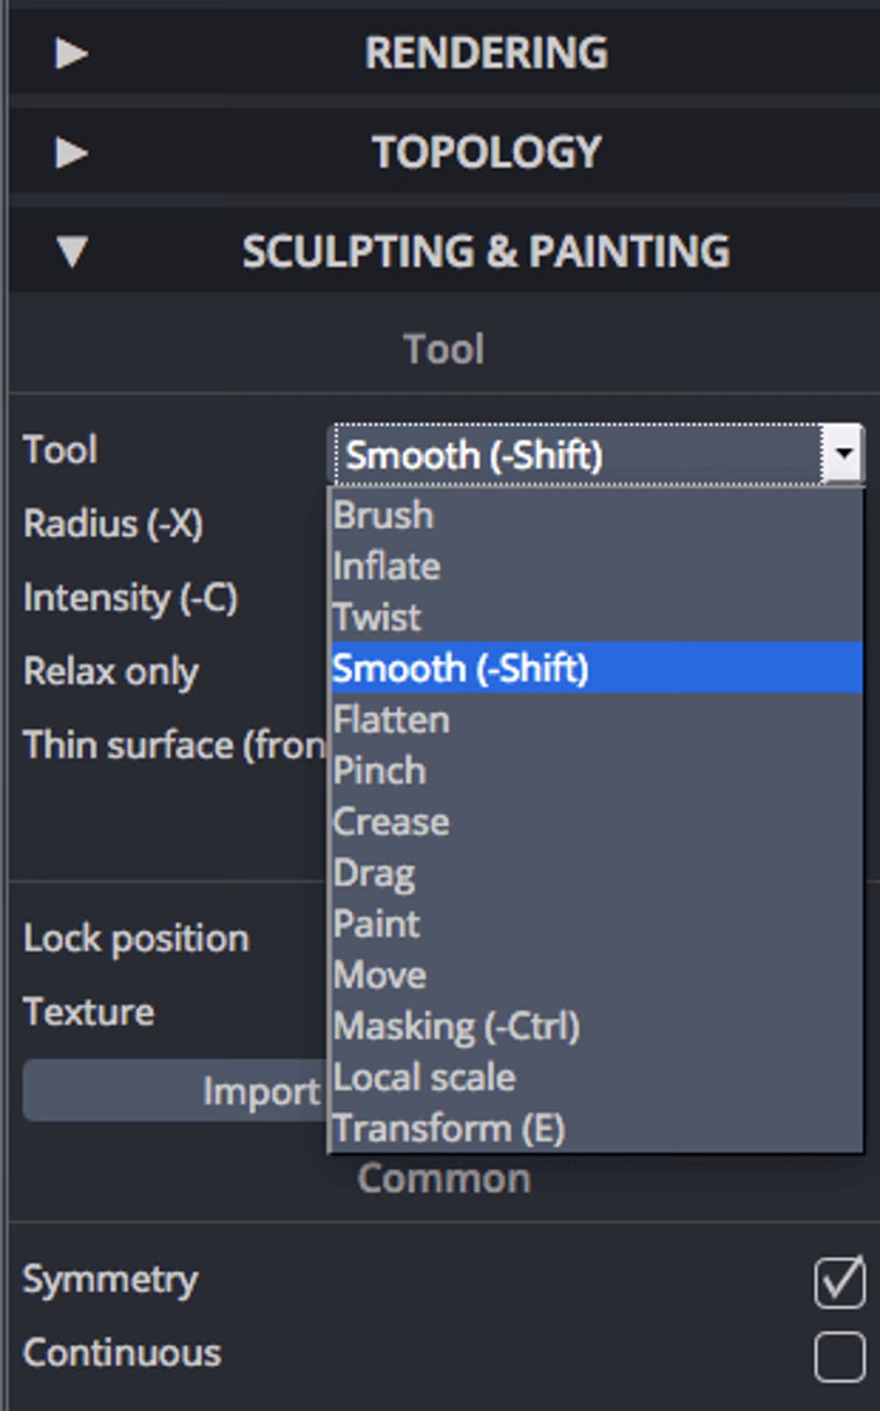
Для экономии времени можно активировать кнопку Симметрия (Symmetry). Это позволит скульптить половину меша, в то время как другая половина будет отображаться зеркально.
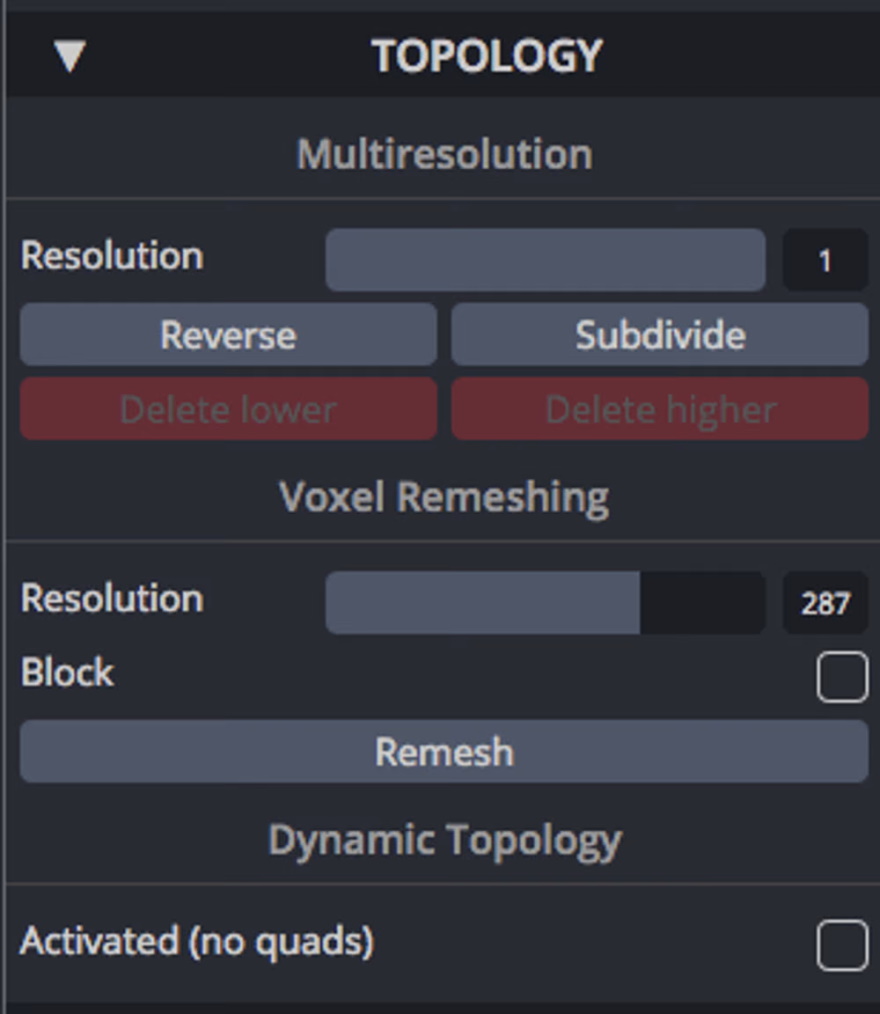
Для повышения детализации придется увеличить разрешение. Есть два способа:
Разделите сетку: выберите Топология» > Множественное разрешение > Разделить (Topology > Multiresolution > Subdivide).
Как вариант, cоздайте меш заново, выбрав разрешение в разделе Топология > Пересоздание вокселей > Разрешение (Topology > Voxel Remeshing > Resolution), а затем нажмите Пересоздать (Remesh).
Шаг №3 Экспорт в файл STL
Щелкните Файл (импорт/экспорт) > Сохранить STL (File (import/export) > Save STL).
Плюсы и минусы использования Sculpt GL
SculptGL — отличный способ сделать первые шаги в 3D-скульптинге, к тому же бесплатный. С другой стороны, он не обладает столько же широким функционалом, как более продвинутые программы, например ZBrush или Mudbox.
Перевод статьи 7 Free STL Editors: How to Edit & Repair STL Files, опубликованной на сайте All3DP.