Babylog 8000 Error List 2 List of device error messages If an error occurs, read the Babylog 8000/8000 SC error messages on the 7-segment display of the Monitoring PCB! Table 1: Device error messages Display error number Monitoring PCB error number 92 Dräger Medical AG & Co. KGaA Meaning 000 CPU PCB ROM error 001 CPU PCB RAM error 002 One or more keys jammed (continuously pressed). 003 Data transmission between CPU PCB and the dual-port RAM of the Monitoring PCB is interfered. 004 Watchdog error or CPU PCB reset 005 CPU PCB error: The CPU PCB is in the boot phase although the Monitoring PCB is running in the background (e.g. by a CPU PCB reset). 006 Vector error or CPU PCB reset 500 Software error: Incorrect operating mode, for example, error in storage of operational data in the time-keeper RAM on the CPU PCB. 501 Monitoring PCB does not function correctly 502 Flow PCB does not function correctly 503 CPU PCB software error: Impermissible breathing phase 504 CPU PCB software error All rights reserved. Copyright reserved. _ _Printed on_18.05.05_GB_K61733XXFL1.fm
All rights reserved. Copyright reserved. _ _Printed on_18.05.05_GB_K61733XXFL1.fm Error List Babylog 8000 Table 1: Device error messages Display error number Dräger Medical AG & Co. KGaA Monitoring PCB error number Meaning 505 CPU PCB software error 506 to 513 CPU PCB software error. 800 FiO2 too high by more than 10 vol.%. 801 FiO 2 too low by more than 10 vol.%. 802 FiO2 measurement deviation between master (CPU PCB and I/O PCB) and Monitoring PCB is too high. 803 Measured Pinsp to potentiometer setting Pinsp too high by more than 25 mbar (cmH2O). 804 Pinsp greater than 110 mbar (cmH2O). 805 Pinsp less than -5 mbar (cmH2O) 806 Flow measurement on the Flow PCB is faulty 807 Potentiometer evaluation is faulty: Master (CPU PCB and Frontcontroller PCB) and Monitoring PCB read different values. 809 Battery or battery charge faulty (battery voltage < 7 V) 93
- Page 1 and 2:
Technical Service Manual Babylog 80
- Page 3 and 4:
All rights reserved. Copyright rese
- Page 5 and 6:
All rights reserved. Copyright rese
- Page 7 and 8:
All rights reserved. Copyright rese
- Page 9:
General 7
- Page 12 and 13:
General Babylog 8000 10 Dräger Med
- Page 15 and 16:
All rights reserved. Copyright rese
- Page 17 and 18:
All rights reserved. Copyright rese
- Page 19 and 20:
All rights reserved. Copyright rese
- Page 21 and 22:
All rights reserved. Copyright rese
- Page 23 and 24:
All rights reserved. Copyright rese
- Page 25 and 26:
All rights reserved. Copyright rese
- Page 27 and 28:
All rights reserved. Copyright rese
- Page 29 and 30:
All rights reserved. Copyright rese
- Page 31 and 32:
All rights reserved. Copyright rese
- Page 33 and 34:
All rights reserved. Copyright rese
- Page 35 and 36:
All rights reserved. Copyright rese
- Page 37 and 38:
All rights reserved. Copyright rese
- Page 39 and 40:
All rights reserved. Copyright rese
- Page 41 and 42:
All rights reserved. Copyright rese
- Page 43 and 44: All rights reserved. Copyright rese
- Page 45 and 46: All rights reserved. Copyright rese
- Page 47 and 48: All rights reserved. Copyright rese
- Page 49 and 50: All rights reserved. Copyright rese
- Page 51 and 52: All rights reserved. Copyright rese
- Page 53 and 54: All rights reserved. Copyright rese
- Page 55 and 56: All rights reserved. Copyright rese
- Page 57 and 58: All rights reserved. Copyright rese
- Page 59: Replacing Non Repairable Items 57
- Page 62 and 63: Babylog 8000 Replacing Non-Repairab
- Page 64 and 65: Babylog 8000 Replacing Non-Repairab
- Page 66 and 67: Babylog 8000 Replacing Non-Repairab
- Page 68 and 69: Babylog 8000 Replacing Non-Repairab
- Page 70 and 71: Babylog 8000 Replacing Non-Repairab
- Page 72 and 73: Babylog 8000 Replacing Non-Repairab
- Page 74 and 75: Babylog 8000 Replacing Non-Repairab
- Page 76 and 77: Babylog 8000 Replacing Non-Repairab
- Page 79 and 80: All rights reserved. Copyright rese
- Page 81 and 82: All rights reserved. Copyright rese
- Page 83 and 84: All rights reserved. Copyright rese
- Page 85 and 86: All rights reserved. Copyright rese
- Page 87 and 88: All rights reserved. Copyright rese
- Page 89 and 90: All rights reserved. Copyright rese
- Page 91: Error List 89
- Page 96 and 97: Babylog 8000 Error List Table 1: De
- Page 98 and 99: Babylog 8000 Error List Table 1: De
- Page 101 and 102: Spare parts catalogue Emergency Car
- Page 103 and 104: 2004-06-17 12:10:18 Schutzvermerk D
- Page 105 and 106: 2004-06-17 12:10:18 Schutzvermerk D
- Page 107 and 108: 2004-06-17 12:10:18 Schutzvermerk D
- Page 109 and 110: 2004-06-17 12:10:18 Schutzvermerk D
- Page 111 and 112: 2004-06-17 12:10:18 Schutzvermerk D
- Page 113 and 114: Spare Parts List Item No. Part No.
- Page 115 and 116: Spare Parts List Item No. Part No.
- Page 117 and 118: 2004-06-17 12:10:18 Schutzvermerk D
- Page 119 and 120: 2004-06-17 12:10:18 Schutzvermerk D
- Page 121 and 122: 2004-06-17 12:10:18 Schutzvermerk D
- Page 123 and 124: Spare Parts List Item No. Part No.
- Page 125 and 126: Spare Parts List Item No. Accessori
- Page 127 and 128: Spare Parts List Item No. Part No.
- Page 129 and 130: Spare Parts List Item No. Maintenan
- Page 131: 2004-06-17 12:10:18 Schutzvermerk D
- Page 134 and 135: For internal use only. Copyright re
- Page 136 and 137: For internal use only. Copyright re
- Page 138 and 139: For internal use only. Copyright re
- Page 140 and 141: For internal use only. Copyright re
- Page 142 and 143: For internal use only. Copyright re
- Page 144 and 145:
For internal use only. Copyright re
- Page 146 and 147:
For internal use only. Copyright re
- Page 148 and 149:
For internal use only. Copyright re
- Page 151 and 152:
Technical Information Technical Doc
- Page 153 and 154:
Electromagnetic Immunity Electromag
- Page 155:
Dräger Medical AG & Co. KGaA Moisl
show all
Error List
Table 1: Device error messages
Display error
Monitoring PCB
number
error number
505
506 to 513
800
801
802
803
804
805
806
807
809
Dräger Medical AG & Co. KGaA
Meaning
CPU PCB software error
CPU PCB software error.
FiO
too high by more than 10
2
vol.%.
FiO
too low by more than 10
2
vol.%.
FiO
measurement deviation
2
between master (CPU PCB and
I/O PCB) and Monitoring PCB is
too high.
Measured Pinsp to potentiometer
setting Pinsp too high by more
than 25 mbar (cmH
O).
2
Pinsp greater than 110 mbar
(cmH2O).
Pinsp less than -5 mbar (cmH2O)
Flow measurement on the Flow
PCB is faulty
Potentiometer evaluation is faulty:
Master (CPU PCB and
Frontcontroller PCB) and
Monitoring PCB read different
values.
Battery or battery charge faulty
(battery voltage < 7 V)
Babylog 8000
93

Babylog 8000 plus аппарат длительной искусственной вентиляции легких при интенсивной терапии недоношенных, новорожденных и детей весом до 20 кг. Аппарат ИВЛ Babylog 8000 plus предназначен для использования в отделениях интенсивной терапии. С аппаратом должен работать врач или медицинский персонал по указаниям врача.
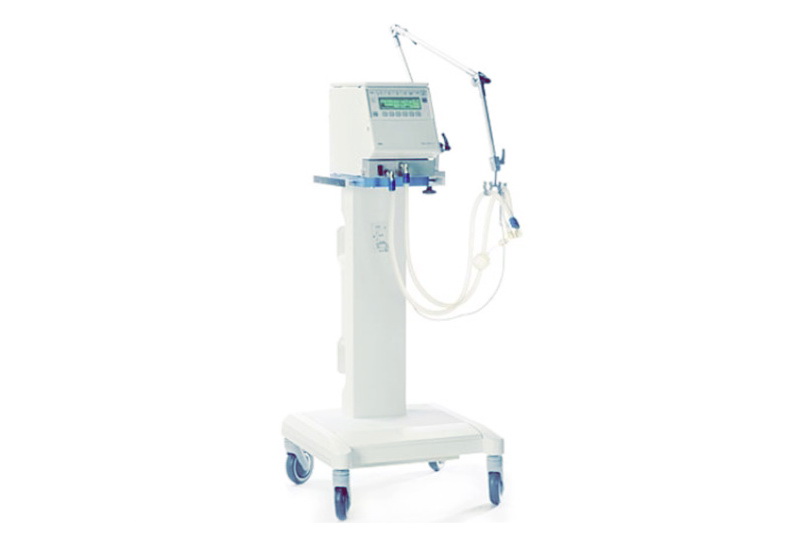
Мониторинг параметров
- концентрация кислорода на вдохе,
- давление в дыхательных путях,
- поток,
- дыхательный объем,
- частота дыхания (при одышке).
Аппарат ИВЛ Drager Babylog 8000 plus может быть оборудован интерфейсом для передачи измеряемых данных и установочных значений на монитор для слежения за больным или на компьютер. При необходимости аппарат можно использовать в комбинации с распылителем медикаментов.
- IPPV/IMV (Intermittent Positive Pressure Ventilation / Intermittent Mandatory Ventilation) – искусственная вентиляция легких с перемежающимся положительным давлением на вдохе с полным замещением дыхательной функции больного.
- SIPPV (Synchronized Intermittent Positive Pressure Ventilation) –
искусственная вентиляция легких с перемежающимся положительным давлением, синхронизируемая с самостоятельным дыханием больного. - SIMV (Synchronized Intermittent Mandatory Ventilation) – искусственная вентиляция легких с заданными дыхательным объемом и частотой, синхронизируемая с самостоятельным дыханием пациента. Пациент дышит самостоятельно между синхронизированными вентиляционными вдохами.
- PSV (Pressure Support Ventilation) – дополнительная функция – синхронизированная вентиляция с заданным давлением на вдохе или заданным дыхательным объемом. Пациент определяет длительность вдоха и частоту вентиляции.
- CPAP (Continuous Positive Airway Pressure) – самостоятельное дыхание с постоянным положительным давлением в дыхательных путях.
Перечисленные режимы вентиляции могут быть использованы в сочетании со следующими дополнительными функциями:
- VG (Volume Guarantee) – дополн. функция – вентиляция, контролируемая по объему. Аппарат ИВЛ автоматически регулирует давление на вдохе для достижения заданного дыхательного объема. Функция может быть использована в режимах SIPPV, SIMV и PSV.
- HFV (High Frequency Ventilation) – дополнительная функция – высокочастотная вентиляция для детей весом до 2 кг. Может использоваться в режимах IPPV/IMV или CPAP.
- VIVE (Variable Inspiratory Variable Expiratory Flow) – изменяемые вдыхаемый и выдыхаемый потоки. Раздельно регулируемый постоянный поток на фазе выдоха принудительной вентиляции. Этот режим не может использоваться в комбинации с HFV.
Рабочая панель оператора Babylog 8000
Рабочая панель оператора состоит из сектора органов управления и сектора дисплея.
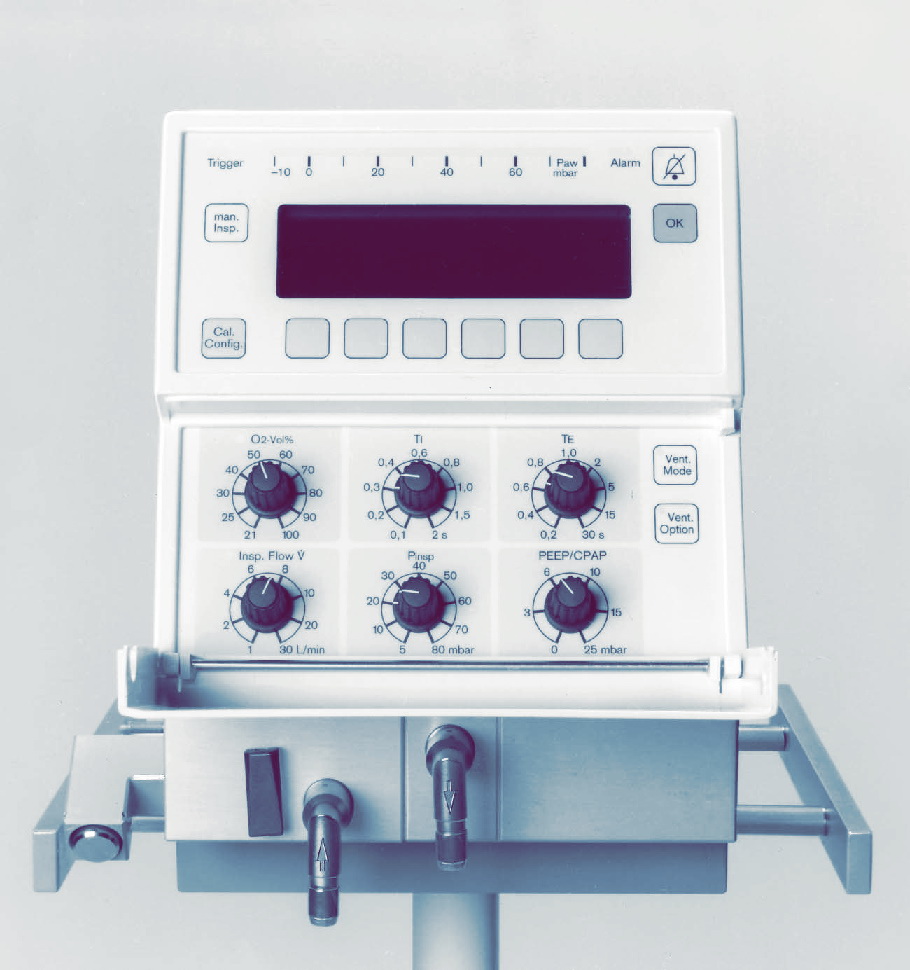
Органы управления
К органам управления относятся клавиши режимов вентиляции и поворотные ручки для регулирования важнейших параметров вентиляции.
Поворотные ручки для установки параметров, доступные в активированном режиме вентиляции, выделяются подсветкой с помощью зеленых светоиндикаторов. Мигание индикатора указывает на наличие ограничения или на необходимость подтверждения установки.
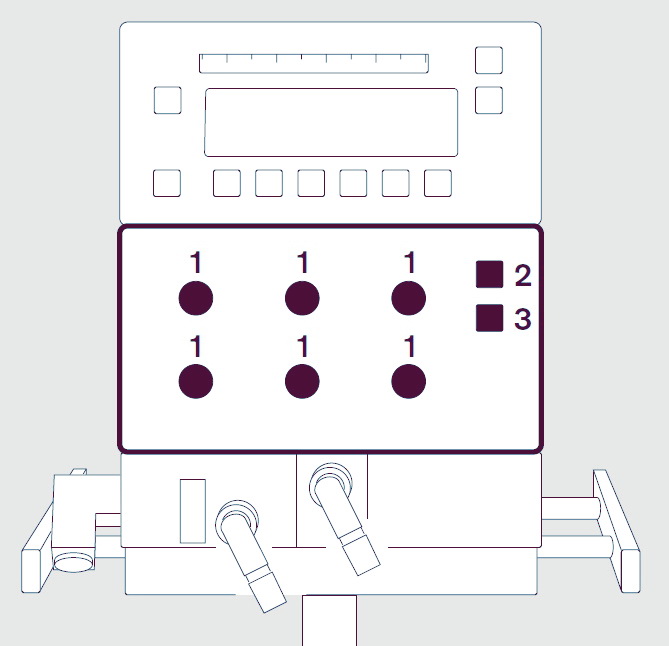
- Поворотные ручки для регулирования параметров вентиляции.
- Клавиша »Vent. Mode« для вызова меню режимов вентиляции.
- Клавиша »Vent. Option« для вызова меню дополнительных функций к режимам вентиляции.
Сектор дисплея
В секторе дисплея находятся экран, индикатор давления (барограф) и различные клавиши с постоянными или контекстно-зависимыми функциями.
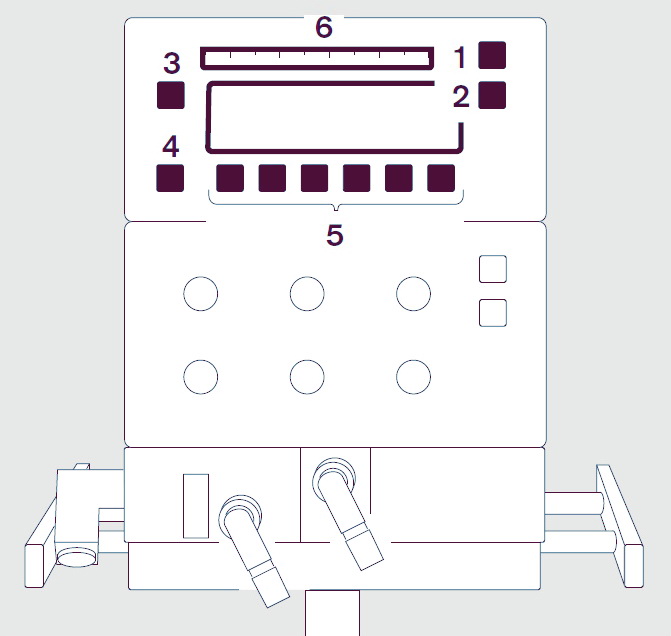
- Клавиша »Отключения сигнала« для отключения звуковых сигналов на 2 минуты.
- Кнопка »OK« для подтверждения наводящих сообщений и установочных значений.
- Клавиша »man. Insp.« для включения ручного режима вентиляции.
- Клавиша »Cal. Config.« для вызова меню калибровки.
- Шесть клавиш под экраном для выбора различных функций мониторинга и режимов вентиляции.
- Шкала барографа для индикации давления в дыхательных путях.
Структура экрана
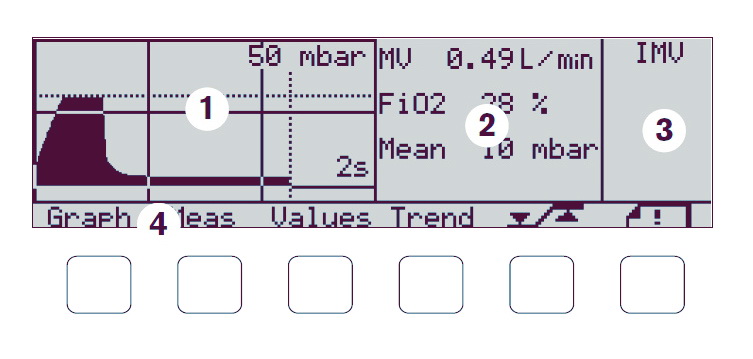
- Окно графиков для графического отображения кривых давления или потока.
- Окно измеряемых значений для отображения числовых значений параметров: MV, FiO2, Peak, Mean, PEEP.
- Экран состояния для отображения активированного режима вентиляции и сообщений для пользователя.
- Строка меню для отображения текущих функций клавиш в форме обозначений и символов.
В определенных случаях окно графиков и окно измеряемых значений интегрируются в одно общее окно.
Сообщения выводятся в окне поверх текущего изображения.
Сборка Babylog 8000
Установка клапана выдоха
Использовать только стерильный клапан выдоха!
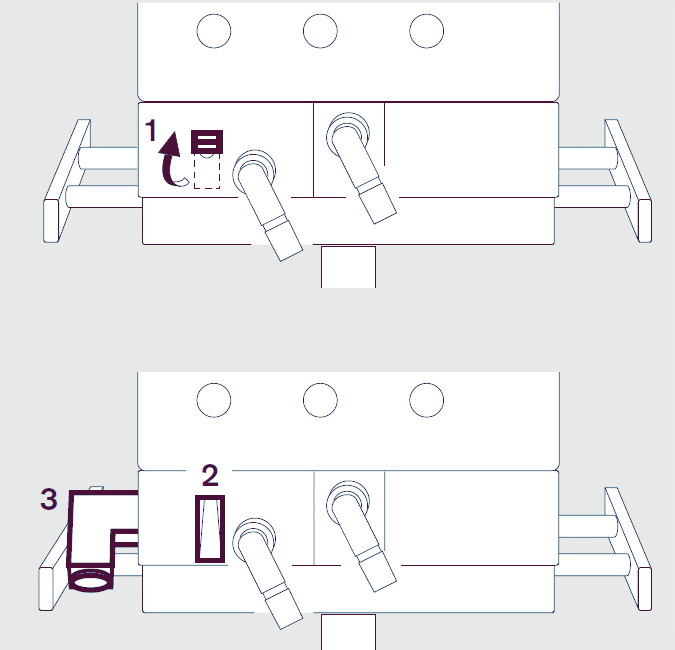
- Поднять фиксатор вверх — разблокировать клапан. Вставить клапан выдоха до упора.
- Заблокировать клапан — повернуть фиксатор вниз.
- Прикрепить глушитель к выходному штуцеру клапана.
Установка датчика О2
Установить датчик кислорода Drager Babylog 8000 при невозможности дальнейшей калибровки датчика (ресурс датчика полностью израсходован).
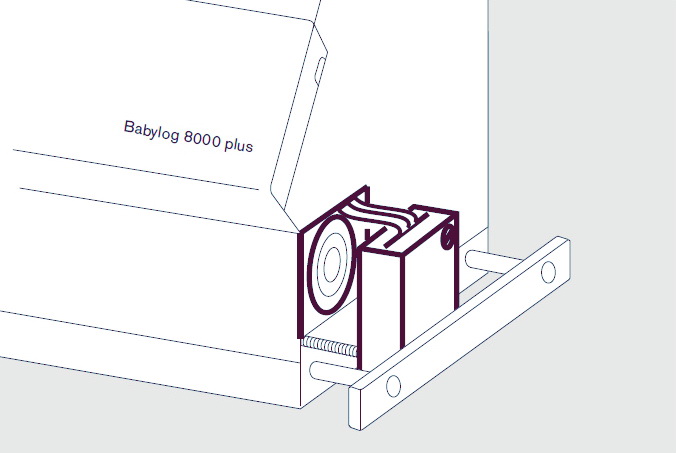
- Отвинтить два шлицевых винта в крышке с правой стороны, снять крышку.
- Извлечь использованный датчик O2.
- Вставить новый датчик O2 – стороной с циркулярными контактами вперед внутрь корпуса.
- Установить крышку на место, зафиксировать ее двумя винтами.
- Дать датчику проработать 15 минут, затем выполнить калибровку O2 вручную.
- Удалить датчик O2 с соблюдением правил удаления особых отходов.
Подсоединение газовых шлангов
Привинтить шланги медицинского воздуха (Air) и кислорода (O2) к соответствующим разъемам (с резьбой) на задней панели Babylog 8000 plus, вставить штекеры шлангов в настенные розетки централизованной системы газоснабжения.
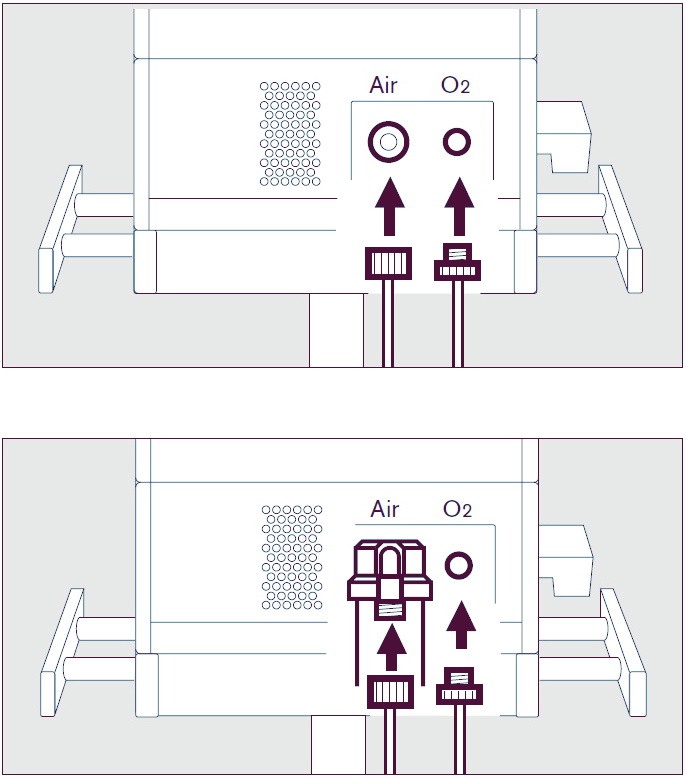
При использовании компрессора для подачи газов нужно присоединить влагосборник высокого давления 84 12 628 к разъему для медицинского воздуха. Привинтить шланг для подачи медицинского воздуха к влагосборнику высокого давления.
Датчики потока Babylog 8000
Калибровка датчика потока
- После включения аппарата,
- каждый раз после сборки датчика,
- каждый раз после замены датчика потока.
Замена датчика потока
При появлении на экране наводящего сообщения: Flow sensor inop Meas switched off.
- Отсоединить штекер от датчика потока.
- Нажать на кнопки по обеим сторонам датчика и одновременно извлечь датчик из Y-образного переходника.
- Вставить новый датчик в Y-образный переходник – убедиться в том, что датчик зафиксировался. Отметки должны совместиться.
- Подсоединить штекер к датчику – выступ датчика должен войти в паз штекера.
- Выполнить калибровку датчика потока
Drager Babylog 8000 ошибки и инеисправности
Аварийные сигналы аппарата ИВЛ Babylog 8000 plus классифицируются по 3 приоритетам:
- Тревожные сообщения – Предупреждающие сообщения – Рекомендательные и наводящие сообщения.
- В таблице ниже сообщения даны в алфавитной последовательности.
- Таблица призвана помочь сориентироваться при диагностике и устранении неисправностей.
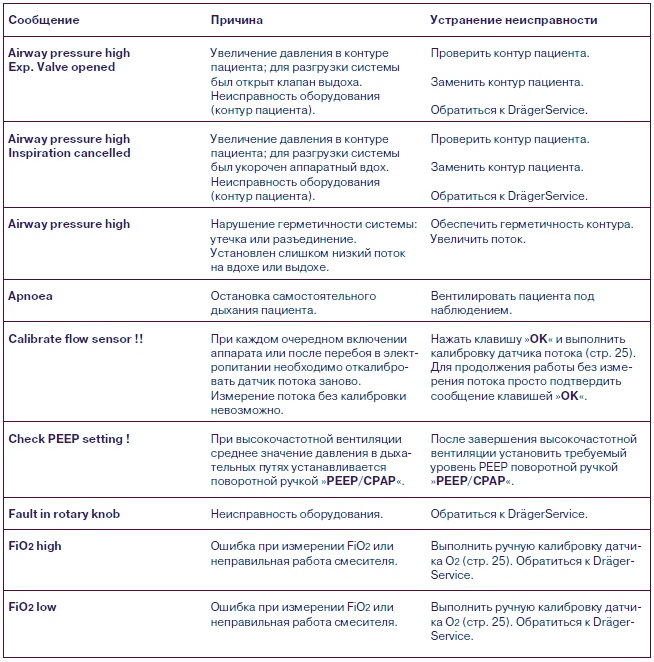
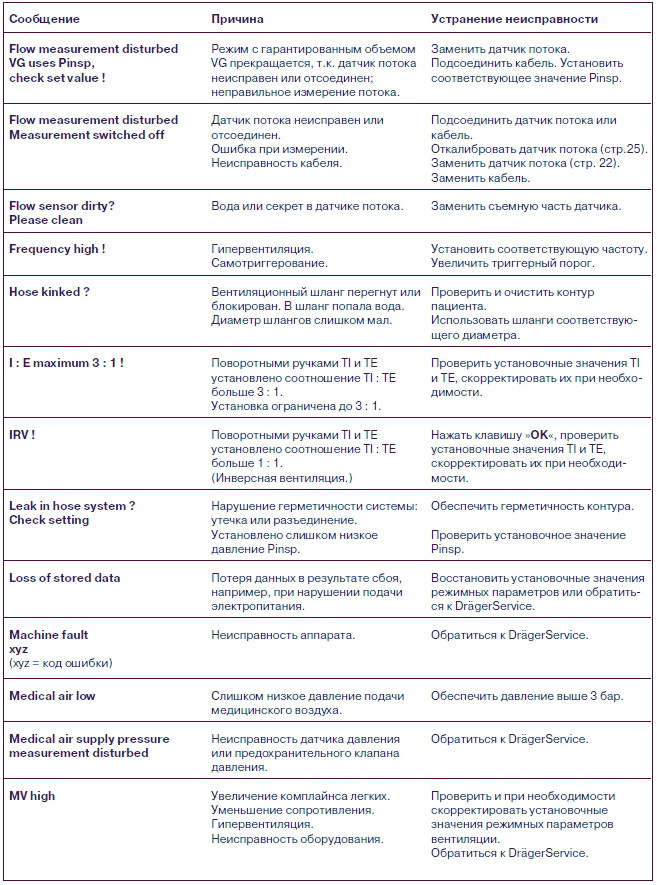
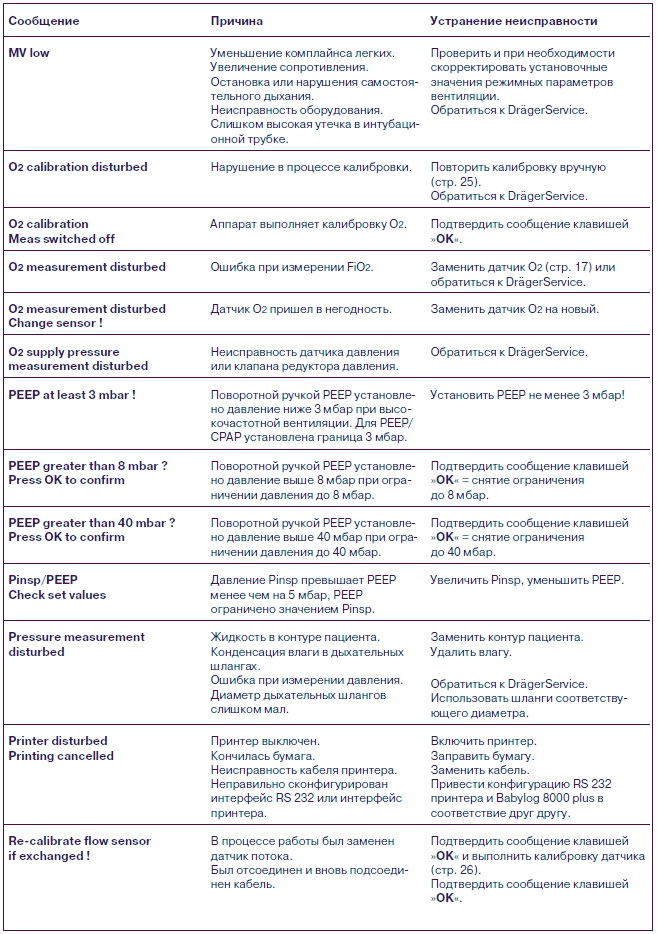
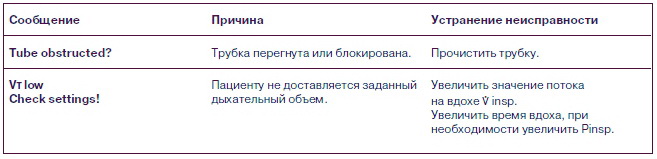
Техническое обслуживание Babylog 8000
Периодичность ТО
- Датчик О2 заменять при появлении соответствующего сообщения.
- Фильтр воздушного охлаждения чистить или заменять через каждые 4 недели.
- Уплотняющие манжеты соединительной пластины за контуром пациента заменять через каждые 2 года.
- Никель-кадмиевый аккумулятор сигнализации нарушения электропитания заменять через каждые 2 года.
- Микросхема RAM заменять через каждые 4 года.
- Техосмотр и техобслуживание через каждые полгода.
- Капитальный ремонт редукторов давления через каждые 6 лет.
Замена фильтра воздушного охлаждения
- Извлечь фильтр воздушного охлаждения из гнезда на задней панели аппарата.
- Заменить фильтр на новый или промыть фильтр теплой водой с моющим средством, дать полностью просохнуть.
- Вставить фильтр воздушного охлаждения в гнездо.
Скачать инструкцию на аппарат ИВЛ Babylog 8000 plus
Скачать инструкцию и другую документацию на аппарат искусственной вентиляции легких Babylog 8000 plus можно здесь.
Руководство пользователя ( user manual ) на русском языке Babylog 8000 plus скачать.
Сервисная инструкция ( service manual ) на английском языке Babylog 8000 plus скачать.
Регистрационное удостоверение Babylog 8000 plus скачать.
Так же смотрите Puritan Bennett 840 аппарат ИВЛ.
Случается так, что владельцы ПК, стремящиеся создать VPN-подсоединение к интернету, сталкиваются со всевозможными проблемами, среди которых распространённой является ошибка 809. Это приводит человека к замешательству, особенно если он абсолютно не разбирается в причинах возникновения ошибок и существующих путях их устранения.

Основные причины ошибки 809 и пути её решения мы разберем в этой статье
Факторы, способствующие проявлению проблем
Причин, по которым может возникать ошибка 809 VPN, препятствующая созданию доступа к глобальной сети, насчитать можно несколько. Если правильно выявить такие причины, ликвидировать проблему будет гораздо проще, поскольку существуют рекомендации, позволяющие вносить достаточно просто требуемые изменения в настройки и обеспечивать VPN-подсоединение к сети.
Причины возникновения проблемы
Ошибка 809 возникает тогда, когда кто-то стремится создать сетевой доступ при помощи VPN-соединения, которое относится к типу виртуальных частных сетей.
Брандмауэр, обязательная составляющая операционной системы, блокирует попытки осуществления такого соединения. Кроме брандмауэра может блокировать сетевое соединение любое устройство, подсоединённое к компьютеру и участвующее в обеспечении сетевого доступа. В качестве одного из девайсов, блокирующего доступ к сети, может выступать маршрутизатор, NAT.

Явной причиной возникновения такой проблемы может являться неполная установка ОС или в некоторых случаях уже установленная система, но сопровождающаяся какими-либо неполадками.
Иногда устанавливают программное обеспечение, скачанное из непроверенных источников, вследствие чего при установке вносятся автоматические изменения в системный реестр, провоцирующие возникновение проблем, связанных с доступом к сети.
Разлад в систему может внести вредоносное программное обеспечение, а также вирусы, способные не только повреждать, но и удалять значимые системные файлы, без которых невозможно обеспечить доступ к интернету.
Поиск и искоренение неполадки позволит избегать подобных проблем в дальнейшем.
Пути искоренения ошибок
Выявив вероятную проблему, юзер должен приложить усилия для её устранения. Если самостоятельно устранить неполадки, ознакомившись с инструкциями, не удаётся, следует обратиться за помощью к специалистам, которые без затруднения быстро установят и ликвидируют ошибки.
Как самостоятельно исправить проблему
Поскольку наиболее вероятной причиной проявления ошибки при VPN подключении считаются недостающие параметры в реестре, очень важно в ручном режиме внести все важные изменения.
Первоначально следует найти ветку реестра, в которую должны вноситься важные дополнения.
Чтобы зайти в реестр и ввести в него системные дополнения, следует нажать «Пуск», затем в строку поиска ввести regedit.

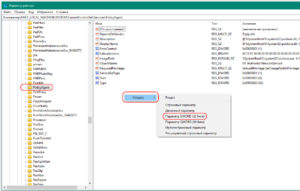
Если на ПК установлен Windows XP, владелец техники должен найти HKEY_LOCAL_MACHINESYSTEMCurrentControlSetServicesIPSec. Когда же установлен Windows 7 или Vista, ветка будет выглядеть иначе: HKEY_LOCAL_MACHINESYSTEMCurrentControlSetServicesPolicyAgent.

Теперь для внесения изменений следует выделить требуемый реестр, кликнув по нему мышкой, далее в меню «Правка» следует выбрать подменю «Создать». Из предлагаемых вариантов необходимо выбрать DWORD.
На экране откроется доступная строка, в которую нужно занести требуемые изменения. В неё пользователь должен ввести AssumeUDPEncapsulationContextOnSendRule, после чего подтвердить внесённые изменения.

После внесения дополнений в системный реестр юзер должен выделить его, используя мышку, и выбрать параметр «Изменить». В появившемся поле можно ввести 0, 1 или 2, в зависимости от обозначенных целей.
Значение «0» чаще всего устанавливается по умолчанию и свидетельствует о том, что при эксплуатации NAT-устройств сетевое подключение не предусмотрено.
Значение «1» разрешает обеспечить подключение к серверу, используя NAT-устройства.
Значение «2» способствует успешной настройке операционной системы в режиме безопасности, обеспечивая подключение ПК к серверу на базе VPN при помощи NAT-девайсов.
Безусловно, чаще всего прибегают именно к введению значения «2». Чтобы все дополнения и изменения вступили в силу, очень важно перезагрузить электронную вычислительную машину.

Когда же проблема с VPN-соединением возникает из-за вирусов, важно обновить антивирусное приложение и запустить полноценное сканирование. Также совсем не помешает почистить операционку, удалив все временные файлы.
Установка обновлений, драйверов могут тоже посодействовать решению проблемы, сопровождающейся надписью «ошибка 809». Если причиной неполадки является программное обеспечение, которое было некорректно инсталлировано или вступившее в конфликт с иным ПО, успешно помогает функция «Восстановление системы», позволяющая откатить систему на несколько суток назад, когда проблем с VPN-соединением не возникало.
И только в отдельных случаях приходится переустанавливать систему, отдавая предпочтение полной загрузке Windows.
Итак, системные ошибки предупреждают, что часть важных дополнений отсутствует или недееспособно. Чтобы вернуть работоспособность всем параметрам и обеспечить доступ к всемирной паутине, следует приложить усилия, проявить повышенное внимание, выполнить последовательно все рекомендуемые действия. Усилия будут потрачены не зря, поскольку контакт компьютера с сервером будет обеспечен.
Ошибка 809 доставляет массу хлопот пользователям. Есть множество причин ее возникновения. Однако переживать не следует.
Неисправность можно довольно быстро устранить.
Главное, что требуется, – строго следовать нашим правилам.
Содержание
- Причины возникновения и способы исправления
- Повторное соединение
- Брандмауэр или антивирус
- Изменения в реестре
- Заключение
Причины возникновения и способы исправления
Существует несколько причин, приводящих к возникновению VPN-ошибки номер 809: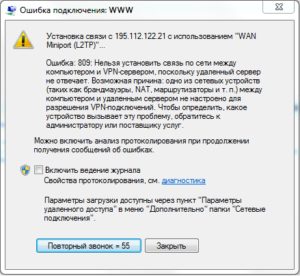
- Появляется неисправность VPN в том случае, если посторонние пользователи стремятся создать сетевой доступ с помощью VPN-подключения.
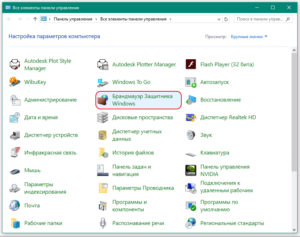
- Брандмауэр запрещает соединение с интернетом.
- Иные девайсы, подключенные к ПК и предоставляющие сетевой доступ.
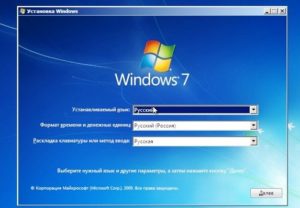
- Установка операционной системы, к примеру, Windows 7, совершена не полностью либо некорректно.
- Загрузка и установка ПО из непроверенных источников.
- Изменение параметров в реестре.

- Наличие вирусных кодов.
Повторное соединение
Данная неисправность VPN возникает у пользователей, заключивших договор с провайдером «Билайн» или применяющих протокол L2TP с использованием IpSec. Самое основное, что необходимо делать при обнаружении неисправностей, – проверить. Требуется проанализировать все подключенные кабели и сетевую плату, после чего совершить повторное подключение.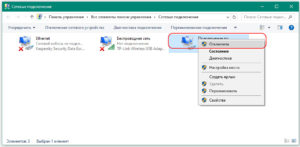
В большинстве случаев проблема кроется не в этом, поэтому далее следует протестировать межсетевой экран и антивирус.
Брандмауэр или антивирус
По умолчанию, межсетевой экран блокируют многие VPN-соединения к определенным портам. Для устранения ошибки требуется выполнить несколько манипуляций:
После данных манипуляций выполнить повторное подключение. Если подсоединиться не удалось, идем дальше.
Требуется проверить компьютер или ноутбук на наличие вирусов. Вероятно, именно по этой причине появляется ошибка VPN. После обнаружения вирусов их рекомендуется вылечить либо удалить. 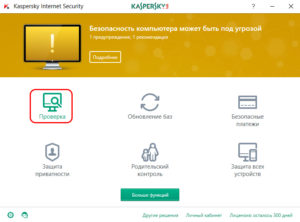 После этого снова попробовать подключиться.
Изменения в реестре
Во многих случаях для устранения неисправностей помогут изменения в реестре. Для активации программы нажать «Пуск». Далее в строку поиска ввести regedit.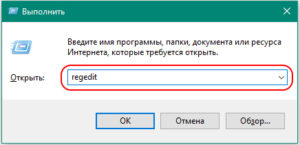 Последовательность действий для устранения ошибки VPN следующая:
- Для Windows XP нужно найти HKEY_LOCAL_MACHINESYSTEMCurrentControlSetServicesIPSec, а для Windows 7 или Vista такая: HKEY_LOCAL_MACHINESYSTEMCurrentControlSetServicesPolicyAgent.
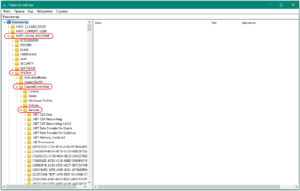
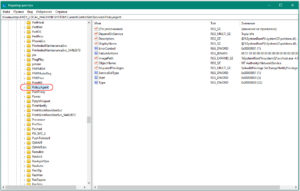
- Теперь, найдя требуемый реестр, выбрать его, затем в правом верхнем углу — «Правку» и перейти в раздел «Создать».
- Создать параметр DWORD с наименованием ProhibitIpSec и значением «1».
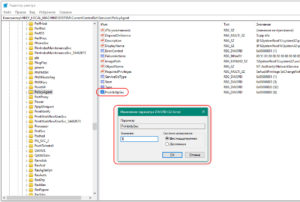
- Появится доступная строка, куда вводится AssumeUDPEncapsulationContextOnSendRule.
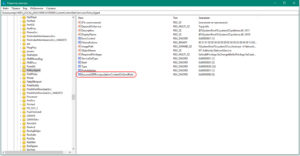
- Теперь подтвердить все изменения.
- Появится поле значения, куда надо ввести «2».
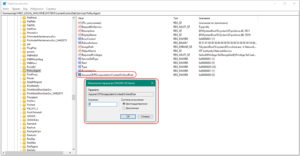
- Для того чтобы указанные действия вступили в силу, требуется перезагрузить устройство.
Стоит отметить, что некоторые модели маршрутизатора MicroTik используются в домашних условиях либо в малых офисах. Поэтому вопрос об изменениях в реестре для устранения данной ошибки касательно этого роутера является актуальным.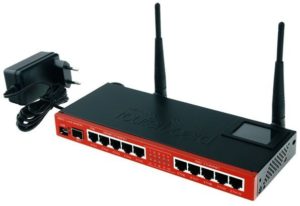
Для запуска программы надо нажать клавиши Win + R. Далее проделать следующие манипуляции:
После вышеуказанных действий соединение должно быть восстановлено, что устранит ошибку.
Заключение
Подобная неполадка VPN доставляет массу неприятностей пользователям. Однако это довольно простая ошибка, которая очень просто и быстро устраняется. Главное, выполнить все указанные рекомендации и проблем не будет.

Подгорнов Илья Владимирович
Всё статьи нашего сайта проходят аудит технического консультанта. Если у Вас остались вопросы, Вы всегда их можете задать на его странице.
-
Bookmarks
Quick Links
Instructions for use
Babylog 8000 plus
WARNING
To properly use this medical device,
read and comply with these
instructions for use.
Intensive care ventilator for neonates
Software 5.n
Related Manuals for Dräger Babylog 8000 plus
Summary of Contents for Dräger Babylog 8000 plus
-
Page 1
Instructions for use Babylog 8000 plus Intensive care ventilator for neonates WARNING Software 5.n To properly use this medical device, read and comply with these instructions for use. -
Page 2
(A) Letters in parentheses refer to elements in the related illustration. In these instructions for use, the designation Letters in illustrations denote elements Babylog 8000 is used for «Babylog 8000 plus». referred to in the text. Any text shown on the screen and any labeling on Screen reproductions… -
Page 3
Users Experts must have the necessary knowledge and experience with complex maintenance work on the Users are persons who use the product in product. accordance with its intended use. Instructions for use Babylog 8000 plus SW 5.n… -
Page 4
Abbreviations and symbols Explanations can be found in the sections »Abbreviations» and »Symbols» in chapter »Overview». Instructions for use Babylog 8000 plus SW 5.n… -
Page 5
Setting ventilation ……….63 Repairs …………125 Endotracheal suction ……..68 Replacing the cooling air filter ……126 Manual inspiration ……….. 69 Medication nebulization ……..70 Analog and digital interface ……76 Instructions for use Babylog 8000 plus SW 5.n… -
Page 6
EMC Declaration ……….146 Connection to IT networks……. 151 Principles of operation ……… 152 Pneumatic function description ……. 153 Description of ventilation modes ….. 156 Additional settings for ventilation….. 161 Measurements……….165 Instructions for use Babylog 8000 plus SW 5.n… -
Page 7
Disposable product………. 11 Sterile accessories ………. 11 Installing accessories ……..11 Storing the instructions for use ……11 Training…………11 Product-specific safety information …. 12 Ensuring ventilation using an independent manual ventilator ……….14 Instructions for use Babylog 8000 plus SW 5.n… -
Page 8
Dräger. If other, incompatible accessories are used, there is a risk of patient injury due to medical device failure. Dräger recommends using the medical device only with accessories from the current list of accessories. Instructions for use Babylog 8000 plus SW 5.n… -
Page 9
– IEC 60601-1-1 (device combinations) – IEC 60601-1-2 (electromagnetic compatibility) – IEC 60601-1-4 (software-controlled functions) – IEC 60601-1-8 (alarm systems) Instructions for use Babylog 8000 plus SW 5.n… -
Page 10
– Mobile phones medical device. – Radio frequency electrosurgical equipment – Defibrillators – Shortwave therapy equipment Maintain sufficient safety distances, see EMC declaration in chapter »Technical data». Instructions for use Babylog 8000 plus SW 5.n… -
Page 11
Install the accessory on the basic device in accordance with the instructions of the basic device. Check for secure connection to the basic device. Strictly observe the instructions for use and assembly instructions. Instructions for use Babylog 8000 plus SW 5.n… -
Page 12
NO monitoring is used, impaired. patient monitoring is not guaranteed. Do not use the medical device in hyperbaric Monitor the NO concentration separately. chambers. Instructions for use Babylog 8000 plus SW 5.n… -
Page 13
– Slowly open the pressure reducer – Do not place any containers with liquid on manually. Do not use tools. or above the device. – Make sure that no liquid penetrates into the device when disinfecting surfaces. Instructions for use Babylog 8000 plus SW 5.n… -
Page 14
If the ventilation slots on the medical device are covered or sealed, the medical device may overheat. – Air must be able to enter freely. – An alarm is triggered if the medical device overheats during operation. Instructions for use Babylog 8000 plus SW 5.n… -
Page 15
Application Application Intended use ……….16 Environment of use ……..16 Instructions for use Babylog 8000 plus SW 5.n… -
Page 16
Application Intended use Babylog 8000 plus 5.n is a long-term ventilator for premature babies, newborns, and children with a body weight of up to approx. 20 kg (44 lbs). The device must only be operated by doctors or, on a doctor’s order, by clinical personnel. -
Page 17
Ventilation functions ……..23 Monitoring functions ……..23 Power supply ……….. 23 Gas supply…………23 Data transfer (optional)……..23 Medication nebulization ……..23 Non-invasive ventilation……..23 Abbreviations……….24 Symbols…………26 Product labels……….27 Instructions for use Babylog 8000 plus SW 5.n… -
Page 18
Overview Babylog 8000 Ventilator on trolley A Control and display unit, display panel B Control and display unit, control panel C Control panel cover D Trolley E Patient connection panel Instructions for use Babylog 8000 plus SW 5.n… -
Page 19
E Key to suppress alarm tone for 2 minutes P Cal. Config. key F OK key Q man. Insp. key G Key to select dialog windows H Vent. Mode key for ventilation modes Vent. Option key for additional settings Instructions for use Babylog 8000 plus SW 5.n… -
Page 20
Overview Patient connection panel A «Exhaust» muffler B Rocker lever for expiratory valve C Expiratory port «GAS RETURN» D Inspiratory port «GAS OUTPUT» Instructions for use Babylog 8000 plus SW 5.n… -
Page 21
«INFLATING GAS INPUT» G Air connection «INFLATING GAS INPUT» H Connection for pneumatic medication nebulizer Connection for flow sensor cable: Applied part of protection class BF or B J Cooling air filter Instructions for use Babylog 8000 plus SW 5.n… -
Page 22
A Babylog 8000 B Device holder C Trolley column D Hose holder E Castor with locking brake, 2 pieces F Castor with locking brake, 2 pieces G Base plate H Holder Lateral standard rail Instructions for use Babylog 8000 plus SW 5.n… -
Page 23
Non-invasive ventilation is possible if BabyFlow – Leakage rate Leak accessories are used. Additional information can – Respiratory rate for panting breathing Panting be found in the BabyFlow instructions for use. – Apnea alarm time Apnoea time Instructions for use Babylog 8000 plus SW 5.n… -
Page 24
Intermittent Mandatory Ventila- tion Time constant Insp. Flow Expiratory time Setting knob for inspiratory flow Inspiratory time IPPV Intermittent Positive-Pressure Ventilation TIspo Inspiratory time during sponta- neous breathing Inverse-Ratio Ventilation Kilogram Liter Instructions for use Babylog 8000 plus SW 5.n… -
Page 25
Vtset Set tidal volume Inspiratory flow and expiratory flow Expiratory flow in the dialog win- dow VIVE Expiratory flow Inspiratory flow in the dialog win- VIVE Inspiratory flow insp Instructions for use Babylog 8000 plus SW 5.n… -
Page 26
Set the volume of the alarm tone Reduce Batch designation Increase Use by Selecting the parameter Switch device on, Keep away from sunlight switch device off Protect from moisture Storage temperature Relative humidity Instructions for use Babylog 8000 plus SW 5.n… -
Page 27
Overview Product labels Product label Explanation Maximum loads and conditions for maintaining the stability of the device on the trolley Nominal weight and maximum weight (for further information, see chapter »Technical data») Instructions for use Babylog 8000 plus SW 5.n… -
Page 28
Keys with fixed and variable functions …. 30 Displays…………32 Dialog windows ……….33 Dialog window layout……..33 Opening dialog windows ……… 33 Main screen…………. 33 Overview of dialog windows ……34 Instructions for use Babylog 8000 plus SW 5.n… -
Page 29
The set value is adopted immediately. Turn the setting knobs for Pinsp and PEEP/CPAP slowly. Otherwise, the set value will be displayed incorrectly. After the next parameter has been set, the display will be correct. Instructions for use Babylog 8000 plus SW 5.n… -
Page 30
Setting the ventilation mode 1 Press the Vent. Mode key (C). 2 Press the key (E) for the desired ventilation mode, e.g., SIMV. 3 Press the On key (E). The ventilation mode is active. Instructions for use Babylog 8000 plus SW 5.n… -
Page 31
If the key is pressed briefly and repeatedly, the value of the parameter is increased or decreased by individual steps. If the key is pressed longer, the value of the parameter changes quickly. Instructions for use Babylog 8000 plus SW 5.n… -
Page 32
Alarms are indicated visually using the LED (C). The alarm message is displayed on the screen (E). Pressing the OK key acknowledges the alarm message and closes the display. For additional information on alarms, see page 82. Instructions for use Babylog 8000 plus SW 5.n… -
Page 33
TE (B) is displayed in the pressure and flow waveforms. – Keys with fixed functions – Vent. Mode – Vent. Option – Cal. Config. – 6 keys with variable functions Press a key to open the associated dialog window. Instructions for use Babylog 8000 plus SW 5.n… -
Page 34
Operating concept Overview of dialog windows Dialog windows for ventilation Instructions for use Babylog 8000 plus SW 5.n… -
Page 35
Operating concept Dialog windows for displays, alarms, and logbook Instructions for use Babylog 8000 plus SW 5.n… -
Page 36
Operating concept Dialog windows for calibration and configuration Instructions for use Babylog 8000 plus SW 5.n… -
Page 37
Connecting the external device for MEDIBUS. 51 Configuring the interface ……… 51 Establishing potential equalization ….. 52 Connecting the potential equalization cable ..52 Transport within the hospital ……. 53 Increasing stability ……….. 53 Instructions for use Babylog 8000 plus SW 5.n… -
Page 38
>5°. Observe the permitted maximum load and weight distribution, see »Operating Do not use the device on a trolley on characteristics» on page 139. inclinations >5°. Instructions for use Babylog 8000 plus SW 5.n… -
Page 39
B Holder 10 kg (22 lbs) Breathing gas device with knurled screws at the rear. humidifier or medication nebulizer C Base plate 50 kg (110 lbs) Ambient air compressor Instructions for use Babylog 8000 plus SW 5.n… -
Page 40
If a monitor is mounted on the ventilator, there is a risk of the device tipping over. Combining devices is only approved on the trolley. The counterweight must be mounted under the base plate of the trolley. Instructions for use Babylog 8000 plus SW 5.n… -
Page 41
Assembly and preparation Mounting the Graphic Screen on Babylog 8000 For information on mounting and connection, see the «Graphic Screen option» instructions for use. Instructions for use Babylog 8000 plus SW 5.n… -
Page 42
3 Tilt the rocker lever down. The expiratory valve the calibration of the O sensor, see page 94. is locked in place. 4 Connect the muffler (B) to the exhaust port of the expiratory valve. Instructions for use Babylog 8000 plus SW 5.n… -
Page 43
Babylog 8000 must not impair the safety and function of either device. Prepare the breathing gas humidifier in accordance with the corresponding instructions for use. Instructions for use Babylog 8000 plus SW 5.n… -
Page 44
2 Insert the adapter Ø15/Ø22 (B) into the breathing hose. 3 Attach the bacterial filter (C) onto the adapter. 4 Insert the catheter connector size II (D) into the bacterial filter. 5 Attach the breathing hoses. Instructions for use Babylog 8000 plus SW 5.n… -
Page 45
2 Rotate the inspiratory and expiratory ports down or in the direction of the patient. 4 Press the rubber connection sleeves on the breathing hoses into the clamp on the holder. Instructions for use Babylog 8000 plus SW 5.n… -
Page 46
The following flow sensors are available: – ISO 15 flow sensor (8411130) – Y-piece flow sensor (8410185) 3 Insert the plug of the flow sensor cable into the connector at the rear and tighten the screws. Instructions for use Babylog 8000 plus SW 5.n… -
Page 47
Insert the test lung in the patient connection 4 Connect the plug (A) of the flow sensor cable to port of the breathing circuit. the flow sensor. 5 Calibrate the flow sensor, see page 95. Instructions for use Babylog 8000 plus SW 5.n… -
Page 48
(8412448) must be in use. Connecting the sample line Connect the sample line to the adapter with safety valve. In order to prevent condensate from accumulating, the Luer Lock connector must face upwards. Instructions for use Babylog 8000 plus SW 5.n… -
Page 49
1 Screw on the compressed gas hoses for Air and O at the rear of the device. 2 Plug the probes into the wall terminal units of the central gas supply system. Instructions for use Babylog 8000 plus SW 5.n… -
Page 50
The mains voltage must be within the voltage range indicated on the rating plate: Either: 100 V to 127 V Or: 220 V to 240 V Insert the mains plug into the mains power socket. Instructions for use Babylog 8000 plus SW 5.n… -
Page 51
MEDIBUS for Dräger Pediatric 9029205 (A). Devices Dräger RS 232 MEDIBUS, Protocol 9028258 Definition Configuring the interface For a description of the process, see chapter »Configuring the RS232 interface» on page 104. Instructions for use Babylog 8000 plus SW 5.n… -
Page 52
1 Connect the potential equalization cable to the potential equalization pin on the device. 2 Connect the potential equalization cable to a hospital potential equalization connection (e.g., wall, ceiling supply unit, operating table). Instructions for use Babylog 8000 plus SW 5.n… -
Page 53
3 Do not attach any additional parts to the lateral standard rails. 4 Remove the monitor if there is one. 5 Grasp the device firmly by the lateral standard rails and push the device in longitudinal direction. Instructions for use Babylog 8000 plus SW 5.n… -
Page 54
……….. 57 Checking readiness for operation ….58 Device check after reprocessing ….. 58 Device check immediately before using the device on a patient ………. 60 Checking the speaker and LEDs….. 61 Instructions for use Babylog 8000 plus SW 5.n… -
Page 55
2 Press the mains switch (B) on the rear of the Move the protective flap over the switch. device until it locks in place. 3 Move the protective flap over the mains switch. Instructions for use Babylog 8000 plus SW 5.n… -
Page 56
The symbol for alarm limits (C) flashes. Set the alarm limits, see page 84. The Calibrate flow sensor! alarm message is displayed. Calibrate the flow sensor, see page 95. Instructions for use Babylog 8000 plus SW 5.n… -
Page 57
Setting -Vol.% 0.4 s 0.6 s Insp. Flow 5 L/min Pinsp 20 mbar (20 cmH PEEP/CPAP 3 mbar (3 cmH 2 Switch the ventilator on. 3 Allow the charging time to expire. Instructions for use Babylog 8000 plus SW 5.n… -
Page 58
2 Set the IPPV/IMV ventilation mode. – Check the alarm for airway pressure 3 Set the following alarm limits: 0 L/min 15 L/min Checking the O alarm: 1 Set the O -Vol.% setting knob to 60 %. Instructions for use Babylog 8000 plus SW 5.n… -
Page 59
Pinsp – MV low PEEP/CPAP Checking the alarm limits for airway pressure: 2 On the main screen, press the Meas key. 1 Set the IPPV/IMV ventilation mode. 3 Press the Paw key. Instructions for use Babylog 8000 plus SW 5.n… -
Page 60
Calibrate the flow sensor, see page 95. If calibration is successful, a confirmation is displayed on the screen. Checking the ventilation functions 1 Set the following alarm limits: 0 L/min 15 L/min Instructions for use Babylog 8000 plus SW 5.n… -
Page 61
Press and hold the OK key for approx. 2 seconds. All LEDs light up and a continuous tone sounds as long as the key is pressed. Instructions for use Babylog 8000 plus SW 5.n… -
Page 62
Analog and digital interface ……76 Data output…………76 Transferring data to the patient monitor ..79 Terminating operation ……..80 Switching the ventilator off ……80 Removing the compressed gas hoses …. 80 Instructions for use Babylog 8000 plus SW 5.n… -
Page 63
Options > VG dialog Vtset window Options > HFV dialog Frequ. window Ampl. SIMV, SIPPV, and PSV ventilation modes If the patients becomes apneic, ventilation begins with the respiratory rate specified by T and T Instructions for use Babylog 8000 plus SW 5.n… -
Page 64
5 Set the alarm limits, see page 84. The trigger threshold currently set (Trigger) is displayed. 2 Reduce the trigger threshold by pressing the key. 3 Increase the trigger threshold by pressing the key. Instructions for use Babylog 8000 plus SW 5.n… -
Page 65
Apnoea time alarm limits. For information on deactivating flow monitoring, see chapter »Deactivating flow monitoring» on page 97. For information on deactivating alarm limits, see chapter »Deactivating alarm limits» on page 85. Instructions for use Babylog 8000 plus SW 5.n… -
Page 66
Pinsp and PEEP is automatically regulated so that the set tidal volume Vtset is applied. 1 Set the pressure plateau, see page 64. 2 Press the Vent. Option key. Instructions for use Babylog 8000 plus SW 5.n… -
Page 67
10 On the main screen, press the Values key. 11 Press the Meas2 key. 12 Monitor the tidal volume VThf and the diffusion coefficient DCO and adjust the amplitude and frequency if necessary. Instructions for use Babylog 8000 plus SW 5.n… -
Page 68
Select an appropriate suction catheter for suction. Closed suction Closed suction is possible in all ventilation modes. An appropriate flow must be set for suction. Insp. Flow Set the appropriate flow with the setting knob. Instructions for use Babylog 8000 plus SW 5.n… -
Page 69
2 Press the man. Insp. key (A) and hold it for the desired inspiratory time. Display (example): The device ends the inspiration after a maximum of 5 seconds. The next manual inspiration can only be started after an additional 5 seconds. Instructions for use Babylog 8000 plus SW 5.n… -
Page 70
If a bacterial filter is placed between the nebulizer and tube during medication nebulization, flow resistance may increase and impair ventilation. Place the bacterial filter between the inspiratory valve and the nebulizer. Instructions for use Babylog 8000 plus SW 5.n… -
Page 71
Switching on flow monitoring 1 Connect the plug of the flow sensor cable to the flow sensor. 2 Check if flow monitoring is active. 2 Acknowledge the alarm message by pressing the OK key. Instructions for use Babylog 8000 plus SW 5.n… -
Page 72
With an inspiratory flow of 10 L/min and a desired reach the lungs, however. concentration of 80 Vol.%, the O -Vol.% setting knob must be set to 90 Vol.% during medication nebulization. Instructions for use Babylog 8000 plus SW 5.n… -
Page 73
Push the inlet port or the outlet port of the mounting screw. medication nebulizer into the upper hose guide 3 Insert the plug (B) into the socket on the rear of of the incubator. the device until it locks in place. Instructions for use Babylog 8000 plus SW 5.n… -
Page 74
8 If no bacterial filter is used, attach a socket (E) until it locks in place. reprocessed expiratory valve, see page 42. Babylog 8000 starts nebulization. 2 Check whether aerosol is generated. Instructions for use Babylog 8000 plus SW 5.n… -
Page 75
3 If a bacterial filter is used to protect the expiratory valve, replace or remove the bacterial filter. 4 If no bacterial filter is used, attach a reprocessed expiratory valve, see page 42. Instructions for use Babylog 8000 plus SW 5.n… -
Page 76
1 Connect the printer (internal resistance ≥ – Measurement waveforms 1 MΩ) using the cable 8306487. 2 Select the measuring signal and scale range, – Data is transmitted to a patient monitor or see page 101. personal computer Instructions for use Babylog 8000 plus SW 5.n… -
Page 77
– Alarm: L during an alarm condition, otherwise H. Analog 1 Analog 2 1 Connect the printer (input resistance ≥ 1 MΩ) using the cable 8306487. 2 Select the signal, see page 103. Instructions for use Babylog 8000 plus SW 5.n… -
Page 78
Automatically printing a report every 30 minutes: 1 Press the Select key repeatedly until 30 min. report is highlighted. 2 Start the print process by pressing the Start key. The key function changes to Stop. Instructions for use Babylog 8000 plus SW 5.n… -
Page 79
2 Press the Select key repeatedly until All is highlighted. 3 Start the print process by pressing the Start key. The key function changes to Stop. Canceling the print process: Press the Stop key. Instructions for use Babylog 8000 plus SW 5.n… -
Page 80
4 Switch off the breathing gas humidifier and Disconnect the probes of the Air and O remove the mains plug. compressed gas hoses from the wall terminal units of the central gas supply system. Instructions for use Babylog 8000 plus SW 5.n… -
Page 81
Acknowledging alarm messages ….83 Alarm limits ………… 84 Automatic alarm limits ……..84 Manual alarm limits………. 84 Setting the alarm limits ……..84 Deactivating alarm limits……..85 Response to power failure……. 85 Instructions for use Babylog 8000 plus SW 5.n… -
Page 82
Quick action required to avert dan- medium priority flashes Note Alarm with low One tone Attention and action required priority For a list of causes and remedies, see chapter »Alarm – Cause – Remedy» on page 106. Instructions for use Babylog 8000 plus SW 5.n… -
Page 83
Acknowledging alarm messages After the fault triggering the alarm has been resolved, the alarm tone is silenced. High-priority alarm messages continue to be displayed and need to be acknowledged. Press the OK key. Instructions for use Babylog 8000 plus SW 5.n… -
Page 84
Apnea alarm time Apnoea 5 to 20 seconds 2 Select the parameter by pressing the time key. Respiratory rate for panting 20 to 200 bpm 3 Set the alarm limit using the key. breathing Panting Instructions for use Babylog 8000 plus SW 5.n… -
Page 85
1 Select the alarm limit Panting. 2 Set the value to <20 bpm. The alarm limit is deactivated. Response to power failure Alarm limits are saved in the event of a power failure. Instructions for use Babylog 8000 plus SW 5.n… -
Page 86
Displaying waveforms and measured values …………. 87 Displaying waveforms ……..87 Displaying measured values ……87 Displaying all set values and measured values ……………. 89 Displaying trends ………. 90 Displaying the logbook……… 91 Instructions for use Babylog 8000 plus SW 5.n… -
Page 87
PEEP End-expiratory pressure E Flow axis scale (e.g., 10 L/min) F Zero line G End of the set expiratory time TE (dotted verti- cal line) H Time axis scale (e.g., 2 s) Instructions for use Babylog 8000 plus SW 5.n… -
Page 88
Expiratory minute volume values may be distorted, e.g., due to a Measured inspiratory O concentration leakage. Mean Mean airway pressure of previous respiratory cycle Instructions for use Babylog 8000 plus SW 5.n… -
Page 89
1 On the main screen, press the Values key. VThf Inspiratory measured tidal volume of 2 Press the Meas1 key. high-frequency ventilation [mL] Displaying additional measured values: Press the Meas2 key. Instructions for use Babylog 8000 plus SW 5.n… -
Page 90
(max. 24 hours, min. 2 hours). The times displayed indicate the beginning and end of the segment. 4 Use the keys to shift the segment: Instructions for use Babylog 8000 plus SW 5.n… -
Page 91
1 On the main screen, press the key. The Logbook dialog window is displayed. 2 Scroll forward in the logbook by pressing the key. 3 Scroll back in the logbook by pressing the key. Instructions for use Babylog 8000 plus SW 5.n… -
Page 92
Sensors and calibration intervals ….93 monitoring ……….94 Calibrating the O sensor …….. 94 Flow monitoring ……….95 Calibrating the flow sensor ……95 Deactivating and activating flow monitoring ..96 Instructions for use Babylog 8000 plus SW 5.n… -
Page 93
Device function impaired If the sensors are not calibrated, device function may be impaired. Calibrate the sensors at the indicated intervals. Recalibration is not necessary if the flow sensor has been unplugged only briefly. Instructions for use Babylog 8000 plus SW 5.n… -
Page 94
-Cal (B) is displayed in the status field. The calibration is completed after approx. 5 minutes. O -Cal (B) is no longer displayed in the status field. Hiding the message (A): Press the OK key. Instructions for use Babylog 8000 plus SW 5.n… -
Page 95
Body temperature 37 °C (98.6 °F), air pressure 1013 mbar (or hPa or cmH plus mean airway pressure 10 mbar (or 8 Press the key (B). -Cal hPa or cmH O), water-vapor-saturated Instructions for use Babylog 8000 plus SW 5.n… -
Page 96
1 second. A message is displayed on the screen. After calibration Connect the tube connector. If calibration was not successful Replace the flow sensor insert, see page 42. Replace the flow sensor cable. Instructions for use Babylog 8000 plus SW 5.n… -
Page 97
1 Connect the plug (A) of the flow sensor cable to the flow sensor. 2 Check whether flow monitoring is active. The information (D) is no longer displayed in the status field. Instructions for use Babylog 8000 plus SW 5.n… -
Page 98
Configuring the data interfaces ….101 Selecting the measuring signals and scale range for the analog output ports ….101 Configuring the impulse output……103 Configuring the RS232 interface ….. 104 Configuring the printer……..104 Instructions for use Babylog 8000 plus SW 5.n… -
Page 99
1 Open the dialog window by pressing the Cal. Config. > Config > Clock keys. 2 Use the keys to select the appropriate parameter. The selected parameter is highlighted. 3 Use the keys to set the value. Instructions for use Babylog 8000 plus SW 5.n… -
Page 100
1 Open the dialog window by pressing the Cal. Config. > Config > Contr keys. A test pattern is displayed. 2 Reduce the contrast by pressing the key. 3 Increase the contrast by pressing the key. Instructions for use Babylog 8000 plus SW 5.n… -
Page 101
1 Open the dialog window by pressing the Cal. Config. > Config > Com keys. 2 Press the Param key repeatedly until Analog1 is highlighted. 3 Use the keys to select the measuring signal. Instructions for use Babylog 8000 plus SW 5.n… -
Page 102
→ 0 … 10 V 0 … 25 mL → 0 … 10 V VThf 0 … 25 mL → 0 … 10 V 0 … 5 mL → 0 … 10 V Instructions for use Babylog 8000 plus SW 5.n… -
Page 103
If a measured value exceeds the limits of the 2 Press the Param key repeatedly until scale, the voltage is limited to the maximum value highlighted. on the scale. 3 Use the key to select the signal. Instructions for use Babylog 8000 plus SW 5.n… -
Page 104
4 Press the Param key repeatedly until Parity is highlighted. 5 Use the key to select one of the following values: – NONE – EVEN – ODD When using the printer, select NONE. Instructions for use Babylog 8000 plus SW 5.n… -
Page 105
Troubleshooting Troubleshooting Failure of the power supply……106 Alarm – Cause – Remedy……106 Instructions for use Babylog 8000 plus SW 5.n… -
Page 106
Airway pressure low Leakage or disconnection Check the breathing circuit for leakages in the connections. Inspiratory or expiratory flow set Increase flow. too low. Apnoea The patient’s spontaneous Apply controlled ventilation. breathing is interrupted. Instructions for use Babylog 8000 plus SW 5.n… -
Page 107
Increase trigger threshold. Hose kinked? Breathing hose kinked, blocked, Check breathing hoses, establish or condensate in breathing hose. clear passage. Inner diameter of breathing Use a suitable breathing circuit. hoses too small. Instructions for use Babylog 8000 plus SW 5.n… -
Page 108
Change sensor! page 42. measurement disturbed? measurement impaired. Replace the O sensor, see page 42. Contact DrägerService. pressure low supply pressure too low. Ensure pressure greater than 2.7 bar (39.2 psi). Instructions for use Babylog 8000 plus SW 5.n… -
Page 109
Tube kinked or blocked. Establish free passage. Flow sensor blocked. Replace flow sensor. VT low Set tidal volume is not reached. Increase flow . Extend insp Check settings! inspiratory time, increase Pinsp if necessary. Instructions for use Babylog 8000 plus SW 5.n… -
Page 110
Reprocessing list ………. 117 Non-critical medical devices……117 Semi-critical medical devices ……117 Manual reprocessing of the Y-piece….118 After reprocessing ……..119 Assembling the components ……119 Preparation for next use ……..119 Instructions for use Babylog 8000 plus SW 5.n… -
Page 111
1 Switch off the device and breathing gas humidifier and unplug their mains plugs. 2 Empty the water traps and breathing hoses. 3 Empty the water container of the breathing gas humidifier. Instructions for use Babylog 8000 plus SW 5.n… -
Page 112
Reprocess the individual parts of the medication nebulizer in accordance with the corresponding instructions for use. Reprocess the parts for adaptation in accordance with the reprocessing list, see page 117. Instructions for use Babylog 8000 plus SW 5.n… -
Page 113
Dismantle and reprocess the breathing gas humidifier and the Aeroneb Pro nebulizer in accordance with the corresponding instructions for use. Dismantle and dispose of the bacterial filter in accordance with the corresponding instructions for use. Instructions for use Babylog 8000 plus SW 5.n… -
Page 114
– Korsolex extra by Bode Chemie 3 Remove disinfectant residues after the contact – Concentration: 3 %, contact time: 15 min time has elapsed. Machine cleaning: – Neodisher MediClean by Dr. Weigert Instructions for use Babylog 8000 plus SW 5.n… -
Page 115
3 Inspect components for visible soiling and damage. Repeat manual disinfection if necessary. 4 Shake off all excess water. Allow components to dry thoroughly. Instructions for use Babylog 8000 plus SW 5.n… -
Page 116
Sterilize only components that have been cleaned and disinfected. For sterilization, use a vacuum steam sterilizer (in accordance with DIN EN 285), preferably with fractional vacuum. Instructions for use Babylog 8000 plus SW 5.n… -
Page 117
Housing of the Daily Possible Possible ISO 15 flow sensor Y-piece flow sen- Daily According to the corresponding Instructions for use and section »Manual reprocessing of the Y-piece» on page 118 Instructions for use Babylog 8000 plus SW 5.n… -
Page 118
(C). Fit a syringe (D) containing 20 mL of the solution to each opening of the Y-piece. Inject the solution three times. Instructions for use Babylog 8000 plus SW 5.n… -
Page 119
1 Assemble and prepare the device for operation, see chapter »Assembly and preparation» on page 37. 2 Calibrate the flow sensor, see page 95. 3 Check readiness for operation, see chapter »Getting started» on page 54. Instructions for use Babylog 8000 plus SW 5.n… -
Page 120
Maintenance Maintenance Overview …………121 Inspection …………122 Safety checks ……….122 Preventive maintenance ……. 124 Table of preventive maintenance intervals..124 Repairs …………125 Replacing the cooling air filter ….. 126 Instructions for use Babylog 8000 plus SW 5.n… -
Page 121
Preventive mainte- Recurrent specified measures intended to maintain the functional condition of a nance medical device Repair Measures intended to restore the functional condition of a medical device after a device malfunction Instructions for use Babylog 8000 plus SW 5.n… -
Page 122
– Country-specific labeling of gas types 3 Using the instructions for use, check that all components and accessories needed to use the product are available. Instructions for use Babylog 8000 plus SW 5.n… -
Page 123
6 Perform a functional test of the following features according to the instructions for use: – All functions described in the test steps of the device check. – Functioning of the power supply failure alarm Instructions for use Babylog 8000 plus SW 5.n… -
Page 124
Filter on entry block of Every 2 years Replace Experts gas connection Time keeper RAM Every 4 years Replace Experts Pressure reducers Every 6 years Basic overhaul of pres- Experts sure reducers Instructions for use Babylog 8000 plus SW 5.n… -
Page 125
Experts valve Integrated diaphragm for Every 6 years Replace Experts equalization valve Repairs Dräger recommends that all repairs are carried out by DrägerService and that only authentic Dräger repair parts are used. Instructions for use Babylog 8000 plus SW 5.n… -
Page 126
2 Replace the cooling air filter or clean it in warm soapy water and dry thoroughly. 3 Insert the cooling air filter in the holder in the rear panel. Instructions for use Babylog 8000 plus SW 5.n… -
Page 127
Disposal Disposal Disposal of the medical device ….128 For countries subject to the EU Directive 2002/96/EC…………128 Disposal of batteries ……..128 Disposal of O sensors ……… 129 Instructions for use Babylog 8000 plus SW 5.n… -
Page 128
The battery installed in the device must therefore be removed by experts before disposal of the device. Observe the applicable laws and regulations for battery disposal. Instructions for use Babylog 8000 plus SW 5.n… -
Page 129
Improper handling of O sensors can result in explosions and chemical burns. – Do not throw O sensors into fire. – Do not force O sensors open. sensors can be sent back to Dräger. Instructions for use Babylog 8000 plus SW 5.n… -
Page 130
150 Reduced separation distances to portable and mobile radio frequency communication devices …………150 Connection to IT networks ……151 Information for connection to an IT network ..151 Instructions for use Babylog 8000 plus SW 5.n… -
Page 131
Ventilation modes IPPV/IMV, IPPV, IMV SIMV, SIPPV PSV, CPAP Inspiratory time Range 0.1 to 2 s Resolution 0.1 to 1 s: 0.01 s 1 to 2 s: 0.1 s Accuracy ±10 ms Instructions for use Babylog 8000 plus SW 5.n… -
Page 132
Inspiratory pressure Pinsp Range 5 to 80 mbar (5 to 80 cmH Resolution 1 mbar (1 cmH Accuracy ±1 mbar (±1 cmH O) or 3 % of the measured value, whichever is greater Instructions for use Babylog 8000 plus SW 5.n… -
Page 133
Only use other breathing circuits if their resistance values do not exceed the above-mentioned values and the inspiratory fraction is approx. 70 %. Other- wise the measurement of the airway pressure may be impaired. Instructions for use Babylog 8000 plus SW 5.n… -
Page 134
10 to 99 mbar (10 to 99 cmH O): 1 mbar (1 cmH Airway pressure Bar display (on device) Range –10 to 80 mbar (–10 to 80 cmH Resolution 2 mbar (2 cmH Instructions for use Babylog 8000 plus SW 5.n… -
Page 135
>2 to 30 L/min: ±10 % (NTPD) endotracheal tube >3 mm (0.12 in)) Leakage Leak Range 0 to 100 % Resolution Spontaneous portion of minute volume spont Range 0 to 100 % Resolution Instructions for use Babylog 8000 plus SW 5.n… -
Page 136
Inspiratory O Range 18 to 100 Vol.% Resolution 1 Vol.% Accuracy ±3 Vol.% based on the compressed gases O <65 s at 1 L/min 0…90 <10 s at 30 L/min Instructions for use Babylog 8000 plus SW 5.n… -
Page 137
±30 % Overinflation index Range 0 to 5 Resolution 0.01 Ratio of f : VT Range 0 to 1000 bpm/mL Resolution 0.1 bpm/mL Transport coefficient Range 0 to 999 mL Resolution 1 mL Instructions for use Babylog 8000 plus SW 5.n… -
Page 138
Range 20 to 200 bpm <20 bpm: monitoring is deactivated Alarm delay time Alarm delay Delays the following alarms: – MV high – VT low Check settings! Range 0 to 30 s Instructions for use Babylog 8000 plus SW 5.n… -
Page 139
2.7 to 6 bar (270 to 600 kPa) (39 to 87 psi) input flow Up to 52 L/min connection NIST Air positive operating pressure 2.7 to 6 bar (270 to 600 kPa) (39 to 87 psi) Instructions for use Babylog 8000 plus SW 5.n… -
Page 140
14-361 ture System Materials used Breathing hose Silicone rubber, Hytrel (milky, transparent, white) Water trap Polysulphone (gray, transparent) Y-piece Polysulphone (yellow, transparent) Expiratory valve (housing, muffler) Aluminum (gray) Inspiratory valve Aluminum (gray) Instructions for use Babylog 8000 plus SW 5.n… -
Page 141
Output resistance <5 kΩ Plug connection SMB-Subclic RS232 interface Level in accordance with DIN 66020 Printer connection With 8306489 printer cable only Pin configuration Monitor connection With 8306488 monitor cable only Pin configuration Instructions for use Babylog 8000 plus SW 5.n… -
Page 142
– Failure of the external power supply – Failure of the gas supply (O and compressed air) An additional performance characteristic is the prevention of backflow of gas into the central gas supply system. Instructions for use Babylog 8000 plus SW 5.n… -
Page 143
CPAP pressure low If airway pressure falls below PEEP/CPAP – 2 mbar (2 cmH and the pressure-time integral exceeds 6 mbar x s (6 cmH O x s), an alarm is triggered. Instructions for use Babylog 8000 plus SW 5.n… -
Page 144
The apnea alarm time can be set to between 5 and 20 seconds. Panting breathing If the measured respiratory rate f is greater than the adjustable panting breathing limit Panting, an alarm is triggered. Instructions for use Babylog 8000 plus SW 5.n… -
Page 145
Babylog 8000 is a software-driven device. The safety concept is based on 2 microprocessor systems that function independently of one another and monitor each other’s functions. The measurement and alarm functions required to do this are thus doubled. Instructions for use Babylog 8000 plus SW 5.n… -
Page 146
Even if the equipment meets the test requirements described below, smooth operation cannot be guaranteed – the ‘quieter‘ the electrical environment the better. In general, increasing the distance between electrical devices decreases the likelihood of interference. Instructions for use Babylog 8000 plus SW 5.n… -
Page 147
(without transformer) to the public low-voltage power supply net- work that supplies buildings used for domestic purposes. Harmonic emissions (IEC 61000- Not applicable 3-2) Voltage fluctuations/flicker emis- Not applicable sions (IEC 61000-3-3) Instructions for use Babylog 8000 plus SW 5.n… -
Page 148
25 periods power supply interruptions, it is recommended that the Voltage dip >95 %, >95 %, medical device is powered 5 seconds 5 seconds from an uninterruptible power supply or a battery. Instructions for use Babylog 8000 plus SW 5.n… -
Page 149
150 kHz to 2.5 GHz and less than 1 V/m above 2.5 GHz. 2) ISM bands in this frequency range are: 6.765 MHz to 6.795 MHz; 13.553 MHz to 13.567 MHz; 26.957 MHz to 27.283 MHz; 40.66 MHz to 40.70 MHz. Instructions for use Babylog 8000 plus SW 5.n… -
Page 150
GSM 1800, GSM 1900 (limited to 1 W ERP) 0.38 m (1.25 ft) UMTS, DECT (limited to 0.25 W ERP) 0.19 m (0.62 ft) Bluetooth, WLAN 2450, RFID 2450 (limited to 0.1 W ERP) 0.07 m (0.23 ft) Instructions for use Babylog 8000 plus SW 5.n… -
Page 151
IT networks with medical devices). Serial interfaces The following interfaces are possible: – RS232 interfaces according to EIA RS-232 (CCITT V.24/V.28) for the following applications: – MEDIBUS – Connections with third-party medical devices Instructions for use Babylog 8000 plus SW 5.n… -
Page 152
Additional settings for ventilation ….161 Volume Guarantee (VG)……..161 Separate expiratory flow……..162 High-frequency ventilation (HFV) ….162 Measurements ……….165 Airway pressure measurement……165 Flow and volume measurement …… 165 Instructions for use Babylog 8000 plus SW 5.n… -
Page 153
H Magnetic valve T Expiratory valve Magnetic valve U Bactericide section of pressure measurements J Non-return valve V Relative pressure absorber K Filter W Magnetic valve L Pneumatic control valve X Ejector Instructions for use Babylog 8000 plus SW 5.n… -
Page 154
The inspiratory oxygen concentration is measured at the O sensor (N) by the open pneumatic control valve (L). The safety valve (P) is opened if a detected stenosis impedes depressurization in the expiratory branch. Instructions for use Babylog 8000 plus SW 5.n… -
Page 155
Y-piece by means of the pressure drop caused by the continuous flow in the breathing circuit. The bactericide section of pressure measurements (U) prevents contamination of the pressure absorber (V) with expiration gas. Instructions for use Babylog 8000 plus SW 5.n… -
Page 156
The patient can always breathe spontaneously. The following settings determine the parameters of the mechanical breath: – Flow determines the ramp insp – Inspiratory time T determines the duration – Inspiratory pressure Pinsp limits the pressure Instructions for use Babylog 8000 plus SW 5.n… -
Page 157
This effect of ventilating the breathing circuit occurs with any ventilator. The flow sensor in Babylog 8000 is located at the Y-piece in order to measure the tidal volume that is actually inhaled and exhaled. Instructions for use Babylog 8000 plus SW 5.n… -
Page 158
– The volume Vtrig (A) inhaled in the course of the spontaneous inspiration must correspond to a volume of at least the selected trigger sensitivity. – The inhaled volume Vtrig (A) must be inhaled until the end of T Instructions for use Babylog 8000 plus SW 5.n… -
Page 159
IPPV/IMV ventilation mode. Triggered mandatory breaths alternate with spontaneous breathing phases without support in which the patient must exert the entire work of breathing alone. By increasing T Instructions for use Babylog 8000 plus SW 5.n… -
Page 160
The effective inspiratory time is optimized for the patient. Breaths are triggered in the same way as in the SIPPV ventilation mode. Instructions for use Babylog 8000 plus SW 5.n… -
Page 161
Conversely, the pressure increases as compliance decreases, but only until the selected pressure limitation Pinsp. Fluctuations in spontaneous breathing are also compensated. The stronger the patient breathes, Instructions for use Babylog 8000 plus SW 5.n… -
Page 162
– In the CPAP ventilation mode, the pattern of manually triggered mechanical breaths can be set separately. A reduced expiratory flow can be used to save oxygen. Instructions for use Babylog 8000 plus SW 5.n… -
Page 163
IMV breaths. Mean airway pressure is somewhat higher than with high-frequency ventilation with CPAP due to the IMV breaths. However, during high-frequency phases, the pressure oscillates at the PEEP/CPAP level again. Instructions for use Babylog 8000 plus SW 5.n… -
Page 164
Tidal volume of the high-frequency pulses, averaged over multiple cycles MVim Minute volume applied by IMV breaths, measured on the inspiratory side VTim Tidal volume applied by IMV breaths, measured on the inspiratory side Instructions for use Babylog 8000 plus SW 5.n… -
Page 165
30 % to 70 %, there is a measurement error for the airway pressure. In the breathing circuits typically used, this error is less than 1 mbar (1 cmH O). In systems with very high Instructions for use Babylog 8000 plus SW 5.n… -
Page 166
1 represents high sensitivity and plus mean airway pressure 10 mbar (or 10 represents low sensitivity. hPa or cmH O), water-vapor-saturated The desired reference condition is set in the dialog window Calibration/Configuration > Sensor. Instructions for use Babylog 8000 plus SW 5.n… -
Page 167
One measure of conformity is the correlation coefficient r, a number between 0 and 1. The closer the correlation coefficient r is to 1, the better the conformity. Instructions for use Babylog 8000 plus SW 5.n… -
Page 168
Dennis R. Bing, Stephen J. Boros. Pediatric Karl L. Yang, Martin J. Tobin. The New England Journal Pulmonology, 5:10-14 (1988) of Medicine, Vol. 324, 21, 1991 Instructions for use Babylog 8000 plus SW 5.n… -
Page 169
Display unit ……29 Disconnecting ….. . . 113 Instructions for use Babylog 8000 plus SW 5.n… -
Page 170
Reprocessing….. . . 114 Non-invasive ventilation ….23 Instructions for use Babylog 8000 plus SW 5.n… -
Page 171
Ventilation functions ….. 23 Checking ……60 Instructions for use Babylog 8000 plus SW 5.n… -
Page 172
Printing ……79 Y-piece Attaching……46 Instructions for use Babylog 8000 plus SW 5.n… -
Page 173
This page intentionally left blank. Instructions for use Babylog 8000 plus SW 5.n… -
Page 174
These instructions for use only apply to Babylog 8000 plus SW 5.n with the Serial No.: If no serial number has been filled in by Dräger, these instructions for use are provided for general information only and are not intended for use with any specific medical device.