Troubleshooting
This section contains procedures to help you locate and resolve problems. Resolve some problems by
simply restarting the printer.
R R e e s s t t a a r r t t i i n n g g t t h h e e P P r r i i n n t t e e r r
To restart the printer, refer to
Note:
If restarting the printer does not resolve the problem, refer to
and
Printer Resets or Powers Off
P P r r i i n n t t e e r r F F a a i i l l s s t t o o P P o o w w e e r r O O n n
Probable Causes
The printer is not powered on.
The power cord is not plugged into the
outlet correctly.
Something is wrong with the outlet
connected to the printer.
The printer is connected to an outlet with a
voltage or frequency that does not match
the printer specifications.
Caution:
Plug in the three-wire cord with grounding prong directly into a grounded AC outlet.
P P r r i i n n t t e e r r R R e e s s e e t t s s o o r r P P o o w w e e r r s s O O f f f f F F r r e e q q u u e e n n t t l l y y
Probable Causes
The power cord is not plugged into the outlet
correctly.
A system error occurred.
120
Xerox
®
B1022 Multifunction Printer
User Guide
Powering the Printer On or
Frequently.
Solutions
Power on the printer. For details, refer to
On or
Off.
Verify that the printer is powered down, then plug in the
power cord securely into the outlet. For details, refer to
Powering the Printer On or
• Plug in a different electrical appliance into the outlet, then
verify that the appliance operates properly.
• Try a different outlet.
Use a power source within the specifications for the printer.
For details, refer to
Off.
Off.
Powering the Printer On or
Solutions
Power off the printer. Before powering on the printer,
confirm that the power cord is plugged in correctly to
the printer and the outlet.
Power off the printer, then power it on again. If the
error persists, contact your Xerox
Printer Fails to Power On
Powering the Printer
Off.
®
representative.


 Доброе время суток! С данным аппаратом проблемка. Начну с предыстории: аппарат новый, пользователь возил куда-то тонер-картридж с принт-картриджем, просыпал весь девелопер из блока проявки (но впечатление что его пылесосом вычистили). Естественно шубы нормальной нет на вале и печатает неравномерными пятнами. Был куплен новый оригинальный тонер-картридж и конечно же это ситуацию не изменило (разве что разблокировало его по тонеру).
Когда аппарат попал ко мне, он печатал через раз — запускаешь на копирование или печать, он одно задание распечатывает, а при повторном задании пишет на экране «Идет печать» либо «Копирование» и ничего не происходит. При нажатии на кнопки реагирует, отменяет печать. Перезагружаешь аппарат и одно задание может распечатать, а может не печатать пока еще один-два раза не перезагрузишь.
По качеству печати (пятнам) клиенту сказал что девелопер закажем и засыпем, это не проблема, продается в Булате и ВТТ. А вот по зависаниями непонятно в чём дело. Клиент утверждает что «хоть и грязно, но вчера всё печатало без зависаний». Собственно вопрос: Может ли начать так себя вести аппарат из-за отсутствия девелопера? Также пользователь говорит что «возможно» он вынимал принт-картридж при включенном принтере, думаю не могло ли что-то из-за этого глюкнуть? К сожалению таких принт-картриджей ни у кого из клиентов нет, подкинуть проверить не получится.
Увы ближайший официальный гарантийный сервис Xerox за 500км. Сбагрить им будет проблематично)
-

lehabasoy
- Осматривается
-


 lehabasoy » Ср авг 12, 2020 11:02 pm
В общем пришёл наконец девелопер Булат для Samsung K2200/Hp M436 и был засыпан в блок проявки. Фасовка идёт 228г, всю банку и засыпал, ибо проявка была девственно чиста (возможно ее предыдущие заправщики вычистили как отработку, хотя хозяин аппарата уверяет что всю случайно просыпал). Чудесным образом все тупняки с зависаниями прошли, все задания печатает без тормозов, хотя всё равно не понял почему аппарат не выпадал в ошибку из-за отсутствия носителя, а просто зависал на заданиях. После восстановления девелопера качество отпечатка сначала было чуть темнее чем нужно (лишено полутонов, хотя клиенту так больше нравится), через примерно 150 копий полутона нормализовались и отпечатки практически идеальные. Теперь буду ждать появления совместимых чипов на тонер-картриджи и можно будет заправлять, как и ближайшего его родственника hp m436. Спасибо Goldwater за короткий, но ёмкий ответ) тему можно считать закрытой.
-
lehabasoy
- Осматривается
-
-
-
Xerox Phaser 6600 «Invalid Yellow» / «Неверный желтый»
kotya-potya в форуме Принтеры, МФУ, факсы, копиры формата A4
- 5
- 5299
3100

Пн ноя 18, 2019 8:24 pm
-
Xerox Phaser 6600 «Invalid Yellow» / «Неверный желтый»
-
-
Xerox WC 3119: «Замятие 1»
kokubenko в форуме Принтеры, МФУ, факсы, копиры формата A4
- 22
- 38581
kokubenko
Ср ноя 23, 2011 4:47 pm
-
Xerox WC 3119: «Замятие 1»
-
-
Xerox 3428 «Установите Картридж»
Roller-ch в форуме Принтеры, МФУ, факсы, копиры формата A4
- 6
- 9316
SeMi
Сб авг 27, 2011 6:42 pm
-
Xerox 3428 «Установите Картридж»
-
-
«Неисправность» финишера Xerox 7556
v1684 в форуме Принтеры, МФУ, копиры формата A3
- 21
- 12636
v1684
Ср сен 19, 2018 4:44 pm
-
«Неисправность» финишера Xerox 7556
-
-
Xerox WC 3119 без признаков «жизни»
MorZ в форуме Принтеры, МФУ, факсы, копиры формата A4
- 5
- 6697
Goldwater
Чт окт 08, 2020 11:34 pm
-
Xerox WC 3119 без признаков «жизни»
Вернуться в Принтеры, МФУ, копиры формата A3
Кто сейчас на форуме
Сейчас этот форум просматривают: нет зарегистрированных пользователей и гости: 12
 Loading…

VERSION 1.1
OCTOBER 2018
702P06461
Xerox® B1022 Multifunction Printer
User Guide
© 2018 Xerox Corporation. All rights reserved. Xerox®, Xerox and Design® are trademarks of Xerox Corporation in the United States or other countries.
Apple®, AirPrint®, Bonjour®, Mac®, and Mac OS® are trademarks or registered trademarks of Apple Inc. in the United States and other countries.
Google Cloud Print™ web printing service, Gmail™ webmail service, and Android™ mobile technology platform are trademarks of Google, Inc.
HP-GL®, HP-UX®, and PCL® are registered trademarks of Hewlett-Packard Corporation in the United States and/or other countries.
Microsoft®, OneDrive®, Windows Vista®, Windows®, and Windows Server® are registered trademarks of Microsoft Corporation in the United States and other countries.
McAfee®, ePolicy Orchestrator®, and McAfee ePO™ are trademarks or registered trademarks of McAfee, Inc. in the United States and other countries.
MOPRIA™ is a trademark of the MOPRIA Alliance Inc.
UNIX® is a trademark in the United States and other countries, licensed exclusively through X/ Open Company Limited.
Wi-Fi CERTIFIED Wi-Fi Direct® is a trademark of the Wi-Fi Alliance.
|
1 Safety ………………………………………………………………………………………………………………………… |
9 |
|
Notices and Safety………………………………………………………………………………………………….. |
10 |
|
Electrical Safety ……………………………………………………………………………………………………… |
11 |
|
General Guidelines …………………………………………………………………………………………….. |
11 |
|
Power Cord ………………………………………………………………………………………………………. |
11 |
|
Emergency Power Off…………………………………………………………………………………………. |
12 |
|
Laser Safety ……………………………………………………………………………………………………… |
12 |
|
Operational Safety………………………………………………………………………………………………….. |
13 |
|
Operational Guidelines……………………………………………………………………………………….. |
13 |
|
Ozone Release ………………………………………………………………………………………………….. |
13 |
|
Printer Location ………………………………………………………………………………………………… |
13 |
|
Printer Supplies …………………………………………………………………………………………………. |
14 |
|
Maintenance Safety………………………………………………………………………………………………… |
15 |
|
Printer Symbols ………………………………………………………………………………………………………. |
16 |
|
Environmental, Health, and Safety Contact Information ……………………………………………….. |
21 |
|
2 Getting Started………………………………………………………………………………………………………… |
23 |
|
Parts of the Printer ………………………………………………………………………………………………….. |
24 |
|
Front View ……………………………………………………………………………………………………….. |
24 |
|
Rear View ………………………………………………………………………………………………………… |
24 |
|
Internal Components …………………………………………………………………………………………. |
25 |
|
Using the Document Glass ………………………………………………………………………………….. |
25 |
|
Using the Optional Document Feeder …………………………………………………………………… |
26 |
|
Control Panel ……………………………………………………………………………………………………. |
26 |
|
Information Pages ………………………………………………………………………………………………….. |
29 |
|
Accessing and Printing the Information Pages………………………………………………………… |
29 |
|
Printing the Configuration Report at the Control Panel …………………………………………….. |
29 |
|
Administration Features …………………………………………………………………………………………… |
30 |
|
Xerox® CentreWare® Internet Services ………………………………………………………………….. |
30 |
|
Accessing Xerox® CentreWare® Internet Services ……………………………………………………. |
30 |
|
Locating the IP Address of the Printer …………………………………………………………………… |
30 |
|
Automatic Data Collection ………………………………………………………………………………….. |
31 |
|
Maintenance Assistant……………………………………………………………………………………….. |
31 |
|
Viewing Billing and Usage Information …………………………………………………………………. |
32 |
|
More Information …………………………………………………………………………………………………… |
33 |
|
Installation and Setup …………………………………………………………………………………………….. |
34 |
|
Installation and Setup Overview ………………………………………………………………………….. |
34 |
|
Selecting a Location for the Printer ………………………………………………………………………. |
34 |
|
Connecting the Printer ……………………………………………………………………………………….. |
34 |
|
Configuring Network Settings ……………………………………………………………………………… |
38 |
|
Enabling the Printer for Scanning …………………………………………………………………………. |
38 |
|
Power Saver Mode …………………………………………………………………………………………….. |
38 |
|
Installing the Driver Software ……………………………………………………………………………… |
39 |
|
Installing the Printer as a Web Service on Devices …………………………………………………… |
42 |
|
Mopria, and Google Cloud Print …………………………………………………………………………… |
43 |
|
Xerox® B1022 Multifunction Printer |
3 |
|
User Guide |
|
3 Using the Services …………………………………………………………………………………………………… |
45 |
|
|
Copy …………………………………………………………………………………………………………………….. |
46 |
|
|
Making a Copy………………………………………………………………………………………………….. |
47 |
|
|
Adjusting Copying Options………………………………………………………………………………….. |
48 |
|
|
Selecting Book Copy ………………………………………………………………………………………….. |
53 |
|
|
Copying Covers …………………………………………………………………………………………………. |
54 |
|
|
Copying an ID Card …………………………………………………………………………………………… |
55 |
|
|
Scan To…………………………………………………………………………………………………………………. |
57 |
|
|
Sending a Scanned Image to a Destination …………………………………………………………… |
57 |
|
|
Scanning to a Shared Folder on a Network Computer………………………………………………. |
58 |
|
|
Initiating Scanning from a Computer ……………………………………………………………………. |
62 |
|
|
Scanning to a USB Flash Drive …………………………………………………………………………….. |
62 |
|
|
Adjusting Scanning Settings ……………………………………………………………………………….. |
63 |
|
|
Email ……………………………………………………………………………………………………………………. |
69 |
|
|
Sending a Scanned Image to an Email Address………………………………………………………. |
69 |
|
|
USB ……………………………………………………………………………………………………………………… |
71 |
|
|
Scanning to a USB Flash Drive …………………………………………………………………………….. |
71 |
|
|
Printing from a USB Device …………………………………………………………………………………. |
71 |
|
|
Address Book …………………………………………………………………………………………………………. |
73 |
|
|
Adding a Contact to an Address Book …………………………………………………………………… |
73 |
|
|
Importing a Contact Entry into an Address Book …………………………………………………….. |
74 |
|
|
Editing or Deleting an Address Book Contact in Xerox® CentreWare® Internet |
||
|
Services …………………………………………………………………………………………………………… |
74 |
|
|
Job Status……………………………………………………………………………………………………………… |
75 |
|
|
Viewing Active or Completed Print Jobs…………………………………………………………………. |
75 |
|
|
Deleting an Active Print Job ………………………………………………………………………………… |
75 |
|
|
Machine Status………………………………………………………………………………………………………. |
76 |
|
|
Accessing Machine Information …………………………………………………………………………… |
76 |
|
|
Printing the Configuration Report at the Control Panel …………………………………………….. |
76 |
|
|
Checking the Toner Level ……………………………………………………………………………………. |
76 |
|
|
Viewing Billing Meter Information ……………………………………………………………………….. |
77 |
|
|
4 Printing…………………………………………………………………………………………………………………….. |
79 |
|
|
Printing Overview ……………………………………………………………………………………………………. |
80 |
|
|
Selecting Printing Options ………………………………………………………………………………………… |
81 |
|
|
Print Driver Help………………………………………………………………………………………………… |
81 |
|
|
Windows Printing Options …………………………………………………………………………………… |
82 |
|
|
Macintosh Printing Options …………………………………………………………………………………. |
83 |
|
|
Linux Printing Options ………………………………………………………………………………………… |
83 |
|
|
Mobile Printing Options ……………………………………………………………………………………… |
85 |
|
|
Printing from a USB Device …………………………………………………………………………………. |
86 |
|
|
Printing Features …………………………………………………………………………………………………….. |
87 |
|
|
Managing Jobs …………………………………………………………………………………………………. |
87 |
|
|
Selecting Paper Options for Printing ……………………………………………………………………… |
88 |
|
|
Scaling…………………………………………………………………………………………………………….. |
88 |
|
|
4 |
Xerox® B1022 Multifunction Printer |
|
|
User Guide |
|
Printing on Both Sides of the Paper ………………………………………………………………………. |
88 |
|
Printing Mirror Images ……………………………………………………………………………………….. |
89 |
|
Printing Multiple Pages to a Single Sheet ………………………………………………………………. |
89 |
|
Print Quality……………………………………………………………………………………………………… |
89 |
|
Printing Booklets ……………………………………………………………………………………………….. |
89 |
|
Printing Cover Pages ………………………………………………………………………………………….. |
90 |
|
Printing Watermarks from Windows ……………………………………………………………………… |
91 |
|
Selecting Print Orientation ………………………………………………………………………………….. |
91 |
|
Using Custom Paper Sizes ………………………………………………………………………………………… |
93 |
|
Printing on Custom-Sized Paper …………………………………………………………………………… |
93 |
|
Defining Custom Paper Sizes……………………………………………………………………………….. |
93 |
|
5 Paper and Media …………………………………………………………………………………………………….. |
95 |
|
Supported Paper …………………………………………………………………………………………………….. |
96 |
|
Ordering Paper………………………………………………………………………………………………….. |
96 |
|
General Paper Loading Guidelines ………………………………………………………………………… |
96 |
|
Paper that can Damage Your Printer …………………………………………………………………….. |
96 |
|
Paper Storage Guidelines ……………………………………………………………………………………. |
97 |
|
Supported Paper Types and Weights …………………………………………………………………….. |
97 |
|
Supported Standard Paper Sizes…………………………………………………………………………… |
98 |
|
Supported Custom Paper Sizes …………………………………………………………………………….. |
98 |
|
Supported Paper Types and Weights for Automatic 2-Sided Printing…………………………… |
98 |
|
Supported Standard Paper Sizes for Automatic 2-Sided Printing ………………………………… |
99 |
|
Supported Custom Paper Sizes for Automatic 2-Sided Printing ………………………………… |
100 |
|
Loading Paper………………………………………………………………………………………………………. |
101 |
|
Loading Paper in Tray 1 ……………………………………………………………………………………. |
101 |
|
Loading Paper in the Optional Tray 2 ………………………………………………………………….. |
103 |
|
Loading Paper in the Bypass Tray……………………………………………………………………….. |
105 |
|
6 Maintenance ………………………………………………………………………………………………………… |
109 |
|
Cleaning the Printer ………………………………………………………………………………………………. |
110 |
|
General Precautions …………………………………………………………………………………………. |
110 |
|
Cleaning the Exterior ……………………………………………………………………………………….. |
110 |
|
Cleaning the Scanner ……………………………………………………………………………………….. |
110 |
|
Ordering Supplies………………………………………………………………………………………………….. |
113 |
|
When to Order Supplies ……………………………………………………………………………………. |
113 |
|
Viewing Toner Level Status………………………………………………………………………………… |
113 |
|
Viewing Printer Supply Status ……………………………………………………………………………. |
113 |
|
Consumables ………………………………………………………………………………………………….. |
114 |
|
Routine Maintenance Items………………………………………………………………………………. |
114 |
|
Toner Cartridges ……………………………………………………………………………………………… |
114 |
|
Drum Cartridges ……………………………………………………………………………………………… |
116 |
|
Recycling Supplies ……………………………………………………………………………………………. |
116 |
|
Moving the Printer ………………………………………………………………………………………………… |
117 |
|
Viewing Billing Meter Information …………………………………………………………………………… |
118 |
|
7 Troubleshooting ……………………………………………………………………………………………………. |
119 |
|
Xerox® B1022 Multifunction Printer |
5 |
|
User Guide |
|
General Troubleshooting ………………………………………………………………………………………… |
120 |
|
|
Restarting the Printer ……………………………………………………………………………………….. |
120 |
|
|
Printer Fails to Power On …………………………………………………………………………………… |
120 |
|
|
Printer Resets or Powers Off Frequently ……………………………………………………………….. |
120 |
|
|
Document Prints from the Wrong Tray ………………………………………………………………… |
121 |
|
|
Automatic 2-Sided Printing Problems ………………………………………………………………….. |
121 |
|
|
Paper Tray Fails to Close……………………………………………………………………………………. |
121 |
|
|
Printing Takes Too Long ……………………………………………………………………………………. |
122 |
|
|
Print Job Fails to Print……………………………………………………………………………………….. |
122 |
|
|
Printer Makes Unusual Noises ……………………………………………………………………………. |
123 |
|
|
Condensation has Formed Inside the Printer ………………………………………………………… |
123 |
|
|
Toner Cartridge Status Messages ……………………………………………………………………….. |
124 |
|
|
Drum Cartridge Status Messages ……………………………………………………………………….. |
124 |
|
|
Paper Jams ………………………………………………………………………………………………………….. |
125 |
|
|
Minimizing Paper Jams …………………………………………………………………………………….. |
125 |
|
|
Locating Paper Jams ………………………………………………………………………………………… |
126 |
|
|
Clearing Paper Jams ………………………………………………………………………………………… |
127 |
|
|
Troubleshooting Paper Jams ……………………………………………………………………………… |
141 |
|
|
Print-Quality Problems……………………………………………………………………………………………. |
143 |
|
|
Controlling Print Quality ……………………………………………………………………………………. |
143 |
|
|
Solving Print-Quality Problems …………………………………………………………………………… |
143 |
|
|
Copy and Scan Problems ………………………………………………………………………………………… |
147 |
|
|
Getting Help ………………………………………………………………………………………………………… |
148 |
|
|
Control Panel Messages ……………………………………………………………………………………. |
148 |
|
|
Using the Integrated Troubleshooting Tools ………………………………………………………… |
148 |
|
|
Available Information Pages ……………………………………………………………………………… |
149 |
|
|
Online Support Assistant …………………………………………………………………………………… |
150 |
|
|
More Information ……………………………………………………………………………………………. |
150 |
|
|
A Specifications………………………………………………………………………………………………………… |
151 |
|
|
Printer Configurations and Options ………………………………………………………………………….. |
152 |
|
|
Available Configurations …………………………………………………………………………………… |
152 |
|
|
Standard Features……………………………………………………………………………………………. |
153 |
|
|
Physical Specifications …………………………………………………………………………………………… |
155 |
|
|
Weights and Dimensions…………………………………………………………………………………… |
155 |
|
|
Physical Specifications for Standard Configuration ………………………………………………… |
156 |
|
|
Clearance Requirements …………………………………………………………………………………… |
156 |
|
|
Environmental Specifications ………………………………………………………………………………….. |
157 |
|
|
Temperatures………………………………………………………………………………………………….. |
157 |
|
|
Relative Humidity ……………………………………………………………………………………………. |
157 |
|
|
Elevation ……………………………………………………………………………………………………….. |
157 |
|
|
Electrical Specifications………………………………………………………………………………………….. |
158 |
|
|
Power Supply Voltage and Frequency ………………………………………………………………….. |
158 |
|
|
Power Consumption …………………………………………………………………………………………. |
158 |
|
|
Performance Specifications …………………………………………………………………………………….. |
159 |
|
|
Printer Warm-up Times …………………………………………………………………………………….. |
159 |
|
|
6 |
Xerox® B1022 Multifunction Printer |
|
|
User Guide |
|
Print Speed …………………………………………………………………………………………………….. |
159 |
|
B Regulatory Information ………………………………………………………………………………………… |
161 |
|
Basic Regulations ………………………………………………………………………………………………….. |
162 |
|
ENERGY STAR® Qualified Product……………………………………………………………………….. |
162 |
|
United States FCC Regulations…………………………………………………………………………… |
162 |
|
European Union………………………………………………………………………………………………. |
163 |
|
European Union Lot 4 Imaging Equipment Agreement Environmental |
|
|
Information ……………………………………………………………………………………………………. |
163 |
|
Germany………………………………………………………………………………………………………… |
165 |
|
Turkey RoHS Regulation ……………………………………………………………………………………. |
165 |
|
Regulatory Information for a 2.4-GHz Wireless Network Adapter……………………………… |
166 |
|
Copy Regulations ………………………………………………………………………………………………….. |
167 |
|
United States………………………………………………………………………………………………….. |
167 |
|
Canada………………………………………………………………………………………………………….. |
168 |
|
Other Countries……………………………………………………………………………………………….. |
169 |
|
Fax Regulations…………………………………………………………………………………………………….. |
170 |
|
United States………………………………………………………………………………………………….. |
170 |
|
Canada………………………………………………………………………………………………………….. |
171 |
|
European Union………………………………………………………………………………………………. |
172 |
|
South Africa……………………………………………………………………………………………………. |
172 |
|
New Zealand ………………………………………………………………………………………………….. |
172 |
|
Material Safety Data Sheets …………………………………………………………………………………… |
174 |
|
C Recycling and Disposal …………………………………………………………………………………………. |
175 |
|
All Countries ………………………………………………………………………………………………………… |
176 |
|
European Union……………………………………………………………………………………………………. |
177 |
|
Domestic/Household Environment ……………………………………………………………………… |
177 |
|
Professional/Business Environment……………………………………………………………………… |
177 |
|
Business Users in the European Union…………………………………………………………………. |
177 |
|
Disposal Outside of the European Union ……………………………………………………………… |
177 |
|
Battery Symbol Note………………………………………………………………………………………… |
178 |
|
Battery Removal ……………………………………………………………………………………………… |
178 |
|
Other Countries…………………………………………………………………………………………………….. |
179 |
|
D Features ………………………………………………………………………………………………………………… |
181 |
|
Xerox® B1022 Multifunction Printer |
7 |
|
User Guide |
1
Safety
|
Your printer and the recommended supplies have been designed and tested to meet strict safety |
||
|
requirements. Attention to the following information ensures the continued and safe operation of |
||
|
your Xerox printer. |
||
|
This chapter contains: |
||
|
• |
Notices and Safety……………………………………………………………………………………………………… |
10 |
|
• |
Electrical Safety …………………………………………………………………………………………………………. |
11 |
|
• |
Operational Safety ……………………………………………………………………………………………………… |
13 |
|
• |
Maintenance Safety……………………………………………………………………………………………………. |
15 |
|
• |
Printer Symbols ………………………………………………………………………………………………………….. |
16 |
|
• Environmental, Health, and Safety Contact Information……………………………………………………. |
21 |
|
Xerox® B1022 Multifunction Printer |
9 |
|
User Guide |

Safety
Notices and Safety
Read the following instructions carefully before operating your printer. Refer to these instructions to ensure the continued safe operation of your printer.
Your Xerox® printer and supplies are designed and tested to meet strict safety requirements. These include safety agency evaluation and certification, and compliance with electromagnetic regulations and established environmental standards.
The safety and environment testing and performance of this product have been verified using Xerox® materials only.
Note: Unauthorized alterations, which can include the addition of new functions or the connection of external devices, can affect the product certification. For more information, contact your Xerox representative.
10Xerox® B1022 Multifunction Printer User Guide

Safety
Electrical Safety
General Guidelines
WARNING:
•Do not push objects into slots or openings on the printer. Touching a voltage point or shorting out a part could result in fire or electric shock.
•Do not remove the covers or guards that are fastened with screws unless you are installing optional equipment and are instructed to do so. Turn off the printer when performing these installations. Disconnect the power cord when removing covers and guards for installing optional equipment. Except for user-installable options, there are no parts that you can maintain or service behind these covers.
WARNING: The following are hazards to your safety:
•The power cord is damaged or frayed.
•Liquid is spilled into the printer.
•The printer is exposed to water.
•The printer emits smoke, or the surface is unusually hot.
•The printer emits unusual noise or odors.
•The printer causes a circuit breaker, fuse, or other safety device to activate.
If any of these conditions occur, do the following:
1.Turn off the printer immediately.
2.Disconnect the power cord from the electrical outlet.
3.Call an authorized service representative.
Power Cord
•Use the power cord supplied with your printer.
•Do not use an extension cord or remove or modify the power cord plug.
•Plug the power cord directly into a properly grounded electrical outlet. Ensure that each end of the cord is connected securely. If you do not know if an outlet is grounded, ask an electrician to check the outlet.
•Do not use a ground adapter plug to connect the printer to an electrical outlet that does not have a ground connection terminal.
WARNING: Avoid the potential of electrical shock by ensuring that the printer is grounded properly. Electrical products can be hazardous if misused.
•Verify that the printer is plugged into an outlet that is providing the correct voltage and power. Review the electrical specification of the printer with an electrician if necessary.
•Do not place the printer in an area where people can step on the power cord.
•Do not place objects on the power cord.
•If the power cord becomes frayed or worn, replace it.
|
Xerox® B1022 Multifunction Printer |
11 |
|
User Guide |

Safety
•Do not plug or unplug the power cord while the power switch is in the On position.
•To avoid electrical shock and damage to the cord, grasp the plug when unplugging the power cord.
•Ensure that the electrical outlet is near the printer and is easily accessible.
The power cord is attached to the printer as a plug-in device on the back of the printer. If it is necessary to disconnect all electrical power from the printer, disconnect the power cord from the electrical outlet.
Emergency Power Off
If any of the following conditions occur, power the printer off immediately. Disconnect the power cord from the electrical outlet. Contact an authorized Xerox service representative to correct the problem if any of the following occurs:
•The equipment emits unusual odors or makes unusual noises.
•The power cable is damaged or frayed.
•A wall panel circuit breaker, fuse, or other safety device has been tripped.
•Liquid is spilled into the printer.
•The printer is exposed to water.
•Any part of the printer is damaged.
Laser Safety
This printer complies with laser product performance standards set by governmental, national, and international agencies and is certified as a Class 1 Laser Product. The printer does not emit hazardous light because the beam is enclosed completely during all modes of customer operation and maintenance.
Laser Warning: Use of controls, adjustments, or performance of procedures other than those specified in this manual can result in hazardous radiation exposure.
12Xerox® B1022 Multifunction Printer User Guide

Safety
Operational Safety
Your printer and supplies were designed and tested to meet strict safety requirements. These include safety agency examination, approval, and compliance with established environmental standards.
Your attention to the following safety guidelines helps to ensure the continued, safe operation of your printer.
Operational Guidelines
•Do not remove any paper trays while the printer is printing.
•Do not open the doors when the printer is printing.
•Do not move the printer when it is printing.
•Keep hands, hair, neckties, and so on, away from the exit and feed rollers.
•Covers, which require tools for removal, protect the hazard areas within the printer. Do not remove the protective covers.
Hot Warning: The metallic surfaces in the fuser area are hot. Always use caution when removing paper jams from this area and avoid touching any metallic surfaces.
Ozone Release
This printer produces ozone during regular operation. The amount of ozone produced depends on copy volume. Ozone is heavier than air and is not produced in amounts large enough to harm anyone. Install the printer in a well-ventilated room.
For more information, contact your local Xerox representative, or go to www.xerox.com/environment_ europe .
Printer Location
•Place the printer on a level, solid, non-vibrating surface with adequate strength to hold its weight. To find the weight for your printer configuration, refer to Physical Specifications
•Do not block or cover the slots or openings on the printer. These openings are provided for ventilation and to prevent overheating of the printer.
•Place the printer in an area where there is adequate space for operation and servicing.
•Place the printer in a dust-free area.
•Do not store or operate the printer in an extremely hot, cold, or humid environment.
•Do not place the printer near a heat source.
•Do not place the printer in direct sunlight to avoid exposure to light-sensitive components.
•Do not place the printer where it is exposed directly to the cold air flow from an air conditioning system.
•Do not place the printer in locations that are susceptible to vibrations.
•For optimum performance, use the printer at the elevations specified in Elevation
|
Xerox® B1022 Multifunction Printer |
13 |
|
User Guide |

Safety
Printer Supplies
•Use supplies that are designed for your printer. The use of unsuitable materials can cause poor performance and a possible safety hazard.
•Follow all warnings and instructions marked on, or supplied with the product, options, and supplies.
•Store all consumables in accordance with the instructions provided on the package or container.
•Keep all consumables away from the reach of children.
•Never throw toner, print cartridges, drum cartridges, or toner containers into an open flame.
•When handling cartridges, such as toner cartridges, avoid skin or eye contact with toner. Eye contact can cause irritation and inflammation. Do not attempt to disassemble the cartridge, which can increase the risk of skin or eye contact.
Caution: Use of non-Xerox supplies is not recommended. The Xerox Warranty, Service Agreement, and Total Satisfaction Guarantee do not cover damage, malfunction, or degradation of performance caused by use of non-Xerox supplies, or the use of Xerox supplies not specified for this printer. The Total Satisfaction Guarantee is available in the United States and Canada. Coverage could vary outside these areas. For details, contact your Xerox representative.
14Xerox® B1022 Multifunction Printer User Guide

Safety
Maintenance Safety
•Do not attempt to perform any maintenance procedure that is not described specifically in the documentation supplied with your printer.
•Clean the printer with a dry, lint-free cloth only.
•Do not burn any consumables or routine maintenance items.
•For information on Xerox supplies recycling programs, go to www.xerox.com/gwa
WARNING: Do not use aerosol cleaners. When used on electromechanical equipment, aerosol cleaners can cause explosions or fires.
|
Xerox® B1022 Multifunction Printer |
15 |
|
User Guide |
Safety
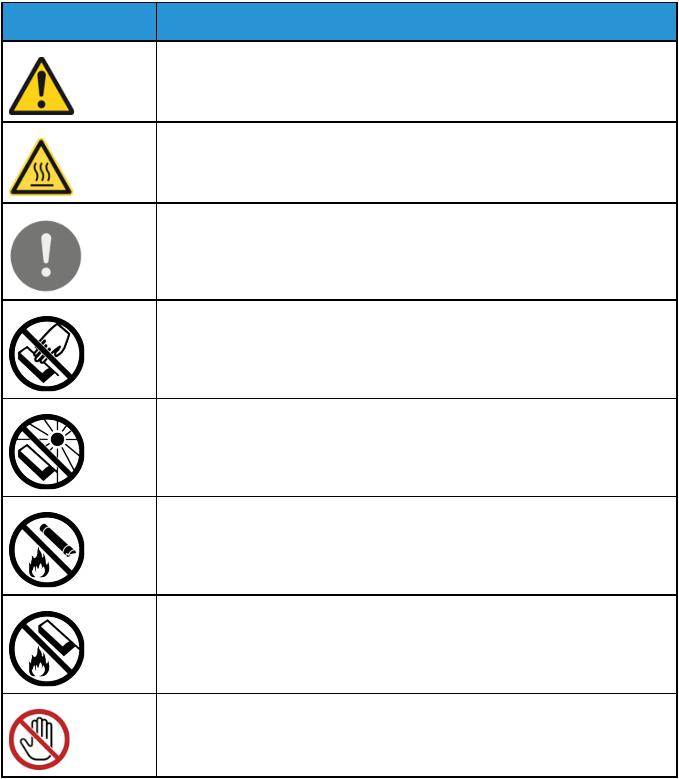
Printer Symbols
|
Symbol |
Description |
|
|
Warning |
: |
|
|
Indicates a hazard that can cause serious injury or death if not avoided. |
||
|
Hot Warning |
: |
|
|
Hot surface on or in the printer. Use caution to avoid personal injury. |
||
|
Caution |
: |
Indicates a mandatory action to take to avoid damage to the property.
Do not touch the part or area of the printer.
Do not expose the drum cartridges to direct sunlight.
Do not burn the toner cartridges.
Do not burn the drum cartridges.
Do not touch the part or area of the printer.
16Xerox® B1022 Multifunction Printer User Guide
Safety
|
Symbol |
Description |
|
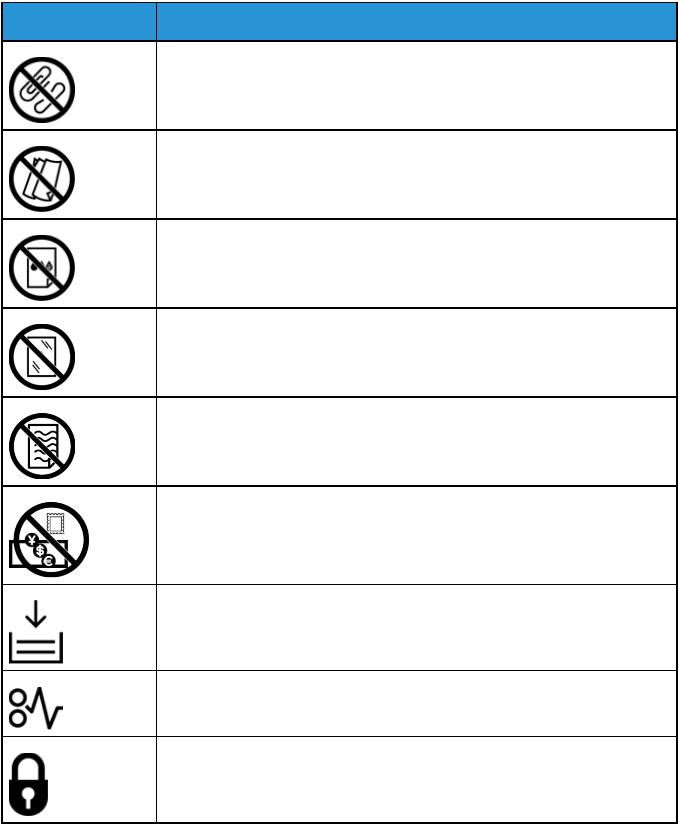
Do not use paper attached with staples or any other form of binding clip. |
|
|
Do not use folded, creased, curled, or wrinkled paper. |
|
|
Do not load or use inkjet paper. |
|
|
Do not use transparencies or overhead projector sheets. |
|
|
Do not reload paper previously printed on or used. |
|
|
Do not copy money, revenue stamps, or postage stamps. |
|
|
Add paper or media. |
|
|
Paper jam |
|
|
Lock |
|
Xerox® B1022 Multifunction Printer |
17 |
|
User Guide |
Safety
|
Symbol |
Description |
|
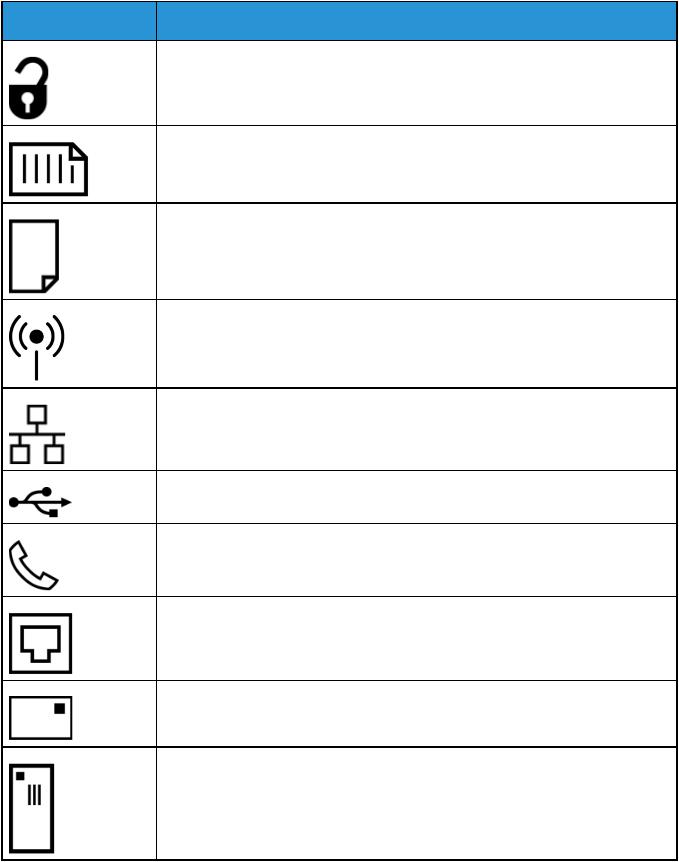
Unlock |
Document
Paper
WLAN
Wireless Local Area Network
LAN
Local Area Network
USB
Universal Serial Bus
Telephone Line
Modem Line
Postcard
Load envelopes in the tray with the flaps closed and facing up.
18Xerox® B1022 Multifunction Printer User Guide
Safety
|
Symbol |
Description |
|
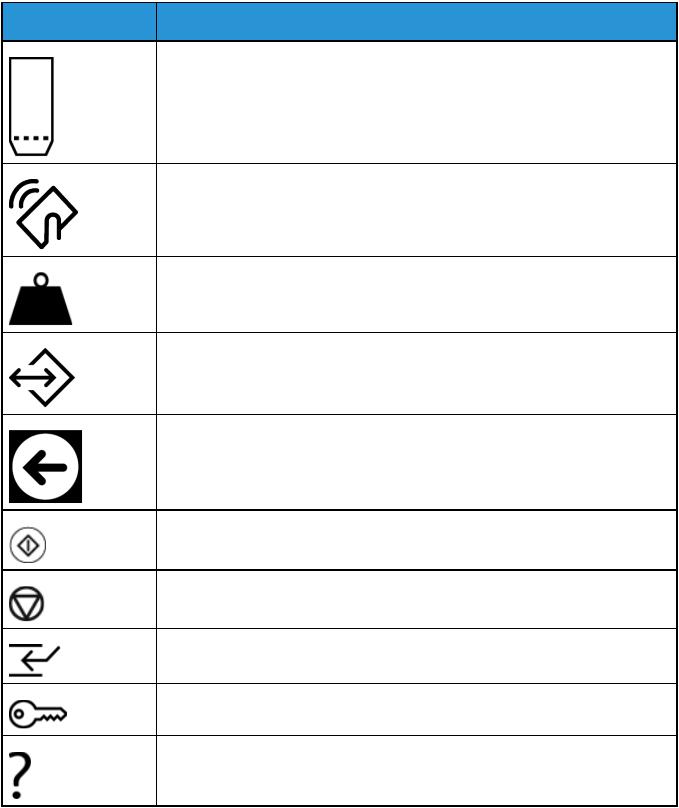
Load envelopes in the tray with the flaps open and facing up. |
NFC
Near Field Communication
Weight
Data Transmission
Paper Feeding Direction Indicator
Start Button
Stop Button
Pause Printing Button
Login In/Out Button
Help Button
|
Xerox® B1022 Multifunction Printer |
19 |
|
User Guide |
|
Safety |
|
|
Symbol |
Description |
|
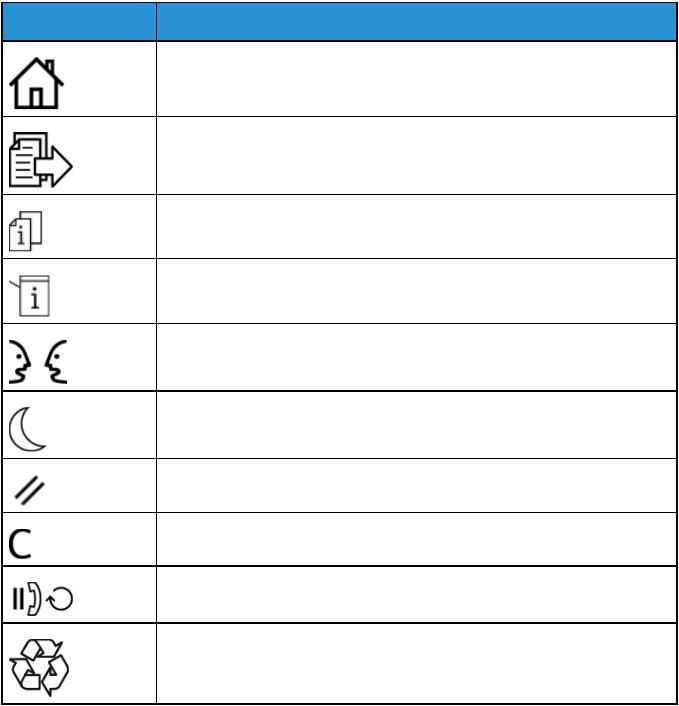
Services Home Button |
|
|
Services Button |
|
|
Job Status Button |
|
|
Printer Status Button |
|
|
Language Button |
|
|
Power/Wake Button |
|
|
Clear All Button |
|
|
Clear Button |
|
|
Dial Pause/Redial Button |
|
|
This item can be recycled. For details, refer to Recycling and Disposal |
20Xerox® B1022 Multifunction Printer User Guide
Safety
Environmental, Health, and Safety Contact
Information
For more information on Environment, Health, and Safety in relation to this Xerox printer and supplies, contact Europe: EHS-Europe@xerox.com
For printer safety information in Europe, go to www.xerox.com/environment_europe
|
Xerox® B1022 Multifunction Printer |
21 |
|
User Guide |
|
2 |
||
Getting Started |
||
|
This chapter contains: |
||
|
• Parts of the Printer ……………………………………………………………………………………………………… |
24 |
|
|
• |
Information Pages ……………………………………………………………………………………………………… |
29 |
|
• |
Administration Features ………………………………………………………………………………………………. |
30 |
|
• |
More Information ………………………………………………………………………………………………………. |
33 |
|
• |
Installation and Setup ………………………………………………………………………………………………… |
34 |
|
Xerox® B1022 Multifunction Printer |
23 |
|
User Guide |
Getting Started
Parts of the Printer
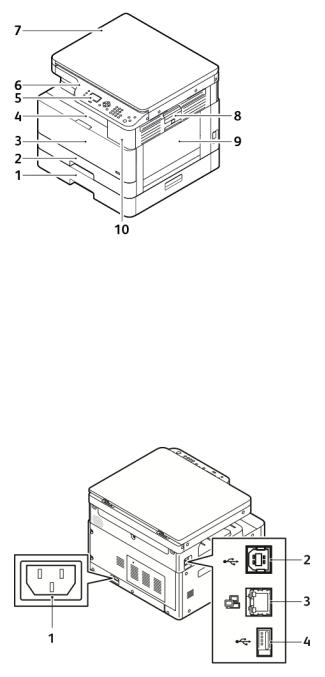
Front View
|
1. |
Optional Tray 2 with 250-Sheet Capacity |
6. |
Control Panel |
|
2. |
Tray 1 with 250-Sheet Capacity |
7. |
Document Top Cover |
|
3. |
Front Cover |
8. |
Side Cover Release Lever |
|
4. |
Exit Tray |
9. |
Bypass Tray |
|
5. |
Screen Display |
10. |
USB Port |
Rear View
|
1. |
Power Receptacle |
3. |
Ethernet Connection |
|
2. |
USB Port, B-Type |
4. |
USB Port, A-Type |
24Xerox® B1022 Multifunction Printer User Guide

Getting Started
Internal Components
|
1. |
Toner Cartridge |
3. |
Document Glass |
|
2. |
Drum Cartridge |
4. |
Document Glass Cover |
Using the Document Glass
1.Lift the document cover.
2.Place the first page face down in the upper-left corner of the document glass.
3.Align the originals to the matching paper size printed on the edge of the glass.
|
Xerox® B1022 Multifunction Printer |
25 |
|
User Guide |
Getting Started
Document Glass Guidelines
The document glass accommodates original document sizes up to 297 x 432 mm (11.67 x 17 in.). Use the document glass to copy or scan the following types of original documents:
•Paper with paper clips or staples attached
•Paper with wrinkles, curls, folds, tears, or notches
•Carbonless paper, or items other than paper, such as cloth or metal
•Books
Using the Optional Document Feeder
An optional document feeder is available with this printer.
Document Feeder Guidelines
When you load original documents into the document feeder, follow these guidelines.
•The document feeder accommodates original documents from 140 x 130 mm (5.5 x 5 in.) to 297 x 432 mm (11.7 x 17 in.).
•Insert original documents face up, with the top of the page entering the feeder first.
•Place loose sheets of paper only in the document feeder.
•Adjust the paper guides so that they fit against the edges of the original documents.
•Insert paper in the document feeder only when ink on the paper is dry.
•Do not load original documents above the MAX fill line.
Control Panel
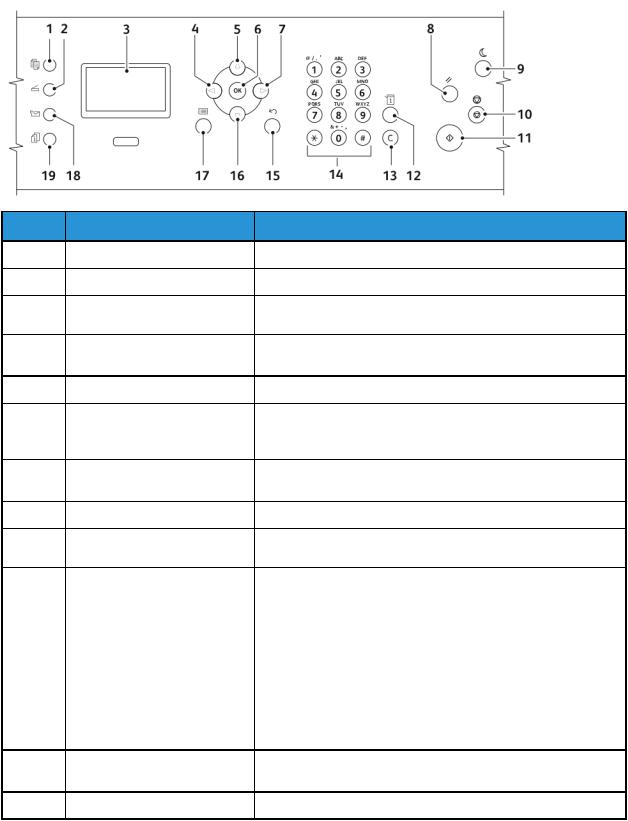
The control panel consists of a display screen, an alphanumeric keypad, and buttons to control the functions available on the printer. You can use the control panel for these tasks:
•View the current operating status of the device.
•Access printer features.
•Access reference materials.
•Access the Tools and Setup menus.
•Access the Troubleshooting menus and videos.
•View status messages about paper tray levels and supplies.
26Xerox® B1022 Multifunction Printer User Guide
Getting Started
• View any errors or warnings that occur on the device.
|
Item |
Name |
Description |
|
|
1 |
Copy button |
This button displays copy-related options. |
|
|
2 |
Scan button |
This button displays all scan-related options. |
|
|
3 |
Screen Display |
The screen displays information and provides access to printer |
|
|
functions. |
|||
|
4, 5, 7, |
Arrow buttons |
These buttons provide navigation between the printer functions |
|
|
16 |
on the control panel screen. |
||
|
6 |
OK button |
This button selects a printer function. |
|
|
8 |
Clear All button |
This button clears previous and changed settings for the current |
|
|
selection. To reset all features to default settings and clear |
|||
|
existing scans, press this button twice. |
|||
|
9 |
Power Saver button |
This button allows the printer to enter and exit the low-power |
|
|
mode, and power down the printer. |
|||
|
10 |
Stop button |
This button cancels the current print, copy, or scan job. |
|
|
11 |
Start button |
This button starts the selected copy, scan, fax, or Print From job, |
|
|
such as Print from USB. |
|||
|
12 |
Machine Status button |
This button allows access to the following functions: |
|
|
• |
Machine Information |
||
|
• |
Information Pages |
||
|
• |
Toner Level |
||
|
• |
Copy Defaults |
||
|
• |
Scan Defaults |
||
|
• |
Email Defaults |
||
|
• |
Print Setup |
||
|
• |
System Setup |
||
|
• |
Network Settings |
||
|
13 |
C (clear) button |
This button deletes numeric values or the last digit entered |
|
|
using the alphanumeric keys. |
|||
|
14 |
Alphanumeric keypad |
Use the keypad to enter alphanumeric information. |
|
Xerox® B1022 Multifunction Printer |
27 |
|
User Guide |
|
Getting Started |
||
|
Item |
Name |
Description |
|
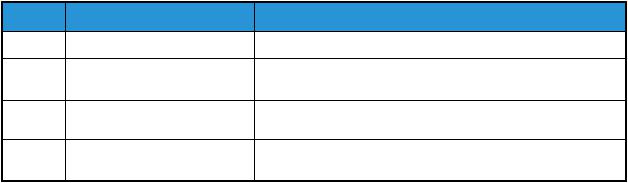
15 |
Back button |
This button moves to the previous screen. |
|
17 |
Menu button |
This button provides access to printer features such as copy, |
|
scan, and fax on the control panel screen. |
||
|
18 |
Send to Email button |
Send a scanned or copied document to the email address |
|
entered in the Address Book. |
||
|
19 |
Job Status button |
This button displays on the control panel all active, secure, or |
|
completed jobs. |
28Xerox® B1022 Multifunction Printer User Guide

Getting Started
Information Pages
Your printer has a set of information pages that you can access from the control panel touch screen. The information pages include Customer Support access, installed options, and more.
Accessing and Printing the Information Pages
To access the full list of information pages for your printer:
1.At the printer control panel, press the Machine Status button.
2.To select Information Pages, press the Down Arrow button once.
3.Press the OK button.
4.To select an information page, press the Down Arrow button as many times as necessary to access the page that you want to view or print.
•Configuration Report
•Demo Page
•Supplies Usage Page
•PCL Font
•PS Font
•Print All Above Reports
Note: For descriptions of each of the Information Pages, refer to Available Information Pages .
5.Press the OK button.
6.To return to any of the previous screens, press the Back button as many times as necessary.
Printing the Configuration Report at the Control
Panel
The Configuration Report provides information about the printer, including installed options, network settings, port setup, tray information, and more.
1. At the printer control panel, press the Machine Status button.
|
2. On the Machine Status screen, to select Information Pages press the Down Arrow button once. |
, |
3.Select the Configuration Report option, then press the OK button.
4.To return to the Home page, press the Back button.
|
Xerox® B1022 Multifunction Printer |
29 |
|
User Guide |

Getting Started
Administration Features
For details about system administrator tasks, refer to the System Administrator Guide at www.xerox. com/office/B1022_B1025docs
Xerox® CentreWare® Internet Services
Xerox® CentreWare® Internet Services is the administration and configuration software installed on the embedded Web server in the printer. CentreWare Internet Services software allows you to configure and administer the printer from a Web browser.
Xerox® CentreWare® Internet Services requires:
•A TCP/IP connection between the printer and the network in Windows, Macintosh, UNIX, or Linux environments.
•TCP/IP and HTTP enabled in the printer.
•A network-connected computer with a Web browser that supports JavaScript.
Accessing Xerox® CentreWare® Internet Services
1.At your computer, open a Web browser.
2.In the address field, type the IP address of the printer.
|
3. Press Enter or Return |
. |
Locating the IP Address of the Printer
You can view the IP address of your printer on the control panel or on the Configuration Report.
To install print drivers for a network-connected printer, you need the IP address of your printer. Use the IP address to access and configure printer settings in the Xerox® CentreWare® Internet Services software.
To view the IP address of the printer on the control panel:
1.At the printer control panel, press the Machine Status button.
2.Select the Machine Information tab.
If the system administrator set the Display Network Settings to show the IP address, it appears in the Machine Information list.
Note: If the IP address does not appear, print the Configuration Report, or contact your system administrator.
30Xerox® B1022 Multifunction Printer User Guide

Getting Started
Automatic Data Collection
The printer collects data automatically and transmits it to a secure off-site location. Xerox, or a designated service provider, uses the data to support and service the printer, or for billing, supplies replenishment, or product improvement. The transmitted data can include product registration, meter readings, supplies levels, printer configuration and settings, software version, and problem or faultcode data. Xerox cannot read, view, or download the content of your documents that reside on or pass through your printer or any of your information-management systems.
To turn off automatic data collection:
1.At your computer, open a Web browser.
2.In the address field, type the IP address of the printer.
|
3. Press Enter or Return |
. |
4.On the Xerox® CentreWare® Internet Services Welcome page, in the note about automated services, select the link.
5.The SMart eSolutions Setup page opens in Xerox® CentreWare® Internet Services. To disable
|
SMart eSolutions, select Not Enrolled |
→ |
A |
Note: System administrator credentials are required to disable SMart eSolutions. If you do not have administrator credentials, contact your workplace administrator for the printer.
Maintenance Assistant
Your printer includes a built-in diagnostic capability that allows you to send diagnostic information to Xerox. Maintenance Assistant is a remote diagnostic tool that offers a fast way to resolve potential issues, receive assistance, and automate the troubleshooting or repair processes.
Enabling Maintenance Assistant
Before you begin:
If your network uses a proxy server, to ensure that the printer can connect to the Internet, configure the printer Proxy Server settings.
1.At your computer, open a Web browser.
2.In the address field, type the IP address of the printer.
|
3. Press Enter or Return |
. |
4.From the Xerox® CentreWare®Internet Services for your Xerox device, click Status eSolutions
|
5. |
From Smart eSolutions, click Maintenance Assistant |
. |
|
6. |
To send status information to Xerox, click Start an Online Troubleshooting Session at www. |
|
|
xerox.com |
. |
7.After Xerox® CentreWare® Internet Services sends the printer data, your browser redirects to www.xerox.com then starts your online troubleshooting session.
|
Xerox® B1022 Multifunction Printer |
31 |
|
User Guide |
Getting Started
Viewing Billing and Usage Information
Billing and printer usage information appears on the Billing Meters information screen. The impression counts are used for billing. For details about viewing the information, refer to Viewing Billing Meter Information in the Maintenance chapter.
32Xerox® B1022 Multifunction Printer User Guide

Getting Started
More Information
You can obtain more information about your printer from these sources:
|
Resource |
Location |
|
Installation Guide |
Packaged with the printer and can be downloaded at |
|
www.xerox.com/office/B1022_B1025docs |
|
|
Other documentation for your |
www.xerox.com/office/B1022_B1025docs |
|
printer |
|
|
Technical support information for |
www.xerox.com/office/B1022_B1025support |
|
your printer, including online |
|
|
technical support, Online Support |
|
|
Assistant, and print driver |
|
|
downloads. |
|
|
Information Pages |
Accessing and Printing the Information Pages |
|
Order supplies for your printer |
www.xerox.com/office/B1022_B1025supplies |
|
Local Sales and Support Center |
www.xerox.com/office/worldcontacts |
|
Printer registration |
www.xerox.com/office/register |
|
Xerox® Direct online store |
www.direct.xerox.com/ |
|
Xerox® B1022 Multifunction Printer |
33 |
|
User Guide |

Getting Started
Installation and Setup
For installation and setup information, refer to:
•Installation Guide packaged with your printer.
•System Administrator Guide at www.xerox.com/office/B1022_B1025docs
Installation and Setup Overview
Before printing, ensure that your computer and the printer are plugged in, powered on, and connected. Configure the initial settings of the printer. On your computer, install the driver software and utilities.
You can connect to your printer from your computer using USB, or connect to a network using an Ethernet cable or wireless connection. Hardware and cabling requirements vary for the different connection methods. Routers, network hubs, network switches, modems, Ethernet cables, and USB cables are not included with your printer and must be purchased separately. Xerox recommends an Ethernet connection because, typically, it is faster than a USB connection, and it provides access to Xerox® CentreWare® Internet Services.
Note: If the Software and Documentation disc is not available, download the latest drivers at www.xerox.com/office/B1022_B1025drivers .
Selecting a Location for the Printer
•Select a dust-free area with temperatures from 10–30° C (50–86° F), and a relative humidity of 20–80%.
Note: Sudden temperature fluctuations can affect print quality. Rapid heating of a cold room can cause condensation inside the printer, and can interfere with image transfer.
•Place the printer on a level, solid, non-vibrating surface with adequate strength for the weight of the printer. The printer must be horizontal with all four feet in solid contact with the surface. To find the weight for your printer configuration, refer to Physical Specifications
•Select a location with adequate clearance to access supplies and to provide proper ventilation. To find the clearance requirements for your printer, refer to Clearance Requirements
•After positioning the printer, you are ready to connect it to the power source and computer or network.
Connecting the Printer
Selecting a Connection Method
You can connect the printer to your computer using a USB cable or an Ethernet cable. The method you select depends on how your computer is connected to the network. A USB connection is a direct connection and is the easiest to set up. An Ethernet connection is used for networking. If you are using a network connection, ensure that you understand how your computer is connected to the network. For details, refer to About TCP/IP and IP Addresses
34Xerox® B1022 Multifunction Printer User Guide

Getting Started
Note:
•Not all options listed are supported on all printers. Some options apply only to a specific printer model, configuration, operating system, or driver type.
•Hardware and cabling requirements vary for the different connection methods. Routers, network hubs, network switches, modems, Ethernet cables, and USB cables are not included with your printer and must be purchased separately.
Wired Network
If your computer is connected to an office network or home network, use an Ethernet cable to connect the printer to a network port. Ethernet networks can support many computers, printers, and devices simultaneously. In most cases, Ethernet connection is faster than USB and provides direct access to printer settings using Xerox® CentreWare® Internet Services.
Wireless Network
If your network includes a wireless router or wireless access point, you can connect the printer to the network with a wireless connection. A wireless network connection provides the same access and services as a wired connection provides. A wireless network connection is typically faster than USB and allows direct access to the setting of the printer using Xerox® CentreWare® Internet Services.
USB
If you connect the printer to one computer and do not have a network, use a USB connection. A USB connection offers fast data speeds, but typically not as fast as an Ethernet connection. In addition, a USB connection does not provide access to Xerox® CentreWare® Internet Services.
Connecting the Printer to a Wired Network
Use a Category 5 or higher Ethernet cable to connect the printer to the network. An Ethernet network is used for one or more computers and supports many printers and systems simultaneously. An Ethernet connection provides direct access to printer settings using Xerox® CentreWare® Internet Services.
To connect the printer:
1.Ensure that the printer is powered off.
2.Connect one end of a Category 5 or higher Ethernet cable to the Ethernet port on the printer. Connect the other end of the Ethernet cable to a correctly configured network port on a hub or router.
For details on configuring network settings, refer to the System Administrator Guide at www. xerox.com/office/B1022_B1025docs
3.Connect the power cord to the printer, then plug the cord into an electrical outlet.
4.Power on the printer.
5.Enter the printer IP address, or set the Xerox® CentreWare® Internet Services software to discover the network IP address of the printer automatically.
|
Xerox® B1022 Multifunction Printer |
35 |
|
User Guide |

Getting Started
Connecting the Printer to a Wireless Network
If you purchased a Wireless Network Adapter, you can connect the device to a wireless network. If the device is connected to a wired network, you can configure wireless settings using Xerox® CentreWare® Internet Services. For details on configuring wireless network settings, refer to the System Administrator Guide at www.xerox.com/office/B1022_B1025docs
Note: Before configuring wireless network settings, install the Xerox Wireless Network Adapter Kit. For information, refer to the Hardware Install and Setup instructions that are included with the kit.
Connecting to a Computer Using USB
To connect using USB, one of these operating systems is required:
•Windows 7 or later
•Windows Server 2008 or later
•Macintosh OS X version 10.9 or later
To connect the printer to the computer using a USB cable:
1.Connect the B end of a standard A/B USB 2.0 cable to the USB Port on the rear left side of the printer.
2.Connect the A end of the USB cable to the USB port on the computer.
3.If the Windows Found New Hardware Wizard appears, select Cancel
4.Install the print drivers. For details, refer to Installing the Driver Software
36Xerox® B1022 Multifunction Printer User Guide

Getting Started
Powering the Printer On or Off
Powering On the Printer
After you plug in the power cord to the printer and the wall outlet, the printer automatically powers on.
Note: If the printer does not automatically power on, press the Power Save button to power on the printer.
Powering Off the Printer
•To power off the printer:
a.At the printer control panel, press the Power Saver button.
b.Use the Up Arrow or Down Arrow buttons, scroll down to, then select Power Down
c.To initiate an orderly shutdown of the electronic printer components, press the Power Saver button.
d.If the power-off sequence is not functioning properly, unplug the power cord from the printer, then plug in the power cord.
The printer powers on again.
Note: If the printer does not power on again, press the Power Save button to power on the printer.
Caution:
•To prevent a printer malfunction, perform the control panel shutdown first.
•If the power-off sequence is not functioning properly, you can unplug the power cord from the printer, then plug in the printer. For routine printer operation, do not plug or unplug the power cord while the printer is powered on.
Note: When all control panel lights are off, the printer power-off sequence is complete.
|
Xerox® B1022 Multifunction Printer |
37 |
|
User Guide |

Getting Started
Configuring Network Settings
About TCP/IP and IP Addresses
Computers and printers primarily use TCP/IP protocols to communicate over an Ethernet network. Generally, Macintosh computers use either TCP/IP or the Bonjour protocol to communicate with a network printer. For Macintosh OS X systems, TCP/IP is preferred. Unlike TCP/IP, however, Bonjour does not require printers or computers to have IP addresses.
With TCP/IP protocols, each printer and computer must have a unique IP address. Many networks, cable, and DSL routers have a Dynamic Host Configuration Protocol (DHCP) server. A DHCP server assigns an IP address automatically to every computer and printer on the network that is configured to use DHCP.
If you use a cable or DSL router, for information on IP addressing, refer to the documentation for your router.
Enabling the Printer for Scanning
If the printer is connected to a network, you can scan to any of the following locations:
•FTP
•SMB
•HTTP
•HTTPS
•SFTP
•An email address
•A shared folder on your computer
For details, refer to Xerox® CentreWare® Internet Services
Note: If your printer is connected using the USB cable, you cannot scan to an email address or a network location, such as a shared folder on your computer.
For details, refer to the System Administrator Guide at www.xerox.com/office/B1022_B1025docs
Power Saver Mode
Power Saver mode reduces power consumption when the printer is left idle for a specified period.
Power Saver Levels
There are two levels of Power Saver mode:
•Power Saver Mode 1 Timer: After a specified period of inactivity, the touch screen dims, then the printer operates at reduced power.
•Power Saver Mode 2 Timer: After a specified period of inactivity, the touch screen becomes dark, then the printer enters Standby mode.
38Xerox® B1022 Multifunction Printer User Guide

Getting Started
Exiting Power Saver Mode
The printer exits Power Saver mode automatically when any of the following events occur:
•You press a button on the control panel
•The printer receives data from a connected device
•You open any door or cover on the printer
Setting the Power Saver Mode Timers at the Control Panel
Note: System administrator credentials are required to perform the following procedure. If you do not have administrator credentials, contact your workplace system administrator.
1.At the printer control panel, press the Machine Status button.
2.On the Machine Status tab, to scroll, use the Arrow buttons Select System Setup
|
Setup ower Saver time |
→ |
. |
P |
|
3. Press OK |
. |
The Power Saver time window appears.
4.To select the required time, press the Arrow buttons, or use the numeric keypad to enter a value.
•Low Power Save: Specify how long the printer remains idle before it changes from Ready mode to Low Power Save mode.
•Very Low Power Save: Specify how long the printer remains idle before it changes from Ready mode to Very Low Power Save mode.
6. To return to the Home page, press the Back button.
Installing the Driver Software
Before you install driver software, verify that the printer is plugged in, powered on, connected correctly, and has a valid IP address. If you cannot find the IP address, refer to Locating the IP
|
Address of the Printer |
. |
|
Download the latest drivers at www.xerox.com/office/drivers |
. |
Operating System Requirements
•Windows 7, Windows 8, Windows 10, Windows Server 2000, Windows Server 2008, Windows Server 2008 R2, and Windows Server 2012
•Macintosh OS X version 10.10 and later
•Citrix
•IBM® AIX® 7.2
•HP-UX® 11iv3
•Oracle® Solaris 11.3
•Fedora Core 24
•SUSE® 13.2
|
Xerox® B1022 Multifunction Printer |
39 |
|
User Guide |

Getting Started
• UNIX and Linux: Your printer supports connections to various UNIX platforms through the network interface. For details, refer to www.xerox.com/office/B1022drivers .
Installing Drivers and Utilities for Windows
To access all the features of your printer, install the Xerox® print driver and the Xerox® scan driver.
To install the print and scan driver software:
1.Insert the Software and Documentation disc into the appropriate drive on your computer. The installer starts automatically.
If the installer does not start automatically, navigate to the drive, then double-click the Setup.exe installer file.
2.To change the language, click Language
|
3. |
Select your language, then click OK |
. |
||
|
4. |
Click Install Drivers |
all Print and Scan Drivers→ |
Inst |
. |
|
5. |
To accept the license agreement, click I Agree |
. |
6.From the list of discovered printers, select your printer, then click Next If your printer does not appear in the list of discovered printers, click Extended Search
7.If your printer still does not appear in the list of discovered printers, and you know the IP address, choose one of the following:
•At the top of the window, click the Network Printer icon, then enter the IP address or the DNS name of the printer.
•Click Search From the list of discovered printers, select your printer, then click Next.
8.If the printer still does not appear in the list of discovered printers, and you do not know the IP address:
|
a. Click Advanced Search |
. |
b.If you know the gateway address and subnet mask, click the top button, then enter the addresses into the Gateway and Subnet Mask fields.
c.If you know the address of another printer on the same subnet, click the middle button, then enter the address in the IP Address field.
e.From the list of discovered printers, select your printer, then click Next
Note: When the printer appears in the Discovered Printers window, it displays the IP address. Record the IP address for later use.
|
9. Select the required driver, then click Install |
. |
10.If the installer prompts you for the IP address, enter the IP address of the printer.
11.If the installer prompts you to restart your computer, to complete the installation of the drivers,
|
click Restart |
. |
|
|
12. To complete the installation, click Finish |
. |
Installing Print Drivers for Macintosh OS X Version 10.9 and Later
Use this procedure to install the Xerox print driver to access all features of your printer.
40Xerox® B1022 Multifunction Printer User Guide
Getting Started
To install the print driver software:
1.Download the print driver from www.xerox.com/office/B1022_B1025drivers
2.To view the .dmg file for your printer, on your desktop, click the disc icon.
3.Open the .dmg file, then navigate to the appropriate installer file for your operating system.
4.To begin installation, open the Installer package file.
5.To acknowledge the warning and introductory messages, click Continue Click Continue again.
6.To accept the license agreement, click Continue then click Agree
7.To accept the current installation location, click Install or select another location, for the
|
installation files, then click Install |
. |
|
8. Enter your password, then click Install Software |
. |
9.In the list of discovered printers, select your printer, then click Continue If your printer does not appear in the list of discovered printers:
a.Click the Network Printer icon.
b.Type the IP address of your printer, then click Continue
c.In the list of discovered printers, select your printer, then click Continue
10.To accept the print queue message, click Continue
|
11. |
To accept the installation success message, click Close |
. |
|
|
12. |
To verify that the print driver recognizes the installed options: |
||
|
a. |
From the Apple menu, click System Preferences rinters and Scanners |
→ |
|
|
b. |
From the list, select your printer, then click Options & Supplies |
||
|
c. |
Click Options |
. |
d.Confirm that all the options installed on the printer appear correct.
e.If you change settings, click OK close the window, then exitSystem, Preferences.
Installing Scan Drivers for Macintosh
To install the scan driver software:
|
1. To download the latest driver, go to www.xerox.com/office/drivers |
. |
2.Download the appropriate package for your operating system.
3.To view the .dmg file for your printer, on your desktop, click the Disc icon.
4.Open the Scan Installer.dmg file, then navigate to the appropriate installer file for your operating system.
5.Open the Scan Installer package file.
6.To acknowledge the warning and introductory messages, click Continue
7.To accept the license agreement, click Continue then click Agree
8.Click Continue again.
|
9. Enter your password, then click OK |
. |
|
|
Xerox® B1022 Multifunction Printer |
41 |
|
|
User Guide |

|
Getting Started |
||
|
10. |
If prompted to close other installations, click Continue Installing |
|
|
11. |
To restart, click Log Out |
. |
Installing Print Drivers for UNIX and Linux
Note:
•To install UNIX print drivers on your computer, root or superuser privileges are required.
•An Internet connection is required to install print drivers.
To install Linux drivers, perform the following steps, then select Linux instead of UNIX for the operating system and package.
To install the print driver software:
1.On the printer control panel, for the IP address, do the following:
a.Allow the printer to set up a DHCP address.
b.Print the Configuration Report, and save it for later reference.
For information on how to print the Configuration Report, refer to Printing the Configuration
|
Report at the Control Panel |
. |
c.From the Configuration Report, verify that the TCP/IP protocol is enabled and that the network cable is installed.
2.At your computer, do the following:
a.From the print driver website for your printer, select your printer model.
|
b. From the Operating System menu, select UNIX then click Go |
. |
, |
c.Select the appropriate package for your operating system.
d.To begin the driver download, click the Start button.
3.In the notes below the driver package that you selected, click Installation Guide then follow the installation instructions.
Other Drivers
The following drivers are available for download:
•The Xerox® Global Print Driver works with any printer on your network, including those printers made by other manufacturers. At installation, the Global Print Driver configures for your printer.
•The Xerox® Mobile Express Driver works with any printer that supports standard PostScript, and is available to your computer. Each time you select Print, the driver configures for the correct printer. If you travel frequently to the same sites, you can save your favorite printers in that location, and the driver saves your settings.
|
Download the drivers at www.xerox.com/office/drivers |
. |
Installing the Printer as a Web Service on Devices
The Web Services on Devices (WSD) application allows you to discover and access a remote device and associated services across a network. WSD supports device discovery, control, and use.
42Xerox® B1022 Multifunction Printer User Guide

Getting Started
Installing a WSD Printer Using the Add Device Wizard
To install a Web Services on Device (WSD) printer, use the Add Device Wizard.
1.At your computer, click Start then select Devices and Printers,
2.To launch the Add Device Wizard, click Add a Device
3.In the list of available devices, select the device that you want to use, then click Next
Note: If your printer does not appear in the list, click the Cancel button. To add the WSD printer to the device list, use the Add Printer Wizard. For information, refer to Installing a WSD Printer Using the Add Printer Wizard
4. Click Close .
Installing a WSD Printer Using the Add Printer Wizard
|
To install a Web Services on Device (WSD) printer, use the Add Printer Wizard. |
||
|
1. |
At your computer, click Start then select Devices and Printers, |
|
|
2. |
To launch the Add Printer Wizard, click Add a Printer |
. |
3.Click Add a network, wireless, or Bluetooth printer
4.In the list of available devices, select the device that you want to use, then click Next
5.If your printer does not appear in the list, click The printer that I want is not listed
6.Select Add a printer using a TCP/IP address or hostname then click Next
|
7. For the Device type, select eb Services Device |
W |
8.In the Hostname or IP address field, enter the printer IP address. Click Next
9.Select an option for sharing the printer with others in your network.
10.To identify the printer for sharing, enter a share name, location, and comments. Click Next
11.To set the printer as the default, select an option. To test the connection, click Print a Test Page
Mopria, and Google Cloud Print
The following features allow you to print without requiring a print driver:
Mopria
Mopria is a software feature that enables you to print from a mobile device without requiring a print driver. You can use Mopria to print from your mobile device to Mopria-enabled printers.
Google Cloud Print
Google Cloud Print allows you to print documents from an Internet-connected device without using a print driver. You can send documents stored in the cloud, a personal computer, tablet, or smartphone to the printer from anywhere.
For more information, refer to the System Administrator Guide at www.xerox.com/office/B1022_ B1025docs
|
Xerox® B1022 Multifunction Printer |
43 |
|
User Guide |
|
3 |
||
Using the Services |
||
|
This chapter contains: |
||
|
• |
Copy ………………………………………………………………………………………………………………………… |
46 |
|
• |
Scan To …………………………………………………………………………………………………………………….. |
57 |
|
• |
Email ……………………………………………………………………………………………………………………….. |
69 |
|
• |
USB …………………………………………………………………………………………………………………………. |
71 |
|
• |
Address Book …………………………………………………………………………………………………………….. |
73 |
|
• |
Job Status …………………………………………………………………………………………………………………. |
75 |
|
• |
Machine Status ………………………………………………………………………………………………………….. |
76 |
The Services are a gateway to the features and functions of your device. There are standard Services already installed and ready to use on the device. There are also Services that are hidden when your device is used for the first time. Set up and customize the Services using Xerox® CentreWare® Internet Services.
|
Xerox® B1022 Multifunction Printer |
45 |
|
User Guide |
Using the Services
Copy
System administrator credentials are required to set up this feature before you can use it. For details, refer to the System Administrator Guide at www.xerox.com/office/B1022_B1025docs
46Xerox® B1022 Multifunction Printer User Guide

Using the Services
Making a Copy
1.At the printer, load the original document on the document glass.
If the Scan To feature is grayed-out, contact your system administrator to enable the feature. For details, refer to the System Administrator Guide at www.xerox.com/office/B1022_B1025docs
• Place the first page of the document face down, in the top-left corner of the document glass.
•For multiple or single pages, you can use the optional document feeder to scan images. Remove any staples and paper clips from the pages, then place the pages face up in the document feeder.
2.Press the Copy button.
3.To enter the number of copies, use the alphanumeric keys on the printer control panel or the Up Arrow and Down Arrow buttons.
|
Xerox® B1022 Multifunction Printer |
47 |
|
User Guide |
Using the Services
4.Change the copy settings, as needed. For details, refer to Adjusting Copying Options
5.Press the green Start button.
To pause or cancel a copy job, at the printer control panel, press the red Stop button.
Adjusting Copying Options
Reducing or Enlarging the Image
The printer can reduce or enlarge an image in the range between 25% and 400% of the original image.
To reduce or enlarge an image:
1.At the printer control panel, press the Copy button.
2.Press the Menu button.
3.On the Copy Features tab, select the Reduce/Enlarge option.
4.Press the OK button.
5.Select an option:
•To reduce or enlarge an image, select any of the present values.
•To adjust a custom value, use the alphanumeric keys to enter the value.
6.To save the changes, press the OK button. The Saved window appears.
Selecting 1-Sided or 2-Sided Copying
The printer provides these copying options: 1-Sided, 2-Sided, or 2-Sided, Rotate Side 2. Either of the 2- Sided copying options initiates the copying of both sides of the document.
To select 2-sided copying:
1.At the printer control panel, press the Copy button.
2.Press the Menu button.
3.To highlight the 2-Sided Copy option, on the Copy Features screen, press the Down Arrow button.
4.To select the 2-Sided Copy option, press the OK button.
5.On the 2-Sided Copy screen, select the 1->2 Sided option.
6.Press the OK button.
|
7. To select Print Rotation, at the prompt, use the appropriate arrow button, then select Yes |
. |
8.To save the changes, press the OK button. The Saved window appears.
48Xerox® B1022 Multifunction Printer User Guide
Using the Services
Selecting a Paper Tray
To select a paper tray:
1.At the printer control panel, press the Copy button.
2.Press the Menu button.
3.To select the Copy Tray option, on the Copy Features screen, press the Down Arrow button.
|
4. |
Press OK |
. |
|
5. |
On the Copy Tray screen, select the appropriate tray. |
|
|
6. |
To save the changes, press OK |
. |
|
The Saved window appears. |
Lightening or Darkening the Image
When you copy a document, you can adjust the lightness or darkness contrast of the original image.
To lighten or darken an image:
1.At the printer control panel, press the Copy button.
2.Press the Menu button.
3.On the Copy Features screen, select the Lighten/Darken option.
5.To adjust the Lighten/Darken intensity:
•To lighten the copy, press the Up Arrow button.
•To darken the copy, press the Down Arrow button.
6.To save the changes, press the OK button. The Saved window appears.
Specifying the Original Document Type
The printer optimizes image quality of copies, based on the type of images in the original document, and how the original was created.
To specify the original document type:
1.At the printer control panel, press the Copy button.
2.Press the Menu button.
|
3. |
On the Copy Features screen, select Original Type |
. |
|
|
4. |
Press OK |
. |
5.On the Original Type screen, select the appropriate option.
•Text Use this setting for black and white: or colored text.
•Photo & Text Use this setting for the following:
•Documents with text and photos printed on the paper
•Photocopied documents that include text and photos
|
Xerox® B1022 Multifunction Printer |
49 |
|
User Guide |

Using the Services
• Documents that include photos and text on photographic paper
|
• Photo Use this setting for the following: |
: |
•Original photographs on photographic paper
•Photos printed on magazine paper
•Photocopied photos
6.To save the changes, press the OK button. The Saved window appears.
Setting Background Suppression
Adjust the background suppression for documents printed on thin paper or paper with text or images visible on the back of the paper. To reduce the sensitivity of the printer for variations in light background colors, select Auto Suppression or adjust the background suppression settings.
To set the background suppression:
1.At the printer control panel, press the Copy button.
2.Press the Menu button.
3.To select the Background Suppression option, on the Copy Features screen, press the Down Arrow button as many times as necessary.
4.Press the OK button.
5.To select a Background Suppression option, press the Down Arrow button as many times as necessary to access the option, then press the OK button.
|
Note: For details about each Background Suppression option, refer to Background |
||
|
Suppression Options |
. |
|
|
• |
OFF |
|
|
• |
Auto |
|
|
• |
Enhance Level 1 |
|
|
• |
Enhance Level 2 |
|
|
• |
Erase Level 1 |
|
|
• |
Erase Level 2 |
|
|
• |
Erase Level 3 |
|
|
• |
Erase Level 4 |
A Saved message appears with a check mark for the selected background suppression option.
6.To save the changes, press the OK button. The Saved window appears.
Background Suppression Options
|
Options |
Description |
|
OFF |
Indicates that the Background Suppression feature is not activated. When this |
|
feature is OFF, the printer adjusts the image quality according to the Enhance |
|
|
and Erase settings. |
|
|
Auto |
The printer examines a sample of the document that you are scanning |
|
automatically, then adjusts the image quality. This setting can produce a |
50Xerox® B1022 Multifunction Printer User Guide
Xerox b1022 сбой привода 09 260
В данной таблице предоставлены коды сброса ошибок популярных моделей аппаратов разных производителей. В левой колонке указана модель аппарата, в правой — метод сброса. Для большинства моделей данной фирмы вход в сервисный режим одинаков — удерживая «0» включить агрегат.
Другие способы входа в сервисный режим
| Xerox 5845, 5855 | Либо включить аппарат с одновременно нажатыми кнопками [Прерывание] и [2] либо на включенном аппарате нажать и удерживать эти кнопки более 2 сек. Если аппарат неисправен — вход осуществляется кнопками [Прерывание] и [5], с ограничением функций (последовательно появляющиеся сообщения о неисправностях сбрасываются двойным нажатием клавиши [Стоп]). Далее аппарат запрашивает четырёхзначный код доступа: это либо 8765 (по умолчанию), либо последние четыре цифры счётчика копий в обратном порядке (если счётчик копий показывает 01234567 — код входа 7654). |
| Xerox N17 24/32/40 3225/4025 |
Есть 3 диагностических режима: 1 — проверяются выключатели, датчики и выводятся параметры фьюзера; вход: (2+6), после «IOT?» нажать «7»; 2 — печатается тест-лист «сетка» в симплексе или дуплексе; вход: (2+6), после «IOT?» нажать «4»; 3 — меняются параметры и настройки принтера (NVRAM); вход: (2+6), после «IOT?» нажать (4+7), «7» сразу же отпустить; «4» держать до появления «3» на дисплее, затем отпустить. |
| XD102. 155 XE60. 84 XC800. 1255 |
stop – auto – stop – auto иногда записывают как C – Density select – C – Density select (что то же самое) |
| WC PE 16(e) | набираем на клавиатуре [menu] — [#] — [1934] — [menu]; после входа в сервисное меню появится надпись «TECH» |
Для выхода из режима дважды нажимаем кнопку «Сброс» или выключаем и снова включаем аппарат.
Возможные проблемы
- Нажать «Экспонирование» и включить питание с нажатой кнопой. Все индикаторы, кроме «Готов», загораются.
- Отпустить «Экспонирование», нажать её еще раз и держать до тех пор, пока не погаснут индикаторы «Тонер» и «Бумага» (10 сек).
- Отпустить кнопу. Выключить питание, подождать 15-20 сек, включить снова
- Войти в режим диагностики (удерживая «Стоп/Сброс», включить питание; загорятся все индикаторы и на дисплее появится «8»; нажать «Кол-во копий»; индикаторы погаснут, на дисплее появится»0″).
- 4 раза нажать на «Кол-во копий»; на дисплее появится «4».
- Нажать «Пуск».
- Выключить-включить аппарат.
НИКОГДА не используйте никаких других диагностических кодов и процедур, потому что это может привести к непредсказуемым последствиям.
Имейте в виду, что сброс ошибки не гарантирует вас от всех остальных бед, поэтому при первой же возможности завезите копировальный аппарат в сервисную фирму, чтобы там удалили отработку, произвели необходимую чистку и регулировки.
Причины возникновения ошибки B1022
Возможные причины и советы по устранению неисправностей приведших к возникновению ошибки.
Возможные причины и советы по устранению неисправностей приведших к возникновению ошибки:
Причины возникновения:
Неисправный блок управления датчиком присутствия. Жгут проводов блока управления датчиком присутствия открыт или замкнут. Плохое электрическое соединение в цепи блока управления датчика присутствия. Блок датчика неисправности.
Рекомендации по устранению неполадок:
Блок управления датчиком присутствия подавляет срабатывание подушки безопасности пассажира, когда состояние пассажирского сиденья пустое или место детское и детское. И включает выключенную контрольную лампу, когда состояние пассажирского сиденья — детское сиденье и ребенок. В случае неисправности мигание контрольной лампы подушки безопасности SRS сообщает о неисправности водителю и встроенной системе самодиагностики. Этот блок управления датчиком присутствия классифицирует пассажира на сиденье пассажира и обнаруживает электрические неисправности в системе классификации пассажиров, а также передает информацию о неисправности в блок управления подушкой безопасности. Он встроен в коврик датчика сиденья и обнаруживает пассажиров с помощью блока управления системы классификации пассажиров (OCS), который классифицирует пассажиров.
DTC Ошибки работы кузовных систем B1022
На нашем ресурсе имеется возможность задавать вопросы и делиться собственным опытом по устренению неисправностей связанных с ошибкой B1022. Задав вопрос в течении нескольких дней Вы сможете найти ответ на него.
Принимая во внимание тот факт, что OBD2 ошибки работы двигателя или других электронных систем автомобиля не всегда на прямую указывают на неработающий элемент, и то что разных марках и моделях автомобилей одна и таже ошибка может возникать как следствие неисправности абсолютно разных элементов электронной системы мы создали этот алгоритм помощи и обмена полезной информацией.
Мы надеемся, с Вашей помощью, сформировать причино-следственную связь возникновения той или иной OBD2 ошибки у конкретного автомобиля (марка и модель). Как показал опыт если рассматривать определенную марка-модель автомобиля, то в подавляющем большинстве случаев причина ошибки одна и таже.
Если ошибка указывает на неверные параметры (высокие или низкие значения) какого нибудь из датчиков или анализаторов, то вероятней всего этот элемент исправен, а проблему надо искать так сказать «выше по течению», в элементах работу которых анализирует датчик или зонд.
Если ошибка указывает на постоянно открытый или закрытый клапан, то тут надо подойти к решению вопроса с умом, а не менять бездумно этот элемент. Причин может быть несколько: клапан засорен, клапан заклинил, на клапан приходит неверный сигнал от других неисправных узлов.
Ошибки работы двигателя OBD2 и других систем автомобиля (ELM327) не всегда на прямую указывают на неработающий элемент. Сама по себе ошибка является косвенными данными о неисправности в системе, в некотором смысле подсказкой, и только в редких случаях прямым указанием на неисправный элемент, датчик или деталь. Ошибки (коды ошибок) полученные от прибора, сканера требуют правильной интерпретации информации, дабы не тратить время и деньги на замену работающих элементов автомобиля. Проблема зачастую кроется намного глубже чем кажется на первый взгляд. Это вызвано теми обстоятельствами, что информационные сообщения содержат, как было выше сказано, косвенную информацию о шарушении работы системы.
Вот пару общих примеров. Если ошибка указывает на неверные параметры (высокие или низкие значения) какого нибудь из датчиков или анализаторов, то вероятней всего этот элемент исправен, так как он анализирует (выдает некие параметры или значения), а проблему надо искать так сказать «выше по течению», в элементах работу которых анализирует датчик или зонд.
Если ошибка указывает на постоянно открытый или закрытый клапан, то тут надо подойти к решению вопроса с умом, а не менять бездумно этот элемент. Причин может быть несколько: клапан засорен, клапан заклинил, на клапан приходит неверный сигнал от других неисправных узлов.
Еще один момент который хотелось бы отметить — это специфика той или иной марки и модели. Поэтому узнав ошибку работы двигателя или дрогой системы Вашего автомобиля не спешите делать поспешных решений, а подойдите к вопросу комплексно.
Наш форум создан для всех пользователей, от простых автолюбителей до профессиональных автоэлектриков. По капле от каждого и всем будет полезно.
Устранение неисправностей принтера Xerox B1022
Принтер не включается
Вилка шнура питания ненадежно вставлена в розетку.
Убедитесь, что принтер выключен, и надежно вставьте вилку шнура питания в розетку.
Неисправна розетка, к которой подключен принтер.
• Подключите к розетке другой электроприбор и посмотрите, будет ли он работать. • Попробуйте другую розетку.
Принтер подключен к розетке сети, напряжение или частота тока в которой не соответствуют техническим характеристикам аппарата.
Используйте источник питания, соответствующий требованиям для принтера.
Вставьте вилку трехжильного шнура с заземляющим контактом напрямую в заземленную розетку сети переменного тока.
Принтер часто перезагружается или отключается
Вилка шнура питания неправильно вставлена в розетку.
Выключите принтер. Перед включением принтера убедитесь, что шнур питания правильно вставлен в принтер и в розетку.
Произошла системная ошибка.
Выключите и снова включите принтер. Если ошибка не устранится, обратитесь в представительство Xerox.
Принтер подключен к источнику бесперебойного питания.
Выключите принтер и вставьте вилку шнура питания в подходящую розетку.
Принтер подключен к разветвителю питания вместе с другими электроприборами большой мощности.
Подключите принтер к розетке напрямую или через разветвитель, к которому не подключены другие электроприборы большой мощности.
Документ печатается не из указанного лотка
В приложении и драйвере печати заданы разные лотки.
1 Проверьте выбранный лоток в интерфейсе драйвера принтера. 2 В приложении, из которого выполняется печать, перейдите к настройкам страницы или параметрам принтера. 3 Укажите источник бумаги, соответствующий лотку, который выбран в интерфейсе драйвера принтера, или установите настройку Автовыбор.
Проблемы при автоматической двусторонней печати
Неподдерживаемая или неподходящая бумага.
Убедитесь, что формат и плотность используемой бумаги подходят для двусторонней печати. Не выполняйте двустороннюю печать на конвертах и наклейках.
В интерфейсе драйвера принтера выберите Настройки принтера > Печать на обеих сторонах.
Примечание. Эта настройка зависит от приложения, из которого выполняется печать.
Лоток для бумаги не закрывается
Лоток блокируется какой-то помехой.
Печать занимает слишком много времени
На принтере установлен медленный режим печати. Например, может быть установлена настройка печати на плотной бумаге.
Печать на специальной бумаге некоторых типов занимает больше времени. Убедитесь, что в интерфейсе драйвера и на панели управления принтера правильно указан тип бумаги.
Принтер находится в режиме энергосбережения.
При выходе из режима энергосбережения может происходить задержка начала печати.
Вариант установки принтера в сети.
Возможно, спулер печати или компьютер, использующий принтер, помещает в буфер все работы печати, а затем передает очередь на принтер. Буферизация может снижать скорость печати. Для проверки скорости печати распечатайте информационные страницы, например демонстрационную страницу офисной печати. Если страница распечатается с номинальной скоростью, причиной может быть неисправность сети или принтера. Обратитесь за помощью к системному администратору.
Дождитесь завершения печати работы.
В интерфейсе драйвера для печати установлен режим «Повышенное качество».
Установите для режима качества печати настройку Стандартный.
Работа не печатается
Вероятные причины Решения
• Для сброса ошибки выключите принтер и снова включите его. • Если ошибка не устранится, обратитесь в представительство Xerox.
В картридже закончился тонер.
Вилка шнура питания ненадежно вставлена в розетку.
Выключите принтер и убедитесь, что шнур питания правильно подключен к принтеру и к розетке. Включите принтер.
• Причиной может быть проблема с предыдущей работой печати. На компьютере удалите все работы в очереди печати с помощью функции «Свойства принтера». • Вложите бумагу в лоток. • На панели управления принтера нажмите кнопку Статус работы. Если работа печати не будет отображаться в списке Активные работы или Выполненные, проверьте Ethernet-подключение принтера к компьютеру. Выключите и снова включите принтер. • На панели управления принтера нажмите кнопку Статус работы. Если работа печати не будет отображаться в списке Активные работы или Выполненные, проверьте USB-подключение принтера к компьютеру. Выключите и снова включите принтер.
Кабель принтера не подключен.
• На панели управления принтера нажмите кнопку Статус работы. Если работа печати не будет отображаться в списке Активные работы или Выполненные, проверьте Ethernet-подключение принтера к компьютеру. Выключите и снова включите принтер. • На панели управления принтера нажмите кнопку Статус работы. Если работа печати не будет отображаться в списке Активные работы или Выполненные, проверьте USB-подключение принтера к компьютеру. Выключите и снова включите принтер.
Посторонний шум в принтере
Внутри принтера имеется помеха.
1 Выключите принтер. 2 Удалите помеху.
Если удалить помеху не получится, обратитесь в региональное представительство.
Конденсация внутри принтера
Конденсация влаги внутри принтера может появляться, когда влажность воздуха превышает 85 % или холодный принтер находится в теплом помещении. Кроме того, конденсация может образовываться, когда принтер находится в холодном помещении, которое начинает быстро прогреваться.
Принтер находился в холодном помещении.
• Перед началом работы дайте принтеру постоять в течение нескольких часов, чтобы адаптироваться к условиям.
• Дайте принтеру поработать несколько часов при комнатной температуре.
В помещении слишком высока относительная влажность.
• Необходимо снизить влажность в помещении. • Установите принтер в таком месте, где температура и относительная влажность соответствуют техническим условиям эксплуатации.
Сообщения о состоянии тонер-картриджа
Когда срок службы подходит к концу, на панели управления выводится сообщение «Мало тонера». Когда опустошается, печать прекращается и на панели управления выводится соответствующее сообщение.
К каждому прилагается инструкция по установке.
Сообщение о состоянии принтера
Статус «Мало тонера». Убедитесь в наличии нового.
Заканчивается тонер. Заказать новый.
В картридже закончился тонер. Откройте переднюю крышку и замените.
Сообщения о состоянии принт-картриджа
Когда срок службы подходит к концу, на панели управления выводится соответствующее сообщение. Когда срок службы заканчивается, отображается соответствующее сообщение, но печать остается доступной.
К каждому прилагается инструкция по установке.
Сообщение о состоянии принтера
Заканчивается срок службы. Убедитесь в наличии нового.
Заканчивается срок службы. Закажите новый.
Принт-картридж изношен. Замените.
Необходимо заменить. Откройте переднюю и боковую крышки и замените.
Предотвращение застревания бумаги
При использовании бумаги поддерживаемых Xerox типов застревание происходит довольно редко. При использовании других типов бумаги застревание может происходить значительно чаще. Если предназначенная для принтера бумага часто застревает на каком-то участке тракта подачи, очистите этот участок.
Следующие факторы могут приводить к застреванию бумаги:
• выбор неверного типа бумаги в драйвере печати,
• использование поврежденной бумаги,
• использование неподдерживаемой бумаги,
• неправильная загрузка бумаги,
• неверная регулировка направляющих бумаги.
В большинстве случаев застревания можно избежать, соблюдая следующие правила:
• Используйте бумагу, предназначенную для принтера.
• соблюдайте правила хранения и загрузки бумаги;
• всегда используйте чистую неповрежденную бумагу (куда продать в Новосибирске, у кого скупка Новосибирск, url смотрим, скупка hp, epson, xerox Новосибирск дорого, продать в Новосибирске по рыночной цене, скупка к принтерам, покупка просроченных, с просроченными датами);
• избегайте использования скрученной, порванной, влажной, мятой бумаги или бумаги со сгибами;
• распустите листы бумаги перед загрузкой в лоток, чтобы разделить их;
• соблюдайте уровень заполнения лотка — не переполняйте лоток;
• вложив бумагу в лоток, установите направляющие в лотке по размеру бумаги; Неправильная установка направляющих может повлечь за собой ухудшение качества печати, неправильную подачу, перекос отпечатков и повреждение принтера;
• вложив бумагу в лоток, правильно выберите ее тип и формат на панели управления,
• выберите правильный тип и формат бумаги для работы печати в интерфейсе драйвера принтера;
• храните бумагу в сухом месте;
• используйте только бумагу Xerox, предназначенную для данного принтера. Недопустимо следующее:
• использование бумаги с полиэфирным покрытием, предназначенной для струйной печати;
• использования мятой, скрученной бумаги или бумаги со сгибами;
• одновременной загрузки в лоток бумаги разных типов, форматов и плотности;
• переполнения выходного лотка;
Нахождение застрявшей бумаги
Во избежание травм не касайтесь зоны с наклейками на нагревательном валу и вблизи него во фьюзере. Если лист бумаги намотается на нагревательный вал, не пытайтесь тотчас же его извлечь. Выключите принтер и подождите 30 минут, пока остынет фьюзер. После охлаждения принтера извлеките застрявшую бумагу. Если ошибка не устранится, обратитесь в представительство Xerox.
При извлечении застрявшей бумаги не пользуйтесь подручными средствами и инструментами. Применение подручных средств и инструментов может существенно повредить принтер.
Ниже указаны места, где может застревать бумага.

3. Участок тонер- и принт-картриджей
4. Верхняя крышка опционального податчика оригиналов
5. Входной лоток опционального податчика оригиналов
6. Внутренняя крышка податчика оригиналов
9. Боковая крышка опционального лотка 2
Извлечение застрявшей бумаги из опционального податчика оригиналов
1. Уберите документы из опционального податчика оригиналов.
2. Откройте верхнюю крышку опционального податчика оригиналов.

3. Если бумага застрянет на выходе из опционального податчика оригиналов, аккуратно вытяните ее на себя.

4. Если бумага не застрянет на входе опционального податчика оригиналов, аккуратно вытяните ее вверх.

5. Если застрявшую бумагу не будет видно, выполните следующее.
а. Откройте верхнюю крышку и поднимите входной лоток податчика оригиналов.

Ь. Аккуратно вытяните застрявшую бумагу на себя.

с. Опустите лоток податчика.

6. Закройте верхнюю крышку податчика оригиналов.

7. Чтобы извлечь застрявшую бумагу из-под внутренней крышки опционального податчика оригиналов, выполните следующее.
а. Поднимите опциональный податчик оригиналов.

b. Аккуратно извлеките застрявшую бумагу.

с. Закройте опциональный податчик оригиналов.

8. Заново вложите оригиналы во входной лоток податчика и установите направляющие по краям листов бумаги.
Извлечение застрявшей бумаги из лотка 1
Чтобы сбросить сообщение об ошибке на панели управления, необходимо извлечь застрявшую бумагу из тракта подачи.
Если не получится извлечь застрявшую бумагу с помощью этой процедуры.
1. Прижмите защелку и откройте боковую крышку принтера.

2. Для извлечения застрявшей бумаги из боковой части принтера вытяните ее на себя.
3. Для извлечения оставшейся застрявшей бумаги из лотка 1 выдвиньте этот лоток до упора.

4. Для извлечения застрявшей бумаги из лотка 1 аккуратно вытяните ее на себя.

5. Чтобы закрыть лоток, задвиньте его в принтер.

6. Если на панели управления появится запрос, подтвердите формат, тип и цвет бумаги на экране Параметры бумаги.
7. Подтвердите формат, тип и цвет и цвет и нажмите кнопку ОК.
Извлечение застрявшей бумаги из опционального лотка 2
Чтобы сбросить сообщение об ошибке на панели управления, необходимо извлечь застрявшую бумагу из тракта подачи.
Если застрявшая бумага не будет выниматься или ее не будет на участке опционального лотка 2.
1. Прижмите защелку и откройте боковую крышку принтера.

2. Для извлечения застрявшей бумаги из боковой части принтера вытяните ее на себя.
3. Для извлечения застрявшей бумаги из опционального лотка 2 выдвиньте этот лоток до упора.

4. Для извлечения застрявшей бумаги из опционального лотка 2 аккуратно поднимите бумагу и вытяните ее на себя.

5. Если застрявшая бумага не будет выниматься или ее не будет на участке опционального лотка 2, выполните следующее.

b. Для извлечения застрявшей бумаги аккуратно вытяните ее вверх.


6. Задвиньте опциональный лоток 2.

7. Для извлечения застрявшей бумаги из-под боковой крышки опционального лотка 2 выполните следующее:
a. Потяните за рычажок боковой крышки лотка 2, чтобы открыть крышку.
b. Для извлечения застрявшей бумаги аккуратно вытяните ее на себя.
8. Если на панели управления появится запрос, подтвердите формат, тип и цвет бумаги на экране «Параметры бумаги»
9. Подтвердите формат, тип и цвет и цвет и нажмите кнопку ОК.
Извлечение застрявшей бумаги из обходного лотка
1. Для извлечения застрявшей бумаги вытяните ее на себя.

2. Если бумага будет рваной, проверьте, не осталось ли обрывков внутри принтера, и аккуратно извлеките их. Если обрывки бумаги не будут извлекаться, обратитесь в представительство.
3. Перед вкладываем бумаги в обходной лоток распустите листы веером, чтобы выровнять их по углам.
4. Если на панели управления появится запрос, подтвердите формат, тип и цвет бумаги на экране «Параметры бумаги»
5. Подтвердите формат, тип и цвет и цвет и нажмите кнопку ОК.
Извлечение застрявшей бумаги из выходного лотка
1. Извлеките застрявшую бумагу на участке выходного лотка, аккуратно вытянув ее на себя.

2. Если бумага будет рваться или не будет выниматься, см. раздел Извлечение застрявшей бумаги из принтера.
3. При необходимости для возобновления печати выполните остальные указания, отображаемые на панели управления принтера.
Извлечение застрявшей бумаги на участке двусторонней печати
1. Прижмите защелку и откройте боковую крышку принтера.

2. Для извлечения застрявшей бумаги аккуратно вытяните ее вверх.

3. Если бумага застрянет на ролике, аккуратно приподнимите ролик и вытяните бумагу на себя.

4. После извлечения застрявшей бумаги закройте боковую крышку.

5. Если на панели управления появится запрос, подтвердите формат, тип и цвет бумаги на экране Параметры бумаги.
6. Подтвердите формат, тип и цвет и цвет и нажмите кнопку ОК.
Извлечение застрявшей бумаги из принтера
Если не получится извлечь застрявшую бумагу из принтера с помощью этой процедуры, обратитесь в представительство Xerox.
1. Прижмите защелку и откройте боковую крышку принтера.

2. Найдите застрявшую бумагу.
а. Если вы обнаружите застрявшую бумагу, аккуратно вытяните ее на себя.

b. Если бумага застрянет возле принт-картриджа, потяните ее сначала вниз, затем на себя.

с. Если бумага застрянет на верхнем ролике, потяните вниз затвор фьюзера и вытяните бумагу на себя.

d Если бумага застрянет на ролике переноса, аккуратно приподнимите ролик и вытяните бумагу на себя.

е. Если не получится вытянуть застрявшую бумагу на себя, аккуратно потяните ее вверх.

Если и после этого не получится вытянуть застрявшую бумагу, обратитесь в сервисное представительство Xerox.
3. После извлечения застрявшей бумаги закройте боковую крышку.

4. Если на панели управления появится запрос, подтвердите формат, тип и цвет бумаги на экране Параметры бумаги.
5. Подтвердите формат, тип и цвет и цвет и нажмите кнопку ОК.
Устранение застревания бумаги
Одновременная подача нескольких листов
В лоток загружено слишком много бумаги.
Уберите часть бумаги. Не вкладывайте бумагу выше линии максимального заполнения лотка.
Кромки бумаги не выровнены.
Извлеките бумагу, выровняйте кромки листов и снова вложите бумагу в лоток.
Бумага отсырела из-за повышенной влажности.
Извлеките бумагу из лотка и замените ее новой пачкой сухой бумаги.
Накопился большой заряд статического электричества.
Вложите в принтер новую бумагу.
Данная бумага не предназначена для принтера.
Используйте только бумагу, рекомендованную компанией Xerox.
Неправильная подача бумаги
Бумага неправильно расположена в лотке.
• Извлеките некорректно поданную бумагу и правильно вложите ее в лоток. • Установите направляющие в лотке так, чтобы они соответствовали формату бумаги.
В лотке слишком много бумаги.
Уберите часть бумаги. Не вкладывайте бумагу выше линии максимального заполнения лотка.
Направляющие в лотке не отрегулированы по размеру бумаги.
Установите направляющие в лотке так, чтобы они соответствовали формату бумаги.
В лотке рваная или мятая бумага.
Извлеките бумагу, разгладьте ее и снова вложите в лоток. Если бумага будет подаваться неправильно, не используйте ее.
Бумага отсырела из-за повышенной влажности.
Удалите отсыревшую бумагу и замените ее сухой.
Бумага несоответствующего формата, плотности или типа.
Используйте только бумагу, рекомендованную компанией Xerox.
Не исчезает сообщение о застревании бумаги
Часть застрявшей бумаги осталась в принтере.
Проверьте тракт бумаги. Убедитесь, что внутри не осталось застрявшей бумаги.
Открыта одна из крышек принтера.
Проверьте крышки принтера. Закройте все открытые крышки.
Застревание при автоматической двусторонней печати
Бумага несоответствующего формата, плотности или типа.
• Используйте только бумагу, рекомендованную компанией Xerox. • Не применяйте для автоматической двусторонней печати использованную, поврежденную бумагу и бумагу плотностью выше 140 г/м2.
Бумага вложена в неподходящий лоток.
Вложите бумагу в подходящий лоток.
В лоток вложена бумага разных типов.
В лоток следует вкладывать бумагу одинакового типа и формата.
Контроль качества печати
На качество отпечатков могут влиять различные факторы. Чтобы обеспечить стабильное и оптимальное качество печати, необходимо использовать бумагу, предназначенную для данного принтера, а также правильно указывать тип бумаги. Для обеспечения оптимального качества печати следуйте указаниям, приведенным в этом разделе.
Качество отпечатков зависит от температуры и влажности. Оптимальное качество печати обеспечивается при температуре 10-30° С (50-86° F) и влажности воздуха 20-80%.
Устранение проблем с качеством печати
В случае низкого качества печати выберите в следующей таблице наиболее похожий признак дефекта и воспользуйтесь соответствующим решением для его устранения. Чтобы точнее определить проблему с качеством печати, можно распечатать демонстрационную страницу.
Если после выполнения соответствующих действий качество печати не улучшится, обратитесь в представительство.
Когда тонер заканчиваются, для сохранения качества печати на панели управления выводится предупреждение. Когда тонера не остается, принтер перестает печатать и выводится предупреждение с указанием заменить данный. Печать становится недоступной, пока не будет установлен новый.
Изображение слишком светлое
Уровень тонера можно проверить на панели управления, в интерфейсе драйвера принтера или в приложении XeroxCentreWare Internet Services. Если в тонер-картридж будет почти пуст, заменить его.
Убедитесь, что данный тонер-картридж предназначен для принтера, и при необходимости замените его. Для достижения наилучших результатов используйте фирменные тонер-картриджи Xerox.
Убедитесь, что для режима качества печати не установлено значение «Экономия тонера». Режим экономии тонера предназначен для черновой печати.
Замените бумагу на бумагу рекомендуемого типа и формата и убедитесь, что настройки материала на принтере и в интерфейсе драйвера правильные. Убедитесь, что бумага сухая и поддерживается принтером. При необходимости замените бумагу. Измените настройки в разделе Тип бумаги в интерфейсе драйвера принтера. В окне драйвера откройте меню Параметры печати, перейдите на вкладку Бумага/ Вывод и измените настройку Тип бумаги. При размещении принтера на значительной высоте над уровнем моря установите настройку высоты.
Тонер смазывается или стирается на отпечатках
Пятна на обратной стороне отпечатков.
В интерфейсе драйвера принтера измените настройки в разделе Тип бумаги. В окне драйвера откройте меню Параметры печати, перейдите на вкладку Бумага/ Вывод и измените настройку Тип бумаги. Например, вместо типа Обычная выберите вариант Тонкая картотечная.
Проверьте настройки формата, типа и плотности бумаги. При необходимости измените настройки бумаги. Убедитесь, что принтер подключен к розетке сети с правильными параметрами электропитания. При необходимости проверьте электротехнические характеристики вместе со специалистом. Подробные сведения приведены в разделе Электропитание.
Произвольно расположенные пятна на отпечатках или размытое изображение.
Убедитесь, что установлен правильно.
Убедитесь, что данный предназначен для принтера, и при необходимости замените его. Для достижения наилучших результатов используйте фирменные.
Установите для настройки типа бумаги значение «Плотная» или «Карточки» или попробуйте бумагу с более гладкой поверхностью.
Убедитесь, что влажность в помещении соответствует требованиям.
Выключите и снова включите принтер.
Если ошибка не устранится, обратитесь в представительство.

Закажите новый. При замене следуйте инструкции, прилагаемой к новому.
Проверьте настройки формата, типа и плотности бумаги. При необходимости измените настройки бумаги. Убедитесь, что влажность соответствует предъявляемым требованиям.
Постороннее изображение на отпечатке.
Проверьте настройки формата, типа и плотности бумаги. При необходимости измените настройки бумаги. Измените настройки в разделе Тип бумаги в интерфейсе драйвера принтера. В окне драйвера откройте меню Параметры печати, перейдите на вкладку Бумага/ Вывод и измените настройку Тип бумаги.

Закажите новый. При замене следуйте инструкции, прилагаемой к новому.
Диагональные полосы на отпечатке.

Уровень тонера можно проверить на панели управления, в интерфейсе драйвера принтера или в приложении XeroxCentreWare Internet Services. Если будет почти пуст, заменить его.
Убедитесь, что данный предназначен для принтера, и при необходимости замените его. Для достижения наилучших результатов используйте фирменные.
При замене следуйте инструкции, прилагаемой к новому.
Сминание или загрязнение отпечатка.

Убедитесь, что для печати используется бумага подходящего формата, типа и плотности и она правильно вложена в лоток. При необходимости замените бумагу. Вложите в принтер новую пачку бумаги. Измените настройки в разделе Тип бумаги в интерфейсе драйвера принтера. В окне драйвера откройте меню Параметры печати, перейдите на вкладку Бумага/ Вывод и измените настройку Тип бумаги.
Неправильное верхнее поле.
Проверьте, правильно ли вложена бумага. Проверьте правильность установки полей в используемом приложении. Убедитесь, что на панели управления принтера в разделе «Параметры бумаги» правильно указана ориентация бумаги.
Проблемы при копировании и сканировании
Линии или полосы появляются только на копиях, выполненных из податчика оригиналов.
Загрязнение стекла экспонирования. При сканировании бумага из податчика оригиналов проходит по загрязненному участку, что приводит к появлению линий или полос. Протрите все стеклянные поверхности безворсовой тканью.
Пятна появляются на копиях, сделанных со стекла экспонирования.
Загрязнение стекла экспонирования. При сканировании из-за загрязнения на изображении появляются пятна. Протрите все стеклянные поверхности безворсовой тканью.
Проявление обратной стороны оригинала на копии или изображении сканирования.
Изображение слишком светлое или слишком темное.
Для осветления или затемнения изображения в разделе сканирования или копирования перейдите на вкладку «Светлее/Темнее».
Сообщения на панели управления
На панели управления принтера выводится информация и указания по устранению неисправностей. Если возникает состояние неисправности или предупреждения, на панели управления отображается соответствующее сообщение. Для многих сообщений о состоянии и предупреждений на панели управления предусмотрены дополнительные сведения.
Просмотр предупреждений на панели управления
Если возникает состояние предупреждения, на панели управления отображается соответствующее сообщение. Таким образом пользователи узнают о состояниях принтера, требующих их вмешательства, таких как малый остаток расходных материалов и открытые крышки. При возникновении нескольких таких состояний на панели управления отображается только одно сообщение.
Просмотр сообщений об ошибках и предупреждений
Если возникает ошибка, на панели управления отображается соответствующее сообщение. Сообщения об ошибках оповещают о состояниях принтера, препятствующих печати или ухудшающих ее качество. При возникновении нескольких ошибок на панели управления отображается только одно сообщение.
Отчет об ошибках доступен на панели управления в техническом режиме.
Проверка статуса работы с панели управления
Для просмотра списка активных и выполненных работ:
1. На панели управления нажмите кнопку Статус работы.
2. Для просмотра списка активных работ нажмите кнопку ОК.
3. Для просмотра списка выполненных работ нажмите кнопку стрелка вниз, затем ОК.
Использование встроенных средств устранения неисправностей
В принтере предусмотрен набор отчетов для печати. При устранении некоторых проблем могут помочь два таких отчета — демонстрационная страница и отчет сообщений об ошибках. На демонстрационной странице печатается изображение для проверки качества печати. В отчете сообщений об ошибках содержатся сведения о последних ошибках принтера.
Установка прав доступа к отчету о конфигурации и информационным страницам
Для изменения прав доступа пользователей в одном из следующих вариантов обратитесь к системному администратору.
• Запрет автоматической печати отчета о конфигурации при включении питания принтера.
• Ограничение прав доступа отдельных или всех пользователей, чтобы они не могли печатать информационные страницы и отчет о конфигурации.
• Изменение прав доступа отдельных или всех пользователей, чтобы они могли печатать информационные страницы и отчет о конфигурации.
Доступ к информационным страницам и их печать
Доступ к информационным страницам для принтера:
1. На панели управления принтера нажмите кнопку Статус аппарата.
2. Для выбора раздела Информац. страницы нажмите кнопку стрелка вниз.
4. Выберите информационную страницу для печати с помощью кнопик кнопки стрелка вниз.
Как обнулить чип на картридже? Статья
Чипы для картриджей представляют собой микросхемы, на которых содержится информация о картридже: дата изготовления, серийный номер, тип, счетчик отпечатков. Основная функция чипа – это контроль за остатком тонера.
По мере окончания ресурса картриджа информация об этом поступает в чип. Устройство подает пользователю предупреждающий сигнал. Как правило, предупреждение появляется, когда картридж израсходован на 85-90%. Это связано с тем, что чип отсчитывает именно количество отпечатанных страниц. По факту же далеко не все распечатанные листы заполнены на 100%. Поэтому после появления сигнала в картридже еще имеется тонер. В зависимости от компании-изготовителя и модели принтера, аппарат продолжает работать или сразу перестает.
Если вы владелец лазерного принтера/МФУ Canon или HP, то предупреждение не влияет на работу устройства и можно пренебречь сигналом и продолжать пользоваться печатающим устройством. Когда принтер перестает печатать, картридж просто заправляется снова без замены чипа.
В случае если принтер сообщил об окончании тонера и перестал печатать, то существует 3 пути решения проблемы:
ВАЖНО: Следует помнить, что при блокировке работы принтера после заправки работа не возобновиться.
Перепрограммирование чипа
Обнулить чип – это значит задать ему новые параметры. В такой ситуации в программное обеспечение принтера не вносятся изменения и он продолжает оставаться «на гарантии».
Способы обнуления
Одним из самых популярных способов является заклеивание контактов. Данный метод является безопасным. С помощью его Вы не повредите принтер и не потеряете гарантию. Он заключается в последовательной блокировке контактов.
В зависимости от модели принтера заклейте нужный контакт. Расположение контактов может отличаться в зависимости от модели принтера, но принцип действий аналогичный для всех. Если нижеуказанная последовательность контактов не подошла, придется воспользоваться ручным методом подбора:
- Вырезаем из скотча маленький квадратик, по размерам сопоставимый с размерами контакта и заклеиваем его.
- Вставляем картридж в принтер и делаем тестовую печать.
- Еще один квадратик из скотча наклеиваем на второй контакт и вновь вставляем картридж, проводим тестовую печать.
- После этого надо заклеить сразу два контакта, как показано на фото. Аналогично предыдущим этапам делаем тест и извлекаем картридж.
- Удалите скотч с контактов и протрите и безворсовой салфеткой. При необходимости протрите контакты спиртом.
Такое перепрограммирование придется делать после каждой заправки.
Обнуление картриджей при помощи программатора
Картриджи можно обнулить при помощи программатора. Данный девайс можно найти во многих интернет-магазинах, на момент написания статьи стоимость в пределах 1000 рублей. При покупке главное обратить внимание на то, чтобы устройство подходило для Вашей модели принтера.
Принцип действия:
- вставляем картридж в программатор, так чтобы чип лег на контакты;
- дожидаемся момента пока не загорится лампочка;
- сброс проведен успешно, извлекаем обнуленный картридж и вставляем его в принтер.
Как обнулить картридж Epson?
- после того, как принтер показал, что картридж «пустой», достаем его из устройства.
- берем проволоку и поочередно замыкаем обе пары контактов на чипе.
- после таких манипуляций принтер должен показать, что картридж заполнен на 100%.
Как обнулить картридж Canon?
В некоторых картриджах Canon чипы отсутствуют. Зато есть площадка с контактами, которые распознаются печатающим устройством и принтер получает информацию о чернильнице и её ресурсе.
В такой ситуации есть 2 пути решения проблемы:
Первый способ
Иметь 2 комплекта картриджей и пользоваться ими по очереди. При попеременном использовании информация в принтере сбрасывается каждый раз автоматически. Недостатком данного способа является то, что сопла в струйных картриджах быстро засыхают и при редком использовании приходят в негодность.
Второй способ
- Заклеиваем верхний ряд контактов и вставляем его в принтер.
- После установки должна появиться надпись о том, что картридж не установлен;
- Достаем картридж, заклеиваем второй ряд контактов и вновь устанавливаем картридж;
- Ошибка о том, что картриджа нет в устройстве повторяется.
- Извлекаем картридж, убираем весь скотч и в третий раз вставляем чернильницу в принтер. Если все сделано правильно, то картридж теперь должен определить картридж полным.
Замена чипа
Большинство производителей оргтехники не заинтересованы в многократном использовании картриджей. Поэтому «перепрошить» чип не всегда возможно, в этом случае остается только поменять его на новый. Чип меняется на новый при каждой заправке, стоимость микросхемы невысока.
«Перепрошивка» принтера
Если принтер недавно появился в продаже, то чипы для него могут быть еще не разработаны. В такой ситуации остается только «перепрошить само устройство. «Плюсом» в таком случае является то, то процедура единоразовая.
Но есть и существенные недостатки:
- изменение прошивки влечет невозможность дальнейшего гарантийного ремонта у производителя;
- относительно высокая стоимость данной услуги.
Вывод
Подведя итог, можно сказать, что обнуление чипа картриджа или замена картриджа значительно сокращает регулярные расходы на печать. Справиться с ошибкой картриджа после заправки легко в домашних условиях, не прибегая к помощи специалистов. Главное не повредить контакты в процессе манипуляций.
Как обнулить картридж: Инструкция для всех принтеров
Большая часть доходов производителей печатной техники приходится на продажу расходных материалов.
Но, в последнее время, для струйных принтеров процент продаж картриджей сильно упал.
Это происходит не из-за снижения популярности печатающих устройств (напротив, они все еще очень популярны и востребованы).
Большинство пользователей приспособились к картриджам самообслуживания. Поэтому для оснащения картриджей принтеров был разработан так называемый «чип».
Почти вся офисная техника на рынке, начиная с 2003 года, имеют электронный чип.
Для чего нужен чип
Принцип работы чипа довольно прост. Он читает количество напечатанных страниц.
Если их число равно максимальному показателю, который хранится в микросхеме, он выдаст предупреждение о необходимости замены картриджа.
Даже при условии остатка краски в картридже.
Если он на самом деле пуст, печать будет заблокирована даже после ее добавления. Чтобы снова распечатать страницы, необходимо обнулить чип картриджа.
Размещение чипа в картридже
Способ 1: ручное отключение
Для чипов в сегменте печатной техники HP и Canon актуально отключение индикатора слежения за уровнем краски.
Когда устройство выдаст сигнал о том, что картридж пуст и заблокирует печать — нажмите и удерживайте кнопку «Отмена» («Stop/Reset») в течение пяти-семи секунд, пока ошибка не исчезнет.
Систему слежения после будет отключена. Произведите данный шаг для картриджа каждого цвета.
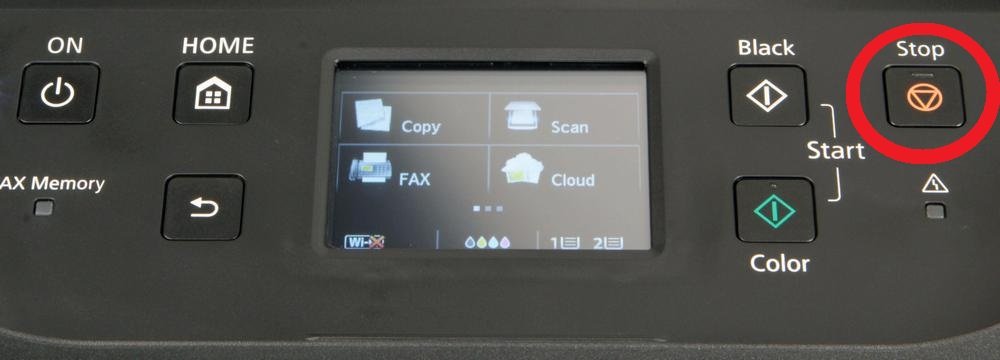
Панель управления Canon
На этом этапе принтер должен вернуться к нормальной работе.
Но если этого не произойдет, на панели задач монитора в нижней части экрана должно появиться новое сообщение:
«Чернильный картридж установлен или заменен. Если распечатка содержит смещенную линию или неудовлетворительная после установки или замены, обратитесь к руководству пользователя и выполните выравнивание печатающей головки».
Нажмите «ОК» , и все готово!
Способ 2: использование программатора
Первым делом нужно купить программатор — устройство, которое используется для сброса чипа картриджа. Конечно, это затраты.
Но лучше приобрести его один раз, чем постоянно покупать новые картриджи.
Купите лучший, который подходит вашей модели оборудования (epson, brother, samsung, canon).
Если не можете найти тот, который нужен, приобретите универсальный программатор.
Их можно найти в компьютерных магазинах, в центрах обслуживания, в специальных сервисных центрах.
Программатор можно сделать самому, однако имейте в виду, что сборка — это длительный процесс, требующий специальных навыков.

Программатор
Прочитайте инструкцию после покупки перед сбросом чипа.
Хотя каждая модель принтера имеет свою собственную функцию обнуления, но в основном процесс похож для всех моделей.
Инструкция
- Извлеките пустой чернильный картридж из принтера:
Изменение цвета индикатора означает, что чип был успешно сброшен. Затем вставьте картридж в принтер и проверьте его работу. Для этого распечатайте страницу.
Способ 3: замена чипа
Замена на чип ARC. Аббревиатура ARC относится к «Auto Reset Chip». Эти микросхемы обычно зеленого цвета и производятся в Китае:
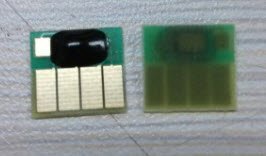
Вид спереди и сзади BCH HP 564 Chip
Существует два вида «ARC». Одним из них является «ARC без уровня чернил».
Эти чипы заполнены случайными данными. Поскольку устройства не могут понять данные, но принтер получает указание на печать, можете заставить его работать, выключив монитор уровня чернил.
Плюсы к этому чипу в том, что это они новые. Для тех, кто не любит бывшие в употреблении или подержанные вещи, это может быть важно.
Минусы — частота ошибок чипа выше, чем у двух других решений. Вы можете обнаружить, что принтер не читает чип после установки. Но как только правильно произведете замену, он будет работать так же хорошо, как и оригинальный чип.
Другой чип «ARC» называется «ARC с уровнем чернил».
Является более сложным, чем упомянутый выше. Содержит копии всех данных устройства, помещенных производителем в новый чип.
Эти чипы сначала показывают полный уровень чернил, и по мере их использования они будут отражать точный уровень чернил, как обычный чип.
Плюсы в том, что он новый и показывает полный бак. Кроме того, он является более стабильным и безошибочным, чем «чип ARC без уровня чернил», благодаря предоставленным ему данным. Однако если ищете что-то экономически выгодное, этот вариант для вас.
Если после замены столкнулись с проблемой плохой индикации тонера или барабана, рекомендуется сначала проверить, правильно ли вставили, установили картридж с тонером или барабан в аппарат. Даже неправильный монтаж может вызвать ошибку.
Можете сначала попытаться выключить и снова включить устройство, а затем сбросить решение.
Тем не менее, лучше всего связаться с кем-то, кто уже сделал это, или обратиться к специалисту по обслуживанию.
Сброс в первую очередь предназначен для устранения сообщений об ошибках, когда аппарат не распознает замену тонера.
Если при печати видно плохое качество изображения, различные белые области или другие ошибки печати не помогут выполнить сброс.
В этом случае тонер пуст, и его необходимо заменить.
Обнуление картриджей HP
Тонер является неотъемлемым компонентом принтера. Когда в оборудовании HP заканчивается тонер, необходимо приобрести новый картридж, который может быть довольно дорогим.
Более дешевой альтернативой является заправка тонера в имеющемся картридже HP.
Однако проблема заключается в том, что техника по-прежнему распознает заправленный картридж как пустой, если только вы не сбросите должным образом.
Сброс картриджа с тонером — это простой процесс, который не должен занимать более тридцати минут вашего времени.
- Выключите устройство.
- Нажмите и удерживайте зеленую клавишу на принтере и включите принтер. Вы увидите, что огни на мгновение вспыхнут, а затем погаснут.Через несколько секунд загорится индикатор внимания, а затем индикатор готовности и зеленый индикатор. Продолжайте нажимать зеленую кнопку.
Обнуление картриджей Brother
Заправка картриджей Brother — это один из способов избежать дорогостоящей замены картриджей и сэкономить несколько рублей.
Однако при заправке картриджа принтера чип на боковой стороне картриджа все еще «сообщает» компьютеру о низком уровне чернил.
Это потому, что простая заправка картриджа с чернилами не возвращает чип к полной настройке.
Предупреждение о низком уровне чернил отменяется с помощью простой процедуры, которая занимает несколько минут вашего времени.
- Начните печать без сообщения об ошибке, изменив настройку чипа.
- Установите новый картридж, открыв каркас доступа и вставив картридж в устройство:
Если вы нашли ошибку, пожалуйста, выделите фрагмент текста и нажмите Ctrl+Enter.
-
Xerox B1022 Multifunction Printer V4
Версия:
5887.300.0.0
(02 июн 2022)
Файл *.inf:
x3univx.inf
Windows Vista x86, 7 x86, 8 x86, 8.1 x86, 10 x86
-
Xerox B1022 Multifunction Printer V4
Версия:
5887.300.0.0
(02 июн 2022)
Файл *.inf:
x3univx.inf
Windows Vista x64, 7 x64, 8 x64, 8.1 x64, 10 x64
В каталоге нет драйверов для Xerox B1022 Multifunction Printer V4 под Windows.
Скачайте DriverHub для автоматического подбора драйвера.
Драйверы для Xerox B1022 Multifunction Printer V4 собраны с официальных сайтов компаний-производителей и других проверенных источников.
Официальные пакеты драйверов помогут исправить ошибки и неполадки в работе Xerox B1022 Multifunction Printer V4 (принтеры).
Скачать последние версии драйверов на Xerox B1022 Multifunction Printer V4 для компьютеров и ноутбуков на Windows.