For anyone getting this exception while reading data from the stream, this may help. I was getting this exception when reading the HttpResponseMessage in a loop like this:
using (var remoteStream = await response.Content.ReadAsStreamAsync())
using (var content = File.Create(DownloadPath))
{
    var buffer = new byte[1024];
    int read;

    while ((read = await remoteStream.ReadAsync(buffer, 0, buffer.Length)) != 0)
    {
        await content.WriteAsync(buffer, 0, read);
        await content.FlushAsync();
    }
}
After some time I found out the culprit was the buffer size, which was too small and didn’t play well with my weak Azure instance. What helped was to change the code to:
using (Stream remoteStream = await response.Content.ReadAsStreamAsync())
using (FileStream content = File.Create(DownloadPath))
{
    await remoteStream.CopyToAsync(content);
}
CopyTo() method has a default buffer size of 81920. The bigger buffer sped up the process and the errors stopped immediately, most likely because the overall download speeds increased. But why would download speed matter in preventing this error?
It is possible that you get disconnected from the server because the download speeds drop below minimum threshold the server is configured to allow. For example, in case the application you are downloading the file from is hosted on IIS, it can be a problem with http.sys configuration:
«Http.sys is the http protocol stack that IIS uses to perform http communication with clients. It has a timer called MinBytesPerSecond that is responsible for killing a connection if its transfer rate drops below some kb/sec threshold. By default, that threshold is set to 240 kb/sec.»
The issue is described in this old blogpost from TFS development team and concerns IIS specifically, but may point you in a right direction. It also mentions an old bug related to this http.sys attribute: link
In case you are using Azure app services and increasing the buffer size does not eliminate the problem, try to scale up your machine as well. You will be allocated more resources including connection bandwidth.
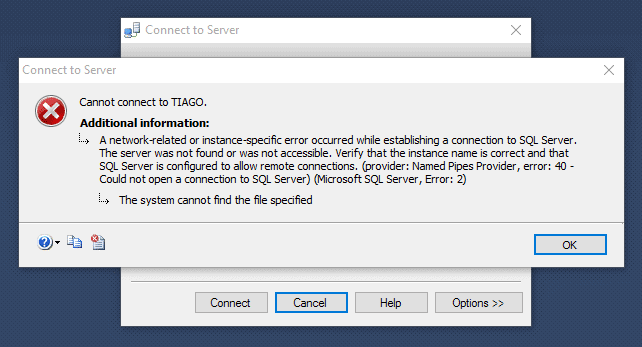
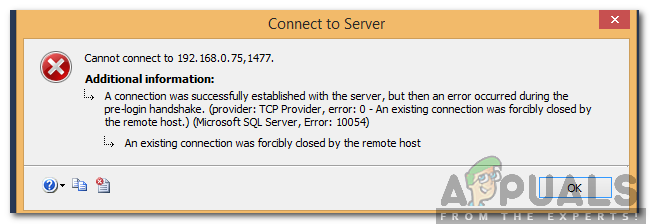
Have you recently been facing the “An existing connection was forcibly closed by the remote host” error on your system? This problem usually happens when you try connecting with any remote host, and the process fails.
After going through the various complaints and grievances reported by the users, we looked into the issue and carved out the best solutions.
Be patient and read the article.
What are the reasons behind the “An existing connection was forcibly closed by the remote host” error?
The lack of a physical presence characterizes the remote computer. This means that the only way to access this computer is through a computer network. The computer that hosts the network for the particular remote computer is called the Remote Host.
The user that operates the remote computer through the network is called the Remote Client. This is a great feature and revolutionizes computing processing.
However, the host and client connection has recently been facing errors.
But before we begin, let us also take you through the causes that are the potential problem-makers so that you do the fixing better:
- Disabled cryptography – If you have not noticed that the feature of Cryptography is disabled on the machine you are using, it will hinder the machine from using TLS 1.2, and it will get the application back to TLS 1.0 usage. This auto depreciation triggers the error.
- The usage of TLS 1.0 / 1.1 – If the application uses TLS 1.0 or TLS 1.1 for operation and storage, there is a high chance that the depreciated TLSs are causing the error. The right type of TLS to be used is TLS 1.2, while selecting the right protocol to be used by the application.
- Faulty socket implementation – There are some cases where a specific socket implementation becomes the reason behind the lost connection error. The associated .NET application that causes the implementations might have got some bugs and become the troublemaker.
- Lost code – Some users working with the Entity Framework also faced the error. This was caused by a specific line of code that was lost, causing trouble in the operation of the application.
- An older .NET Framework – In some cases, the “An existing connection was forcibly closed by the remote host” error was being caused. The reason was the .NET framework being disabled. Some system tasks need the latest framework version installed on the PC to run properly. If the condition is not fulfilled, then they cease to function.
Five Best Methods to Fix the Connection Error
Pick any of these solutions per the issue causing the error.
Besides, here, you will figure out what is the ETD Control Center.
Method 1: Enable the Cryptography
One of the prime reasons you have seen the error message saying, “An existing connection was forcibly closed by the remote host,” is that TLS 1.2 is prohibited from running on the machine.
This hindered the Cryptography from being operational thereby and caused the problem. A logical solution is to enable Cryptography, which will potentially solve the issue.
Below is the series of steps that you need to follow to enable the Cryptographic operation:
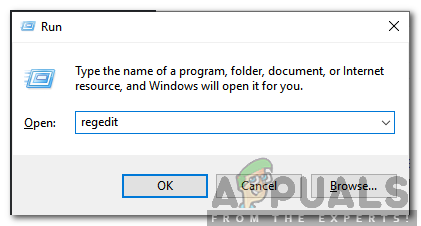
1. Press the keys Windows + R together to launch the prompt of the Run Dialogue box.
2. Enter the command regedit. Now hit the button to enter.

3. Navigate down and then find the address:
KEY_LOCAL_MACHINESOFTWAREMicrosoft.NETFrameworkv4.0.3031
4. Look inside the right pane, and if you don’t find any value like “SchUseStrongCrypto,” then you will have to find this address:
HKEY_LOCAL_MACHINESOFTWAREWow6432NodeMicrosoft.NETFrameworkv4.0.30319
5. Again, look through the right window pane and hit right-click over the option of “SchUseStrongCrypto.” Then enter the number 1 as the value of the data being entered.
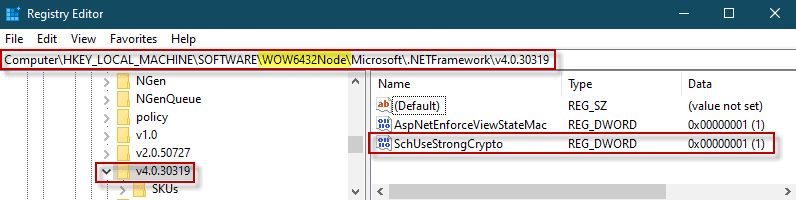
6. Lastly, click on the option OK to save the changes you made successfully.
Now go back to the operation you were running previously and see if the error is gone.
Method 2: Force launching the usage of TLS 1.2
It might not have come to your notice, but the application you have been trying to run might have experienced certain changes in its configuration.
Sometimes the user settings of any application are set at TLS 1.0 or TLS 1.1, while the correct option should be TLS 1.2.
This change can become the reason for the error “An existing connection was forcibly closed by the remote host.”
This method will deal with the error by changing such system configurations and setting it to TLS 1.2. Follow the steps given below:
1. Navigate and find the root folder of the particular website. Now hit a right-click over the file with the name global.asax.
2. Select the option of View Code from the given list.
3. Find the option of the method named ‘Application_Start‘ that must be in the next window pane. The line of code that we give you down below needs to be added in the particular method:
if (ServicePointManager .SecurityProtocol.HasFlag (SecurityProtocoType.Tls12) == false)
{
ServicePointManager.SecurityProtocol = ServicePointManager.SecurityProtocol | SecurityProtocolType.Tls12;
}

4. Save these changes that you made.
Go back to running the previous operation and see if the method has removed the error.
Method 3: Change the Socket Implementation
A faulty socket implementation is another probable reason why the error “An existing connection was forcibly closed by the remote host” has been creating trouble with the program you wanted to operate.
Sometimes, any glitch or bug that might have affected the socket implementation related to the program happens.
This hinders the program’s concerning elements from running smoothly, and the error, as mentioned earlier, is the result. In this method, we sought to configure and set up a new implementation, which will be different from the previous one.
Follow the steps we give below:
1. Before starting the process, check properly and ensure that the class StateObject is available to you. The code “public byte[] buffer = new byte[1024], public Socket socket;” should be there too.
2. Make a call over the function named “Receive (Socket s)” and then call in the mentioned code “void ReceiveCallback(IAsyncResult ar)“
SocketError errorCode;
Int nBytesRec = socket.EndReceive (ar, out errorCode);
If (errorCode != SocketError.Success)
{
nBytesRec = 0;
}
Once you have successfully implemented this code, go back, and see if the error remains. It would probably be solved by now.
If it is not, move ahead with the next methods that we give you for dealing with the error “An existing connection was forcibly closed by the remote host.”
Method 4: Add the Command Lines (for the users of Entity Framework)
If you have been a user of the Entity Framework, then there might be a possibility that a particular line of code must have been left out.
We aim to deal with this issue in this method, where we will add the missing line of code to fix the final host error issue.
Follow the steps below to do so:
1. Open the file named ‘.edmx.’ on your system. You will find a file named ‘.context.tt‘ below the previous file. Open it.
2. Now open the file named ‘.context.cs‘. In the associate constructor, you need to enter the line of code that we give you below:
Public DBEntities ()
: base(“name=DBEntities”)
{
This.Configuration.ProxyCreationEnabled = false; // ADD THIS LINE !
}
Once the command runs successfully, go back to the application you were trying to open and see if it has gone error-free.
Method 5: Update the .NET Framework
Many elements need to operate nicely for any application to run smoothly. The .NET framework is one such component, and you need to have the latest version of this framework installed on your PC to ensure the proper functioning of the related applications.
Therefore, this method will deal with installing the updated version of the .NET framework from the right website.
Follow the steps to do so:
1. Open Microsoft’s official website to download the setup of the concerned framework. Finish the download and begin to install the setup properly.
2. Find the .exe file in the setup and open it to execute it. This will begin the process of installing the framework program.

3. Keep following the instructions as they appear on the screen for installing the application properly on the PC that you are using.
Now go back to run the program that you were previously trying to. See if this method successfully removes the error “An existing connection was forcibly closed by the remote host.”
Conclusion
The error “An existing connection was forcibly closed by the remote host” hampers the connection between the server and the client. We hope that the solutions helped rectify the error and eliminate it.
This website uses cookies to ensure you get the best experience on our website
A remote computer is the one which has no physical presence; it can be accessed only through some sort of a computer network. The Remote Host is the computer hosting the network which hosts the remote computer and the remote client is the user of the remote client on the network. This feature has revolutionized a lot of processes and has a great scope in the future as well.
However, quite recently, a lot of reports have been coming in of an “an existing connection was forcibly closed by the remote host” error while trying to connect to the remote host. This error is triggered with a socket connection between a client and a server. In this article, we will provide some viable solutions to completely rectify this error and also inform you of the reasons that trigger this error.
What Causes the ‘An existing connection was forcibly closed by the remote host’ Error in Windows?
After receiving numerous reports from multiple users, we decided to investigate the issue and devised a set of solutions to fix it. Also, we looked into the reasons due to which it is triggered and listed them below.
- TLS 1.1/1.0 Usage: If the application is running on TLS 1.1 or TLS 1.0, it might trigger this error due to them being depreciated. TLS 1.2 is the way to go when selecting the protocol which the application uses.
- Cryptography Disabled: If Cryptography has been disabled for your machine it will prevent the usage of TLS 1.2 and will fall back on TLS 1.0 which might trigger the error.
- Socket Implementation: In some cases, a particular type of socket implementation triggers the error. There is a bug with some implementations by “.NET” application and it might cause this error.
- Missing Code: For some people who were using the Entity Framework, it was observed that a certain line of code was missing due to which the error was being triggered.
- Outdated “.NET” Framework: In certain cases, if the “.NET” Framework has been disabled, this error might be triggered. Certain tasks require the “.NET” framework to be updated to the latest version in order for them to work properly.
Now that you have a basic understanding of the nature of the problem, we will move on towards the solutions. Make sure to implement these in the specific order in which they are presented to avoid conflicts.
Solution 1: Enabling Cryptography
If Cryptography has been disabled for your machine the usage of TLS 1.2 is prohibited. Therefore, in this step, we will be enabling Cryptography. For that:
- Press “Windows” + “R” to open the Run prompt.
- Type in “regedit” and press “Enter“.
Typing in “Regedit” and pressing “Enter” - Navigate to the following address
HKEY_LOCAL_MACHINESOFTWAREMicrosoft.NETFrameworkv4.0.3031
Navigate to this address if there is no “SchUseStrongCrypto” value in the right pane.
HKEY_LOCAL_MACHINESOFTWAREWow6432NodeMicrosoft.NETFrameworkv4.0.30319
- In the right pane, double click on the “SchUseStrongCrypto” option and enter “1” as Value data.
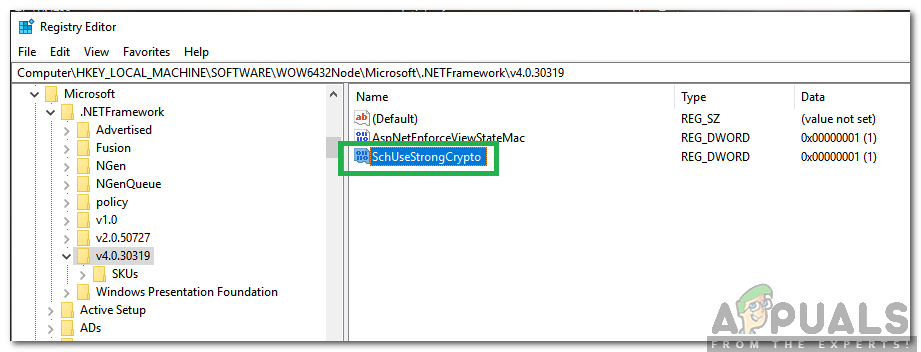
Double clicking on the “SchUseStrongCrypto” value in the right pane - Click on “OK” to save your changes and check to see if the issue persists.
Solution 2: Forcing TLS 1.2 Usage
If the application has been configured to use TLS 1.1 or TLS 1.0 instead of the TLS 1.2, it might trigger this error. Therefore, in this step, we will be configuring our computer to use TLS 1.2. For that:
- Navigate to the root of the site and right-click on the “global.asax” file.
- Select “View Code” from the list.
- There should be an “Application_Start” method, add the following line of code to that method
if (ServicePointManager.SecurityProtocol.HasFlag(SecurityProtocolType.Tls12) == false)
            {
                ServicePointManager.SecurityProtocol = ServicePointManager.SecurityProtocol | SecurityProtocolType.Tls12;
            }
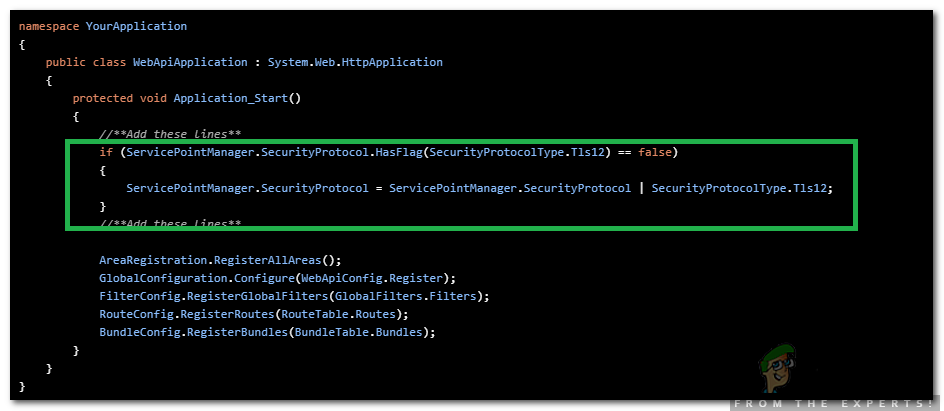
Adding the lines to the code - Save your changes and check to see if the issue persists.
Solution 3: Changing Socket Implementation
If a certain socket implementation has a bug or glitch in it, it might prevent certain elements of the application from functioning properly due to which this error might be triggered. Therefore, in this step, we will be configuring it to use a different implementation. For that:
- Make sure you have a “StateObject” class with “public byte[] buffer = new byte[1024], public Socket socket;“.
- Call the “Receive(Socket s)” function and call the following code in “void ReceiveCallback(IAsyncResult ar)”
SocketError errorCode; int nBytesRec = socket.EndReceive(ar, out errorCode); if (errorCode != SocketError.Success) { nBytesRec = 0; } - Check to see if the issue persists after implementing this code.
Solution 4: Adding Command Lines (Only for Entity Framework)
If you are using the Entity Framework, it is possible that a certain line of code might be missing. Therefore, in this step, we will be adding that line of code in order to fix this issue. For that:
- Open your “.edmx” file and open the “.context.tt” file below it.
- Open the “.context.cs” file and add the following line of code to your constructor
public DBEntities() : base("name=DBEntities") { this.Configuration.ProxyCreationEnabled = false; // ADD THIS LINE ! } - Check to see if the issue persists after adding this line of code.
Solution 5: Updating .NET Framework
The latest version of the “.NET” Framework is required in order for everything to function smoothly. Therefore, in this step, we will be downloading the latest version from the site and installing it. For that:
- Navigate to this link to download the setup.
- Execute the “.exe” file in order to start the installation process.
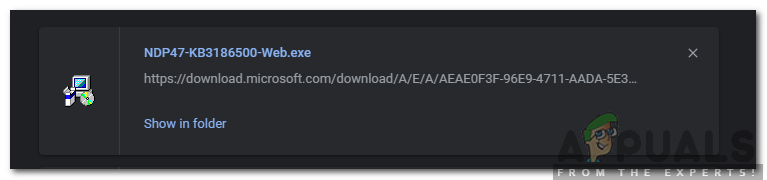
Running the executable downloaded from Microsoft - Follow the onscreen instructions to install the application on your computer.
- Check to see if the issue persists after completing the installation.

Kevin Arrows
Kevin is a dynamic and self-motivated information technology professional, with a Thorough knowledge of all facets pertaining to network infrastructure design, implementation and administration. Superior record of delivering simultaneous large-scale mission critical projects on time and under budget.
Проблема
Одно из следующих сообщений появляется в следующих случаях:
- Возврат файлов.
- Использование команд Vault, например Copy Design, Import Item и Get.
- Также можно просмотреть журналы сервера Vault при использовании репликации Autodesk Vault File Server (AVFS).
«Удаленный узел принудительно закрыл существующее подключение».
Или
«Запрос прерван: время ожидания операции истекло.»
Это сообщение отображается в журналах при использовании репликации AVFS:
The underlying connection was closed: An unexpected error occurred on a receive. Stacktrace(Inner): at System.Net.HttpWebRequest.GetResponse() at System.ServiceModel.Channels.HttpChannelFactory`1.HttpRequestChannel.HttpChannelRequest.WaitForReply(TimeSpan timeout)

Exception(Inner): Unable to read data from the transport connection: An existing connection was forcibly closed by the remote host.
Причины
Эта проблема может быть вызвана несколькими причинами.
- Последние обновления для Vault Server и клиента не установлены.
- Обновления Vault устанавливаются только на клиентском компьютере, но не на сервере.
- Конфигурация брандмауэра.
- Подключение к Vault заблокировано антивирусным программным обеспечением.
- Ненадежное соединение между Vault Server и клиентом.
- Проблемы производительности на сервере Vault.
- Неверно настроенные параметры прокси-сервера.
- Поврежденные данные файла.
- Клиент Vault установлен с использованием учетной записи Windows и не имеет достаточных прав.
Решение
Попробуйте решить эту проблему одним из следующих способов.
Установите последние обновления Vault на клиенте и сервере.
См. раздел Загрузки Vault
Настройка конфигурации брандмауэра
Используйте следующее руководство для проверки конфигурации. Брандмауэр блокирует подключение клиентов Vault к службам управления данными на сервере?
Проверьте конфигурацию антивирусной программы.
Переустановка клиента Vault
Переустановите клиент Vault, следуя инструкциям в разделе Удаление и повторная установка клиента Vault с помощью учетной записи Windows с правами администратора.
Примечание. Перед установкой обновлений Vault убедитесь в наличии проблемы при переустановке клиента Vault без обновлений.
Устранение проблем с подключением:
Чтобы предотвратить ненадежное соединение между клиентами Vault и сервером, рассмотрите возможность внедрения обновления в Vault Architecture. Это может означать,
- Установка Vault Server на облачном компьютере.
- Установка Autodesk Vault File Server (AVFS) на сервере, который является локальным для клиента.
- Или даже полная репликация SQL. (Связанные Рабочие Группы Хранилищ).
- Обновление аппаратного обеспечения, включая увеличение пропускной способности сети.
Повышение производительности Vault Server
Неверная настройка прокси
Поврежденные данные файла
Если эта ошибка возникает только для определенных файлов, убедитесь в целостности файла и убедитесь, что в наборе данных, с которым он пытается работать, нет поврежденных файлов. Эти файлы могут быть заменены, если они находятся в контексте сборки.
В некоторых случаях для устранения проблемы можно сохранить копию файла, переименовать его так же, как исходный файл, а затем открыть его повторно и вернуть.
Выполните сброс веб-служб IIS
Используйте командную строку Windows для выполнения команды IISReset, чтобы сбросить веб-службы.
См. также:
- Сообщение «Существующее подключение принудительно закрыто удаленным узлом» при переходе к определенной папке в клиенте Vault
- Внезапно клиенты Vault не могут обновлять/синхронизировать свойства и получать файлы.
Программы
Vault Basic; программы Inventor; программы AutoCAD; Vault Office; Vault Professional; Vault Workgroup
The way Minecraft inspires players and its unique aesthetic make it stand out. So in 2020, Minecraft is still incredibly popular. But while mining the landscape, players report encountering an error saying “An existing connection was forcibly closed by the remote host”. If you happened to be one of them, don’t worry. In this article, you’ll definitely pinpoint the cause.
Try these fixes
You may not need to try them all; just work from the top down until you find the one that works.
- Turn off Windows Firewall
- Create a new registry value
- Reset your last session on Hypixel
- Flush your DNS cache
- Change your DNS server
- Update your drivers
- Configure Java settings with the Control Panel
- Restart your network
Fix 1: Turn off Windows Firewall
It’s important to have Microsoft Defender Firewall on because it helps protect you from unauthorized access. But there is a possibility that it fails to allow Minecraft to run. So to fix it, you should turn off Windows Firewall. Here’s how you can do this:
1) On your keyboard, press the Windows logo key  and I at the same time to open the Settings app.
2) Click Update & Security.
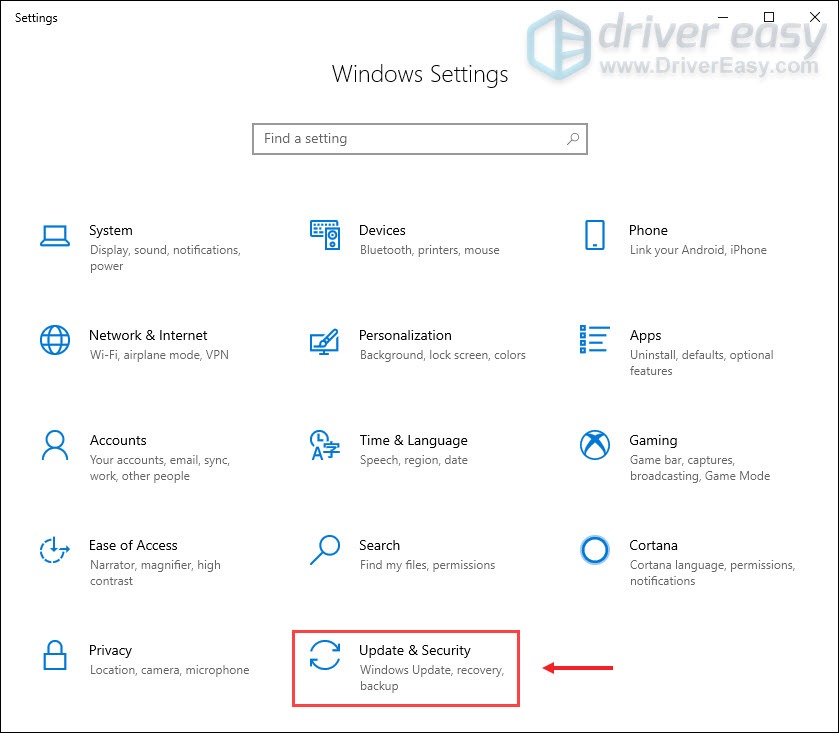
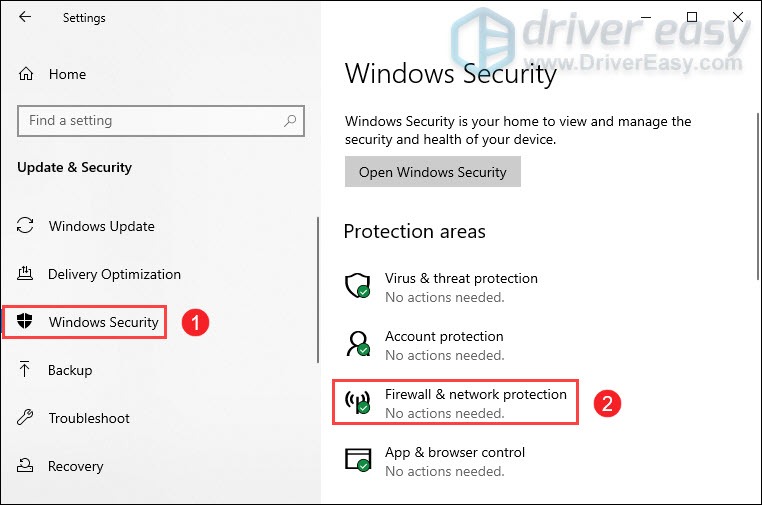
3) Click Windows Security > Firewall & network protection.
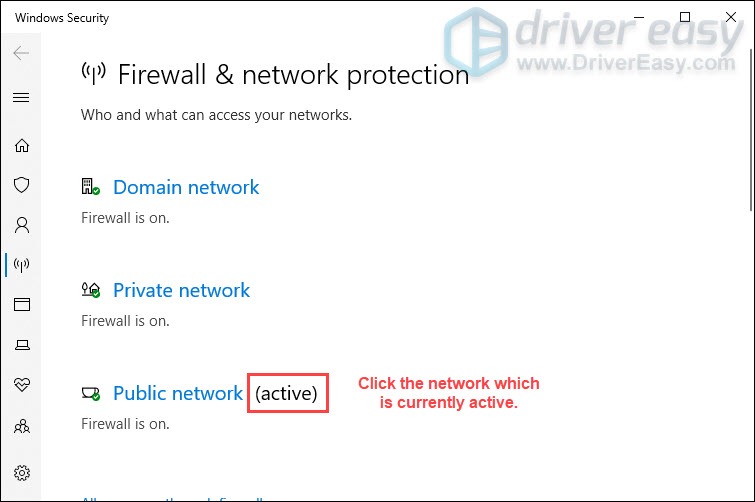
4) Click the network which is active currently.
5) Scroll down and under the Windows Defender Firewall section, toggle off the button to disable it.
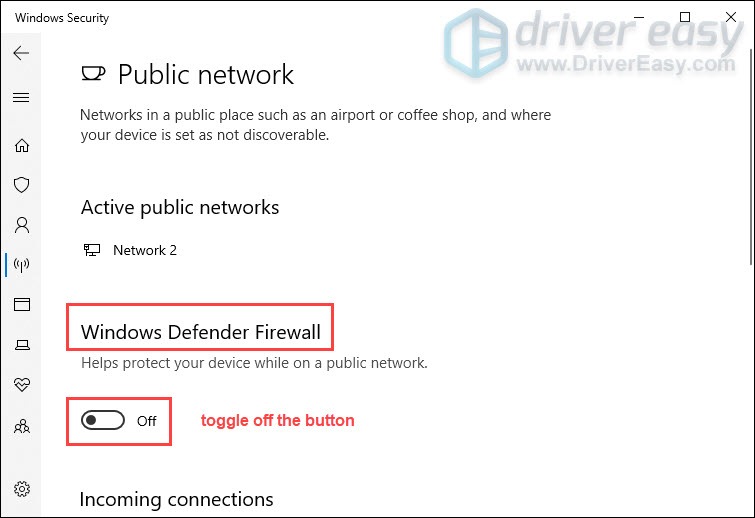
After you’ve done these and still can’t connect to the Minecraft server, move on to the next fix.
Fix 2: Create a new registry value
Creating a new registry value with Windows Registry is part of a troubleshooting step to fix some kind of bug with how Windows handles something. So to fix the connection lost error from Minecraft, you should create a new registry value:
1) In the Search box, type regedit. Right-click on Registry Editor from the results and select Run as administrator.
2) When you receive a User Account Control prompt, select Yes.
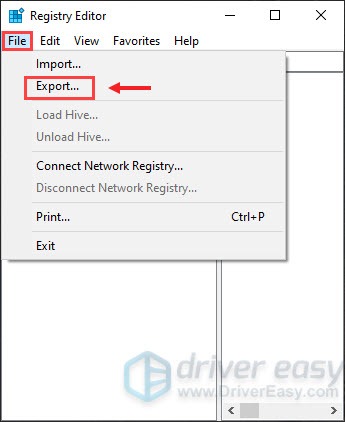
3) Before you proceed in the registry, you’re supposed to create a backup of it so that if anything were to go wrong, you can easily restore it back.
- Click on the File tab and select Export.
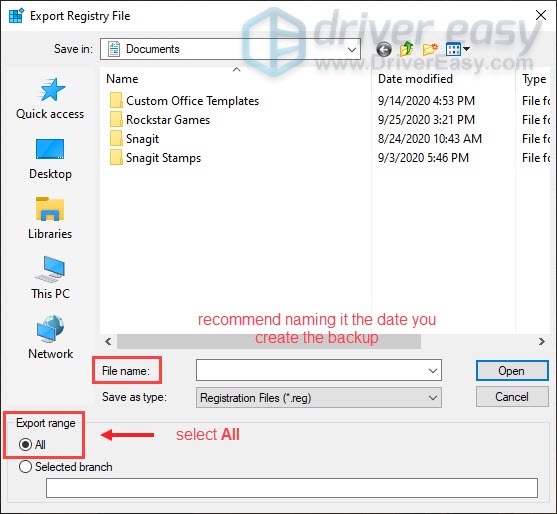
- For the File name, we recommend naming it the date you create the backup. The Export range should be selected to All. Then Save it to a convenient location on your computer.
- If you need to import it back in, you just need to click on the File tab and select Import.
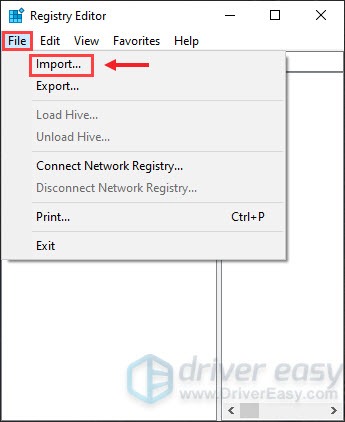
- The navigate to the file location.
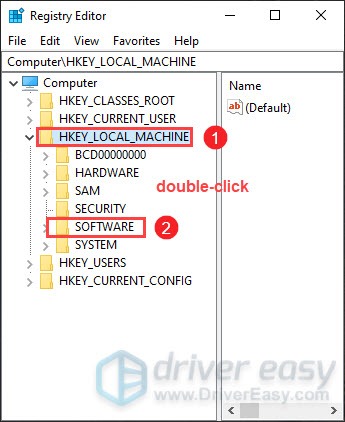
4) Once you’ve created a backup, double-click on the folder HKEY_LOCAL_MACHINE > SOFTWARE.
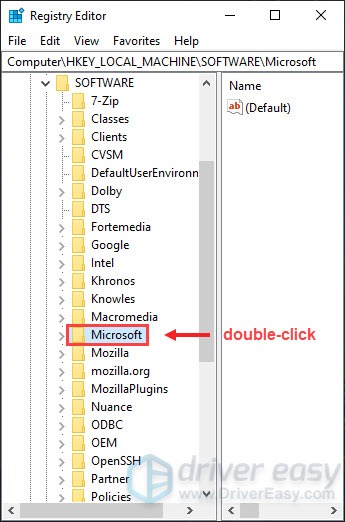
5) From the list of folders, double-click on Microsoft.
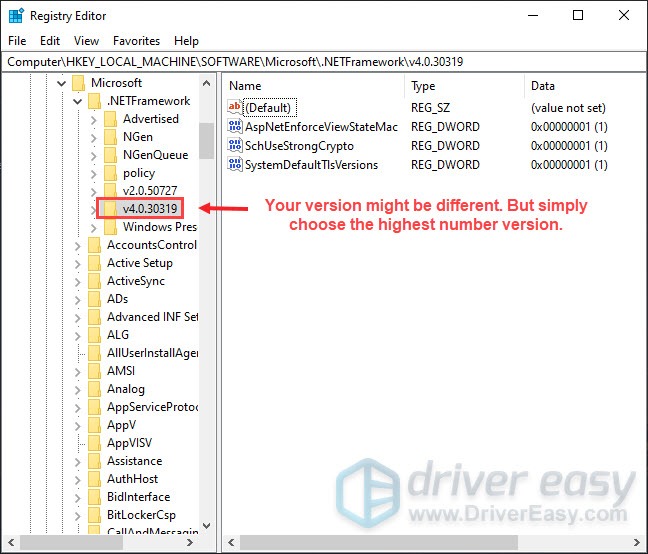
6) Locate .NETFramework and double-click on this folder. It should be near the top of the list because it starts with a dot.
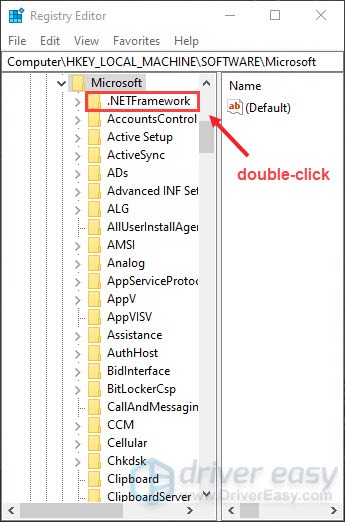
7) Click on the folder v4.0.30319. It might be a newer version. But just remember to select the highest number version.
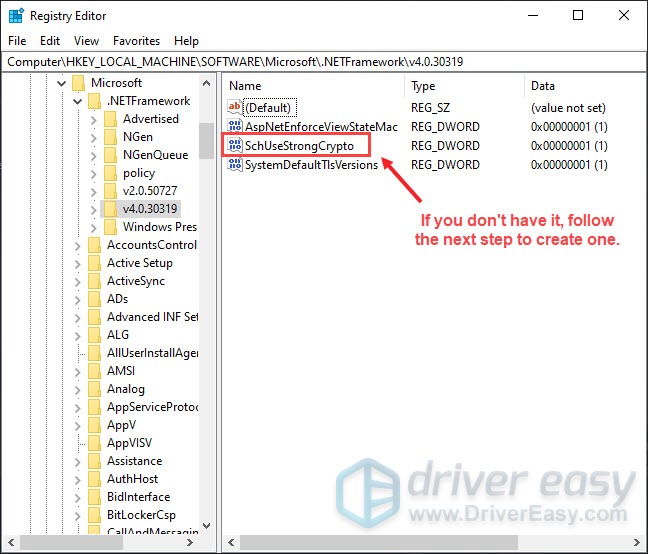
8) Now on the right side, locate something that says SchUseStrongCrypto. If you don’t see a value in here, you can go ahead and create one.
9) On the right panel, right-click on the blank area. Select New > DWORD (32-bit) Value.
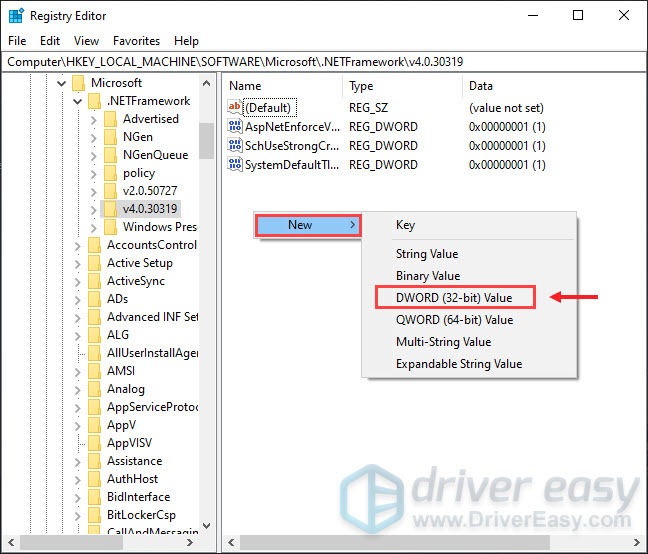
10) Type in SchUseStrongCrypto. Make sure the first letter of each word is capitalized. Then hit Enter to save that.

11) Double-click on SchUseStrongCrypto. Set the Value data to 1 and click OK.

12) Now close the Registry Editor.
13) Restart your computer for the change to take effect. Then attempt to connect to the remote host once again and your issue should hopefully be resolved.
Fix 3: Reset your last session on Hypixel server
The Hypixel server was created to play and further showcase Minecraft adventure maps. By resetting your last session on the Hypixel server, it would probably fix the issue. Here’s how you can do this:
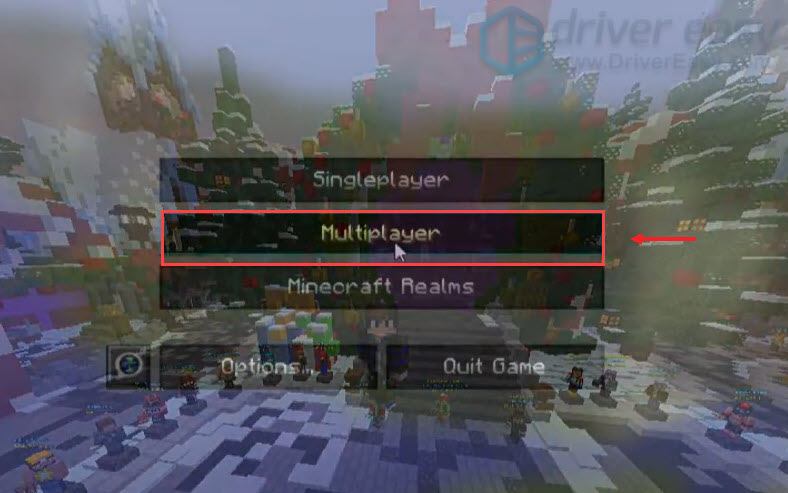
1) Open Minecraft. Click Multiplayer.
2) In the bottom, click Direct Connect.

3) In the Server Address, type Stuck.hypixel.net_. Then click Join Server.
![]()
This should reset your last session on Hypixel. See if that works. If not, then you should restart your router and flush your DNS cache.
Fix 4: Flush your DNS cache
Clearing the DNS cache on a regular basis can remove all the entries and deletes any invalid records. When you get the error from Minecraft, it’s mostly caused by internet connectivity problems. So flushing DNS cache will help you solve the problem. To do this, follow the steps below:
1) On your keyboard, press the Windows logo key and R at the same time to invoke the Run box.
2) Type cmd and then press Enter on your keyboard to open the Command Prompt.
3) Type ipconfig /flushdns and press Enter.
ipconfig /flushdns
Once you’ve successfully flushed the DNS cache, restart your computer and play your game to check if it works.
Fix 5: Change your DNS server
Sometimes your ISP-supplied DNS server might be slow or not properly configured for caching, which can effectively slow your connection. So it could be the reason why you’re getting the error from Minecraft. To fix it, you need to change your DNS server.
1) On your keyboard, press the Windows logo key and R at the same time to invoke the Run box.
2) Type control and then press Enter on your keyboard to open the Control Panel.
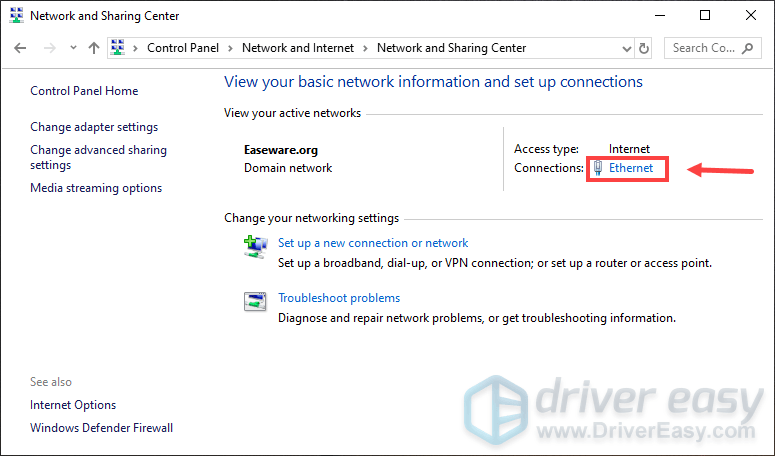
3) Click Network and Internet. (Note: make sure you view the Control Panel by Category.)
3) Click Network and Sharing Center.
4) Click on your Connections, whether it’s Ethernet, Wifi, or others.
5) Click Properties.
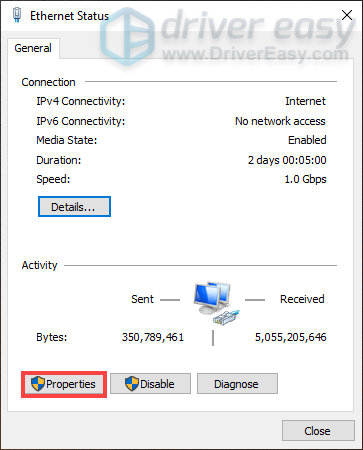
6) Click Internet Protocol Version 4 (TCP /IPv4) > Properties.

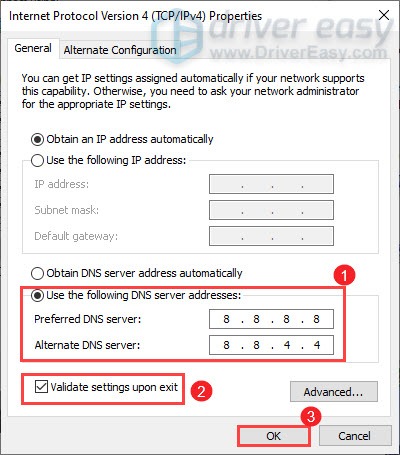
7) Click Use the following DNS server addresses:.
In Preferred DNS server: section, type 8888.
In Alternate DNS server: section, type 8844.
Check the box next to Validate settings upon exit and then click OK.
After applying the changes, try playing your game and the connection issue should be resolved.
Fix 6: Update your drivers
When you encounter various issues and errors while playing a game like Minecraft, one of the troubleshooting steps you need to take is to check for drivers updates. If your drivers are outdated or not optimized, you may encounter poor performance or even can’t connect to the server. So if you receive the error “An existing connection was forcibly closed by the remote host”, you should update your drivers especially network adapter drivers and graphics drivers (Updating graphics drivers even worked for some players.)
There are two ways you can update your drivers: manually and automatically.
Option 1: Manually update your drivers
Manufacturers keep releasing driver updates. To get them, you need to go to the official websites, find the correct drivers, and download them manually. But you might risk downloading and installing the wrong drivers which are not compatible with your Windows version.
Option 2: Automatically update your drivers (recommended)
If you don’t have the time, patience, or computer skills to update drivers manually, you can do it automatically with Driver Easy.
Driver Easy will automatically recognize your system and find the correct drivers for it. You don’t need to know exactly what system your computer is running or risk downloading and installing the wrong driver.
1) Download and install Driver Easy.
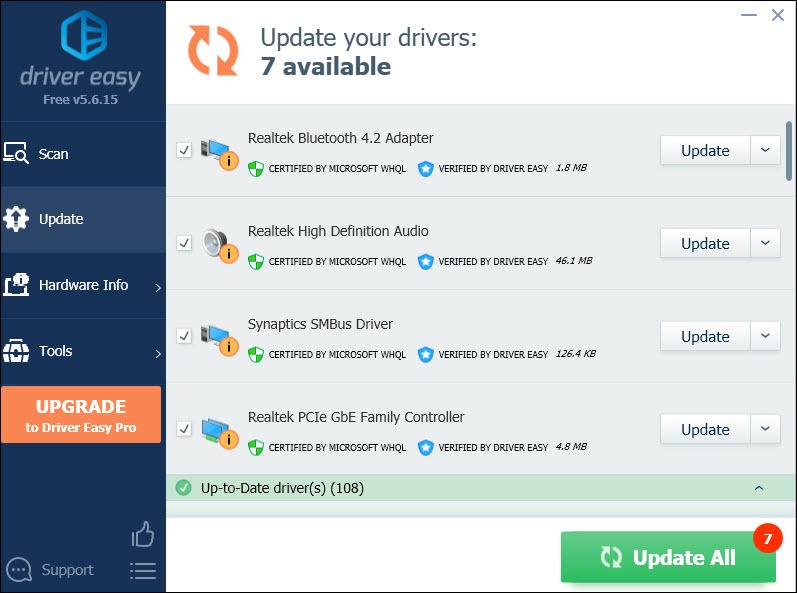
2) Run Driver Easy and click the Scan Now button. Driver Easy will then scan your computer and detect any problem drivers.

3) Click the Update button next to the flagged driver to automatically download the correct version of that driver, then you can manually install it (you can do this with the FREE version).
Or click Update All to automatically download and install the correct version of all the drivers that are missing or out of date on your system. (This requires the Pro version which comes with full support and a 30-day money-back guarantee. You’ll be prompted to upgrade when you click Update All.)
The Pro version of Driver Easy comes with full technical support. If you need assistance, please contact Driver Easy’s support team at support@drivereasy.com.
After updating your drivers, restart your computer to check if you still get the same error.
Fix 7: Configure Java settings with the Control Panel
The Java settings set by default might not give you the best gaming experience. So configuring them might offer you a greater performance and even fix the error you’re receiving.
To do this, you should:
1) On your keyboard, press the Windows logo key and R at the same time to invoke the Run box.
2) Type control and then press Enter on your keyboard to open the Control Panel.
3) Click System and Security. (Note: make sure you view the Control Panel by Category.)
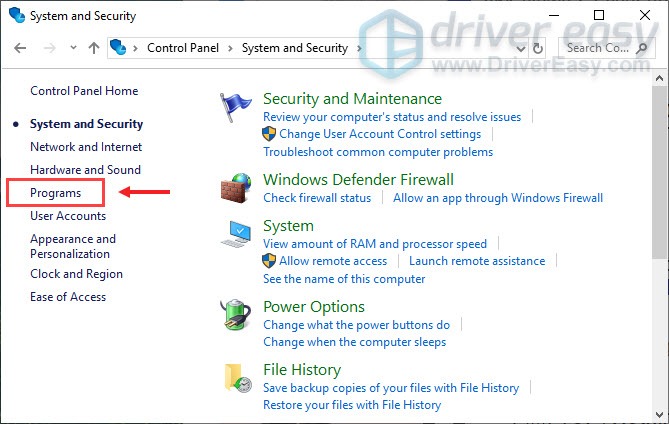
4) On the left pane, click Programs.
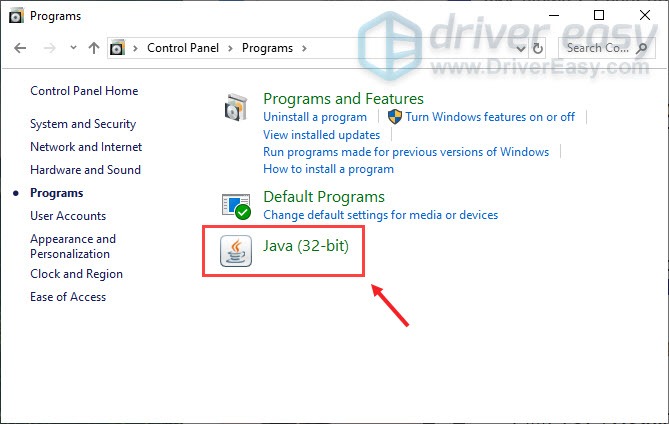
5) Click on Java.
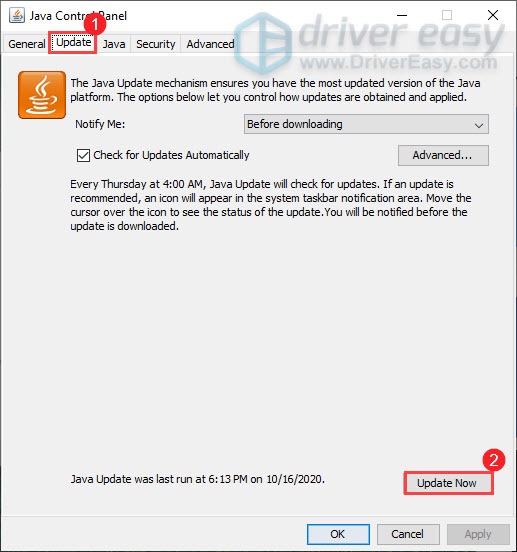
5) If there’s an Update tab, select it and click Update to update your Java.
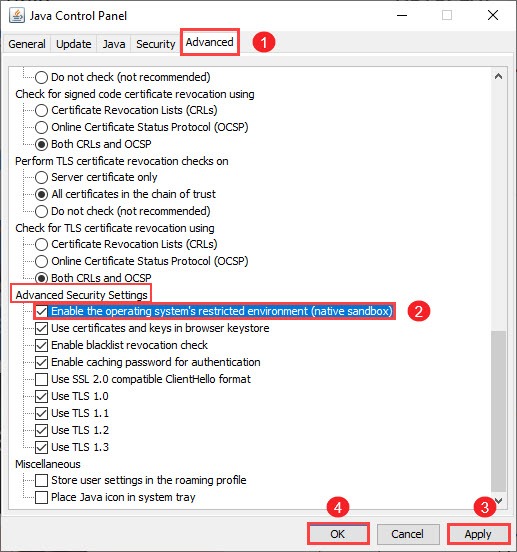
6) Select the tab Advanced. Check the box next to Enable the operating system’s restricted environment (native sandbox). Then click Apply > OK.
7) Now restart your computer and launch your game to check if it works. If not, move on to the next fix.
Fix 8: Restart your network
If you encounter the error “An existing connection was forcibly closed by the remote host” in Minecraft, perhaps there are some problems with your network. In this case, you should restart your network.
You can unplug both your router and modem and disconnect the ethernet cable for few minutes. Then reconnect the cable and plug in the modem back. Once the indicator lights are back to the normal state, check if the error has been resolved.
Hopefully, these fixes work for you. If you have any ideas or questions, please do not hesitate to leave us a comment.
Question
Issue: An existing connection was forcibly closed by the remote host Minecraft error – how to fix?
Hello, I can’t play Minecraft normally. At random times, an error shows up, saying, “An existing connection was forcibly closed.” I have not changed anything within my PC, so I wonder what is causing this. Any suggestions? Help would be much appreciated.
Solved Answer
Minecraft is one of the most popular video games in the world, enjoyed by the young and the mature. First developed in 2011, this sandbox game[1] grew the playerbase to as many as 126 million users. However, while the game is a fun sandbox experience, it does not avoid issues, and An existing connection was forcibly closed by the remote host Minecraft error is one of them.
Players claimed that they would abruptly be disconnected from the game, and receive the following error message:
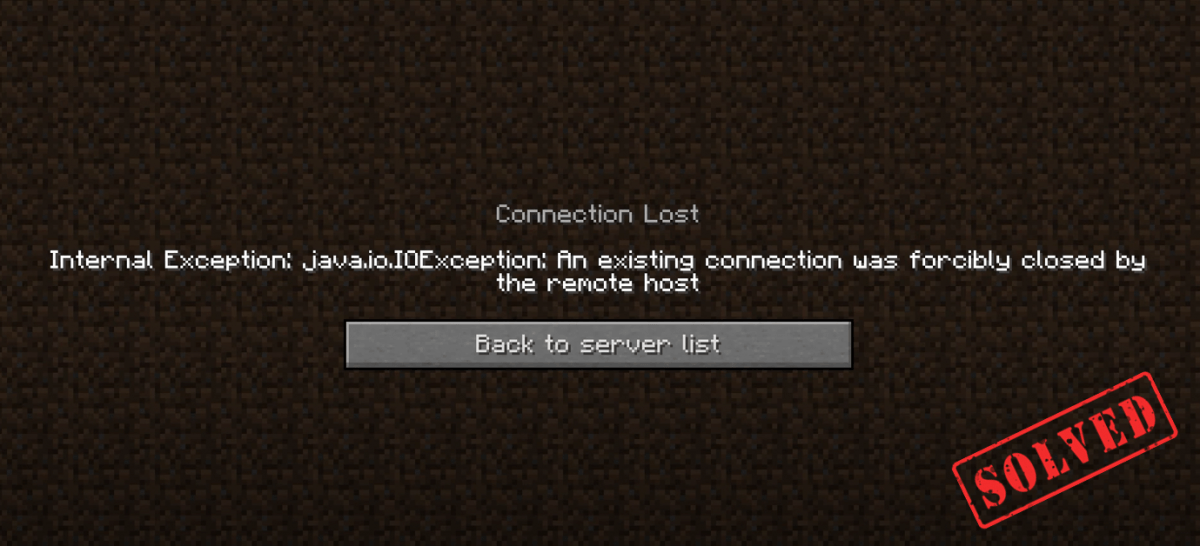
Connection lost
Internal Exception: java.io.IOException: An existing connection was forcibly closed by the remote host
This can be extremely frustrating to users, as it interrupts their gaming sessions. In some cases, people claimed that they are unable to play Minecraft at all due to this problem.
An existing connection was forcibly closed error might show up seemingly out of nowhere, and it does not explain adequately why it occurred (at least not to regular computer users). As seen on the message text, it is claimed that a remote host has closed the connection.
In reality, the explanation is much more simple – you are receiving An existing connection that was forcibly closed by the remote host Minecraft error because your computer network connection failed to reach Minecraft servers.
Now, the reason why this would happen can vary from person to person, as each computer has its own set of configurations, so things happen (or don’t happen) due to various reasons. However, one of the most common issues for this problem was related to Microsoft Windows Firewall[2] blocking the connection to Minecraft servers. Additionally, users with overly-protective antivirus can also experience this issue.

Therefore, there are several different ways to fix An existing connection was forcibly closed by the remote host Minecraft error, and we provide a comprehensive, step-by-step guide for you below. Keep in mind that different solutions will work for different situations, so try them all to see which one helps you.
Before you begin, we would like to suggest you try running a scan with ReimageMac Washing Machine X9, as it could achieve An existing connection was forcibly closed by the remote host Minecraft error fix automatically if the problem is related to the underlying Windows system issues.
Solution 1. Run network connection troubleshooter
Fix it now!
Fix it now!
To repair damaged system, you have to purchase the licensed version of Reimage Reimage.
Let’s start from very simple solutions and check whether your internet connection is not experiencing any issues – run Windows Network connections troubleshooter:
Solution 2. Let Minecraft through Firewall
Fix it now!
Fix it now!
To repair damaged system, you have to purchase the licensed version of Reimage Reimage.
Just like in the case of io.netty.channel.ConnectTimeoutException connection timed out Minecraft error, in incorrect Firewall settings might prevent you from being connected to Minecraft servers, causing An existing connection was forcibly closed by the remote host error. Here’s how to bypass this problem:
- Type in Control Panel in Windows search and press Enter
- Go to System and Security section
- Under Windows Defender Firewall, pick Allow an app through Windows Defender Firewall

- In the main window, select Change settings
- Scroll down until you locate all the Java (TM) Platform SE binary entries, and tick Private and Public checkboxes
- Click OK.
Solution 3. Use different DNS settings
Fix it now!
Fix it now!
To repair damaged system, you have to purchase the licensed version of Reimage Reimage.
- Right-click on Start and pick Network Connections
- On the right side of the window, pick Change adapter options

- When Network Connections window opens, right-click on the appropriate option (in our case, Ethernet), and select Properties
- Click on Internet Protocol Version 4 (TCP/IPv4) once and then select Properties at the bottom
- Select Use the following DNS server address and then type in the following into the fields:
8.8.8.8
8.8.8.9 - Press OK.

Solution 4. Disable NAT acceleration on your router (Asus routers only)
Fix it now!
Fix it now!
To repair damaged system, you have to purchase the licensed version of Reimage Reimage.
NAT Acceleration, also known as Cut-Through Forwarding, is a feature in Asus routers that can positively impact internet connection speeds when it is turn on. However, this can cause problems in some cases, and users said that turning this feature off helped them fix the Minecraft error.
- Login to your Asus wireless router panel
- Go to LAN > Switch Control
- Under NAT Acceleration, click on the drop-down menu and select Disable
- Click Apply.

Solution 5. Reset your router
Fix it now!
Fix it now!
To repair damaged system, you have to purchase the licensed version of Reimage Reimage.
Most ISPs (Internet Service Providers) assign you with a dynamic IP address,[3] which means that it changes at certain time intervals, e.g., when you reboot your router. Thus, you should reboot the device and see if that helps to fix An existing connection was forcibly closed by the remote host Minecraft error:
- Go to your router and pull the connection wire out of it, or take it out of the electric socket
- Wait around a minute and re-connect your device
- Check if the error persists.
Note that you should not try to do this by pressing the Reset button on your router, as it could result in the device being reset to the factory settings.
Note 2: you can ask your ISP to provide you a static IP, although this service might not be free.
Repair your Errors automatically
ugetfix.com team is trying to do its best to help users find the best solutions for eliminating their errors. If you don’t want to struggle with manual repair techniques, please use the automatic software. All recommended products have been tested and approved by our professionals. Tools that you can use to fix your error are listed bellow:
do it now!
Download Fix
Happiness
Guarantee
do it now!
Download Fix
Happiness
Guarantee
Compatible with Microsoft Windows
Compatible with OS X
Still having problems?
If you failed to fix your error using Reimage, reach our support team for help. Please, let us know all details that you think we should know about your problem.
Reimage — a patented specialized Windows repair program. It will diagnose your damaged PC. It will scan all System Files, DLLs and Registry Keys that have been damaged by security threats.Reimage — a patented specialized Mac OS X repair program. It will diagnose your damaged computer. It will scan all System Files and Registry Keys that have been damaged by security threats.
This patented repair process uses a database of 25 million components that can replace any damaged or missing file on user’s computer.
To repair damaged system, you have to purchase the licensed version of Reimage malware removal tool.

Private Internet Access is a VPN that can prevent your Internet Service Provider, the government, and third-parties from tracking your online and allow you to stay completely anonymous. The software provides dedicated servers for torrenting and streaming, ensuring optimal performance and not slowing you down. You can also bypass geo-restrictions and view such services as Netflix, BBC, Disney+, and other popular streaming services without limitations, regardless of where you are.
Malware attacks, particularly ransomware, are by far the biggest danger to your pictures, videos, work, or school files. Since cybercriminals use a robust encryption algorithm to lock data, it can no longer be used until a ransom in bitcoin is paid. Instead of paying hackers, you should first try to use alternative recovery methods that could help you to retrieve at least some portion of the lost data. Otherwise, you could also lose your money, along with the files. One of the best tools that could restore at least some of the encrypted files – Data Recovery Pro.