Некоторые пользователи получают код ошибки 0x800f0954 при попытке установить .NET Framework 3.5 или другую дополнительную функцию в Windows 10. Большая часть пользователей получают эту ошибку при попытке установить какой-либо пакет с помощью компонентов Windows, а другие получают в командной строке с использованием инструмента DISM. Ошибка может быть в Windows 7, Windows 8.1 и Windows 10 и связана с конкретной групповой политикой, журналы CBS могут указывать на ошибку, а на самом деле её по факту нет, или компьютер не может получить доступ к обновлению. Давайте разберем, как исправить ошибку 0x800f0954. Вы должны опираться на способы решения исходя из своих проблем.
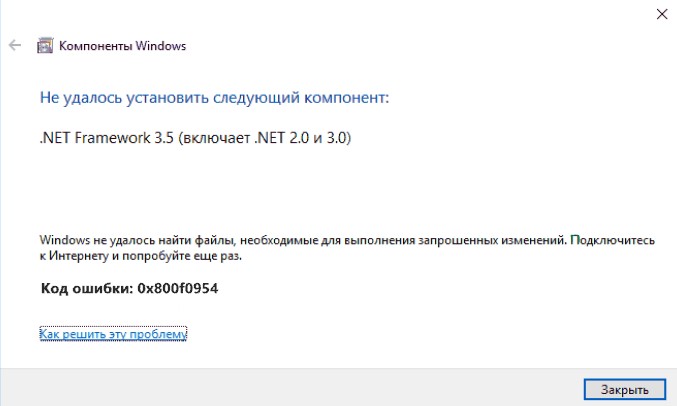
Обход сервера WSUS
Система не может получить доступ к серверу WU. Это типично в ситуациях, когда существует целая сеть присоединенных к домену компьютеров, настроенных для загрузки обновлений с сервера WSUS. В этом случае вы можете решить эту проблему, временно минуя сервер WSUS во время установки компонента. Наберите в «поиске» редактор реестра и нажмите по нему правой кнопкой мыши. Далее выберите «запустить от имени администратора«. В реестре перейдите вручную по пути:
HKEY_LOCAL_MACHINESOFTWAREPoliciesMicrosoftWindowsWindowsUpdateAU- Если у вас нет разделаWindowsUpdate и AU, то создайте их. Нажмите правой кнопкой мыши на конечной папке Windows и «Создать» > «Раздел», назовите его WindowsUpdate. Далее нажмите правой кнопкой мыши на WindowsUpdate и «Создать» > «Раздел» с именем AU.
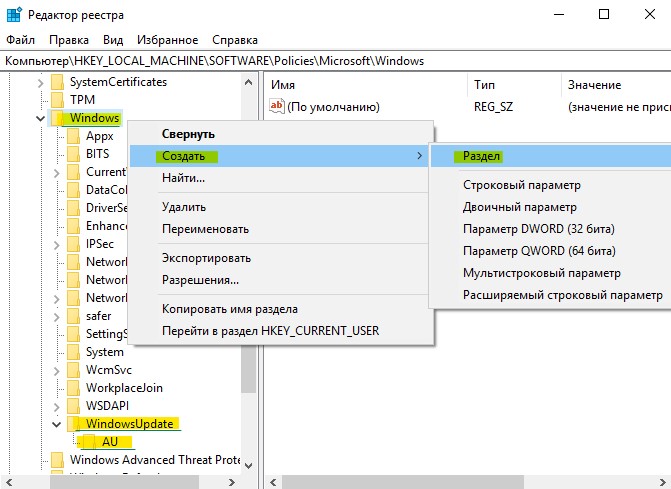
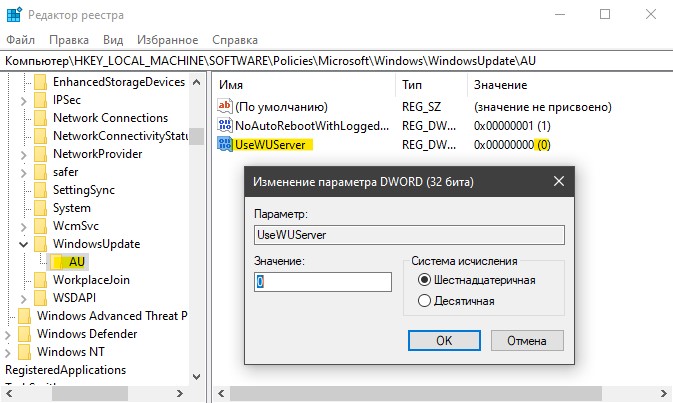
Теперь выделите папку AU и слева нажмите на пустом поле правой кнопкой мыши и выберите «Создать» > «Строковый параметр» с именем UseWUServer и значением 0. Перезагрузите ПК и проверьте, решена ли проблема.
Очистка журналов CBS
Нужно очистить журнал CBS и запустить потом DISM. Перейдите в проводнике по пути C:WindowsLogsCBS и выделите все файлы, после чего удалите их.
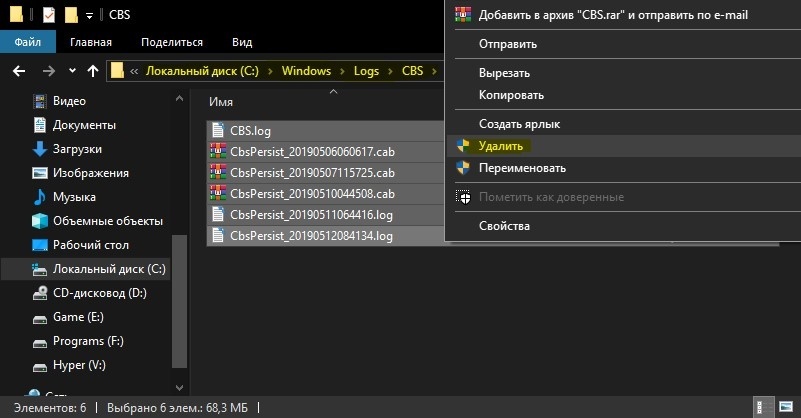
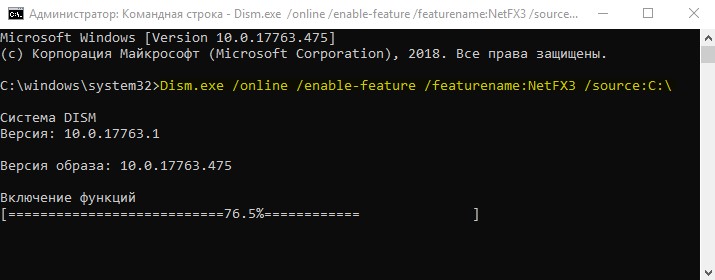
Как только удалили все файлы в папке CBS, то запустите командную строку от имени администратора и введите команду DISM:
Dism.exe /online /enable-feature /featurename:NetFX3 /source:C:
Использовать PowerShell для установки .NET Framework 3.5 с установочного носителя
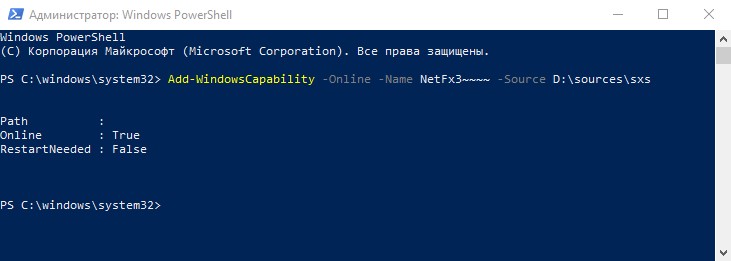
Если вы сталкиваетесь с ошибкой 0x800f0954 при попытке установить .NET Framework 3.5 методом команд обновления или установки через сервера, то можно установить его через PowerShell с образа ISO. Первое что вам нужно сделать, это создать установочную флешку Windows 10 или виртуальный диск с установочной Windows 10. Запустите PowerShell от имени администратора и введите следующий апплет:

Add-WindowsCapability –Online -Name NetFx3~~~~ –Source D:sourcessxs— Где D: это имя установочной флешки с Windows 10.- Перезагрузите ПК и попробуйте установить .NET Framework 3.5 еще раз.
Установка и восстановление необязательных компонентов
Если вы столкнулись с ошибкой 0x800f0954 при использовании инструмента RSAT (средство удаленного администрирования сервера), то можно решить эту проблему с помощью одной политики, которая даст разрешения ОС, загружать восстановительный контент и дополнительные функции непосредственно из WU.
- Нажмите Win + R и введите gpedit.msc, чтобы открыть редактор групповых политик.
- В редакторе перейдите «Конфигурация компьютера» > «Административные шаблоны» > «Система«.
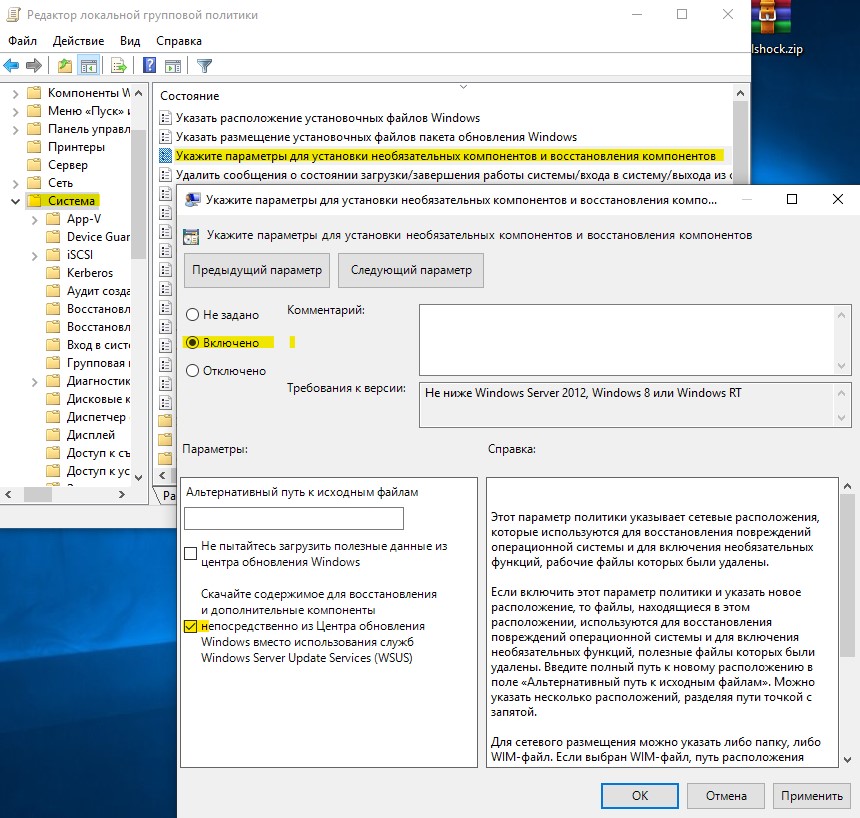
- Справа найдите «Укажите параметры для установки необязательных компонентов и восстановления компонентов» и на жмите по ней два раза.
- В окне свойств, выберите «Включено» и установите ниже галочку «Скачайте содержимое для восстановления и дополнительные компоненты непосредственно из центра обновления Windows вместо использования служб Windows Server Update Services (WSUS)«.
- Нажмите применить и перезагрузите ПК. Надеюсь вы исправили ошибку 0x800f0954.
Смотрите еще:
- Как установить NET Framework 2.0 3.0 и 3.5 в Windows 10
- Как исправить код ошибки 0x800F081F в Windows 10
- Как исправить ошибку 0x80070017 в Windows 10
- Исправить ошибку 0x80071779 в Windows 10
- Как исправить код ошибки 0x8004deb4 OneDrive в Windows 10
[ Telegram | Поддержать ]
Рассказываем, из-за чего возникает и как исправить ошибку 0x800f0954 в Windows 10.
Что это за ошибка?
Этот сбой связан с программным обеспечением .NET Framework. Ошибка появляется во время установки и не дает ее завершить, жалуясь на необходимость подключиться к интернету (даже если он и так есть).
А .NET Framework — это очень нужный инструмент для разработчиков, на базе которого построены многие приложения для Windows. Эти же приложения полагаются на Фреймворк при запуске. Проще говоря, обойтись без него никак нельзя. Поэтому ошибку 0x800f0954 придется как-то исправлять. Иначе есть шанс лишиться кучи программ и видеоигр.
Далее рассмотрим методы решения проблемы, которые уже доказали свою эффективность.
Меняем параметры реестра
Иногда ошибка возникает из-за проблем при подключении к внешнему серверу обновлений. В этом случае можно попытаться установить .NET Framework, игнорируя хранилища Microsoft Update.
Для этого:
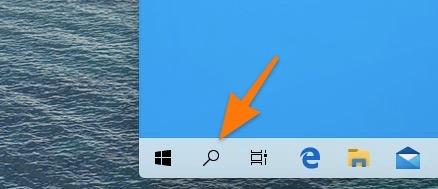
- Кликаем по иконке в виде лупы в левом нижнем углу.
Жмем сюда
- В открывшееся поисковое поле вводим название программы regedit и запускаем ее от имени администратора.
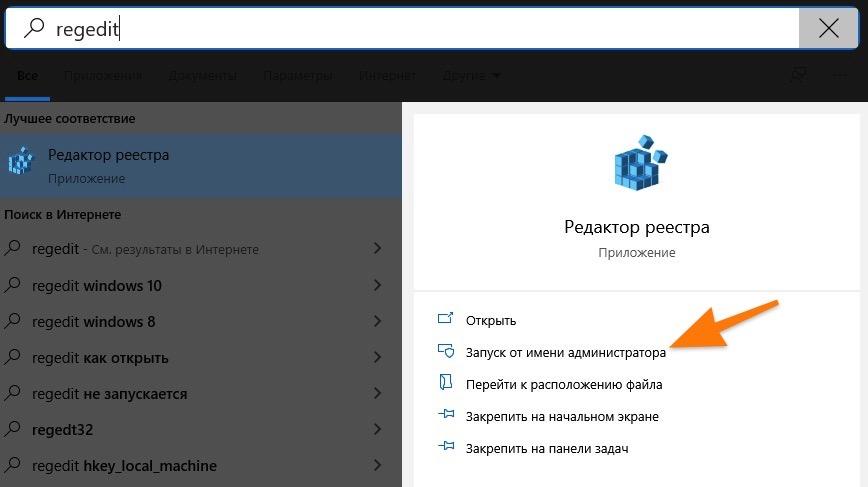
Обязательно выбираем этот пункт
- Когда появится запрос от системы безопасности, нажимаем «Да».
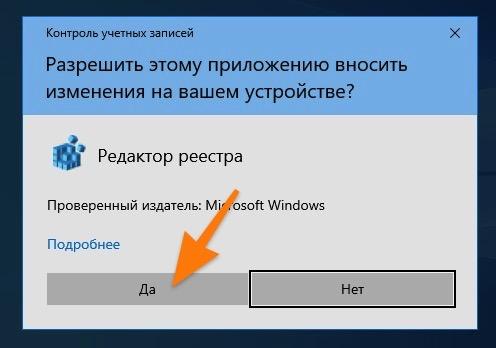
Возможно, для внесения изменений понадобится пароль администратора
- Откроется реестр. Переходим в нем в папку Windows по пути HKEY_LOCAL_MACHINESOFTWAREPoliciesMicrosoftWindows.
- Кликаем по этой папке правой кнопкой мыши.
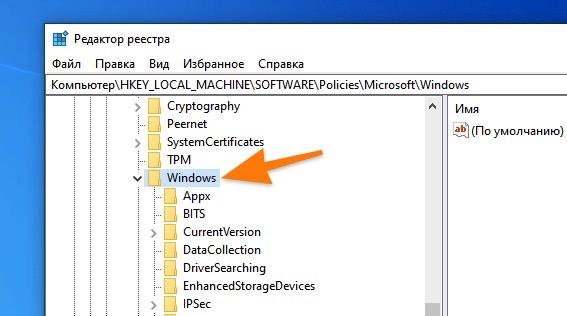
Создаем подпапку в этой директории
- В появившемся контекстном меню наводим курсор на пункт «Создать», а потом выбираем опцию «Раздел».
- Даем ему название WindowsUpdate.
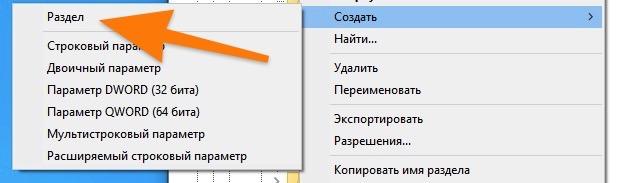
Сначала нажимаем вот сюда
- Потом кликаем правой кнопкой мыши по папке WindowsUpdate и повторяем то же самое. То есть создаем еще один раздел. На этот раз с названием AU.
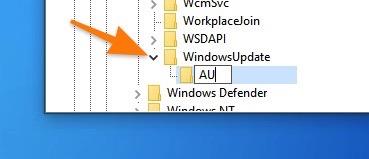
Внимательно указывайте названия папок и файлов
- Открываем вновь созданный раздел AU. Получится вот такой путь HKEY_LOCAL_MACHINESOFTWAREPoliciesMicrosoftWindowsWindowsUpdateAU.
- Кликаем правой кнопкой мыши по пустому пространству в правой части редактора реестра.
- В появившемся контекстном меню выбираем опцию «Создать параметр DWORD (32 бита)».
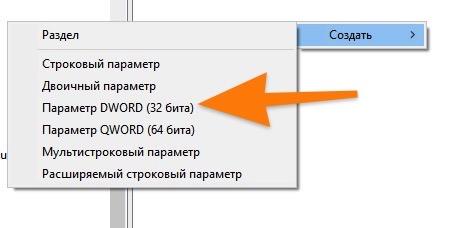
Создаем новую опцию
- Даем параметру название UseWUServer.
- Кликаем по нему дважды.
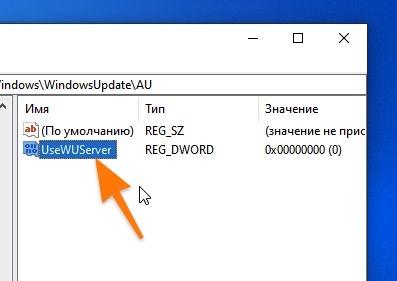
Скорее всего, у вас тут будет всего лишь один параметр
- Появится окошка с настройками. Заменяем «Значение» на 0.
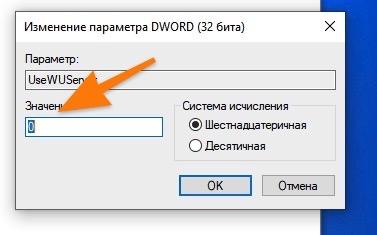
Остальные значения оставляем прежними
- После этого перезагружаем компьютер и заново пытаемся установить .NET Framework. Ошибка должна исчезнуть.
Удаляем файлы CBS
Второй способ — удаление временных файлов CBS. Это журнал данных Component-Based Servicing. Иногда их наличие мешает установке тех или иных системных компонентов и сторонних приложений.
Чтобы их удалить:
- Открываем встроенный файловый менеджер Windows.
- Переходим в папку _Локальный диск (С:)WindowsLogsCBS_
- Удаляем все содержимое. Просто выделяем и жмем на клавишу Delete.
- А потом очищаем корзину.
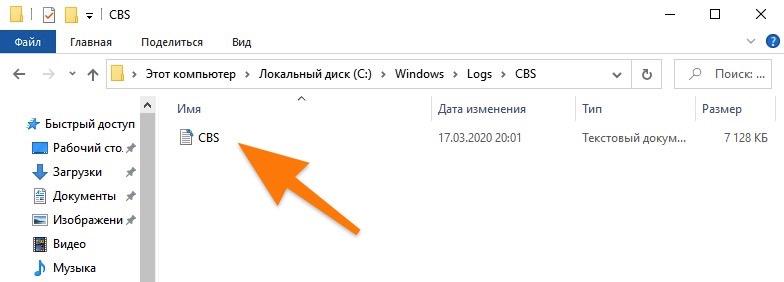
У меня тут всего один файл, но у вас их может быть с десяток разных. Удаляем все сразу. Они не нужны
После удаления журналов пробуем установить .NET Framework через систему выгрузки образов Microsoft. Для этого:
- Открываем поисковик Windows, кликнув по соответствующей иконке.
- Ищем там программу cmd.exe и запускаем от имени администратора.
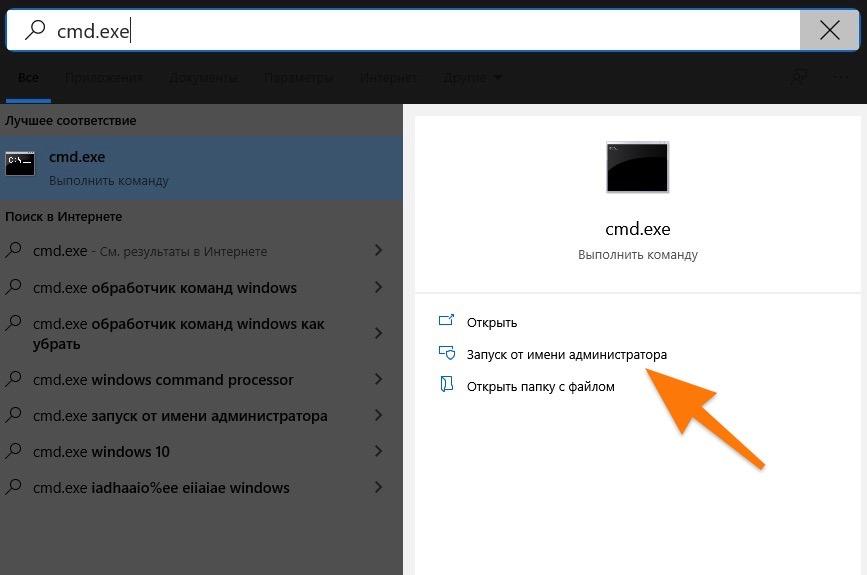
Командную строку тоже надо включать от имени администратора. И тоже может понадобиться пароль
- Затем вводим команду _Dism.exe /online /enable-feature /featurename:NetFX3 /source:C:_
- Дождавшись окончания работы программы, перезапускаем компьютер.
- А потом еще раз пробуем установить .NET Framework. В этот раз должно получиться.
Устанавливаем .NET Framework через командную строку
Еще один способ обойти ошибку 0x800f0954 — установка .NET Framework прямо с образа системы через командную строку.
Чтобы это сделать:
- Создаем флэшку с установочными файлами Windows (перед этим, вероятно, придется скачать образ Windows 10 с официального сайта Microsoft).
- Вставляем ее в компьютер и запоминаем букву диска, под которой она отображается в системе.
- Открываем поисковик Windows.
- Ищем там командную строку и запускаем ее от имени администратора.
- Сразу же вводим туда команду Add-WindowsCapability -Online -Name NetFx3~~~~ -Source буква диска, под которым записана флэшка с Windows:sourcessxs
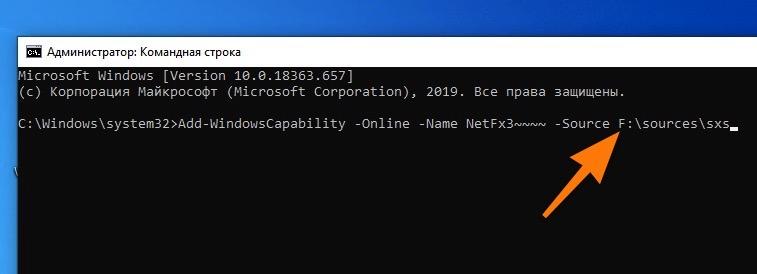
В моем случае выбран диск с буквой F. Вот как он вписывается в команду
- Дожидаемся, пока завершится процесс загрузки и установки нужных компонентов.
- Затем перезагружаем компьютер и заново пробуем установить .NET Framework стандартным способом.
Устанавливаем дополнительные компоненты
Если у вас установлена Windows 10 Pro (или Enterprise), то есть еще один вариант исправления ошибки. Для этого надо поменять параметры групповой политики в системе.
Чтобы это сделать:
- Одновременно нажимаем клавиши Win + R.
- В окне программы «Выполнить» набираем gpedit.msc и кликаем по кнопке ОК.
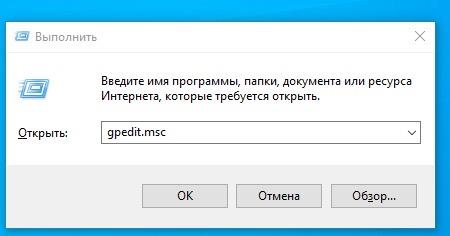
Это короткий путь к редактору групповых политик
- Откроется редактор групповых политик. Переходим там по пути «Конфигурация компьютера»«Административные шаблоны»«Система».
- Затем ищем политику под названием «Укажите параметры для установки необязательных компонентов и восстановления компонентов». Кликаем по ней два раза.
- Ставим галочки напротив пункта «Включено» и напротив пункта «Скачайте содержимое для восстановления и дополнительные компоненты непосредственно из центра обновления Windows вместо использования служб Windows Server Update Services (WSUS)»
- После этого перезагружаем компьютер и пробуем заново установить .NET Framework.
 Загрузка …
Post Views: 2 925
В сети всё чаще фигурирует ошибка с кодом 0x800f0954. Она появляется при попытке добавить в Windows 10 различные дополнительные компоненты. Чаще всего она наблюдается во время добавления .NET Framework разных версий. Неудачно закончится может и один из встроенных инструментов командной строки – DISM. Вместо сканирования системы или выполнения других системных задач может отобразиться окно со сбоем. Способы исправления, а также причины ошибки 0x800f0954 в Windows 7-10 описаны ниже.
Содержание
- Что вызывает ошибку 0x800f0954?
- Способ 1: обход WSUS
- Способ 2: Очистка журналов CBS
- Способ 3: использование PowerShell для инсталляции .NET Framework
- Способ 4: изменение настроек редактора групповой политики
Что вызывает ошибку 0x800f0954?
Чтобы понять источник появления проблемы, эксперты изучили около 30 отчётов пользователей. Затем подобное состояние Windows было воспроизведено на тестовых машинах. Результат – появилась та же самая ошибка.
Удалось установить следующих виновников неисправностей:
- Компьютер не в состоянии подключиться к серверам Windows, отвечающим за передачу обновлений. Очень вероятно, что системе самостоятельно не удалось связаться с серверами WU. Проблема является типичной для компьютерных сетей, которые подключаются к доменам и настроены на автоматическую загрузку обновлений с сервера WSUS. Для фикса ошибки достаточно скачать обновление в обход службы WSUS.
- Проблему вызывают журналы DISM CBS. Утилита DISM может создавать журналы CBS с отчётами об ошибках, которые в реальности отсутствуют. Удаление журналов обслуживания помогает убрать глюк системы. Скорее всего при повторном запуске сканирования Windows через DISM, утилита покажет корректный результат.
- Неудачное обновление .NET Framework через встроенный компонент ОС. Чтобы загрузить и поставить более новую версию .NET Framework без ошибки, лучше использовать Powershell;
- Настройки групповой политики блокируют выполнение действия. Существует одна настройка в групповой политике, которая в неактивном состоянии может вызывать ошибку 0x800f0954. Решением проблемы станет включение одной опции в редакторе.
Способы исправления были подобраны согласно перечисленным проблемам. Каждую неисправность по-отдельности можно устранить, заменив всего одну настройку или выполнив несколько ручных действий. Однако, чтобы понять, в чём истинная первопричина проблемы, порой нужно выполнить несколько манипуляций. Все способы размещены в том порядке, в котором их целесообразно использовать с точки зрения эффективности и простоты применения.
Способ 1: обход WSUS
Очевидно, что для получения дополнительных компонентов Windows обязателен доступ к серверам корпорации Microsoft. Если нужного подключения система установить не может, как раз и появляется ошибка 0x800f0954. Приблизительно 35% всех отчётов от серверных машин о сбое вызваны проблемами с подключением к серверу. Всё из-за того, что они настроены на загрузку обновлений с серверов WSUS.
Если у читателя аналогичная проблема, скорее всего когда-то компьютер состоял в доменной сети, поэтому в нём сохранились старые настройки групповой политики. При этом сценарии следует установить временный костыль, позволяющий обойти сервер WSUS. Для этого нужно изменить настройки реестра.
Важно! Перед работой с реестром лучше сделать точку восстановления Windows. Изменив не тот параметр или задав неправильное значение, можно нарушить правильность работы системы.
Что нужно сделать:
- Нажать сочетание кнопок Win + R на клавиатуре.
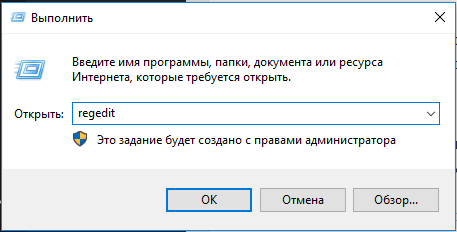
- В диалоговое окно «Выполнить» вставить слово regedit и нажать Ctrl + Shift + Enter (позволяет запустить редактор реестра с администраторскими правами). Если появится уведомление от приложения «Контроль учётных записей пользователей», следует подтвердить действие кнопкой «Да».
- На вертикальной панели последовательно открыть HKEY_LOCAL_MACHINESOFTWAREPoliciesMicrosoftWindowsWindowsUpdateAU или вставить ссылку в навигационную панель. Возможно, «WindowsUpdate» не удастся найти, в этом случае стоит нажать ПКМ по рабочему окну и создать данный ключ. То же самое сделать с ключом «AU».
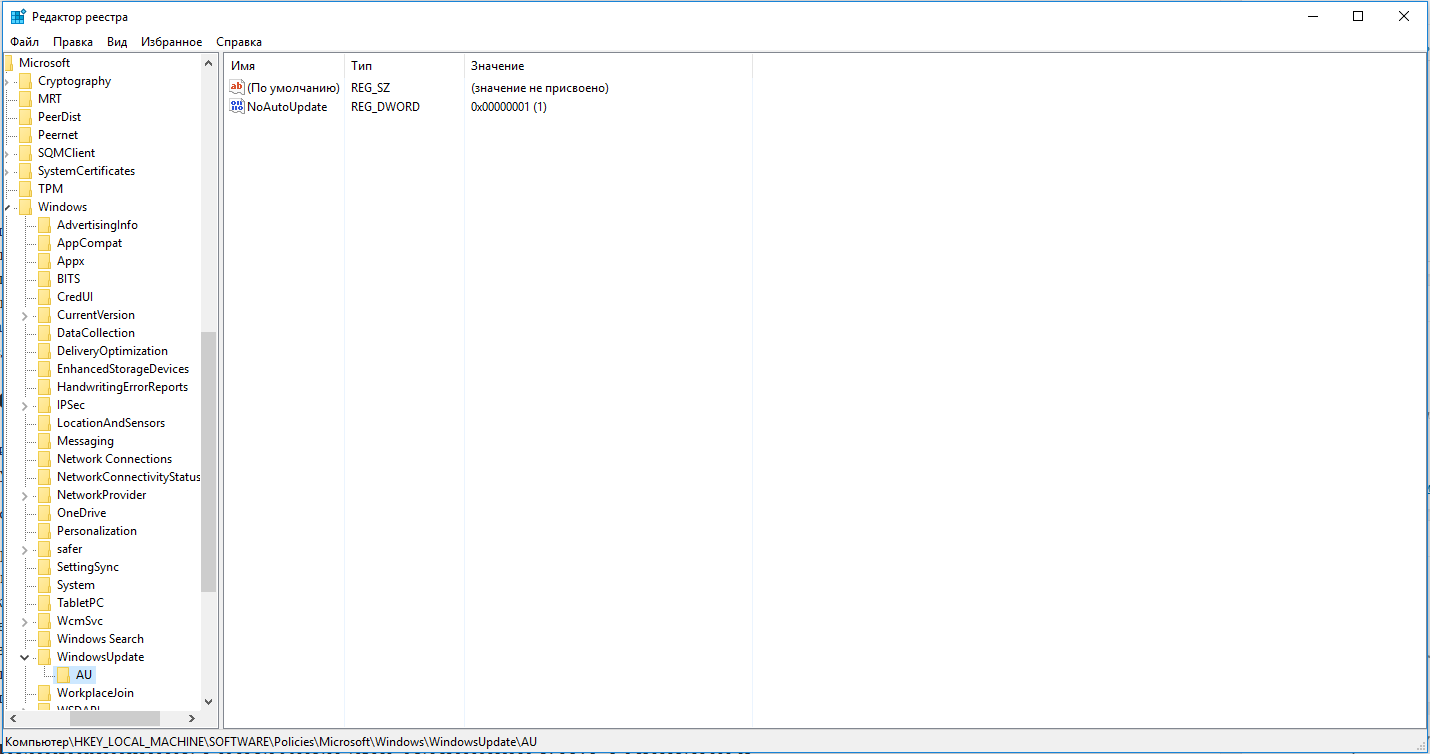
- В конечной папке в панели справа щёлкнуть ПКМ и выбрать «Создать» – «Строковый параметр». Значение нужно переименовать в «UserWUServer».
- Двойным нажатием открыть только что созданный параметр и задать ему значение 0.
- Выйти из редактора реестра и перезагрузить компьютер.
Способ 2: Очистка журналов CBS
Исходя их личного опыта и опыта многих пользователей, можно сказать, что в борьбе с ошибкой 0x800f0954 может помочь удаление журнала CBS (Component Based Servicing). Он создан DISM. Следующий этап – заново запустить DISM и воспроизвести действие по установке компонента Windows, ранее вызывавшего ошибку.
Пошаговое руководство:
- Открыть «Проводник» и перейти по пути C:WindowsLogsCBS.
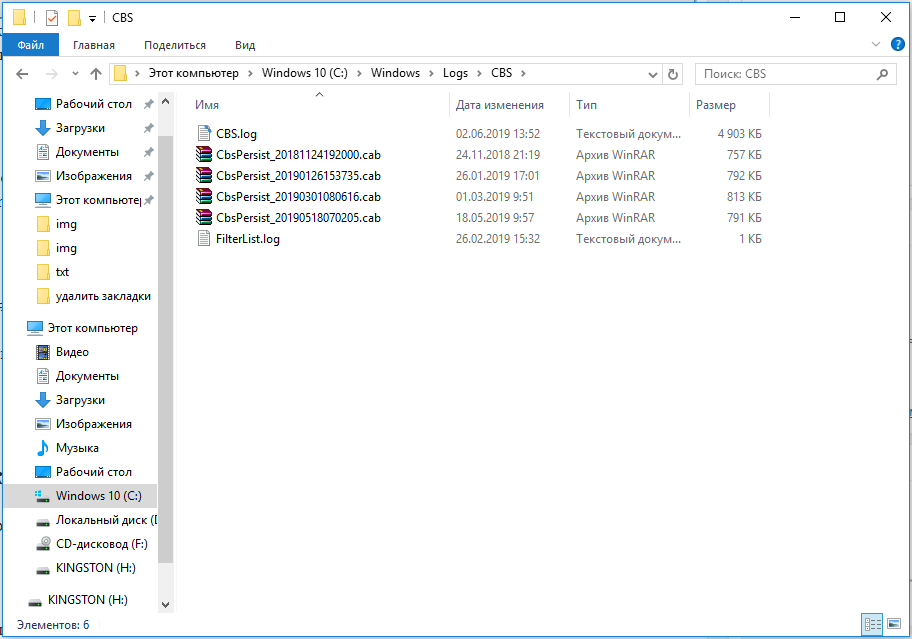
- Попав в папку CBS, нажать Ctrl + A для выделения всего содержимого и Del – для его удаления. Как только все файлы с расширением .log и .cab удалятся, можно закрыть «Проводник».
- Нажать ПКМ по «Пуску» и выбрать «Командная строка (Администратор). Если появится уведомление UAC, в нём нажать «Да» для подтверждения выдачи прав.
- В консоль с полными правами вставить команду – Dism.exe /online /enable-feature /featurename:NetFX3 /source:C: и нажать Enter.
- Выполнить перезапуск системы.
Способ 3: использование PowerShell для инсталляции .NET Framework
Если проблема возникла при установке .NET Framework при помощи DISM, стоит обратиться к другому инструменту – Powershell. Он работает по иному принципу, и с большей долей вероятности установит подходящий компонент.
Инструкция:
- Нажать сочетание Win + R, вставить в строку powershell и щёлкнуть по клавишам Ctrl + Shift + Enter.
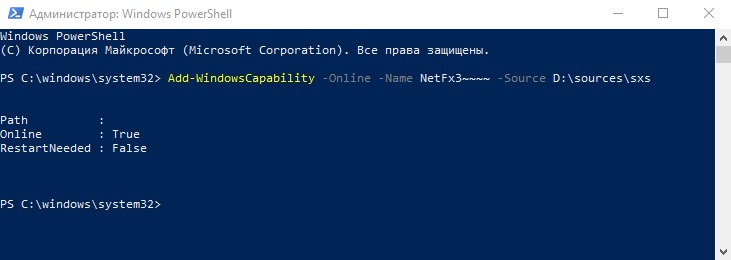
- После запуска Powershell в режиме повышенных прав вставить запись Add-WindowsCapability -Online -Name NetFx3 ~ ~ ~ ~ – Source D: sourcessxs и применить действие кнопкой Ввод.
- Закрыть консоль, и перезапустить компьютер.
- Проверить всё ли работает правильно.
Способ 4: изменение настроек редактора групповой политики
Метод применим в ситуации, когда ошибка 0x800f0954 сопровождает попытку добавить инструментарий RSAT. В такой ситуации пользователю придётся внести пару изменений в настройки групповой политики.
Важно! Редактор групповой политики доступен не во всех версиях Windows. Если установлена «десятка» в редакции Home, по умолчанию не будет доступа к данному инструменту. Придётся дополнительно установить редактор.
При наличии доступа к групповым политикам, следует:
- Щёлкнуть по значку лупы возле «Пуска», вставить название файла gpedit.msc и открыть его.
- Внутри редактора перейти в раздел «Административные шаблоныСистема».
- В правой области найти параметр «Укажите параметры для установки необязательных компонентов…» и дважды щёлкнуть по нему.
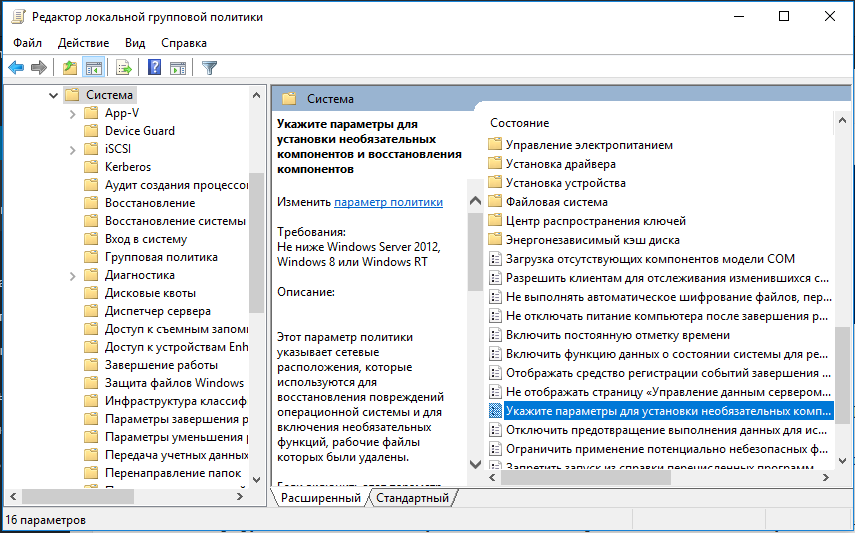
- Перевести её в состояние «Включено».
- Установить флажок напротив «Скачайте содержимое для восстановления…».
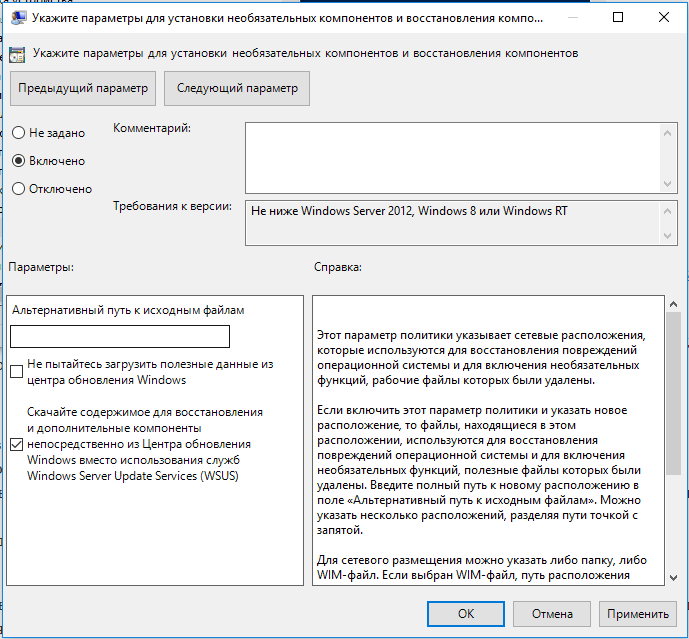
- Нажать на кнопку «Применить» и закрыть редактор.
На этом всё, какой-то из способов должен помочь исправить ошибку 0x800f0954 и всё-таки установить нужный компонент Windows. Изначально стоит выбрать свою ситуацию и перейти к решению, разработанному под неё. Если не получается определить свою проблему, можно выполнить все действия последовательно.
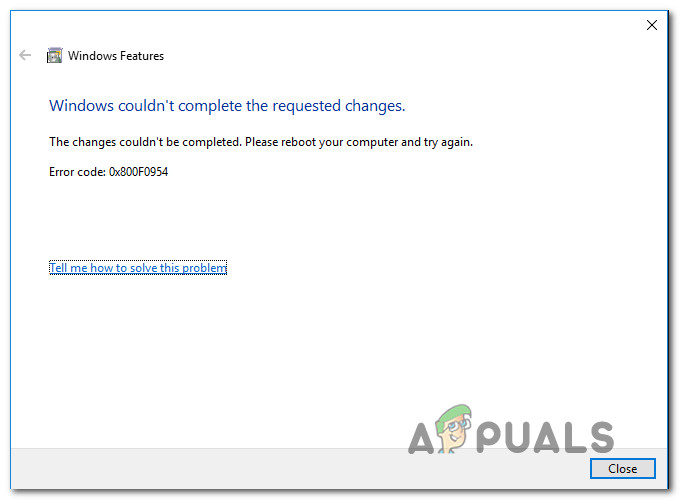
When you attempt to install .NET Framework 3.5 or any other optional feature using “Windows Features” (optionalfeatures.exe) dialog or using DISM command-line, error 0x800F0954 may popup.
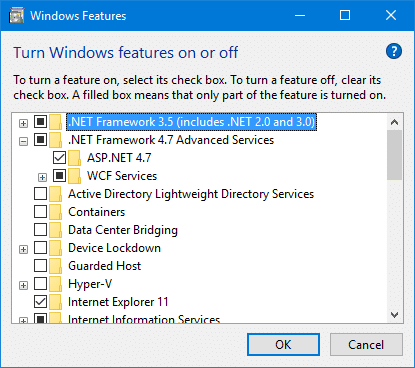
After enabling .NET Framework 3.5 and clicking OK, the following error may appear:
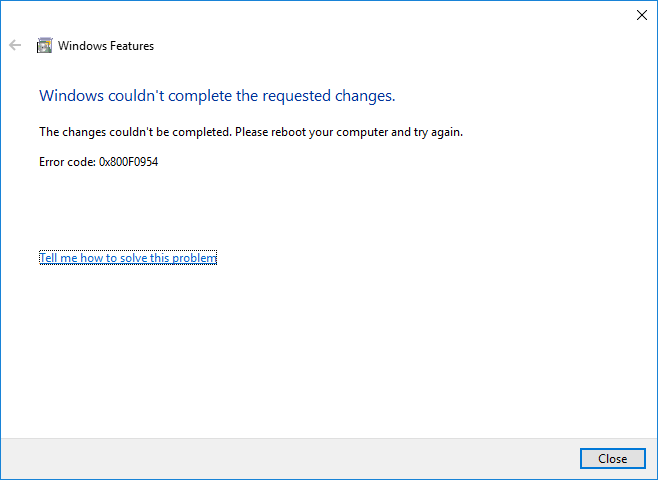
Windows couldn’t complete the requested changes.
The changes couldn’t be completed. Please reboot your computer and try again.
Error code: 0x800F0954
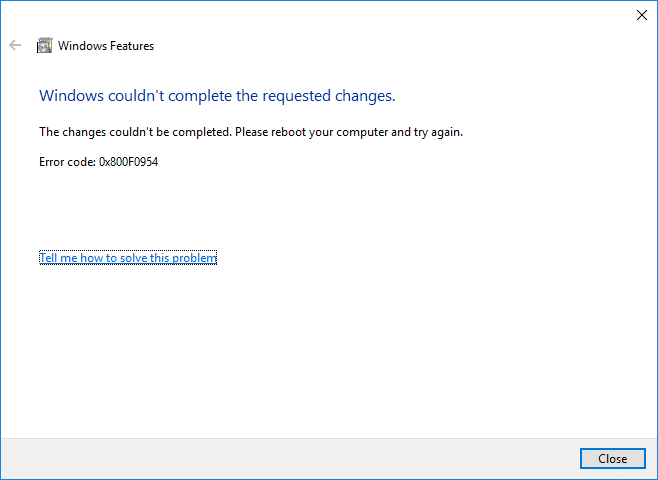
The same error may occur when attempting to install additional speech recognition or supplemental fonts using Optional features in the Settings page or using DISM command-line. For instance, you run the following command to install .NET Framework 3.5 from an elevated or administrator Command Prompt.
DISM /Online /Enable-Feature /FeatureName:NetFx3 /All
After pressing ENTER, here is the full error message you might see:
Deployment Image Servicing and Management tool
Version: 10.0.16299.15
Image Version: 10.0.16299.192
Enabling feature(s)
[==========================100.0%==========================]
Error: 0x800f0954
DISM failed. No operation was performed.
For more information, review the log file.
The DISM log file can be found at C:WindowsLogsDISMdism.log
The DISM.log file would show these entries/errors:
xxxx, Info                  DISM   DISM Package Manager: PID=12956 TID=12296 Further logs for online package and feature related operations can be found at %WINDIR%logsCBScbs.log - CPackageManagerCLIHandler::ExecuteCmdLine
xxxx, Error                 DISM   DISM.EXE: DISM Package Manager processed the command line but failed. HRESULT=800F0954
And the CBS.log file would have recorded these errors:
xxxx, Info                  CBS    DWLD:Failed to do Windows update search [HRESULT = 0x800f0954 - CBS_E_INVALID_WINDOWS_UPDATE_COUNT_WSUS]
xxxx, Info                  CBS    FC:   WindowsUpdateDownloadFromUUP returns. [0x800F0954]
Note that the error 0x800f0954 refers to CBS_E_INVALID_WINDOWS_UPDATE_COUNT_WSUS which indicates that your system might have been configured to use a WSUS server (on your domain network) to get updates instead of connecting to Windows Update servers directly.
If the error 0x800f0954 occurs installing optional Windows features, it may be because the system is unable to access the Windows Update server. This is especially true in case of domain-joined computers which is configured to downloads updates from a WSUS server. It could also be possible that your computer was once a part or a corporate or domain network and the group policy setting is still in place.
Method 1: Bypass WSUS to Install Features/Updates Directly from Windows Update
To fix the problem, temporarily bypass WSUS server using the following registry edit (requires administrator privileges).
- Right-click Start, and click Run
- Type
regedit.exeand click OK - Go to the following registry key:
HKEY_LOCAL_MACHINESOFTWAREPoliciesMicrosoftWindowsWindowsUpdateAU
- On the right-pane, if the value named
UseWUServerexists, set its data to0 - Exit the Registry Editor
- Restart Windows.
Note: Please note that some servers will flip the UseWUServer back to 1 on reboot. In that scenario, set it to 0, restart the Windows Update service (without rebooting), and install the required optional feature (Feature on Demand).
Automate the above, using PowerShell (admin)
Here are the PowerShell commands to automate the following steps:
- Set “UseWUServer” registry setting to 0
- Restart the Windows Update service
- Install .NET Framework (“NetFx3”)
- Then, flip “UseWUServer” back to 1.
Set-ItemProperty "REGISTRY::HKLMSoftwarePoliciesMicrosoftWindowsWindowsUpdateAU" UseWUserver -value 0
Get-Service wuauserv | Restart-Service
Add-WindowsCapability –Online -Name NetFx3~~~~
Set-ItemProperty "REGISTRY::HKLMSoftwarePoliciesMicrosoftWindowsWindowsUpdateAU" UseWUserver -value 1
See if you’re able to install .Net Framework 3.5 or any other optional feature (e.g., Print Management, RSAT, Notepad, etc.) now. In most cases, the above steps should fix the problem.
Method 2: Bypass WSUS for Repair Content/Feature On Demand Downloads
Using this method, you can bypass WSUS server only for downloading repair content and Feature-on-Demand package installation. After you enable the following setting, Windows will use Windows Update (instead of WSUS) to download the FOD packages or the files needed to repair the operating system corruption.
- Open the Group Policy Editor (
gpedit.msc). - Go to:
Computer Configuration → Policies → Administrative Templates → System
- Double-click “Specify settings for optional component installation and component repair”
- Set “Download repair content and optional features directly from Windows Update instead of Windows Server Update Services (WSUS)” to Enabled.
(This policy setting specifies the network locations that will be used for the repair of operating system corruption and for enabling optional features that have had their payload files removed.)
Alternately, use the following registry setting equivalent:
Windows Registry Editor Version 5.00

[HKEY_LOCAL_MACHINESOFTWAREMicrosoftWindowsCurrentVersionPoliciesServicing]
"RepairContentServerSource"=dword:00000002
This fixes the error 0x800f0954 when installing a feature (FOD) using GUI or DISM.
Method 3: Install .NET Framework (or Optional Features) from Windows 10/11 ISO or DVD
If the procedure under Method 1 or 2 did not help, you may use the following DISM command (with the installation source path) to install additional features from the Windows 10/11 ISO or DVD. However, you must make sure that the Windows 10 version on your DVD or ISO corresponds to the version of Windows 10/11 installed on your system.
Here are the steps to install .NET Framework 3.5 from the Windows setup disk or ISO:
- Obtain the latest Windows 10 ISO (assuming that your Windows 10/11 system is running the newest build) using the Media Creation Tool.

Download Windows ISO Using Media Creation Tool Editor’s note: Even better option would be to update your Windows 10 device fully, and then prepare an up-to-date Windows 10 setup disk by slipstreaming. See how to Slipstream Windows (Integrate Updates with Original Setup Disk)
- Mount the ISO image by double-clicking on the ISO file.
- Note down the drive letter of your DVD or the mounted drive, let’s say
H: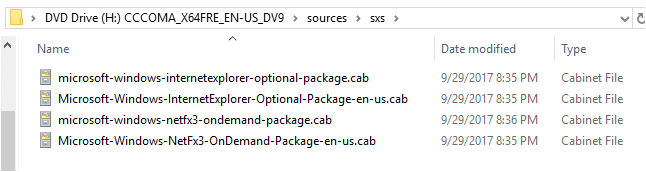
- Open an elevated Command Prompt (Administrator) window.
- Type the following command, and press ENTER
dism /online /enable-feature /featurename:NetFX3 /Source:H:sourcessxs /LimitAccess
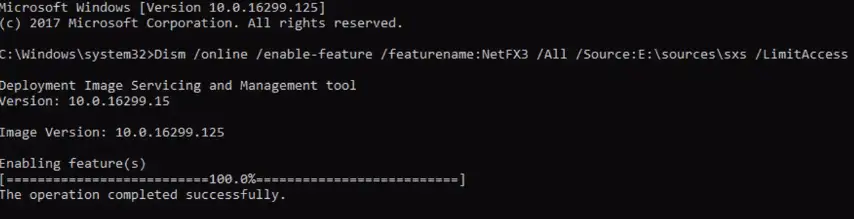
Note: If you need to install the “Windows Communication Foundation (WCF) HTTP Activation” and “Windows Communication Foundation (WCF) Non-HTTP Activation”, make sure you add the /All parameter, as seen in the above screenshot. As said earlier, these two components are usually not required for most users.
Similarly, to install other optional features using DISM, refer blog post Adding features (including .NET 3.5) to Windows 10 – Michael Niehaus’ Windows and Office deployment ramblings as well as Microsoft Docs articles DISM Capabilities Package Servicing Command-Line Options & Available features on demand
Hope this article helped you install .NET Framework 3.5 or any other optional Windows features, without getting the error 0x800F0954.
One small request: If you liked this post, please share this?
One «tiny» share from you would seriously help a lot with the growth of this blog.
Some great suggestions:
- Pin it!
- Share it to your favorite blog + Facebook, Reddit
- Tweet it!
So thank you so much for your support. It won’t take more than 10 seconds of your time. The share buttons are right below. 🙂
Related article
- [Fix] .NET Framework 3.5 Error 0x800f0950 in Windows 10/11

При установке .NET Framework 3.5 в систему многие пользователи сообщали об ошибке с кодом 0x800F0954. Сообщение об ошибке также появляется при установке различных дополнительных функций в Windows 11/10.
Windows не удалось внести запрошенные изменения.
Не удалось завершить изменения. Пожалуйста, перезагрузите компьютер и повторите попытку.
Код ошибки: 0x800F0954
Что вызывает код ошибки 0x800F0954?
Прежде чем переходить к решениям, важно выяснить причину сообщения об ошибке. Код ошибки 0x800F0954 возникает при попытке установить .NET Framework 3.5 или любые другие дополнительные функции с помощью функций Windows или DISM. Ниже приведены все распространенные виновники проблемы.
- Сообщение появится, если есть препятствие в соединении между службами Windows Server Update Services и установщиком дополнительных компонентов Windows.
- .NET Framework 3.5 — сравнительно старая версия .NET Framework. Поэтому часто возникает упомянутая ошибка при установке с помощью компонентов Windows.
- Еще одной серьезной причиной проблемы могут быть неправильно настроенные параметры установки дополнительных компонентов и восстановления компонентов.
Теперь, когда у вас есть предварительные знания о различных причинах, вызывающих сообщение об ошибке, давайте посмотрим, как от них избавиться.
Ниже приведен список всех эффективных решений, которые можно попробовать, если вы получаете сообщение об ошибке 0x800F0954 при установке .NET Framework в Windows 11/10:
- Временно обойти сервер WSUS
- Очистить журналы CBS
- Изменение параметров установки и восстановления компонентов
- Установите .NET Framework 3.5 через PowerShell
Теперь давайте подробно рассмотрим все решения.
1]Временно обойти сервер WSUS
Первое, что вы должны попробовать, это временно обойти сервер WSUS с помощью реестра Windows. Вы можете сделать это, выполнив следующие шаги.
Откройте диалоговое окно «Выполнить», нажав сочетание клавиш Windows + R.
Введите regedit и нажмите кнопку ОК.
Нажмите «Да» в появившемся UAC.
Направляйтесь к следующему разделу реестра.
HKEY_LOCAL_MACHINESOFTWAREPoliciesMicrosoftWindowsWindowsUpdateAU
На правой панели экрана найдите UseWUServer.
Установите значение UseWUServer равным 0.
Вот и все. Закройте редактор реестра и перезагрузите систему. Проверьте, устранена ли проблема или нет.
В окне PowerShell введите следующую команду и нажмите клавишу ввода.
Enable-WindowsOptionalFeature -Online -FeatureName «NetFx3»
Дождитесь выполнения команды. Это займет от 10 до 15 минут.
Читать: Устранение неполадок при установке .NET Framework
Как проверить установленную версию .NET Framework в Windows 11/10?
Проверить установленную версию .NET Framework очень просто. На самом деле, есть несколько способов сделать это. Вы можете сделать это с помощью командной строки, редактора реестра, PowerShell и проводника. Чтобы проверить версию через проводник, выполните следующие действия: откройте проводник и перейдите к %windir%Microsoft.NETFramework. Здесь вы найдете все установленные версии.
Читайте: исправить ошибку установки .NET Framework 3.5 0x800F0950
Как исправить ошибку 0x800F080C при установке .NET Framework?
Ошибка 0x800F080C при установке .NET Framework из-за поврежденных файлов или зависимостей .NET Framework. Вы можете попробовать следующие решения, чтобы решить проблему: запустите средство восстановления .NET, запустите сканирование SFC и DISM и загрузите автономный установщик .NET Framework. Устранить эту ошибку очень легко.
Читать далее. Исправьте код ошибки 0x800f0954 или 0x500f0984 при установке компонента Windows или обновления Windows.
- Remove From My Forums
-
Вопрос
-
Title. Downloads for about 2 seconds then fails. Tried the DISM command
Dism /online /enable-feature /featurename:NetFX3 /All /Source:D:sourcessxs
Get the same error code.
Windows 10 1709
-
Изменено
8 декабря 2017 г. 20:16
-
Изменено
Ответы
-
Title. Downloads for about 2 seconds then fails. Tried the DISM command
Dism /online /enable-feature /featurename:NetFX3 /All /Source:D:sourcessxs
Get the same error code.
Windows 10 1709
Used the powershell command
Add-WindowsCapability –Online -Name NetFx3~~~~ –Source D:sourcessxs
which worked.
-
Помечено в качестве ответа
CFFraser
8 декабря 2017 г. 20:37
-
Помечено в качестве ответа
Некоторые программы в Windows 10 для корректного запуска требуют наличия установленных старых версий .NET Framework 2.0, 3.0 или 3.5.
The application requires the .NET Framework version 2.0. Please install the .NET Framework and run this setup again.
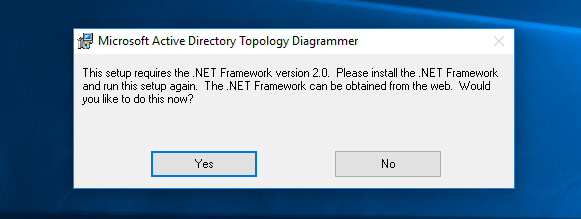
Установка.NET Framework 2.0, 3.0 и 3.5 через Windows Update
Откройте панель Settings и перейдите в раздел Apps -> Apps and features -> Programs and Features.
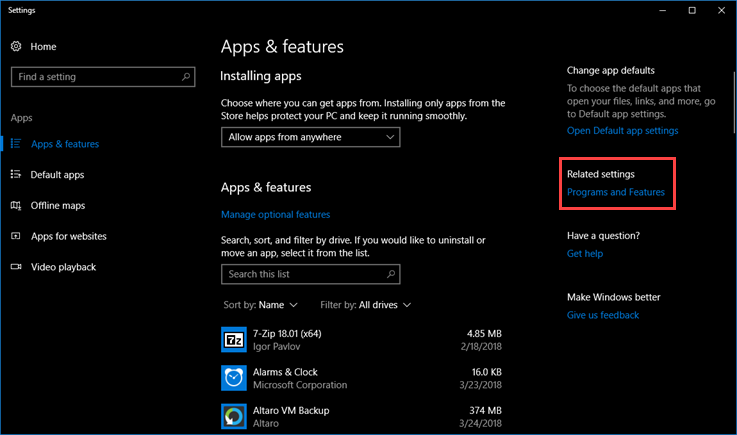
Откроется стандартное диалоговое классической Панели Управления, выберите в левом столбце Turn Windows features on or off.
Также вы можете открыть это окно, нажав Win+R и набрав optionalfeatures.
В списке компонентов Windows выберите .NET Framework 3.5 (includes .NET 2.0 and 3.0) и нажмите OK.
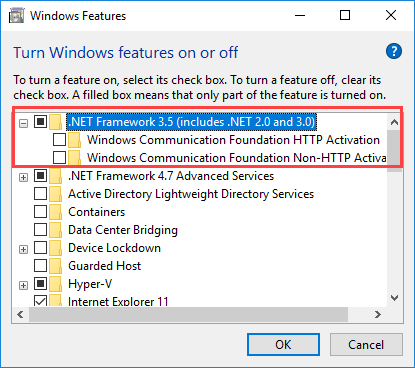
Система должна загрузить все необходимые установочные файлы .NET Framework из Интернета с серверов Windows Update.
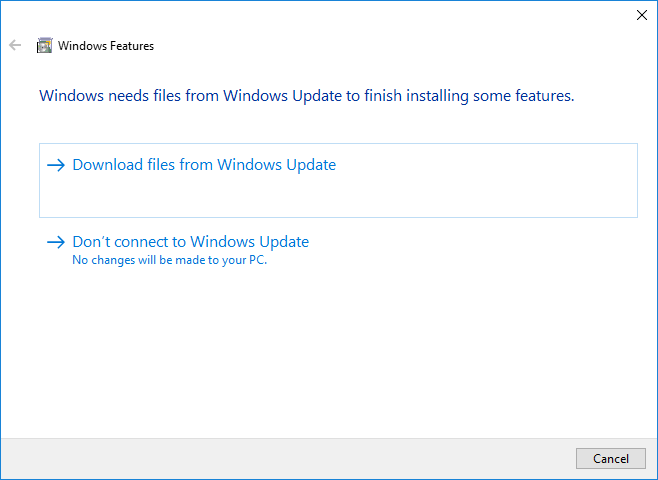
После загрузки и установки .NET Framework Windows запросит перезагрузку.
Установка.NET Framework 2.0, 3.0 и 3.5 с помощью PowerShell
Чтобы из консоли PowerShell в Windows запустить установка .NET Framework с серверов Windows Update, выполните следующую команду:
Add-WindowsCapability -Online -Name NetFx3~~~~
Чтобы вывести список доступных компонентов Windows 10, выполните:
Get-WindowsCapability -Online
Если в вашей инфраструктуре используется сервер обновлений WSUS, при попытке установить .Net Framework из интернета, вы получите ошибку 0x800F0954. В этом случае вы можете установить .Net из установочных файлов дистрибутива Windows.
Установка.NET Framework 2.0, 3.0 и 3.5 с установочного диска Windows 10
Распакуйте ISO образ Windows 10 в локальную или сетевую папку, либо просто смонтируйте образ в виртуальный CD-ROM.
Запустите консоль PowerShell с правами администратора и выполните следующую команду (замените путь к каталогу SxS вашего распакованного дистрибутива Windows 10):
Add-WindowsCapability -Online -Name NetFx3~~~~ -Source D:SourcesSxS
Либо вы можете запустить установку из командной строки с помощью DISM:
DISM.exe /Online /Add-Capability /CapabilityName:NetFx3~~~~ /Source:D:SourcesSxS
Вы можете убедиться, что.NET Framework успешно установлен с помощью команды:
Get-WindowsCapability -Online -Name NetFx3~~~~
Надеюсь, эта инструкция поможет вам справиться с ошибкой 0x800F0954 при установке .NET Framework в Windows 10.
While installing .NET Framework 3.5 on the system, many users have reported coming across Error code 0x800F0954. The error message also occurs upon installing different Optional features in Windows 11/10.
Windows couldn’t complete the requested changes.
The changes couldn’t be completed. Please reboot your computer and try again.
Error code: 0x800F0954
What causes Error code 0x800F0954?
0x800f0954, CBS_E_INVALID_WINDOWS_UPDATE_COUNT_WSUS
Before getting into solutions, it’s important to find out the reason behind the error message. The Error code 0x800F0954 occurs when you try to install .NET Framework 3.5 or any other optional features using the Windows Features functionality or DISM. Below are all the common culprits behind the problem.
- The message will occur if there’s an obstruction in the connection between Windows Server Update Services and Windows Optional Features Installer.
- The .NET Framework 3.5 is a comparatively older .NET Framework. Therefore, it’s common to face the mentioned error while installing it via Windows Features.
- Misconfigured optional component installation and component repair settings can be another significant reason behind the problem.
Now that you have prior knowledge of different reasons causing the error message let’s check out how to get rid of them.
Below is the list of all the effective solutions to try if you receive the error 0x800F0954 when installing .NET Framework in Windows 11/10:
- Temporarily bypass WSUS server
- Clear CBS logs
- Change Component Installation and Component Repair settings
- Install .NET Framework 3.5 via PowerShell
Now, let’s take a look at all the solutions in detail.
1] Temporarily bypass the WSUS server
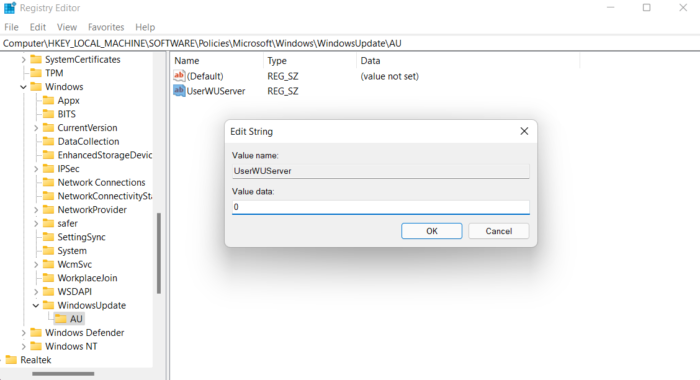
The first thing you should try is to temporarily bypass the WSUS server with the help of the Windows Registry. You can do so by following the below steps.
Open the Run dialogue box by pressing the Windows + R shortcut key.
Type regedit and click on the OK option.
Click on Yes on the UAC that pops up.
Head towards the following registry key.
HKEY_LOCAL_MACHINESOFTWAREPoliciesMicrosoftWindowsWindowsUpdateAU
In the right panel of the screen, locate UseWUServer.
Set the value of UseWUServer to 0.
That’s it. Close the Registry Editor and reboot your system. Check if the problem is fixed or not.
Read: Microsoft .NET Framework Repair Tool will fix .NET Framework problems & issues
2] Clear CBS logs
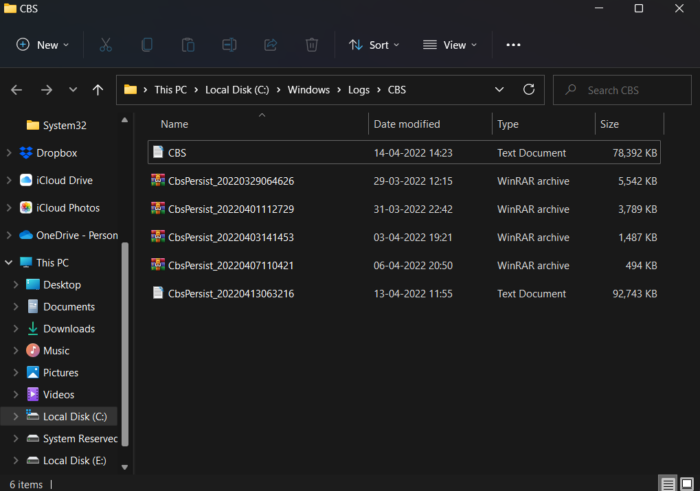
CBS stands for Component Based Servicing, and it is a file that features logs related to both, installed and uninstalled Windows Update components. The error message was fixed by clearing CBS logs per many users. You can do the same and check if it resolves the problem for you as well. Here’s how it’s done.
Open the Run dialogue box, paste the below location and click on the OK option:
C:WindowsLogsCBS
Select everything inside the CBS folder.
Right-click on the selected files and choose the delete option.
Now, open Command Prompt in administrator mode.
Type the following command and press the enter key.
Dism.exe /online /enable-feature /featurename:NetFX3 /source:C:
Once the command is executed, the .NET Framework 3.5 will have been installed on your system without any error. But if the problem continues, try the following solutions.
See: How to enable Automatic .NET Updates in Windows Server
3] Change Component Installation and Component Repair settings
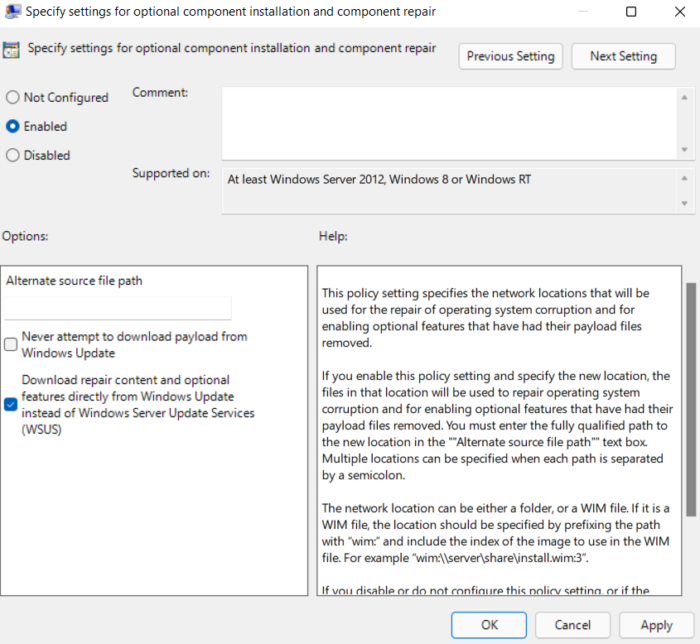
The next thing to try is to make some changes to the Group Policy Editor. Here’s what you need to do.
Open the Run dialogue box, type gpedit and press the enter key.
Navigate to the below location.
Computer Configuration > Administrative Templates > System
Double click on Specify settings for optional component installation and component repair.
Select the Enabled option.
Checkmark Download repair content and optional features directly from Windows Update instead of Windows Server Update Services (WSUS).
Click on Apply > OK to save the changes.
Reboot your system and check if the problem is fixed or not.
See: Enable .NET Framework 2.0 and .NET Framework 3.5 in Windows 11
4] Install .NET Framework 3.5 via PowerShell
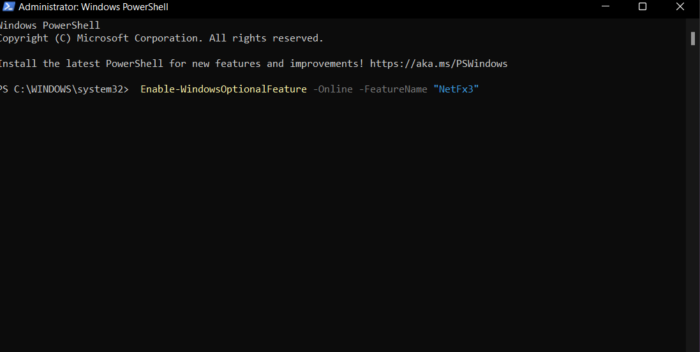
You can install the .NET Framework 3.5 via Windows PowerShell as well. The situation applies especially to users facing the mentioned issue while going through the installation process via DISM. Here’s how to get the work done.
To begin with, open Windows PowerShell in administrator mode.
In the PowerShell window, type the following command and press the enter key.
Enable-WindowsOptionalFeature -Online -FeatureName "NetFx3"
Wait until the command is executed. It will take around 10 to 15 minutes.
Read: Troubleshoot .NET Framework Installation Issues
How do I check the installed .NET Framework version on Windows 11/10?
It’s very easy to check the installed .NET Framework version. In fact, there are multiple ways to do it. You can do it using Command Prompt, Registry Editor, PowerShell, and File Explorer. To check the version via File Explorer, follow these steps: open File Explorer and navigate to %windir%Microsoft.NETFramework. Here you’ll find all the installed versions.
Read: Fix .NET Framework 3.5 Installation Error 0x800F0950
How to fix error 0x800F080C when installing .NET Framework?
The error 0x800F080C when installing .NET Framework due to corrupted files or corrupted .NET Framework dependencies. You can try these solutions to solve the problem: Run the .NET repair tool, run SFC and DISM scan, and download .NET Framework offline installer. It’s very easy to troubleshoot this error.
Read Next: Fix Error Code 0x800f0954 or 0x500f0984 while installing a Windows Feature or a Windows Update.
Some users are getting the Error Code 0x800f0954 when attempting to install .NET Framework 3.5 or a different optional feature in Windows 10. Most users are reporting that this error occurs while they trying to install the package via Windows Features, but others are getting it while using the DISM command-line tool. The error doesn’t seem to be exclusive to a certain Windows version since it’s confirmed to occur on Windows 7, Windows 8.1 and Windows 10.
What is causing the Error Code 0x800f0954?
We looked into this particular issue by trying to replicate the issue on our testing machines and by looking at various user reports that have encountered this exact problem. As it turns out, there are several different potential culprits that might end up triggering this error code:
- The computer cannot access the Windows Update server – In some cases, the error message occurs because the system is not able to reach the WU server. This is typical in situations where there’s a whole network of domain-joined computers configured to download updates from a WSUS server. In this case, you can resolve the issue by bypassing the WSUS.
- DISM CBS logs are triggering the issue – Sometimes, the CBS logs generated by the DISM utility can point towards a problem that doesn’t actually exist. In this case, you can resolve the issue by deleting the Component Based Servicing logs and re-running the DISM command that was previously failing with this error message.
- .NET Framework needs to be installed via Powershell – If you’re trying to install an older .NET Framework package, you might have to do it from a PowerShell window in order to avoid the 0x800f0954 error.
- Group policy is preventing the installation – There’s one policy that has the potential of triggering this particular error if it’s disabled from the Local Group Policy Editor. If this scenario is applicable, you can resolve the issue by enabling the ‘Specify settings for optional component installation and component repair’ policy.
If you’re currently searching for a fix for the 0x800f0954 error, this article will provide you with several troubleshooting steps. Down below, you’ll find a collection of methods that other users in a similar situation have successfully used to fix this particular issue.
Keep in mind that the methods below are ordered by efficiency and severity, so we encourage you to follow them in the order that they are presented. Chances are not every potential fix will be applicable to your current situation, so feel free to skip the methods that cannot be followed.
Method 1: Bypassing the WSUS
If you get the 0x800f0954 error while trying to install optional Windows features, it’s probably because your system cannot access the Windows Update server. This seems to have occurred for a lot of users in a similar situation – especially in situations where there’s a whole network of domain-joined computers that are configured to download updates from a WSUS server.
If your situation is similar, it’s possible that the issue occurs because your computer was once a part of a domain network and the group policy setting is still in place. If this scenario is applicable, you can resolve the issue by temporarily bypassing the WSUS server. You can do this easily by performing the following registry edit:
- Press Windows key + R to open up a Run dialog box. Then, type “regedit” and hit Ctrl + Shift + Enter to open up the Registry Editor with administrative privileges. When prompted by the UAC (User Account Control), click Yes to grant administrative privileges.
- Inside the Registry Editor, use the left-hand pane to navigate to the following location:
HKEY_LOCAL_MACHINESOFTWAREPoliciesMicrosoftWindowsWindowsUpdateAU
Note: You can also paste the address directly into the navigation bar and press Enter to get there instantly.
- If the WindowsUpdate key doesn’t exist, you’ll need to create it manually. To do this, right-click on the Windows key, select New > Key and name it ‘WindowsUpdate’. Then, right-click on the newly created key and select New > Key and name the newest key AU.
- With the AU key selected, move over to the right-hand pane, right-click on an empty space and choose New > String value. Next, rename the newly created string value to UserWUServer.
- Once the UserWUServer key has been created, double-click on it and set it’s Value Data to 0.
- Close the Registry Editor, restart your computer and see if the issue has been resolved at the next system startup.
If this method didn’t resolve the issue or it wasn’t applicable, move down to the next method below.
Method 2: Cleaning the CBS logs
Some users that we’re encountering this exact issue have reported that they managed to resolve the issue after deleting the CBS (Component Based Servicing) logs related to DISM. After doing this and re-running the DISM command, some affected users have reported that the 0x800f0954 error was no longer occurring.
Here’s what you need to do:
- Open File Explorer and navigate to the following location:
C:WindowsLogsCBS
- Once you get inside the CBS folder, select everything there and choose Delete.
- After every file .log and .cab file is deleted, you can close the CBS folder.
- Press Windows key + R to open up a Run dialog box. Then, type “cmd” and press Ctrl + Shift + Enter to open up an elevated Command Prompt. When you see the UAC (User Account Control), click Yes to grant administrative privileges.
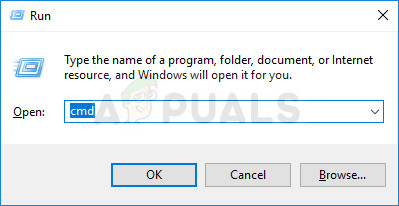
- Inside the elevated Command Prompt, type the following command and press Enter to rerun the DISM command once again:
Dism.exe /online /enable-feature /featurename:NetFX3 /source:C:
- After hitting Enter, the .NET Framework should install without the 0x800f0954 error.
If you’re still encountering the same error message or this method wasn’t applicable to your current scenario, move down to the next method below.
Method 3: Using PowerShell to install .NET Framework 3.5
If you’re encountering the 0x800f0954 error while trying to install the .NET Framework 3.5 by using DISM (Deployment Image Servicing and Management), you might be able to circumvent the error message by using Powershell.
Several affected users have reported that the error code was no longer occurring after they ran a powershell command that ended up fixing the problem. Here’s what you need to do:
- Press Windows key + R to open up a run command. Then, type “powershell” and press Ctrl + Shift + Enter to open up an elevated Powershell prompt. When prompted by the UAC (User Account Control), click Yes to grant administrative privileges.
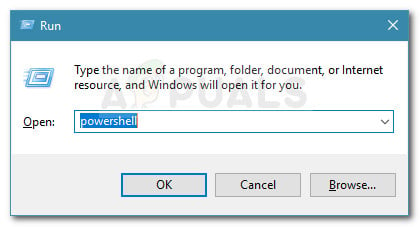
Run dialog: powershell Then press Ctrl + Shift + Enter - Inside the elevated Powershell prompt, type the following command and press Enter to run it:
Add-WindowsCapability –Online -Name NetFx3~~~~ –Source D:sourcessxs
- Close the elevated Powershell prompt and restart your machine.
- At the next system startup, attempt to install the .NET Framework 3.5 once again and see if the issue has been resolved.
If the same error is still occurring, move down to the next method below.
Method 4: Using the Group Policy Editor
If you get the 0x800f0954 error while trying to add the RSAT Toolset, chances are you’ll need to make some changes using the Group Policy Editor tool. Several users have managed to solve this issue by running the Gpedit tool to modify some settings related to Component Installation and Component Repair.
After enabling a certain local policy and allowing the OS to download repair content and optional features directly from WU, several users have reported that the issue was resolved.
Note: Keep in mind that the Group Policy Editor tool is not available for all Windows versions. If you have Windows 10 Home or another version that doesn’t include it, you’ll need to follow this article (here) to install the policy editor on your computer.
If you have the Group Policy Editor on your Windows version, here’s a quick guide on how to make the necessary edits:
- Press Windows key + R to open up a Run dialog box. Then, type “gpedit.msc” and press Enter to open up the Local Group Policy Editor. If you’re prompted by the UAC (User Account Control), click Yes to grant administrative privileges.
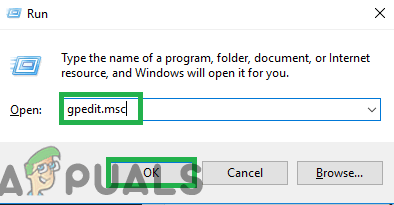
Typing “gpedit.msc” in the Run prompt - Once you’re inside the Local Group Policy Editor, use the left-hand pane to navigate to the following location:
Computer ConfigurationAdministrative TemplatesSystem - Then, with System selected, go over to the right-hand pane and double-click on the Specify settings for optional component installation and component repair.
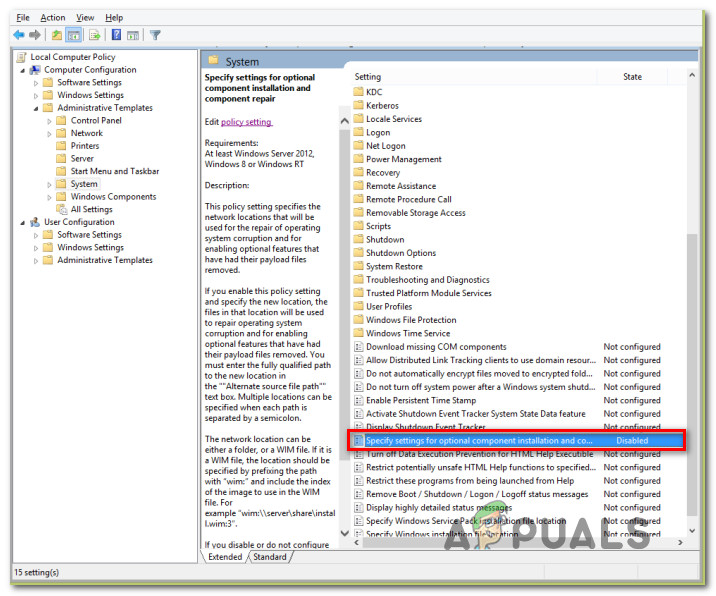
Specify settings for optional component installation and component repair - Next, set the policy to Enabled and make sure to check the box associated with Download repair content and optional features directly from Windows Update instead of Windows Server Update Services (USUS).
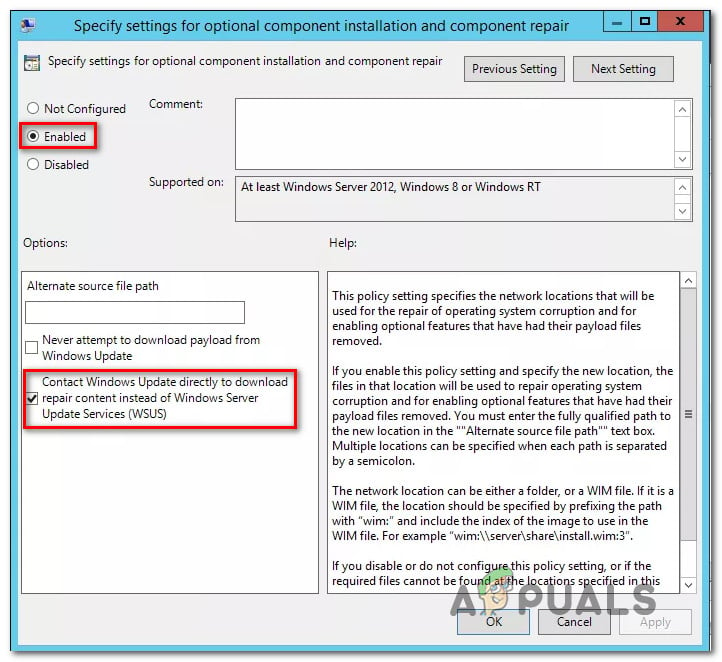
Enable the required Policy - Hit Apply to save the configuration, then close the Local Group Policy Editor and restart your computer.
- At the next system startup, the error should no longer occur.
Solution 5: Changing Registry Value UseWUServer
If none of the above methods work, we will attempt to change the UseWUServer registry entry and change it to disabled. Apparently, after a recent Windows update, this key was conflicting with Windows update service and causing the error message under discussion. Make sure that you are logged in as an administrator before proceeding further and backup your registry just in case.
- Press Windows + R, type “regedit” in the dialogue box and press Enter.
- Once in the registry editor, navigate to the following path:
HKLM/Software/Policies/Microsoft/Windows/WindowsUpdate/AU/UseWUServer
- Now, change the value from 1 to 0.
- After making the following changes, restart your computer and start the update service again. Check if the issue is resolved.

Kevin Arrows
Kevin is a dynamic and self-motivated information technology professional, with a Thorough knowledge of all facets pertaining to network infrastructure design, implementation and administration. Superior record of delivering simultaneous large-scale mission critical projects on time and under budget.